HTML5 & CSS3 FOR THE REAL WORLD (2015)
Chapter 2 Markup, HTML5 Style
Now that we’ve given you a bit of a history primer, along with some compelling reasons to learn HTML5 and start using it in your projects today, it’s time to introduce you to the sample site that we’ll be progressively building in this book.
After we briefly cover what we’ll be building, we’ll discuss some HTML5 syntax basics, along with some suggestions for best-practice coding. We’ll follow that with some important info on cross-browser compatibility, and the basics of page structure in HTML5. Lastly, we’ll introduce some specific HTML5 elements and see how they’ll fit into our layout.
So let’s get into it!
Introducing The HTML5 Herald
For the purpose of this book, we’ve put together a sample website project that we’ll be building from scratch. The website is already built—you can check it out now at thehtml5herald.com. It’s an old-time newspaper-style website called The HTML5 Herald. The home page of the site contains some media in the form of video, images, articles, and advertisements. There’s also another page comprising a registration form.
Go ahead and view the source, and try some of the functionality if you like. As we proceed through the book, we’ll be working through the code that went into making the site. We’ll avoid discussing every detail of the CSS involved, as most of it should already be familiar to you—float layouts, absolute and relative positioning, basic font styling, and the like. We’ll primarily focus on the new HTML5 elements, along with the APIs, plus all the new CSS3 techniques being used to add styles and interactivity to various elements.
Figure 2.1 shows a bit of what the finished product looks like.
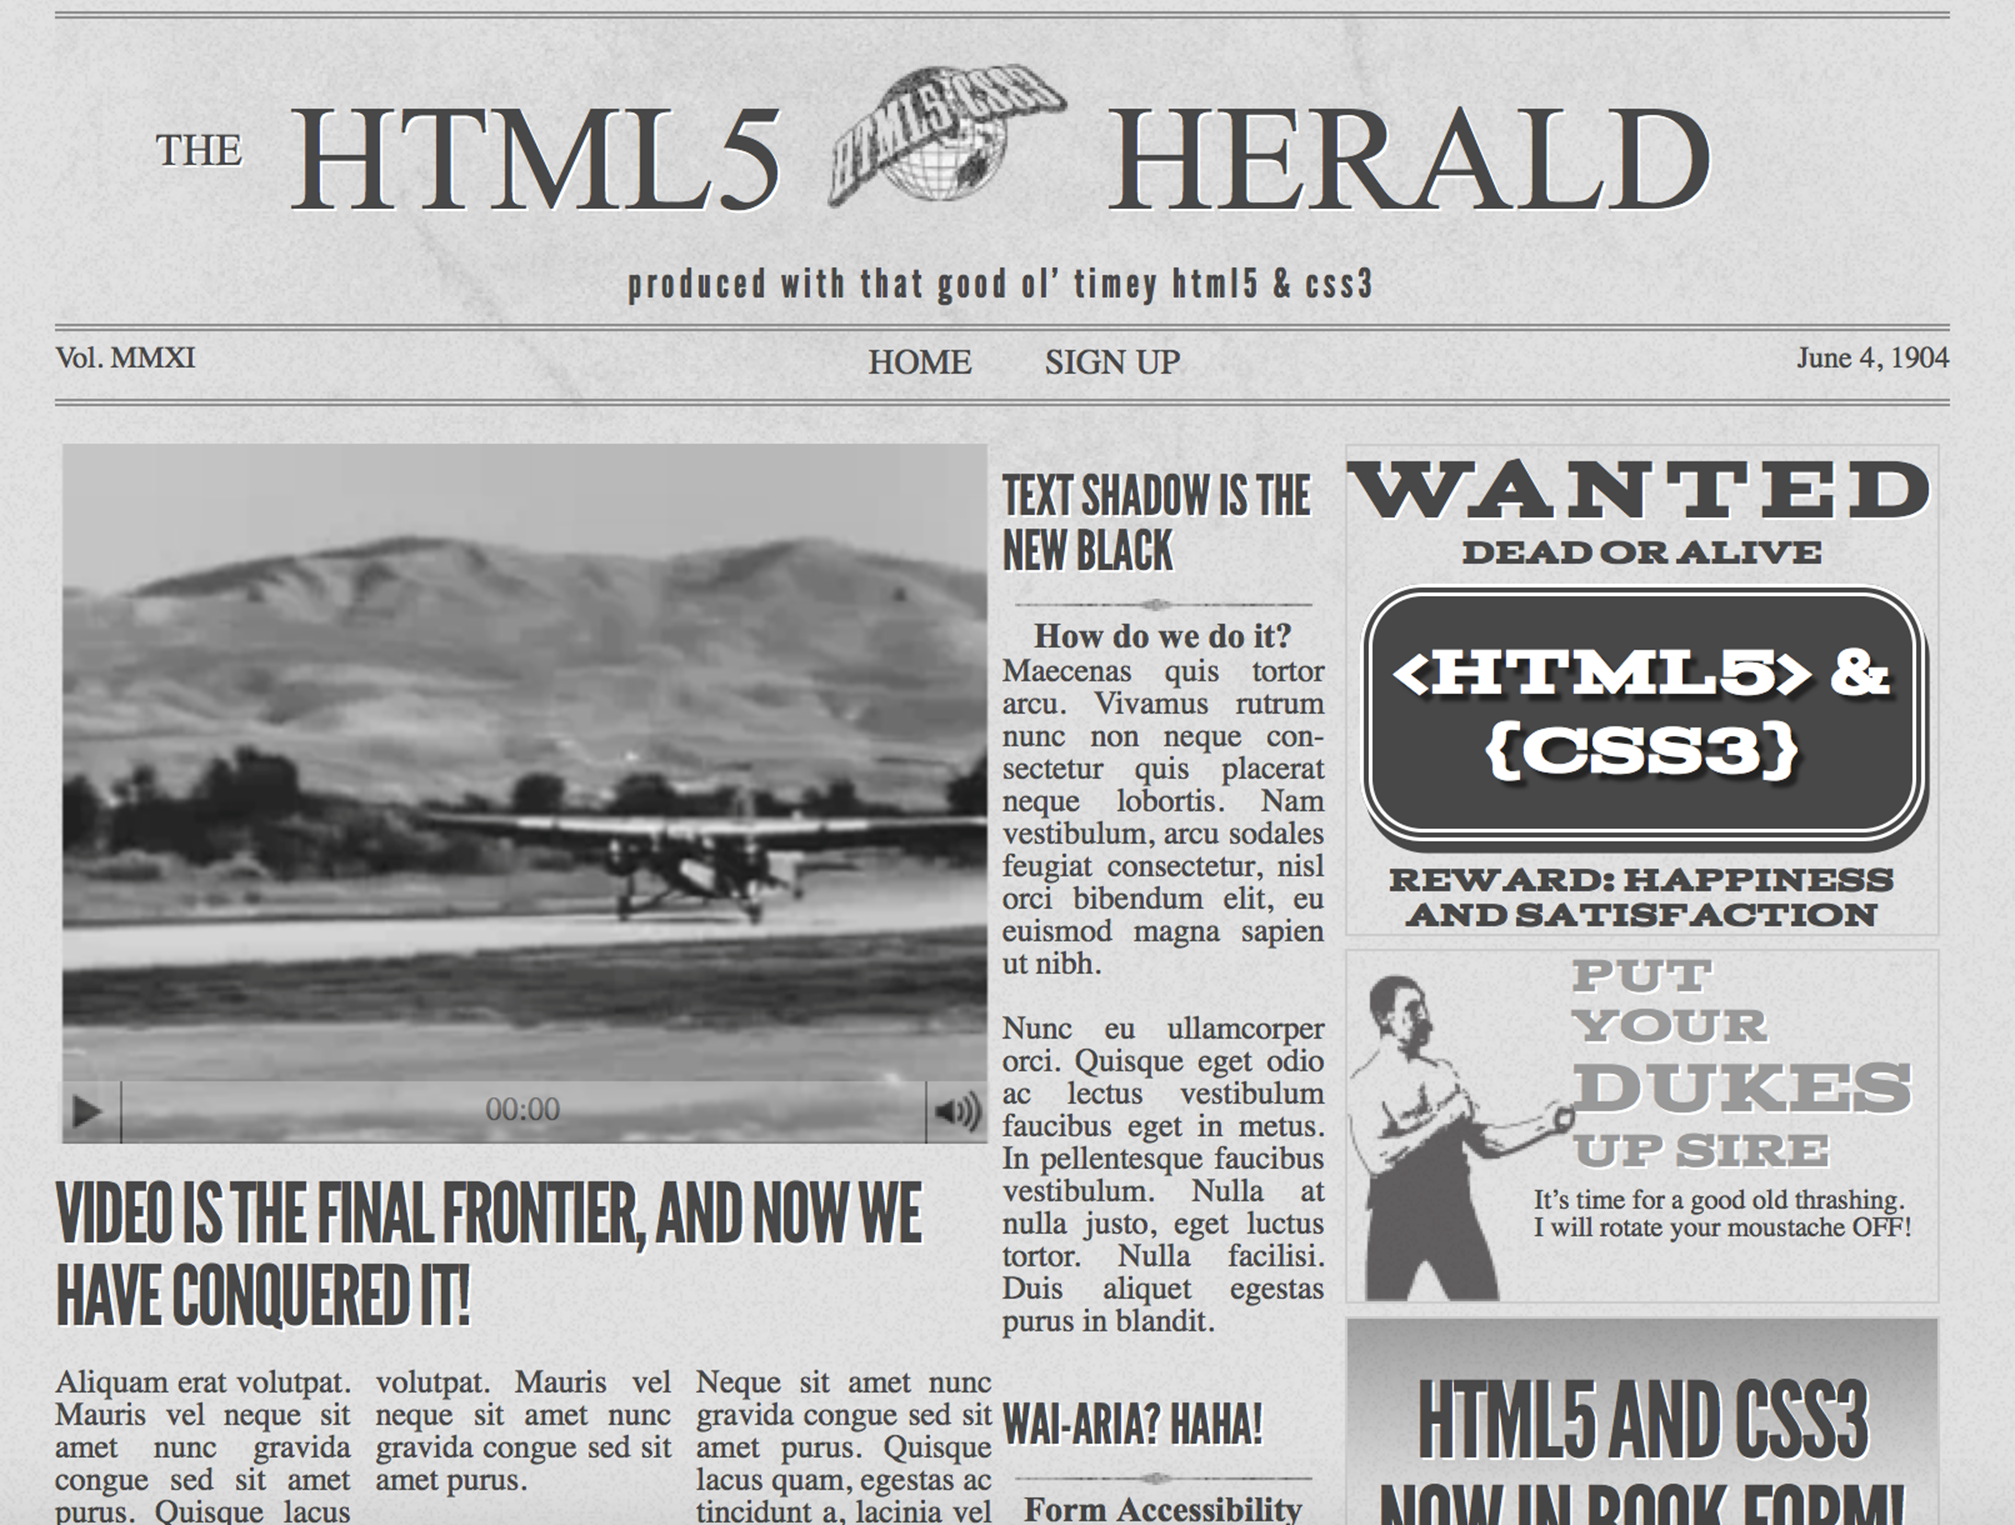
Figure 2.1. The front page of The HTML5 Herald
While we build the site, we’ll do our best to explain the new HTML5 elements, APIs, and CSS3 features, and aim to recommend some best practices. Of course, some of these technologies are still new and in development, so we’ll try not to be too dogmatic about what you can and can’t do.
A Basic HTML5 Template
As you learn HTML5 and add new techniques to your toolbox, you’re likely to want to build yourself a boilerplate, from which you can begin all your HTML5-based projects. We encourage this, and you may also consider using one of the many online sources that provide a basic HTML5 starting point for you.[4]
In this project, however, we want to build our code from scratch and explain each piece as we go along. Of course, it would be impossible for even the most fantastical and unwieldy sample site we could dream up to include every new element or technique, so we’ll also explain many new features that don’t fit into the project. This way, you’ll be familiar with a wide set of options when deciding how to build your HTML5 and CSS3 websites and applications, enabling you to use this book as a quick reference for a number of features and techniques.
Let’s start simple, with a bare-bones HTML5 page:
<!DOCTYPE html>
<html lang="en">
<head>
<meta charset="utf-8">
<title>The HTML5 Herald</title>
<meta name="description" content="The HTML5 Herald">
<meta name="author" content="SitePoint">
<link rel="stylesheet" href="css/styles.css">
<!--[if lt IE 9]>
<script src="js/html5shim.js"></script>
<![endif]-->
</head>
<body>
<script src="js/scripts.js"></script>
</body>
</html>
With that basic template in place, let's now examine some of the significant parts of the markup and how these might differ from how HTML was written prior to HTML5.
The Doctype
First, we have the Document Type Declaration, or doctype. This is simply a way to tell the browser—or any other parser—what type of document it's looking at. In the case of HTML files, it means the specific version and flavor of HTML. The doctype should always be the first item at the top of any HTML file. Many years ago, the doctype declaration was an ugly and hard-to-remember mess. For XHTML 1.0 Strict:
<!DOCTYPE html PUBLIC "-//W3C//DTD XHTML 1.0 Strict//EN" "http://www .w3.org/TR/xhtml1/DTD/xhtml1-strict.dtd">
And for HTML4 Transitional:
<!DOCTYPE HTML PUBLIC "-//W3C//DTD HTML 4.01 Transitional//EN" "http ://www.w3.org/TR/html4/loose.dtd">
Although that long string of text at the top of our documents hasn’t really hurt us (other than forcing our sites’ viewers to download a few extra bytes), HTML5 has done away with that indecipherable eyesore. Now all you need is this:
<!DOCTYPE html>
Simple, and to the point. The doctype can be written in uppercase, lowercase, or mixed case. You’ll notice that the “5” is conspicuously missing from the declaration. Although the current iteration of web markup is known as “HTML5,” it really is just an evolution of previous HTML standards—and future specifications will simply be a development of what we have today.
Because browsers are usually required to support all existing content on the Web, there’s no reliance on the doctype to tell them which features should be supported in a given document. In other words, the doctype alone is not going to make your pages HTML5-compliant. It's really up to the browser to do this. In fact, you can use one of those two older doctypes with new HTML5 elements on the page and the page will render the same as it would if you used the new doctype.
The html Element
Next up in any HTML document is the html element, which has not changed significantly with HTML5. In our example, we’ve included the lang attribute with a value of en, which specifies that the document is in English. In XHTML-based markup, you were required to include an xmlnsattribute. In HTML5, this is no longer needed, and even the lang attribute is unnecessary for the document to validate or function correctly.
So here’s what we have so far, including the closing html tag:
<!DOCTYPE html>
<html lang="en">
</html>
The head Element
The next part of our page is the head section. The first line inside the head is the one that defines the character encoding for the document. This is another element that’s been simplified since XHTML and HTML4, and is an optional feature, but recommended. In the past, you may have written it like this:
<meta http-equiv="Content-Type" content="text/html; charset=utf-8">
HTML5 improves on this by reducing the character-encoding meta tag to the bare minimum:
<meta charset="utf-8">
In nearly all cases, utf-8 is the value you’ll be using in your documents. A full explanation of character encoding is beyond the scope of this book, and it probably won’t be that interesting to you, either. Nonetheless, if you want to delve a little deeper, you can read up on the topic on W3C orWHATWG.
Important: Encoding Declaration
To ensure that all browsers read the character encoding correctly, the entire character-encoding declaration must be included somewhere within the first 512 characters of your document. It should also appear before any content-based elements (such as the title element that follows it in our example site).
There’s much more we could write about this subject, but we want to keep you awake—so we’ll spare you those details! For now, we’re content to accept this simplified declaration and move on to the next part of our document:
<title>The HTML5 Herald</title>
<meta name="description" content="The HTML5 Herald">
<meta name="author" content="SitePoint">
<link rel="stylesheet" href="css/styles.css">
In these lines, HTML5 barely differs from previous syntaxes. The page title (the only mandatory element inside the head) is declared the same as it always was, and the meta tags we’ve included are merely optional examples to indicate where these would be placed; you could put as manyvalid meta elements here as you like.
The key part of this chunk of markup is the stylesheet, which is included using the customary link element. There are no required attributes for link other than href and rel. The type attribute (which was common in older versions of HTML) is not necessary, nor was it ever needed to indicate the content type of the stylesheet.
Leveling the Playing Field
The next element in our markup requires a bit of background information before it can be introduced. HTML5 includes a number of new elements, such as article and section, which we’ll be covering later on. You might think this would be a major problem for older browser support for unrecognized elements, but you’d be wrong. This is because the majority of browsers don’t actually care what tags you use. If you had an HTML document with a recipe tag (or even a ziggy tag) in it, and your CSS attached some styles to that element, nearly every browser would proceed as if this were totally normal, applying your styling without complaint.
Of course, such a hypothetical document would fail to validate and may have accessibility problems, but it would render correctly in almost all browsers—the exception being old versions of Internet Explorer (IE). Prior to version 9, IE prevented unrecognized elements from receiving styling. These mystery elements were seen by the rendering engine as “unknown elements,” so you were unable to change the way they looked or behaved. This includes not only our imagined elements, but also any elements that had yet to be defined at the time those browser versions were developed. That means (you guessed it) the new HTML5 elements.
The good news is, at the time of writing, most people still using a version of IE are using version 9 or higher, and very few are on version 9, so this is not a big problem for most developers anymore; however, if a big chunk of your audience is still using IE8 or earlier, you'll have to take action to ensure your designs don't fall apart.
Fortunately, there’s a solution: a very simple piece of JavaScript originally developed by John Resig. Inspired by an idea by Sjoerd Visscher, it can make the new HTML5 elements styleable in older versions of IE.
We’ve included this so-called “HTML5 shiv”[5] in our markup as a script tag surrounded by conditional comments. Conditional comments are a proprietary feature implemented in Internet Explorer in version 9 and earlier. They provide you with the ability to target specific versions of that browser with scripts or styles.[6] The following conditional comment is telling the browser that the enclosed markup should only appear to users viewing the page with Internet Explorer prior to version 9:
<!--[if lt IE 9]>
<script src="js/html5shim.js"></script>
<![endif]-->
It should be noted that if you’re using a JavaScript library that deals with HTML5 features or the new APIs, it’s possible that it will already have the HTML5-enabling script present; in this case, you could remove reference to the script. One example of this would be Modernizr, a JavaScript library that detects modern HTML and CSS features. Modernizr gives you the option to include code that enables the HTML5 elements in older versions of IE, so the shiv would be redundant. We take a closer look at Modernizr in Appendix A.
Note: Not Everyone Can Benefit from the HTML5 Shiv
Of course, there’s still a group of users unable to benefit from the HTML5 shiv: those who have for one reason or another disabled JavaScript and are using IE8 or lower. As web designers, we’re constantly told that the content of our sites should be fully accessible to all users, even those without JavaScript. But it’s not as bad as it seems. A number of studies have shown that the number of users who have JavaScript disabled is low enough to be of little concern, especially when you factor in how few of those will be using IE8 or lower.
In a study published in October, 2013, the UK Government Digital Service determined that users browsing government web services in the UK with JavaScript disabled or unavailable was 1.1%. In another study conducted on the Yahoo Developer Network (published in October 2010), users with JavaScript disabled amounted to around 1% of total traffic worldwide.
The Rest Is History
Looking at the rest of our starting template, we have the usual body element along with its closing tag and the closing html tag. We also have a reference to a JavaScript file inside a script element.
Much like the link tag discussed earlier, the script tag does not require that you declare a type attribute. If you ever wrote XHTML, you might remember your script tags looking like this:
<script src="js/scripts.js" type="text/javascript"></script>
Since JavaScript is, for all practical purposes, the only real scripting language used on the Web, and since all browsers will assume that you’re using JavaScript even when you don’t explicitly declare that fact, the type attribute is unnecessary in HTML5 documents:
<script src="js/scripts.js"></script>
We’ve put the script element at the bottom of our page to conform to best practices for embedding JavaScript. This has to do with the page-loading speed; when a browser encounters a script, it will pause downloading and rendering the rest of the page while it parses the script. This results in the page appearing to load much more slowly when large scripts are included at the top of the page before any content. It's why most scripts should be placed at the very bottom of the page, so that they’ll only be parsed after the rest of the page has loaded.
In some cases, however, (such as with the HTML5 shiv) the script may need to be placed in the head of your document, because you want it to take effect before the browser starts rendering the page.
HTML5 FAQ
After this quick introduction to HTML5 markup, you probably have a bunch of questions swirling in your head. Here are some answers to a few of the likely ones.
Why do these changes still work in older browsers?
To understand why this isn’t a problem, we can compare HTML5 to some of the new features added in CSS3, which we’ll be discussing in later chapters.
In CSS, when a new feature is added (for example, the border-radius property that adds rounded corners to elements), that feature also has to be added to browsers’ rendering engines, so older browsers will fail to recognize it. If a user is viewing the page on a browser with no support forborder-radius, the rounded corners will appear square. This happens because square corners are the default and the browser will ignore the border-radius declaration. Other CSS3 features behave similarly, causing the experience to be degraded to some degree.
Many developers expect that HTML5 will work in a similar way. While this might be true for some of the advanced features and APIs we’ll be considering later in the book, it’s not the case with the changes we’ve covered so far; that is, the simpler syntax, fewer superfluous attributes, and the new doctype.
HTML5’s syntax was more or less defined after a careful study of what older browsers can and can’t handle. For example, the 15 characters that comprise the doctype declaration in HTML5 are the minimum characters required to make every browser display a page in standards mode.
Likewise, while XHTML required a lengthier character-encoding declaration and an extra attribute on the html element for the purpose of validation, browsers never actually required them in order to display a page correctly. Again, the behavior of older browsers was carefully examined, and it was determined that the character encoding could be simplified and the xmlns attribute removed—and browsers would still see the page the same way.
Unlike changes to CSS3 and JavaScript, where additions are only supported when browser makers actually implement them, there’s no need to wait for new browser versions to be released before using HTML5’s markup syntax. And when it comes to using the new semantic elements, a small snippet of JavaScript is all that’s required to bring any really old browsers into line.
Note: Standards Mode versus Quirks Mode
When standards-based web design was in its infancy, browser makers were faced with a problem: supporting emerging standards would, in many cases, break backwards compatibility with existing web pages that were designed to older, nonstandard browser implementations. Browser makers needed a signal indicating that a given page was meant to be rendered according to the standards. They found such a signal in the doctype: new standards-compliant pages included a correctly formatted doctype, while older nonstandard pages generally didn’t. Using the doctype as a signal, browsers could switch between standards mode (in which they try to follow standards to the letter in the way they render elements) and quirks mode (where they attempt to mimic the “quirky” rendering capabilities of older browsers to ensure that the page renders how it was intended).
It’s safe to say that in the current development landscape, nearly every web page has a proper doctype, and thus will render in standards mode; it’s therefore unlikely that you’ll ever have to deal with a page rendered in quirks mode. Of course, if a user is viewing a web page using a very old browser (such as IE4), the page will be rendered using that browser’s rendering mode. This is what quirks mode mimics, and it will do so regardless of the doctype being used.
Although the XHTML and older HTML doctypes include information about the exact version of the specification they refer to, browsers have never actually made use of that information. As long as a seemingly correct doctype is present, they’ll render the page in standards mode. Consequently, HTML5’s doctype has been stripped down to the bare minimum required to trigger standards mode in any browser. Further information, along with a chart that outlines what will cause different browsers to render in quirks mode, can be found onWikipedia. You can also read a good overview of standards and quirks mode on SitePoint’s CSS reference.
Shouldn’t all tags be closed?
In XHTML, all elements were required to be closed—either with a corresponding closing tag (such as html) or in the case of void elements, a forward slash at the end of the tag. Void elements are elements that can’t contain child elements (such as input, img, or link).
You can still use that style of syntax in HTML5—and you might prefer it for consistency and maintainability reasons—but adding a trailing slash on void elements is no longer required for validation. Continuing with the theme of “cutting the fat,” HTML5 allows you to omit the trailing slash from such elements, arguably leaving your markup cleaner and less cluttered.
It’s worth noting that in HTML5, most elements that can contain nested elements—but simply happen to be empty—still need to be paired with a corresponding closing tag. There are exceptions to this rule (such as p tags and li tags), but it’s simpler to assume that it’s universal.
What about other XHTML-based syntax customs?
While we’re on the subject, omitting closing slashes is just one aspect of HTML5-based syntax that differs from XHTML. In fact, syntax style issues are completely ignored by the HTML5 validator, which will only throw errors for code mistakes that threaten to disrupt your document in some way.
What this means is that through the eyes of the validator, the following five lines of markup are identical:
<link rel="stylesheet" href="css/styles.css" />
<link rel="stylesheet" href="css/styles.css">
<LINK REL="stylesheet" HREF="css/styles.css">
<Link Rel="stylesheet" Href="css/styles.css">
<link rel=stylesheet href=css/styles.css>
In HTML5, you can use lowercase, uppercase, or mixed-case tag names or attributes, as well as quoted or unquoted attribute values (as long as those values don’t contain spaces or other reserved characters), and it will all validate just fine.
In XHTML, all attributes were required to have values, even if those values were redundant. For example, in XHTML you’d often see markup like this:
<input type="text" disabled="disabled" />
In HTML5, attributes that are either “on” or “off” (called Boolean attributes) can simply be specified with no value. So, the aforementioned input element can be written as follows:
<input type="text" disabled>
Hence, HTML5 has very loose requirements for validation, at least as far as syntax is concerned. Does this mean you should just go nuts and use whatever syntax you want on any given element? No, we certainly don’t recommend that.
We encourage developers to choose a syntax style and stick to it—especially if you are working in a team environment where code maintenance and readability are crucial. We also recommend (though this is optional) that you choose a minimalist coding style while staying consistent.
Here are some guidelines for you to consider using:
· Use lowercase for all elements and attributes as you would in XHTML.
· Despite some elements not requiring closing tags, we recommend that all elements containing content be closed (as in <p>Text</p>).
· Although you can leave attribute values unquoted, it’s highly likely that you’ll have attributes that require quotes (for example, when declaring multiple classes separated by spaces, or when appending a query string value to a URL). As a result, we suggest that you always use quotes for the sake of consistency.
· Omit the trailing slash from void elements (such as meta or input).
· Avoid providing redundant values for Boolean attributes (for instance, use <input type="checkbox" checked> rather than <input type="checkbox" checked="checked">).
Again, these recommendations are by no means universally accepted; however, we believe that they’re reasonable syntax suggestions for achieving clean, easy-to-read maintainable markup.
If you do run amok with your code style, including too much that’s unnecessary, you're just adding extra bytes for no reason. You're also potentially making your code harder to maintain, especially if you work with other developers on the same code base.
Defining the Page’s Structure
Now that we’ve broken down the basics of our template, let’s start adding some meat to the bones and give our page some structure.
Later in the book, we’re going to specifically deal with adding CSS3 features and other HTML5 goodness; for now, we’ll consider what elements we want to use in building our site’s overall layout. We’ll be covering a lot in this section and throughout the coming chapters about semantics. When we use the term “semantics,” we’re referring to the way a given HTML element describes the meaning of its content.
If you look back at the screenshot of The HTML5 Herald (or view the site online), you’ll see that it’s divided up as follows:
· header section with a logo and title
· navigation bar
· body content divided into three columns
· articles and ad blocks within the columns
· footer containing some author and copyright information
Before we decide which elements are appropriate for these different parts of our page, let’s consider some of our options. First of all, we’ll introduce you to some of the new HTML5 semantic elements that could be used to help divide our page and add more meaning to our document’s structure.
The header Element
Naturally, the first element we’ll look at is the header element. The spec describes it succinctly as “a group of introductory or navigational aids.”
Contrary to what you might normally assume, you can include a new header element to introduce each section of your content. It's not just reserved for the page header (which you might normally mark up with <div id="header">). When we use the word “section” here, we’re not limiting ourselves to the actual section element described in the next part; technically, we’re referring to what HTML5 calls “sectioning content.” This means any chunk of content that might need its own header, even if that means there are multiple such chunks on a single page.
A header element can be used to include introductory content or navigational aids that are specific to any single section of a page, or apply to the entire page, or both.
While a header element will frequently be placed at the top of a page or section, its definition is independent from its position. Your site’s layout might call for the title of an article or blog post to be off to the left, right, or even below the content; regardless of which, you can still use headerto describe this content.
The section Element
The next element you should become familiar with is HTML5’s section element. The spec defines section as follows:
The section element represents a generic section of a document or application. A section, in this context, is a thematic grouping of content, typically with a heading.
It further explains that a section shouldn’t be used as a generic container that exists for styling or scripting purposes only. If you’re unable to use section as a generic container—for example, in order to achieve your desired CSS layout—then what should you use? Our old friend, the divelement, which is semantically meaningless.
Going back to the definition from the spec, the section element’s content should be “thematic,” so it would be incorrect to use it in a generic way to wrap unrelated pieces of content.
Some examples of acceptable uses for section elements include:
· individual sections of a tabbed interface
· segments of an “About” page; for example, a company’s “About” page might include sections on the company’s history, its mission statement, and its team
· different parts of a lengthy “terms of service” page
· various sections of an online news site; for example, articles could be grouped into sections covering sports, world affairs, and economic news
Note: Using section Correctly
Every time new semantic markup is made available to web designers, there will be debate over what constitutes correct use of these elements, what the spec’s intention was, and so on. You may remember discussions about the appropriate use of the dl element in previous HTML specifications. Unsurprisingly, HTML5 has not been immune to this phenomenon, particularly when it comes to the section element. Even Bruce Lawson, a well-respected authority on HTML5, has admitted to using section incorrectly in the past. For a bit of clarity, it's well worth reading Bruce’s post explaining his error.
In short:
· section is generic, so if a more specific semantic element is appropriate (such as article, aside, or nav), use that instead.
· section has semantic meaning; it implies that the content it contains is related in some way. If you’re unable to succinctly describe all the content you’re trying to put in a section using just a few words, it’s likely you need a semantically neutral container instead: the humble div.
That said, as is always the case with semantics, it’s open to interpretation in some instances. If you feel you can make a case for why you’re using a given element rather than another, go for it. In the unlikely event that anyone ever calls you on it, the resulting discussion can be both entertaining and enriching for everyone involved, and might even contribute to the wider community’s understanding of the specification.
Keep in mind, also, that you’re permitted to nest section elements inside existing section elements, if it’s appropriate. For example, for an online news website, the World News section might be further subdivided into a section for each major global region.
The article Element
The article element is similar to the section element, but there are some notable differences. Here’s the definition according to the spec:
The article element represents a complete, or self-contained, composition in a document, page, application, or site and that is, in principle, independently distributable or reusable, e.g. in syndication.
The key terms in that definition are self-contained composition and independently distributable. Whereas a section can contain any content that can be grouped thematically, an article must be a single piece of content that can stand on its own. This distinction can be hard to wrap your head around, so when in doubt, try the test of syndication: if a piece of content can be republished on another site without being modified, or if it can be pushed out as an update via RSS, or on social media sites such as Twitter or Facebook, it has the makings of an article.
Ultimately, it’s up to you to decide what constitutes an article, but here are some suggestions in line with recommendations in the spec:
· a forum post
· a magazine or newspaper article
· a blog entry
· a user-submitted comment on a blog entry or article
Finally, just like section elements, article elements can be nested inside other article elements. You can also nest a section inside an article, and vice versa. It all depends on the content you're marking up.
The nav Element
It’s safe to assume that the nav element will appear in virtually every project. nav represents exactly what it implies: a group of navigation links. Although the most common use for nav will be for wrapping an unordered list of links, there are other options. For example, you could wrap thenav element around a paragraph of text that contained the major navigation links for a page or section of a page.
In either case, the nav element should be reserved for navigation that is of primary importance. So, it’s recommended that you avoid using nav for a brief list of links in a footer, for example.
Note: Skip Navigation Links
A design pattern you may have seen implemented on many sites is the “skip navigation” link. The idea is to allow users of screen readers to quickly skip past your site’s main navigation if they’ve already heard it—after all, there’s no point listening to a large site’s entire navigation menu every time you click through to a new page! The nav element has the potential to eliminate this need; if a screen reader sees a nav element, it could allow its users to skip over the navigation without requiring an additional link. The specification states: “User agents (such as screen readers) that are targeted at users who can benefit from navigation information being omitted in the initial rendering, or who can benefit from navigation information being immediately available, can use this element as a way to determine what content on the page to initially skip or provide on request (or both).”
Although not all assistive devices recognize nav as of this writing, by building to the standards now you ensure that as screen readers improve, your page will become more accessible over time.
Note: User Agents
You’ll encounter the term “user agent” a lot when browsing through specifications. Really, it’s just a fancy term for a browser—a software “agent” that a user employs to access the content of a page. The reason the specs don’t simply say “browser” is that user agents can include screen readers or any other technological means to read a web page.
You can use nav more than once on a given page. If you have a primary navigation bar for the site, this would call for a nav element. Additionally, if you had a secondary set of links pointing to different parts of the current page (using in-page anchors or “local” links), this too could be wrapped in a nav element.
As with section, there’s been some debate over what constitutes acceptable use of nav and why it isn’t recommended in some circumstances (such as in a footer). Some developers believe this element is appropriate for pagination or breadcrumb links, or for a search form that constitutes a primary means of navigating a site (as is the case on Google).
This decision will ultimately be up to you, the developer. Ian Hickson, the primary editor of WHATWG’s HTML5 specification, responded to the question directly: “use [it] whenever you would have used class=nav”.[7]
The aside Element
This element represents a part of the page that’s “tangentially related to the content around the aside element, and which could be considered separate from that content.”
The aside element could be used to wrap a portion of content that is tangential to:
· a specific standalone piece of content (such as an article or section).
· an entire page or document, as is customarily done when adding a sidebar to a page or website.
The aside element should never be used to wrap sections of the page that are part of the primary content; in other words, aside is not meant to be parenthetical. The aside content could stand on its own, but it should still be part of a larger whole.
Some possible uses for aside include a sidebar, a secondary list of links, or a block of advertising. It should also be noted that the aside element (as in the case of header) is not defined by its position on the page. It could be on the side, or it could be elsewhere. It’s the content itself, and its relation to other elements, that defines it.
The footer Element
The final element we’ll discuss in this chapter is the footer element. As with header, you can have multiple footer elements on a single page, and you should use footer instead of something generic such as <div id="footer">.
A footer element, according to the spec, represents a footer for the section of content that is its nearest ancestor. The section of content could be the entire document, or it could be a section, article, or aside element.
Often a footer will contain copyright information, lists of related links, author information, and similar information that you normally think of as coming at the end of a block of content; however, much like aside and header, a footer element is not defined in terms of its position on the page, so it does not have to appear at the end of a section, or at the bottom of a page. Most likely it will, but this is not required. For example, information about the author of a blog post might be displayed above the post instead of below it, and will still be considered footer information.
Note: How did we get here?
If you're wondering a little bit about the path to HTML5 and how we ended up with the tags that we did, you might want to check out Luke Stevens' book called The Truth about HTML5. Currently in its 2nd edition, Luke's book is somewhat controversial. In addition to covering many of the HTML5 technologies such as video and canvas, he also goes in-depth in his coverage of the history of HTML5, explaining some of the semantic and accessibility problems inherent in the new elements and providing some recommendations on how to handle these issues.
Structuring The HTML5 Herald
Now that we’ve covered the basics of page structure and the elements in HTML5 that will assist in this area, it’s time to start building the parts of our page that will hold the content.
Let’s start from the top, with a header element. It makes sense to include the logo and title of The Herald in here, as well as the tagline. We can also add a nav element for the site navigation.
After the header, the main content of our site is divided into three columns. While you might be tempted to use section elements for these, stop and think about the content. If each column contained a separate “section” of information (such as a sports section and an entertainment section), that would make sense. As it is, though, the separation into columns is really only a visual arrangement, so we’ll use a plain old div for each column.
Inside those divs, we have newspaper articles; these, of course, are perfect candidates for the article element.
The column on the far right, though, contains three ads in addition to an article. We’ll use an aside element to wrap the ads, with each ad placed inside an article element. This may seem odd, but look back at the description of article: “a self-contained composition […] that is, in principle, independently distributable or reusable.” An ad fits the bill almost perfectly, as it’s usually intended to be reproduced across a number of websites without modification.
Next up, we’ll add another article element for the final article that appears below the ads. That final article will be excluded from the aside element that holds the three ads. To belong in the aside, the article needs to be tangentially related to the page’s content. This isn’t the case: this article is part of the page’s main content, so it would be wrong to include it in the aside.
Now the third column consists of two elements: an aside and an article, stacked one on top of the other. To help hold them together and make them easier to style, we’ll wrap them in a div. We’re not using a section, or any other semantic markup, because that would imply that the articleand the aside were somehow topically related. They’re not—it’s just a feature of our design that they happen to be in the same column together.
The New main Element
At this point, it's probably a good time to introduce another major structural element that's been introduced in HTML5: the main element. This element was not originally part of the HTML5 spec, but has been added since the first edition of this book was published.
Unfortunately, defining the main element and how it can be used is a little tricky. But let's start with where the element originated. In some HTML documents, developers were wrapping their primary content in a generic element, like this:
<body>
<header>
...
</header>
<div id="main">
...
</div>
<footer>
...
</footer>
</body>
Notice the generic div element used here as a sibling to the header and footer elements. Notice also the ID attribute with a value of "main". In addition to this, many developers were adding an ARIA role to this element:
<div id="main" role="main">
...
</div>
We'll avoid going into the details of ARIA here―that's covered in Appendix B ―but basically, the new main element is meant to replace this practice.
The W3C spec defines main as follows: “The main element represents the main content of the body of a document or application. The main content area consists of content that is directly related to or expands upon the central topic of a document or central functionality of an application.”
The WHATWG spec defines it similarly; however, the two specs have very different definitions beyond that. The WHATWG spec says:
“There is no restriction as to the number of main elements in a document. Indeed, there are many cases where it would make sense to have multiple main elements. For example, a page with multiple article elements might need to indicate the dominant contents of each such element.”
But uncharacteristically, in complete contradiction to that, the W3C spec says:
“Authors must not include more than one main element in a document. Authors must not include the main element as a descendant of an article, aside, footer, header, or nav element.”
In addition, the W3C spec adds the recommendation to use the role="main" attribute on the main element until the main element is fully recognized by user agents. Having that knowledge, we're going to adopt the W3C's recommendation, and use only a single main element on our page, using an ARIA role as a fallback.
Going back to our Herald markup, this is how it will look after we've added the main element inside the body tag:
<body>
<header>
...
</header>
<main role="main">
</main>
<footer>
...
</footer>
<script src="js/scripts.js"></script>
</body>
As you can see, the main element exists outside the header and footer. Inside the main is where we'll put the three columns we discussed, which make up the layout and primary content for The HTML5 Herald.
Continuing to Structure The Herald
The last part of our layout we'll consider here is the footer, which you can see in The Herald screenshot in its traditional location—at the bottom of the page. Because the footer contains a few different chunks of content, each of which forms a self-contained and topically related unit, we’ve split these out into section elements inside the footer. The author information will form one section, with each author sitting in their own nested section. Then there’s another section for the copyright and additional information.
Let’s add the new elements to our page so that we can see where our document stands:
<body>
<header>
<nav></nav>
</header>
<main role="main">
<div class="primary">
<article></article>
</div>
<div class="secondary">
<article></article>
</div>
<div class="tertiary">
<aside>
<article></article>
</aside>
<article>
</article>
</div>
</main><!-- main -->
<footer>
<section id="authors">
<section></section>
</section>
<section id="copyright">
</section>
</footer>
<script src="js/scripts.js"></script>
</body>
Figure 2.2 shows a screenshot that displays our page with some labels indicating the major structural elements we’ve used.
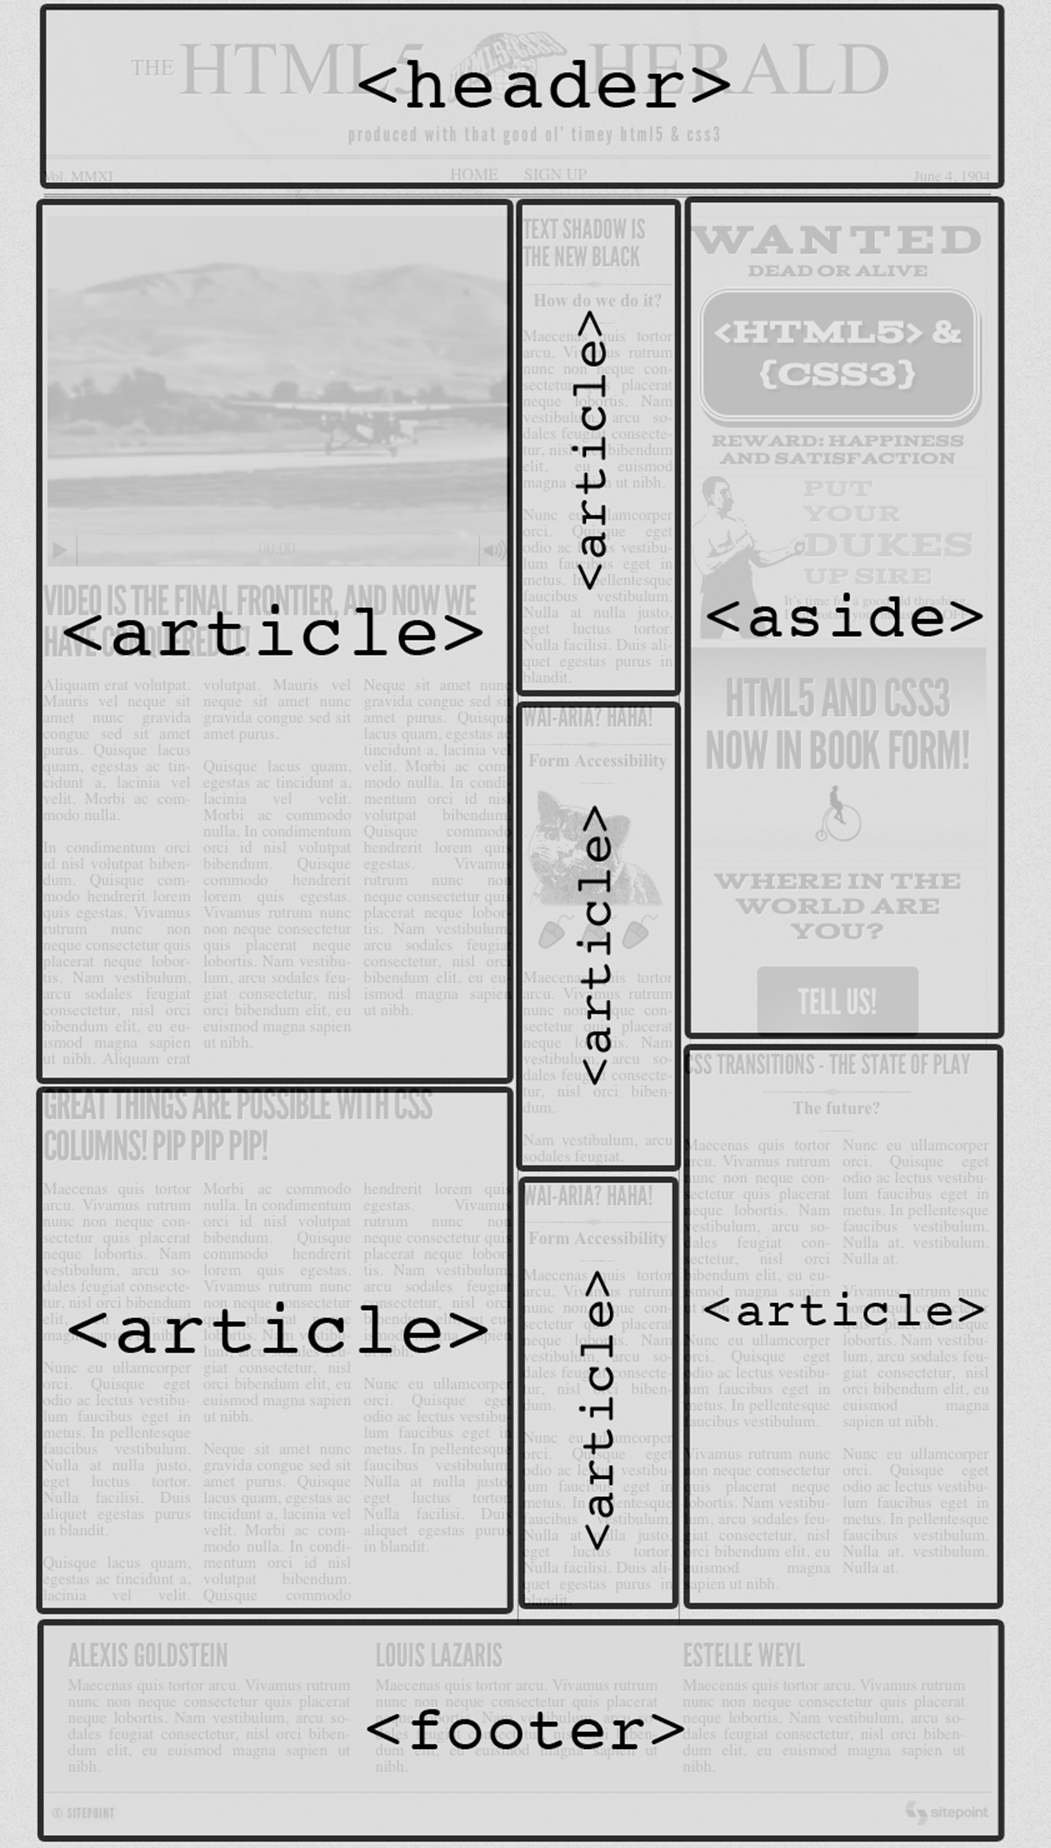
Figure 2.2. The HTML5 Herald broken into structural HTML5 elements
We now have a structure that can serve as a solid basis for the content of our website.
Note: What if I use the wrong element?
Although it can be confusing at times to remember which elements to use in which situations, we encourage you to avoid stressing or spending too much time making decisions on semantics. While it is good to be consistent, there are few repercussions from using the wrong elements. If your pages are accessible, that's what is important. Of course, there are cases where the correct semantic element will be beneficial to accessibility, so we encourage you to research this and make sure your choice of element won't cause your pages to become inaccessible. A good place to start might be HTML5 Accessibility or The Accessibility Project.
Wrapping Things Up
That’s it for this chapter. We’ve learned some of the basics of content structure in HTML5, and we’ve started to build our sample project using the knowledge we’ve gained.
In the next chapter, we’ll have a more in-depth look at HTML5 content, and continue to add semantics to our page when we deal with some of the other elements available in HTML5.
[4] A few you might want to look into can be found at html5boilerplate.com and https://github.com/murtaugh/HTML5-Reset.
[5] You might be more familiar with its alternative name: the HTML5 shim. Whilst there are identical code snippets out there that go by both names, we’ll be referring to all instances as the HTML5 shiv, its original name.
[6] For more information see the SitePoint Reference.
[7] See http://html5doctor.com/nav-element/#comment-213.