D3 on AngularJS: Create Dynamic Visualizations with AngularJS (2014)
Intro to Angular
Up until this point, we’ve focused only on D3 but in the next chapters, we’ll look at some of the interesting ways in can be combined with Angular to make our visualizations more modular, reusable, and interactive. This also had a the benefit of making them easier to conceptualize in our heads as well as making it easier for us to come back to several months later after we’ve forgotten all the nuances of our visualization.
About Angular
Angular is a framework that makes it easier to create (web) applications but it lends it self well to interactive visualization. It does this by forcing us to break up our application into pieces that perform specific types of tasks. Splitting our code up this way allows components to be easily swapped out for other components. It also helps with connecting our components to other components allowing one visualization to be driven by each other or update themselves automatically when their underlying data changes.
Angular has a lot of features but most aren’t directly related to data visualization. For a more in depth deep dive into Angular check out Ari’s ng-book.
Angular for interactive and reusable data visualization
There are a lot of reason’s to use Angular when doing data visualization but chief among them all are directives. Directives make it easier to create reusable visualizations. They are essentially a way for us to create our own HTML elements that act just like the browsers built-in HTML tags. Imagine we just created a pie chart visualization we’d like to reuse again. If we had created a directive that contained our pie chart, this would be simple. We can just copy and paste the <pie-chart> element in our html without having to write any JavaScript.
1 <pie-chart></pie-chart>
2 <pie-chart></pie-chart>
This also makes it easier for people that didn’t write our pie chart, since they don’t need to know the pie chart works to use it.
If we write our visualizations in directives, we also get a lot of other advantages for free. Namely, we can use Angular’s other built-in directives like ng-switch to conditionally show different visualizations. In this example we’re conditionally showing either a pie chart or bar chart view of the data depending on the state of the selection scope variable.
1 <div ng-switch on="selection">
2 <div ng-switch-when="pie">
3 <pie-chart></pie-chart>
4 </div>
5 <div ng-switch-default>
6 <bar-chart></bar-chart>
7 </div>
8 </div>
Using another built-in Angular directive, ng-repeat, we can easily create the effective data visualization technique of small multiples allowing us to convey more information more effectively. It does this by allowing us to reuse the same visualization a variable number of times.
1 <div ng-repeat="races in incomes">
2 <map ng-repeat="race in races"></map>
3 </div>

|
|
Live version: http://vicapow.github.io/angular-d3-talk/slides/demos/life-expectancy/index.html |

Lastly, Angular makes it easy to create dynamic visualizations by handling updates on the scope. This is often useful when creating visualizations that depend on the state of some other visualization or when, say, you wanted two different visualizations to update whenever a slider was moved.
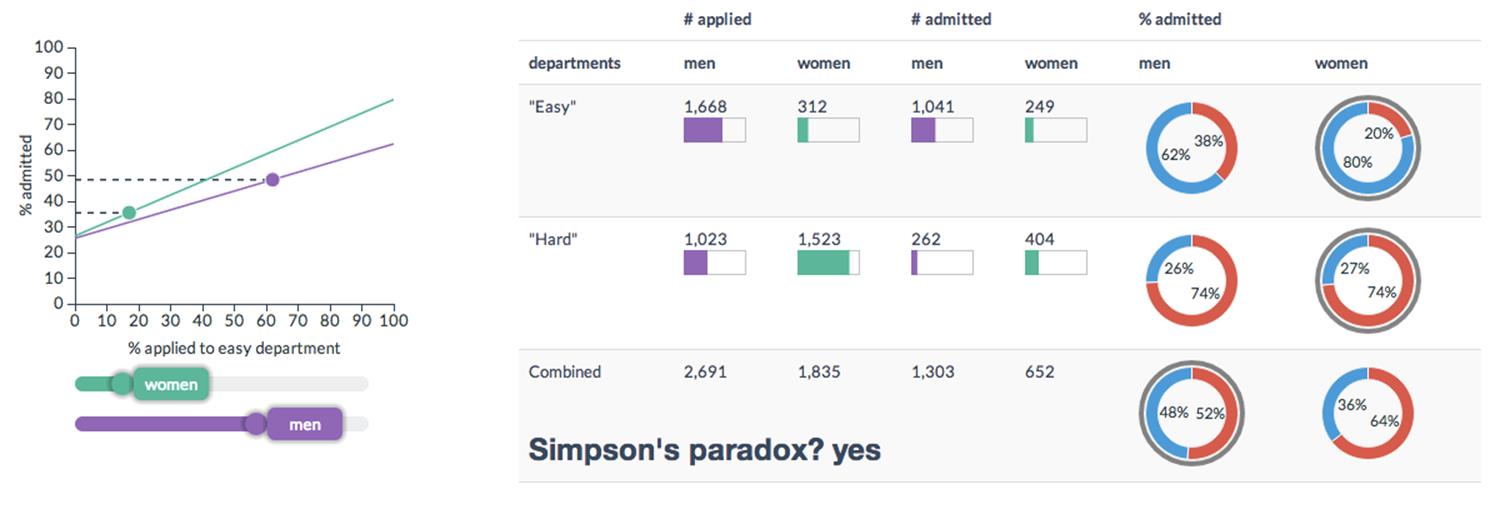
|
|
Live version: http://vudlab.com/simpsons/ |
Model, View, Whatever
Most web frameworks encourage developers to break up their code into ether “models”, “views”, or “controllers” or (MVC). We can think of them in the following way:
Models: The information our application wants to show or allow to be modified. Views: The components responsible for showing or modifying that information or a “view” of the information. Controllers: the logic responsible for properly connecting the two.
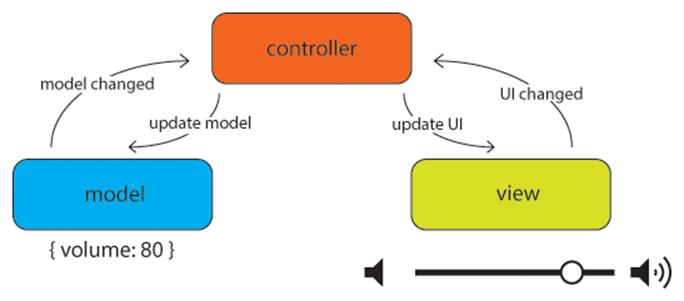
Remember to keep in mind that there’s a difference between this general, informal categorization of the parts of any application, and the types of components that actually exist in our application. Some frameworks might share some of these responsibilities across components or might call them something completely different. In Angular specifically, there is no formal “view” class or function. The “view” is just the DOM.
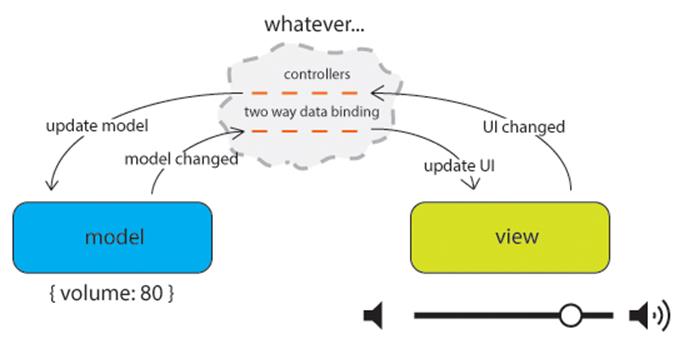
In Angular, for the most part, our viewers and models are automatically connected. This automatic (or “two-way”) data binding is the default and occurs on what’s called the “scope”. Just by changing a variable on the scope (aka, the model), it’s change will automatically be sent to the DOM. Because this isn’t strictly MVC, the Angular community refers to this pattern as “Model, View, Whatever” because you can loose a lot of time contemplating exactly what pattern Angular falls into.
Hello Angular!
To get familiar with how to install and setup an Angular app, let’s walk through creating a ‘Hello World’ style application. This app will update a template whenever the value of an input tag changes.
Installing Angular
The easiest way to install Angular is to include the latest version from Google’s CDN by copy and pasting the below snippet into a new HTML file. (At the time of writing, the newest version is 1.2.10).
1 <!DOCTYPE html>
2 <html>
3 <head>
4 <script src="https://ajax.googleapis.com/ajax/libs/angularjs/1.2.10/angular.m\
5 in.js"></script>
6 </head>
7 <body></body>
8 </html>
Next, we’ll need to tell angular where our app begins using ng-app. Most of the time, this will just be the entire <body> tag.
1 <body ng-app>
2 <!-- yo angular, everything in here is our app -->
3 </body>
Now we’ll add an input tag that created a variable person on the scope. The snippet ng-model="person" is responsible doing this. It also handles checking for changes to the <input> tag and updating the scope, or vice versa. In MVC speak, this “wires up” the “model” person variable on scope to the <input> tag (our “view”). Don’t worry too much how the scope works. Just know that it contains the information of our application. In this case, the “person” we’d like to say hello to. Angular will take care of wiring everything up for us automatically using two way data binding.
1 <body ng-app>
2 <input type="text" ng-model="person"></input>
3 </body>
The person variable now updates whenever the value of the <input> tag changes but there’s no way to prove it since we’re not using that variable anywhere else. Let’s fix that by using a simple Angular template.
1 <body ng-app>
2 <input type="text" ng-model="person"></input>
3 hello {{person}}!
4 </body>
|
|
Live version: http://jsbin.com/izimoQoL/1/edit |
Great! Now when we update the <input> text field, the change is automatically sent to the scope which then causes the template to get rendered. Here’s the full version.
1 <!DOCTYPE html>
2 <html>
3 <head>
4 <script src="https://ajax.googleapis.com/ajax/libs/angularjs/1.2.10/angular.min\
5 .js"></script>
6 <script src="http://d3js.org/d3.v3.min.js" charset="utf-8"></script>
7 </head>
8 <body ng-app>
9 <input type="text" ng-model="person"></input>
10 hello {{person}}!
11 </body>
12 </html>
All materials on the site are licensed Creative Commons Attribution-Sharealike 3.0 Unported CC BY-SA 3.0 & GNU Free Documentation License (GFDL)
If you are the copyright holder of any material contained on our site and intend to remove it, please contact our site administrator for approval.
© 2016-2026 All site design rights belong to S.Y.A.