Java eLearning Kit For Dummies (2014)
Chapter 1. Starting With Java
· Java’s increasing popularity makes it the most common language used to develop cross-platform applications.
· Developers rely on the fact that Java is a standards-based language.
· Each platform that Java supports has its own version of the Java Software Development Kit (SDK) and Java Runtime Engine (JRE), yet uses precisely the same language.
· All Java applications share common components.
· Java applications rely on a special application called a compiler to change Java source code that the developer understands to an executable form that the JRE understands.
· Use comments to make it easier to remember what tasks your application performs.
· Java applications rely on the Java Application Programming Interface (API) to perform many tasks.
· Develop a better understanding of Java by viewing the help files.

1. What are the advantages of using a language that works across multiple platforms?
Cross-platform compatibility is a major advantage of using Java, as described on page 10
2. Where can I obtain a copy of the Java SDK?
You can find the installation and configuration instructions for the Java SDK starting on page 13
3. Do I absolutely have to use an Integrated Development Environment (IDE)?
Java makes it quite easy to use a simple text editor to create programs, but you’ll do much better if you rely on an IDE as described on page 21
4. What are the main parts of a Java application?
You can find a description of the major parts on page 24
5. What purpose does the .class file serve?
A .class file contains the byte code executed by the JRE as described on page 29
6. Why is the JavaW command important?
Discover the JavaW difference on page 31
7. When should I comment my code?
There are distinct times when you should consider commenting your code, as explained on page 32
8. Where do I find an explanation of the Java API content?
The Java API contains all the standard classes used to create applications, and you can find out about it on page 35
9. Must I go online to get help?
Java provides both local and online help, as described on page 42
Java is an amazing language. Most programming languages are designed around a single operating system or environment. For example, when you work with the Microsoft .NET Framework languages, such as C# or Visual Basic, you’re working with Windows unless you get a special third-party product to make these languages work elsewhere. Likewise, Macintosh developers commonly use Objective C to create their applications. Using PHP means that you’re creating applications that appear in a browser, rather than applications that run within the host operating system. Java crosses all these boundaries. You can find Java running on just about every operating system, and Java applications can run both within the operating system environment and as part of a browser presentation.
LINGO
Java programmers use the Java Software Development Kit (SDK) to gain access to Java features, such as the ability to display information on screen or to work with files. To make the process of writing applications as easy as possible, the programmer uses an Integrated Development Environment (IDE) to write code. The IDE provides special help, such as reminding you about the Java features you can access as you type and finding errors in your code. After the programmer finishes writing an application, the source code is compiled into a .class file, and you can run it using the Java Runtime Engine (JRE).
It isn’t hard to find a copy of Java. Some operating systems come with Java installed, or another application will install Java for you. Even if Java isn’t installed on your system, a version of the language is available for most platforms. One of the first tasks that you perform in this chapter is to install your own copy of Java.
Java receives strong support in the developer community. You can find all sorts of tools, add-on products, and free source code. In fact, the number of choices can become overwhelming. This chapter starts out slowly and makes you aware of choices you need to make based on how you plan to use Java to create applications.
Programs contain standard basic parts that this chapter shows you how to construct. You can add to program functionality by using standardized features found in the Java Application Programming Interface (or Java API), a collection of code samples that lets you write Java applications with greater ease by reducing the amount of code you need to write. Code makes your application do something useful, but in order to understand the code, you need to add comments as a means of documentation. Adding comments to your code makes it easier to read.
LINGO
Lots of people talk about platforms, but most of them don’t explain what the term means. It can mean different things to different people. When you see the term platform in this book, it means a combination of hardware and an associated operating system. It isn’t enough to refer to the operating system alone. For example, some versions of Windows work across multiple kinds of hardware (everything from PCs to tablets and phones). The combination of hardware and operating system denotes a platform.
 An essential fact to remember about Java is that you can get lots of help using this language — you’re never left to your own devices with Java, because help is always available. You don’t need to know any sort of special handshake or rely on certain people to discover how Java works. This chapter provides you with basic information about getting help with Java. You’ll also find more information on getting help as the book progresses.
Considering Why You’d Use Java
Java, like all programming languages, has both positive and negative features. It’s important to know why you’re learning Java before you do anything else because having a good reason to do something is a motivator. The following sections describe some of the benefits of using Java as a programming language.
Using a popular language
Literally hundreds (perhaps thousands) of computer languages are available today. Some of these languages are definitely more popular than others. Precisely which language is most popular depends on who you ask. For example, many people trust the judgment of TIOBE — an organization that tracks programming language popularity (amongst other things) — when it comes to language popularity (http://www.tiobe.com/content/paperinfo/tpci/index.html). The TIOBE information is a little stark. If you prefer some commentary with your statistics, try a site such as Udemy/blog (https://www.udemy.com/blog/best-programming-language). Just about everyone agrees that Java is a popular language (and many organizations view Java as the most popular language).
If you’re learning a first programming language and you want to ensure you have the best chance of success of getting a job based on your skills using the language, Java is a great choice. Java’s popularity also makes it a good choice because you have better access to a wide range of third-party tools, libraries, and add-ons. Using a popular language also means that your chances of finding someone to help you with a problem are significantly better. In fact, popularity makes Java an excellent choice as a language even when learning a third or fourth language, just because it’s used in so many places.
However, popularity doesn’t necessarily make Java the right language for you to use to satisfy a particular application requirement — functionality makes Java the right language to use. The reason you encounter so many languages is that people often find something lacking in an existing language and try to create a better language that addresses the failure. Java is great for satisfying business and user-oriented needs, but I wouldn’t use it to create a device driver for an operating system because Java lacks low-level support. This book can’t answer the question of whether Java will precisely match your needs, but it will give you the knowledge required to answer that question on your own. Always consider language features when choosing a language for a particular application need. If you still need help figuring out whether Java is the right programming language for you, consider looking online at sites such as Java Pros and Cons (http://c2.com/cgi/wiki?JavaProsAndCons).
GO ONLINE
The technologies found in Java are created, monitored, and controlled by the Java Community Process (JCP). The JCP ensures that you can discover what features new versions of Java will contain. Individuals can even join the JCP for free and have a voice in what will happen with Java. You can learn more about the JCP at http://jcp.org/en/home/index.
Working with a standardized language
For Java to work in all the environments that it does, it has to have a strong standardized language. Standardization means that code designed to perform a specific task on one platform performs that same task on every other platform. Of course, each platform must run the same version of the JRE to ensure compatibility. You knew there was going to be a little gotcha, didn’t you? When you think about it, this is a small gotcha and a reasonable requirement.
Creating applications for multiple platforms
At one time, writing an application for Windows running on a PC answered the needs of most businesses. Organizations simply didn’t require many platforms to complete required tasks. Most organizations today, however, have to support a number of platforms. People want to access the same data using their PC, tablet, and smartphone, for example. An application has to be versatile enough to work well on all three pieces of hardware (as a minimum). Because tablet and smartphone operating systems vary considerably, an application must also work well across a number of operating systems and present the user with essentially the same interface to reduce support costs. Java makes it possible to support all these requirements.
Defining other reasons to use Java
When you start talking with people about Java, you’ll find many reasons to make Java your next programming language. Many developers would argue that Java is a good choice because it’s free or that, with Java, it’s easy to leverage skills acquired from mastering other languages, such as JavaScript and C/C++. Whether these reasons make sense to you as a developer depends on your current skill set and the requirements of your next application. Java does have a lot to offer, and you should at least consider the following reasons to adopt it:
· Java provides a large, standardized library of functions that make it possible to write robust applications without relying on any third-party products.
· The people who created Java are constantly trying to simplify its syntax (language structure) to make it easier to learn.
· Relying on Object-Oriented Programming (OOP) techniques makes Java more robust and less susceptible to problems than other languages because OOP technologies have a great track record in that area. (See the discussion athttp://www.freetopessays.com/content/paper-outlining-various-concepts-found-object-oriented-programming-oop for details.)
· All memory-related tasks are handled for you, so all you have to worry about is writing your code.
· The huge help facility means that you won’t be left out in the cold trying to figure something out.
· Strong community support means that you can ask someone what the documentation means when you can’t figure it out.
· Great performance on a wide variety of platforms.
Don’t worry about understanding all these reasons now. Some of these reasons are emphasized later in the book, and some of them won’t really matter unless you work with other languages. File these reasons away for now and think about them later as you work through this book and begin building applications of your own.
Obtaining and Installing the Java 8 JDK
The examples in this book rely on the Java Standard Edition (SE) Development Kit 8, which is the latest version of Java. At least some of the examples will work with older versions of Java, but you’ll find that you get better results using Java 8. Oracle does create Java 8 in a number of other editions, but don’t worry about them for this book. Yes, if you have Java Enterprise Edition (EE) Development Kit 8, the examples will work just fine, but you really don’t require such a fancy version of the product to use this book. With that in mind, the following sections describe how to download and install the Java SE Development Kit 8.
Downloading Java 8
To create a Java application, you must have the Java Development Kit (JDK). If you want others to run your application, but these others don’t need to write application code, then they must have the Java Runtime Environment (JRE). The version of the JRE must match the version of your JDK to ensure that the application will run as expected. You can download a copy of the JDK for your operating system from https://jdk8.java.net. The JDK currently supports the following:
· Windows 32-bit and 64-bit
· Macintosh OS X 64-bit
· Linux 32-bit and 64-bit
· Linux for the Acorn RISC Machine (ARM) 32-bit processor (ARM processors are typically used in tablets and smartphones.)
· Solaris 32-bit and 64-bit (You have to install the 32-bit version first and then the 64-bit version.)
· Solaris SPARC 32-bit and 64-bit (You have to install the 32-bit version first and then the 64-bit version.)
Simply follow the link for the version of Java 8 that you require. When you want to obtain a copy of the JRE for your users, you can get it from https://jdk8.java.net by clicking the JRE link rather than the JDK link. (You must use the JDK when working with a device equipped with an ARM processor.) The JDK also comes with a copy of the JRE as a subdirectory of the installation.
Performing the Windows installation
Files needed: The Java installation program you downloaded
The Windows version of Java comes as an executable file that installs much like any other executable file on your system. After you download the version of the JDK for your system, use the following steps to install it.
1. Double-click the downloaded file.
You may see a User Account Control dialog box appear. This dialog box asks whether you want to allow the application to make changes to your system. Click Yes to allow system changes. If you click No, the application exits, and Java doesn’t install.
You see the Welcome page of the setup wizard.
2. Click Next.
You see the Custom Setup page of the wizard, as shown in Figure 1-1. The three items you must install — Development Tools, Source Code, and Public JRE — are already selected in the figure.
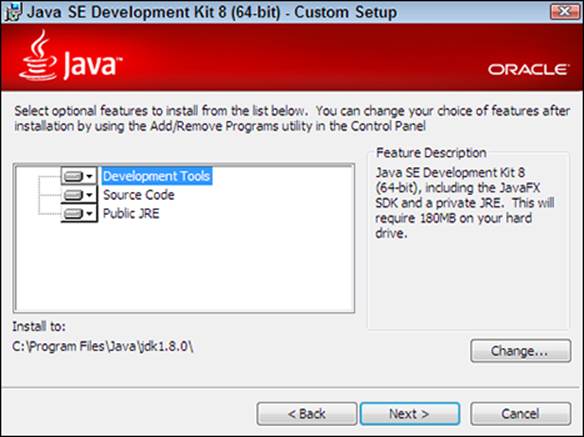
Figure 1-1:
3. (Optional) Click Change to select a location to store the Java files.
GO ONLINE
The Java installation program used to include a Demos and Samples option. This option is no longer available in Java 8. To obtain this feature, you must perform a separate download from https://jdk8.java.net. The demos and samples come as a .zip file that you extract onto your hard drive. Separate versions of this file are available for the Windows, Mac, and Linux platforms.
Normally, it’s best to use the default installation location unless you have a special reason for storing the files somewhere else. Using the default location makes it easier for tools, such as an IDE, to find the files later.
4. Click Next.
The setup wizard performs the installation.
After the JDK installation is complete, you see a secondary setup dialog box appear for the JRE installation.
5. (Optional) Click Change to select a location for the JRE installation.
In most cases, using the default installation location works fine.
6. Click Next.
The JRE installation starts. After the JRE installation is complete, the secondary setup dialog box disappears, and you return to the initial setup dialog box.
7. Click Close.
The setup is complete, and the setup wizard disappears.
Performing the Linux installation
Files needed: The Java installation program you downloaded
The precise steps you use to install Java on Linux depend on your Linux distribution. Installing Java by using the downloadable files means acting as the root user. Some versions of Linux (such as Fedora, Red Hat, and openSuSE) enable the root user, but others (such as Ubuntu and Debian) don’t. No matter which version of Linux you own, you generally have access to the super-user do (sudo) command. With this in mind, the easiest way to get Java on Linux is to execute the following command:
sudo apt-get install oracle-java8-installer
Performing the Mac installation
Files needed: The Java installation program you downloaded
After you download the version of the JDK for your system, extract the file on your hard drive, preferably to the /System/Library/Java/java-8 folder. To use Java from an IDE, all you need to do is tell the IDE where to find the files. However, if you want to use Java for running applications normally, you must create a path to it by using the instructions found in the “Creating a path on the Mac” section, later in this chapter.
EXTRA INFO
One of the advantages of using an IDE is that you don’t normally need to worry about the location of the Java executable files. Install the JDK first and then install the IDE. The IDE setup program will automatically locate the JDK files for you and configure the IDE to use these files when you need help, or compile, debug, or run an application.
Accessing the Java executables
The location of the Java executable files on your system is important. The folder containing these files provides access to all the tools you require to use Java. When you install Java, the setup program tells you where these files will be stored. The following sections tell you the default location for storing the Java 8 files and provide some tips on accessing them.
Creating a path in Windows
If you’re not using an IDE in Windows, you’ll always have to create a path to the Java executable files. That’s because Windows doesn’t normally offer any Java support out of the box. The files you need will normally appear in one of two locations, unless you specifically store them somewhere else.
· The \Program Files\Java\jdk1.8.0\bin folder is the standard storage location. (If you install a newer version of the JDK, you may find it stored in a slightly different folder. For example, if you install version 1.8.0.1, then you might see the JDK stored in the \Program Files\Java\jdk1.8.0.1\bin folder.)
· When you install the 32-bit bit version of Java on a 64-bit version of Windows, the standard storage location is \Program Files (x86)\Java\jdk1.8.0\bin.
You can use Windows Explorer to find the precise location of the JDK on your system. When you know this information, you can create a path to those files. In the following exercise, you create a path to the Java installation in Windows.
Files needed: None
1. Right-click Computer and choose Properties from the contextual menu that appears, or open the System applet in the Control Panel.
You see the System window shown in Figure 1-2.
2. Click Advanced System Settings in the Control Panel Home menu on the left.
You see the Advanced tab of the System Properties dialog box, as shown in Figure 1-3.
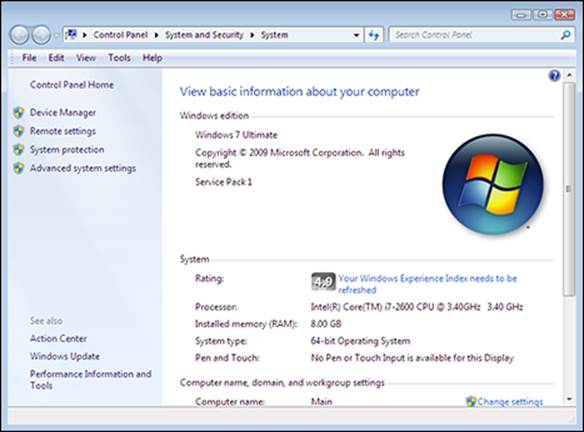
Figure 1-2:

Figure 1-3:
3. Click the Environment Variables button in the lower-right of the dialog box.
You see the Environment Variables dialog box shown in Figure 1-4. Notice that this dialog box is split into two sections. The upper section affects only the local user, whereas the lower section affects everyone who uses the system.
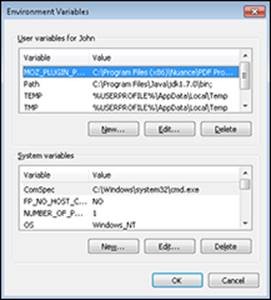
Figure 1-4:
4. Highlight the Path entry for the user (if you want to use Java for just the current user’s account) or the system (if everyone on the system will use Java) and click Edit.
1. If a Path entry doesn’t exist, click New.
2. Type Path in the Variable Name field.
You see a variable dialog box similar to the one shown in Figure 1-5. The variable dialog box can have one of four names depending on which version you access: Add User Variable, Edit User Variable, Add System Variable, or Edit System Variable. All four versions differ in name only — they work precisely the same way.
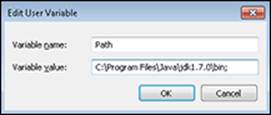
Figure 1-5:
5. Type the path to the JDK in the Variable Value field, followed by a semicolon, without changing any of the existing content.
Figure 1-5 shows an example entry.
6. Click OK three times to close the three dialog boxes you’ve opened.
7. Close the System window.
The environment variable is in place, and you can access Java at the command line.
Creating a path in Linux
To ensure that you can access Java 8 as needed, you must configure a path to the Java executable files by using this command:
sudo apt-get install oracle-java8-set-default
The techniques described for Solaris in the following section also work with Linux.
Creating a path in Solaris
When working with Solaris, it’s likely that you already have a version of Java installed on your system. Most versions of Java will work with most of the examples in this book. However, to obtain the maximum benefit from these examples, you really do need Java 8. To determine whether you can access Java at the command line, type % Java –Version and press Enter. If you see a version number, you can access Java without trouble. When you see a version number older than Java 8, you‘ll need to think about installing a newer version of Java on your system.
In some cases, you may not be able to access Java from the command line on your system, even though Java is installed. Java 8 is normally installed in the /usr/local/jdk1.8.0/bin/ directory on your machine. (You can find other versions of Java in the appropriate version-specific directory.) If you find that Java is installed and you simply can’t access it, use the appropriate procedure (depending on the shell you’re using) in the following sections to provide access.
Working with the bash shell
The bash shell is one of two popular shells supplied with Solaris. (There are others, including the C shell described later in this chapter.) In the following exercise, you add a path to Java when you use the bash shell.
Files needed: None
1. Open the ~/ .bashrc file for editing.
2. Modify the Path variable to include the path to your Java installation.
Your Path variable will look something like: PATH=/usr/local/jdk1.8.0/bin.
3. Type Export Path and press Enter.
The shell exports the Path variable for you.
4. Save the file and exit the editor.
5. Open a new terminal window when necessary.
Many versions of Linux open a terminal window immediately when you start the operating system. If you don’t have an open terminal window, look for an application called Xterm, Terminal, Konsole, Console, or something similar.
6. Type % Java –Version and press Enter.
You see the version number of the Java installation.
Working with the C shell
The C shell is one of two popular shells supplied with Solaris. (There are others, including the bash shell described earlier in this chapter.) In the following exercise, you add a path to Java when you use the C shell.
Files needed: None
1. Open the ~/.cshrc file for editing.
2. Type set path=(/usr/local/jdk1.8.0/bin ) and press Enter.
3. Save the file and exit the editor.
4. Open a new terminal window when necessary.
Again, many versions of Linux open a terminal window immediately when you start the operating system. If you don’t have an open terminal window, look for an application called Xterm, Terminal, Konsole, Console, or something similar.
5. Type % Java –Version and press Enter.
You see the version number of the Java installation.
Creating a path on the Mac
The Mac OS X Leopard setup includes several versions of Java as part of the base installation. So, you do have Java available, but you may not have the right version available. To use Java 8 as your default version of Java, you must open Terminal (by choosing the Applications⇒Utilities⇒Terminal command) and export a path to Java 8 by typing the following command:
$export JAVA_HOME=/System/Library/Java/java-8
After you export the path, you need to verify that you have the right version of Java selected. Test your installation by typing the following command in Terminal:
$java -version
You see the version number of Java that you have selected.
Choosing an IDE for Java
An IDE is simply a special kind of text editor. It provides a wealth of features that make your coding experience easier. However, you can just as easily use any text editor. For example, a Windows user could rely on Notepad to get the job done, whereas Linux users have vi and Mac users have TextEdit. The following sections discuss the use of an IDE for your projects. However, this book doesn’t assume you’re using any particular IDE and you won’t have to worry about matching your output to the output of any particular IDE.
Working with a text editor
You can use any editor that produces pure text output to create Java applications. The most important consideration when working with a text editor is that it produces pure text output — text without any formatting information whatsoever. Bare-bones text editors (such as Notepad on Windows or vi on Linux) are great for producing the required pure text, but text editors that are just slightly more complicated (such as Wordpad for Windows and TextEdit on the Macintosh) will add formatting codes to the output, making the text useless to the compiler. (You can set up TextEdit as a plain text editor using the instructions at http://support.apple.com/kb/ta20406, but it’s important that you remember to perform the task as needed.)
GO ONLINE
Windows users have Notepad, and it works fine for creating Java applications. If you really want something with more pizzazz, try Notepad++ (http://notepad-plus-plus.org). Linux developers will likely want something friendlier than vi to use. You can find a number of plain text editors at http://www.yolinux.com/TUTORIALS/LinuxTextEditors.html. Mac users may want to investigate Plain Text Editor for Mac, found at http://download.cnet.com/Plain-Text-Editor/3000-2079_4-10138406.html. Otherwise, check out the article at http://mac.blorge.com/2009/07/14/mac-software-five-best-free-plain-text-editors-for-mac for a description of other editors that will work on the Mac. If you work with multiple programming languages, you might want to try an editor that caters to them, such as PilotEdit (http://www.pilotedit.com/About%20PilotEdit.htm), a free editor that supports a host of programming languages.
If you do use a plain text editor to create your applications, you’ll also need to manually compile and execute the applications at the command line. It isn’t difficult to perform these tasks, but it does involve extra work that an IDE would normally perform for you. This chapter tells you how to compile the application in the “Opening the command prompt” section as well as how to execute it in the “Using the Java command” section, so using a plain text editor or an IDE is completely up to you.
Finding an IDE
There are many Java-specific IDEs on the market and even more editors that will work with Java, even if they aren’t specifically designed for Java. In fact, there are so many editors out there that it could (and possibly will) make your head spin, and no one wants that. If you’re going to invest time and effort into learning how to work with an IDE, it’s best to get a Java-specific product.
One of the fastest and most feature-complete Java editors on the market today is JCreator Pro. This IDE is written entirely in C++, a language that’s valued for its high performance, which is the reason it runs so fast. It also provides a complete feature set that works well with all levels of Java development. However, this product has a few issues that make it unsuitable for this particular book. For one thing, it only runs on Windows. For another, it’s not free. You can download a limited time demo version from http://www.jcreator.com, but you’ll want to reserve this product for a time when you’re working with some larger applications. You can download an older version called JCreator Standard for free from http://download.cnet.com/JCreator/3000-2212_4-7956957.html.
The editor that most Java developers start out with is called Eclipse (http://www.eclipse.org/downloads). It’s a little less capable than higher end IDEs like JCreator — it doesn’t provide simplified project management or version control support, for example — but it runs fine on Linux, Mac, and Windows systems. Best of all, Eclipse is community supported (you get peer help, amongst other things) and free. I used Eclipse while writing this book, but you don’t have to have it. None of the chapters require you to have Eclipse, and none of the screenshots reference it in any way. It’s entirely up to you whether or not you use this IDE.
GO ONLINE
You can find entire sites devoted to the topic of Java editors and IDEs. One of the more comprehensive offerings is at http://apl.jhu.edu/~hall/java/IDEs.html. If you don’t like any of the products mentioned in this section and still feel that you’d like something better than Notepad to write your applications, check online for other offerings. There’s an editor or IDE out there that will meet your needs.
Some developers don’t want an IDE — they prefer an editor (a simple application that only provides basic functionality such as code editing). An editor is a product that provides features such as keyword highlighting and language help, but doesn’t offer compiling and debugging. Editors are simple and small. An example of a good Java editor is JEdit (http://www.jedit.org/index.php?page=download). This product is free, and you can obtain Linux, Windows, and Mac versions.
Determining when to use a particular development environment
It’s important to make a good choice when you decide on tools to use for your application. A tool that works for one person may not work for someone else. Experienced developers usually have multiple tools at their disposal for this very reason — it isn’t possible for a single tool to meet every requirement. However, you’re just starting out, so one of the tools described in the previous sections will work for now. When you do start creating more complex or larger applications, you’ll want to consider these guidelines in choosing a tool.
· Does the tool match the complexity and size of your application? Large applications require a good debugger. Working with multiple programmers means that the tool must provide team support.
· Are you comfortable with the tool’s user interface?
· What level of support does the tool’s vendor supply? If this is a community-supported tool, look at the online forums to see how many people are actually providing support (versus those who are asking questions).
· What additional tools does the product support? For example, if you’re working in a team environment, it’s important that your tool provide source control — a method of tracking changes to your code, including recording who is currently making changes to a particular file, amongst other things.
· Can you find good reviews for the tool? A good review is unbiased and discusses both the pros and cons of the tool. If you find yourself believing that the tool is too good to be true, it probably is.
· How much does the tool cost? Some of the best tools in the world are free, but often free means crippled — software whose functionality has been intentionally limited — or lacking support. Then again, some costly tools are poorly written or overkill for the simple projects that you’re likely to start working on at first. Make sure you question whether the tool will provide everything you need at a cost you can afford.
Creating a Simple Application
LINGO
Think of a class as a box that holds the data you want to work with, along with the code needed to manipulate the data. Computers are all about managing data. They move data from place to place, manipulate the data in various ways, and present the data in ways that human viewers can understand. Using classes makes it possible to keep data and code together so that the application components are less likely to break and are much easier to interact with.
Unlike most programming languages, Java applications maintain a basic semblance of structure no matter how complex they become. For example, every Java application has at least one class, and there is no code outside of a class. To create an application, the class must have a method (a kind of code) named main(). Don’t worry too much about how all this works just yet — the following sections fill you in on the details.
Writing the application code
This section shows how to write a simple application. This is the simplest application you can write and still have the application do something. You don’t need anything fancy to work with this application — just an editor and your Java setup will do.
Defining the class
Every Java application begins with a class. In the following exercise, you create a class for your first Java application and discover the components that make up a class.
Files needed: GetStarted.java
1. Open the editor or IDE that you’ve chosen to use for this book.
2. Type the following code into the editor screen.
LINGO
A code block is any number of lines of code that appear within a starting curly bracket ({) and an ending curly bracket (}). You use Java code blocks to divide code into easier-to-understand chunks. You’ll see many code blocks used throughout this book.
/* This is your first Java program.
Author: John Mueller (John@JohnMuellerBooks.com)
Written: 6 January 2014 */
class GetStarted
{
}
This is typically how you start any application, by creating a class code block. This application also starts with a comment that describes the program, who wrote it, and when it was written — another typical feature. The compiler doesn’t see the comment — only you see the comment. Comments document your code so you can remember what it does later.
3. Save the code you’ve written to disk using the name of the class and a .java extension, which is GetStarted.java in this example.
The name of the file must match the name of the class. Even though you can put multiple classes in a single .java file, most developers put just one top-level class in each file to make the classes easier to work with. The application now has a class, and you could compile it if desired, but it wouldn’t run.
Leave the editor or IDE open for the next exercise.
Defining main()
If you want an application to perform a task, it must have a main() method. You can write classes that don’t have a main() method, but you can’t run them as applications. In the following exercise, you create a main() method so that you can run this application.
Files needed: GetStarted.java
1. In GetStarted.java, type the following method block (in bold) in the class block (within the class curly brackets).
class GetStarted
{
public static void main(String args[])
{
}
}
Most programmers use a technique called indention to show the code block levels. The method block is indented two or three spaces for each line in the class block.
2. Save the code you’ve written to disk.
If you compiled the application at this point, it would run, but it wouldn’t do anything.
Leave the editor or IDE open for the next exercise.
Giving the application something to do
The main() method doesn’t do anything except give the application a place to start. To do something, the application must have a set of steps — a procedure — to follow. In the following exercise, you give the main() method a task to perform.
Files needed: GetStarted.java
1. In GetStarted.java, type the following steps (in bold) in the method block (within the curly brackets).
public static void main(String args[])
{
// This is an executable statement with its
// associated data.
System.out.println("This is your first Java program!");
}
Each task consists of telling Java to do something, just as you do when someone gives you a set of steps to perform, as I’m doing in this exercise. In this case, the application is telling Java to print some text to the screen. The println() method accepts some data as input and then displays that input on screen so you can see it.
Notice that there is another comment here, but it uses a different technique to tell the compiler that it is a comment. Any line that starts out with two slashes (//) is a comment. You’ll learn all about comments as the book progresses.
2. Save the code you’ve written to disk.
If you compiled the application at this point, it would run and display a simple message on screen, “This is your first Java program!” You see how all this works later in this chapter.
Leave the editor or IDE open for the next exercise.
Identifying the parts of the application
It’s time to look at the sample application as a whole, rather than in pieces as you’ve done previously. In the following exercise, you review the pieces of the complete GetStarted sample application.
Files needed: GetStarted.java
1. View the GetStarted application you created in the previous exercises.
Your source code should look like the source code shown here:
/* This is your first Java program.
Author: John Mueller (John@JohnMuellerBooks.com)
Written: 6 January 2014 */
class GetStarted
{
public static void main(String args[])
{
// This is an executable statement with its
// associated data.
System.out.println("This is your first Java program!");
}
}
2. Examine the class block.
The class block will always begin with the word class, followed by the class name, which is GetStarted in this case.
3. Examine the method block.
LINGO
An argument is information that a method requires to perform useful work. A method can have zero, one, or more arguments. The main() method always has just one argument, args. Even if you decide not to use the information (as the example has done), you normally provide the args argument. The application will compile without the args argument, but it won’t run.
A method block begins with a number of keywords — public, static, and void in this case — as discussed in future chapters. The name of the method — main, in this case — follows next. A method can require that you provide information to it. The main() method here requires just one argument, which is named args in this case. The args argument is of type String, which you’ll discover in Chapter 3. In addition, args[] is also an array — a topic you’ll encounter in Chapter 10. So, it may all look mysterious now, but the mysteries will be explained as time goes on.
4. Examine the single line of code used to perform a task.
LINGO
A subclass is a class that is contained within another class. You can create intricate hierarchies of classes when needed. To access a subclass, you provide the class name, a period (.), and the name of the subclass. In the example, System.out accesses the out subclass of the System class. When you have access to the subclass, you can call on any methods it contains to perform useful work.
The main() method calls the println() method to display information on screen. The println() method is located in the out subclass of the System class. The println() method requires at least one input — the data that you want displayed on screen.
5. Save the file and close the IDE or editor.
Compiling the Simple Application
Your IDE very likely has a means of compiling — turning the human-readable words you write into something the computer can understand — and running the application created earlier in this chapter. In fact, many editors also provide this feature. However, it’s important to know how to compile this application at the command prompt to better understand how Java works. The following sections describe how to open a command prompt and compile the GetStarted source code into an application.
LINGO
To compile a Java application means to turn the human-readable words that a developer writes into Java byte code, which the JRE can understand. The JRE, in turn, changes the byte code into low level computer code that is executed. In order to compile an application, you must use a compiler — a special application designed to read human-readable words and write them out as something more useful to the computer.
Opening the command prompt
The command prompt actually appears within a special window supported by your operating system. How you open the command prompt depends on which operating system you’re using.
Working with the Linux command prompt
Some versions of Linux open a command prompt immediately when you start them. If you’re using a shell that doesn’t, you can always open a command prompt separately. The official name for the command prompt in most versions of Linux is the terminal. You can open it by looking for an application called Xterm, Terminal, Konsole, Console, or something similar. When the command prompt is open, you can type commands to compile and run your Java application. To access your application, type CD Full Application Path and press Enter, where Full Application Path is the path you used to save the source code that you created in the previous sections.
Working with the Mac command prompt
The command prompt on the Mac is called a terminal. Use the Applications⇒Utilities⇒Terminal command to open the terminal. (The Terminal icon looks just like an old television set.) When you open Terminal, you can type commands to gain access to your application, compile it, and run it. To access your application, type cd Application Directory and press Enter, where Application Directory is the relative path you use to save the source code to disk. Normally, the Mac saves everything to the/Users/Your User Name directory on the system, and the source code will appear in a subdirectory under this directory.
Working with the Windows command prompt
The output screenshots you see in this book rely on the Windows command prompt. That doesn’t mean your application won’t run on Linux, Solaris, or the Mac. The examples in this book run on any platform that Java supports. In fact, the beta readers for this book are testing these applications on a number of platforms. (See my blog post at http://blog.johnmuellerbooks.com/2011/03/18/errors-in-writing.aspx for a description of beta readers.) The use of Windows screenshots simplifies the book’s presentation and makes it less confusing.
The command prompt on a Windows system is actually called “the command prompt,” rather than something obscure like “terminal” or “konsole.” Choose Start⇒All Programs⇒Accessories⇒Command Prompt to open a command prompt on a Windows system. The command prompt automatically opens to your user directory on the machine — for example, the command prompt opens to C:\Users\John on my machine. Type CD Application Directory and press Enter, where Application Directory is the relative path you use to save the source code to disk, to access your application when you save it in your personal user folder. However, you might have saved the data to some other location on the hard drive, in which case you must type CD Full Application Path and press Enter to access it. The example screenshots will use a folder of \Java eLearning Kit for Dummies as the starting point for each chapter, followed by a chapter-specific folder. So the examples for this chapter appear in \Java eLearning Kit for Dummies\Lesson 01.
Creating the compiled .class file
After you’ve opened a command prompt and have access to your application, you can compile it. Compiling takes the words that you’ve typed and changes them into byte codes that the JRE understands. The JRE reads these byte codes and turns them into something that the native machine can understand. Your application can run on all sorts of machines because of the JRE! In the following exercise, you compile the GetStarted application and check for its existence.
Files needed: GetStarted.java
1. Open the command prompt for your operating system.
You see the command prompt or terminal window.
2. Type javac GetStarted.java and press Enter.
The javac utility used here calls up the Java Compiler (JavaC), which creates a .class file for your application. Note that all this activity takes place under the hood, as it were; you won’t see anything happen onscreen.
 Make absolutely certain that you include the .java file extension when you execute the javac utility. Otherwise, the compiler won’t be able to find the file it’s supposed to compile, and you’ll see an error message.
3. Type Dir (or type ls when working with a Mac or Linux computer) and press Enter.
You see both the original .java file and the new .class file. The .class file is the one you’ll execute in the next exercise.
Leave the command prompt open for the next exercise.
Executing the Simple Application
Compiling an application makes it possible to execute it. When you run, or execute, an application, you get to see what task the application performs. In the case of GetStarted, the application displays a message. The following sections describe two main methods for executing applications.
Using the Java command
An IDE normally provides some way to execute a Java application. Some editors also provide this functionality. However, it’s important to know how to execute a Java application without using the IDE or editor because your users won’t have this software — they need to execute the application in some other way. In the following exercise, you execute the GetStarted application to see what it does.
Files needed: GetStarted.java
1. Type java GetStarted and press Enter.
You see the message shown in Figure 1-6.
The name of the application is case sensitive. If you don’t type the name correctly, Java will complain. Notice that you don’t include a file extension when using the java utility. You only provide the name of the .class file.
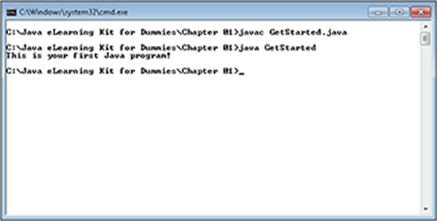
Figure 1-6:
2. To test the case-sensitive nature of Java, type java getstarted and press Enter.
Java 8 displays an error message this time like the one shown in Figure 1-7.
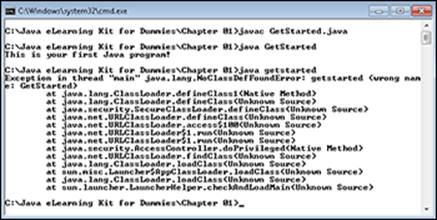
Figure 1-7:
Leave the command prompt open for the next exercise.
EXTRA INFO
Earlier versions of Java displayed really complex looking error messages that looked like this:
Exception in thread "main" java.lang.
UnsupportedClassVersionError: getstarted :
Unsupported major.minor version 52.0
at java.lang.ClassLoader.defineClass1(Native Method)
at java.lang.ClassLoader.defineClass
(Unknown Source)
at java.security.SecureClassLoader.defineClass
(Unknown Source)
at java.net.URLClassLoader.defineClass(Unknown Source)
at java.net.URLClassLoader.access$100(Unknown Source)
at java.net.URLClassLoader$1.run(Unknown Source)
at java.net.URLClassLoader$1.run(Unknown Source)
at java.security.AccessController.doPrivileged(Native
Method)
at java.net.URLClassLoader.findClass(Unknown Source)
at java.lang.ClassLoader.loadClass(Unknown Source)
at sun.misc.Launcher$AppClassLoader.loadClass(Unknown
Source)
at java.lang.ClassLoader.loadClass(Unknown Source)
at sun.launcher.LauncherHelper.checkAndLoadMain(Unknown
Source)
Understanding the JavaW command difference
If you were to execute the GetStarted.class file using the java utility from something other than the command prompt, you’d see a command prompt appear for a moment, the message would display, and then the command prompt would disappear. Some Java applications (such as IDEs) are designed to work in the background, or they’re designed to wait on other programs to call them. Having the command prompt show up, and then disappear can be distracting. Fortunately, Java provides a way around this problem through the Java Windowless (JavaW) utility. Try it out now with the GetStarted application. Type javaw GetStarted and press Enter. You won’t see anything displayed at the command prompt, even though the application does run.
Adding Comments to Your Java Code
One of the most important tasks you can perform when writing code is to document it using comments. No matter how simple, you’ll find that you forget what an application does later if you leave out the comments. Even the GetStarted program includes comments. The following sections describe comments and tell you how to use them.
Grasping the importance of comments
Many developers leave comments out of their programs because they think that comments are too difficult to write. However, comments are in fact quite easy to write. Trying to figure out what your code is doing six months after you’ve written it — that’s hard. Most experienced programmers use copious comments because they’ve run into too many situations where a weekend was ruined due to the lack of comments. Comments provide many benefits, but these benefits are most important to the beginning programmer:
· Comments make it easier to remember what tasks your code performs.
· You use comments to document who makes changes, when, and for what purpose.
· Good comments make it easier to debug your application because they document how the code is supposed to work.
· Some IDEs make it possible to create the documentation for an application directly from the application comments.
· A comment can define specifics of an application, such as why a developer used a specific technique.
· It’s possible to use comments to document resources that the application needs to run properly.
Creating single-line comments
A single-line comment can appear anywhere on the line. It begins with a double slash (//) and contains any text you want to include. The compiler ignores anything after the //, so the text can be anything you want. In the following exercise, you add a single-line comment to the GetStarted application.
Files needed: GetStarted.java
1. Open the GetStarted.java file using your favorite editor or IDE.
You see the source code that you previously wrote.
2. Use the description of the main() method earlier in the chapter to create a single line comment for it.
The comment you create can contain any information you find helpful. The text in bold shows a suggested series of single-line comments for this method.
// This is the first method that Java calls when it
// starts the application. This method is public, so
// every other class can see the method. The method is
// static, so it isn't used as part of an object, but
// rather, called directly. The result is void, so this
// method doesn't return any data to the caller. The
// only argument, args, is a list of strings.
public static void main(String args[])
Notice that each single-line comment begins with a //. You’ll discover more about what precisely this comment means as the book progresses. For now, this is an informational comment telling you everything there is to know about the main() method.
3. Save the file to disk.
4. Use the steps in the “Creating the compiled .class file” section to compile the file.
The javac utility compiles the file without error.
5. Use the steps in the “Using the Java command” section to execute the file.
Notice that the output of the application hasn’t changed due to the comment you’ve provided. Compilers ignore any comments you may have added — they’re included in the source code only for your benefit.
Leave the editor or IDE open for the next exercise.
Creating multiline comments
Multiline comments can start anywhere on a line, but they normally appear at the beginning of the line. The comment continues over multiple lines until the compiler reaches an End of Comment symbol. Multiline comments always begin with a /* and end with */. In the following exercise, you add a multiline comment to the GetStarted application.
Files needed: GetStarted.java
1. Create a new multiline comment at the beginning of the file to document the change you’ve made to the application.
As with the single-line comment, the comment you create can contain any information you might find helpful. The text in bold shows a suggested multiline comment for this example:
/* Add a comment to the main() method.
Author: Your Name
Written: Today's Date
/* This is your first Java program.
Author: John Mueller (John@JohnMuellerBooks.com)
Written: 6 January 2014 */
Every change you make to the application should receive a header comment at the beginning of the file so that others can see an application history. Application histories make it easier to discover which techniques have (and haven’t) worked with the application.
2. Save the file to disk and close the editor or IDE.
3. Use the steps in the “Creating the compiled .class file” section to compile the file.
The javac utility compiles the file without error.
4. Use the steps in the “Using the Java command” section to execute the file.
Notice that the output of the application hasn’t changed due to the comment you’ve provided.
5. Save the file and close the IDE or editor.
Importing Other Classes
The Java API is huge. It’s unlikely that any developer can memorize even a small portion of it. Developers commonly memorize the portions of the API that they use often and then use the API help (http://docs.oracle.com/javase/7/docs/api/help-doc.html) to locate the information needed for a particular application. The following sections describe the Java API in more detail and show you how to use it.
Introducing the Java API
The Java API is made up of a whole series of classes. The topmost class is the java class, which isn’t usable by itself. You’ll always deal with a subclass, such as java.lang, which contains all the language elements for Java. However, to perform any really useful work, you have to choose a subclass of the java.lang class, such as String, which provides the means for working with text. So, the first usable class is actually java.lang.String. Every API feature you use depends on a hierarchy such as java.lang.String.
The Java API has thousands of classes. Naturally, trying to access a particular class would be hard if you didn’t have some means of locating it quickly. Java uses packages to hold groups of classes. The java.lang package holds all of the classes that appear as subclasses to the java.langclass. Think of a package as a means of wrapping classes up so that they’re bundled together. You can find a listing of packages and the classes they contain at http://download.java.net/jdk8/docs/api/index.html. This site shows the packages in the upper-left pane, elements of the package you select in the lower-left pane, and the documentation for the element you select in the right pane, as shown in Figure 1-8.
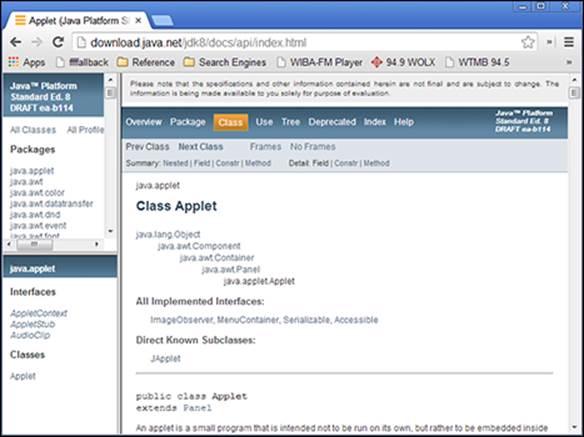
Figure 1-8:
LINGO
A package is a container used to hold a group of classes. The topmost package in the Java API is the java package. Within the java package are a number of other packages, such as the lang package, named the java.lang package. Each packaging level is separated from its parent by a period.
Importing single classes
Before you use a class in the Java API, you normally import it. The import keyword adds a class or an entire package to your application so that you can use it. In the following exercise, you create a new application that lets you interact with Java in a new way. You can type something at the command line, and Java will use a special class to import that information into the application.
Files needed: SayHello.java
1. Open the editor or IDE that you’ve chosen to use for this book.
2. Type the following code into the editor screen.
// Import the required API classes.
import java.util.Scanner;
import java.lang.String;
class SayHello
{
public static void main(String args[])
{
// Create an instance of the Scanner class to
// use for keyboard access.
Scanner getName = new Scanner(System.in);
// Create a variable to hold the user's name.
// This variable is designed to hold text.
String userName;
// Ask the user's name and place this name in
// userName.
System.out.print("What is your name?");
userName = getName.nextLine();
// Display a message to the user with the user's
// name in view.
System.out.println("Hello" + userName + "!");
}
}
In this example, getName is a Scanner object. The Scanner object provides access to the keyboard so that you can store what the user types to a variable. A variable is a sort of box used to store information. To save what the user types, the application must grab the keystrokes from the keyboard and place them in the variable. When the application detects that the user has pressed Enter, it stops gathering keystrokes.
3. Save the code you’ve written to disk using the name of the class and a .java extension, which is SayHello.java in this example.
The name of the file must match the name of the class exactly, or the application won’t compile.
4. Open a command prompt to the directory for this example.
5. Type javac SayHello.java and press Enter.
The Java compiler creates a .class file for you.
6. Type java SayHello and press Enter.
The application asks you to type your name.
7. Type your name and press Enter.
You see a hello message that includes your name. Figure 1-9 shows a typical example of the output from this application.
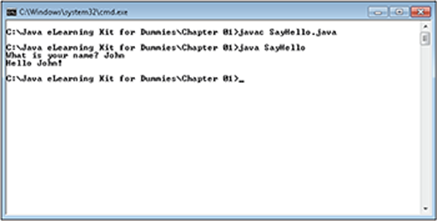
Figure 1-9:
Save the file and close the IDE or editor.
Importing an entire package
When you find yourself using more than one class of a particular package, it’s often more convenient to import the entire package. In this case, you follow the package name with an asterisk (*). For example, suppose you want to use multiple types from the java.lang package, such asjava.lang.String and java.lang.Integer. In this case, you can import the entire package by using import java.lang.*. In the following exercise, you create a new application that uses multiple members of the java.lang package.
Files needed: SayHello.java
1. Open the editor or IDE that you’ve chosen to use for this book.
2. Type the following code into the editor screen.
// Import the required API classes.
import java.util.Scanner;
// Import the required API packages.
import java.lang.*;
class SayHello2
{
public static void main(String args[])
{
// Create an instance of the Scanner class to
// use for keyboard access.
Scanner getName = new Scanner(System.in);
// Create a variable to hold the user's name.
// This variable is designed to hold text.
String userName;
// Ask the user's name and place this name in
// userName.
System.out.print("What is your name?");
userName = getName.nextLine();
// Create a variable to hold the number of letters
// in the user's name.
Integer letterCount;
// Get the number of letters in the user's name.
letterCount = userName.length();
// Display a message to the user with the user's
// name in view.
System.out.println("Hello" + userName +
"your name has" + letterCount + "letters in it!");
}
}
This example extends the SayHello example to include a count of the number of letters in the user’s name. Imagine that! Java can count letters and tell you how many there are.
3. Save the code you’ve written to SayHello2.java.
4. Open a command prompt to the directory for this example.
5. Type javac SayHello2.java and press Enter.
The Java compiler creates a .class file for you.
6. Type java SayHello2 and press Enter.
The application asks you to type your name.
7. Type your name and press Enter.
You see a hello message that includes your name and the number of letters in your name. Figure 1-10 shows a typical example of the output from this application.
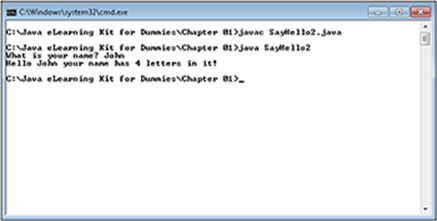
Figure 1-10:
Save the file and close the IDE or editor.
Obtaining Help for Java
Java could be a little scary for someone who’s just starting out. Don’t worry about memorizing everything (or anything for that matter) or making mistakes. You can find help for using the Java API, all the utilities supplied with the JDK, and the various utilities output error messages when something is incorrect in your code. No one is expecting you to remember anything or to code perfectly. The following sections tell you how to obtain help when you need it.
Getting local help
The advantage of using local help, rather than online help, is that local help is always available — even when your Internet connection isn’t working. A lot of people find that local help also provides faster access because you aren’t using a network connection. However, local help does have a disadvantage — it’s current as of the moment you download it. When an update appears to the Java help system, you won’t see it unless you download a new copy of help. Often, the help on your hard drive simply continues to get outdated because there isn’t any system in place to remind you to apply updates (or even tell you that they’re available).
Even with its limitations, having a local copy of help comes in handy. In the following exercise, you download and install local help for your Java installation.
Files needed: None
1. Open the page at https://jdk8.java.net in your browser.
You see the options for working with Java.
2. Click the JDK 8 Release link.
You see a new page with download options for the JDK.
3. Locate the Additional Resources section of this page. (Scroll down if necessary to find it.)
4. Click the Download icon next to the Java SE 8 Documentation entry.
You see a new page with a licensing agreement.
5. Click Accept.
The JDK documentation download link becomes active.
6. Click the download link.
Your browser downloads the documentation, which is in a .zip file.
7. Open the .zip file in a directory on your local hard drive.
Use a folder related to the Java installation on your machine. For example, on a Windows system, you may want to create a \Program Files\Java\docs folder and place the help file there.
8. Open the index.html file in your browser.
You see an introductory page with a conceptual diagram. You can choose the help topic you want to use. For example, if you want to read about the java.lang package, you click the lang and util link. Figure 1-11 shows the conceptual diagram, which is part of a much larger page.
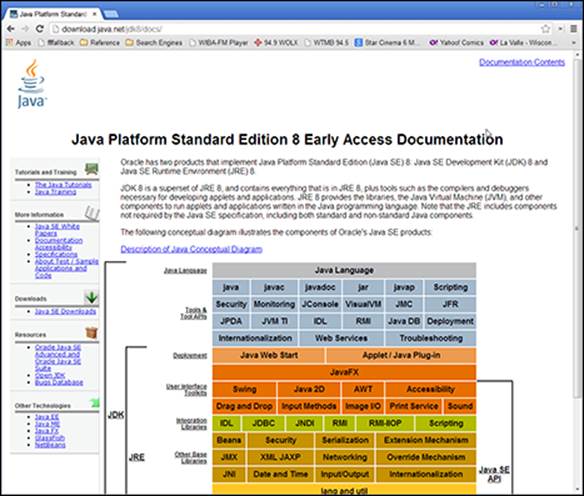
Figure 1-11:
Getting local utility help
All the utilities supplied with the JDK provide their own help, so you don’t need to memorize their usage. To gain access to the help information, you type the name of the utility followed by –help. For example, to access help information about the java utility, you type java –help. Figure1-12 shows a typical utility help screen.
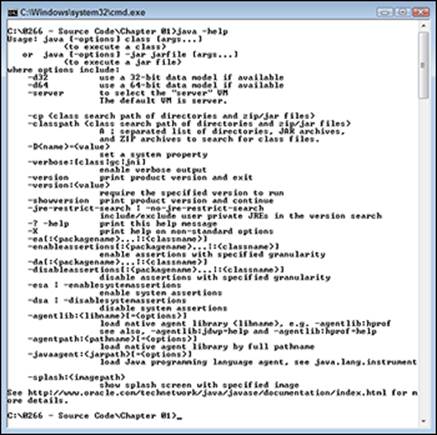
Figure 1-12:
Locating Java information online
The advantage of using online help is that the information is always up-to-date. You don’t have to ever worry about getting old information that could cause problems with your application. You’ll always access the online help starting athttp://download.java.net/jdk8/docs/api/index.html. As mentioned in the earlier “Introducing the Java API” section of the chapter, you begin by selecting a package, and then you select a class within a package to obtain help about that class.
 Summing Up
Here are the key points you learned about in this chapter:
· Java is one of the most popular languages available because it works well on so many platforms.
· Standardization is a key reason why Java is able to work in so many different environments.
· The JCP provides input on how Java should continue to change as a language.
· You can use any text editor to write Java applications, but using an IDE provides some significant advantages in the form of color coding, help, and convenience.
· Installing either the JDK or the JRE will let you run Java applications on your machine.
· To obtain the best functionality, the version of Java supported by your JRE must match the version of Java supported by the JDK used to write the application.
· When manually creating applications for Java, especially on Windows systems, you must ensure that your system has a path configured to find the Java executable files.
· An IDE will normally locate and configure the Java executable file path automatically for you.
· Classes can contain both methods and other classes.
· The javac command compiles your application from the source code you provide.
· The java command runs an application in a command window, whereas the javaw command runs an application without a command window.
· Java supports both single-line and multiline comments, both of which document your application so you can remember what it does later.
· The Java API is so huge that you can’t memorize it all, but you can memorize the parts you use most often.
· When you use the Java API, you normally access a class hierarchy, such as java.lang.String.
· Import an entire package when you need to use more than one class from it.
· Local help has the advantages of being more reliable and faster than remote help.
· Remote help has the advantage of providing updates that could make it easier to write an application.
Try-it-yourself lab
For more practice with the features covered in this chapter, try the following exercise on your own:
1. Open the GetStarted application.
2. Change the text that the application outputs.
For example, you might change it to read, “This text has been updated!”
3. Compile the application.
4. Run the application.
You should see the new text you’ve provided on screen.
5. Repeat Steps 1 through 4 for any other strings you’d like to see the application output.
Know this tech talk
· Application Programming Interface (API): Software consisting of classes contained in packages that come with the JDK. This software lets you write Java application with greater ease and reduces the amount of code you need to write.
· argument: Information provided to a method so that the method has data to manipulate.
· byte code: The compiled form of a Java application. Byte code normally appears within a .class file.
· class: A method of combining code and data. Classes are the basis of OOP techniques. Using classes means that Java applications are self-contained and easier to work with.
· code block: Any code that appears within a starting curly bracket ({) and an ending curly bracket (}).
· compile: To turn source code into executable byte code. The compiled application resides in a .class file.
· cross-platform: Software that can run on more than one platform.
· Integrated Development Environment (IDE): A special kind of editor used by developers to write application code. An IDE normally provides features such as color coding and access to various forms of help. It also lets you provide special configurations to make compiling, running, and debugging applications significantly easier.
· Java Community Process (JCP): A group dedicated to making Java a better language. Members of this group help improve standardization, discuss language additions, and work on fixes for language errors (bugs).
· Java Development Kit (JDK): A special kind of SDK used specifically to write and test Java applications.
· Java Runtime Engine (JRE): The special piece of software used to run Java applications.
· object-oriented programming (OOP): A form of programming that makes development simpler by packaging data and code together in a way that makes it easier to access and manage. OOP relies on the use of objects that correspond to real world entities. As with real world objects, OOP relies on properties to describe the object, methods to interact with the object, and events to let the object communicate with the outside world.
· package: A container used to combine a number of classes into an easily accessible whole. A package wraps up the classes so that you can find them with greater ease.
· platform: A combination of hardware and operating software that creates a specific environment in which to run Java applications.
· Software Development Kit (SDK): A combination of tools and software used to provide an application development environment.
· variable: A kind of box used to hold information in an application.
All materials on the site are licensed Creative Commons Attribution-Sharealike 3.0 Unported CC BY-SA 3.0 & GNU Free Documentation License (GFDL)
If you are the copyright holder of any material contained on our site and intend to remove it, please contact our site administrator for approval.
© 2016-2026 All site design rights belong to S.Y.A.