Java eLearning Kit For Dummies (2014)
Chapter 7. Repeating Tasks Using Loops
· Creating for loops allows an application to perform a task a specific number of times.
· Creating while loops allows an application to perform a task until it has been completed.
· Creating for-each loops allows an application to perform tasks with collections of objects until every object in the collection has been used.

1. Is it possible to tell Java to perform a specific task an exact number of times?
The for loop makes it possible to specify precisely how many times to perform a task, as shown on page 187
2. Can the application stop performing tasks in the loop when some expectation isn’t met?
Using the break statement makes it possible to stop performing a task when conditions aren’t right, as described on page 189
3. Is it possible to continue processing a for loop after interrupting a single loop?
The continue statement makes it possible to ignore just one loop (a single value) and then continue processing the next task, as described on page 191
4. What happens if I don’t know how many times to perform a task in advance?
Using a while loop controls how many times a task is performed using an expression instead of a precise count, as demonstrated on page 197
5. An expression could be false, which means the code in a while loop would never execute. How do I ensure a task is performed at least once?
Using a do …while loop ensures that a task is performed at least once, but after the first loop, the expression controls whether the loop is repeated, as shown on page 199
6. How is it possible to perform tasks on an unknown number of elements and ensure each element is processed?
A for-each loop makes it possible to perform tasks on individual elements of enumerations, arrays, and collections until each element is processed, as shown on page 202
Repeat after me, “Java is an amazing language!” Now say it again for good measure. There are many times in the real world when you repeat something. Likewise, applications have a need to repeat tasks. Doing them once isn’t enough, in some cases. This chapter helps you understand how to perform the same task multiple times
LINGO
A repetitive loop consists of a special structure that tracks when to begin and end a series of repetitive tasks, and the tasks within that structure. The for loop repeats a series of tasks a specific number of times and a while loop continues to repeat a series of tasks until a specific condition is met. The for-next loop is special in that it works with each element in an enumeration, array, or collection.
Performing Tasks a Set Number of Times
It’s possible to perform every sort of repetitive loop using a for loop, but doing so would mean writing your code in odd ways. Even so, the for loop is the workhorse of the repetitive loop structures because it’s easy to create, easy to debug, and easy to understand. The essence of a forloop is that the application performs a series of tasks a specific number of times.
LINGO
A structure starts with a statement that specifies the purpose of the structure, such as a repetitive loop. The structure body starts with an opening curly brace ({) and ends with a closing curly brace (}). One or more lines of code that describe one or more tasks to perform appear between the two braces, in the body of the structure. Structures are used for a number of purposes throughout the book.
Using the standard for loop
It’s important to understand how a for loop is put together before you create your first one. The for loop begins with the word “for” followed by parentheses containing the following three items, separated by semicolons (;):
· A counter variable and the code used to initialize it, such as int Current = 1.
· A condition that will end the loop after a specific count, such as Current <= 5.
· A method for updating the counter variable so that the for loop can keep track of the current count, such as Current++.
LINGO
A counter variable is a variable whose whole purpose is to track the current count of something. The variable doesn’t actually add or subtract anything from the application data; rather, the purpose of the counter variable is to help the application perform the tasks you assign to it.
The set of curly braces used to define the beginning and end of the for loop appears next. You place your code within the curly braces. In the following example, you create a for loop and then use it to see how for loops work.
Files needed:StandardFor.java
1. Open the editor or IDE that you’ve chosen to use for this book.
2. Type the following code into the editor screen.
// Import the required API classes.
import java.util.Scanner;
public class StandardFor
{
public static void main(String[] args)
{
// Create the scanner.
Scanner GetChoice = new Scanner(System.in);
// Ask the user how many times to say hello.
System.out.print("Say \"Hello\" how many times?");
int Count = GetChoice.nextInt();
// Create a for loop.
for (int Current = 1; Current <= Count; Current++)
{
// Perform the required task.
System.out.println("Hello Number " + Current);
}
}
}
The application begins by asking the user how many times the application should say Hello. (Of course, a production application would ask other sorts of questions, but the principle is the same.) The answer the user provides is placed within Count.
The next step is to create a for loop where an int variable, Current, keeps track of the current count as the counter variable. The loop will continue to perform the tasks within the structure body until Current is greater than Count. Every time the loop starts, Current is incremented by one, so if Count is 5, the loop will execute five times.
 Notice that this example uses an escape sequence \" to display double quotes in the output. In many situations, you need to remember that escape sequences exist in order to achieve your goals.
3. Save the code to disk using the filename StandardFor.java.
4. In your command prompt, type javac StandardFor.java and press Enter.
The compiler compiles your application and creates a .class file from it.
5. Type java StandardFor and press Enter.
The application asks you how many times it should say Hello.
6. Type 5 and press Enter.
The application outputs a series of Hello messages, as shown in Figure 7-1. Notice that the output includes the current value of Current. The value increases by 1 for each iteration of the loop, just as expected.
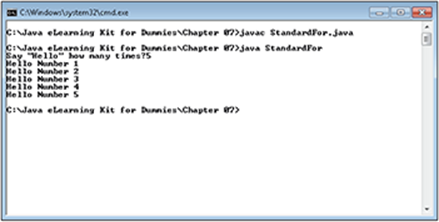
Figure 7-1:
Using the break statement
There are times when you want to stop a for loop early. For example, you might detect a condition that would cause the loop to fail. Perhaps there aren’t enough items to process, or your application detects some other issue. In this case, you can use the break statement to stop the for loop from doing any more work. In the following example, you add a break statement to the StandardFor application to stop it early.
Files needed: UsingBreak.java
1. Open the editor or IDE that you’ve chosen to use for this book.
2. Type the following code into the editor screen.
// Import the required API classes.
import java.util.Scanner;
public class UsingBreak
{
public static void main(String[] args)
{
// Create the scanner.
Scanner GetChoice = new Scanner(System.in);
// Ask the user how many times to say hello.
System.out.print("Say \"Hello\" how many times? ");
int Count = GetChoice.nextInt();
// Create a for loop.
for (int Current = 1; Current <= Count; Current++)
{
// Don't allow the application to say
// hello more than three times.
if (Current == 4)
break;
// Perform the required task.
System.out.println("Hello Numnber " + Current);
}
}
}
This application looks much like the StandardFor application in the “Using the standard for loop” section of the chapter. However, it has the addition of an if statement that detects when Current is equal to four. When Current reaches this value, the application issues a breakstatement.
 Notice that the if statement doesn’t use curly braces in this example. A structure doesn’t have to use curly braces if it only works with the next line of code. The if statement is associated only with the break statement in this case, so there’s no need to use the curly braces.
3. Save the code to disk using the filename UsingBreak.java.
4. In your command prompt, type javac UsingBreak.java and press Enter.
The compiler compiles your application and creates a .class file from it.
5. Type java UsingBreak and press Enter.
The application asks you how many times it should say Hello.
6. Type 2 and press Enter.
The application outputs two Hello messages.
7. Repeat Steps 5 and 6 using a value of 5 in place of 2.
You see only three Hello messages, as shown in Figure 7-2. The break statement doesn’t hamper the application from outputting anything up to three Hello messages, but it doesn’t allow anything over that number.
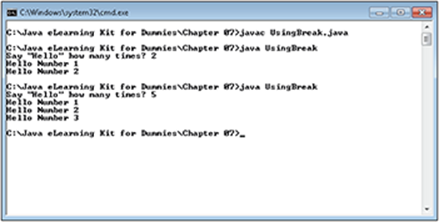
Figure 7-2:
Using the continue statement
So far, you’ve seen a version of the for loop that performs a specific number of loops and another version that stops at a specific point using a break statement. A third version of the for loop performs a specific number of loops, but it skips some of the loops when conditions don’t warrant performing the task. For example, the data that you need to process might not be of the right type or might be missing completely. This third form relies on the continue statement. The continue statement tells the for loop to go immediately to the next loop, rather than complete the current loop.
EXTRA INFO
Just because the examples in this chapter look at the break and continue statements separately, that doesn’t mean you can’t combine them in a single for loop. The break and continue statements can appear wherever and whenever you need them. For example, you could choose to process part of a for loop and then continue on to the next loop if things aren’t working out as expected. If an error occurs in the same for loop, you could choose to use a break statement to end it. A single for loop can also contain multiple instances of both the break and continue statements.
The best way to understand the difference between the break and continue statements is to contrast the output they provide. In the following exercise, you create an application that works almost precisely the same as the UsingBreak example in the “Using the break statement” section of the chapter and test it using the same approach. However, as you’ll see, the resulting output differs because this example uses a continue statement instead of a break statement.
Files needed: UsingContinue.java
1. Open the editor or IDE that you’ve chosen to use for this book.
2. Type the following code into the editor screen.
// Import the required API classes.
import java.util.Scanner;
public class UsingContinue
{
public static void main(String[] args)
{
// Create the scanner.
Scanner GetChoice = new Scanner(System.in);
// Ask the user how many times to say hello.
System.out.print("Say \"Hello\" how many times? ");
int Count = GetChoice.nextInt();
// Create a for loop.
for (int Current = 1; Current <= Count; Current++)
{
// Don't allow the application to say
// hello more than three times.
if (Current == 4)
continue;
// Perform the required task.
System.out.println("Hello Numnber " + Current);
}
}
}
The only difference between this application and the UsingBreak application is the continue statement that appears within the if structure. This difference may not seem like much, but it does control how the for structure works.
3. Save the code to disk using the filename UsingContinue.java.
4. In your command prompt, type javac UsingContinue.java and press Enter.
The compiler compiles your application and creates a .class file from it.
5. Type java UsingContinue and press Enter.
The application asks you how many times it should say Hello.
6. Type 2 and press Enter.
The application outputs two Hello messages. In this case, output is precisely the same as the UsingBreak application because the condition provided by the if statement is never invoked.
7. Repeat Steps 5 and 6 using a value of 5 in place of 2.
This time you see four Hello messages, as shown in Figure 7-3. Notice that the message when Current equals 4 is missing. However, because the continue statement lets the for structure process the next loop, you do see the output when Current equals 5.
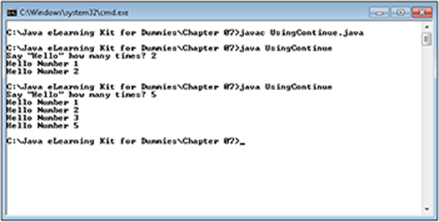
Figure 7-3:
 Modify the UsingContinue application so that it skips the number 3 and stops at the number 6. You’ll need to use both a continue and a break statement to accomplish the task.
Nesting for loops
Sometimes you need to process something using multiple loops. For example, when working with tabular data, you might use one loop to process the rows and another loop to process the columns. There are multiple columns for each row, so the Columns loop appears within the Rows loop. Placing one repeating loop within another is called nesting the loops. Each iteration of the main loop executes the entire subordinate loop. So, when you start processing the first row, it executes all the column tasks for that row before moving to the next row.
LINGO
Nesting is the process of enclosing one structure within another of the same type. Java uses nesting in a number of ways, so you’ll see this term used quite often. When working with structures, one structure acts as a container to hold the other structure. The container structure is called the main, or parent, structure. The structure within the main structure is called the subordinate, or child, structure.
The multiplication tables are one of the better ways to demonstrate nesting because you need to create a loop for rows and another for columns. In addition, you need to create the headings that show the numbers being multiplied, which means using an additional loop. In the following exercise, you create an application that demonstrates one method for creating the multiplication tables with code.
Files needed: NestingLoops.java
1. Open the editor or IDE that you’ve chosen to use for this book.
2. Type the following code into the editor screen.
// Import the required API classes.
import java.util.Scanner;
public class NestingLoops
{
public static void main(String[] args)
{
// Create the scanner.
Scanner GetChoice = new Scanner(System.in);
// Ask the user how many rows to provide.
System.out.print("How many rows do you want? ");
int Rows = GetChoice.nextInt();
// Ask the user how many columns to provide.
System.out.print("How many columns do you want? ");
int Columns = GetChoice.nextInt();
// Print out a column heading across the top.
for (int ColNum = 1; ColNum <= Columns; ColNum++)
System.out.print("\t" + ColNum);
// End the column heading.
System.out.println();
// Create a for loop for the rows.
for (int Row = 1; Row <= Rows; Row++)
{
// Print out the current row number.
System.out.print(Row + "\t");
// Create a for loop for the columns.
for (int Column = 1; Column <= Columns; Column++)
{
// Display a value for each column.
System.out.print(Row * Column + "\t");
}
// Move to the next row.
System.out.println();
}
}
}
This application relies on multiple loops to perform its work. However, before it can do any work, the application must get some information from the user. It obtains the number of rows and columns that the user wants to see.
The first loop prints out the column numbers for the heading. Notice how this loop relies on an escape sequence ("\t") to produce tabs between each column heading entry.
The second loop is nested. Because of the way your display works, the application always prints a row and all of the columns within that row, before moving on to the next row. The example prints out row heading elements at the beginning of each row.
3. Save the code to disk using the filename NestingLoops.java.
4. In your command prompt, type javac NestingLoops.java and press Enter.
The compiler compiles your application and creates a .class file from it.
5. Type java NestingLoops and press Enter.
The application asks you how many rows you want to see.
6. Type 4 and press Enter.
The application now asks how many columns you want to see.
7. Type 5 and press Enter.
The application outputs a multiplication table containing headings, along with four rows and five columns of multiplication values, as shown in Figure 7-4.
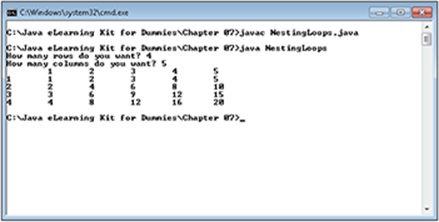
Figure 7-4:
Modify the NestingLoops application so that it displays multiplication backward — showing the highest number first, and then proceeding to the lowest number. Being able to display output in any order you want is an important part of working with the for loop.
Executing Tasks Until Complete
You can create any looping situation you want by using a for loop. However, working with for loops isn’t always convenient, and you’ll find situations where checking for a condition, rather than taking a precise number of steps, works considerably easier. Java provides two methods for checking conditions. You can check the condition at the outset of the loop by using the while loop, or you can check the condition at the end of the loop by using a do … while loop. The following sections show how to use both loop types.
EXTRA INFO
As with a for loop, you can use the break and continue statements in either the while loop or do …while loop. The statements work precisely the same way. In addition, you can nest either loop to produce results similar to those shown for the for loop. The main difference in loops is how you define the beginning and end of the loop iterations.
Using the while loop
A while loop checks for a specific condition before it does any work. As long as the condition exists, the loop will continue performing the tasks you assign to it. Because it relies on a condition, the while loop has no specific ending count — you simply wait until a condition changes to end it. In this example, you compare the while loop against the for loop shown in the StandardFor application found in the “Using the standard for loop” section of the chapter.
Files needed: StandardWhile.java
1. Open the editor or IDE that you’ve chosen to use for this book.
2. Type the following code into the editor screen.
// Import the required API classes.
import java.util.Scanner;
public class StandardWhile
{
public static void main(String[] args)
{
// Create the scanner.
Scanner GetChoice = new Scanner(System.in);
// Ask the user how many times to say hello.
System.out.print("Say \"Hello\" how many times?");
int Count = GetChoice.nextInt();
// Define a counter variable.
int Current = 1;
// Create a for loop.
while (Current <= Count)
{
// Perform the required task.
System.out.println("Hello Number " + Current);
// Update the counter variable.
Current++;
}
}
}
This application produces precisely the same output as the Standard For application when you provide the same input. However, the while loop requires that you do things a little differently. For example, notice that you must define a counter variable (Current) on a separate line of code — the for loop defines the counter variable as part of the for statement.
The condition part of the while statement is the same as the condition part (the second argument) of the for loop. However, to update the counter variable, Current, you must add another line of code within the while statement structure.
3. Save the code to disk using the filename StandardWhile.java.
4. In your command prompt, type javac StandardWhile.java and press Enter.
The compiler compiles your application and creates a .class file from it.
5. Type java StandardWhile and press Enter.
The application asks you how many times it should say Hello.
6. Type 5 and press Enter.
The application outputs a series of Hello messages, as shown in Figure 7-5.
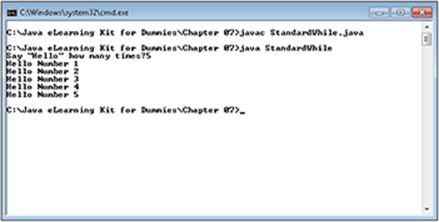
Figure 7-5:
7. Compare Figure 7-1 with Figure 7-5.
Notice that the output of the StandardFor application is precisely the same as the output of the StandardWhile application.
Now that you have a better idea of how the while statement works, use it to create versions of the UsingBreak, UsingContinue, and NestedLoops examples in this chapter. In each case, you need to make changes similar to the changes you’ve seen in this section. There’s a special trick required to make the continue statement work in the while loop — remember that you must update the counter variable during each loop iteration. After you create each new application, ask yourself whether the for loop or the while loop is easiest to use in that particular situation.
Checking after the first execution with the do …while loop
A do … while loop works almost like a while loop. The difference shows up when the condition is checked. A do … while loop checks the condition at the end of the loop, which means that the loop will always run at least one time. In this example, you compare the do … while loop against the for loop shown in the StandardFor application. However, in this case, you’ll also perform another test that shows the interesting difference in using a do … while loop.
Files needed: StandardDoWhile.java
1. Open the editor or IDE that you’ve chosen to use for this book.
2. Type the following code into the editor screen.
// Import the required API classes.
import java.util.Scanner;
public class StandardDoWhile
{
public static void main(String[] args)
{
// Create the scanner.
Scanner GetChoice = new Scanner(System.in);
// Ask the user how many times to say hello.
System.out.print("Say \"Hello\" how many times? ");
int Count = GetChoice.nextInt();
// Define a counter variable.
int Current = 1;
// Create a for loop.
do
{
// Perform the required task.
System.out.println("Hello Number " + Current);
// Update the counter variable.
Current++;
} while (Current <= Count);
}
}
The difference to note in this listing is that the condition isn’t tested until after the loop has executed. Otherwise, everything else is the same as the StandardWhile loop example.
3. Save the code to disk using the filename StandardDoWhile.java.
4. In your command prompt, type javac StandardDoWhile.java and press Enter.
The compiler compiles your application and creates a .class file from it.
5. Type java StandardDoWhile and press Enter.
The application asks you how many times it should say Hello.
6. Type 5 and press Enter.
The application outputs a series of Hello messages.
7. Perform Steps 5 and 6 again, but substitute –1 for the input value.
The application still outputs a single Hello, as shown in Figure 7-6. In fact, you can type any negative number, 0, or 1 and still get a single Hello message from the application.
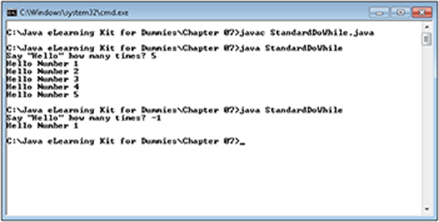
Figure 7-6:
8. Perform Steps 5 and 6 again using –1 with the StandardFor application.
The application exits without providing any output.
9. Perform Steps 5 and 6 again using –1 with the StandardWhile application.
Again, the application exits without providing any output. Theoretically, you can provide this same behavior when working with a for loop, but it’s complicated and using the do … while loop proves much easier to use.
As with the while statement, it’s important to see how the do … while statement compares with the for statement across a number of examples. Create versions of the UsingBreak, UsingContinue, and NestedLoops examples in this chapter using the do … while statement.
Interacting with Objects
The for-each loop is a special kind of loop in that you can use it with groups of things. It looks like a for loop in some respects because it doesn’t actually use the keyword for-each — it uses the for keyword instead. However, the associated statement is different. The associated statement begins with a variable to hold one element of whatever sort of collection of elements you want to process like this:
for (char Letter
It then has a colon. This colon means “in.” So, the statement now reads, for each Letter of type char in like this:
for (char Letter :
The last part is the collection of elements you want to process. Suppose you start with a String named MyString. You need to use the toCharArray() method to obtain a collection of char elements to process. So, the entire statement looks like this:
for (char Letter : MyString.toCharArray())
You read this statement as, “For each Letter of type char in the MyStringchar collection, do something.” At this point, you can process each of the elements (char variables) in MyString as you normally would with any other structure.
For now, you really don’t need to worry about what a collection of elements precisely means. You’ll discover how these structures work in Chapter 10. The main focus of the sections that follow is to introduce you to the for-each loop, which you’ll use quite often as the book progresses. So, for now, concentrate on the for-each loop as you work through the sections that follow.
EXTRA INFO
Java 8 provides a special kind of for-each loop for lambda expressions. Chapter 10 describes how lambda expressions work and demonstrates how you use the foreach() method with lambda expressions to simplify your code and make it run faster.
Creating a basic for-each loop
A for-each loop can process any collection of objects that you want. In the example that follows, you create a collection of char variables from a String. A collection of this sort makes it easier to see how the for-each loop works and why it’s such an important Java programming feature.
Files needed: StandardForEach.java
1. Open the editor or IDE that you’ve chosen to use for this book.
2. Type the following code into the editor screen.
// Import the required API classes.
import java.lang.String;
import java.util.Scanner;
public class StandardForEach
{
public static void main(String[] args)
{
// Create the scanner.
Scanner GetString = new Scanner(System.in);
// Obtain a string value.
System.out.print("Type any string: ");
String MyString = GetString.nextLine();
// Process each character separately in a
// for-each loop.
for(char Letter : MyString.toCharArray())
System.out.println(Letter);
}
}
This example begins by obtaining a String from the user. The String can contain anything — numbers, letters, or special characters, as long as they aren’t special characters, such as a tab.
The example then converts the String — MyString, in this example — to a collection of char variables by calling the toCharArray() method. It places each char in Letter and then displays Letter on screen. In short, the for-each loop is processing each letter in MyString separately.
3. Save the code to disk using the filename StandardForEach.java.
4. In your command prompt, type javac StandardForEach.java and press Enter.
The compiler compiles your application and creates a .class file from it.
5. Type java StandardForEach and press Enter.
The application asks you to type any string.
6. Type Hello and press Enter.
The application outputs each letter that you’ve typed on a separate line of the output, as shown in Figure 7-7.

Figure 7-7:
Using the for-each loop with enumerations
Chapter 3 introduces you to enumeration, a special kind of structure that makes it possible to create item lists. It’s possible to use a for-each loop to list an enumeration. Instead of assuming that you know what a list contains (as the example in Lesson 3 does), you can use a for-each loop to ask what your options are. People commonly perform this task with real world lists, too, so it makes sense that Java supports this feature.
In this example, you create a Days of the Week enumeration and then use it to display the names to the user with a for-each loop. The user selects any of the entries by typing its associated number.
Files needed: UsingEnumerations.java
1. Open the editor or IDE that you’ve chosen to use for this book.
2. Type the following code into the editor screen.
// Import the required API classes.
import java.util.Scanner;
public class UsingEnumerations
{
// Create an enumeration to use in the
// example.
enum Days
{
Sunday,
Monday,
Tuesday,
Wednesday,
Thursday,
Friday,
Saturday
}
public static void main(String[] args)
{
// Create the scanner.
Scanner GetDay = new Scanner(System.in);
// Display the list of days on screen.
for (Days ThisDay : Days.values())
System.out.println(
ThisDay.ordinal() + "\t" + ThisDay);
// Display a message asking the user to select
// a day.
System.out.print("Type the number of a day: ");
// Get the number.
int Selection = GetDay.nextInt();
// Display the result.
Days TheDay = Days.values()[Selection];
System.out.println("You selected " + TheDay);
}
}
Enumerations can appear just about anywhere in your code, but this example places the enumeration within the class structure, outside of main(). The enumeration is named Days, and it contains the days of the week.
Inside main(), the for-each loop lists each day of the week in turn. An enumerated entry has both a name and an ordinal value. The example shows you both of them.
After the application displays the days of the week for the user, it asks the user to select a particular day by typing its numeric value. The code uses this value to select a particular day from Days and place it in TheDay. The output from the example is the name of the day the user has selected.
3. Save the code to disk using the filename UsingEnumerations.java.
4. In your command prompt, type javac UsingEnumerations.java and press Enter.
The compiler compiles your application and creates a .class file from it.
5. Type java UsingEnumerations and press Enter.
The application displays the days of the week. It then asks the user to type a number corresponding to a particular day.
6. Type 1 and press Enter.
The application outputs Monday as the day selected, as shown in Figure 7-8.
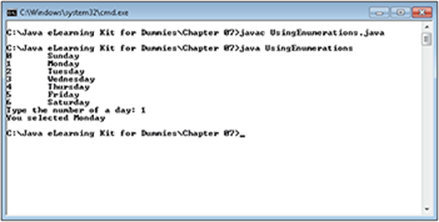
Figure 7-8:
 Summing Up
Here are the key points you learned about in this chapter:
· The for loop repeats a series of tasks a specific number of times.
· Use the break statement to stop a for loop from continuing to process tasks.
· Use the continue statement when you want to stop a single for loop from processing but want to continue with the remaining loops.
· Nest two or more sets of for loops when you need to process multiple dimensions or create a complex processing loop series.
· A while loop continues to repeat a series of tasks until a specific condition is met.
· The do … while statement acts much like the while statement, but it has the distinction of executing the tasks within its structure at least once, no matter what condition you might set for it.
· It’s possible to repeat most forms of standard looping requirements by using the for, while, or do … while statements and your choice depends on convenience or personal taste.
· The for-next loop is special in that it works with each element in an enumeration, array, or collection.
· The for-each loop relies on a special kind of for loop to do its work.
· You use the for-each loop to process individual elements of a collection of elements one element at a time.
· Using an enumeration can make it easier to work with your application.
Try-it-yourself lab
For more practice with the features covered in this chapter, try the following exercise on your own.
1. Open the UsingEnumerations application.
2. Create a new enumeration that contains a list of colors.
Make sure you separate each color with a command and don’t include any spaces in the color names.
3. Rewrite the code to display the enumeration to the user with the for-each loop.
4. Change the code to ask the user to select a color and then display the color selection onscreen.
5. Compile the application.
6. Run the application.
7. Try each of the new color entries.
Do the new color entries work as you anticipated? If they don’t, why not?
Know this tech talk
· counter variable: A special sort of variable used to track the current count of something in the application. In most cases, a counter variable is a primitive integer type because counter variables only track whole numbers and don’t require the extra features of an object variable type.
· enumeration: A listing of like items that you can use to make your code easier to read. An enumeration makes it possible to refer to something using a human-readable term, even though the actual value is a number.
· iteration: A single loop from a series of repetitive loops. A single iteration is one pass through the code in a repetitive loop structure.
· nesting: Placing one structure within another structure of the same type. For example, nesting for loops places a subordinate for loop within a main for loop.
· repetitive loop: A method of telling your application to perform a task more than once. The repetitive loop consists of a structure that defines where the loop begins and ends, some sort of condition used to determine how long to loop, and the series of tasks contained within the structure.
· structure: A programming construct that begins with a statement that specifies the purpose of the structure. Normally curly braces ({}) appear after the statement to define the statement body. One or more lines of code appear within the structure body to define the tasks performed by the structure.
All materials on the site are licensed Creative Commons Attribution-Sharealike 3.0 Unported CC BY-SA 3.0 & GNU Free Documentation License (GFDL)
If you are the copyright holder of any material contained on our site and intend to remove it, please contact our site administrator for approval.
© 2016-2026 All site design rights belong to S.Y.A.