Building Web Apps with Ember.js (2014)
Chapter 5. Building the RocknRollCall Prototype: The Router, Routes, and Models
If we set out to build a “single-page application,” we’ve sure nailed that so far. But if we want our application to actually do anything, we’re going to need to represent a few different application states, or what used to be described as “pages.” In modern web applications, it should still mean a change to the value in your browser’s address bar, most of the time.
For a few years now, HTML5’s History API has made it possible—or at least far easier—to change the URL without reloading the page. What has not been so easy, without frameworks like Backbone.js and its kin, has been using that URL as a convenient way to serialize the state of your application. Serializing application state has always been tricky. Giving the user an easily portable token that both represents state in a high-resolution manner and is meaningful has been largely unheard of. The URL that you expose to your users is just such a token. They can bookmark it, send it to their mobile phone/tablet/refrigerator/friend and even tweet it. Consider Google Chrome, which uses URLs to grant access to its own settings panel. If a family member using Google Chrome asks you where they can disable cookies, you can send a link to that pane in the settings interface. Good luck doing the same with a native application.
Ember’s Routing mechanisms offer a robust toolkit for building a complex matrix of states, and their APIs and conventions offer convenient ways to implement those states as routes. Ember’s Controller APIs and conventions offer a similarly robust and convenient way to express application logic, interact with models, shuttle events back and forth among views and controllers, and quite often, navigate from route to route.
This is going to be a big chapter. We’re going to map out the functionality of our site in terms of URLs, implement a router that organizes those URLs into a tree, create route classes that can serialize and deserialize state data in our models, and hand the data off to controllers. We’ll look at the router, routes, and models, and before we’re all done, our application will actually be able to see our application in several states, even if we can’t use the application to navigate among them, quite yet.
Yehuda Katz on URLs
For an overall awesome talk on Ember and a great case made for thinking hard about URLs, check out Yehuda Katz’s “Building Web Applications with Ember.js” (starting at about 13:00) from HTML5DevConf 2013.
URLs : The Web :: “Saved Game Passwords” : The Nintendo Entertainment System
If your childhood didn’t involve feverishly copying “saved game passwords” by hand, straining your eyes to decipher often poorly rendered text on television screens, if “up, up, down, down, left, right…” doesn’t ring a bell, then serialization might be a new concept for you. In our day, there was no persistent storage available in gaming consoles, and to allow for the illusion of saved progress, game makers would generate unique alphanumeric “passwords,” that, when deciphered by the game engine, detailed your current game state—everything from what level you were on to how many lives you had left. You played the game for a while, got an updated “password,” and confidently shut down your console, knowing that entering that password at the start of your next session would allow you to pick up where you left off.
This is serialization and de-serialization, in software terms. Serialization is the act of converting data into a format more ideal for long-term storage or transmission, usually a less verbose format that takes up less space on a disk or when transmitted across a wire. Most commonly, as in the case of the difficult-to-transcribe “saved game passwords,” the serialized version of the data is not human readable. Most of the time this does not matter, as the serialized version of data is not exposed to the user. Web applications have a unique serialization/de-serialization mechanism that not only exposes serialized data to the user, but offers serialized data that is quite readable. The URL is that mechanism. Originally created as way to locate whole documents, modern server technologies have abstracted the URL to allow for arbitrary use—you, the developer, can choose to use the URL to locate a file by specifying a traditional file path or to serialize, in any way you see fit, your application’s state data. When a user accesses your site via a URL—whether by clicking a link, opening her own bookmark, or typing it in manually—it’s just like a player putting in her saved game password. The serialized data in your URL tells your application how to restore itself to the state in which the user left it, when she captured the URL. It’s up to you to decide which bits of state are persisted and how to translate them into a URL (or serialize them), but Ember is going to make it pretty easy.
The great thing about the URL being visible to the user is that it has shamed developers into working hard to make the serialized version of the state data attractive, readable and even memorable. If you do recall the days of “saved game passwords,” you almost assuredly remember the Metroid password “JUSTIN BAILEY.” This was not the greatest Metroid password available—we used to get them from magazines and bulletin-board systems (BBSs), in our day, but it was far easier to remember than the random-number-and-letter combinations the game normally generated. Even “Narpas Sword,” another popular password, was technically a “better” password, offering the player more progress and more inventory. I think “Justin Bailey” won the popularity contest because it’s so much easier to remember. It’s a proper noun. If you hear it, you can type it out. Even if you’re not sure of the spelling, you know a few different spellings you can try. This makes for a great serialized state token, one that I remember clearly 25—I mean, 15—years later.
Great web applications include carefully crafted URLs, putting frequently used application states a short keystroke or bookmark click away. If you use Twitter, you probably know that you can see a user’s timeline by navigating to http://twitter.com/[USERNAME]. Less awesome applications obscure things, with needless obfuscation, à la Google+ URLs, like mine (Figure 5-1), or careless construction, such as the easily forgotten /in/ that disappears into the middle of a LinkedIn profile URL, like mine (Figure 5-2).
![]()
Figure 5-1. I give it a Google–
![]()
Figure 5-2. /in/? More like easily left /out/
Routing
All this time, we’ve thrown the word router around as though we all know we’re using it the same way. If you haven’t encountered that word in similar usage, perhaps when learning or using another MVC framework, it is pretty much what it sounds like. A router is a logical mechanism that routes things.
You can send that fan mail to tqb@thomasqbrady.com.
OK, but seriously, folks, just like the person at your local post office who has “router” in his title, our version of a router routes packages to the right places. A request comes in—the mailperson is asked to deliver a package and our router is asked to deliver a route, which includes the right model(s), view(s), controller(s), and template(s)—to the router, and a response—the mailperson drops a package into the right bin, our router finds and returns the right route—is sent.
Routing, in Ember, is handled in two pieces. First, you need a map. Just as the mailperson compares the address on a package and their maps of which neighborhoods belong to which zip codes, our router will match a URL to our model, view, controller, and template bundle. Remember that potentially complex matrix we mentioned a few paragraphs back? It doesn’t always have to be that complex, but it does have to map every URL to which you want your app to respond. If you’re coming from a backend-development background, this is not so different from mapping out your application by starting with your API. The next step is to restore the application state, with all of the pieces we’ve retrieved, and any encoded data that may have also been sent along, exactly like our “saved game password.” Ember lets you define this map with a class method onEmber.Router called—you guessed it—map. We’ll take a look in a just a second.
Second, we’ll need the thing that our map helps us find to enable us to rebuild our application to the desired state. That thing, the thing that our map will help us find, is a route. We’ll take a look at how routes manage state, including serilizaion/de-serialization, after we’ve figured out our map.
Keeping an Eye on and Debugging Routes in the Console
Before things get going, there’s a useful logging feature we can enable that will help illustrate what’s going on. It’s also a lifesaver for debugging route issues. Add this object as a parameter passed when we instantiate our Ember application on line 1 in app/scripts/app.js:
var RocknrollcallYeoman = window.RocknrollcallYeoman = Ember.Application.create({
LOG_TRANSITIONS: true
});
See the change in this commit.
Now every time you change routes in your appliation, Ember will write out a helpful debug statement to the console (Figure 5-3).
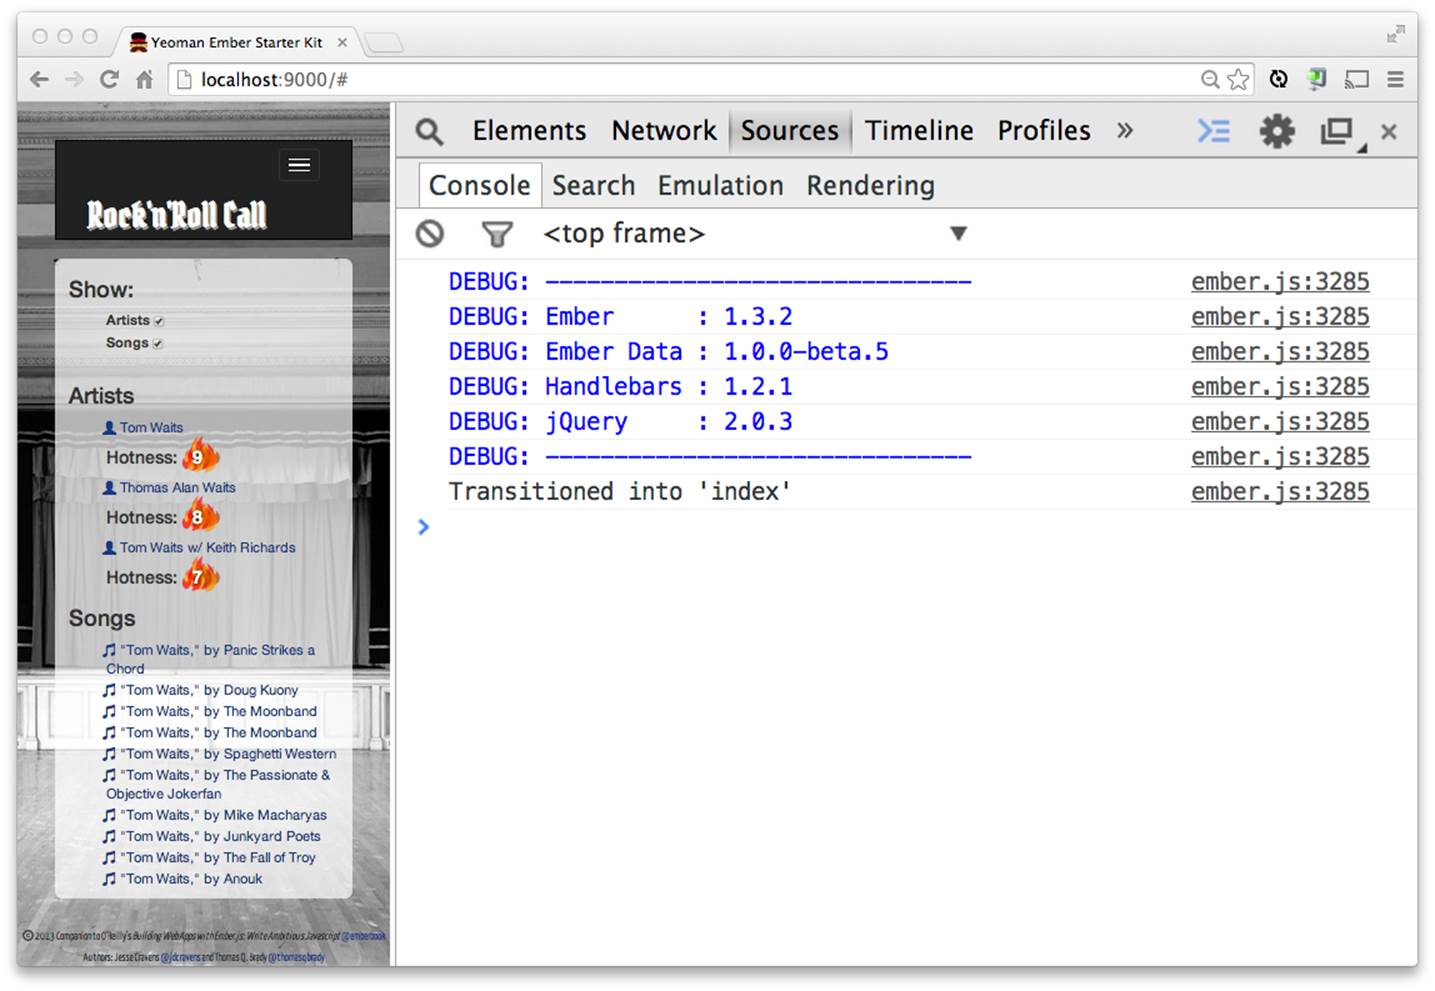
Figure 5-3. Logging router transitions
The Router
Let’s build a map. While we’re on that topic, why have we gotten so far without one? Let’s not forget that we get some things for free with Ember. Ember has been very politely creating default maps and routes for us. Even after we define our own, we’ll still make frequent use of Ember’s conventions, and not having to specifically declare the names of and paths to our definitions of all of our views, controllers, and templates. Ember will assume that it can find all of those things based on what we named our routes. Assuming we stick with convention, we get to save a lot of typing.
The domain name of our app—currently http://localhost:9000—won’t really matter. Ember won’t care if that part changes. Everything after that, though, will matter. Even with nothing specified there, you’re hitting a default route: the IndexRoute. When your user navigates tohttp://localhost:9000/#/search/tom waits, the /search and /tom waits parts will be given significance and will be translated into a route in the former case and de-serialized to state data in the latter case.
So, what do we currently have? We already have an ApplicationRoute:
RocknrollcallYeoman.ApplicationRoute = Ember.Route.extend({
model: function () {
return ['red', 'yellow', 'blue'];
}
});
We haven’t used this code since the very beginning of our journey, when we first generated our applicaton in Chapter 3, so we can go ahead and delete it. The ApplicationRoute is entered when the application is first initialized, primarily to render the application template; it isn’t often we would use it in an evolved application. It will be generated for us if we dont have it explicitly created.
See the change in this commit.
We also have an IndexRoute. In Chapter 4, we briefly introduced the index.hbs template. Behind the scenes, Ember generated an IndexRoute for us. You may be beginning to see that this is one of the magical features of Ember, called active generation.
Understanding Active Generation
When Ember doesn’t find a route handler or a controller, it will actively generate one. This is one of the most frustrating aspects of Ember for newcomers. But once you undersand and embrace it, you’ll see that it can be a huge timesaver to only have to write code when you need to. We can turn on logging of this feature, within our Application.create() configuration object:
var RocknrollcallYeoman = window.RocknrollcallYeoman = Ember.Application.create({
LOG_TRANSITIONS: true,
LOG_ACTIVE_GENERATION: true
});
See the change in this commit.
Now in our console we can see the active generation of both the ApplicationController and the IndexRoute (Figure 5-4).
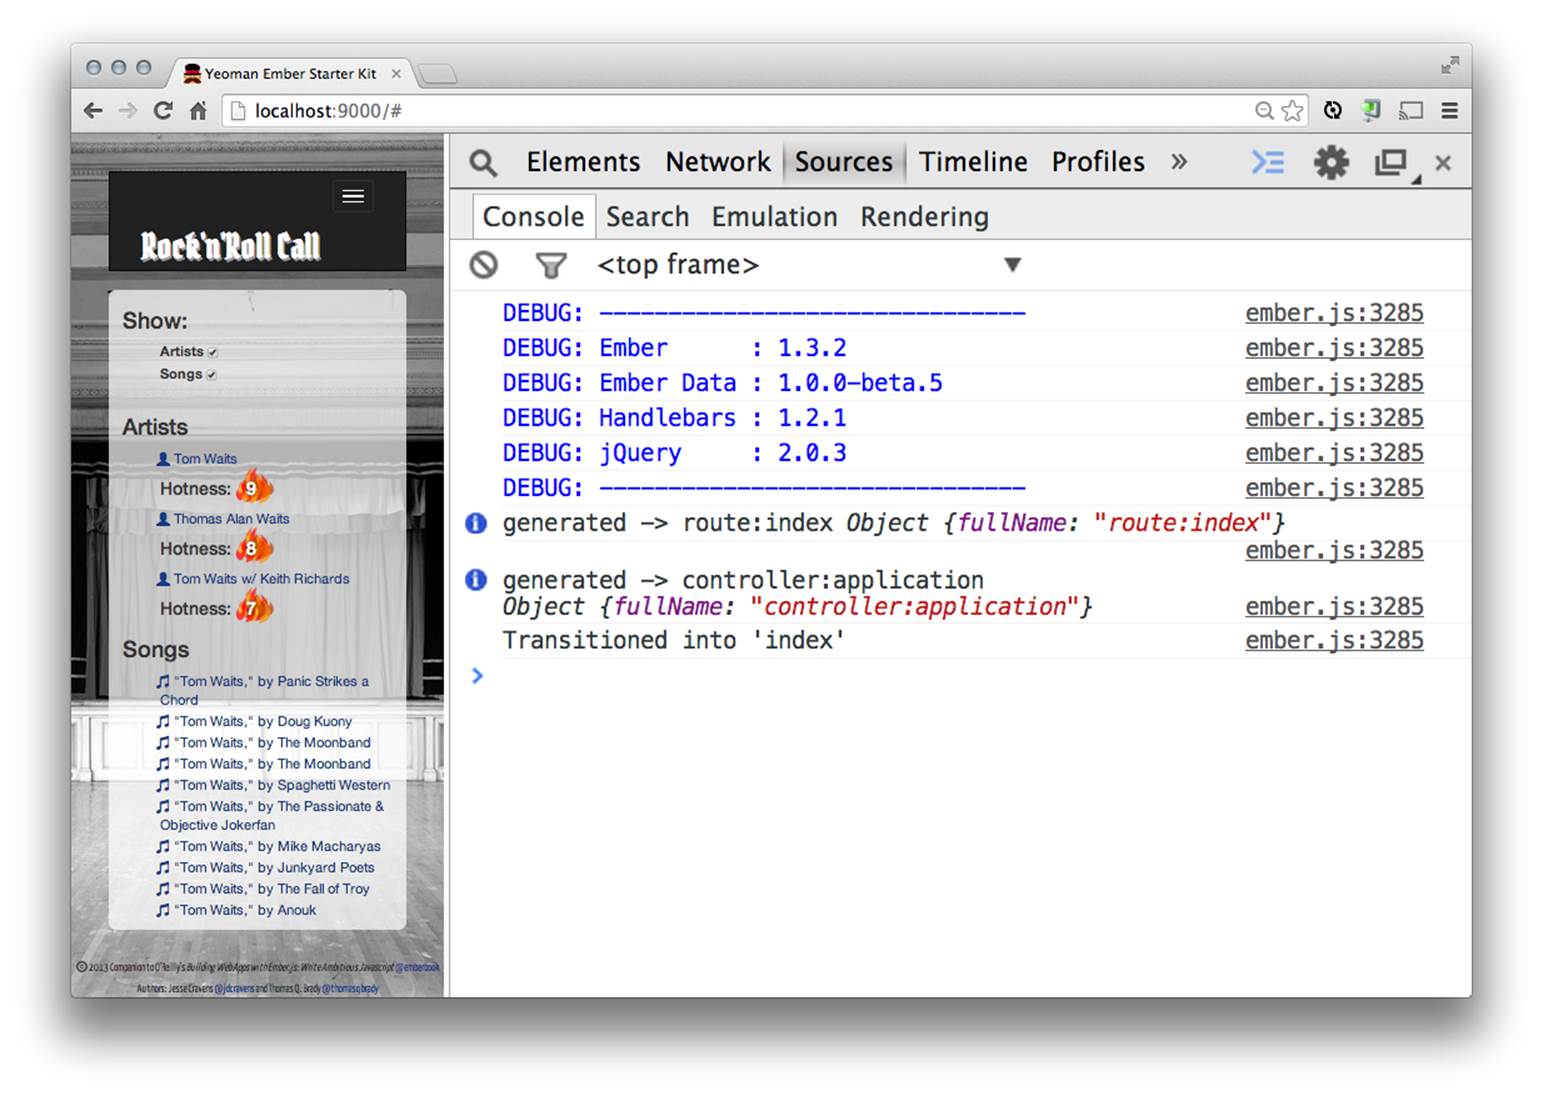
Figure 5-4. Logging active generation
OK, so now that we know what we have and what is being created for us, let’s start making our own routes. Once the user types in some search terms and hits Enter, we’ll want to show search results, so we’ll need a SearchResultsRoute. From there, our user will click on artists’ names or song titles to view entity pages for each, so we’ll need an ArtistRoute and a SongRoute.
Let’s take a look at the current state of our app/scripts/app.js:
var RocknrollcallYeoman = window.RocknrollcallYeoman = Ember.Application.create({
LOG_TRANSITIONS: true,
LOG_ACTIVE_GENERATION: true
});
RocknrollcallYeoman.applicationName = "Rock'n'Roll Call";
RocknrollcallYeoman.dummySearchResultsArtists = [
{
id: 1,
name: 'Tom Waits',
type: 'artist',
enid: 'ARERLPG1187FB3BB39',
hotttnesss: '1'
},
{
id: 2,
name: 'Thomas Alan Waits',
type: 'artist',
enid: 'ARERLPG1187FB3BB39',
hotttnesss: '.89'
},
{
id: 3,
name: 'Tom Waits w/ Keith Richards',
type: 'artist',
enid: 'ARMPVNN13CA39CF8FC',
hotttnesss: '.79'
}
];
/* Order and include as you please. */
require('scripts/controllers/*');
require('scripts/store');
require('scripts/models/*');
require('scripts/routes/*');
require('scripts/views/*');
require('scripts/router');
...
While we’re here, let’s go ahead and remove some cruft. You might want to go back and tinker with what we have so far, so feel free to comment out rather than delete, but let’s get rid of our dummySearchResultsArtists object. We won’t need these training wheels any longer.
See the change in this commit.
Now, let’s take a look in app/scripts/router.js. Here’s where we’ll define all those routes we outlined a few paragraphs back. The map function takes a callback function as its argument; when that callback is called, it is passed a reference to your application’s Router instance, in the variablethis. In this callback, you will define all your application’s routes. Typically you’ll see this defined inline. Within that callback, you can call the route method on the Router instance assigned to this to create a route. Here are all the routes we’ve discussed so far, added toapp/scripts/router.js:
RocknrollcallYeoman.Router.map(function() {
this.route('search-results');
this.route('artist');
this.route('song');
});
See the change in this commit.
Notice we didn’t define an application or index route, because, as we said, we get those for free. If we wanted to customize them somehow, we could define them here, but we’re not doing anything interesting with them, at least not yet.
Remember how in Chapter 4 we put our search results HTML in index.hbs? We had to do that because we didn’t have a way to get from our IndexRoute to the SearchResultsRoute. In fact, the SearchResultsRoute didn’t even exist, yet. Later, we will be able to move that HTML into its proper template, search-results.hbs.
For now, we’ve told Ember that we want the user to be able to navigate to http://localhost:9000/#/search-results, http://localhost:9000/#/artist, and http://localhost:9000/#/song. We’ve declared that we want those route objects to exist, and therefore Ember will create default instances for us, even if we don’t create our own.
Convention over Configuration
If the conventions for naming things in Ember are not clicking for you, or if you just want to learn more about how and why they work, look no further than the API documentation for Ember.DefaultResolver.
Pop quiz: what would happen if you pulled up http://localhost:9000/#/search-results in a browser right now, having not yet created a Handlebars template (or a route), yet? We’ll get a page that contains our application template and what looks like an empty spot where our search-results template would go. Technically, it’s only empty because the default search-results template that Ember created for us is empty. If you did guess that, then you have already understood what the router does, and why we wrote that map callback.
Dynamic Routes
If you go and pull up those URLs now, you’ll find they all exist. They’re all supported. But they’re not terribly useful, yet. You can begin to set up the templates for those pages and get some of the page structure—at least the markup and CSS—put in place, but even that’s going to be tough because we haven’t hooked up the user’s search request yet. When you go to the search-results route, you can see the search-results.hbs template, but we can’t populate the page with any data because we don’t know who or what the user searched for yet. We’ll probably want to reflect that in our URL, something like http://localhost:9000/#/search-results/tom waits. Try that URL out right now, and, if you have your console showing, you’ll see an error message. Ember doesn’t know where to go. We haven’t defined a route that matches /search-results/tom waits.
“Wait a minute,” you might be saying, “how can I define a route for every possible thing the user might search for?” You’re astute. The answer is you can’t. And you shouldn’t have to. And you don’t have to. What we do need is a route with a “wildcard,” what’s called a dynamic segment.
This is way easier than it sounds. Let’s start with the syntax to define the dynamic segment. In our map function, we can specify what we want our URL, or “path,” to look like, including a dynamic portion, by passing an options object as the second argument, like this:
RocknrollcallYeoman.Router.map(function() {
this.route('search-results', {
path: 'search/:term'
});
this.route('artist');
this.route('song');
});
The :term part is our dynamic segment. If you go to the URL http://localhost:9000/#/search/tom waits now, you no longer get the error message about that route not existing. In a few paragraphs or so, we’ll see that Ember has plucked out the part of the URL that matches up to this dynamic segment and made it available to your route.
We sneaked another feature in there while we were at it. Did you notice? We specified the path /search/:term. This means our URL will read http://localhost:9000//search/tom waits instead of http://localhost:9000//search-results/tom waits. “Search-results” makes a better class name than it does a URL. Thanks to the map function, we can define separate strings for what shows in our URL and what we call our routes.
See the change in this commit.
Speaking of routes, let’s look at how those work.
Routes
So, if we’ve used the map function to declare our routes, and Ember is now using those names to find our views, controllers, and templates, what’s left? What else does a route need to do?
It makes intuitive sense that a URL and view can be so tightly coupled—that they would share a name, for instance. Continuing that line of reasoning, why wouldn’t your template have the same name as your view? And, while we’re at it, your controller? They’re all parts of a team that is responsible for linking application logic, state, and a user interface. The only thing missing from this list is a model. Your models are not tied very directly to your routes, though. Your models are probably more persistent than particular routes; your models are probably used by more than one route.
This being the case, there must be some way to match up the required model(s) with a particular controller or view, right? Why, in fact, there is, and it’s called a route!
We’ve most recently been getting data into our templates by making use of variables hung off the global App object so far, promising along the way that we’d fix that. When we first loaded the Ember start kit, way back in Chapter 2, we saw a glimpse of the right solution. In that example application, we made use of the model method defined in our IndexRoute to define a model. Whatever we returned from that method became the model, which we could then pluck properties from to populate our templates.
The model method is one of the biggest reasons you’ll use Ember’s Routes. One key feature of the model method is that it can be used to de-serialize your URL into model/state data. We left off, just a few paragraphs back, in the middle of talking about dynamic segments, having introduced them, but not really having covered what they’re useful for. Here’s what they’re good for. We defined the route search-results with the path search/:term, and now if we visit the URL http://localhost:9000/#/search/tom waits in our application, our SearchResultsRoutewill have an argument passed to its model method. That value of that argument will be… our dynamic segment! It will be “tom waits”. This may not have you jumping out of your seat, just yet, but believe me, it’s pretty convenient. You can imagine, no doubt, a few ways that you could take that argument and turn it into some useful data, such as would be required to populate a search-results page.
Our search-results route is going to have one slightly complicated aspect to it that we don’t want to get tangled in, just yet, so let’s set it aside for a moment and jump ahead in our application. When the user gets to this search-results route in our finished application, she’ll click, assuming she’s found what she was after, an artist’s name or song title, which will be rendered by a linkTo helper. That link will then transition her to either the artist or the song route. We’re going to have the same issue with those that we had with search-results: we will need a dynamic segment in order to support a myriad of artists and songs with just two routes.
Right, back to the map! Let’s add some dynamism to those routes:
RocknrollcallYeoman.Router.map(function() {
this.route('search-results', {
path: 'search/:term'
});
this.route('artist', {
path: 'artist/:enid'
});
this.route('song', {
path: 'song/:enid'
});
});
See the change in this commit.
“Who is Enid?” you might be asking. It’s short for “Echo Nest ID,” the unique ID assigned to each row in The Echo Nest’s database. The search-results lists that we will get back from Echo Nest’s search API will include these unique IDs, which we will then use to request further information about the selected artist or song, in order to populate an entity page.
So now we have routes for individual artists and songs. If a user were to get this far starting from scratch, they would now have a URL that looked like this, corresponding to Tom Waits’ entity page: http://localhost:9000/#/artist/ARERLPG1187FB3BB39. That last bit is the Echo Nest ID, the dynamic segment for our artist route.
What are we going to do with that enid? We now know that our model method will get that string passed as an argument, giving us a chance to create a model object to be passed off to the controller to be used to populate our template, and so on, but how do we turn this very “saved game password"-esque “ARERLPG1187FB3BB39” into a model object?
This is a great opportunity to look at a real-world problem that we don’t seem to find answered in many of the Ember training materials. How do you incorporate third-party services? Well, here’s one way.
First, let’s finally talk about models; and while we’re at it, let’s make one! Then, let’s define an ArtistRoute class, with a model method, and within that method, let’s make an XHR against The Echo Nest’s API, passing our enid and using what Echo Nest sends back to us to create an instance of our fancy, new Artist model.
Models
Until we get into persistence, you won’t actually be using Ember’s Model classes, and with good reason. Models, as a concept, mostly exist for the purposes of persistence (by persistence, here, just so we’re clear, we mean storing something in a database of some kind for long-term storage and retrieval). In our application, there’s some transient data—data that we don’t plan to store to a database—that would still probably do well to be kept in a model. For one thing, we are dealing with structured data, and models are good for defining such structures. For another, technically speaking, the data we’re putting in these models is being persisted, on someone else’s server (The Echo Nest).
There’s a lower-level Object class that is actually a great fit for something like a proto-model, offering computed properties, data binding and convenient methods to extend the class. For our purposes, it will do. Let’s define our “model”:
RocknrollcallYeoman.Artist = Em.Object.extend({
id: null,
name: null,
enid: null,
biography: null,
hotttnesss: null,
image: null,
videos: null
});
Notice that we extended Ember’s Object class, and that we defined all of the properties our Artist class could have. We gave all of these properties a default value of null, but we could have given default strings, booleans, numbers, etc. to any or all of these properties.
See the change in this commit.
To instantiate an Artist, simply create an Artist, like so, passing an object containing the properties of an Artist that you wish to define:
var artist = RocknrollcallYeoman.Artist.create({
enid: 'ARERLPG1187FB3BB39',
name: 'Tom Waits',
hotttnesss: 100,
biography: 'Rain dog.',
image: 'http://is.gd/GeaUhC'
});
Armed with our proto-model, let’s jot down, in pseudocode, how we’re going to instantiate one in our ArtistRoute’s model method:
RocknrollcallYeoman.ArtistRoute = Ember.Route.extend({
model: function(params) {
/* pseudocode
XHR("some URL",{"id":params.enid},function callback(response){
var artist = App.Artist.create({
name: response.name,
hotttnesss: response.hotttnesss,
});
});
*/
}
});
See the change in this commit.
If you’re paying attention, there are at least two problems with that pseudocode, and failure to compile isn’t one of them.
For one thing, we’re not returning anything from the model method. Our route won’t have anything to pass on to our controller, leaving our templates high and dry.
For another, how in the world would we return anything? We have a callback issue here. We can’t return our artist object within the XHR callback, because we wouldn’t be returning the object in the right scope. Within the right scope, how are we going to make sure we have gotten something back from our XHR before returning said object?
Promises, Promises
You can’t throw a rock at a JavaScript developer’s blog without bouncing it off two articles about Promises, lately. Promises are a new feature in ES6 (EcmaScript 6, the latest version of JavaScript, at the time of this writing, so new it isn’t fully supported in all modern browsers, yet) that offer a solution to our “when will everything be ready?” conundrum. For an in-depth explanation of the problem and the solution that Promises offer, I recommend the HTML5 Rocks article: “JavaScript Promises: There and Back Again”. In the all-too-recent old days, you might have tackled this chicken-and-egg problem by setting up a variable in the outermost scope meant to hold the model, once populated, setting up an XHR, whose success callback would populate that variable and then call yet another callback, with the assurance that the model variable was now populated and we can get on with the show.
As you can imagine, that sort of thing is even more tiring to author than it is to have just read about. What’s worse, it still wouldn’t solve our scope issue, of returning something immediately in the model method, that would, eventually, actually contain a model.
Promises offer a better, or at least far more convenient, way, that looks like this:
Promise.all([functionOnWhichWeDepend(), anotherFunctionOnWhichWeDepend(),
yetAnotherFunctionOnWhichWeDepend()]).then(function() {
console.log("They're all finished, success is ours!")
}, function() {
console.error("One or more FAILED!")
});
That all method takes an array of methods, then returns a Promise object. That Promise object has a then method, which accepts two callbacks, one which will be called if every one of the methods passed in all has successfully returned something, and one to call if any of them fails. See how much shorter this paragraph was, let alone the actual code?
Now that we get the concept of promises, let’s take a look at two specific implementations: the Ember core team’s RSVP and a simple example in jQuery.
RSVP
Ember bundles the popular library RSVP.js (created and maintained by a team of Ember core contributors), which provides an excellent implementation of the Promises specification, even in browsers that don’t yet support Promises (which is more of them than you’d prefer). What’s more, Ember mixes in Promises functionality to a lot of its core objects. For instance, our model method can return a Promise object, and, if it does, the router will be notified when the Promise is resolved. If you have default values in your models, those will be pushed into your templates and rendered to the screen, and then the router will wait for your model method’s returned Promise to fulfill. If it does so successfully, your new model data will be pushed through, and your templates will be updated with the new data.
Other Promise implementations
The only catch at the moment, regarding Promises, due to the fact that the specification is still so new, is that there are a few different “flavors” out there, each with slightly different APIs. It’s not as bad as it sounds, but know that you will often be dealing with more than one flavor in an Ember project: RSVP, mentioned previously, and the version within jQuery. All jQuery AJAX calls (such as getJSON), for instance, return Promise objects, which we will see in the next example. No worries: the APIs should be, and in most cases are, so similar that you can use them almost interchangeably.
The model() Method
Let’s take a crack at that model method, now that we have a game plan. jQuery’s getJSON will return a Promise object, so let’s use that method to request data from the Echo Nest, returning that Promise object, which will, itself, return a newly minted Artist model. Here’s how I did it:
RocknrollcallYeoman.ArtistRoute = Ember.Route.extend({
model: function(params) {
var url = "http://developer.echonest.com/api/v4/artist/profile?api_key
=<YOUR-API-KEY>&format=json&bucket=biographies&bucket=blogs&bucket=
familiarity&bucket=hotttnesss&bucket=images&bucket=news&bucket=reviews
&bucket=terms&bucket=urls&bucket=video&bucket=id:musicbrainz",
obj = {"id": params.enid};
return Ember.$.getJSON(url, obj)
.then(function(data) {
var entry = data.response.artist;
var bio = null;
var img = null;
for (i = 0;i<entry.biographies.length;i++) {
if (entry.biographies[i].site.toLowerCase() == "wikipedia") {
bio = entry.biographies[i];
}
}
if (!bio && entry.biographies.length > 0) {
bio = entry.biographies[0];
}
if (entry.images.length) {
img = entry.images[0];
}
var lastVideo = 4;
if (entry.video.length < 4) {
lastVideo = entry.video.length;
}
var videos = [];
for (i=0;i<lastVideo;i++) {
videos.push(entry.video[i]);
}
return RocknrollcallYeoman.Artist.create({
enid: entry.id,
name: entry.name,
hotttnesss: entry.hotttnesss,
biography: bio,
image: img,
videos: videos
});
});
},
});
Walking through that code, we:
1. Define a model method that accepts a params argument.
2. Define a url variable that is an Echo Nest API request, with numerous flags set to dial in the kind of data we want to get returned to us. You’ll need your own API key, so see the aside about that.
3. Define an object, obj, in which we’ll hold the request body and include the Echo Nest ID of the entity for which we want more data.
4. We then immediately return the Promise object returned from jQuery’s (Ember.$ is a shortcut to jQuery) getJSON.
Keep in mind, getJSON immediately returns the Promise object, and later, when the Promise is broken or fulfilled, then will be called on that Promise object.
5. Chain a then method which, upon fulfillment of the Promise returned by the getJSON method, will be called and passed the response body of the XHR in an argument ('data').
6. Then we do several things with that response data:
a. We sift through the biographies, plucking either the first Wikipedia biography that we find or just using the first biography we find if we don’t find a Wikipedia biography.
b. Grab an image URL, if there is one.
c. Grab up to four video URLs to embed, if there are any.
7. Finally, we create and return an Artist model and fill it with all the material we’ve just pulled out of the response body from The Echo Nest’s API.
See the change in this commit.
Get Your Own Echo Nest API Key!
You’ll need your own API key for The Echo Nest, but don’t worry—it’s a quick, easy process to get one. Just visit https://developer.echonest.com/account/register in your browser, fill out the form, and follow the directions. Once you’ve activated your account, you’ll land on your brand-new profile page, which will contain your API key, consumer key, and shared secret, as well as forms to allow you to change your profile info. The API key listed there is all you’ll need for now.
Wrapping Things Up
This is by far the most intimidating code we’ve written so far, but it breaks down pretty easily, doesn’t it? We still have very little code, but we’ve got quite a bit of power already. We have a router that lets us easily respond to numerous URLs, with dynamic segments and custom path names, four custom routes, an Artist model, and an ArtistRoute, which can respond to a URL with an Echo Nest ID in it and can, using an XHR, turn that ID into a full-fledged Artist model. And along the way, we learned about Promises, and how they hold fast that potentially leaky connection between our route and our controllers. You guys! We are so close to a finished application! One more chapter and we’ll have a working music search engine!
All materials on the site are licensed Creative Commons Attribution-Sharealike 3.0 Unported CC BY-SA 3.0 & GNU Free Documentation License (GFDL)
If you are the copyright holder of any material contained on our site and intend to remove it, please contact our site administrator for approval.
© 2016-2026 All site design rights belong to S.Y.A.