JavaScript Application Design: A Build First Approach (2015)
Part 2. Managing complexity
The second part of the book is more interactive than the first, as it contains even more practical code samples. You’ll get to explore different little angles at which we can attack complexity in our application designs, such as modularity, asynchronous programming patterns, testing suites, keeping your code concise, and API design principles.
Chapter 5 is a detailed examination of modularity in JavaScript. We start with the basics, learning about encapsulation, closures, and a few quirks of the language. Then we delve into the different formats that allow us to build modular code, such as CommonJS, AMD, and ES6 modules. We’ll also go over different package managers, comparing what they bring to the table.
Chapter 6 teaches you to think about asynchronous code. We’ll go through tons of practical code samples, following a few different styles and conventions. You’ll learn all about Promises, the async control flow library, ES6 generators, and event-based programming.
Chapter 7 aims to expand your JavaScript horizons by teaching you about MVC. You’ll take a fresh look at jQuery and learn how you could be writing more modular code instead. Later on, you’ll leverage the Backbone.js MVC framework to componentize your front-end efforts even further. Backbone.js can even be used to render views on the server side, and we’ll leverage the Node.js platform to do exactly that.
In chapter 8 you’ll learn how to automate testing right off the bat, using Grunt tasks. Then you’ll learn how to write tests for the browser, and how to run them using either Chrome or the PhantomJS headless browser. You won’t only learn to do unit testing, but also visual testing and even performance testing as well.
Chapter 9 is dedicated to REST API design principles. In this chapter you’re exposed to the best practices you should follow when laying out the foundations for an API service, as well as how you could design a layered architecture to complement the API. Last, you’ll learn how to easily consume the API, using the conventions set forth by following a RESTful design approach.
Chapter 5. Embracing modularity and dependency management
This chapter covers
· Working with code encapsulation
· Understanding modularity in JavaScript
· Incorporating dependency injection
· Using package management
· Trying out ECMAScript 6
Now that we’re done with the Build First crash course, you’ll notice a decline in Grunt tasks, though you’ll definitely continue to improve your build. In contrast, you’ll see more examples discussing the tradeoffs between different ways you can work with the JavaScript code underlying your apps. This chapter focuses on modular design, driving down the code complexity of applications by separating concerns into different modules of interconnected, small pieces of code that do one thing well and are easily testable. You’ll manage complexity in asynchronous code flows, client-side JavaScript patterns and practices, and various kinds of testing in chapters 6, 7, and 8, respectively.
Part 2 boils down to increasing the quality in your application designs through separation of concerns. To improve your ability to separate concerns, I’ll teach you all about modularity, shared rendering, and asynchronous JavaScript development. To increase the resiliency of your applications, you should test your JavaScript, as well, which is the focus of chapter 8. While this is a JavaScript-focused book, it’s crucial that you understand REST API design principles to improve communication across pieces of your application stack, and that’s exactly the focus ofchapter 9.
Figure 5.1 shows how these bits and pieces of the second half of the book relate to each other.
Figure 5.1. Modularity, good architecture, and testing are fundamentals of designing maintainable applications.
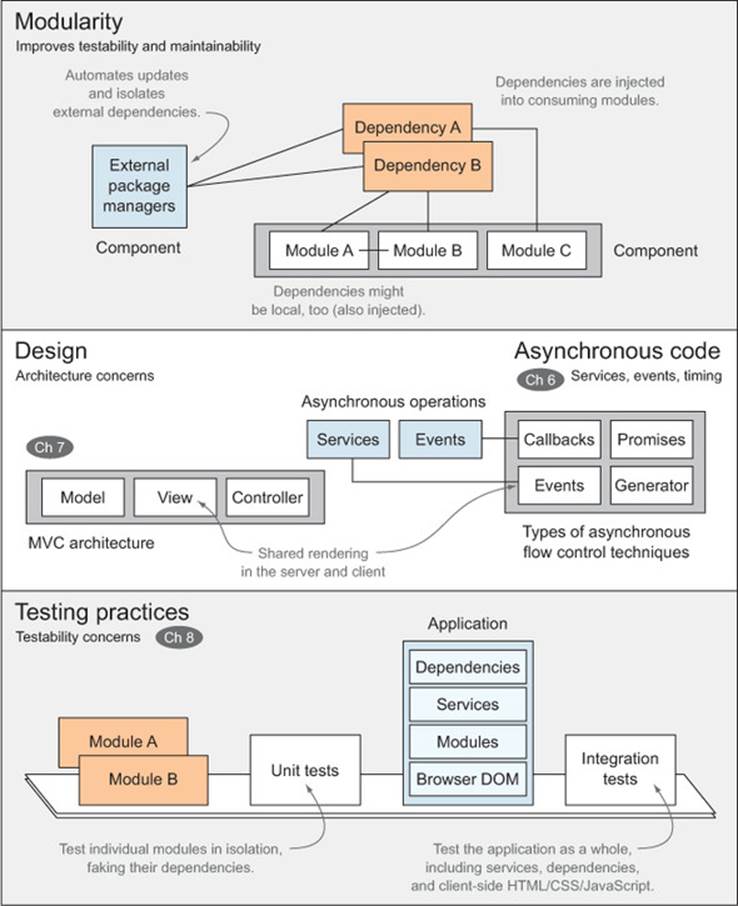
Applications typically depend on external libraries (such as jQuery, Underscore, or AngularJS), which should be handled and updated by using package managers, rather than manually downloaded. Similarly, your application can also be broken down into smaller pieces that interact with each other, and that’s another focus of this chapter.
You’ll learn the art of code encapsulation, treating your code as self-contained components; designing great interfaces and arranging them precisely; and information hiding to reveal everything the consumer needs, but nothing else. I’ll spend a good number of words explaining elusive concepts such as scoping, which determines where variables belong; the this keyword, which you must understand; and closures, which help you hide information.
Then we’ll look at dependency resolution as an alternative to maintaining a sorted list of script tags by hand. Afterward, we’ll jump to package management, which is how you’ll install and upgrade third-party libraries and frameworks. Last, we’ll look at the upcoming ECMAScript 6 specification, which has a few nice new tricks in store for building modular applications.
5.1. Working with code encapsulation
Encapsulation means keeping functionality self-contained and hiding implementation details from consumers of a given piece of code (those who access it). Each piece, whether a function or an entire module, should have a clearly defined responsibility, hide implementation details, and expose a succinct API to satisfy its consumers’ needs. Self-contained functionality is easier to understand and change than code that has many responsibilities.
5.1.1. Understanding the Single Responsibility Principle
In the Node.js community, inspired by the UNIX philosophy of keeping programs concise and self-contained, packages are well known for having a specific purpose. The high availability of coherent packages that don’t go overboard with features plays a big role in making the npm package manager great. For the most part, package authors accomplish this by following the Single Responsibility Principle (SRP): build packages that do one thing, and do it well. SRP doesn’t apply only to packages as a whole; you should follow SRP at the module and method levels, as well. SRP helps your code stay readable and maintainable by keeping it simple and concise.
Consider the following use case. You need to build a component that takes a string and returns a hyphenated representation. It will be helpful when generating semantic links in web applications such as blogging platforms. This component might take blog post titles such as 'Some Piece Of Text', and convert them to 'some-piece-of-text'. This is called slugging.
Suppose you start with the following listing (available as ch05/01_single-responsibility-principle in the samples). It uses a two-step process in which it first normalizes all nonalphanumeric character sequences into single dashes and then removes leading and trailing dashes. Then it lowercases the string. Exactly what you need but nothing else.
Listing 5.1. Converting text using slugging
function getSlug (text) {
var separator = /[^a-z0-9]+/ig;
var drop = /^-|-$/g;
return text
.replace(separator, '-')
.replace(drop, '')
.toLowerCase();
}
var slug = getSlug('Some Piece Of Text');
// <- 'some-piece-of-text'
The first expression, /[^a-z0-9]+/ig is used to find sequences of one or more characters that aren’t alphanumerical, such as spaces, dashes, or exclamation points. These expressions are replaced by dashes. The second expression looks for dashes at either end of the string. Combining these two, you can build a URL-safe version of blog post titles.
Understanding regular expressions
Although you don’t need to know regular expressions to understand this example, I encourage you learn the basics. Regular expressions are used to find patterns in strings, and they can also be used to replace those occurrences with something else. These expressions are supported in virtually all major languages.
Expressions such as /[^a-z0-9]+/ig can be confusing to look at, but they aren’t that hard to write! My blog has an entry-level article you can read if the subject interests you.[a]
a You can find the article on my blog at http://bevacqua.io/bf/regex.
In the previous example, the separator variable is a simple regular expression that will match sequences of non-letter, non-numeric characters. For example, in the 'Cats, Dogs and Zebras!' string, it will match the first comma and space as a single occurrence, both spaces around'and', and the '!' at the end. The second regular expression matches dashes at either end of the string, so that the resulting slug begins and ends with words, especially because you’re converting any nonalphanumeric characters into dashes in the previous step. Combining these two steps is enough to produce a decent slugging function for your component.
Imagine a feature request for which you need to add a timestamp of the publication date to the slug. An optional argument in the slugging method to turn on this functionality might be tempting, but it would also be wrong: your API would become more confusing to use, harder to refactor (change its code without breaking other components, detailed in chapter 8 when we discuss testing), and even more difficult to document. It would be more sensible to build your component by following the SRP principle using a composition pattern instead. Composition only means applying functions in sequence, rather than mashing their functionality together. So first you’d apply slugging and then you could add a timestamp to the slugs, as shown in the following code snippet:
function stamp (date) {
return date.valueOf();
}
var article = {
title: 'Some Piece Of Text',
date: new Date()
};
var slug = getSlug(article.title);
var time = stamp(article.date);
var url = '/' + time + '/' + slug;
// <- '/1385757733922/some-piece-of-text'
Now, imagine that your Search Engine Optimization (SEO) expert comes along, and he wants you to exclude irrelevant words from your URL slugs so you get better representation in search results. You might be tempted to do that right in the getSlug function, but here are a few reasons why that would be wrong in this case, too:
· It would become harder to test the slugging functionality on its own, because you’d have logic that doesn’t have anything to do with the slugging.
· The exclusion code might become more advanced as time goes on, but it’d still be contained in getSlug.
If you’re cautious, you’ll code a function aimed at the expert’s requirements, which looks like the following code snippet:
function filter (text) {
return text.replace(keywords, '');
}
var keywords = /\bsome|the|by|for|of\b/ig; // match stopwords
var filtered = filter(article.title);
var slug = getSlug(filtered);
var time = stamp(article.date);
var url = '/' + time + '/' + slug;
// <- '/1385757733922/piece-text'
That looks fairly clean! By giving each method a clear responsibility, you extended your functionality without complicating matters too much. In addition, you uncovered the possibility of reuse. You might use the SEO expert’s filtering functionality all over an application, and that would be easy to extract from your slugging module, because it doesn’t depend on that. Similarly, testing each of these three methods will be easy. For now, it should be enough to say that keeping code succinct and to the point and doing exactly what the function name implies is one of the fundamental aspects of maintainable, testable code. In chapter 8 you’ll learn more about unit testing.
Splitting functionality in a modular way is important, but it’s not enough. If you’re building a typical component, which has a few methods but shouldn’t expose its variables, you need to hide this information from the public interface. I’ll discuss the importance of information hiding next.
5.1.2. Information hiding and interfaces
As you’re building out an application, code will invariably grow in both volume and complexity. This can eventually turn your code base into an unapproachable tangle, but you can help it by writing more straightforward code and making it easier to follow the flow of code. One way to drive down the complexity creep is to hide away unnecessary information, keeping it inaccessible on the interface. This way only what matters gets exposed; the rest is considered to be irrelevant to the consumer, and it’s often referred to as implementation details. You don’t want to expose elements such as state variables you use while computing a result or the seed for a random number generator. This has to be done at every level; each function in every module should attempt to hide everything that isn’t relevant to its consumers. In doing this, you’ll do fellow developers and your future self a favor by reducing the amount of guesswork involved in figuring out how a particular method or module works.
As an example, consider the following listing illustrating how you might build an object to calculate a simple average sum. The listing (found as ch05/02_information-hiding in the samples) uses a constructor function and augments the prototype so Average objects have an add method and a calc method.
Listing 5.2. Calculating an average sum
function Average () {
this.sum = 0;
this.count = 0;
}
Average.prototype.add = function (value) {
this.sum += value;
this.count++;
};
Average.prototype.calc = function () {
return this.sum / this.count;
};
All that’s left to do is create an Average object, add values to it, and calculate the average. The problem in this approach is that you might not want people directly accessing your private data, such as Average.count. Maybe you’d rather hide those values from the API consumers using the techniques we’ll cover soon. An even simpler approach might be to ditch the object entirely and use a function instead. You could use the .reduce method (found on the Array prototype, new in ES5) to apply an accumulator function on an array of values to calculate the average:
function average (values) {
var sum = values.reduce(function (accumulator, value) {
return accumulator + value;
}, 0);
return sum / values.length;
}
The upside of this function is that it does exactly what you want. It takes an array of values, and it returns the average, as its name indicates. In addition, it doesn’t keep any state variables the way your prototypical implementation did, effectively hiding any information about its inner workings. This is what’s called a pure function: the result can only depend on the arguments passed to it, and it can’t depend on state variables, services, or objects that aren’t part of the argument body. Pure functions have another property: they don’t produce any side effects other than the result they provide. These two properties combined make pure functions good interfaces; they are self-contained and easily testable. Because they have no side effects or external dependencies, you can refactor their contents as long as the relationship between input and output doesn’t change.
Functional factories
An alternative implementation might use a functional factory. That’s a function that, when executed, returns a function that does what you want. As you’ll better understand in the next section, anything you declare in the factory function is private to the factory, and the function that resides within. This is easier to understand after reading the following code:
function averageFactory () {
var sum = 0;
var count = 0;
return function (value) {
sum += value;
count++;
return sum / count;
};
}
The sum and count variables are only available to instances of the function returned by averageFactory; furthermore, each instance has access only to its own context, those variables that were declared within that instance, but not to the context of other instances. Think of it like a cookie cutter. The averageFactory is the cookie cutter, and it cuts cookies (your function) that take a value and return the cumulative average (so far). As an example, here’s how its use might look:
var avg = averageFactory();
// <- function
avg(1);
// <- 1
avg(3);
// <- 2
Much like using your cookie cutter to cut out new cookies won’t affect existing cookies, creating more instances won’t have any effect on existing ones. This coding style is similar to what you did previously using a prototype, with the difference that sum and count can’t be accessed from anywhere other than the implementation. Consumers can’t access these variables, effectively making them an implementation detail of the API. Implementation details don’t only introduce noise; they can also potentially present security concerns: you wouldn’t want to grant the outside world the ability to modify the inner state of your components.
Understanding variable scopes, which define where variables are accessible, and this keyword, which provides context about the caller of a function, is essential in building solid structures that can hide information properly. Properly scoping variables enables you to hide the information that consumers of an interface aren’t supposed to know about.
5.1.3. Scoping and this keyword
In his undisputed classic, JavaScript: The Good Parts (O’Reilly Media, 2008),[1] Douglas Crockford explains many of the quirks of the language, and encourages us to avoid the “bad parts,” such as with blocks, eval statements, and type-coercing equality operators (== and !=). If you’ve never read his book, I recommend you do so sooner rather than later. Crockford says that new and this are tricky to understand, and he suggests avoiding them entirely. I say you need to understand them. I’ll describe what this represents, and then I’ll explain how it can be manipulated and assigned. In any given piece of JavaScript code, the context is made up of the current function scope, and this.
1 You can find JavaScript: The Good Parts at Amazon following this link: http://bevacqua.io/bf/goodparts.
If you’re used to server-side languages, such as Java or C#, then you’re used to thinking of a scope: the bag where variables are contained, which starts and ends whenever a curly brace is opened and closed, respectively. In JavaScript, scoping happens at the function level (called lexical scoping), rather than at the block level.
Figure 5.2 disambiguates lexical scoping from block scoping by comparing C#, which has block scoping (other examples include Java, Perl, C, and C++) with JavaScript, which has lexical scoping (R is another example).
Figure 5.2. Discrepancies in scoping across languages
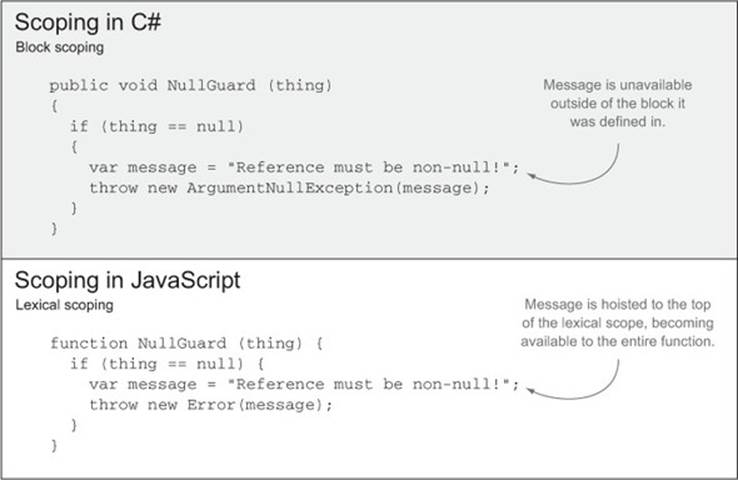
In the figure, a message variable is used in both examples. In the first example, message is only available inside the if statement block, while in the second example message is available to the entire function, thanks to lexical scoping. As you’ll learn, this has both benefits and drawbacks.
Variable scoping in JavaScript
An understanding of how scopes work will set you up to understand the module pattern, which we’ll visit in section 5.2 as a way of componentizing your code base. In JavaScript, function is a first-class citizen, and it’s treated like any other object. Nested functions each come with their own scope, and inner functions have access to the parent scope up until the global space. Consider the getCounter function in the following code:
function getCounter () {
var counter = 0;
return function () {
return counter++;
};
}
In this example, the counter variable is context-bound to the getCounter function. The returned function can access counter, because it’s part of the parent scope. But nothing outside getCounter can create a reference to counter; access to it has been shut down and only the privileged children of getCounter can manipulate it. If you introduce a console.log(this) statement at either scoping level, you’ll see in both cases the global Window object instance is referenced. This is the true “bad part;” by default, the this keyword will be a reference to the global object, as demonstrated in the following listing.
Listing 5.3. Understanding the this keyword
function scoping () {
console.log(this);
return function () {
console.log(this);
};
}
scoping()();
// <- Window
// <- Window
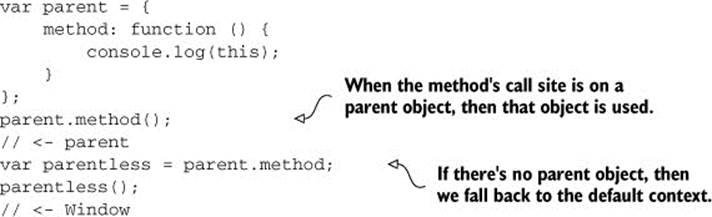
There are different ways we can manipulate the this keyword. The most common way to assign a this context is to invoke methods on an object. For example, when doing 'Hello'.toLowerCase(), 'Hello' will be used as the this context for the function call.
Getting to the call site
When functions are invoked directly as properties on an object, the object will become the this reference. If the method is in the object’s prototype—for example Object.prototype.toString—this will also be the object the method has been invoked on. Note that this is a fragile behavior; if you get a direct reference to a method and invoke that, then this won’t be the parent anymore but rather the global object once again. To illustrate, let me show you another listing.
Listing 5.4. Scoping the this keyword
Under strict mode, this will default to undefined, instead of Window. Outside strict mode, this is always an object; it’s the provided object if it’s called with an object reference; it’s a boxed representation if it’s called with a primitive boolean, string, or numeric value; or it’s the global object (again, undefined under strict mode) if it’s called with either undefined or null, either by getting a direct reference to the method or by using any one of these: .apply, .call, or .bind. The value passed as this to a function in strict mode isn’t boxed into an object. We’ll get to what else strict mode does shortly.
Other than what happens out of the box when invoking functions, you can use different methods to assign a value to this; it’s not entirely out of your control. In fact, you could use .bind to create a function that will always have the this value provided to it. Alternative ways of executing a method include .apply, .call, and the new operator. Here’s a cheat sheet so you can see the methods in action:
Array.prototype.slice.call([9, 5, 7], 1, 2)
// <- [5]
String.prototype.split.apply('13.12.02', ['.'])// <- ['13', '12', '02']
var data = [1, 2];
var add = Array.prototype.push.bind(data, 3);
add(); // effectively the same as data.push(3)
add(4); // effectively the same as data.push(3, 4)
console.log(data);
// <- [1, 2, 3, 3, 4]
In JavaScript, variables fill a scope in the following order:
· Scope context variables: this and arguments
· Named function parameters: function (these, variable, names)
· Function expressions: function something () {}
· Local scope variables: var foo
If you’re not experimenting or following along with a JavaScript interpreter by your side, make sure to look at the code sample (ch05/03_context-scoping); I’ve included these examples in the source code provided with the book, and they have a few inline comments if you have trouble understanding. Let’s now discuss what the strict mode entails.
5.1.4. Strict mode
When enabled, strict mode modifies semantics in the way your code works, reducing the leniency toward missing var statements and similarly error-prone practices, sort of complementary to using a linter.[2] Strict mode can be enabled on individual functions or on an entire script.
2 Get a detailed explanation of strict mode in Mozilla Developer Network at http://bevacqua.io/bf/strict.
For client-side code, the function form is preferred. To turn on strict mode, put the 'use strict'; statement (double quotes work, too) at the top of a file or function:
function () {
'use strict';
// here lies strict mode
}
Aside from this defaulting to undefined, rather than the global object, strict is less tolerant of mistakes, turning them into errors rather than correcting them. Restrictions also include banning the with statement, octal notation, and preventing keywords such as eval and arguments to be assigned.
'use strict';
foo = 'bar' // ReferenceError foo is not defined
Under strict mode, the engine also throws an exception if you attempt to write on read-only properties, delete undeletable properties, instantiate an object with duplicate property keys, or declare a function with duplicate argument names. This kind of intolerance helps catch issues due to sloppy coding.
The last quirk I want to cover while we’re on the topic of scoping is something that’s commonly referred to as hoisting. Understanding hoisting is important if you’re to write complex JavaScript applications sensibly.
5.1.5. Variable hoisting
A large number of JavaScript interview questions can be answered with an understanding of scoping, how this works, and hoisting. We’ve covered the first two, but what exactly is hoisting? In JavaScript, hoisting means that variable declarations are pulled to the beginning of a scope. This explains the unexpected behavior you can observe in certain situations.
Function expressions are hoisted entirely: the function body is also hoisted, not only their declaration. If I had a single thing to take away from The Good Parts, it would be learning about hoisting; it changed the way I write code, and reason about it.
Hoisting is the reason invoking function expressions before declaring them works as expected. Assigning functions to a variable won’t do the trick, because the variable won’t be assigned by the time you want to invoke the function. The following code is one example; you’ll find more examples in the accompanying source code, listed as ch05/04_hoisting:
var value = 2;
test();
function test () {
console.log(typeof value);
console.log(value);
var value = 3;
}
You might expect the method to print 'number' first, and 2 afterward, or maybe 3. Try running it! Why does it print 'undefined' and then undefined? Well, hello hoisting! It’ll be easier to picture if you rearrange the code the way it ends up after hoisting takes place. Let’s look at the following listing.
Listing 5.5. Using hoisting
var value;
function test () {
var value;
console.log(typeof value);
console.log(value);
value = 3;
}
value = 2;
test();
The value declaration at the end of the test function got hoisted to the top of the scope, and it’s also why test didn’t give a TypeError exception, warning that undefined isn’t a function. Keep in mind that if you used the variable form of declaring the test function, you would, in fact, have gotten that error, because although var test would be hoisted, the assignment wouldn’t be, effectively becoming the code in the following listing.
Listing 5.6. Hoisting var test
var value;
var test;
value = 2;
test();
test = function () {
var value;
console.log(typeof value);
console.log(value);
value = 3;
};
The code in listing 5.6 won’t work as expected, because test won’t be defined by the time you want to invoke it. It’s important to learn what gets hoisted and what doesn’t. If you make a habit of writing code as if it were already hoisted, pulling variable declarations and functions to the top of their scope, you’ll run into fewer problems than you might run into otherwise. At this point you should feel comfortable with scoping and the this keyword. It’s time to talk about closures and modular patterns in JavaScript.
5.2. JavaScript modules
Up to this point, you’ve looked at the single responsibility principle, information hiding, and how to apply those in JavaScript. You also have a decent idea of how variables are scoped and hoisted. Let’s move on to closures. These will help you create new scopes and prevent variables from leaking information.
5.2.1. Closures and the module pattern
Functions are also referred to as closures, particularly when focusing on the fact that functions create new scopes. An IIFE is a function that you execute immediately. The term IIFE stands for Immediately-Invoked Function Expression. Using an IIFE is useful when all you want is a closure. The following code is an example IIFE:
(function () {
// a new scope
})();
Note the parentheses wrapping the function. These tell the interpreter you’re not only declaring an anonymous function, but also using it as a value. These expressions can also be used in assignments, which are useful if you need variables accessible by the exported return value. This is commonly referred to as the module pattern, as shown in the following code (labeled ch05/05_closures in the samples):
var api = (function () {
var local = 0; // private and in-place!
var publicInterface = {
counter: function () {
return ++local;
}
};
return publicInterface;
})();
api.counter();
// <- 1
A common variant to the previous code doesn’t rely on anything outside of the closure, but instead imports the variables it’s going to use. If it wants to expose a public API, then it imports the global object. I tend to favor this approach because everything is nicely wrapped by a closure, and you can instruct JSHint to blow up on issues due to undeclared variables. Without a closure and JSHint, these would inadvertently become globals. To illustrate, look at the following code:
(function (window) {
var privateThing;
function privateMethod () {
}
window.api = {
// public interface
};
})(window);
Let’s consider prototypal modularity, which augments a prototype rather than using closures, as a complementary alternative to IIFE expressions. Using prototypes provides performance gains, as many objects can share the same prototype and adding functions on the prototype provides the functionality to all the objects that inherit from it.
5.2.2. Prototypal modularity
Depending on your use case, prototypes might be exactly what you need. Think of prototypes as JavaScript’s way of declaring classes, even though it’s an entirely different model, because prototypes are simply links, and you can’t override properties unless you replace them entirely (and do the overriding by hand). In short, don’t try to treat prototypes as classes, because it will assuredly result in maintainability issues. Prototypes are most useful when you expect to have multiple instances of your module. For example, all JavaScript strings share the String prototype. A good use for prototypes is when interacting with DOM nodes. Sometimes I find myself declaring prototypal modules inside a closure and then keeping private state in the closure, outside the prototype. The following listing shows pseudo-code, but please look at the accompanying code sample listed as ch05/06_prototypal-modularity for a fully working example and to get a better understanding of the pattern.
Listing 5.7. Using pseudo-code for prototypes
var lastId = 0;
var data = {};
function Lib () {
this.id = ++lastId;
data[this.id] = {
thing: 'secret'
};
}
Lib.prototype.getPrivateThing = function () {
return data[this.id].thing;
};
This is one way to keep data safe from consumers; many scenarios exist when data privatization isn’t necessary and where allowing consumers to manipulate your instance data might be a good thing. You should wrap all of this in a closure so your private data doesn’t leak out. I believe prototypes in JavaScript are most useful when dealing with DOM interaction, as we’ll investigate in chapter 7. That’s because when dealing with DOM objects, you usually have to work with many elements at the same time; prototypes improve performance because their methods aren’t replicated on each instance, saving resources.
Now that you have a clearer understanding of how scoping, hoisting, and closures work, we can move on to how modules are meant to interact with one another. First, let’s look at CommonJS modules: a way to keep code well-organized and deal with dependency injection (DI) at once.
5.2.3. CommonJS modules
CommonJS (CJS) is a specification adopted by Node.js, among others, which allows you to write modular JavaScript files. Each module is defined by a single file, and if you assign a value to module.exports, it becomes that module’s public interface. To consume a module, you callrequire with the relative path from the consumer to the dependency.
Let’s look at a quick example, labeled ch05/07_commonjs-modules in the samples:
// file at './lib/simple.js'
module.exports = 'this is a really simple module';
// file at './app.js'
var simple = require('./lib/simple.js');
console.log(simple);
// <- 'this is a really simple module'
One of the most useful advantages of these modules is that variables don’t leak to the global object: you have no need to wrap your code in a closure. The variables that are declared on the top-most scope (such as the simple variable in the previous snippet) are merely available in that module. If you want to expose something, you need to make that intent explicit by adding it to module.exports.
At this point you might think I went off the trail with CJS, given that it’s not supported natively in browsers any more than are CoffeeScript and TypeScript. You’ll soon learn how to compile these modules using Browserify, a popular library designed to compile CJS modules to something browsers can deal with. CJS has the following benefits over the way browsers behave:
· No global variables, less cognitive load
· Straightforward process to expose an API and consume a module
· Easier to test modules by mocking dependencies
· Access to packages on npm, thanks to Browserify
· Modularity, which translates into testability
· Easy to share code between client and server, if you’re using Node.js
You’ll learn more about package management solutions (npm, Bower, and Component) in section 5.4. Before we get there, we’ll look at dependency management, or how to deal with the components needed by your application, and how different libraries can help manage them.
5.3. Using dependency management
We’ll discuss two kinds of dependency management here: internal and external. When talking about internal dependencies, I’m referring to those that are part of the program you’re writing. Most frequently, these are a one-to-one mapping to physical files, but you might also have multiple modules in a single file. By modules I mean pieces of code that have a single responsibility, regardless of them being services, factories, models, controllers, or something else. External dependencies are, in contrast, those in which the code isn’t governed by your application itself. You may own or have authored the package, but the code belongs to a different repository altogether, regardless.
I’ll explain what dependency graphs are, and then we’ll investigate ways of working through them, such as the caveats with resorting to the RequireJS module loader, the innocent straightforwardness made available by CommonJS, and the elegant way AngularJS (a Model-View-Controller framework built by Google) resolves dependencies while keeping everything modular and testable.
5.3.1. Dependency graphs
When writing out a module which depends on something else, the most common approach is to have your module create an instance of the object you depend on. To illustrate the point, bear with me through a little Java code; it should be easy to wrap your head around. The following listing displays a UserService class, which has the purpose of serving any data requests from a domain logic layer. It could consume any IUserRepository implementation which is tasked with retrieving the data from a repository such as a MySQL database or a Redis store. This listing is labeled ch05/08_dependency-graphs in the samples.
Listing 5.8. Using a module to create an object
public class UserService {
private IUserRepository _userRepository;
public UserService () {
_userRepository = new UserMySqlRepository();
}
public User getUserById (int id) {
return _userRepository.getById(id);
}
}
But that doesn’t cut it; if your service is supposed to use any repository that conforms to the interface, why are you hard-coding UserMySqlRepository that way? Hard-coded dependencies make it more difficult to test a module, because you wouldn’t merely test against the interface, but rather against a concrete implementation. A better approach, which is coincidentally more testable, might be passing that dependency through the constructor, as shown in the following listing. This pattern is often referred to as dependency injection, which is a smart-sounding alternative to giving an object its instance variables.
Listing 5.9. Using dependency injection
public class UserService {
private IUserRepository _userRepository;
public UserService (IUserRepository userRepository) {
if (userRepository == null) {
throw new IllegalArgumentException();
}
_userRepository = userRepository;
}
public User getUserById (int id) {
return _userRepository.getById(id);
}
}
This way, you can build out your service the way it was intended, as a consumer of any repository conforming to the IUserRepository interface without any knowledge of implementation specifics. Creating a UserService might not sound like such a great deal, but it gets harder as soon as you take into consideration its dependencies, and its dependencies’ dependencies. This is called a dependency tree. The following snippet is certainly unappealing:
String connectionString = "SOME_CONNECTION_STRING";
SqlConnectionString connString = new SqlConnectionString(connectionString);
SqlDbConnection conn = new SqlDbConnection(connString);
IUserRepository repo = new UserMySqlRepository(conn);
UserService service = new UserService(repo);
The code shows inversion of control (IoC),[3] which is a wordy definition for something rather simple. IoC means that instead of making an object responsible for the instantiation of its dependencies, or getting references to them, the object is given the dependencies through its constructor or through public properties. Figure 5.3 examines the benefits of using an IoC pattern.
3 Read a primer on inversion of control and dependency injection by Martine Fowler at http://bevacqua.io/bf/ioc.
Figure 5.3. Classical dependencies compared with using IoC to improve testability
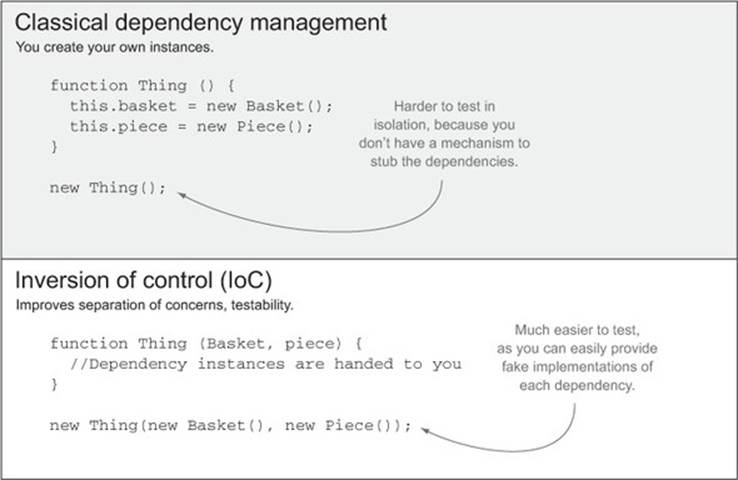
The IOC code (at the bottom of the figure) is easier to test, more loosely coupled, and easier to maintain as a result, than the classic dependency management code shown at the top of the figure.
IoC frameworks are used to address dependency resolution and mitigate dependency hell. The basic gist of these frameworks is that you ditch the new keyword and rely on an IoC container. The IoC container is a registry that has knowledge about how to instantiate your services, repositories, and any other modules. Learning how to configure a traditional IoC container (such as Spring in the case of Java, or Castle Windsor for C#) is outside of the scope of this book, but a top-level view of the issue is required to pave the road ahead.
Is IoC important for testability?
Ultimately, the importance of avoiding hard-coded dependencies lies in the ability to easily mock them when unit testing, as you’ll see in chapter 8.
Unit testing is about asserting whether interfaces work as expected, regardless of how they’re implemented. Mocks are stubs that implement the interface, but don’t do anything other than the bare minimum to conform to them. For example, a mocked user repository might always return the same hard-coded User object. This is useful in the context of unit testing, where you might want to test the UserService class on its own, but don’t need details about its inner workings, much less how its dependencies are implemented!
Great! Enough Java for now, though. What does any of this have to do with JavaScript Application Design? Understanding testability principles is required if you hope to write testable code. Although you may not agree with the Test-Driven Development movement, it’s undeniable that code that isn’t written with testability in mind is much harder to write tests for. When speaking about client-side JavaScript, you have an additional layer of complexity: networking. Modules aren’t immediately available unless your code is bundled together the way you learned to do it in chapter 2.
Next, I’ll introduce you to RequireJS, an asynchronous module loader, which is a better option than the classical approach of having an unmanaged dependency soup.
5.3.2. Introducing RequireJS
RequireJS is a JavaScript asynchronous module loader (AMD) that allows you to define modules and have them depend on one another. The following code (found as ch05/09_requirejs-usage in the samples) is an example usage of AMD, depicting a module that depends on something else:
require(['lib/text'], function(text) {
var result = text('foo bar');
console.log(result);
// <- 'FOO BAR'
});
By convention, 'lib/text’ looks for the file that can be found at the ./lib/text.js path, relative to the JavaScript directory root. That resource will be requested, interpreted, and once all dependencies have been loaded, the module’s function will be invoked, getting its dependencies as arguments to the module’s function, much like the Java code I talked about in section 5.3.1. The sample 'lib/text' module is defined as follows:
define([], function () {
return function (input) {
return input.toUpperCase();
};
});
Next, let’s analyze where RequireJS is better than the alternatives, and where it falls short.
Benefits and drawbacks of RequireJS
In this case, the definition uses an empty array because it has no dependencies. The returned function is the public interface provided by the 'lib/text' module. The use of RequireJS has a few benefits:
· Dependency graph is automatically resolved. No more worrying about ordering script tags!
· Asynchronous module loading is included.
· A compile step isn’t required during development.
· It’s unit testable, so you only load the module that needs to be tested.
· Closures are enforced, because your module is defined in a function.
These are all true and nice to have, but drawbacks exist. If a package your code depends on isn’t wrapped in AMD magic, you have no option other than adding a compile step to bundle everything together. Unless you bundle your modules together, RequireJS will create an HTTP request cascade to fetch each dependency, which would be too slow in production systems. Many of the benefits of AMD came from the lack of a compile step, so you’re left with a glorified dependency graph resolver packed with the following drawbacks:
· Asynchronous loading functionality is unavailable if you use the bundler.
· It requires vendors to conform to the AMD model.
· It clutters your code with AMD wrappers.
· Production needs compilation.
· Code in release environments diverges from local development.
It’s been a while since we spoke of Grunt in chapter 4, and you wouldn’t want to release a bunch of unoptimized scripts! Grunt will help compile AMD modules during your builds so they don’t need to be fetched asynchronously.
To compile[4] AMD modules through r.js, the RequireJS optimizer, using Grunt, you can use the grunt-contrib-requirejs package. That package allows you to pass options through to r.js. The following listing is the pertinent task configuration. You’ll set default options that apply to every target in Grunt and tweak the debug target. This is useful when you’d otherwise have to repeat parts of the configuration, breaking the DRY principle.
4 Check out the accompanying code sample that shows how to compile RJS modules at http://bevacqua.io/bf/requirejs.
Listing 5.10. Using Grunt to configure a module
requirejs: {
options: {
name: 'app',
baseUrl: 'js/amd',
out: 'build/js/app.min.js'
},
debug: {
options: {
preserveLicenseComments: false,
generateSourceMaps: true,
optimize: 'none'
}
},
release: {}
}
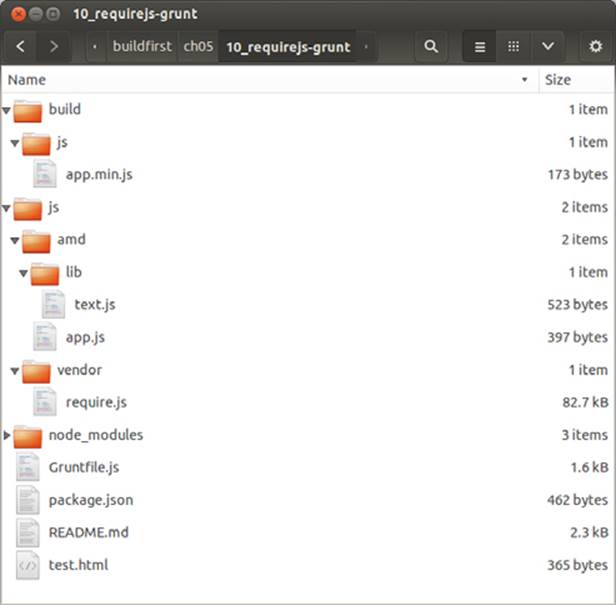
In the debug distribution you generate a source map,[5] which helps browsers map what they’re executing to the source code you used to compile it. This is useful when debugging, as you’ll get stack traces that point to the source code rather than hard-to-debug compilation results. Therelease target doesn’t have any additional configuration, because it merely uses the defaults provided previously. It’ll be easier for you to visualize the configuration if you take a look at the directory structure in the accompanying samples, which looks like the one in figure 5.4.
5 For more information on source maps, refer to this introductory article on HTML5Rocks at http://bevacqua.io/bf/sourcemap.
Figure 5.4. Typical file structure when using RequireJS during Grunt builds
Note
A sample that integrates RequireJS with Grunt can be found in the book’s source code at ch05/10_requirejs-grunt. It contains detailed information about the meaning of each option used to configure the RequireJS build task.
Not having to add script tags in a specific order is a nice feature to have, and you have a few ways to accomplish that. If you’re not entirely sold on the AMD solution, or if you’re curious, read on for an explanation of how you could bring CommonJS modules to the browser, as an alternative.
5.3.3. Browserify: CJS in the browser
In section 5.2.3 I explained the benefits of CJS, the module system used in Node.js packages. These modules also have a place in the browser, thanks to Browserify. This option is frequently pitched as an alternative to AMD, although opinions vary. As you’re following a Build First approach, compiling CJS modules for the browser won’t be a big deal; it’s another step in your build process!
In addition to the advantages described in section 5.2.3, such as no implicit globals, CJS offers a terse alternative to AMD in that you don’t need all the clutter and boilerplate needed by AMD to define a module. A continuously improving trait in favor of CJS modules is immediate access to any package in the npm registry out of the box. In 2013, the npm registry grew by an order of magnitude (or 10x), and at the time of this writing, it boasts well more than 100,000 registered packages.
Browserify will recursively analyze all the require() calls in your app to build a bundle that you can serve up to the browser in a single <script> tag. As you might expect, Grunt has numerous plugins eager to compile your CJS modules into a Browserify bundle, and one such plugin isgrunt-browserify. Configuring it is more akin to what you saw in chapter 2, where you provided a filename declaring the entry point of your CJS module and an output filename as well:
browserify: {
debug: {
files: { 'build/js/app.js': 'js/app.js' },
options: { debug: true }
},
release: {
files: { 'build/js/app.js': 'js/app.js' }
}
}
I think most of the mental load in taking this approach won’t come from Browserify, but rather learning about require and modularity in CJS modules. Luckily, you already used CJS modules when configuring Grunt tasks throughout part 1, and that should give you insight into CJS, as well as a bunch of code samples to look at! A fully working example of how to compile CJS modules, using grunt-browserify, can be found at ch05/11_browserify-cjs in the accompanying code samples. Next up, we’ll look at how AngularJS deals with dependency resolution, as a third (and last) way to deal with dependency management.
5.3.4. The Angular way
Angular is an innovative client-side Model-View-Controller (MVC) framework developed at Google. In chapter 7 you’ll use another popular JavaScript MVC framework called Backbone. But Angular’s dependency resolver deserved a mention in this section.[6]
6 Angular’s documentation has an extensive guide explaining how DI works in Angular at http://bevacqua.io/bf/angular-di.
Leveraging Dependency Injection in Angular
Angular has a fairly elaborate dependency injection solution in place, so we won’t get into the details. Luckily for us, it’s abstracted well enough that it’s easy to use. I’ve personally used many different DI frameworks, and Angular makes it feel natural: you don’t even realize you’re doing DI, similarly to Java and RequireJS. Let’s walk together through a contrived example, which can be found at ch05/12_angularjs-dependencies in the samples. It’s convenient to keep the module declaration in its own file, something like this:
angular.module('buildfirst', []);
Then each of the different pieces of a module, such as services or controllers, are registered as extensions to that module, which you previously declared. Note that you’re passing an empty array to the angular.module function so your module doesn’t depend on any other modules:
var app = angular.module('buildfirst');
app.factory('textService', [
function () {
return function (input) {
return input.toUpperCase();
};
}
]);
Registering controllers is also similar; in the following example you’ll use the textService service you created. This works in a similar way to RequireJS, because you need to use the name you gave to the service:
var app = angular.module('buildfirst');
app.controller('testController', [
'textService',
function (text) {
var result = text('foo bar');
console.log(result);
// <- 'FOO BAR'
}
]);
Next up, let’s compare Angular to RJS in a nutshell.
Comparing Angular and RequireJS
Angular is different from RequireJS in that, rather than acting as a module loader, Angular worries about the dependency graph. You need to add a script tag for each file you’re using, unlike with AMD, which dealt with that for you.
In the case of Angular you see an interesting behavior where script order isn’t all that relevant. As long as you have Angular on top and then the script that declares your module, the rest of the scripts can be in whatever order you want, and Angular will deal with that for you. You need code such as the following on top of your script tag list, which is why the module declaration needs its own file:
<script src='js/vendor/angular.js'></script>
<script src='js/app.js'></script>
The rest of the scripts, which are part of the app module (or whatever name you give it), can be loaded in any order, as long as they come after the module declaration:
<!--
These could actually be in any order!
-->
<script src='js/app/testController.js'></script>
<script src='js/app/textService.js'></script>
Let’s draw a few quick conclusions on the current state of module systems in JavaScript.
Bundling Angular components using Grunt
As a side note, when preparing a build, you can explicitly add Angular and the module to the top, and then glob for the rest of the pieces of the puzzle. Here’s how you might configure the files array passed to a bundling task, such as the ones in the grunt-contrib-concat or grunt-contrib-uglify packages:
files: [
'src/public/js/vendor/angular.js',
'src/public/js/app.js',
'src/public/js/app/**/*.js'
]
You might not want to commit to the full-featured framework that is AngularJS, and you’re not about to include it in your project for its dependency resolution capabilities! As a closing thought, I’d like to add that there’s no right choice, which is why I presented these three methods:
· RequireJS modules, using AMD definitions
· CommonJS modules, and then compiling them with Browserify
· AngularJS, where modules will resolve the dependency graph for you
If your project uses Angular, that’s good enough that you wouldn’t need either AMD or CJS, because Angular provides a sufficiently modular structure. If you’re not using Angular, then I’d probably go for CommonJS, mostly because of the abundance of npm packages you can potentially take advantage of.
The next section sheds light on other package managers, and as you did for npm, teaches you how to leverage them in your client-side projects.
5.4. Understanding package management
One of the drawbacks of using package managers is that they tend to organize dependencies using a certain structure. For example, npm uses node_modules to store installed packages, and Bower uses bower_components. One of the great advantages to Build First is that’s not a problem, because you can add references to those files in your builds and that’s that! The original location of the packages won’t matter at all. That’s a huge reason to use a Build First approach.
I want to discuss two popular front-end package managers in this section: Bower and Component. We’ll consider the tradeoffs in each and compare them to npm.
5.4.1. Introducing Bower
Although npm is an extraordinary package manager, it isn’t fit for all package management needs: virtually all of the packages published to it are CJS modules, because it’s ingrained into the Node ecosystem. Although I chose to use Browserify so that I could write modular front-end code under the CJS format, this might not be the choice for every project you work on.
Bower is a package manager for the web, created at Twitter, and it’s content agnostic, meaning it doesn’t matter whether authors pack up images, style sheets, or JavaScript code. By now you should be accustomed to the way npm tracks packages and version numbers, using thepackage.json manifest. Bower has a bower.json manifest that’s similar to package.json. Bower is installed through npm:
npm install -g bower
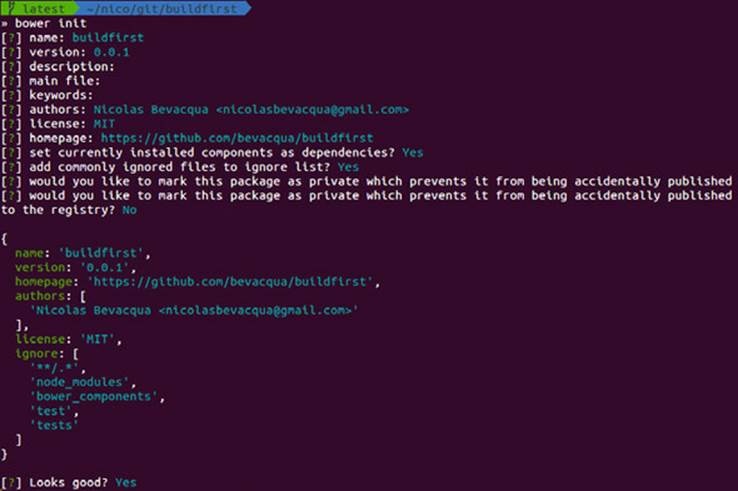
Installing packages with bower is fast and straightforward; all you need to do is specify the name or a git remote endpoint. The first thing you’ll need to do on a given project is run bower init. Bower will ask you a few questions (you can press Enter because the defaults are fine), and then it’ll create a bower.json manifest for you, as in figure 5.5.
Figure 5.5. Using bower init to create a bower.json manifest file
Once that’s out of the way, installing packages is a breeze. The following example installs Lo-Dash, a utility library similar to Underscore, but more actively maintained. It will download the scripts and place them in a bower_components directory, as shown in figure 5.6.
Figure 5.6. Using bower install --save to fetch a dependency and add it to the manifest
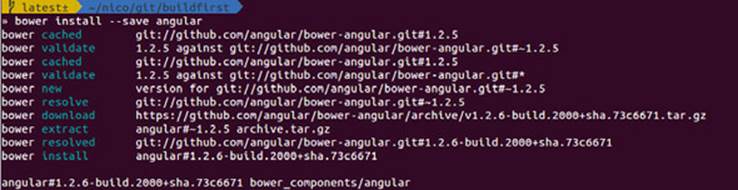
bower install --save lodash
That’s it! You should have scripts in the bower_components/lodash directory. Including them in your builds is a matter of adding the file to your distribution configuration. As usual, this example can be found in the accompanying source code; look for ch05/13_bower-packages.
Bower is arguably the second-largest package manager, with close to 20,000 packages in its registry, and behind npm, which has more than 100,000. Component, another package management solution, lags behind with nearly 3,000 packages under its belt, but it offers a more modular alternative and a more comprehensive solution to client-side package management. Let’s take a look!
5.4.2. Big libraries, small components
Huge libraries such as jQuery do everything you need, as well as things you don’t need. For instance, you might not need the animations or the AJAX that come with it. In this sense, struggling to keep pieces out of jQuery using custom builds is an uphill battle; automating the process isn’t trivial, and you’re doing more to get less, which I guess is what the “write less, do more” slogan refers to.
Component is a tool that’s all about small components that do one thing only but do it well. Rather than using a big library for all your needs, TJ Holowaychuk,[7] prolific open source author, advocates using multiple small blocks to build exactly what you need in a modular way and without any added bloat.
7 Read an introduction to Component on Holowaychuk’s blog at http://bevacqua.io/bf/component.
The first thing you’ll need to do, as usual, is install the CLI tool from npm:
npm install -g component
If you’re consuming components, you can get away with a manifest with the bare minimum valid JSON. Let’s create that, too:
echo "{}" > component.json
Installing components such as Lo-Dash works similarly to what you did previously with Bower. The main difference is that rather than using a registry whose sole purpose is tracking packages, like Bower does, Component uses GitHub as its default registry. Specifying the username and repository, as shown in the following command, is enough to fetch a component:
component install lodash/lodash
In contrast with what other libraries do, Component will always update the manifest, adding the packages you install. You must also add the entry point to the scripts field in the component manifest.
"scripts": ["js/app/app.js"]
Another difference you can find in Component is that it has an additional build step, which will bundle any components you’ve installed into a single build.js concatenated file. Given that components use CommonJS-style require calls, the necessary require function will also be provided.
component build
I encourage you to look at a pair of accompanying samples, which might help you learn how to use Component. The first one, ch05/14_adopting-component, is a fully working example of what has been described here.
The second, ch05/15_automate-component-build, explains how to automate the build step with Grunt, using the grunt-component-build package. Such a build step is particularly useful if your code is also treated as components.
To wrap things up, I’ll give you an overview of each of the systems we’ve discussed, which might help you decide on a package manager or module system.
5.4.3. Choosing the right module system
Component has the right idea behind it—modular pieces of code that do one thing well—but it has subtle drawbacks, as well. For instance, it has an unnecessary build step in component install. Executing component install should build everything you need for the components to work, the way npm does. It’s also kind of mystical to configure, and the documentation is hard to find. Poor naming is a huge drawback in this regard, as you can’t do a web search for Component and not get unrelated results, making it hard to find the documentation you want.
Bower is fine if you don’t buy into the CJS concept, and it’s certainly better than downloading code and placing it into directories by yourself and dealing with version upgrades on your own. Bower is fine for fetching packages, but it does little to help you with modularity, and that’s where it falls short.
As far as Browserify goes, at the moment it’s the best option that’s available to us, if you’re willing to concede that CJS is the simplest module format available today. The lack of a package manager embedded into Browserify is a good thing, because it doesn’t matter which source you pick for modules you consume. They can come from npm, Bower, GitHub, or somewhere else.
Browserify provides mechanisms for both bringing vendor code into the CJS format and exporting a CJS formatted application into a single file. As we discussed in 5.3.3, Browserify can produce source maps that help debug during development, and using it gives you access to any CJS modules originally written for Node development.
Last, AMD modules might be a good fit for using Bower, because they don’t interfere with each other. The benefit here is that you don’t have to learn the CJS approach, although I would argue that there isn’t all that much to learn about it.
Before discussing the changes coming to the JavaScript language in ECMAScript 6, there’s one more topic we need to tend to. That’s the topic of circular dependencies, such as a chicken depending on an egg that depends on a chicken.
5.4.4. Learning about circular dependencies
Circular dependencies, explained previously as a chicken depending on an egg that depends on a chicken, are a tough nut to crack, and they’re straight up unsupported by many module systems. In this brief section I aim to dispel any issues you have by answering the following questions:
· Is there a good reason to use circular dependencies?
· What patterns can you use to avoid them?
· How do the solutions we’ve talked about handle circular dependencies?
Components that depend on each other represent a code smell, meaning there might be a deeper problem in your code. The best approach to circular dependencies is to avoid them altogether. You can use a few patterns to avoid them. If two components are talking to each other, it might be a sign that they need to communicate through a service they both consume, for example. That way, it’ll be easier to reason about (and write code for) the affected components. In chapter 7, you’ll look at the ways you can avoid these chicken-and-egg type of situations when using AngularJS in client-side applications.
Using a service as a middleman is one of many ways to solve circular dependencies. You might have your chicken module depend on egg and talk to it directly, but if egg wants to talk to chicken, then it should use the callbacks chicken gives to it. An even simpler approach is to have instances of your modules depend on each other. Have a chicken and an egg depending on each other, rather than the entire families, and the problem is circumvented.
You also need to take into account that different systems deal with circular dependencies differently. If you try to resolve a circular dependency in Angular, it will throw an error. Angular doesn’t provide any mechanisms to deal with circular dependencies at the module level. You can get around this by using their dependency resolver. Once an egg module that depends on the chicken module is resolved, then the chicken module can fetch the egg module when it’s used.
In the case of AMD modules, if you define a circular dependency such that chicken needs egg and egg needs chicken, then when egg’s module function is called, it will get an undefined value for chicken. egg can fetch chicken later, after modules have been defined by using therequire method.
CommonJS allows circular dependencies by pausing module resolution whenever a require call is made. If a chicken module requires an egg module, then interpretation of the chicken module is halted. When the egg module requires chicken, it will get the partial representation of the chicken module, until the require call is made. Then the chicken module will finish being interpreted. The code sample labeled ch05/16_circular-dependencies illustrates this point.
The bottom line is that you should avoid circular dependencies like the plague. Circular dependencies introduce unnecessary complexity into your programs, module systems don’t have a standard way of dealing with them, and they can always be avoided by writing code in a more organized way.
To wrap up this chapter, we’ll go through a few changes coming to the language in ECMAScript 6, and what they bring to the table when it comes to modular component design.
5.5. Harmony: a glimpse of ECMAScript 6
As you might know, ECMAScript (ES) is the spec that defines the behavior of JavaScript code. ES6, also known as Harmony, is the (long-awaited) upcoming version of the spec. Once ES6 lands, you’ll benefit from hundreds of small and large improvements to the language, part of which I’ll cover in this section. At the time of this writing, parts of Harmony are in Chrome Canary, the edge version of Google Chrome, and also in the Firefox Nightly build. In Node, you can use the --harmony flag when invoking the node process to enable ES6 language features.
Please note that ES6 features are highly experimental and subject to change; the spec is constantly in flux. Take what’s discussed in this section with a pinch of salt. I’ll introduce you to concepts and syntax in the upcoming language release; features proposed as part of ES6 at this point are unlikely to change, but specific syntax is more likely to be tweaked.
Google has made an interesting effort in popularizing ES6 learning through their Traceur project, which compiles ES6 down to ES3 (a generally available spec version), allowing you to write code in ES6 and then execute the resulting ES3. Although Traceur doesn’t support every feature in Harmony, it’s one of the most featured compilers available.
5.5.1. Traceur as a Grunt task
Traceur is available as a Grunt task, thanks to a package called grunt-traceur. You can use the following configuration to set it up. It will compile each file individually and place the results in a build directory:
traceur: {
build: {
src: 'js/**/*.js',
dest: 'build/'
}
}
With the help of this task, you can compile a few of the ES6 Harmony examples I’ll show you along the way. Naturally, the accompanying code samples have a working example of this Grunt task, as well as a few different snippets of what you can do with Harmony, so be sure to check outch05/17_harmony-traceur and skim through those samples. Chapters 6 and 7 also contain more pieces of ES6 code, to give you a better picture of what features are coming to the language.
Now that you know of a few ways to turn ES6 features on, let’s dive into Harmony’s way of doing modules.
5.5.2. Modules in Harmony
Throughout this chapter, you’ve navigated different module systems and learned about modular design patterns. Input from both AMD and CJS have influenced the design decisions behind Harmony modules, in a way that aims to please proponents of either system. These modules have their own scope; they export public API members using the export keyword, which can later be imported individually using the import keyword. An optional explicit module declaration allows for file concatenation.
What follows is an example of how these mechanics work. I’m using the latest syntax available[8] at the time of this writing. The syntax comes from a meeting held in March 2013 by TC39, the technical committee in charge of moving the language forward. If I were you, I wouldn’t focus too much on the specifics, only the general idea.
8 Find the ES6 article at http://bevacqua.io/bf/es6-modules.
To begin with, you’ll define a basic module with a couple of exported methods:
// math.js
export var pi = 3.141592;
export function circumference (radius) {
return 2 * pi * radius;
}
Consuming these methods is a matter of referencing them in an import statement, as shown in the following code snippet. These statements can choose to import one, many, or all the exports found in a module. The following statement imports the circumference export into the local module:
import { circumference } from "math";
If you want to import multiple exports, you comma-separate them:
import { circumference, pi } from "math";
Importing every export from a module in an object, rather than directly on the local context, can be done using the as syntax:
import "math" as math;
If you want to define modules explicitly, rather than having them be defined implicitly, for release scenarios where you’re going to bundle your scripts in a single file, there’s a literal way in which you can define a module:
module "math" {
export // etc...
};
If you’re interested in the module system in ES6, you should read an article[9] that encompasses what you’ve learned so far about ES6, and sheds light on the module system’s extensibility. Always keep in mind that the syntax is subject to change. Before heading to chapter 6, I have one last little ES6 feature to touch on with regard to modularity. That’s the let keyword.
9 Find this ES6 article at http://bevacqua.io/bf/es6-modules.
5.5.3. Let there be block scope
The ES6 let keyword is an alternative to var statements. You may remember that var is function scoped, as you analyzed in section 5.1.3. With let, you get block scoping instead, which is more akin to the scoping rules found in traditional languages. Hoisting plays an important role when it comes to variable declaration, and let is a great way to get around the limitations of function scoping in certain cases.
Consider, for instance, the scenario below, a typical situation where you conditionally want to declare a variable. Hoisting makes it awkward to declare the variable inside the if, because you know it’ll get hoisted to the top of the scope, and keeping it inside the if block might cause trouble if someday you decide to use the same variable name in the else block.
function processImage (image, generateThumbnail) {
var thumbnailService;
if (generateThumbnail) {
thumbnailService = getThumbnailService();
thumbnailService.generate(image);
}
return process(image);
}
Using the let keyword you could get away with declaring it in the if block, not worrying about it leaking outside of that block, and without the need to split the variable declaration from its assignment:
function processImage (image, generateThumbnail) {
if (generateThumbnail) {
let thumbnailService = getThumbnailService();
thumbnailService.generate(image);
}
return process(image);
}
The difference is subtle in this case, but getting away from having a long list of variables listed on the top of a function scope, which might only be used in one of the code paths, is a code smell in current JavaScript implementations using var. It’s a code smell that could easily be avoided by using the let keyword, keeping variables in the block scope they belong to.
5.6. Summary
At long last, you’re done with scoping, module systems, and so on!
· You learned that keeping code self-contained that has a clear purpose, as well as information hiding, can greatly improve your interface designs.
· Scoping, this, and hoisting are much clearer now, which will help you design code that fits the JavaScript paradigm better, without even realizing it.
· Using closures and the module pattern taught you how module systems work.
· You compared how CommonJS, RequireJS, and Angular deal with module loading, and how they handle circular dependencies.
· You learned about the importance of testability, which we’ll expand on in chapter 8, and how the Inversion of Control pattern can make your code more testable.
· We discussed how to leverage npm packages in the browser thanks to Browserify, downloading dependencies with Bower, and the UNIX philosophy of writing modular code with Component.
· You saw what’s coming in ES6, such as the module system and the let keyword, and you learned how to play around with ES6 using the Traceur compiler.
In chapter 6 you’ll learn about asynchronous JavaScript development. You’ll learn your way around common pitfalls, and you’ll work through examples that will help you understand how to effectively debug these functions. You’ll look at various patterns for writing asynchronous functions, such as callbacks, events, Promises, and the upcoming generators API in Harmony.
All materials on the site are licensed Creative Commons Attribution-Sharealike 3.0 Unported CC BY-SA 3.0 & GNU Free Documentation License (GFDL)
If you are the copyright holder of any material contained on our site and intend to remove it, please contact our site administrator for approval.
© 2016-2026 All site design rights belong to S.Y.A.