JavaScript Application Design: A Build First Approach (2015)
Part 2. Managing complexity
Chapter 7. Leveraging the Model-View-Controller
This chapter covers
· Comparing pure jQuery to MVC
· Learning about MVC in JavaScript
· Introducing Backbone
· Building Backbone applications
· Looking at shared-view rendering in the server and browser
Until now, we’ve discussed topics around application development, such as crafting a build process. We also talked about code-related topics, such as coherent asynchronous flows and modular application design. We haven’t yet covered the bulk of an application itself, which is what we’ll do in this chapter. I’ll explain why jQuery, a popular library that makes interacting with the DOM easier, might be lacking for large-scale application design and what tools you can use to supplement it or how to replace it entirely. You’ll look at developing an application using the Model-View-Controller (MVC) design pattern, and you’ll create an application to manage a list of to-do items throughout the chapter.
Like modularity, MVC improves software quality by separating concerns. In the case of MVC, this separation is split into three types of modules: Models, Views, and Controllers. These parts are interconnected to separate internal information representation (Models, what the developer understands) from the presentation layer (Views, what the user sees) from the logic that connects both representations of the same data (Controllers, which also help validate user data and decide what views to show them).
First I’ll tell you why jQuery doesn’t suffice in large scale application design, and then I’ll teach you about MVC in JavaScript through the Backbone.js library. The goal here isn’t for you to become a Backbone grandmaster, but rather to get you started in the wonderful world of modern JavaScript application structure design.
7.1. jQuery isn’t enough
Since its inception, the jQuery library has helped virtually every web developer out there by doing a few things well. It works around known bugs across different browser versions, and it normalizes the web API across browsers, giving the consumer a flexible API that delivers consistent results, making it easy to use.
jQuery helped popularize CSS selectors as the preferred method of querying the DOM in JavaScript. The native querySelector DOM API works similarly to querying in jQuery, allowing you to search for DOM elements using a CSS selector string. On its own, however, jQuery isn’t enough. Let’s discuss why.
Code organization and jQuery
jQuery provides no means for organizing your code base, and that’s okay because jQuery wasn’t designed to do that. Although jQuery makes it simpler to access the native DOM API, it makes no effort to perform the necessary tasks to take your application closer to a well-structured one. Relying on jQuery alone is fine for traditional web applications where you don’t have a need for structure, but doing so isn’t suitable for the job of developing single page applications, which tend to have a larger and more complex client-side code base.
Another reason jQuery is so popular even today is because it’s a library that plays well with others. This means you’re not forced into using jQuery for everything you do. Rather, you can combine it with other libraries, which may or may not be meant to augment jQuery. You may also use jQuery on its own without other libraries. Unless you pair jQuery with an MVC library or framework, it’ll be difficult to develop modular components that don’t become a maintainability nightmare over time.
The MVC pattern separates your application’s concerns into views, models, and controllers; these components interact and collaborate with each other to serve the application. Most of the logic you develop becomes self-contained, meaning that a single complex view won’t translate into a complex application, making it a great choice for developing scalable applications. MVC came into existence in the late 1970s, but it only made its way into web applications with Ruby on Rails in 2005. In 2010, Backbone was released, bringing MVC into the client-side JavaScript application development mainstream. Today, dozens of alternatives exist for developing MVC web applications in JavaScript.
View templates
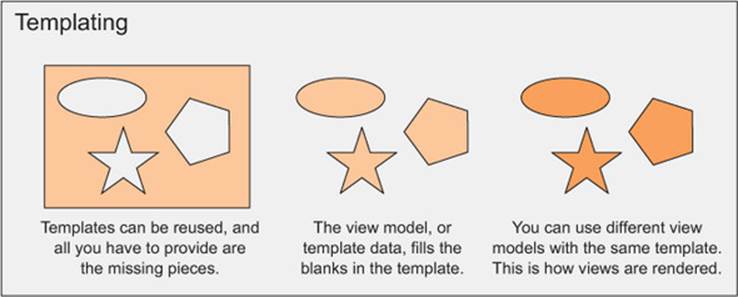
First you have the HTML; we’ll call that the view. This is what defines how your component looks and how it’s represented on the user interface. This is also how you define where pieces of data will go. If you use only jQuery, then you’d have to create the DOM elements that make up your component by hand, with their corresponding HTML attribute values and inner text. Typically, though, you’d use a templating engine, which takes a template string (of HTML, in your case) and data, and fills out the template using that data. There might be parts of the template where you loop through an array and create a few HTML elements for each item in the array. That kind of code is tedious to write in plain JavaScript, even if you’re using jQuery. You don’t have to worry about that if you’re using a templating library, because the engine will handle it for you. Figure 7.1 illustrates how templates work as reusable components.
Figure 7.1. Reusing templates with different template data models
Using controllers
Then there’s the functionality, giving life to your views; we call this the controller. This is how you take your still HTML template and give it life. In the controller you’ll do things such as binding DOM events to certain actions or updating the view when something happens. This is an easy thing to do with jQuery; you add events to the DOM, and that’s it, right? That’s fine for one-time bindings, but what if you want to develop a component using a view like you saw previously and also bind events to the rendered HTML?
For this scenario you’d need a way to consistently create the DOM structure, bind events to it, react to changes, and update it. You also need this to work in isolation, because this is a reusable component, and you want it to work in many places in your application. To be blunt, you’ll end up slowly writing your own MVC framework. That’s fine, as a learning exercise. In fact, that’s exactly how I’ve come to understand and value MVC in JavaScript. I wrote my own MVC engine for a pet project, my blog, and that’s what got me on the path of learning more about other MVC engines in JavaScript. The alternative is to use an existing (and proven) MVC framework.
This primer explains how the MVC pattern works, how it helps develop complex applications, and why it’s needed. In section 7.2 you’ll learn how it can be applied in JavaScript. You’ll look at different libraries that help write MVC code, and then you’ll settle for Backbone. As you would expect, the MVC pattern dictates that your application should be split into
· Models that hold the information necessary to render a view
· Views that are in charge of rendering a model and allowing the human to interact with it
· Controllers that fill the models before rendering their related views and manage human interaction with the component
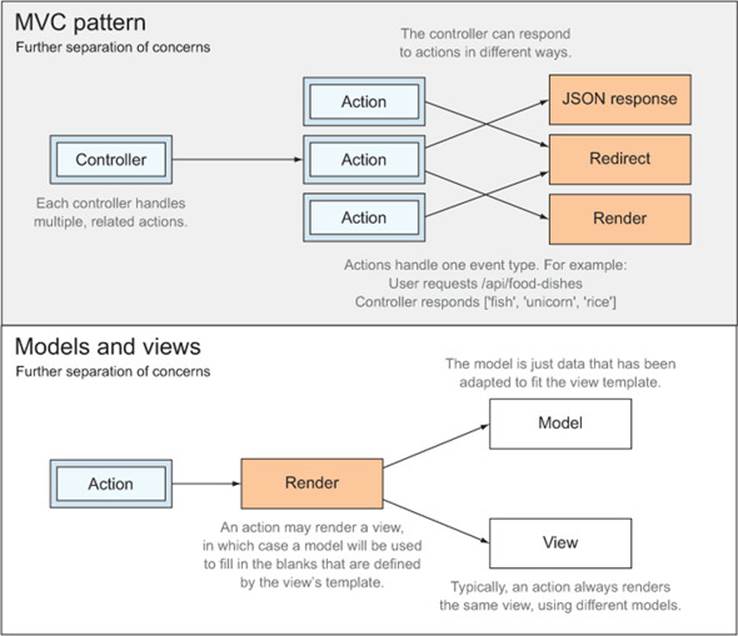
Figure 7.2 illustrates the interaction between the different elements in a typical MVC application design.
Figure 7.2. The MVC pattern separates concerns into controllers, views, and models.
Models
Models define the information to be conveyed by the views. This information can be pulled from a service that, in turn, fetches the data from a database source, as we’ll cover in chapter 9 when discussing REST API design and the service layer. A model contains raw data, but there isn’t any logic in models; they’re static collections of related data. It doesn’t know anything about displaying that data, either. That concern is left to views and views alone.
Views
A view is the combination of a template, which gives structure to a data representation of the model, and a model, which contains the data itself. Models can and often are reused across different views. For instance, an “Article” model could be used in both the “Search” view and the “ArticleList” view. Combining a view template with a view model yields a view that can then be used as the response to an HTTP request.
Controllers
Controllers decide what view to render, and that’s one of their primary purposes. The controller will decide on a view to render, prepare a view model containing all the relevant bits and pieces for the view template, and let the view engine render the view using the provided model and template. You can use controllers to add behavior to your views, respond to specific actions, or redirect humans to another view.
Router
The view router is a fundamental piece of MVC in the web, although it’s not part of its name. A view router is the first component of MVC applications that gets hit by a request. A router matches URL patterns to controller actions by following previously defined rules. Rules are defined in code, and they capture a request based on a condition: “Whenever a request for /articles/{slug} is made, route that request through the Articles controller, invoking the getBySlug action, passing it the slug parameter” (the slug is interpolated from the requested URL). The router then delegates to the controller, which will validate the request, decide on a view and render it, redirect to other URLs, and perform similar actions. Rules are evaluated in sequence. If the requested URL doesn’t match the rule’s pattern, it simply ignores the request, and the next rule is evaluated.
Let’s get deeper into JavaScript MVC, which spans the rest of this chapter.
7.2. Model-View-Controller in JavaScript
The MVC pattern is nothing new, although it has seen a significant increase in adoption in the last decade, particularly in the client-side web world, which has traditionally been completely devoid of any structure. In this section I’ll explain why I chose Backbone as my teaching weapon of choice, and why I discarded the other options I was considering. In section 7.3 I’ll show you the basics of MVC through Backbone. Then in section 7.4 you’ll dive into a case study where you’ll use Backbone to develop a small application so you can learn how to use it to build scalable applications. In chapter 9 you’ll take Backbone to the next level, along with everything else you’ve learned so far, and use it to flesh out a larger application.
7.2.1. Why Backbone?
Many different frameworks and libraries exist for performing client-side MVC, let alone server-side MVC, and sadly I can’t cover all of them. One of the hardest choices I had to make for this book was picking an MVC framework to use. For a long while, I was torn between React, Backbone, and Angular. Ultimately, I decided Backbone is the best tool for teaching the concepts I want to relay to you. Arriving at that choice wasn’t easy, and it came down mostly to maturity, simplicity, and familiarity. Backbone is one of the oldest MVC libraries out there, and therefore one of the most mature. It’s also one of the most popular MVC libraries. Angular is an MVC framework developed at Google. It’s also mature—in fact it was released before Backbone—but it’s also much more complex, having a steep learning curve. React is Facebook’s take; it’s not as complex as Angular, but it’s a much younger project, having been initially released in 2013, and it doesn’t provide true MVC capabilities as it’s meant to provide only the View in MVC.
Angular introduces concepts that can be hard to grasp at first, and I didn’t want to spend the rest of the book explaining these concepts. I felt Angular would’ve gotten in the way of teaching how to write MVC code, and I would’ve had to teach how to write Angular code instead. Most importantly, one of the requirements I had going in was to show off how to do shared rendering, reusing the same logic in the server and the browser, to render your views across the stack, and Angular isn’t the best solution out there when you want to have both server-side and client-side rendering, as it wasn’t developed with that constraint in mind. We’ll explore shared rendering in section 7.5.
Understanding progressive enhancement
Progressive enhancement is a technique that helps deliver a usable experience to everyone who uses your site. The technique suggests that you prioritize content, and then progressively add enhancements, such as additional functionality, to the content. Applications that are progressively enhanced must therefore serve the full content of a page without depending on client-side JavaScript to render the view. Once that minimally digestible content is provided to the user, the experience may be enhanced gradually by detecting the features available to the user’s browser. After that initial experience is provided, we may then provide a single-page application experience by means of client-side JavaScript.
Developing applications under this philosophy has several benefits. Because you’re prioritizing content, everyone visiting your site can get the minimal experience. This doesn’t mean that people who have JavaScript disabled can view your site, but that people who are data roaming on mobile networks can see the content faster. Furthermore, if the requests for the JavaScript assets fail to load, at least they’ll have access to a readable version of your website.
You can read more about progressive enhancement on my blog at http://ponyfoo.com/articles/tagged/progressive-enhancement.
React introduces more complexity than Backbone does, and it doesn’t provide a true MVC solution the way Angular and Backbone does. React helps you write your views, giving you templating capabilities, but it involves more work on your part if you want to use it exclusively as your MVC engine.
Backbone is easier to learn progressively. You don’t need to use every feature in it to build a simple application. As you make progress, you can add more components and include extra features in Backbone, such as routing, but you won’t need to even know about those features until you need them.
7.2.2. Installing Backbone
In chapter 5, you wrote your client-side code using CommonJS. Later, you’ll compile those modules so that browsers can interpret them. The next section is dedicated to laying down an automated compilation process using Grunt and Browserify. For now, let’s talk about Backbone. The first thing you’ll do is install it through npm, as shown here.
Remember, if you don’t have a package.json file, you should create one using npm init. Check out appendix A on Node.js applications if you get stuck.
npm install backbone --save
Backbone needs a DOM manipulation library such as jQuery or Zepto to function properly. You’ll use jQuery in your examples, because it’s more widely known. I recommend you look at Zepto if you’re considering this setup for a production-grade application, as it has a significantly smaller footprint. Let’s go ahead and install jQuery as well:
npm install jquery --save
Once you have both Backbone and jQuery, you can start putting together the application. The first few lines of code you’ll write are to set up your Backbone library. Backbone expects a jQuery-like library to be assigned to Backbone.$ before you use it, so you’ll need to give it that:
var Backbone = require('backbone');
Backbone.$ = require('jquery');
Backbone will use jQuery to interact with the DOM, attach and remove event handlers, and perform AJAX requests. That’s all there is to getting up and running.
It’s time to see Browserify in action! I’ll walk you through setting up Grunt to compile the code for the browser. Once that’s out of the way, you can make your way through the examples in the next few sections.
7.2.3. Browserifying your Backbone module with Grunt
You already touched on how to Browserify modules in chapter 5, section 5.3.3. The following listing shows how the Gruntfile configuration for Browserify looked back then.
Listing 7.1. Gruntfile configuration for Browserify
{
browserify: {
debug: {
files: { 'build/js/app.js': 'js/app.js' },
options: {
debug: true
}
}
}
}
This time around, let’s do two small tweaks to that configuration. The first tweak is because you want to watch for changes and have Grunt rebuild the bundle. This enables continuous, rapid development, as we addressed in chapter 3. To watch for changes you can use grunt-contrib-watch, as we discussed in chapter 3, using configuration such as the one in the following code:
{
watch: {
app: {
files: 'app/**/*.js',
tasks: ['browserify']
}
}
The tasks property contains any tasks that should run when the matched files change.
The other tweak uses something that’s called a transform. Transforms allow Browserify to change the source code in your modules, better adjusting it to your needs when it comes to running that code on the browser. In your case, the transform to include is called brfs for “Browser File System.” This transform inlines the results of fs.readFileSync calls, making it possible to keep the view templates separate from the JavaScript code. Consider the following module:
var fs = require('fs');
var template = fs.readFileSync(__dirname + '/template.html', {
encoding: 'utf8'
});
console.log(template);
That piece of code couldn’t be transformed to run in the browser because the browser doesn’t have access to files in your server’s file system. To work around that issue, you can use brfs by adding it to the list of transforms in your Grunt configuration options for grunt-browserify.The brfs transform will read files referenced by fs.readFile and fs.readFileSync statements and inline them in your bundle, allowing them to work seamlessly in either Node or the browser:
options: {
transform: ['brfs'],
debug: true
}
You’ll also need to install the brfs package from npm in your local project, with the following code:
npm install brfs --save-dev
That’s it, as far as Browserifying your CommonJS modules with Grunt goes! Next up, I’ll introduce you to the major concepts in Backbone, how they work, and when to use them.
7.3. Introduction to Backbone
A few constructs exist in Backbone that you can build your applications around. Here’s a list:
· Views render the UI and deal with human interaction.
· Models can be used to track, compute, and validate properties.
· Collections are ordered sets of models, useful for interacting with lists.
· Routers allow you to control the URL, enabling development of single-page applications.
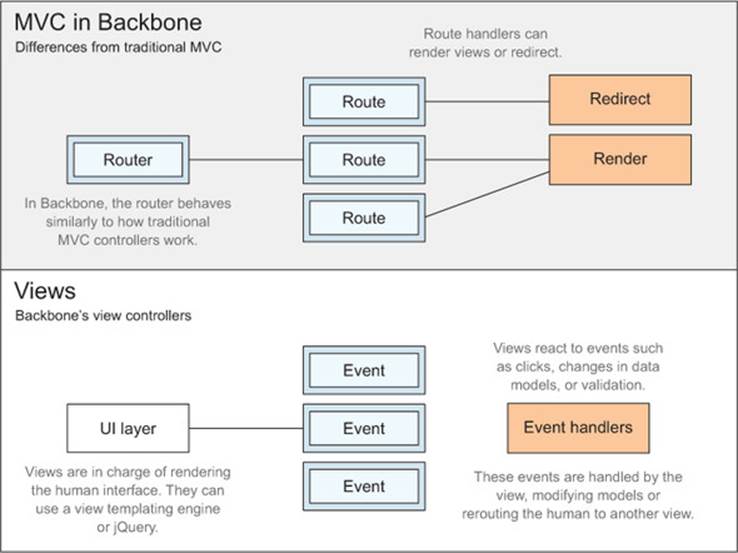
You might’ve noticed that controllers are nowhere to be found in that list. In reality, Backbone views act as controllers. This subtle fork from traditional MVC is often referred to as Model-View-View-Model (MVVM). Figure 7.3 illustrates the differences between Backbone and traditional MVC, as they were shown in figure 7.2, and explains where routing fits in this structure.
Figure 7.3. Backbone deals with the human-facing aspects of MVC: event handling, validation, and UI rendering.
Naturally, there’s more to learn about each one of these constructs. Let’s visit each one.
7.3.1. Backbone views
The views are in charge of rendering the UI, and you’re in charge of putting together the rendering logic for your views. How to render the UI is entirely up to you. The two preferred options are using jQuery or a templating library.
Views are always associated with an element, which is where the rendering will take place. In the following listing, let’s see how a basic view could be rendered. Here you’re creating a Backbone view, adding custom render functionality that will set text in the view element. Then you’re instantiating the view and rendering the view instance.
Listing 7.2. Rendering a basic view
var SampleView = Backbone.View.extend({
el: '.view',
render: function () {
this.el.innerText = 'foo';
}
});
var sampleView = new SampleView();
sampleView.render();
See how you declared the el property and assigned .view to it? You can assign a CSS selector to that property, and it’ll look up that element in the DOM. In the view that element will get assigned to this.el. With an HTML page, such as the following one, you could render this minimal Backbone view:
<div class='view'></div>
<script src='build/bundle.js'></script>
The bundle script file would be the compiled application as I explained in section 7.2.3. Once you run this, the view element would get the foo text content. You can check out this example in the accompanying source code; it’s listed as ch07/01_backbone-views.
Your view is static as it is, and you probably have a good idea how to render one with jQuery, but that involves more work, because you’d have to create every element, set their attributes, and construct a DOM tree in code. Using templates is easier to maintain and keeps your concerns separate. Let’s see how that works.
Using Mustache templates
Mustache is a view-templating library that takes a template string and a view model and returns the resulting view. The way you reference model values in your template is by declaring them using the special {{value}} notation, which is replaced by the model’s value property.
Mustache also uses a similar syntax that lets you iterate through arrays, wrapping part of the template in {{#collection}} and {{/collection}}. When looping a collection, you can access the array item itself using {{.}}, and you can also directly access its properties.
To give you a quick example, let’s start with an HTML view template:
<p>Hello {{name}}, your order #{{orderId}} is now shipping. Your order includes:</p>
<ul>
{{#items}}
<li>{{.}}</li>
{{/items}}
</ul>
To fill this template, you need to use Mustache, passing it to a model. First, you’ll have to install Mustache from npm:
npm install mustache --save
Rendering this template is a matter of passing it to Mustache as a string, along with a view model:
var Mustache = require('mustache');
Mustache.to_html(template, viewModel);
To do this in Backbone you’ll create a reusable module, shown in the following code snippet, which will know to render any view using Mustache, passing it to the view’s template and the view’s view model. Here you’re creating a base view you can let other views inherit from, sharing basic functionality such as view rendering, so that you don’t have to copy and paste this method onto every view you create:
var Backbone = require('backbone');
var Mustache = require('mustache');
module.exports = Backbone.View.extend({
render: function () {
this.el.innerHTML = Mustache.to_html(this.template, this.viewModel);
}
});
In the previous example, where you had a static view, it was fine to keep all of your application in a single module. But this time around, you’re modularizing it a bit. Having a base view is neat, and having a single module for each view is as important. In the snippet below, you’re requiring the base view template you saw previously and extending that one. You’re using fs.readFileSync to load your Mustache template, because require only works with JavaScript and JSON files. You won’t include the template in the view module itself because it’s always nice to keep your concerns separated, particularly if these concerns are in different languages. Also, the view template could arguably be used by many different views.
var fs = require('fs');
var base = require('./base.js');
var template = fs.readFileSync(
__dirname + '/templates/sample.mu', 'utf8'
);
module.exports = base.extend({
el: '.view',
template: template
});
Last, you’ll adapt your original application module, making it require the view rather than declare it, and declaring a view model before rendering the view. This time around, the view will be rendered with Mustache, as shown in the following listing.
Listing 7.3. Rendering a view with Mustache
var SampleView = require('./views/sample.js');
var sampleView = new SampleView();
sampleView.viewModel = {
name: 'Marian',
orderId: '1234',
items: [
'1 Kite',
'2 Manning Books',
'7 Random Candy',
'3 Mars Bars'
]
};
sampleView.render();
You can check out this example in the accompanying code samples; it’s listed as ch07/02_backbone-view-templates. Next up are the models, another crucial part of Backbone applications.
7.3.2. Creating Backbone models
Backbone models (also called data models) hold your application data, which are often copies of the data that can be found in a database. They can be used to observe changes, as well as validate those changes. These aren’t to be confused with view models (such as what we’ve assigned tosampleView.viewModel in the previous example, also called template data), which usually contain a combination of Backbone data models, often formatted to fit the prose in the HTML template. For instance, a date might be stored in an ISO format in the data model, but formatted into a human-readable string in the template data. In the same way views get extended off Backbone.View, models get extended from Backbone.Model, and they can go a great way toward making your data interactive. Models can be validated, testing user input for bad data; they can be observed, helping you react to changes in the data model; and you can also compute properties based on data in the model.
Probably the most impactful thing you can do with your models is observing changes in the model data. This allows your UI to react to changes in the data with little effort. Remember, the same piece of data can be represented in many different ways. For instance, you could represent the same piece of data as an item in a list, as an image, or as a description. Models enable you to update each of those representations as data changes, in real time!
Data modeling and malleability
Let’s look at an example (found under ch07/03_backbone-models in the samples) where you take a piece of user input and render it as plain text, in binary, and as an anchor link, if it’s a URL. To kick things off, you’ll create a model to check whether its data looks like a link. The getmethod allows you to access the value of a model property in Backbone.
module.exports = Backbone.Model.extend({
isLink: function () {
var link = /^https?:\/\/.+/i;
var raw = this.get('raw');
return link.test(raw);
}
});
Assuming you had a binary.fromString method to convert the model data to a binary string, and you wanted to get the first few characters of the binary stream, you could add a model method for that, because it’s also data-related. As a rule of thumb, every method that could be reused that depends solely (or mostly) on model data should probably be a model method. The following is a possible implementation to get the binary string. If the binary code is more than 20 characters, you can trim it using the Unicode ellipsis character, '\u2026' or '...':
getBinary: function () {
var raw = this.get('raw');
var bin = binary.fromString(raw);
if (bin.length > 20) {
return bin.substr(0, 20) + '\u2026';
}
return bin;
}
I mentioned you could listen for changes in your models. Let’s learn more about events.
Models and events
To tie your view to this model, you need to create an instance of the model. One of the most interesting aspects of models is events. For example, you could listen for changes in the model and update your view every time the model changes. You can use the view’s initialize property to create a model instance, bind your change listener to it, and give the model an initial value, as shown in the following code snippet:
initialize: function () {
this.model = new SampleModel();
this.model.on('change', this.updateView, this);
this.model.set('raw', 'http://bevacqua.io/buildfirst');
}
Instead of rendering the view from the outside, the view will rerender itself as necessary whenever the model changes. It turns out that’s easy to implement. Whenever the model changes, updateView is invoked, and you have a chance to update the view model and render the template with the updated values.
updateView: function () {
this.viewModel = {
raw: this.model.get('raw'),
binary: this.model.getBinary(),
isLink: this.model.isLink()
};
this.render();
}
All that’s left for your view to do is allow user input to modify the model. You can conveniently bind to DOM events by adding properties to the events property on the view. These properties should have a key in the form of {event-type} {element-selector}; for example, click .submit-button. The property value should be the name of an event handler that’s available in the view. In the following code snippet, I implement an event handler that updates the model every time the input changes:
events: {
'change .input': 'inputChanged'
},
inputChanged: function (e) {
this.model.set('raw', e.target.value);
}
Whenever a change event is raised, the model data will be updated. That will, in turn, trigger the model’s change event listener, which will update the view model and refresh the UI. Keep in mind that if anything else changed the model data, such as incoming server data, that would refresh the UI accordingly as well. That’s where the value of using models comes from. As your data gets more complex, you can benefit more from using models to access it, because they’re equipped to track and react to changes in the data in such a way that your code isn’t tightly coupled.
This is one of the ways in which models help shape your data without repeating logic in your code, and we’ll closely inspect the benefits of models, such as data validation, over the next few sections. One last aspect of data organization you’ll want to look at is collections. Let’s get a quick overview of those before heading to view routing.
7.3.3. Organizing models with Backbone collections
Collections in Backbone enable you to group and order a set of models. You can listen for items being added or removed from the collection, and you can even get notified when any model in the collection is modified. In the same way models are helpful in computing data out of their properties, collections are concerned with finding specific models in addition to dealing with CRUD-like (Create Read Update Delete) operations.
A collection takes a model type so that you can add values to it using plain objects, which get converted internally into that model type. The collection created in the following snippet, for example, would create SampleModel instances whenever you added an item to it. The collections example can be found at ch07/04_backbone-collections:
var SampleModel = require('../models/sample.js');
module.exports = Backbone.Collection.extend({
model: SampleModel
});
Similarly to models or views, collections need to be instantiated for you to take advantage of them. To keep this example short, your view will create an instance of this collection, listen for insertions, and add models to the collection. The toJSON method casts your collection to a plain JavaScript object that can be used to fetch model data when rendering a template, as shown in the following listing.
Listing 7.4. Fetching model data
initialize: function () {
var collection = new SampleCollection();
collection.on('add', this.report);
collection.add({ name: 'Michael' });
collection.add({ name: 'Jason' });
collection.add({ name: 'Marian' });
collection.add({ name: 'Candy' });
this.viewModel = {
title: 'Names',
people: collection.toJSON()
};
this.render();
},
report: function (model) {
var name = model.get('name');
console.log('Someone got added to the collection:', name);
}
Collections can also validate models as they’re inserted, as you’ll see in section 7.4. There’s one last item on your checklist before getting there, though. I’m talking about Backbone routers.
7.3.4. Adding Backbone routers
Modern web applications are increasingly becoming single-page applications, meaning that the site is loaded once, which results in fewer round-trips to the server, and the client-side code takes over. Routing on the client side can be handled by either changing what comes after the hash in the URL or using paths such as #/users or #/users/13. In modern browsers, it can be modified using the History API, which allows you to change the URL without resorting to the hash hack, resulting in cleaner-looking links, as if the site was getting the pages from the server. In Backbone, you can define and instantiate routers that serve two purposes: changing the URL to give the human a permanent link they can use to navigate to a part of your application, and taking action when the URL changes.
Figure 7.4 shows how a router can track your application’s state.
Figure 7.4. Routing in Backbone and the route inspector
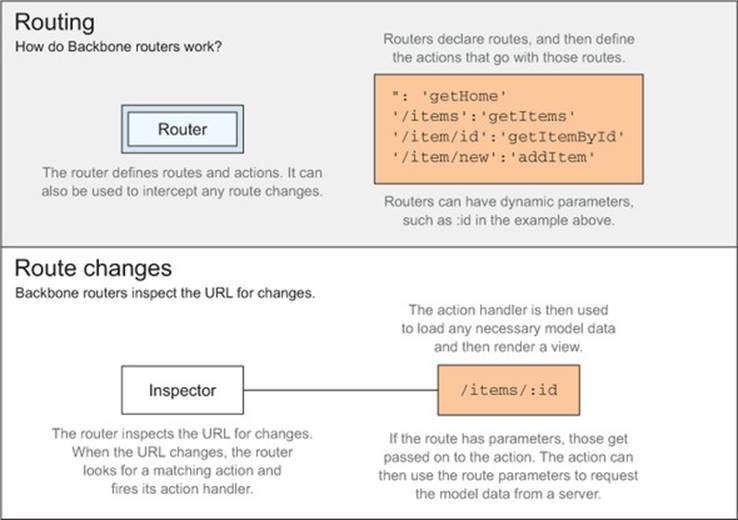
As you learned in section 7.1, routers are the first human contact in your application. Traditional routers define rules that route requests to particular controller actions. In the case of Backbone, the controller intermediary doesn’t exist, and requests are routed directly to views, which play the role of the controller as well as provide the view templates and rendering logic. The Backbone router inspects the location for changes and invokes action methods, providing them with relevant URL parameters.
Route Changes
The following code snippet (available as ch07/05_backbone-routing) instantiates a view router and uses Backbone.history.start to begin monitoring the URL for changes. It’ll also check the current URL to see if it matches one of the routes that have been defined, and in that case it’ll trigger that route:
var ViewRouter = require('./routers/viewRouter.js');
new ViewRouter();
$(function () {
Backbone.history.start();
});
That’s all you need to do as far as wiring goes. Let’s write your ViewRouter component now.
A routing module
Routers are in charge of connecting each URL to an action. Typically, you’ll build your application so that the action method either prepares a view and renders it, or does something that renders a view, such as navigating to a different route. In the following snippet I’m creating a router with different routes:
var Backbone = require('backbone');
module.exports = Backbone.Router.extend({
routes: {
'': 'root',
'items': 'items',
'items/:id': 'getItemById'
}
});
The first route, when humans visit the application root, triggers them to redirect to the default route, as indicated in the following snippet. In this case, that’s the items route. This ensures that the user won’t be left stranded if they visit the page at the root level rather than at #items, or/items if you’re using the history API. The trigger option tells navigate to change the URL and trigger the action method for that route. Next we should add the root method to the object passed to Backbone .Router.extend:
root: function () {
this.navigate('items', { trigger: true });
}
As long as all of your views get rendered to the same view container, it could suffice to instantiate the view when a particular action is triggered, such as in the following snippet:
items: function () {
new ItemView();
}
You’d have to require the view at the top of your routing module, like this:
var ItemView = require('../views/item.js');
Last, you might notice that the getItemById route has a named parameter in the form of :id. The router will parse the URL in views, match the items/:id pattern, and call your action method passing in the id as a parameter. Then, it’s a matter of using that parameter when rendering the view.
getItemById: function (id) {
new DetailView(id);
}
That’s all there is to view routing! In section 7.4 you’ll expand on all of these concepts to build a small application. Next up, let’s investigate how to use your newfound Backbone knowledge to build your first application with MVC in the browser.
7.4. Case study: the shopping list
Before you run off and develop your own applications, I want to give you a self-contained example of how to write MVC in the browser using Backbone, putting into practice everything you’ve learned so far in this chapter.
In this section you’ll progressively build a simple shopping list application, which allows you to view shopping list items, remove them from the list, add new ones, and change the quantities. I’ve divided the exercise into five stages. At each stage, you’ll add functionality and refactor what you have so far to keep your code tidy. The five stages are
· Creating a static view with shopping list items
· Adding remove buttons for deleting items
· Building a form to add new items to your shopping list
· Implementing inline editing on the list to change the quantities
· Adding view routing
That sounds like fun! Keep in mind that you have access to the code at any of these five stages in the accompanying code samples.
7.4.1. Starting with a static shopping list
Let’s go back to basics and put the application together from scratch. The Gruntfile remains the same as it was back in section 7.2.3, and it won’t change during the course of this case study, so you don’t need to revisit it. Look at the HTML in listing 7.5 (available as ch07/06_shopping-list) to get started. Note that you’re including the built Browserify bundle to get the Common.js code working in the browser. The <div> will act as your view container in this example. This piece of HTML is called app.html, because it’s the single page the application will run on.
Listing 7.5. Creating the shopping list
<!doctype html>
<html>
<head>
<title>Shopping List</title>
</head>
<body>
<h1>Shopping List</h1>
<div class='view'></div>
<script src='build/bundle.js'></script>
</body>
</html>
Next up, this example needs to render a list of shopping items, displaying the quantity and name of each item. Here’s a Mustache snippet that can render an array of shopping list items. Mustache templates will go into the views/templates directory.
<ul>
{{#shopping_list}}
<li>{{quantity}}x {{name}}</li>
{{/shopping_list}}
</ul>
Your views will need to render these templates using a view model. This functionality should go in a base view so that it’s only implemented once.
Rendering views with Mustache
To easily render Mustache templates in your views and to avoid repetition, you’ll wire up a base view and place it in the views directory. The rest of your views will extend this one, allowing you to add functionality that gets shared across every view. If a view needs to be rendered in another way, that’s okay; you can override the render method again.
var Backbone = require('backbone');
var Mustache = require('mustache');
module.exports = Backbone.View.extend({
render: function () {
this.el.innerHTML = Mustache.to_html(this.template, this.viewModel);
}
});
Next you’ll create items for your List view.
The shopping list view
A static shopping list of items will suffice for now, which is why in the following listing you can set the view model object once and forget about it. Note the initialize method, which runs when the view gets instantiated so that the view renders itself when it’s created. This view uses the template you saw previously and targets the .view element in app.html.
Listing 7.6. Creating a list of items
var fs = require('fs');
var base = require('./base.js');
var template = fs.readFileSync(
__dirname + '/templates/list.mu', { encoding: 'utf8' }
);
module.exports = base.extend({
el: '.view',
template: template,
viewModel: {
shopping_list: [
{ name: 'Banana', quantity: 3 },
{ name: 'Strawberry', quantity: 8 },
{ name: 'Almond', quantity: 34 },
{ name: 'Chocolate Bar', quantity: 1 }
]
},
initialize: function () {
this.render();
}
});
Last, you need to initialize the application. Here’s the entry point code where you create an instance of the List view after initializing Backbone. Note that because the view renders itself, you only have to instantiate it.
var Backbone = require('backbone');
Backbone.$ = require('jquery');
var ListView = require('./app/views/list.js');
var list = new ListView();
You’ve laid out the ground work for a shopping list application. Let’s build on that in the next stage. You’ll add delete buttons and refactor to accommodate a dynamic application where the data can change.
7.4.2. This time with remove buttons
The first thing you’ll do at this stage is update the view template so that it includes buttons to remove items from the shopping list. You’ll set a data-name attribute on the buttons so you can identify which item should be removed from the list. The updated template can be found in the following snippet:
<ul>
{{#shopping_list}}
<li>
<span>{{quantity}}x {{name}}</span>
<button class='remove' data-name='{{name}}'>x</button>
</li>
{{/shopping_list}}
</ul>
Before wiring up the Remove button, you need to set up a proper model and a collection.
Using a model and a collection
The collection will let you listen for changes to the list, such as when an item gets removed from the list. The model can be used to track changes at the individual level, and it allows you to do validation, as well as computation, as you’ll see in the next few stages. For your purposes, you don’t need much more than a standard Backbone model, but it’s always a good idea to keep your models strictly separated in different modules and well named. The ShoppingItem model will be in the models directory.
var Backbone = require('backbone');
module.exports = Backbone.Model.extend({
});
The collection isn’t that special, either; it needs a reference to the model. That way, the collection will know what kind of model to create when inserting new objects into the list. To keep things neatly organized, you’ll place your collections in a collections directory.
var Backbone = require('backbone');
var ShoppingItem = require('../models/shoppingItem.js');
module.exports = Backbone.Collection.extend({
model: ShoppingItem
});
Rather than setting the view model once and forgetting about it, and now that you have both the model and the collection in place, you should change your view to use the collection instead. The first change you’ll make in your view will be to require the collection, as shown in the following code:
var ShoppingList = require('../collections/shoppingList.js');
Instead of the viewModel property, which you’ll set dynamically from now on, you’ll use a collection property to keep track of your models. Note that, as I mentioned previously, I don’t have to explicitly create ShoppingList instances for my collection, because it already knows that’s the model type it has to use.
collection: new ShoppingList([
{ name: 'Banana', quantity: 3 },
{ name: 'Strawberry', quantity: 8 },
{ name: 'Almond', quantity: 34 },
{ name: 'Chocolate Bar', quantity: 1 }
])
Next, you’ll have the view update the UI when it first loads. To do that, you’ll set the view model to whatever is in the collection and then render the view. Using the toJSON method gives a plain array of model objects.
initialize: function () {
this.viewModel = {
shopping_list: this.collection.toJSON()
};
this.render();
}
Last, you’ll wire up your shopping list item Remove button.
Wiring up DOM events in Backbone
To listen for DOM events, you can assign properties to an events object in your views. These properties should be named using an event name and a CSS selector, separated by a space. The following code is what you’ll use in your updated view. It’ll trigger an action whenever a clickevent occurs in an element matching the .remove selector. Keep in mind that these events look for elements inside your view el, in this case the <div> you created during the previous stage, and it won’t fire events for elements that are outside the view. Last, the event should be set to the name of a method that can be found in your view.
events: {
'click .remove': 'removeItem'
}
Let’s define removeItem now. You’ll use a collection filtering method. The button can be accessed through e.target, and you’ll use its data-name attribute to fetch the name. Then you’ll use that name to filter the collection to find the shopping list item associated with this particular button.
removeItem: function (e) {
var name = e.target.dataset.name;
var model = this.collection.findWhere({ name: name });
this.collection.remove(model);
}
Once a model is removed from the collection, the view should be updated again. The naive approach would be to update the view model and render the view after removing an item from the collection. The problem is that items may be removed from a collection in different places throughout an application, particularly if it’s a good one. A better approach is to listen to events emitted by the collection. In this case, you can listen for the remove event in the collection and refresh the view whenever that event is raised.
The following listing sets up the event listener as you initialize the view, and also includes refactoring so that the code isn’t duplicated, staying loyal to the DRY principle.
Listing 7.7. Setting up an event listener
initialize: function () {
this.collection.on('remove', this.updateView, this);
this.updateView();
},
updateView: function () {
this.viewModel = {
shopping_list: this.collection.toJSON()
};
this.render();
}
That was a big chunk to digest! You may now head over to the accompanying code samples and take a glance at ch07/07_the-one-with-delete-buttons, which is the working example you got as you completed this stage. In the next portion of this walkthrough, you’ll create a form that humans can use to add items to their shopping list.
7.4.3. Adding items to your cart
In the previous stage you gave life to your shopping list, allowing items to be removed from the list. This time, you’ll add the option to add new items as well, so that humans can make their own purchases, instead of removing the items they don’t want.
To keep things interesting, let’s throw in another requirement. When creating a new item, you need to make sure its name isn’t already listed. If the item is already on the grocery list, then the quantity needs to be added to the existing item. That avoids creating duplicate items.
Creating an “add to cart” component
You’ll add the bit of HTML in the following listing to add groceries to the list. This sample can be found as ch07/08_creating-items. You’ll use a couple of inputs, and a button that will add the item to the shopping list collection. There’s also a field that will only be displayed if an error message is set. You’ll use that field for input validation purposes. To keep things simple, this piece of HTML will go into your list template for now. You’ll refactor and move it into its own view in the next couple of stages.
Listing 7.8. Setting up an add to cart component
<fieldset>
<legend>Add Groceries</legend>
<label>Name</label>
<input class='name' value='{{name}}' />
<label>Quantity</label>
<input class='quantity' type='number' value='{{quantity}}' />
<button class='add'>Add</button>
{{#error}}
<p>{{error}}</p>
{{/error}}
</fieldset>
Until now your models never changed. You could remove items but not update them. Now that the models can be changed via human interaction, it’s time to add in validation.
Input validation
Human input should never be trusted, because users can easily enter a quantity that isn’t numeric, or they can forget to enter a name. Maybe they entered a negative number, and that should be taken into consideration as well. Backbone allows you to validate information by supplying avalidate method on your models. That method takes an attrs object, which is an internal model variable that holds all of the model properties so that you can access them directly. The following listing shows how to implement the validation function. You’re checking that the model has a name, a numeric quantity that’s not NaN (Not a Number). Confusingly, NaN is of type 'number' and NaN is not equal to itself either, so you need to test for NaN using the native JavaScript isNaN method. Last, you’ll make sure that the quantity is at least 1.
Listing 7.9. Implementing the validation function
validate: function (attrs) {
if (!attrs.name) {
return 'Please enter the name of the item.';
}
if (typeof attrs.quantity !== 'number' || isNaN(attrs.quantity)) {
return 'The quantity must be numeric!';
}
if (attrs.quantity < 1) {
return 'You should keep your groceries to yourself.';
}
}
To make editing simpler, you’ll also add a helper method to the model that takes a quantity and updates the model, adding that amount to the current quantity. This change should be validated to make sure that a negative amount doesn’t make the resulting quantity go below 1. Models aren’t validated by default when changing their values, but you can force that by turning on the validate option. The following code shows what that method looks like:
addToOrder: function (quantity) {
this.set('quantity', this.get('quantity') + quantity, { validate: true });
}
When adding any amount to the model, validation will be triggered, and if it fails, the model won’t be changed, but instead a validationError property will be set on the model. Suppose you have a model with a quantity of 6; the following code will fail and set the validationErrorproperty to the appropriate error message:
model.addToOrder(-6);
model.validationError;
// <- 'You should keep your groceries to yourself.'
Now that your model protects itself against bad data, you can update the view and give life to your new form.
Refactoring the view logic
The first change we’ll make to the view is adding a render method that can display an error message while keeping the name and quantity that the human entered, so that they’re not cleared when an error occurs. Let’s name that method updateViewWithValidation for clarity:
updateViewWithValidation: function (validation) {
this.viewModel = {
shopping_list: this.collection.toJSON(),
error: validation.error,
name: validation.name,
quantity: validation.quantity
};
this.render();
}
You also need to bind an event listener to click events on your Add button. To do that, add another property to the events object in your view. Then all that’s left is creating the addItem event handler:
'click .add': 'addItem'
The first couple of things your addItem handler should do is get the human input and parse the quantity as a base 10 integer:
var name = this.$('.name').val();
var quantity = parseInt(this.$('.quantity').val(), 10);
Once you have the user input, the first thing you’ll do is figure out if any items in the collection have the same name, and, in that case, you’ll use the addToOrder method to update the model after validating the input. If the item isn’t already in the list, then you create a new ShoppingItemmodel instance and validate it. If the validation passes, then you add the newly created item onto the collection. In code, that looks like the following listing.
Listing 7.10. Validating a shopping item
var model = this.collection.findWhere({ name: name });
if (model) {
model.addToOrder(quantity);
} else {
model = new ShoppingItem({ name: name, quantity: quantity }, { validate: true });
if (!model.validationError) {
this.collection.add(model);
}
}
Because you’re using the ShoppingItem class, you’ll have to add the following statement to the top of your module:
var ShoppingItem = require('../models/shoppingItem.js');
If the validation step fails, you need to render the view again, adding the validation error message so that the user knows what went wrong:
if (!model.validationError) {
return;
}
this.updateViewWithValidation({
name: name,
quantity: quantity,
error: model.validationError
});
If validation goes well, the collection will either get a new item or an existing item will change. These cases should be handled by listening to the add and change events on the collection. You need to add the following couple of lines to the initialize method on the view:
this.collection.on('add', this.updateView, this);
this.collection.on('change', this.updateView, this);
That’s all there is to this stage. You now have the ability to add new items to the list, modify the quantity on existing ones, and remove items. In the next stage, you’ll make editing more intuitive by adding an inline edit button on each list item.
7.4.4. Using inline editing
In this section we’ll introduce inline item editing. Each item will get an Edit button. Clicking on it will allow humans to change the quantity and then save the record. That feature in itself is simple, but you’re going to take this opportunity and clean house a bit. You’re going to split your growing list view into three: an Add Item view that will be in charge of the input form, a List Item view that will be in charge of individual list items, and the original List view that will handle removals and additions to the collection.
Componentizing your views
The first order of business will be breaking your list view template in two. You’ll use two different view containers: one for the list and another one for the form. The <div> you used to have can be replaced by the following code:
<ul class='list-view'></ul>
<fieldset class='add-view'></fieldset>
This division of labor also means you need to split your Mustache template. Rather than have the list template do everything, you’ll replace it with two other templates. As you’ll soon learn, the list itself won’t need any templating; only the form and the individual list items will. The following code is what views/templates/addItem.mu looks like. The form remains almost unchanged, except the fieldset tag has been promoted to view container status, so it’s no longer in the template.
<legend>Add Groceries</legend>
<label>Name</label>
<input class='name' value='{{name}}' />
<label>Quantity</label>
<input class='quantity' type='number' value='{{quantity}}' />
<button class='add'>Add</button>
{{#error}}
<p>{{error}}</p>
{{/error}}
The List view no longer needs a template itself, because the only element that’s needed is the <ul> element, bound to your List view through the el property, as you’ll see in a minute. Each list item will be kept in its own view, and you’ll use a view template for them. The List Item view model will hold a property to track whether the item is being edited or not. This property is checked in the view template to decide if you need to render a label and the action buttons or the inline editing form. The list item template looks like the following listing and goes intoviews/templates/listItem.mu.
Listing 7.11. Viewing a list item template
{{^editing}}
<span>{{quantity}}x {{name}}</span>
<button class='edit'>Edit</button>
<button class='remove'>x</button>
{{/editing}}
{{#editing}}
<span>{{name}}</span>
<input class='edit-quantity' value='{{quantity}}' type='number' />
<button class='cancel'>Cancel</button>
<button class='save'>Save</button>
{{/editing}}
{{#error}}
<span>{{error}}</span>
{{/error}}
You’ll still create the collection in the List view, but you need to pass that collection to the addItem view. This couples both views tightly, because the addItem view needs a List view that can create a collection, and that isn’t modular. This is what your entry point, app.js, looks like now. You’ll sort out the coupling issues in the next stage; this code snippet is about turning your components smaller:
var Backbone = require('backbone');
Backbone.$ = require('jquery');
var ListView = require('./views/list.js');
var listView = new ListView();
var AddItemView = require('./views/addItem.js');
var addItemView = new AddItemView({ collection: listView.collection });
Let’s continue by creating the Add Item view.
A modular “add to cart” view
The Add Item view is similar to what you had in the List view before starting to componentize it. First, the following listing shows how the view is initialized, and how it uses the .add-view selector to find the <fieldset>, which will be used as the view container.
Listing 7.12. Initializing the view
var fs = require('fs');
var base = require('./base.js');
var template = fs.readFileSync(
__dirname + '/templates/addItem.mu', { encoding: 'utf8' }
);
var ShoppingItem = require('../models/shoppingItem.js');
module.exports = base.extend({
el: '.add-view',
template: template,
initialize: function () {
this.updateView();
},
updateView: function (vm) {
this.viewModel = vm || {};
this.render();
}
});
This view is only concerned with adding models to the collection, and it shows. It’ll have a click event handler on the Add button that will look almost exactly identical to your old addItem method. The only difference is that in this version you update the view every time the addItemevent handler is fired, as shown in the following listing.
Listing 7.13. Updating the view
events: {
'click .add': 'addItem'
},
addItem: function () {
var name = this.$('.name').val();
var quantity = parseInt(this.$('.quantity').val(), 10);
var model = this.collection.findWhere({ name: name });
if (model) {
model.addToOrder(quantity);
} else {
model = new ShoppingItem(
{ name: name, quantity: quantity },
{ validate: true }
);
if (!model.validationError) {
this.collection.add(model);
}
}
if (!model.validationError) {
this.updateView();
return;
}
this.updateView({
name: name,
quantity: quantity,
error: model.validationError
});
}
The only thing the Add Item view has to do is add items, so that’s all there is to it! Let’s put together the List item view next.
Creating a list item component
The list item component will be in charge of rendering any changes made to its model and provide the opportunity to edit or remove items from the list. Let’s go over this view from scratch. First off, there are the usual suspects. You need to read the template file and extend the base view. The tagName property means that this view will get rendered to an <li> element. Start with the following code snippet:
var fs = require('fs');
var base = require('./base.js');
var template = fs.readFileSync(
__dirname + '/templates/listItem.mu', { encoding: 'utf8' }
);
module.exports = base.extend({
tagName: 'li',
template: template
});
This view will take the model and collection properties as they’re created, as you’ll see when refactoring the List view, which you’ll do next. Whenever the model changes, you’ll render the view again. The view also needs to be rendered when it’s initialized. In case a validation error occurs while using the inline editing feature, you’ll track that with the view model as well. Here’s how that looks in code:
initialize: function () {
this.model.on('change', this.updateView, this);
this.updateView();
},
updateView: function () {
this.viewModel = this.model.toJSON();
this.viewModel.error = this.model.validationError;
this.render();
}
The remove event handler is much simpler now, because all you have to do is remove the model from the collection, and you still have both of those in the properties of your view. This is how it looks in code:
events: {
'click .remove': 'removeItem'
},
removeItem: function (e) {
this.collection.remove(this.model);
}
Next you’ll wire up the edit and cancel methods, which are similar. The first one puts the item in edit mode, while the second leaves edit mode. All these methods need to do is change the editing property. The rest will be handled by the model change event listener, which will make sure to render the view again. When switching the edit mode on or off, you’ll clear the validationError property as well. The following listing introduces these event handlers.
Listing 7.14. Adding edit and cancel methods
events: {
'click .edit': 'editItem',
'click .cancel': 'cancelEdit',
'click .remove': 'removeItem'
},
removeItem: function (e) {
this.collection.remove(this.model);
}
editItem: function (e) {
this.model.validationError = null;
this.model.set('editing', true);
},
cancelEdit: function (e) {
this.model.validationError = null;
this.model.set('editing', false);
}
The last task of the List Item view will be saving edits made to a record. You’ll bind to clicks on the Save button, parse the input, and update the quantity. You’ll get out of edit mode only if the validation succeeded. Keep in mind I’m not repeating all of the previous event handlers, for brevity:
events: {
'click .save': 'saveItem'
},
saveItem: function (e) {
var quantity = parseInt(this.$('.edit-quantity').val(), 10);
this.model.set('quantity', quantity, { validate: true });
this.model.set('editing', this.model.validationError);
}
});
List items don’t have any other responsibilities, but the list should add and remove this partial view to the UI. When saying partial view, I mean that it only represents a portion of an object, in this case a portion of the list rather than the whole. The List view needs to hold as many list item views as it has to.
Rebuilding the list view
Previously, your List view would rerender every time an item was added or deleted. Now your list will only render individual items and append them to the DOM or remove existing items from the DOM. This is not only faster than rerendering the whole list, but it’s also more modular. The list is only managing the big picture actions, when items are added or removed. The individual items will each be in charge of maintaining their own state and updating their own UI representation.
For this to work, the List view will no longer rely on the view.render method, but manipulate the DOM directly instead. The aspects of the old List view that you kept, such as the hard-coded collection data, extending from the base view, and the el property declaration are shown in the following listing. Note that the view container has changed to match your <ul> element.
Listing 7.15. Aspects of the old list view
var base = require('./base.js');
var ShoppingList = require('../collections/shoppingList.js');
module.exports = base.extend({
el: '.list-view',
collection: new ShoppingList([
{ name: 'Banana', quantity: 3 },
{ name: 'Strawberry', quantity: 8 },
{ name: 'Almond', quantity: 34 },
{ name: 'Chocolate Bar', quantity: 1 }
])
});
Because you no longer desire to repaint the entire view every time an item changes, you’ll rely on two new methods, addItem and removeItem, to do the DOM manipulation. You’ll run these methods whenever the collection is updated, keeping the UI up to date at all times. You can also use the addItem method to render the initial representation of the collection, by running it on each model in the collection when initializing the view. The initialize method will look like the following code snippet. I’ll explain the partials variable next.
initialize: function () {
this.partials = {};
this.collection.on('add', this.addItem, this);
this.collection.on('remove', this.removeItem, this);
this.collection.models.forEach(this.addItem, this);
}
Before you can see the addItem method, I’ll mention that it needs to require the List Item view. You’ll use that to create partial views, one for each model in the collection. Let’s add that to the top of the List view module:
var ListItemView = require('./listItem.js');
You’re now ready to implement the addItem method. That method will take a model and create an instance of the ListItemView. Then the view element, which is an <li>, will be appended to this.$el, which is your <ul> element. To cleanly find and remove items from the list, you’ll track them in the partials variable. Backbone models have a unique ID property that can be accessed through model.cid, so you can use that as the keys in your partials object. The code is as follows:
addItem: function (model) {
var item = new ListItemView({
model: model,
collection: this.collection
});
this.$el.append(item.el);
this.partials[model.cid] = item;
}
Removing elements is now merely a matter of looking at the partials object, accessing the partial by means of the model.cid key, and removing the element. You should then make sure that it gets removed from the partials object as well.
removeItem: function (model) {
var item = this.partials[model.cid];
item.$el.remove();
delete this.partials[model.cid];
}
Phew! That was an intense refactoring session, but it paid off. Now you have a few different views working on the same collection, and they’re much more self-contained now. The Add Item view only adds items to the collection, the List view only cares about creating new List Item views or removing them from the DOM, and the List Item view is only concerned about changes to an individual model.
Give yourself a congratulatory pat on the back, and check out the accompanying code samples to make sure you understand all the changes you’ve made at this stage and the current state of the shopping list application. You’ll find the example listed as ch07/09_item-editing.
You accomplished a nice separation of concerns at this stage, but you can do better. Let’s examine that in the last stage of this process.
7.4.5. A service layer and view routing
This last stage introduces two changes to your organization. You’ll add a thin service layer and introduce view routing into your application design. By creating a service that provides a unique shopping list collection, you give your views the ability to actively ask the service for the shopping list data. This dramatically decouples your views, which previously generated the data and shared it with each other.
Note that in this case you’re still hard coding an array of items, but you could as easily pull them from an Ajax request and provide access to them through a Promise, as you saw in chapter 6. For the time being, the following listing will do. This should be placed in the services directory.
Listing 7.16. Hard coding an array of items
var ShoppingList = require('../collections/shoppingList.js');
var items = [
{ name: 'Banana', quantity: 3 },
{ name: 'Strawberry', quantity: 8 },
{ name: 'Almond', quantity: 34 },
{ name: 'Chocolate Bar', quantity: 1 }
];
module.exports = {
collection: new ShoppingList(items)
};
Once that’s in place, both the Add Item and the List views should require the service, and assign shoppingService.collection to their collection properties. In doing that, you no longer need to pass around a reference to the collection that was previously initialized by the List view.
Let’s turn to the routing changes, rounding up your shopping list adventure.
Routing for the shopping list
You’re also going to implement routing at this stage. To keep things interesting, you’ll move the Add Item view to a different route. The code in the following listing should go into its own module. Place it at routers/viewRouter.js. The 'root' action helps redirect humans when they open up the application, and there’s no other hash location set.
Listing 7.17. Moving the Add Item view to a different route
var Backbone = require('backbone');
var ListView = require('../views/list.js');
var AddItemView = require('../views/addItem.js');
module.exports = Backbone.Router.extend({
routes: {
'': 'root',
'items': 'listItems',
'items/add': 'addItem'
},
root: function () {
this.navigate('items', { trigger: true });
},
listItems: function () {
new ListView();
},
addItem: function () {
new AddItemView();
}
});
As I mentioned back in section 7.3.4 when I first introduced Backbone routers, you’ll have to go back to app.js and replace what you had in there with the code in the following listing. This will wire up your view router and activate it. Rather than statically defining the first view served to the human, it’ll depend on from which URL they visit your application.
Listing 7.18. Activating the view router
var Backbone = require('backbone');
var $ = require('jquery');
Backbone.$ = $;
var ViewRouter = require('./routers/viewRouter.js');
new ViewRouter();
$(function () {
Backbone.history.start();
});
The last change you need to make to have routing has to do with views and templating. First, you’ll revert back to the single view container you used to have before the last stage:
<div class='view'></div>
Second, you need to set the el property to '.view' in both the Add Item view and the List view. You also have to change the view templates around a bit. For example, the Add Item view template should have a Cancel button that goes back to the List view. It should look like the following code:
<a href='#items' class='cancel'>Cancel</a>
Last, you’ll give your List view a well-deserved view template, which will be small. It needs the <ul> that will keep the list and an anchor link that matches the route for the Add Item view. The following code snippet shows how the template, placed in views/templates/list.mu, should look:
<ul class='items'></ul>
<a href='#items/add'>Add Item</a>
The List view should render this template when initialized and look up the list element:
this.render();
this.$list = this.$('.items');
When adding an item to the list, rather than appending them to $el, which is now the shared view container, you should append them to $list:
this.$list.append(item.el);
That’s all there is to it! Make sure to check out the code in the accompanying repository. The last stage can be found under ch07/10_the-road-show, and it contains everything you’ve worked on so far. Next up, you’ll learn about Rendr, a technology you can use to render client-side Backbone views on the server side, which is useful for improving human-perceived performance when developing Node.js applications.
7.5. Backbone and Rendr: server/client shared rendering
Rendr boosts the perceived performance of Backbone applications by rendering them on the server side. This allows you to display the rendered page before JavaScript code is executed in the browser and Backbone kicks in. The first time the page gets loaded, the human will see the content sooner. After that first load, Backbone will take over and handle routing on the client side. The first load is extremely important and rendering the application on the server before the human gets any content is better than having them wait for Backbone to pull your data, fill your views, and render your templates. That’s why server-side rendering is still vital to the web application development process. Let’s start with a quick dive into the world of Rendr.
7.5.1. Diving into Rendr
Rendr uses a conventional approach to application building. It expects you to name your modules in a certain way and place them in certain directories. Rendr also has opinions about the kinds of templates you should use and how your application should access its data. By default, this means Rendr expects you to have a REST API to access the application data; you’ll investigate REST API design in chapter 9.
Rendr runs on Node.js, acting as middleware in your HTTP stack. It works by intercepting requests and rendering views server-side before handing the prerendered results to the client. In its conventional approach, it helps separate concerns by defining controllers, where you can fetch data, render views, or perform redirects. Rather than having to reference your templates in your views, Rendr uses well-defined naming policies that abstract away dependencies, which are mostly managed by the Rendr engine. This will become clearer once you look at the code in section 7.5.2.
Problems in paradise
Not all is peaches and cream. At the time of this writing, Rendr (v0.5) includes “peculiar” design choices that ultimately made me decide not to use it throughout this chapter, as it would’ve complicated the examples. For instance, Rendr uses Browserify to bring the modules you write into the browser, but it has three distinct hacks in the way it compiles your CommonJS modules using Browserify:
1. jQuery needs to be shimmed through browserify-shim. This is problematic because the server-side version of Rendr uses its own version of jQuery, and there could be versioning discrepancies. If you try to use the CommonJS version obtained through npm, it won’t work.
2. It needs aliases for part of its require calls to work as expected, which is an issue because it translates into the next deficiency, as well.
3. You can’t use the brfs transform with Rendr.
The decision to not go deeper into Rendr mostly had more to do with it being less broadly applicable. If you chose a server-side language other than Node.js, you couldn’t carry as many of the concepts I’ll teach into your designs. Beside these problems, there definitely is value in learning about the conventional MVC capabilities Rendr provides to your Backbone applications. Many conventional MVC frameworks exist in server-side languages, providing similar features as those resulting from combining Backbone and Rendr, but you rarely learn about those when talking about client-side JavaScript. The ability to perform shared rendering definitely boosts its appeal. As with most things when deciding on a technology stack, it’s a tradeoff. Note that Facebook’s React is a good example of a library that’s capable of doing both server-side and client-side rendering without any additional tooling needed.
Diving in
To showcase Rendr, I’ve settled for a slightly modified version of an example AirBnB (the company behind Rendr) uses to teach how Rendr works. You can find the code as ch07/11_entourage in the accompanying code samples.
First, let’s talk about the templates. Rendr encourages you to use a superset of Mustache called Handlebars. Handlebars provides extra features, mostly in the form of helper methods you can use, such as an if convenience method. Rendr expects you to compile the Handlebars templates and place the bundled result in app/templates/compiledTemplates.js. To do that, start by installing the Grunt plugin for Handlebars:
npm install --save-dev grunt-contrib-handlebars
To configure the Handlebars Grunt plugin, you have to add the code in the following listing to the Gruntfile. The options passed to the handlebars:compile task target are needed by Rendr, which expects the templates to be named in a certain way.
Listing 7.19. Configuring the Handlebars plugin
handlebars: {
compile: {
options: {
namespace: false,
commonjs: true,
processName: function (filename) {
return filename.replace('app/templates/', '').replace('.hbs', '');
}
},
src: 'app/templates/**/*.hbs',
dest: 'app/templates/compiledTemplates.js'
}
}
The Browserify configuration is, at the moment, also tied to Rendr’s expectations. You’ll need to shim jQuery, rather than install it from npm. You’re expected to provide an alias so Rendr can access rendr-handlebars, the Handlebars adapter used by Rendr. Last, Rendr needs you to provide a few mappings so it can access your application’s modules. The code to configure Browserify to play nice with Rendr can be found in the following listing.
Listing 7.20. Configuring Browserify to work with Rendr
browserify: {
options: {
debug: true,
alias: ['node_modules/rendr-handlebars/index.js:rendr-handlebars'],
aliasMappings: [{
cwd: 'app/',
src: ['**/*.js'],
dest: 'app/'
}],
shim: {
jquery: {
path: 'assets/vendor/jquery-1.9.1.min.js',
exports: '$'
}
}
},
app: {
src: ['app/**/*.js'],
dest: 'public/bundle.js'
}
}
That’s it, as far as build configuration goes. It might not be ideal, but once it’s in there you can forget about it. Let’s go into the sample application code and see how it works.
7.5.2. Understanding boilerplate in Rendr
The first step you’ll take in putting together your Rendr application is creating the entry point for the Node program. You’ll name this file app.js and place it in your application root. As I mentioned previously, Rendr works as a middleware in your HTTP stack, sitting inside Express.
Express middleware for Rendr
Express is a popular Node.js framework that wraps the native http module, providing more functionality and allowing you to perform routing and a few other things. Past this section, most of what we’ll discuss is inherent to Rendr and not part of Express. Rendr enhances Express to make its conventions work, though.
npm install express --save
Have a look at the following piece of code. You’re using the express package to set up an HTTP server in Node. Calling express() will create a new Express application instance, and you can add middleware to that instance with app.use. Invoking app.listen(port) will keep the application running and react on incoming HTTP requests on the chosen port. Best practice dictates that the listening port for your application should be configurable as an environment variable and have a sensible default value.
var express = require('express');
var app = express();
var port = process.env.PORT || 3000;
app.use(express.static(__dirname + '/public'));
app.use(express.bodyParser());
app.listen(port, function () {
console.log('listening on port %s', port);
});
The static middleware tells Express to serve all of the content in the specified directory as static assets. If a human requests http://localhost:3000/js/foo.js, and the public/js/foo.js file exists, that’s what Express will respond with. The bodyParser middleware is a utility that will parse request bodies that are detected to be in JSON or form data format.
The following listing configures Rendr for your example. The middleware will take care of everything else, as you’ll see next. The data adapter configuration tells Rendr what API it should query. The beauty of Rendr lies in that, both on the client side as well as on the server side, it’ll query the API whenever it needs to fetch data.
Listing 7.21. Configuring Rendr
var rendr = require('rendr');
var rendrServer = rendr.createServer({
dataAdapterConfig: {
default: {
host: 'api.github.com',
protocol: 'https'
}
}
});
app.use(rendrServer);
Setting up Rendr
Rendr provides a series of base objects you’re expected to extend when building your application. The BaseApp object, which extends from BaseView, should be extended and placed in app/app.js to create a Rendr app. In this file you could add app initialization code that runs in both the client and the server and is used to maintain the application’s global state. The following snippet of code will suffice:
var BaseApp = require('rendr/shared/app');
module.exports = BaseApp.extend({
});
You also need to create a router module, which you could use to track page views whenever there’s a route change, although for now you’ll merely create an instance of the base router. The router module should be placed at app/router.js, and it should look like the following code:
var BaseClientRouter = require('rendr/client/router');
var Router = module.exports = function Router (options) {
BaseClientRouter.call(this, options);
};
Router.prototype = Object.create(BaseClientRouter.prototype);
Router.prototype.constructor = BaseClientRouter;
Let’s turn our attention to how the meat of your Rendr application should look.
7.5.3. A simple Rendr application
You’ve configured Grunt and Express to comply with Rendr’s needs. Now it’s time to develop the application itself. To make this example easier to understand, I’ll show you the code in the logical order Rendr uses to serve its responses. To keep your example self-contained, yet interesting, you’ll create three different views:
1. Home is the welcome screen for your app.
2. Users keeps a list of GitHub users.
3. User contains the details of a specific user.
These views will have a one-to-one relationship with routes. The home view will sit at the application root, /; the user list will be at /users; and the user details view will be at /users/:login, where :login is the user login on GitHub (bevacqua in my case). Views are rendered by controllers.
Figure 7.5 shows what the user list will look like when you’re done.
Figure 7.5. A list of users in your GitHub browser built using Rendr
Let’s start with routing and then learn how controllers operate.
Routes and controllers
The following code matches routes to controller actions. The controller actions should be defined as the controller name, followed by a hash, and then the action name. This module goes into app/routes.js.
module.exports = function (match) {
match('', 'home#index');
match('users' , 'users#index');
match('users/:login', 'users#show');
};
Controllers fetch any data that’s required to render a view. You have to define each action that’s expected by the routes. Let’s put the two controllers together. By convention, controllers should be placed in app/controllers/{{name}}_controller.js. The following code snippet, your Home controller, should be placed at app/controllers/home_controller.js. It should expose an index function, matching the index route. This function takes a parameters object and a callback that, once called, will render the view:
module.exports = {
index: function (params, callback) {
callback();
}
};
The user_controller.js module is different. It has an index action as well, but it also has a show action. In both cases, you need to call this.app.fetch with parameters to get the model data and then invoke the callback once you’re done, as shown in the following listing.
Listing 7.22. Retrieving model data
module.exports = {
index: function (params, callback) {
var spec = {
collection: {
collection: 'Users',
params: params
}
};
this.app.fetch(spec, function (err, result) {
callback(err, result);
});
},
show: function (params, callback) {
var spec = {
model: {
model: 'User',
params: params
},
repos: {
collection: 'Repos',
params: { user: params.login }
}
};
this.app.fetch(spec, function (err, result) {
callback(err, result);
});
}
};
Fetching this data wouldn’t be possible if you didn’t have matching models and collections. Let’s flesh those out next.
Models and collections
Models and collections need to extend the base objects provided by Rendr, so let’s create those. The following code is for your base model, placed at app/models/base.js:
var RendrBase = require('rendr/shared/base/model');
module.exports = RendrBase.extend({});
The base collection is similarly thin. Having your own base objects, though, is necessary to easily share functionality across your models:
var RendrBase = require('rendr/shared/base/collection');
module.exports = RendrBase.extend({});
We’ll have to define your models using the endpoint you want to use to fetch the models, in this case from the GitHub API. Your models should also export a unique identifier that’s the same as what you used when calling app.fetch in your User controller. The following code shows what the User model looks like. This should be placed at app/models/user.js:
var Base = require('./base');
module.exports = Base.extend({
url: '/users/:login',
idAttribute: 'login'
});
module.exports.id = 'User';
As long as your models don’t have any validation or computed data functions, they’ll look similar: a url endpoint, the unique identifier, and the name of the parameter that’s used to look up a single model instance. When you look at REST API design in chapter 9, constructing a URL in this way will feel more natural to you. Here’s what the Repo model looks like:
var Base = require('./base');
module.exports = Base.extend({
url: '/repos/:owner/:name',
idAttribute: 'name'
});
module.exports.id = 'Repo';
As in your case study in section 7.4, collections need to reference a model to learn what kind of data they’re dealing with. Collections are similar to models and use a unique identifier to teach Rendr what kind of collection they are and a URL from which you can fetch data. The following code shows the Users collection in code. It should be placed in app/collections/users.js:
var User = require('../models/user');
var Base = require('./base');
module.exports = Base.extend({
model: User,
url: '/users'
});
module.exports.id = 'Users';
The Repos collection is almost identical, except it uses the Repo model, and it has a different URL for fetching the data from the REST API. The code is as follows, and it should go in app/collections/repos.js:
var Repo = require('../models/repo');
var Base = require('./base');
module.exports = Base.extend({
model: Repo,
url: '/users/:user/repos'
});
module.exports.id = 'Repos';
At this point, the user requested a URL, and the router decided which controller action that should direct them to. The action method probably fetched data from the API and then it invoked its callback. At last, let’s learn how views behave to render the HTML.
Views and templates
As with most things Rendr, the first step in defining your views is creating your own base view, which is an extension of Rendr’s base view. The base view should go in app/views/base.js and look like the following code:
var RendrBase = require('rendr/shared/base/view');
module.exports = RendrBase.extend({});
Your first view is the Home view. It should be placed at app/views/home/index.js and look like the following. As you can see, views also need to export an identifier:
var BaseView = require('../base');
module.exports = BaseView.extend({
});
module.exports.id = 'home/index';
Given that your views consist mostly of links to each other, but not much functionality, they’re mostly empty. The Users view is almost identical to the Home view. It goes in app/views/users/index.js, and its code follows:
var BaseView = require('../base');
module.exports = BaseView.extend({
});
module.exports.id = 'users/index';
The User Details view goes in app/views/users/show.js. This view has to tamper with the template data, which is what I’ve referred to as the view model, to make the repos object available to the template, as shown in the following listing.
Listing 7.23. Making the repos object available to the template
var BaseView = require('../base');
module.exports = BaseView.extend({
getTemplateData: function () {
var data = BaseView.prototype.getTemplateData.call(this);
data.repos = this.options.repos;
return data;
}
});
module.exports.id = 'users/show';
The last view you’ll put together is a partial to render a list of repositories. It should be placed in app/views/user_repos_view.js, and as you can see, partials barely differ from other views, and they need a view controller like any other view:
var BaseView = require('./base');
module.exports = BaseView.extend({
});
module.exports.id = 'user_repos_view';
Last, there are the view templates. The first view template you’ll look at is the layout .hbs file. This is the HTML that will serve as a container for all your templates. You can find the code in the following listing. Note that you’re bootstrapping the application data and initializing it using JavaScript. This is required by Rendr. The {{{body}}} expression will be replaced by the views dynamically as the route changes.
Listing 7.24. Bootstrapping the application data
<!doctype html>
<html>
<head>
<title>Entourage</title>
</head>
<body>
<div>
<a href='/'>GitHub Browser</a>
</div>
<ul>
<li><a href='/'>Home</a></li>
<li><a href='/users'>Users</a></li>
</ul>
<section id='content' class='container'>
{{{body}}}
</section>
<script src='/bundle.js'></script>
<script>
(function() {
var App = window.App = new (require('app/app'))({{json appData}});
App.bootstrapData({{json bootstrappedData}});
App.start();
})();
</script>
</body>
</html>
Next you have the Home view template. Here are a few links with no view model data access going on. This template goes in app/templates/home/index.hbs. Note that Backbone will capture navigation to any links in your application that match one of its routes and behave as a single-page application. Rather than reloading the entire page whenever a link is clicked, Backbone will load the corresponding view.
<h1>Entourage</h1>
<p>
Demo on how to use Rendr by consuming GitHub's public API.
</p>
<p>
Check out <a href='/repos'>Repos</a> or <a href='/users'>Users</a>.
</p>
Now things get more interesting. Here you’re looping through the list of models that were fetched in the controller action, and rendering a list of users and links to their account details. This template goes in app/templates/users/index.hbs:
<h1>Users</h1>
<ul>
{{#each models}}
<li>
<a href='/users/{{login}}'>{{login}}</a>
</li>
{{/each}}
</ul>
Next up you have the User Details template, which goes in app/templates/users/show.hbs. You can find the template code in the following listing. Take into account how you’re telling Handlebars to load the user_repos_view partial and how that name matches exactly the identifier that was defined in its view.
Listing 7.25. Setting up the User Details template
<img src='{{avatar_url}}' width='80' height='80' /> {{login}} ({{public_repos}} public repos)
<br />
<div>
<div>
{{view 'user_repos_view' collection=repos}}
</div>
<div>
<h3>Info</h3>
<br />
<table>
<tr>
<th>Location</th>
<td>{{location}}</td>
</tr>
<tr>
<th>Blog</th>
<td>{{blog}}</td>
</tr>
</table>
</div>
</div>
The User Repos view is your last view template, a partial in this case. It has to be located at app/templates/user_repos_view.hbs, and it’s used to iterate through a collection of repositories, displaying interesting metrics about each repository, as shown in the following listing.
Listing 7.26. Setting up the User Repos template
<h3>Repos</h3>
<table>
<thead>
<tr>
<th>Name</th>
<th>Watchers</th>
<th>Forks</th>
</tr>
</thead>
<tbody>
{{#each models}}
<tr>
<td>{{name}}</td>
<td>{{watchers_count}}</td>
<td>{{forks_count}}</td>
</tr>
{{/each}}
</tbody>
</table>
That’s it! Phew. As you can see, once you get past the vast amount of boilerplate code around your application, creating a Rendr app isn’t that hard. I’m sure over time they’ll reduce the amount of boilerplate around the meat of your Rendr applications. The nice aspect of creating an application using Rendr, Backbone, and CommonJS is how modular your code can become. Modularity is one of the characteristic properties of testable code.
7.6. Summary
Wow, we certainly accomplished big results in this chapter:
· You learned why jQuery isn’t enough, and how a more structured approach would help you with the application development process.
· You got an overview of how Model-View-Controller patterns are supposed to work.
· You went on a Backbone adventure after learning about the basic concepts in Backbone.
· You exploited CommonJS and Browserify to get modular Backbone components interoperating in the browser.
· You took advantage of Rendr to bring a Backbone application to the server side, improving perceived performance.
Let’s use this momentum to learn more about testability and how to write good tests. All kinds of testing await; turn the page already!