JavaScript Application Design: A Build First Approach (2015)
Part 2. Managing complexity
Chapter 9. REST API design and layered service architectures
This chapter covers
· Designing API architectures
· Understanding the REST constraint model
· Learning about API paging, caching, and throttling schemes
· API documentation techniques
· Developing layered service architectures
· Consuming a REST API on the client side
I’ve described how to approach build processes, and you’ve learned about deployments and configuring the different environments your application will live on. You also learned about modularity, dependency management, asynchronous code flows in JavaScript, and the MVC approach to developing scalable application architectures. To round things out, this chapter focuses on designing a REST API architecture and consuming it on the client side, allowing you to tie the front end to a back-end persistence layer using a transparent and clean API.
9.1. Avoiding API design pitfalls
If you’ve ever worked on the front end of a web project for a large enterprise, then I’m sure you can relate to the complete lack of cohesion in the design of the back-end API. Do you need to access a list of product categories? You should do an AJAX request GET /categories. Do you have products belonging to a category? Sure thing; use GET /getProductListFromCategory?category_id=id. Do you have products in two categories? Use GET /productInCategories?values=id_1,id_2,...id_n. Need to save changes to the product description? Tough luck, you’ll have to send the entire product again through the wire. POST /product, appending a large JSON blob in the body. Need to send a customized email to a particular human? POST /email-customer with their email and the email message data.
If you can’t find anything wrong with that API design, chances are you’ve spent too much time working with similar APIs. The following list details issues with how it was designed:
· Each new method has its own set of naming conventions: the GET verb is repeated in the endpoint, camelCase, hyphen-delimited, or underscore_separated. You name it!
· Beside naming conventions, endpoints aren’t marked in any way that differentiates them from those that render views.
· Argument intake preference also varies wildly with no clear distinction through the query string or the request body. Maybe cookies could do the trick!
· It’s not clear when to use each HTTP verb (HEAD, GET, POST, PUT, PATCH, DELETE). As a result, only GET and POST are used.
· Inconsistency throughout the API. Well-designed APIs are not only well documented, but also present consistency across the board that allows consumers to hack through the API, as well as implementers to easily build on the existing API by copying what it does.
This isn’t merely the work of a madman who decided to mix naming and argument-passing conventions, along with glossing over any kind of standardization and cohesion across API endpoints. The most likely scenario for how the API got to the state it is in today is employee rotation on the project maintaining the API. Yes, it could also be a single person who doesn’t know any better, but in that case you’ll observe at least some degree of consistency across the API methods. A well-designed API enables consumers to infer documentation for a method once they’ve used a few related methods. That’s because methods would be named in a consistent manner, they would take similar parameters, and those parameters would be named and ordered consistently as well. When an API is poorly designed, or doesn’t follow a set of consistency guidelines, it’s harder to achieve this state where the how can be inferred from simply using the API. Inference can only be attained when the API is consistently designed to be straightforward.
In this chapter I’ll teach you how to design cohesive, consistent, and coherent APIs for direct consumption in your web projects and elsewhere. The API consumed by the front end is one area where we could do better. Together with JavaScript testing, I’d say that these are two of the most commonly undervalued aspects of front-end development.
REST stands for Representational State Transfer, and it’s a comprehensive set of guidelines that you can use to design API architectures. Once you understand REST, I’ll give you a tour of how to design a typical layered service architecture to go with that API. Before signing off, you’ll gain insight into developing client-side code to interact with the REST API, allowing you to react to responses from the API. Let’s get going!
9.2. Learning REST API design
REST is a set of architectural constraints that aid you when developing an API over HTTP. Imagine you start developing a web API in “anything goes” mode—a clean slate. Then add REST constraints into the mix, one by one. The end result will be a standardized API that most developers will feel comfortable developing and consuming. Note that there are different interpretations of how a REST API should be designed, and that several of my interpretations are sprinkled throughout this chapter. These are the interpretations that work well for me, but in the end that’s simply my opinion.
Roy Fielding wrote a dissertation that introduced REST to the world,[1] and it has only seen an increase in adoption since its publication in 2000. I’ll only cover the constraints relevant to our purposes: putting together a dedicated REST API for the front end of your application to consume. Among other constraints, you’ll touch on how to construct the endpoints that make up your API, how to handle requests, and what kinds of status codes you should use. Later we’ll go into more advanced HTTP communication topics, such as paging results, caching responses, and throttling requests.
1 Fielding, Roy Thomas. Architectural Styles and the Design of Network-Based Software Architectures. Doctoral dissertation, UC Irvine, 2000. http://bevacqua.io/bf/rest.
The first such constraint that you’ll visit is that REST is stateless, meaning requests should contain all the information necessary for the back end to understand what you want, and the server shouldn’t take advantage of any additional context stored in the server. In practical terms, you get “pure” endpoints where the output (response) is defined solely by the inputs (request).
The other constraint that interests us is that REST expects a uniform interface. Each endpoint in the API is expected to take parameters, affect the persistence layer, and respond in a certain, predictable way. To expand on these, you’ll need to understand that REST deals in resources.
REST resources
In REST, a resource is an abstraction of information, any information. For your purposes you could act as if resources and database models were equivalents. Users are a resource, and so are Products and Categories. Resources can be queried through the uniform interface I described.
Let’s bring the discussion closer to the ground and describe in practical terms what this means for the way you structure the front-end API.
9.2.1. Endpoints, HTTP verbs, and versioning
Have you ever used an API and felt it was great? Felt that you “get it,” and in fact you could guess the names of their methods, their methods worked in the way you expected them to, and there were no surprises? A couple of examples of well-executed APIs come to my mind; the first one is the language API in the Ruby standard library, with methods that clearly define what their purpose is, are consistent in the parameters they take, and have mirror methods that do exactly their opposite.
The String class in Ruby has a .capitalize method; it creates an uppercase copy of a string.
Then there’s .capitalize!, which capitalizes the original string rather than creating a copy. You also have .strip, which returns a copy where leading and trailing whitespace is gone. You probably guessed the next one: .strip!, which is the same as .strip but on the original string.
Facebook has other good examples. Their Graph REST API is easy to use, and it’s cohesive in that endpoints work mostly the same way. You can also chop parts of the URL and hack your way through their website; for example, http://facebook.com/me takes you to your own profile, as their API recognizes me as the currently authenticated user.
This kind of consistent behavior is critical to a great API. In contrast, bad API design leads to confusion and is characterized by the lack of a naming convention, ambiguous or poor documentation, or even worse: undocumented side effects. PHP is a notorious guide to writing a poor API. The issue arises because of the lack of a specification and different authors taking over different parts of the PHP language API. As a result, PHP functions have wildly varying signatures, names, and even casing conventions. You have no way to guess the name of a given function. Sometimes these issues can be solved by wrapping the existing API in a consistent one, which is a big part of how jQuery became popular—by abstracting the DOM API in a more convenient and consistent API.
The single most important aspect in API design is consistency, and that starts with endpoint naming conventions.
Naming your endpoints
To begin with, you need to define a prefix for all API endpoints. If you have a subdomain to use, such as api.example.com, that’ll work too. For front-end API efforts, using example.com/api as a prefix should work. A prefix helps discern API methods from view routes and sets an expectation for the kind of responses they produce (typically JSON in modern web applications).
The prefix on its own isn’t enough, though. Putting together a coherent API mostly relies on following strict guidelines when naming your endpoints. Here’s a set of guidelines to get you started:
· Use all lowercase, hyphenated endpoints such as /api/verification-tokens. This increases URL “hackability,” which is the ability to manually go in and modify the URL by hand. You can pick any naming scheme you like, as long as you’re consistent about it.
· Use a noun or two to describe the resource, such as verification-tokens, users, or products.
· Always describe resources in plural: /api/users rather than /api/user. This makes the API more semantic, as you’ll see in a minute.
These guidelines get us to an interesting point. Let’s make an example out of /api/products to see how you can design the API in a way that’s RESTful and consistent.
HTTP verbs and CRUD consistency
First, getting a list of products is probably the most basic task you could perform against the products API. The /api/products endpoint is prime for the task, so you implement a route on the server that returns a list of products as JSON, and you start feeling pretty good about yourself. Next, you want to return individual products; this will be used when humans visit the product details page. In this case, you might be tempted to define the endpoint as /api/product/:id, but one of your guidelines was to always use plurals, so that’ll end up looking like/api/products/:id.
Both of those methods are clearly defined as GET requests, because they interact with the server in a read-only fashion. What about removing a product? Typically, non-REST interfaces use methods such as POST /removeProduct?id=:id. Sometimes the GET verb is used, which results in web crawlers such as Google wiping out important database information by following GET links on a site.[2] REST suggests you use the DELETE HTTP verb instead, on the same endpoint that you used to GET a single product, /api/products/:id. Taking advantage of one of the building blocks of HTTP—their verbs—you can compose more semantic and consistent APIs.
2 Read this article for a similar story on how Google wiped clean the content on a website just by following links: http://bevacqua.io/bf/spider.
Inserting items of a given resource type involves a similar thought process. In non-REST scenarios you might’ve had POST /createProduct and a body of relevant data, whereas in REST you should use the more semantic PUT verb, along with the consistent /api/products endpoint. Last, edits should use the PATCH verb and an endpoint such as /api/products/:id. We’ll reserve the POST verb for operations that don’t merely involve creating or updating database objects, such as /notifySubscribers via email. Relationships are one last type of endpoint that can be considered part of basic storage operations (Create, Read, Update, Delete, or CRUD for short). Given all of what I’ve described so far, it probably won’t be hard for you to imagine how GET /api/products/:id/parts is a great starting point for a request that responds with the individual parts that make up a particular product.
That’s it, as far as CRUD goes. What happens if you want to use something other than CRUD? Use your best judgment. Usually, you could use the POST verb, ideally constraining yourself to a particular resource type, which doesn’t necessarily need to be a database model reference. For instance, POST /api/authentication/login can handle login attempts on the front end.
As a summary, Table 9.1 shows the verbs and endpoints discussed so far per a typical REST API design. I omitted the /api prefixes for brevity. Note that I use products as an example resource type to make the example easier to relate to, but this applies to any resource type.
Table 9.1. Product endpoints in a typical REST API
|
Verb |
Endpoint |
Description |
|
GET |
/products |
Gets a list of products |
|
GET |
/products/:id |
Gets a single product by ID |
|
GET |
/products/:id/parts |
Gets a list of parts in a single product |
|
PUT |
/products/:id/parts |
Inserts a new part for a particular product |
|
DELETE |
/products/:id |
Deletes a single product by ID |
|
PUT |
/products |
Inserts a new product |
|
HEAD |
/products/:id |
Returns whether the product exists through a status code of 200 or 404 |
|
PATCH |
/products/:id |
Edits an existing product by ID |
|
POST |
/authentication/login |
Most other API methods should use POST requests |
Please note that the HTTP verbs chosen for each type of action aren’t set in stone. It is, in fact, a topic of heated arguments, where people argue POST should be used for inserts, or any other operation that’s not idempotent, and endpoints using the other verbs (GET, PUT, PATCH, DELETE) must result in idempotent operations—repeated requests on those endpoints shouldn’t alter the outcome.
Versioning is also an important aspect of REST API design, but is it necessary for front-end operations?
API versioning
In traditional API scenarios, versioning is useful because it allows you to commit breaking changes to your service without demolishing the interaction with existing consumers. Two main schools of thought exist in the REST API versioning department.
One school of thought is convinced that the API version should be set in HTTP headers, and that if a version isn’t specified in the request, you should get a response from the latest version of the API. This formal approach is closer to what the original dissertation for REST proposed, but an argument is that if the API is poorly executed it can lead to breaking changes inadvertently.
Instead, they propose that the version is embedded into the API endpoint prefix: /api/v1/.... This also identifies right away which version of the API your application wants by looking at the requested endpoint.
Truth is, it doesn’t change that much from having the v1 be in the endpoint or in a request header, so it’s mostly a matter of preference for the API implementer. When it comes to web applications and their accompanying API, you don’t necessarily need to implement any versioning, and that’s why I’m inclined to go with the request header approach. That way, if somewhere down the line you decide you do need versioning, you can easily define a “latest version” as the default, and if consumers still want the previous version they can add a header explicitly asking for the old one. That being said, requesting a specific version of the API is always more desirable than blindly accepting whatever the latest API may be, so as not to break functionality unexpectedly.
I mentioned you don’t need to necessarily implement versioning in the REST API consumed by the front end, and that depends on two factors:
· Is the API public facing as well? In this case, versioning is necessary, baking a bit more predictability into your service’s behavior.
· Is the API used by several applications? Are the API and the front end developed by separate teams? Is there a drawn-out process to change an API endpoint? If any of these cases apply, you’re probably better off versioning your API.
Unless your team and your application are small enough that both live in the same repository and developers touch on both indistinctly, go for the safe bet and use versions in your API.
Time to move on and study what requests and responses may look like.
9.2.2. Requests, responses, and status codes
As I’ve mentioned before, consistency by following REST conventions is key in developing a highly usable API. This applies to requests and responses as well. An API is expected to take arguments consistently; the way this usually works is that you take the ID via the endpoint. In the case of the product by ID route, /api/products/:id, when requesting the /api/products/bad0-bab8 URL, assume bad0-bab8 is the requested resource identifier.
Requests
Modern-day web routers have no trouble dissecting the URL and providing the specified request parameters. For instance, the following code shows how Express, a Node.js web framework, lets you define a dynamic route that captures requests for products via an identifier. Then it parses the request URL and hands you the appropriately parsed parameters:
app.get('/api/products/:id', function (req, res, next) {
// req.params.id contains the extracted id
});
Having the identifier as part of the request endpoint is great because it allows DELETE and GET requests to use the same endpoint, making for a more intuitive API, like I mentioned previously about Ruby. You should decide on a consistent data-transfer strategy to upload the data to the server when making PUT, PATCH, or POST requests that modify a resource in the server. Nowadays, JSON is used almost ubiquitously as the data transport of choice due to its simplicity, the fact that it’s native to browsers, and the high availability of JSON parsing libraries across server-side languages.
Responses
Like requests, responses should conform to a consistent data-transfer format, so you have no surprises when parsing the response. Even when an error occurs on the server side, the response is still expected to be valid according to the chosen transport; for example, if our API is built using JSON, then all the responses produced by our API should be valid JSON (granted the user is accepting a JSON response in the HTTP headers).
You should figure out the envelope in which you’ll wrap your responses. An envelope, or message wrapper, is crucial for providing a consistent experience across all your API endpoints, allowing consumers to make certain assumptions about the responses the API provides. A useful starting point may be an object with a single field, named data, that contains the body of your response:
{
"data": {} // the actual response
}
Errors may be another useful field, only present when an error occurs, containing an object that may expose properties such as an error message, reason, and accompanying metadata. Suppose you query the API on the GET /api/products/baeb-b00f endpoint, but a baeb-b00f product doesn’t exist in the database:
{
"error": {
"code": "bf-404",
"message": "Product not found.",
"context": {
"id": "baeb-b00f"
}
}
}
Using an envelope and the appropriate error fields in your responses aren’t enough on their own. As a REST API developer you should also be conscious about the status codes that you choose for your API’s responses.
HTTP Status codes
In the case of a product not being found, you should respond with the 404 Not Found status code, in addition to the properly formatted response that describes the error. Status codes are particularly important in allowing API consumers to make assumptions about the responses. When you respond with status codes in the 2xx Success class, the response body should contain all of the relevant data that was requested. Here’s an example showing the response to a request on a product that could be found, alongside with the HTTP version and status code:
HTTP/1.1 200 OK
{
"data": {
"id": "baeb-b001",
"name": "Angry Pirate Plush Toy",
"description": "Batteries not included.",
"price": "$39.99",
"categories": ["plushies", "kids"]
}
}
Then there’s the 4xx Client Error class codes, which mean the request most likely failed due to an error made by the client side (the user wasn’t properly authenticated, for instance). In these cases, you should use the error field to describe why the request was faulty. For instance, if input validation fails on a form while attempting to create a product, you could return a response using a 400 Bad Request status code, as shown in the following listing.
Listing 9.1. Describing an error
HTTP/1.1 400 Bad Request
{
"error": {
"code": "bf-400",
"message": "Some required fields were invalid.",
"context": {
"validation": [
"The product name must be 6-20 alphanumeric characters",
"The price can't be negative",
"At least one product category should be selected"
]
}
}
}
Another kind of error in the 5xx status code range is an unexpected error such as 500 Internal Server Error. These should be presented to the consumer in the same way as 4xx errors. Suppose the previous request results in an error; you should then respond with a 500 status code and a snippet of data in the response body, similar to the following:
HTTP/1.1 500 Internal Server Error
{
"error": {
"code": "bf-500",
"message": "An unexpected error occurred while accessing the database."
"context": {
"id": "baeb-b001"
}
}
}
It’s usually relatively easy to capture these kinds of errors when everything else fails and respond with a 500 message, passing in a bit of context as to what went wrong.
Up to this point I’ve covered endpoints, request bodies, status codes, and response bodies. Setting proper response headers is another REST API design aspect that’s worth mentioning for a variety of reasons.
9.2.3. Paging, caching, and throttling
Although not as important in small applications, paging, caching, and throttling all play a part in defining a consistent and highly usable API. Paging in particular is often a necessity, because a complete lack of paging would easily cripple your application by allowing the API to query and transfer massive amounts of data from the database to the clients.
Response Paging
Going back to the first REST endpoint example I used, suppose I make a query to your API for /api/products. How many products should that endpoint return? All of them? What if there are a hundred? A thousand? Ten? A million? You have to draw the line somewhere. You could set a default pagination limit across the API and have the ability to override that default for each individual endpoint. Within a reasonable range, the consumer should have the ability to pass in a query string parameter and choose a different limit.
Suppose you settle for 10 products per request. You then have to implement a paging mechanism to access the rest of the products available on your application. To implement paging, you use the Link header.
If you query the first products page, the response’s Link header should be similar to the following code:
Link: <http://example.com/api/products/?p=2>; rel="next",
<http://example.com/api/products/?p=54>; rel="last"
Note that the endpoints must be absolute so the consumer can parse the Link header and query them directly. The rel attribute describes the relationship between the requested page and the linked page.
If you now request the second page, /api/products/?p=2, you should get a similar Link header, this time letting you know that “previous” and “first” related pages are also available:
Link: <http://example.com/api/products/?p=1>; rel="first",
<http://example.com/api/products/?p=1>; rel="prev",
<http://example.com/api/products/?p=3>; rel="next",
<http://example.com/api/products/?p=54>; rel="last"
Cases exist where data flows too rapidly for traditional paging methods to behave as expected. For instance, if a few records make their way into the database between requests for the first page and the second one, the second page results in duplicates of items that were on page one but were pushed to the second page as a result of the inserts. This issue has two solutions. The first solution is to use identifiers instead of page numbers. This allows the API to figure out where you left off, and even if new records get inserted, you’ll still get the next page in the context of the last range of identifiers that the API gave you. The second approach is to give tokens to the consumer that allow the API to track the position they arrived at after the last request and what the next page should look like.
If you deal with the kind of large datasets that require paging to work efficiently, then you’ll probably get big returns from implementing caching and throttling. Caching will probably yield better results than throttling, so let’s discuss that first.
Response Caching
Typically it’s up to the end client to cache API results as deemed necessary. The API, however, can make suggestions with varying degrees of confidence on how its responses should be cached. What follows is a crash course on HTTP caching behaviors and the related HTTP headers.
Setting the Cache-Control header to private bypasses intermediaries (such as proxies like nginx, other caching layers like Varnish, and all kinds of hardware in between) and only allows the end client to cache the response. Similarly, setting it to public allows intermediaries to store a copy of the response in their cache.
The Expires header tells the browser that a resource should be cached and not requested again until the expiration date has elapsed:
Cache-Control: private
Expires: Thu, 3 Jul 2014 18:31:12 GMT
It’s hard to define future Expires headers in API responses because if the data in the server changes, it could mean that the client’s cache becomes stale, but it doesn’t have any way of knowing that until the expiration date. A conservative alternative to Expires headers in responses is using a pattern known as “conditional requests.”
Conditional requests can be time-based, specifying a Last-Modified header in your responses. It’s best to specify a max-age in the Cache-Control header, to let the browser invalidate the cache after a certain period of time even if the modification date doesn’t change:
Cache-Control: private, max-age=86400
Last-Modified: Thu, 3 Jul 2014 18:31:12 GMT
The next time the browser requests this resource, it will only ask for the contents of the resource if they’re unchanged since this date, using the If-Modified-Since request header:
If-Modified-Since: Thu, 3 Jul 2014 18:31:12 GMT
If the resource hasn’t changed since Thu, 3 Jul 2014 18:31:12 GMT, the server will return with an empty body with the 304 Not Modified status code.
An alternative to the Last-Modified negotiation is to use the ETag (also known as Entity Tag) header, which is usually a hash that represents the resource in its current state. This allows the server to identify if the cached contents of the resource are different than the most recent version:
Cache-Control: private, max-age=86400
ETag: "d5aae96d71f99e4ed31f15f0ffffdd64"
On subsequent requests, the If-None-Match request header is sent with the ETag value of the last requested version for the same resource:
If-None-Match: "d5aae96d71f99e4ed31f15f0ffffdd64"
If the current version has the same ETag value, your current version is what the client has cached and a 304 Not Modified response will be returned. Once you have caching in place, request throttling could also mitigate server load.
Request Throttling
Throttling, also known as rate limiting, is a technique you can use to limit the number of requests a client can make to your API in a certain window of time. You have numerous criteria to rely on to rate limit consumers, but one of the most common ways to do so is to define a fixed rate limit and reset the quota after a certain period of time. You also have to decide how you’re going to enforce such limiting. Maybe the limit is enforced per IP address, and you could also have a more permissive limit for authenticated users.
Suppose you define a rate limit of 2,000 requests per hour for unauthenticated users; the API should include the following headers in its responses, with every request shaving off a point from the remainder. The X-RateLimit-Reset header should contain a UNIX timestamp describing the moment when the limit will be reset:
X-RateLimit-Limit: 2000
X-RateLimit-Remaining: 1999
X-RateLimit-Reset: 1404429213925
Once the request quota is drained, the API should return a 429 Too Many Requests response, with a helpful error message wrapped in the usual error envelope:
HTTP/1.1 429 Too Many Requests
X-RateLimit-Limit: 2000
X-RateLimit-Remaining: 0
X-RateLimit-Reset: 1404429213925
{
"error": {
"code": "bf-429",
"message": "Request quota exceeded. Wait 3 minutes and try again.",
"context": {
"renewal": 1404429213925
}
}
}
This kind of safeguarding is usually unnecessary when dealing with an internal API, or an API meant only for your front end, but it’s a crucial measure to take when exposing the API publicly. Together with paging and caching, these measures help relieve the strain on your back-end services.
When something unexpected happens as the consumer is using your API, thorough documentation will be the last bastion of the highly usable services you design. The next section explains the essentials of properly documenting an API.
9.2.4. Documenting an API
Any API worth using is well-documented, regardless of whether it’s public facing or not. When everything else fails, consumers refer to the API documentation. You can get away with auto-generating the API based on metadata sprinkled throughout your code base, often in the form of code comments, but you have to make sure the documentation stays up to date and relevant.
Good API documentation should
· Explain how the response envelope looks.
· Demonstrate how error reporting works.
· Show how authentication, paging, throttling, and caching work on a high level.
· Detail every single endpoint, explain the HTTP verbs used to query those endpoints, and describe each piece of data that should be in the request and the fields that may appear in the response.
Test cases can sometimes help as documentation by providing up-to-date working examples that also indicate best practices in accessing an API. Documentation enables API client developers to rapidly sift through any issues they may have because they didn’t fully understand the kind of data the API expected from them. Another desirable component in API documentation is a changelog that briefly details the changes that occur from one version to the next. Refer to section 4.2.2 for more information about changelogs.
Documentation may be useful even when the API and the web application live together, because it helps reduce time spent researching what the API is supposed to expect or how it works. Instead of sifting through code, developers can read the documentation. When asked something about the API, you can direct them to the docs. In this regard, documentation doesn’t present benefits only when maintaining a REST API, but it makes sense for any kind of service, library, or framework. In the case of a library—take jQuery, for example—the documentation should cover each of the library’s public API methods, clearly detailing the possible arguments and response combinations. The docs may also explain the underlying implementation in those cases where it helps the consumer understand why the API is shaped the way it is. Well-executed API documentation examples include Twitter, Facebook, GitHub, and Stack-Exchange.[3]
3 You can find these examples at http://bevacqua.io/bf/api-twitter, http://bevacqua.io/bf/api-fb, http://bevacqua.io/bf/api-github, and http://bevacqua.io/bf/api-stack, respectively.
Armed with the knowledge needed to design a REST API, in the next section you’ll explore the possibility of creating a series of layers for the API. These layers will define the API and help you keep your service modularly structured and testable.
9.3. Implementing layered service architectures
If your API is small enough and dedicated to the front end, chances are that it’ll live in the same project. If that’s the case, then it makes sense that the API lives in the same layer as the web application’s controllers.
A common approach is to have a so-called service layer that handles the core of the data processing task, while having a data layer that’s in charge of interacting with the database. Meanwhile, the API should be designed as a thin layer on top of the others. This architecture is pictured infigure 9.1.
Figure 9.1. Overview of a three-tiered service architecture
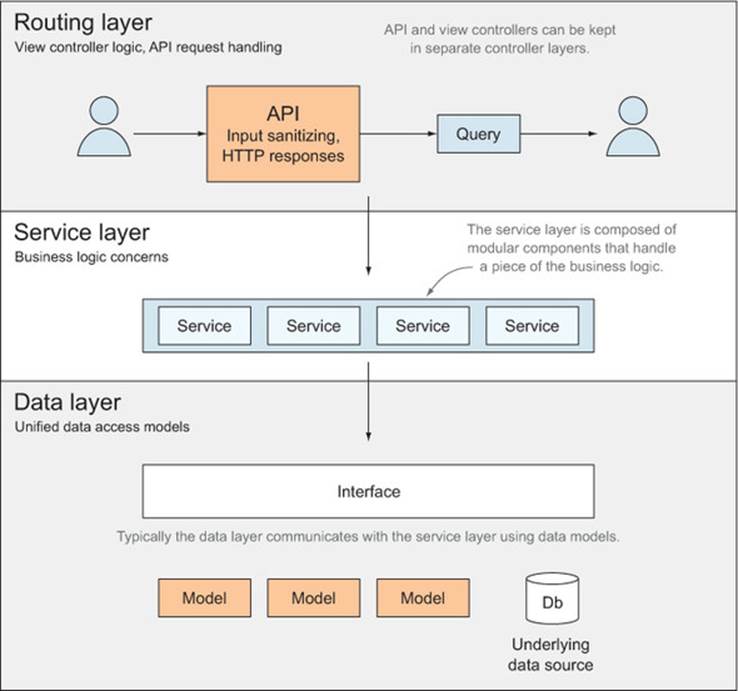
Looking at the figure from the top down, you can see the basic parts of each API layer.
9.3.1. Routing layer
The API layer is in charge of dealing with throttling, paging, caching headers, parsing request bodies, and preparing responses. All of that, however, should be accomplished by using the service layer as the only way to access or modify the data, for the following reasons:
· Controllers must validate request data before producing a response.
· The API asks the service for the different pieces of data it needs to properly fulfill the response.
· When the service jobs are complete, the API controller responds with a proper status code and relevant response data.
9.3.2. Service layer
The service layer can be architected to defer all data access to a third layer: the data layer. This layer is in charge of dealing with computation for any missing data that can’t be directly extracted from the data stores:
· The service layer is composed of many small services. Each of them handles a subset of the business.
· The service layer queries the data layer, computes business logic rules, and validates request data on a model level.
· CRUD operations typically end up being a pass-through to the data layer.
· Tasks such as sending out emails, where no persistence access is involved, may be handled entirely by a component of the service layer without resorting to a data store.
9.3.3. Data layer
The data layer is in charge of communicating with the persistence medium such as a database, flat file, memory, and so on. Its purpose is to provide access to any of those mediums through a consistent interface. The goal of having such an interface in place is that you can easily swap persistence layers (database engines, or in-memory key-value stores, for example), also making it easier to test:
· The data access layer provides an interface to the data in the underlying data store. This makes it easier to interact with different data sources and change vendors.
· Models stay the same independently of the underlying data store; they’re part of the interface.
· The underlying data models are kept away from the interface. This makes swapping out data stores easier, because data layer consumers won’t be affected.
That was a frantic overview! Let’s slow down and pace ourselves through this three-tiered architecture in greater detail. Note that this type of architecture isn’t limited to API design but could also fit typical web applications and possibly other types of applications too, if they deserve the extra infrastructure.
9.3.4. Routing layer
Controllers are the public-facing layer in this type of architecture. At this layer you’ll define the routes your application can be accessed from. The routing layer is also in charge of parsing any parameters found in the requested URL and in the request body.
Before even trying to fulfill the request, you may have to validate that the client didn’t exceed their allowed quota, and if that were the case, you can kill the request right then, passing the appropriate response and status code of 429 Too Many Requests.
As we all know, user input can’t be trusted, and this is where you’re meant to validate and sanitize user input most aggressively. Once the request is parsed, make sure that the request provided exactly what’s needed to fulfill the request, nothing less and also nothing more. Once you’ve made sure all of the required fields are provided, you should sanitize them and make sure that the inputs are valid. For example, if the provided email address isn’t a valid email, your API should know to respond with a 400 Bad Request and an appropriately formatted response body.
Once the request is parsed and its inputs validated, you’re ready to hand it to the service layer, which will trade the inputs provided by the request into the outputs it requires. (Bear with me for a minute; we’ll go deeper into the service layer.) Once the service layer gets back to you, you can finally figure out if the request can be fulfilled or not and respond with the corresponding status code and response data. What exactly is the service layer supposed to do, then? Glad you asked!
9.3.5. Service layer
At the service level, also known as the business logic layer, the request is processed, data is pulled from the data layer, and a representation of that data is returned. At this point it makes sense to validate business rules, whereas it wasn’t a responsibility of the routing layer.
For instance, if a user tries to create a new product with a price of very expensive or -1, it’s up to the routing layer to figure out that’s not a valid money input. If the selected product category expects products in the $20 - $150 range and the product is priced $200, then it’s up to the service layer to figure out that the request can’t be fulfilled.
The service layer is also responsible for doing any necessary data aggregation. Although it’s likely that the routing layer will only have to make a single call into the service layer to get what it needs, the same isn’t true for the interaction between the service and data layers. As an example, the service layer may need to get a list of articles on a news site and hand that over to a service that performs a processing task on the contents of those articles, finding commonalities and eventually returning a list of articles related to each other.
In this regard, the service layer is the event organizer in the architecture, in that it will query and command other layers to provide it with the means to produce a meaningful response. Let’s quickly comb through the specifics of how the data layer should be shaped.
9.3.6. Data layer
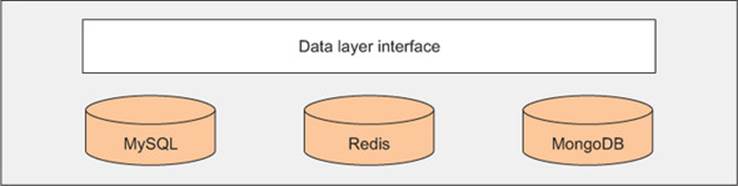
The data layer is the only layer that’s meant to access a persistence component, which would be your database. The goal of the data layer is to ensure a consistent API is provided, regardless of the underlying data store being used. If you’re persisting data in MongoDB, MySQL, or Redis, the API offered by the data layer will hide that detail from the service layer by providing a consistent API that isn’t tied to any particular persistence model.
Figure 9.2 shows the potential data stores that could be behind the data layer’s interface. Note that this interface doesn’t necessarily hide a single type of backing data store: you could be using both Redis and MySQL, for instance.
Figure 9.2. The data layer interface and a few underlying data stores
The data layer is typically thin, bridging the gap between the service and persistence layers. Results produced by the data layer are also expected to be consistent, because changing the underlying persistence model truly won’t make a difference.
Although not recommended, in small projects it’s plausible to merge the service layer and the data layer if there won’t be any significant changes in the persistence model of the application. Keep in mind that splitting the two is easy at first, but doing so once you have dozens of services that consume dozens of different data models becomes increasingly complex and nontrivial. That’s why, if possible, it’s recommended to split these two layers from the get-go.
The last topic we’ll go over in this chapter is how services like these should be consumed on the client side.
9.4. Consuming a REST API on the client side
When intensively interacting with a REST API layer on the client side of a web application, it’s often prudent to come up with a thin layer to act as an intermediary between the API and the core of your application. This layer relies on creating a shared infrastructure to emit requests against the API in exchange for the following list of benefits enumerated:
· A high-level overview of the requests taking place in your application
· Allows you to perform caching and avoid extra requests
· Manage errors in a single place in your application, providing a consistent UI experience
· Ability to shoot down pending requests when navigating away in a single-page application
I’ll start by describing what creating such a layer would entail, and then we’ll move on to the specifics.
9.4.1. The request handling layer
Putting together such a layer can be tackled in two ways. You can patch the XHR implementation in browsers, guaranteeing that any AJAX requests made by your application will have to go through the proxy you patched into XHR, or you can create a wrapper around XHR and use it every time an AJAX request takes place. The latter approach is typically regarded as being “cleaner,” because it doesn’t affect the native behavior provided by the browser the way the monkey-patching approach does, which sometimes leads to unexpected behavior. This is often reason enough to prefer creating a simple wrapper around XHR calls and using that instead of the native APIs.
I’ve created a library called measly exactly with this purpose in mind. It takes the less invasive wrapper approach, because that way it won’t affect code that’s unaware of how Measly behaves, and it allows you to easily associate requests with different parts of the DOM. It also allows for caching and event handling, both of which can be limited to the context of a particular DOM element or global. I’ll walk you through several key features in measly. To get started, you’ll have to install it from npm. It’s also available on Bower under the same name.
npm install --save measly
After you install measly, you’ll be ready to get into the next section, where we’ll explore how to use it to make sure requests don’t end up causing unintended side effects.
9.4.2. Shooting down old requests
Single-page web applications are all the rage these days. In traditional web applications, the user agent aborts all pending requests when navigating away to another page, but what about single-page applications (SPA)? If you’re developing an SPA, chances are that you hope stray requests won’t corrupt the state of your application when a human navigates to another page.
The following code is a generic example assuming a client-side MVC framework that broadcasts events when entering and leaving views. In this example you’re creating a measly layer on the view container element and aborting all requests on that layer when leaving the view:
view.on('enter', function (container) {
measly.layer({ context: container });
});
view.on('leave', function (container) {
measly.find(container).abort();
});
Whenever you need to make an AJAX call, you’ll have to look up the layer first. You can keep a reference around for convenience, as well. Using the measly layer to create requests is fairly straightforward. In this case you’re making a request for DELETE/api/products/:id, deleting a product by ID using a REST API:
var layer = measly.find(container);
deleteButton.addEventListener('click', function () {
layer.delete('/api/products/' + selectedItem.id);
});
Whenever you make a request, measly emits a series of events, letting you react to them. For example, if you want to know when a request succeeds you can use the data event, and if you want to listen for errors you can subscribe to the error event. You have two different places where you can listen for errors:
· At the request level directly, where you’re notified only if a particular request results in an error.
· At a layer level, where you can learn about any requests that result in an error.
Each of these methods has obvious use cases. You definitely want to know when a request succeeds so you can do something specific armed with the response data.
You may also need to learn about any errors that originate in your application on a global scale, so you can display the corresponding UI elements to notify the human about those errors or to send reports to a logging service.
9.4.3. Consistent AJAX error management
The following listing explains how you can show a UI dialog whenever an AJAX error occurs, but only if the status code in the response equals 500, meaning there was an internal server error. You’ll fill the dialog with the error message provided by the response, and after a short timeout, you’ll hide it again.
Listing 9.2. Showing a UI dialog box when an AJAX error occurs
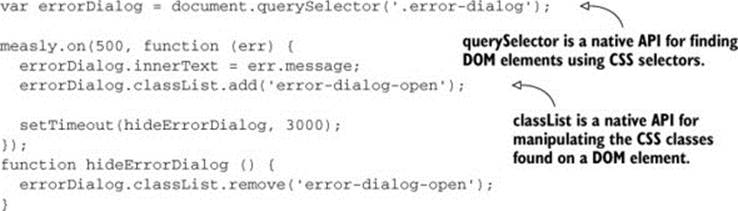
To be frank, this is a terribly uninteresting approach, and not something you couldn’t accomplish. A more useful scenario would be in-context validation. In this case, watch out for 400 Bad Request responses, which is the status code that should be assigned by the API to a validation failure response. Measly will set this in the event handler as the request object, allowing you to access important properties of the request, such as its DOM context element. The following code intercepts any 400 Bad Request response and turns it into a validation message in the context of a piece of DOM. If you’re binding Measly close enough to the visual context of the requests you create, humans won’t have any trouble finding your list of validation messages:
measly.on(400, function (err, body) {
var message = document.createElement('pre');
message.classList.add('validation-messages');
message.innerText = body.validation.messages.join('\n');
this.context.appendChild(message);
});
The best part is that you get this almost for free! Because you’re already using the context to make sure requests are aborted whenever you switch views, you may only have to declare a few child layers where it makes sense to do so, such as partial views or HTML forms. The last point I’d like to bring up is caching rules in Measly.
Measly caching rules
Measly lets you cache two ways. First, it allows you to define an amount of time a response is considered fresh, meaning that subsequent requests for the same resource will result in the cached response for as long as the cached copy is fresh. The following listing shows how you can request to cache the response for 60 seconds, and then when a button is clicked Measly either uses the cached copy (if within 60 seconds since the last request) or makes a new request if the data has been updated.
Listing 9.3. Caching files with Measly
measly.get('/api/products', {
cache: 60000
});
queryButton.addEventListener('click', function () {
var req = measly.get('/api/products', {
cache: 60000
});
req.on('data', function (body) {
console.log(body);
});
})
The other way you can avoid querying the server with an unwarranted HTTP request is to prevent it manually. The following listing is an example where a list of products is cached by hand.
Listing 9.4. Manually preventing unwarranted HTTP requests
var saved = []; // a list of products that you know to be fresh
var req = measly.get('/api/products');
req.on('ready', function () {
if (computable) {
req.prevent(null, saved);
}
});
req.on('data', function (body) {
console.log(body);
});
You’ll find a quick demo into how Measly works in the accompanying code samples for this chapter, listed as ch09/01_a-measly-client-side-layer. In the demo I show how to create different contexts to contain different requests to a portion of the DOM.
All in all, measly may not be the answer you’re looking for, but along with the rest of this book I hope it gave you something to think about!
9.5. Summary
That wasn’t that hard, was it? We covered a lot of ground, and looked at many best practices along the way:
· Responsible API design follows the REST constraint model by providing conventional endpoints, sanitizing inputs, and also providing consistent outputs.
· Paging, throttling, and caching in a REST API are all necessary to provide a fast and safe API service.
· Documentation should be taken seriously to lower the friction introduced by your API.
· You should develop a thin API layer backed by a domain logic layer and a data layer.
· A thin client-side layer helps you assign a context to AJAX requests, validate responses, and render HTTP errors on the user interface.