JavaScript for Kids: A Playful Introduction to Programming (2015)
Part III. Canvas
Chapter 15. Controlling Animations with the Keyboard
Now that you know how to work with the canvas; draw and color objects; and make objects move, bounce, and grow in size, let’s liven things up by adding some interactivity!
In this chapter, you’ll learn how to make your canvas animations respond when a user presses a key on the keyboard. This way, a player can control an animation by pressing an arrow key or one of a few assigned letters on their keyboard (like the classic W, A, S, D game controls). For example, instead of just having a ball bounce across a screen, we can have a player control the movement of the ball using the arrow keys.
Keyboard Events
JavaScript can monitor the keyboard through keyboard events. Each time a user presses a key on the keyboard, they generate a keyboard event, which is a lot like the mouse events we saw in Chapter 10. With mouse events, we used jQuery to determine where the cursor was when the event took place. With keyboard events, you can use jQuery to determine which key was pressed and then use that information in your code. For example, in this chapter we’ll make a ball move left, right, up, or down when the user presses the left, right, up, or down arrow key.
We’ll use the keydown event, which is triggered whenever a user presses a key, and we’ll use jQuery to add an event handler to the keydown event. That way, every time a keydown event occurs, our event handler function can find out which key was pressed and respond accordingly.
Setting Up the HTML File
To begin, create a clean HTML file containing the following code and save it as keyboard.html.
<!DOCTYPE html>
<html>
<head>
<title>Keyboard input</title>
</head>
<body>
<canvas id="canvas" width="400" height="400"></canvas>
<script src="https://code.jquery.com/jquery-2.1.0.js"></script>
<script>
// We'll fill this in next
</script>
</body>
</html>
Adding the keydown Event Handler
Now let’s add some JavaScript to respond to keydown events. Enter this code inside the empty <script> tags in your keyboard.html file.
$("body").keydown(function (event) {
console.log(event.keyCode);
});
In the first line, we use the jQuery $ function to select the body element in our HTML and then call the keydown method. The argument to the keydown method is a function that will be called whenever a key is pressed. Information about the keydown event is passed in to the function through the event object. For this program, we want to know which key was pressed, and that information is stored in the event object as event.keyCode.
Inside the function, we use console.log to output the event object’s keyCode property: a number representing the pressed key. Each key on your keyboard has a unique keycode. For example, the keycode for the spacebar is 32, and the left arrow is 37.
Once you’ve edited your keyboard.html file, save it and then open it in a browser. Now open the console so you can see the output, and click in the main browser window to have JavaScript register your keypresses. Now, if you start pressing keys, the corresponding keycodes should be printed to the console.
For example, if you type hi there, you should see the following output in the console:
72
73
32
84
72
69
82
69
Every key you press has a different keycode. The H key is 72, the I key is 73, and so on.
Press various keys to see their keycodes. What are the keycodes for the up, down, left, and right arrows? What about SHIFT and ENTER? The number and letter keys each have their own keycodes too.
Using an Object to Convert Keycodes into Names
To make it easier to work with keys, we’ll use an object to convert the keycodes into names so that the keypresses will be easier to recognize. In this next example, we create an object called keyNames, where the object keys are keycodes and the values are the names of those keys. Delete the JavaScript in keyboard.html and replace it with this:
var keyNames = {
32: "space",
37: "left",
38: "up",
39: "right",
40: "down"
};
$("body").keydown(function (event) {
➊ console.log(keyNames[event.keyCode]);
});
First, we create the keyNames object and fill it with the keycodes 32, 37, 38, 39, and 40. The keyNames object uses key-value pairs to match keycodes (such as 32, 37, and so on) with corresponding labels (such as "space" for the spacebar and "left" for the left arrow).
We can then use this object to find out the name of a key based on its keycode. For example, to look up the keycode 32, enter keyNames[32]. That returns the string "space".
At ➊, we use the keyNames object in the keydown event handler to get the name of the key that was just pressed. If the event keycode referenced by event.keyCode matches one of the keys in the keyNames object, this function will log the name of that key. If no key matches, this code will log undefined.
Load keyboard.html in your browser. Open the console, click in the main browser window, and try pressing a few keys. If you press one of the five keys in the keyName object (the arrow keys or spacebar), the program should print the name of the key. Otherwise, it will print undefined.
Add more key-value pairs to the keyNames object so that it can convert more keys to names. Insert the keycodes and names for SHIFT, ENTER/RETURN, and ALT/OPTION.
Moving a Ball with the Keyboard
Now that we can determine which key is being pressed, we can write a program to use the keyboard to control the movement of a ball. Our program will draw a ball and move it to the right. Pressing the arrow keys will change the ball’s direction, and pressing the spacebar will stop it. If the ball goes off the edge of the canvas, it will wrap around to the opposite side. For example, if the ball goes off the right edge of the canvas, it will show up again on the left edge while continuing to move in the same direction, as shown in Figure 15-1.
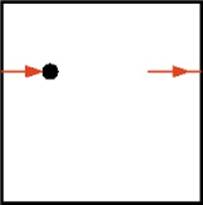
Figure 15-1. If the ball moves off the right side of the canvas, it will reappear on the left.
We’ll use an object called keyActions to find out which key was pressed and then use that information to set the direction of the ball’s movement. We’ll use setInterval to continually update the ball’s position and redraw it at its new position.
Setting Up the Canvas
First we need to set up the canvas and the context object. Open keyboard.html and replace the JavaScript between the second set of <script> tags with this code:
var canvas = document.getElementById("canvas");
var ctx = canvas.getContext("2d");
var width = canvas.width;
var height = canvas.height;
On the first line, we use document.getElementById to select the canvas element. On the second line, we call getContext on the canvas to get the context object. Then, in the var width and var height lines, we store the width and height of the canvas element in the variableswidth and height. This way, when we need the canvas dimensions, we can use these variables instead of having to enter the numbers manually. Now, if we choose to change the size of the canvas, we can simply edit the HTML, and the JavaScript code should still work.
Defining the circle Function
Next, we define the same circle function for the ball that we used in Chapter 14. Add this function after the code from the previous section:
var circle = function (x, y, radius, fillCircle) {
ctx.beginPath();
ctx.arc(x, y, radius, 0, Math.PI * 2, false);
if (fillCircle) {
ctx.fill();
} else {
ctx.stroke();
}
};
Creating the Ball Constructor
Now we’ll create a Ball constructor. We’ll use this constructor to create the moving ball object. We’ll be using the same technique for moving this ball as we did in Chapter 14—using the xSpeed and ySpeed properties to control the horizontal and vertical speed of the ball. Add this code after the circle function:
var Ball = function () {
this.x = width / 2;
this.y = height / 2;
this.xSpeed = 5;
this.ySpeed = 0;
};
We set the x and y values (the ball’s position) to width / 2 and height / 2 so that the ball will start at the center of the canvas. We also set this.xSpeed to 5 and this.ySpeed to 0. This means that the ball will start the animation by moving to the right (that is, with each animation step, its x position will increase by 5 pixels and its y position will stay the same).
Defining the move Method
In this section, we’ll define the move method. We’ll add this method to Ball.prototype to move the ball to a new location based on its current location, xSpeed and ySpeed. Add this method after the Ball constructor:
Ball.prototype.move = function () {
this.x += this.xSpeed;
this.y += this.ySpeed;
➊ if (this.x < 0) {
this.x = width;
} else if (this.x > width) {
this.x = 0;
} else if (this.y < 0) {
this.y = height;
} else if (this.y > height) {
this.y = 0;
}
};
First we update this.x and this.y using this.xSpeed and this.ySpeed, just as we did in Chapter 14 (see Moving the Ball). After that is the code for when the ball reaches the edge of the canvas.
The if...else statement at ➊ checks the ball’s position to see if it has moved off the edge of the canvas. If it has, this code makes the ball wrap around to the other side of the canvas. For example, if the ball goes off the left edge of the canvas, it should reappear from the right side of the canvas. In other words, if this.x is less than 0, we set this.x to width, which places it at the very right edge of the canvas. The rest of the if...else statement deals with the other three edges of the canvas in a similar way.
Defining the draw Method
We’ll use the draw method to draw the ball. Add this after the definition of the move method:
Ball.prototype.draw = function () {
circle(this.x, this.y, 10, true);
};
This method calls the circle function.
It uses the ball’s x and y values to set the center of the ball, sets the radius to 10, and sets fillCircle to true. Figure 15-2 shows the resulting ball.

Figure 15-2. The ball is a filled circle with a radius of 10.
Creating a setDirection Method
Now we have to create a way to set the direction of the ball. We’ll do that with a method called setDirection. This method will be called by our keydown event handler, which you’ll see in the next section. The keydown handler will tell setDirection which key was pressed by passing it a string ("left", "up", "right", "down", or "stop"). Based on that string, setDirection will change the xSpeed and ySpeed properties of the ball to make it move in the direction that matches the keypress. For example, if the string "down" is passed, we setthis.xSpeed to 0 and this.ySpeed to 5. Add this code after the draw method:
Ball.prototype.setDirection = function (direction) {
if (direction === "up") {
this.xSpeed = 0;
this.ySpeed = -5;
} else if (direction === "down") {
this.xSpeed = 0;
this.ySpeed = 5;
} else if (direction === "left") {
this.xSpeed = -5;
this.ySpeed = 0;
} else if (direction === "right") {
this.xSpeed = 5;
this.ySpeed = 0;
} else if (direction === "stop") {
this.xSpeed = 0;
this.ySpeed = 0;
}
};
The entire body of this method is one long if...else statement. The new direction is passed into the method as the direction argument. If direction is equal to "up", we set the ball’s xSpeed property to 0 and its ySpeed property to -5. The other directions are handled in the same way. Finally, if the direction is set to the string "stop", we set both this.xSpeed and this.ySpeed to 0, which means that the ball will stop moving.
Reacting to the Keyboard
This next snippet of code creates a ball object using the Ball constructor, and it listens for keydown events in order to set the ball’s direction. Add this code after the setDirection method:
➊ var ball = new Ball();
➋ var keyActions = {
32: "stop",
37: "left",
38: "up",
39: "right",
40: "down"
};
➌ $("body").keydown(function (event) {
➍ var direction = keyActions[event.keyCode];
➎ ball.setDirection(direction);
});
At ➊, we create a ball object by calling new Ball(). At ➋ we create a keyActions object, which we’ll use to convert keycodes to their corresponding direction. This object is the same as the keyNames object we created in Using an Object to Convert Keycodes into Names, except that for 32 (the keycode for the spacebar) we replace the label "space" with "stop" since we want the spacebar to stop the ball from moving.
At ➌ we use the jQuery $ function to select the body element and then call the keydown method to listen for keydown events. The function passed to the keydown method is called every time a key is pressed.
Inside this function, we use keyActions[event.keyCode] at ➍ to look up the label for the key that was pressed and assign that label to the direction variable. This sets the direction variable to a direction: "left" if the left arrow is pressed, "right" if the right arrow is pressed,"up" for the up arrow, "down" for the down arrow, and "stop" for the spacebar. If any other key is pressed, direction is set to undefined, and the animation won’t be affected.
Finally, at ➎ we call the setDirection method on the ball object, passing the direction string. As you saw before, setDirection updates the ball’s xSpeed and ySpeed properties based on the new direction.
Animating the Ball
All we have left to do now is animate the ball. The following code should look familiar, since it’s quite similar to what we used in Chapter 14. It uses the setInterval function that we’ve seen in the animation code in previous chapters to update the ball’s position at regular intervals. Add this code after the code from the previous section:
setInterval(function () {
ctx.clearRect(0, 0, width, height);
ball.draw();
ball.move();
ctx.strokeRect(0, 0, width, height);
}, 30);
We use setInterval to call our animation function every 30 milliseconds. The function first clears the entire canvas with clearRect and then calls the draw and move methods on the ball. As we’ve seen, the draw method simply draws a circle at the ball’s current location, and the movemethod updates the ball’s position based on its xSpeed and ySpeed properties. Finally, it draws a border with strokeRect so we can see the edge of the canvas.
Putting It All Together
Now that we’ve gone through all the code, here’s the full listing for your convenience.
var canvas = document.getElementById("canvas");
var ctx = canvas.getContext("2d");
var width = canvas.width;
var height = canvas.height;
var circle = function (x, y, radius, fillCircle) {
ctx.beginPath();
ctx.arc(x, y, radius, 0, Math.PI * 2, false);
if (fillCircle) {
ctx.fill();
} else {
ctx.stroke();
}
};
// The Ball constructor
var Ball = function () {
this.x = width / 2;
this.y = height / 2;
this.xSpeed = 5;
this.ySpeed = 0;
};
// Update the ball's position based on its speed
Ball.prototype.move = function () {
this.x += this.xSpeed;
this.y += this.ySpeed;
if (this.x < 0) {
this.x = width;
} else if (this.x > width) {
this.x = 0;
} else if (this.y < 0) {
this.y = height;
} else if (this.y > height) {
this.y = 0;
}
};
// Draw the ball at its current position
Ball.prototype.draw = function () {
circle(this.x, this.y, 10, true);
};
// Set the ball's direction based on a string
Ball.prototype.setDirection = function (direction) {
if (direction === "up") {
this.xSpeed = 0;
this.ySpeed = -5;
} else if (direction === "down") {
this.xSpeed = 0;
this.ySpeed = 5;
} else if (direction === "left") {
this.xSpeed = -5;
this.ySpeed = 0;
} else if (direction === "right") {
this.xSpeed = 5;
this.ySpeed = 0;
} else if (direction === "stop") {
this.xSpeed = 0;
this.ySpeed = 0;
}
};
// Create the ball object
var ball = new Ball();
// An object to convert keycodes into action names
var keyActions = {
32: "stop",
37: "left",
38: "up",
39: "right",
40: "down"
};
// The keydown handler that will be called for every keypress
$("body").keydown(function (event) {
var direction = keyActions[event.keyCode];
ball.setDirection(direction);
});
// The animation function, called every 30 ms
setInterval(function () {
ctx.clearRect(0, 0, width, height);
ball.draw();
ball.move();
ctx.strokeRect(0, 0, width, height);
}, 30);
Running the Code
Now our program is complete. When you run the program, you should see a black ball moving across the canvas to the right, as shown in Figure 15-3. When it reaches the right side of the canvas, it should wrap around to the left side and keep moving to the right. When you press the arrow keys, the ball should change direction, and pressing the spacebar should make the ball stop.
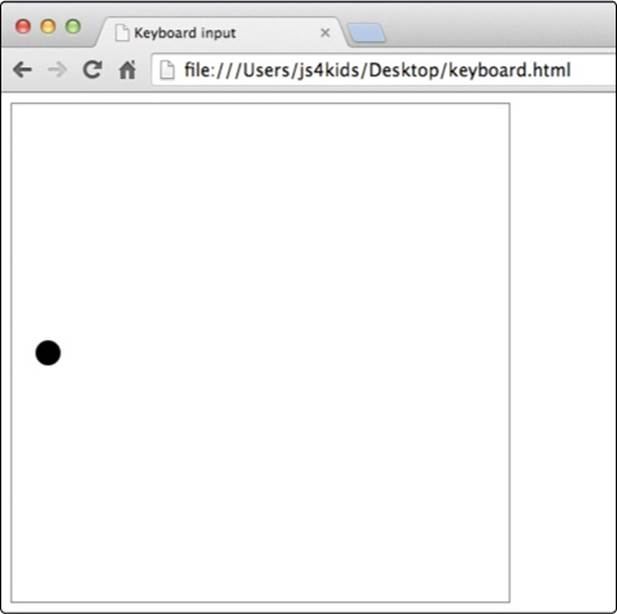
Figure 15-3. A screenshot from the moving ball animation
NOTE
If the animation doesn’t respond to keys as expected, click the page to make sure the program can access your keypresses.
What You Learned
In this chapter, you learned how to make programs that react to keyboard events. We used this knowledge to create a moving ball, where the ball’s direction is set by the keyboard.
Now that we can draw to the canvas, create animations, and update those animations based on user input, we can create a simple canvas-based game! In the next chapter, we’ll re-create the classic Snake game, combining everything we’ve learned up until now.
Programming Challenges
Here are a few ways you can build on the final animation to make it more sophisticated.
#1: BOUNCING OFF THE WALLS
Modify the code so the ball bounces off the side and top walls instead of wrapping around to the other side. Hint: Just reverse the direction when the ball hits the wall.
#2: CONTROLLING THE SPEED
The ball currently moves 5 pixels for every step of the animation. This is because setDirection always sets xSpeed or ySpeed to -5 or 5. Create a new property in the Ball constructor called speed and set it to 5. Then use this instead of the number 5 in setDirection.
Now, change your code so that you can use the number keys to set the speed from 1 to 9. Hint: Create an object called speeds, and use it to determine the new speed, if any, based on the keydown event.
#3: FLEXIBLE CONTROLS
Modify your code so that when you press the Z key, the ball slows down, and when you press the X key, it speeds up. Once that’s working, use C to make the ball smaller and V to make it larger.
What happens if the speed goes below 0? What about the size? Add a check in the code to make sure the speed and size never go below 0.