JavaScript for Kids: A Playful Introduction to Programming (2015)
Part I. Fundamentals
Chapter 3. Arrays
So far we’ve learned about numbers and strings, which are types of data that you can store and use in your programs. But numbers and strings are kind of boring. There’s not a lot that you can do with a string on its own. JavaScript lets you create and group together data in more interesting ways with arrays. An array is just a list of other JavaScript data values.
For example, if your friend asked you what your three favorite dinosaurs were, you could create an array with the names of those dinosaurs, in order:
var myTopThreeDinosaurs = ["T-Rex", "Velociraptor", "Stegosaurus"];
So instead of giving your friend three separate strings, you can just use the single array myTopThreeDinosaurs.
Why Should You Care About Arrays?
Let’s look at dinosaurs again. Say you want to use a program to keep track of the many kinds of dinosaurs you know about. You could create a variable for each dinosaur, like this:
var dinosaur1 = "T-Rex";
var dinosaur2 = "Velociraptor";
var dinosaur3 = "Stegosaurus";
var dinosaur4 = "Triceratops";
var dinosaur5 = "Brachiosaurus";
var dinosaur6 = "Pteranodon";
var dinosaur7 = "Apatosaurus";
var dinosaur8 = "Diplodocus";
var dinosaur9 = "Compsognathus";
This list is pretty awkward to use, though, because you have nine different variables when you could have just one. Imagine if you were keeping track of 1000 dinosaurs! You’d need to create 1000 separate variables, which would be almost impossible to work with.

It’s like if you had a shopping list, but every item was on a different piece of paper. You’d have one piece of paper that said “eggs,” another piece that said “bread,” and another piece that said “oranges.” Most people would write the full list of things they want to buy on a single piece of paper. Wouldn’t it be much easier if you could group all nine dinosaurs together in just one place?
You can, and that’s where arrays come in.
Creating an Array
To create an array, you just use square brackets, []. In fact, an empty array is simply a pair of square brackets, like this:
[];
[]
But who cares about an empty array? Let’s fill it with our dinosaurs!
To create an array with values in it, enter the values, separated by commas, between the square brackets. We can call the individual values in an array items or elements. In this example, our elements will be strings (the names of our favorite dinosaurs), so we’ll write them with quote marks. We’ll store the array in a variable called dinosaurs:
var dinosaurs = ["T-Rex", "Velociraptor", "Stegosaurus", ![]()
"Triceratops", "Brachiosaurus", "Pteranodon", "Apatosaurus", ![]()
"Diplodocus", "Compsognathus"];
NOTE
Because this is a book and the page is only so wide, we can’t actually fit the whole array on one line. The ![]() is to show where we’ve put the code onto an extra line because the page is too narrow. When you type this into your computer, you can type it all on one line.
is to show where we’ve put the code onto an extra line because the page is too narrow. When you type this into your computer, you can type it all on one line.
Long lists can be hard to read on one line, but luckily that’s not the only way to format (or lay out) an array. You can also format an array with an opening square bracket on one line, the list of items in the array each on a new line, and a closing square bracket, like this:
var dinosaurs = [
"T-Rex",
"Velociraptor",
"Stegosaurus",
"Triceratops",
"Brachiosaurus",
"Pteranodon",
"Apatosaurus",
"Diplodocus",
"Compsognathus"
];
If you want to type this into your browser console, you’ll need to hold down the SHIFT key when you press the ENTER key for each new line. Otherwise the JavaScript interpreter will think you’re trying to execute the current, incomplete, line. While we’re working in the interpreter, it’s easier to write arrays on one line.
Whether you choose to format the items in an array on one line or on separate lines, it’s all the same to JavaScript. However many line breaks you use, JavaScript just sees an array—in this example, an array containing nine strings.
Accessing an Array’s Elements
When it’s time to access elements in an array, you use square brackets with the index of the element you want, as you can see in the following example:
dinosaurs[0];
"T-Rex"
dinosaurs[3];
"Triceratops"
An index is the number that corresponds to (or matches) the spot in the array where a value is stored. Just as with strings, the first element in an array is at index 0, the second is at index 1, the third at index 2, and so on. That’s why asking for index 0 from the dinosaurs array returns "T-Rex" (which is first in the list), and index 3 returns "Triceratops" (which is fourth in the list).
It’s useful to be able to access individual elements from an array. For example, if you just wanted to show someone your absolute favorite dinosaur, you wouldn’t need the whole dinosaurs array. Instead you would just want the first element:
dinosaurs[0];
"T-Rex"

Setting or Changing Elements in an Array
You can use indexes in square brackets to set, change, or even add elements to an array. For example, to replace the first element in the dinosaurs array ("T-Rex") with "Tyrannosaurus Rex", you could do this:
dinosaurs[0] = "Tyrannosaurus Rex";
After you’ve done that, the dinosaurs array would look like this:
["Tyrannosaurus Rex", "Velociraptor", "Stegosaurus", "Triceratops",
"Brachiosaurus", "Pteranodon", "Apatosaurus", "Diplodocus",
"Compsognathus"]
You can also use square brackets with indexes to add new elements to an array. For example, here’s how you could create the dinosaurs array by setting each element individually with square brackets:
var dinosaurs = [];
dinosaurs[0] = "T-Rex";
dinosaurs[1] = "Velociraptor";
dinosaurs[2] = "Stegosaurus";
dinosaurs[3] = "Triceratops";
dinosaurs[4] = "Brachiosaurus";
dinosaurs[5] = "Pteranodon";
dinosaurs[6] = "Apatosaurus";
dinosaurs[7] = "Diplodocus";
dinosaurs[8] = "Compsognathus";
dinosaurs;
["T-Rex", "Velociraptor", "Stegosaurus", "Triceratops",
"Brachiosaurus", "Pteranodon", "Apatosaurus", "Diplodocus",
"Compsognathus"]
First we create an empty array with var dinosaurs = []. Then, with each following line we add a value to the list with a series of dinosaurs[] entries, from index 0 to index 8. Once we finish the list, we can view the array (by typing dinosaurs;). We see that JavaScript has stored all the names ordered according to the indexes.
You can actually add an element at any index you want. For example, to add a new (made-up) dinosaur at index 33, you could write the following:
dinosaurs[33] = "Philosoraptor";
dinosaurs;
["T-Rex", "Velociraptor", "Stegosaurus", "Triceratops",
"Brachiosaurus", "Pteranodon", "Apatosaurus", "Diplodocus",
"Compsognathus", undefined × 24 "Philosoraptor"]
The elements between indexes 8 and 33 will be undefined. When you output the array, Chrome helpfully tells you how many elements were undefined, rather than listing them all individually.
Mixing Data Types in an Array
Array elements don’t all have to be the same type. For example, the next array contains a number (3), a string ("dinosaurs"), an array (["triceratops", "stegosaurus", 3627.5]), and another number (10):
var dinosaursAndNumbers = [3, "dinosaurs", ["triceratops", ![]()
"stegosaurus", 3627.5], 10];
To access an individual element in this array’s inner array, you would just use a second set of square brackets. For example, while dinosaursAndNumbers[2]; returns the entire inner array, dinosaursAndNumbers[2][0]; returns only the first element of that inner array, which is"triceratops".
dinosaursAndNumbers[2];
["triceratops", "stegosaurus", 3627.5]
dinosaursAndNumbers[2][0];
"triceratops"
When we type dinosaursAndNumbers[2][0];, we tell JavaScript to look at index 2 of the array dinosaursAndNumbers, which contains the array ["triceratops", "stegosaurus", 3627.5], and to return the value at index 0 of that second array. Index 0 is the first value of the second array, which is "triceratops". Figure 3-1 shows the index positions for this array.
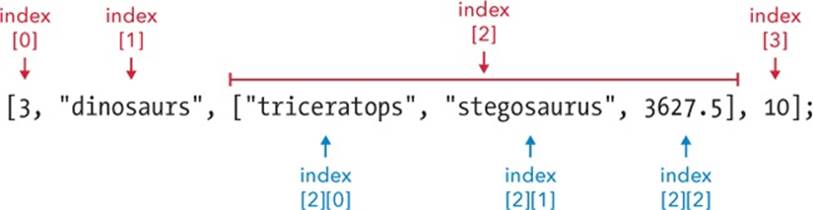
Figure 3-1. The index positions of the main array are labeled in red, and the indexes of the inner array are labeled in blue.
Working with Arrays
Properties and methods help you work with arrays. Properties generally tell you something about the array, and methods usually do something to change the array or return a new array. Let’s have a look.
Finding the Length of an Array
Sometimes it’s useful to know how many elements there are in an array. For example, if you kept adding dinosaurs to your dinosaurs array, you might forget how many dinosaurs you have.
The length property of an array tells you how many elements there are in the array. To find the length of an array, just add .length to the end of its name. Let’s try it out. First we’ll make a new array with three elements:
var maniacs = ["Yakko", "Wakko", "Dot"];
maniacs[0];
"Yakko"
maniacs[1];
"Wakko"
maniacs[2];
"Dot"
To find the length of the array, add .length to maniacs:
maniacs.length;
3
JavaScript tells us that there are 3 elements in the array, and we already know they have the index positions 0, 1, and 2. This gives us a useful piece of information: the last index in an array is always the same number as the length of the array minus 1. This means that there is an easy way to access the last element in an array, however long that array is:
maniacs[maniacs.length - 1];
"Dot"
Here, we’re asking JavaScript for an element from our array. But instead of entering an index number in the square brackets, we use a little bit of math: the length of the array minus 1. JavaScript finds maniacs.length, gets 3, and then subtracts 1 to get 2. Then it returns the element from index 2—the last maniac in the array, "Dot".
Adding Elements to an Array
To add an element to the end of an array, you can use the push method. Add .push to the array name, followed by the element you want to add inside parentheses, like this:
var animals = [];
animals.push("Cat");
1
animals.push("Dog");
2
animals.push("Llama");
3
animals;
["Cat", "Dog", "Llama"]
animals.length;
3
Here we create an empty array with var animals = [];, and then use the push method to add "Cat" to the array. Then, we use push again to add on "Dog" and then "Llama". When we display animals;, we see that "Cat", "Dog", and "Llama" were added to the array, in the same order we entered them.

The act of running a method in computer-speak is known as calling the method. When you call the push method, two things happen. First, the element in parentheses is added to the array. Second, the new length of the array is returned. That’s why you see those numbers printed out every time you call push.
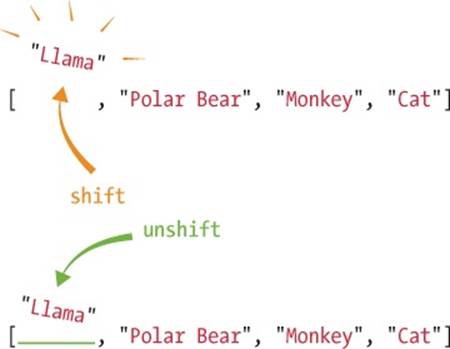
To add an element to the beginning of an array, you can use .unshift(element), like this:
animals;
["Cat", "Dog", "Llama"]
➊ animals[0];
"Cat"
animals.unshift("Monkey");
4
animals;
["Monkey", "Cat", "Dog", "Llama"]
animals.unshift("Polar Bear");
5
animals;
["Polar Bear", "Monkey", "Cat", "Dog", "Llama"]
animals[0];
"Polar Bear"
➋ animals[2];
"Cat"
Here we started with the array that we’ve been using, ["Cat", "Dog", "Llama"]. Then, as we add the elements "Monkey" and "Polar Bear" to the beginning of the array with unshift, the old values get pushed along by one index each time. So "Cat", which was originally at index 0 ➊, is now at index 2 ➋.

Again, unshift returns the new length of the array each time it is called, just like push.
Removing Elements from an Array
To remove the last element from an array, you can pop it off by adding .pop() to the end of the array name. The pop method can be particularly handy because it does two things: it removes the last element, and it returns that last element as a value. For example, let’s start with ouranimals array, ["Polar Bear", "Monkey", "Cat", "Dog", "Llama"]. Then we’ll create a new variable called lastAnimal and save the last animal into it by calling animals.pop().
animals;
["Polar Bear", "Monkey", "Cat", "Dog", "Llama"]
➊ var lastAnimal = animals.pop(); lastAnimal;
"Llama"
animals;
["Polar Bear", "Monkey", "Cat", "Dog"]
➋ animals.pop();
"Dog"
animals;
["Polar Bear", "Monkey", "Cat"]
➌ animals.unshift(lastAnimal);
4
animals;
["Llama", "Polar Bear", "Monkey", "Cat"]
When we call animals.pop() at ➊, the last item in the animals array, "Llama", is returned and saved in the variable lastAnimal. "Llama" is also removed from the array, which leaves us with four animals. When we call animals.pop() again at ➋, "Dog" is removed from the array and returned, leaving only three animals in the array.
When we used animal.pop() on "Dog", we didn’t save it into a variable, so that value isn’t saved anywhere anymore. The "Llama", on the other hand, was saved to the variable lastAnimal, so we can use it again whenever we need it. At ➌, we use unshift(lastAnimal) to add"Llama" back onto the front of the array. This gives us a final array of ["Llama", "Polar Bear", "Monkey", "Cat"].
Pushing and popping are a useful pair because sometimes you care about only the end of an array. You can push a new item onto the array and then pop it off when you’re ready to use it. We’ll look at some ways to use pushing and popping later in this chapter.

To remove and return the first element of an array, use .shift():
animals;
["Llama", "Polar Bear", "Monkey", "Cat"]
var firstAnimal = animals.shift();
firstAnimal;
"Llama"
animals;
["Polar Bear", "Monkey", "Cat"]
animals.shift() does the same thing as animals.pop(), but the element comes off the beginning instead. At the start of this example, animals is ["Llama", "Polar Bear", "Monkey", "Cat"]. When we call .shift() on the array, the first element, "Llama", is returned and saved in firstAnimal. Because .shift() removes the first element as well as returning it, at the end animals is just ["Polar Bear", "Monkey", "Cat"].
You can use unshift and shift to add and remove items from the beginning of an array just as you’d use push and pop to add and remove items from the end of an array.
Adding Arrays
To add two arrays together to make a new, single array, you can use firstArray.concat(otherArray). The term concat is short for concatenate, a fancy computer science word for joining two values together. The concat method will combine both arrays into a new array, with the values from firstArray added in front of those from otherArray.
For example, say we have a list of some furry animals and another list of some scaly animals, and we want to combine them. If we put all of our furry animals in an array called furryAnimals and all of our scaly animals in an array called scalyAnimals, enteringfurryAnimals.concat(scalyAnimals) will create a new array that has the values from the first array at the beginning and the values from the second array at the end.

var furryAnimals = ["Alpaca", "Ring-tailed Lemur", "Yeti"];
var scalyAnimals = ["Boa Constrictor", "Godzilla"];
var furryAndScalyAnimals = furryAnimals.concat(scalyAnimals);
furryAndScalyAnimals;
["Alpaca", "Ring-tailed Lemur", "Yeti", "Boa Constrictor", "Godzilla"]
furryAnimals;
["Alpaca", "Ring-tailed Lemur", "Yeti"]
scalyAnimals;
["Boa Constrictor", "Godzilla"]
Even though firstArray.concat(otherArray) returns an array containing all the elements from firstArray and secondArray, neither of the original arrays is changed. When we look at furryAnimals and scalyAnimals, they’re the same as when we created them.
Joining Multiple Arrays
You can use concat to join more than two arrays together. Just put the extra arrays inside the parentheses, separated by commas:
var furryAnimals = ["Alpaca", "Ring-tailed Lemur", "Yeti"];
var scalyAnimals = ["Boa Constrictor", "Godzilla"];
var featheredAnimals = ["Macaw", "Dodo"];
var allAnimals = furryAnimals.concat(scalyAnimals, featheredAnimals);
allAnimals;
["Alpaca", "Ring-tailed Lemur", "Yeti", "Boa Constrictor", "Godzilla",
"Macaw", "Dodo"]
Here the values from featheredAnimals get added to the very end of the new array, since they are listed last in the parentheses after the concat method.
concat is useful when you have multiple arrays that you want to combine into one. For example, say you have a list of your favorite books, and your friend also has a list of favorite books, and you want to go see if the books are available to buy all at once at the bookstore. It would be easier if you had only one list of books. All you’d have to do is concat your list with your friend’s, and voilà! One list of books.
Finding the Index of an Element in an Array
To find the index of an element in an array, use .indexOf(element). Here we define the array colors and then ask for the index positions of "blue" and "green" with colors.indexOf("blue") and colors.indexOf("green"). Because the index of "blue" in the array is 2,colors.indexOf("blue") returns 2. The index of "green" in the array is 1, so colors.indexOf("green") returns 1.
var colors = ["red", "green", "blue"];
colors.indexOf("blue");
2
colors.indexOf("green");
1
indexOf is like the reverse of using square brackets to get a value at a particular index; colors[2] is "blue", so colors.indexOf("blue") is 2:
colors[2];
"blue"
colors.indexOf("blue");
2
Even though "blue" appears third in the array, its index position is 2 because we always start counting from 0. And the same goes for "green", of course, at index 1.
If the element whose position you ask for is not in the array, JavaScript returns -1.
colors.indexOf("purple");
-1
This is JavaScript’s way of saying “That doesn’t exist here,” while still returning a number.
If the element appears more than once in the array, the indexOf method will return the first index of that element in the array.
var insects = ["Bee", "Ant", "Bee", "Bee", "Ant"];
insects.indexOf("Bee");
0
Turning an Array into a String
You can use .join() to join all the elements in an array together into one big string.
var boringAnimals = ["Monkey", "Cat", "Fish", "Lizard"];
boringAnimals.join();
"Monkey,Cat,Fish,Lizard"
When you call the join method on an array, it returns a string containing all the elements, separated by commas. But what if you don’t want to use commas as the separator?

You can use .join(separator) to do the same thing, but with your own chosen separator between each value. The separator is whatever string you put inside the parentheses. For example, we can use three different separators: a hyphen with spaces on either side, an asterisk, and the wordsees with spaces on either side. Notice that you need quote marks around the separator, because the separator is a string.
var boringAnimals = ["Monkey", "Cat", "Fish", "Lizard"];
boringAnimals.join(" - ");
"Monkey - Cat - Fish - Lizard"
boringAnimals.join("*")
"Monkey*Cat*Fish*Lizard"
boringAnimals.join(" sees ")
"Monkey sees Cat sees Fish sees Lizard"
This is useful if you have an array that you want to turn into a string. Say you have lots of middle names and you’ve got them stored in an array, along with your first and last name. You might be asked to give your full name as a string. Using join, with a single space as the separator, will join all your names together into a single string:
var myNames = ["Nicholas", "Andrew", "Maxwell", "Morgan"];
myNames.join(" ");
"Nicholas Andrew Maxwell Morgan"
If you didn’t have join, you’d have to do something like this, which would be really annoying to type out:
myNames[0] + " " + myNames[1] + " " + myNames[2] + " " + myNames[3];
"Nicholas Andrew Maxwell Morgan"
Also, this code would work only if you had exactly two middle names. If you had one or three middle names, you’d have to change the code. With join, you don’t have to change anything—it prints out a string with all of the elements of the array, no matter how long the array is.
If the values in the array aren’t strings, JavaScript will convert them to strings before joining them together:
var ages = [11, 14, 79];
ages.join(" ");
"11 14 79"
Useful Things to Do with Arrays
Now you know lots of different ways to create arrays and play around with them. But what can you actually do with all these properties and methods? In this section, we’ll write a few short programs that show off some useful things to do with arrays.
Finding Your Way Home
Picture this: your friend has come over to your house. Now she wants to show you her house. The only problem is that you’ve never been to her house before, and later you’ll have to find your way back home on your own.
Luckily, you have a clever idea to help you with your problem: on the way to your friend’s house, you’ll keep a list of all the landmarks you see. On the way back, you’ll go through the list in reverse and check items off the end of the list every time you pass a landmark so you know where to go next.
Building the Array with Push
Let’s write some code that would do exactly that. We start off by creating an empty array. The array starts off empty because you don’t know what landmarks you’ll see until you actually start walking to your friend’s house. Then, for each landmark on the way to your friend’s house, we’ll push a description of that landmark onto the end of the array. Then, when it’s time to go home, we’ll pop each landmark off the array.

var landmarks = [];
landmarks.push("My house");
landmarks.push("Front path");
landmarks.push("Flickering streetlamp");
landmarks.push("Leaky fire hydrant");
landmarks.push("Fire station");
landmarks.push("Cat rescue center");
landmarks.push("My old school");
landmarks.push("My friend's house");
Here we create an empty array named landmarks and then use push to store all the landmarks you pass on the way to your friend’s house.
Going in Reverse with pop
Once you arrive at your friend’s house, you can inspect your array of landmarks. Sure enough, the first item is "My house", followed by "Front path", and so on through the end of the array, with the final item "My friend's house". When it’s time to go home, all you need to do is pop off the items one by one, and you’ll know where to go next.
landmarks.pop();
"My friend's house"
landmarks.pop();
"My old school"
landmarks.pop();
"Cat rescue center"
landmarks.pop();
"Fire station"
landmarks.pop();
"Leaky fire hydrant"
landmarks.pop();
"Flickering streetlamp"
landmarks.pop();
"Front path"
landmarks.pop();
"My house"
Phew, you made it home!
Did you notice how the first landmark you put in the array was also the last one you got out of it? And the last landmark you put in the array was the first one that came out? You might have thought that you’d always want the first item you put in to be the first item you get out, but you can see that it’s sometimes helpful to go back through an array in reverse.

It’s actually very common to use a process like this in larger programs, which is why JavaScript makes pushing and popping so easy.
NOTE
This technique is known as a stack in computer-speak. Think of it like a stack of pancakes. Every time you cook a new pancake, it goes on top (like push), and every time you eat one, it comes off the top (like pop). Popping a stack is like going back in time: the last item you pop is the first one you pushed. It’s the same with pancakes: the last pancake you eat is the first one that was cooked. In programming jargon, this is also called Last In, First Out (LIFO). The alternative to LIFO is First In, First Out (FIFO). This is also known as a queue, because it acts like a queue (or line) of people. The first person to join the queue is the first person to be served.
Decision Maker
We can use arrays in JavaScript to build a program to make decisions for us (like a Magic 8-Ball). First, though, we need to find out how to get random numbers.
Using Math.random()
We can produce random numbers using a special method called Math.random(), which returns a random number between 0 and 1 each time it’s called. Here’s an example:
Math.random();
0.8945409457664937
Math.random();
0.3697543195448816
Math.random();
0.48314980138093233
It’s important to note that Math.random() always returns a number less than 1 and will never return 1 itself.
If you want a bigger number, just multiply the result of calling Math.random(). For example, if you wanted numbers between 0 and 10, you would multiply Math.random() by 10:
Math.random() * 10;
7.648027329705656
Math.random() * 10;
9.7565904534421861
Math.random() * 10;
0.21483442978933454
Rounding Down with Math.floor()
We can’t use these numbers as array indexes, though, because indexes have to be whole numbers with nothing after the decimal point. To fix that, we need another method called Math.floor(). This takes a number and rounds it down to the whole number below it (basically getting rid of everything after the decimal point).
Math.floor(3.7463463);
3
Math.floor(9.9999);
9
Math.floor(0.793423451963426);
0
We can combine these two techniques to create a random index. All we need to do is multiply Math.random() by the length of the array and then call Math.floor() on that value. For example, if the length of the array were 4, we would do this:
Math.floor(Math.random() * 4);
2 // could be 0, 1, 2, or 3
Every time you call the code above, it returns a random number from 0 to 3 (including 0 and 3). Because Math.random() always returns a value less than 1, Math.random() * 4 will never return 4 or anything higher than 4.
Now, if we use that random number as an index, we can select a random element from an array:
var randomWords = ["Explosion", "Cave", "Princess", "Pen"];
var randomIndex = Math.floor(Math.random() * 4);
randomWords[randomIndex];
"Cave"
Here we use Math.floor(Math.random() * 4); to pick a random number from 0 to 3. Once that random number is saved to the variable randomIndex, we use it as an index to ask for a string from the array randomWords.
In fact, we could shorten this by doing away with the randomIndex variable altogether and just say:
randomWords[Math.floor(Math.random() * 4)];
"Princess"
The Complete Decision Maker
Now let’s create our array of phrases, and we can use this code to pick a random one. This is our decision maker! I’m using comments here to show some questions you might want to ask your computer.
var phrases = [
"That sounds good",
"Yes, you should definitely do that",
"I'm not sure that's a great idea",
"Maybe not today?",
"Computer says no."
];
// Should I have another milkshake?
phrases[Math.floor(Math.random() * 5)];
"I'm not sure that's a great idea"
// Should I do my homework?
phrases[Math.floor(Math.random() * 5)];
"Maybe not today?"
Here we created an array called phrases that stores different pieces of advice. Now, every time we have a question, we can ask for a random value from the phrases array, and it will help us make a decision!
Notice that because our array of decisions has five items, we multiply Math.random() by 5. This will always return one of five index positions: 0, 1, 2, 3, or 4.
Creating a Random Insult Generator
We can extend the decision maker example to create a program that generates a random insult every time you run it!
var randomBodyParts = ["Face", "Nose", "Hair"];
var randomAdjectives = ["Smelly", "Boring", "Stupid"];
var randomWords = ["Fly", "Marmot", "Stick", "Monkey", "Rat"];
// Pick a random body part from the randomBodyParts array:
➊ var randomBodyPart = randomBodyParts[Math.floor(Math.random() * 3)];
// Pick a random adjective from the randomAdjectives array:
➋ var randomAdjective = randomAdjectives[Math.floor(Math.random() * 3)];
// Pick a random word from the randomWords array:
➌ var randomWord = randomWords[Math.floor(Math.random() * 5)];
// Join all the random strings into a sentence:
var randomInsult = "Your " + randomBodyPart + " is like a " + ![]()
randomAdjective + " " + randomWord + "!!!";
randomInsult;
"Your Nose is like a Stupid Marmot!!!"

Here we have three arrays, and in lines ➊, ➋, and ➌, we use three indexes to pull a random word from each array. Then, we combine them all in the variable randomInsult to create a complete insult. At ➊ and ➋ we’re multiplying by 3 because randomAdjectives andrandomBodyParts both contain three elements. Likewise, we’re multiplying by 5 at ➌ because randomWords is five elements long. Notice that we add a string with a single space between randomAdjective and randomWord. Try running this code a few times—you should get a different random insult each time!
If you wanted to be really clever, you could replace line ➌ with this:
var randomWord = randomWords[Math.floor(Math.random() * ![]()
randomWords.length)];
We know that we always need to multiply Math.random() by the length of the array, so using randomWords.length means we don’t have to change our code if the length of the array changes.
Here’s another way to build up our random insult:
var randomInsult = ["Your", randomBodyPart, "is", "like", "a", ![]()
randomAdjective, randomWord + "!!!"].join(" ");
"Your Hair is like a Smelly Fly!!!"
In this example, each word of the sentence is a separate string in an array, which we join with the space character. There’s only one place where we don’t want a space, which is in between randomWord and "!!!". In this case, we use the + operator to join those two strings without the space.
What You Learned
As you’ve seen, JavaScript arrays are a way to store a list of values. Now you know how to create and work with arrays, and you have many ways of accessing their elements.
Arrays are one of the ways JavaScript gives you to bring multiple values together into one place. In the next chapter, we’ll look at objects, which are another way of storing multiple values as a single unit. Objects use string keys to access the elements, rather than number indexes.
Programming Challenges
Try out these challenges to practice the skills you learned in this chapter.
#1: NEW INSULTS
Make your own random insult generator with your own set of words.
#2: MORE SOPHISTICATED INSULTS
Extend the random insult generator so it generates insults like “Your [body part] is more [adjective] than a [animal]’s [animal body part].” (Hint: You’ll need to create another array.)
#3: USE + OR JOIN?
Make two versions of your random insult generator: one that uses the + operator to create the string, and one that creates an array and joins it with " ". Which do you prefer, and why?
#4: JOINING NUMBERS
How could you turn the array [3, 2, 1] into the string "3 is bigger than 2 is bigger than 1" using the join method?