Microsoft Press Programming Windows Store Apps with HTML, CSS and JavaScript (2014)
Appendix D Provider-Side Contracts
In this appendix:
• File picker providers
• The cached file updater
• Contact card action providers
• Contact picker providers
• Appointment providers
File Picker Providers
In Chapter 11, “The Story of State, Part 2,” we looked at how the file/folder picker can be used to reference not only locations on the file system but also content that’s managed by other apps or even created on-the-fly within other apps. Let’s be clear on this point: the app that’s using the file picker is doing so to obtain a StorageFile or StorageFolder for some purpose. But this does not mean that provider apps that can be invoked through the file picker necessary manage their data as files or folders. Their role is to take whatever kind of data they manage and package it up so that it looks like a file/folder to the picker.
In the “The File Picker UI” section of Chapter 11, for instance, we saw how the Windows Sound Recorder app can be used to record and audio track and return it through the file picker. Such a recording did not exist at the time the target app was invoked; instead, it displayed its UI through which the user could create a file that was then passed back through the file picker. In this way, the Sound Recorder app shortcuts the whole process of creating a new recording: it provides that function exactly when the user is trying to select an audio file. Otherwise the user would have to start the Sound Recorder app separately, make a recording, store it locally, and switch to the original app to invoke the file picker, and locate that new file.
The file picker is not limited to audio or other media, of course: it works with any file type, depending on what the caller indicates it wants. One app might let the user go into an online music library, purchase and download a track, and then return that file to the file picker. Another app might perform some kind of database query and return the results as a file, and still others might allow the user to browse online databases of file-type entities, again hiding the details of downloading and packaging that data as a file such that the user’s experience of the file picker is seamless across the local file system, online resources, and apps that just create or acquire data dynamically. In such cases, however, note that the file picker contracts are designed for relatively quick in-and-out experiences. For this reason an app should provide only basic editing capabilities in this context (like cropping a photo or trimming the audio).
As with the Search and Share target contracts, Visual Studio and Blend provide an item template for file picker providers, specifically the File Open Picker Contract item in a project’s Add > New Item dialog. This gives you a basic selection structure built around a ListView control, but not much else. For our purposes we won’t be using this template; we’ll draw on samples instead. Generally speaking, when servicing the file picker contracts, an app should use the same views and UI as it does when launched normally, thereby keeping the app experience consistent in both scenarios.
Manifest Declarations
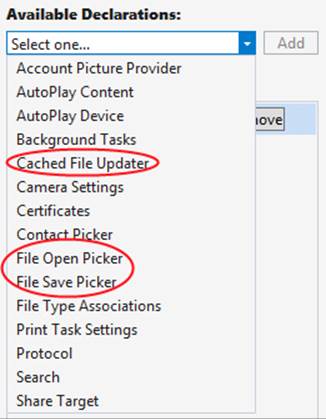
To be a provider for the file picker, an app starts by—what else!—adding the appropriate declaration to its manifest. In this case there are actually three declarations: File Open Picker, File Save Picker, and Cached File Updater, as shown below in Visual Studio’s manifest designer. Each of these declarations can be made once within any given app.
The File Open Picker and File Save Picker declarations are what make a provider app available in the dialogs invoked through the Windows.Storage.Pickers.FileOpenPicker and FileSavePicker API. The calling app in both cases is completely unaware that another app might be invoked—all the interaction is between the picker and the provider app through the contract, with the contract broker being responsible first for displaying a UI through which to select an object and second for returning a StorageFile object for that item.
With both the File Open Picker and File Save Picker contracts, the provider app indicates in its manifest those file types that it can service. This is done through the Add New button in the image below; the file picker will then make that app available as a choice only when the calling app indicates a matching file type. The Supports Any File Type option that you see here will make the app always appear in the list, but this is appropriate only for apps like OneDrive that provide a general storage location. Apps that work only with specific file types should indicate only those types.
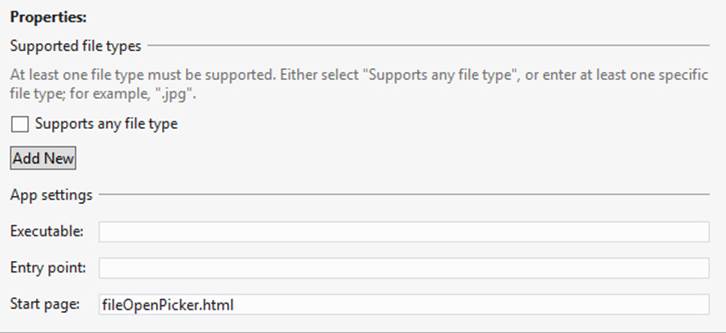
The provider app indicates a Start Page for the open and save provider contracts separately—the operations are distinct and independent. In both cases, as we’ve seen for other contracts, these are the pages that the file picker will load when the user selects this particular provider app. As with Share targets, these pages are typically independent of the main app and will have their own script contexts and activation handlers, as we’ll see in the next section. (Again, the Executable and Entry Point options are there for other languages.)
You might be asking: why are the open and save contracts separate? Won’t most apps generally provide both? Well, not necessarily. If you’re creating a provider app for a web service that is effectively read-only (like the image results from a search engine), you can serve only the file open case. If the service supports the creation of new files and updating existing files, such as a photo or document management service would, then you can also serve the file save case. There might also be scenarios where the provider would serve only the save case, such as writing to a sharing service. In short, Windows cannot presume the nature of the data sources that provider apps will work with, so the two contracts are kept separate.
The next main section in this Appendix covers the Cached File Updater contract, but it’s good to know how it relates to the others here. This contract allows a provider app to synchronize local and remote copies of a file, essentially to subscribe to and manage change/access notifications for provided files. This is primarily of use to apps that represent a file repository where the user will frequently open and save files, like OneDrive or a database app. It’s essentially a two-way binding service for files when either local or remote copies can be updated independently. As such, it’s always implemented in conjunction with the file picker provider contracts.
Tip The Sharing and exchanging data topic has some helpful guidance about when you might choose to be a provider for the file save picker contract and when being a share target is more appropriate.
Activation of a File Picker Provider
Demonstrations of the file picker provider contracts—for open and save—are found in the File picker contracts sample, which I’ll refer to as the provider sample for clarity. Declarations for both are included in the manifest with Supports Any File Type, so the sample will be listed with other apps in all file pickers:

When the provider app is invoked, the Start page listed in the manifest for the appropriate contract (open or save) is loaded. These are fileOpenPicker.html and fileSavePicker.html, found in the root of the project. Both of these pages are again loaded independently of the main app and appear as shown in Figure D-1 and Figure D-2. Note that the title of the app and the color scheme is determined by the Visual Assets section in the provider app’s manifest. In particular, the text comes from the Tile > Short Name field and the colors come from the Tile > Foreground Text and Tile > Background Color settings. Note that the system automatically adds the down chevron (![]() ) next to the title (at the top of each figure) through which the user can select a different picker location or provider app.
) next to the title (at the top of each figure) through which the user can select a different picker location or provider app.
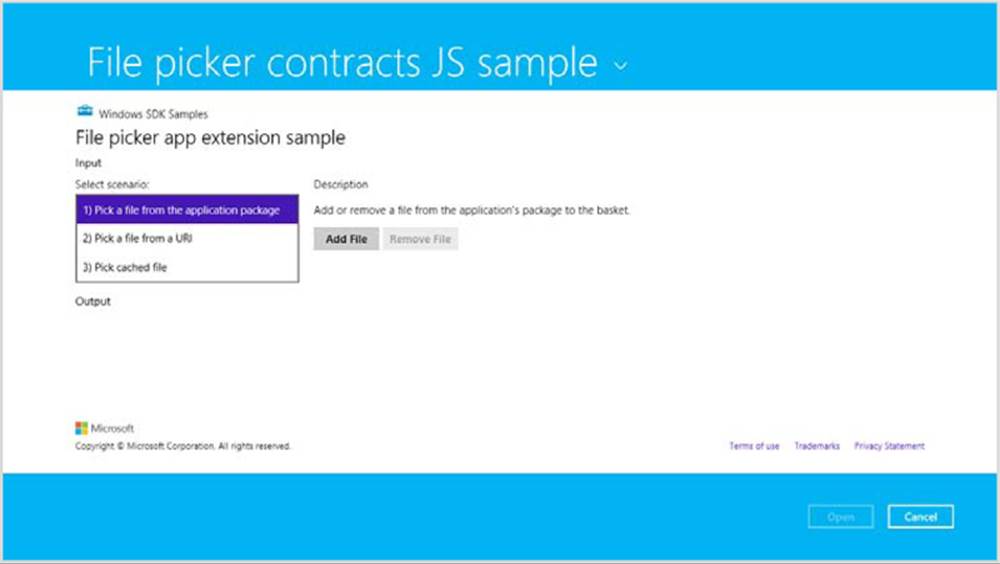
FIGURE D-1 The Open UI as displayed by the sample.

FIGURE D-2 The Save UI as displayed by the sample.
When you first run this sample, you won’t see either of these pages. Instead you’ll see a page through which you can invoke the file open or save pickers and then choose this app as a provider. You can do this if you like, but I recommend using a different app to invoke the pickers, just so we’re clear on which app is playing which role. For this purpose you can use the sample we used in Chapter 11, the File picker sample (this is the consumer side). You can even use something like the Windows Music app where the Open File command on its app bar will invoke a picker wherein the provider sample will be listed.
Whatever your choice, the important parts of the provider sample are its separate pages for servicing its contracts, which are again fileOpenPicker.html and fileSavePicker.html. In the first case, the code is contained in js/fileOpenPicker.js where we can see the activated event handler with the activation kind of fileOpenPicker:
function activated(eventObject) {
if (eventObject.detail.kind ===
Windows.ApplicationModel.Activation.ActivationKind.fileOpenPicker) {
fileOpenPickerUI = eventObject.detail.fileOpenPickerUI;
eventObject.setPromise(WinJS.UI.processAll().then(function () {
// Navigate to a scenario page...
}));
}
}
Here eventObject.detail is a WebUIFileOpenPickerActivatedEventArgs object, whose fileOpenPickerUI property (a FileOpenPickerUI object) provides the means to fulfill the provider’s responsibilities with the contract.
In the second case, the code is in js/fileSavePicker.js where the activation kind is fileSavePicker:
function activated(eventObject) {
if (eventObject.detail.kind ===
Windows.ApplicationModel.Activation.ActivationKind.fileSavePicker) {
fileSavePickerUI = eventObject.detail.fileSavePickerUI;
eventObject.setPromise(WinJS.UI.processAll().then(function () {
// Navigate to a scenario page
}));
}
}
where eventObject.detail is a WebUIFileSavePickerActivatedEventArgs object. As with the open contract, the fileSavePickerUI property of this (a FileSavePickerUI object) provides the means to fulfill the provider’s side of the contract.
In both open and save cases, the contents of the contract’s Start page is displayed within the letterboxed area between the system-provided top and bottom bands. If that content overflows the provided space, scrollbars would be provided only within that area—the top and bottom bands always remain in place. In both cases, WinRT also provides the usual features for activation, such as the splashScreen and previousExecutionState properties, just as we saw in Chapter 3, “App Anatomy and Performance Fundamentals,” meaning that you should reload necessary session state and use extended splash screens as needed.
What’s most interesting, though, are the contract-specific interactions that are represented in the different scenarios for these pages (as you can see in Figure D-1 and Figure D-2). Let’s look at each.
Note For specific details on designing a file picker experience, see Guidelines for file pickers.
File Open Provider: Local File
The provider for file open works through the FileOpenPickerUI object supplied with the fileOpenPicker activation kind. Simply said, whatever kind of UI the provider offers to select some file or data will be wired to the various methods, properties, and events of this object. First, the UI will use the allowedFileTypes property to filter what it displays for selection—clearly, the provider should not display items that don’t match what the file picker is being asked to pick! Next, the UI can use the selectionMode property (a FileSelectionMode value) to determine if the file picker was invoked for single or multiple selection.
When the user selects an item within the UI, the provider calls the addFile method with the StorageFile object as appropriate for that item. Clearly, the provider has to somehow create that StorageFile object. In the sample’s open picker > scenario 1 (js/fileOpenPickerScenario1.js), this is accomplished with a StorageFolder.-getFileAsync (where the StorageFolder is the package location).
Windows.ApplicationModel.Package.current.installedLocation
.getFileAsync("images\\squareTile-sdk.png").then(function (fileToAdd) {
addFileToBasket(localFileId, fileToAdd);
}
where addFileToBasket just calls FileOpenPickerUI.addFile and displays messages for the result. That result is a value from the AddFileResult enumeration:added (success), alreadyAdded (redundant operations, so the file is already there), notAllowed (adding is denied due to a mismatched file type), and unavailable (app is not visible). These really just help you report the result to users in your UI. Note also that the canAddFile method might be helpful for enabling or disabling add commands in your UI as well, which will prevent some of these error cases from ever arising in the first place.
The provider app must also respond to requests to remove a previously added item, as when the user removes a selection from the “basket” in the multi-select file picker UI. To do this, listen for the FileOpenPickerUI object’s fileRemoved event, which provides a file ID as an argument. You pass this ID to containsFile followed by removeFile as in the sample (js/fileOpenPickerScenario1.js):
// Wire up the event in the page's initialization code
fileOpenPickerUI.addEventListener("fileremoved", onFileRemovedFromBasket, false);
function removeFileFromBasket(fileId) {
if (fileOpenPickerUI.containsFile(fileId)) {
fileOpenPickerUI.removeFile(fileId);
}
}
If you need to know when the file picker UI is closing your page (such as the user pressing the Open or Cancel buttons shown in Figure D-1), listen for the closing event. This gives you a chance to close any sessions you might have opened with an online service and otherwise perform any necessary cleanup tasks. In the eventArgs you’ll find an isCanceled property that indicates whether the file picker is being canceled (true) or being closed due to the Open button (false). The eventArgs.closingOperation object also contains a getDeferral method and a deadlineproperty that allows you to carry out async operations as well, similar to what we saw in Chapter 3 for the suspending event.
A final note is that a file picker provider should respect the FileOpenPickerUI.settingsIdentifier to relaunch the provider to a previous state (that is, a previous picker session). If you remember from the other side of this story, an app that’s using the file picker can use thesettingsIdentifier to distinguish different use cases within itself—perhaps to differentiate certain file types or feature contexts. The identifier can also differ between different apps that invoke the file picker. By honoring this property, then, a provider app can maintain a case-specific context each time it’s invoked (basically using settingsIdentifier in its appdata filenames and the names of settings containers), which is how the built-in file pickers for the file system works.
It’s also possible for the provider app to be suspended while displaying its UI and could possibly be shut down if the calling app is closed. However, if you manage picker state based on settingsIdentifier values, you don’t need to save or manage any other session state where your picker functionality is concerned.
File Open Provider: URI
For the most part, scenario 2 of the open file picker case in the provider sample is just like we’ve seen in the previous section. The only difference is that it shows how to create a StorageFile from a nonfile source, such as an image that’s obtained from a remote URI. In this situation we need to obtain a data stream for the remote URI and convert that stream into a StorageFile. Fortunately, a few WinRT APIs make this very simple, as shown in js/fileOpenPickerScenario2.js within its onAddFileUri method:
function onAddUriFile() {
// Respond to the "Add" button being clicked
var imageSrcInput = document.getElementById("imageSrcInput");
if (imageSrcInput.value !== "") {
var uri = new Windows.Foundation.Uri(imageSrcInput.value);
var thumbnail =
Windows.Storage.Streams.RandomAccessStreamReference.createFromUri(uri);
// Retrieve a file from a URI to be added to the picker basket
Windows.Storage.StorageFile.createStreamedFileFromUriAsync("URI.png", uri,
thumbnail).then(function (fileToAdd) {
addFileToBasket(uriFileId, fileToAdd);
},
function (error) {
// ...
});
} else {
// ...
}
}
Here Windows.Storage.StorageFile.createStreamedFileFromUriAsync (a static method) does the honors to give us a StorageFile for a URI, and addFileToBasket is again an internal method that just calls the addFile method of the FileOpenPickerUI object.
If you need to perform authentication or take other special steps to obtain content from a web service, you’ll generally want to use the Windows.Netwoking.BackgroundTransfer API to acquire the content (where you can provide credentials), followed by StorageFile.createStreamedFile to serve that file up through the contract. StorageFile.createStreamedFileFromUriAsync does exactly this but doesn’t provide for authentication.
File Save Provider: Save a File
Similar to how the file open provider interacts with a FileOpenPickerUI object, a provider app for saving files works with the specific methods, properties, and events FileSavePickerUI class. Again, the open and save contracts are separate concerns because the data source for which you might create a provider app might or might not support save operations independently of open. If you do support both, you will likely reuse the same UI and would thus use the same Start page and activation path.
Within the FileSavePickerUI class, we first have the allowedFileTypes as provided by the app that invoked the file save picker UI in the first place. As with open, you’ll use this to filter what you show in your own UI so that users can clearly see what items for these types already exist. You’ll also typically want to populate a file type drop-down list with these types as well.
For restoring the provider’s save UI for the specific calling app from a previous session, there is again the settingsIdentifier property.
Referring back to Figure D-2, notice the controls along the bottom of the screen, the ones that are automatically provided by the file picker UI when the provider app is invoked. When the user changes the filename field, the provider app can listen for and handle the FileSavePickerUIobject’s filenameChanged event; in your handler you can get the new value from the fileName property. If the provider app has UI for setting the filename, it cannot write to this property, however. It must instead call trySetFileName, whose return value from the SetFileNameResultenumeration is either succeeded, notAllowed (typically a mismatched file type), or unavailable. This is typically used when the user taps an item in your list, where the expected behavior is to set the filename to the name of that item.
The most important event, of course, happens when the user finally taps the Save button. This will fire the FileSavePickerUI object’s targetFileRequested event. You must provide a handler for this event, in which you must create an empty StorageFile object in which the app that invoked the file picker UI can save its data. The name of this StorageFile must match the fileName property.
The eventArgs for this event is a TargetFileRequestedEventArgs object. This contains a single property named request, which is a TargetFileRequest. Its targetFile property is where you place the StorageFile you create (or null if there’s an error). You must set this property before returning from the event handler, but of course you might need to perform asynchronous operations to do this at all. For this purpose, as we’ve seen many times, the request also contains a getDeferral method. This is used in scenario 1 of the provider sample’s save case (js/fileSavePickerScenario1.js):
function onTargetFileRequested(e) {
var deferral = e.request.getDeferral();
// Create a file to provide back to the Picker
Windows.Storage.ApplicationData.current.localFolder.createFileAsync(
fileSavePickerUI.fileName).done(function (file) {
// Assign the resulting file to the targetFile property and complete the deferral
e.request.targetFile = file;
deferral.complete();
}, function () {
// Set the targetFile property to null and complete the deferral to indicate failure
e.request.targetFile = null;
deferral.complete();
});
};
In your own app you will, of course, replace the createFileAsync call in the local folder with whatever steps are necessary to create a file or data object. Where remote files are concerned, on the other hand, you’ll need to employ the Cached File Updater contract (see “Cached File Updater” below).
File Save Provider: Failure Case
Scenario 2 of the provider sample’s save UI shows one other aspect of the process: displaying errors in case there is a real failure to create the necessary StorageFile. Generally speaking, you can use whatever UI you feel is best and consistent with the app in general, to let the user know what they need to do. The sample uses a MessageDialog like so (js/fileSavePickerScenario2.js):
function onTargetFileRequestedFail(e) {
var deferral = e.request.getDeferral();
var messageDialog = new Windows.UI.Popups.MessageDialog("If the app needs the user to
correct a problem before the app can save the file, the app can use a message like this to
tell the user about the problem and how to correct it.");
messageDialog.showAsync().done(function () {
// Set the targetFile property to null and complete the deferral to indicate failure
// once the user has closed the dialog. This will allow the user to take any
// necessary corrective action and click the Save button once again.
e.request.targetFile = null;
deferral.complete();
});
};
Cached File Updater
Using the cached file updater contract provides for keeping a local copy of a file in sync with one managed by a provider app on some remote resource. This contract is specifically meant for apps that provide access to a storage location where users regularly save, access, and update files. The OneDrive app in Windows is a good example of this.
Back in Chapter 11, we saw some of the method calls that are made by an app that uses the file picker: Windows.Storage.CachedFileManager.deferUpdates and completeUpdatesAsync. This usage is shown in scenarios 4 and 6 of the File picker sample we worked with in that chapter. These are the calls that a file-consuming app makes if and when it writes to a file that it obtained from a file picker. It does this because it won’t know (and shouldn’t care) whether the file provider has another copy in a database, on a web service, etc., that needs to be kept in sync. If the provider needs to handle synchronization, the consuming app’s calls to these methods will trigger the necessary cached file updater UI of the provider app, which might or might not be shown, depending on the need. Even if the consuming app doesn’t call these methods, the provider app will still be notified of changes but won’t be able to show any UI.
There are two directions with which this contract works, depending on whether it’s updating a local (cached) copy of a file or the remote (source) copy. In the first case, the provider is asked to update the local copy, typically when the consuming app attempts to access that file (pulling it from the FutureAccessList or MostRecentlyUsed list of Windows.Storage.AccessCache; it does not explicitly ask for an update). In the second case, the consuming app has modified the file such that the provider needs to propagate those changes to its source copy.
From a provider app’s point of view, updates come into play whenever it supplies a file to another app. This can happen through the file picker contracts, as we’ve seen in the previous section, but also through file type associations and the share contract. In the latter case a share source app is, in a sense, a file provider and might make use of the cached file updater contract. In short, if you want your file-providing app to be able to track and synchronize updates between local and remote copies of a file, this is the contract to use.
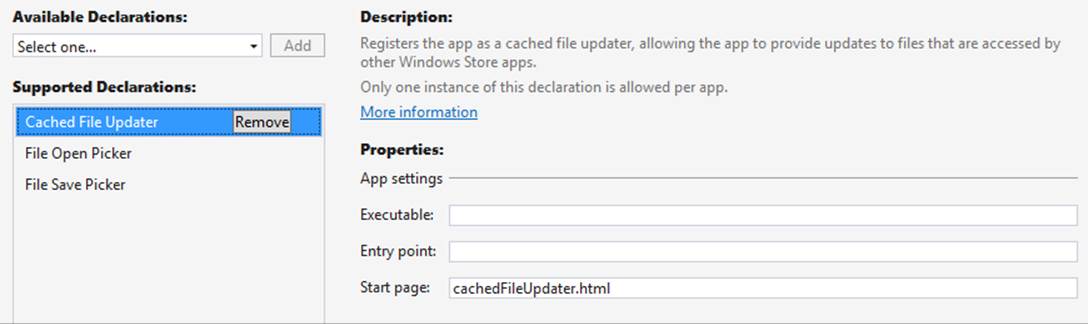
Supporting the contract begins with a manifest declaration as shown below, where the Start page indicates the page implementing the cached file updater UI. That page will handle the necessary events to update files and might or might not actually be displayed to the user, as we’ll see later.
The next step for the provider is to indicate when a given StorageFile should be hooked up with this contract. It does so by calling Windows.Storage.Provider.CachedFileUpdater.setUpdateInformationon a provided file, as shown in scenario 3 of the File picker contracts sample, which I’ll again refer to as the provider sample for simplicity (js/fileOpenPickerScenario3.js):
function onAddFile() {
// Respond to the "Add" button being clicked
Windows.Storage.ApplicationData.current.localFolder.createFileAsync("CachedFile.txt",
Windows.Storage.CreationCollisionOption.replaceExisting).then(function (file) {
Windows.Storage.FileIO.writeTextAsync(file, "Cached file created...").then(
function () {
Windows.Storage.Provider.CachedFileUpdater.setUpdateInformation(
file, "CachedFile",
Windows.Storage.Provider.ReadActivationMode.beforeAccess,
Windows.Storage.Provider.WriteActivationMode.notNeeded,
Windows.Storage.Provider.CachedFileOptions.requireUpdateOnAccess);
addFileToBasket(localFileId, file);
}, onError);
}, onError);
};
Note Be careful to not confuse the CachedFileUpdater class, which we’re using here from the provider side, with the CachedFileManager class, which is used from the consumer side of the contract.
The setUpdateInformation method takes the following arguments:
• A StorageFile for the data in question.
• A content identifier string that identifies the remote resource to keep in sync.
• A ReadActivationMode indicating whether the calling app can read its local file without updating it; values are notNeeded and beforeAccess.
• A WriteActivationMode indicating whether the calling app can write to the local file and whether writing triggers an update; values are notNeeded, readOnly, and afterWrite.
• One or more values from CachedFileOptions (that can be combined with bitwise-OR) that describes the ways in which the local file can be accessed without triggering an update; values are none (no update), requireUpdateAccess (update on accessing the local file),useCachedFileWhenOffline (update on access if the calling app desires, and access is allowed if there’s no network connection), and denyAccessWhenOnline (triggers an update on access and requires a network connection).
It’s through this call, in other words, that the provider specifically controls how and when it should be activated to handle updates when a local file is accessed.
So, together we have two cases where the provider app will be invoked and might be asked to show its UI: one where the calling app updates the file, and another when the calling app attempts to access the file but needs an update before reading its contents.
Before going into the technical details, let’s see how these interactions appear to the user. To see the cached file updater in action using the sample, invoke it by using the file picker from another app. First, then, run the provider sample to make sure its contracts are registered. Then run the aforementioned File picker sample. In the latter, scenarios 4, 5, and 6 cause interactions with the cached file updater contract. Scenarios 4 and 6 write to a file to trigger an update to the remote copy; scenario 5 accesses a local file that will trigger a local update as part of the process.
Updating a Local File: UI
In scenario 5 of the File picker sample (updating a local file), follow the instructions that it gives to tap the Pick Cached File button and select the File Picker Contracts JS Sample from the location list:

This will launch the provider sample. In that view, select scenario 3 so that you see the UI shown in Figure D-3. This is the mode of the provider sample that is just a file picker provider, (js/fileOpenPickerScenario3.js) where it calls setUpdateInformation. This is not the UI for the cached file updater yet. Tap the Add File to Basket button, and tap the Open button. This will return you to the first app (the picker sample in the above graphic) where the Output Latest Version button will now be enabled. Tapping that button will then invoke the provider sample through the cached file updater contract, as shown in Figure D-4. This is what appears when there’s a need to update the local copy of the cached file.
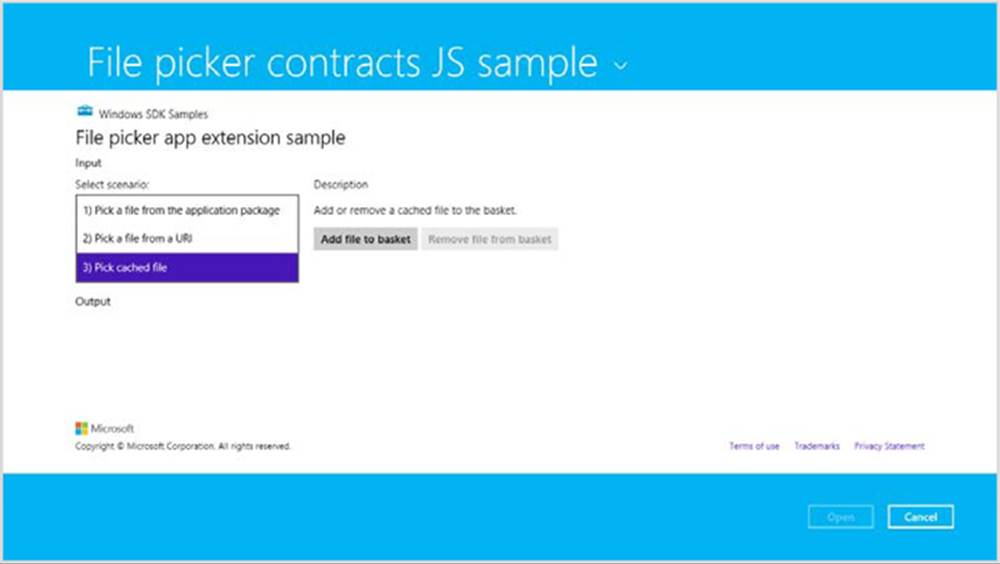
FIGURE D-3 The provider sample’s UI for picking a file; the setUpdateInfomationmethod is called on the provided file to set up the cached file updater relationship.
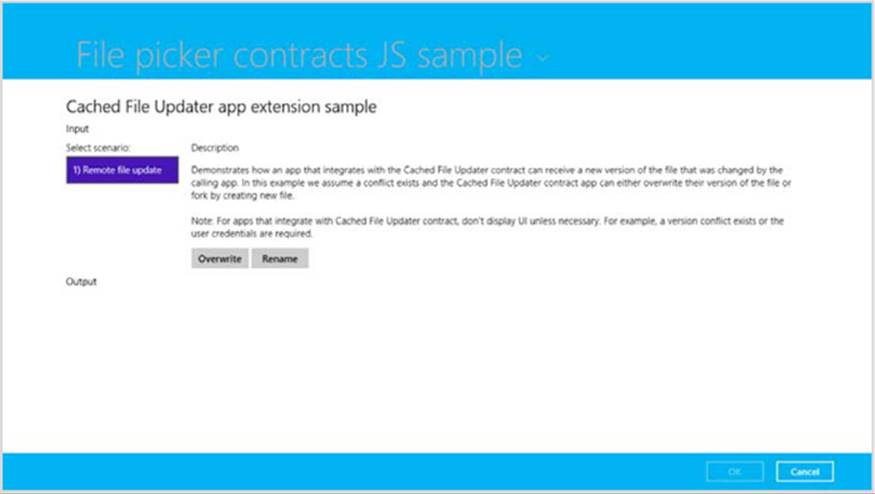
FIGURE D-4 The provider sample’s UI for the cached file updater contract on a local file.
Take careful note of the description in the sample. While the sample shows this UI by default, a cached file updater app will not show it unless it’s necessary to resolve conflicts or collect credentials. Oftentimes no such interaction is necessary and the provider silently updates the local file or indicates that it’s current. The sample’s UI here choose instead to show both those options as explicit choices (and be sure to choose one of them because selecting Cancel will throw an exception).
Updating a Remote File: UI
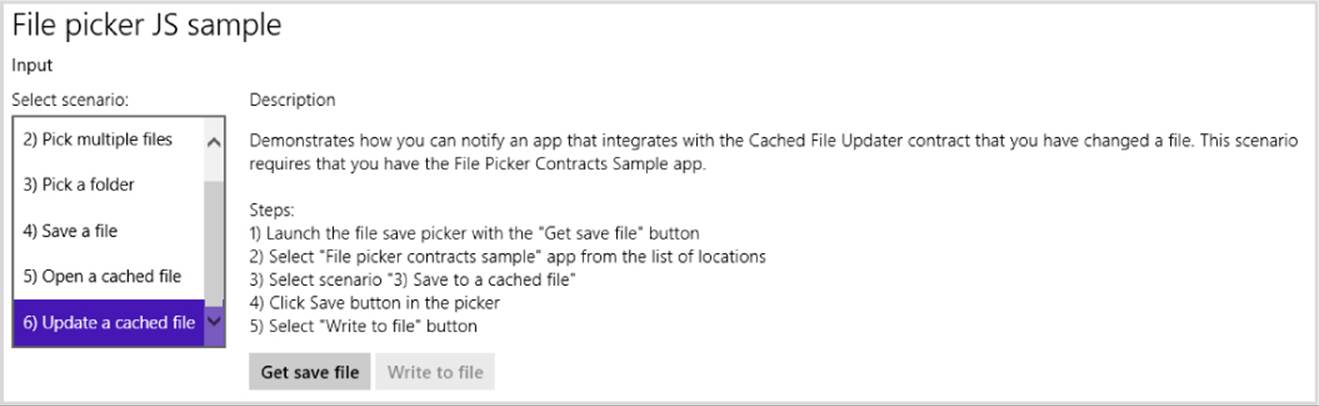
In scenario 6 of the File picker sample (updating a remote file), we can see the interactions that take place when the consuming app writes changes to its local copy, thereby triggering an update to the remote copy. Start by tapping the Get Save File button in the UI shown below, and then select the File Picker Contracts JS Sample again from the location list:
This will invoke the provider sample’s UI of Figure D-5 through the file save picker contract, where you should select scenario 3 (implemented in html/fileSavePickerScenario3.html and js/fileSavePickerScenaro3.js). If you look in the JavaScript file, you’ll again see a call tosetUpdateInformation that’s called when you enter a file name and tap Save. Doing so also returns you to the picker sample above where Write To File should now be enabled. Tapping Write To File then reinvokes the provider sample through the cached file updater contract with the UI shown in Figure D-6. This UI is intended to demonstrate how such a provider app would accommodate overwriting or renaming the remote file.
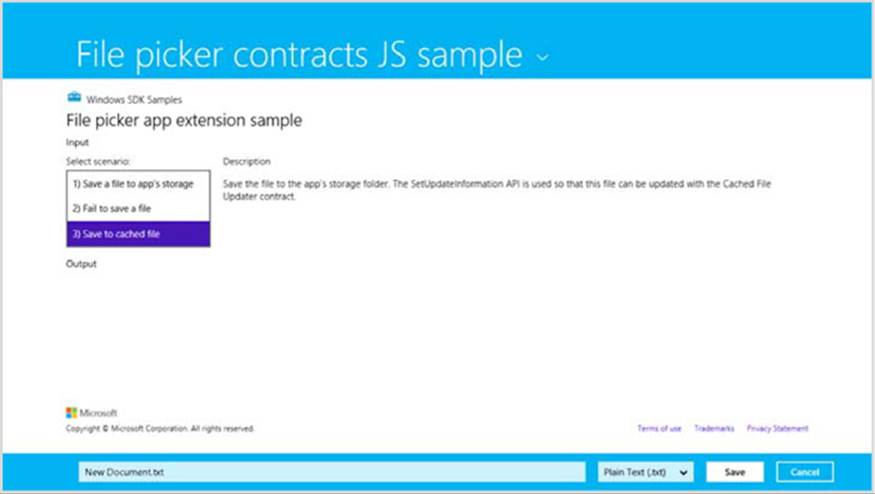
FIGURE D-5 The provider sample’s UI for saving a file; the setUpdateInfomationmethod is again called on the provided file to set up the cached file updater relationship.
FIGURE D-6 The provider sample’s UI for the cached file updater contract on a remote file.
Update Events
Let’s see how the cached file updater contract looks in code. As you will by now expect, the provider app is launched, the Start page (cachedFileUpdater.html in the project root) is loaded, and the activated handler is called with the activation kind of cachedFileUpdater. This will happen for both local and remote cases, and as we’ll see here, you use the same activation code for both. Here eventObject.detail is a WebUICachedFileUpdaterActivatedEventArgs that contains a cachedFileUpdaterUI property (a CachedFileUpdaterUI) along with the usual roster of kind,previousExecutionState, and splashScreen. Here’s how it looks in js/cachedFileUpdater.js of the provider sample:
function activated(eventObject) {
if (eventObject.detail.kind ===
Windows.ApplicationModel.Activation.ActivationKind.cachedFileUpdater) {
cachedFileUpdaterUI = eventObject.detail.cachedFileUpdaterUI;
cachedFileUpdaterUI.addEventListener("fileupdaterequested", onFileUpdateRequest);
cachedFileUpdaterUI.addEventListener("uirequested", onUIRequested);
switch (cachedFileUpdaterUI.updateTarget) {
case Windows.Storage.Provider.CachedFileTarget.local:
// Code omitted: configures sample to show cachedFileUpdaterScenario1
// if needed.
break;
case Windows.Storage.Provider.CachedFileTarget.remote:
// Code omitted: configures sample to show cachedFileUpdaterScenario2
// if needed.
break;
}
}
}
When the provider app is invoked to update a local file from the remote source, the cachedFile-UpdaterUI.updateTarget property will be local, as you can see above. When the app is being asked to update a remote file with local changes, the target is remote. All the sample does in these cases is point to either html/cachedFileUpdaterScenario1.html (Figure D-4) or html/cachedFile-UpdaterScenario2.html (Figure D-6) as the update UI.
The UI is not shown initially. What happens first is that the CachedFileUpdaterUI object fires its fileUpdateRequested event to attempt a silent update. Here the eventArgs is a FileUpdateRequested-ventArgs object with a single request property (FileUpdateRequest), an object that you’ll want to save in a variable that’s accessible from your update UI.
If it’s possible to silently update a local file, follow these steps:
• Because you’ll likely be doing async operations to perform the update, obtain a deferral from request.getDeferral.
• To do the update, use one of these options:
• If you already have a StorageFile with the new contents, just call request.updateLocalFile. This is a synchronous call, in which case you do not need to obtain a deferral.
• The local file’s StorageFile object will be in request.file. You can open this file and write whatever contents you need within it. This will typically start an async operation, after which you return from the event handler.
• To update the contents of a remote file, copy the contents from request.file to the remote source.
• Depending on the outcome of the update, set request.status to a value from FileUpdateStatus: complete (the copies are sync’d), incomplete (sync didn’t work but the local copy is still available), userInputNeeded (the update failed for need of credentials or conflict resolution),currently-Unavailable (source can’t be reached, and the local file is inaccessible), failed (sync cannot happen now or ever, as when the source file has been deleted), and completeAndRenamed (the source version has been renamed, generally to resolve conflicts).
• If you asked for a deferral and processed the outcome within completed and error handlers, call the deferral’s complete method to finalize the update.
Now the provider might know ahead of time that it can’t do a silent update at all—a user might not be logged into the back-end service (or credentials are needed each time), there might be a conflict to resolve, and so forth. In these cases the event handler should check the value ofcachedFileUpdaterUI.uiStatus (a UIStatus) and set the request.status property accordingly:
• If the UI status is visible, switch to that UI and return from the event handler. Complete the deferral when the user has responded through the UI.
• If UI status is hidden, set request.status to userInputNeeded and return. This will trigger the CachedFileUpdaterUI.onuiRequested event followed by another fileUpdateRequested event where uiStatus will be visible, in which case you’ll switch to your UI.
• If the UI status is unavailable, set request.status to currentlyUnavailable.
You can see some of this in the sample’s onFileUpdateRequest handler (js/cachedFileUpdater.js); it really handles only the uiStatus check because it doesn’t attempt silent updates at all (as described in the comments I’ve added below):
function onFileUpdateRequest(e) {
fileUpdateRequest = e.request;
fileUpdateRequestDeferral = fileUpdateRequest.getDeferral();
// Attempt a silent update using fileUpdateRequest.file silently, or call
// fileUpdateRequest.updateLocalFile in the local case, setting fileUpdateRequest.status
// accordingly, then calling fileUpdateRequestDeferral.complete(). Otherwise, if you
// know that user action will be required, execute the following code.
switch (cachedFileUpdaterUI.uiStatus) {
case Windows.Storage.Provider.UIStatus.hidden:
fileUpdateRequest.status =
Windows.Storage.Provider.FileUpdateStatus.userInputNeeded;
fileUpdateRequestDeferral.complete();
break;
case Windows.Storage.Provider.UIStatus.visible:
// Switch to the update UI (configured in the activated event)
var url = scenarios[0].url;
WinJS.Navigation.navigate(url, cachedFileUpdaterUI);
break;
case Windows.Storage.Provider.UIStatus.unavailable:
fileUpdateRequest.status = Windows.Storage.Provider.FileUpdateStatus.failed;
fileUpdateRequestDeferral.complete();
break;
}
}
Again, if a silent update succeeds, the provider app’s UI never appears to the user. In the case of the provider sample, it never attempts to do a silent update and so always does the check on uiStatus. When the app was just launched to service the contract, we’ll end up in the hidden case and return userInputNeeded, as would happen if you attempted a silent update but returned the same status. Either way, the CachedFileUpdateUI object will fire its uiRequested event, telling the provider app that the system is making the UI visible. The app, in fact, can defer initializing its UI until this event occurs because there’s no need to do so for a silent update.
After this, the fileUpdateRequested event will fire again with uiStatus now set to visible. Notice how the code above will have called request.getDeferral in this case but has not called its complete. We save that step for when the UI has done what it needs to do (and, in fact, we save both the request and the deferral for use from the UI code).
The update UI is responsible for gathering whatever user input is necessary to accomplish the task: collecting credentials, choosing which copy of a file to keep (the local or remote version), allowing for renaming a conflicting file (when updating a remote file), and so forth. When updating a local file, it writes to the StorageFile within request.file or calls request.updateLocalFile; in the remote case it copies data from the local copy in request.file.
To complete the update, the UI code then sets request.status to complete (or any other appropriate code if there’s a failure) and calls the deferral’s complete method. This will change the status of the system-provided buttons along the bottom of the screen (see Figure D-4 and Figure D-6), enabling the OK button and disabling Cancel. In the provider sample, both buttons just execute these two lines for this purpose:
fileUpdateRequest.status = Windows.Storage.Provider.FileUpdateStatus.complete;
fileUpdateRequestDeferral.complete();
All in all, the interactions between the system and the app for the cached file updater contract are simple and straightforward in themselves: handle the events, copy data around as needed, and update the request status. The real work with this contract is first deciding when to callsetUpdateInformation, providing the UI to support updates of local and remote files under the necessary circumstances, and interacting with your backend storage system.
Contact Cards Action Providers
In Chapter 15, “Contracts,” we saw that contact cards can appear with up to three actions, depending on the data contained in the contact. To repeat a few images from that chapter below, we see actions such as Email, Call, Send Message, and Map:
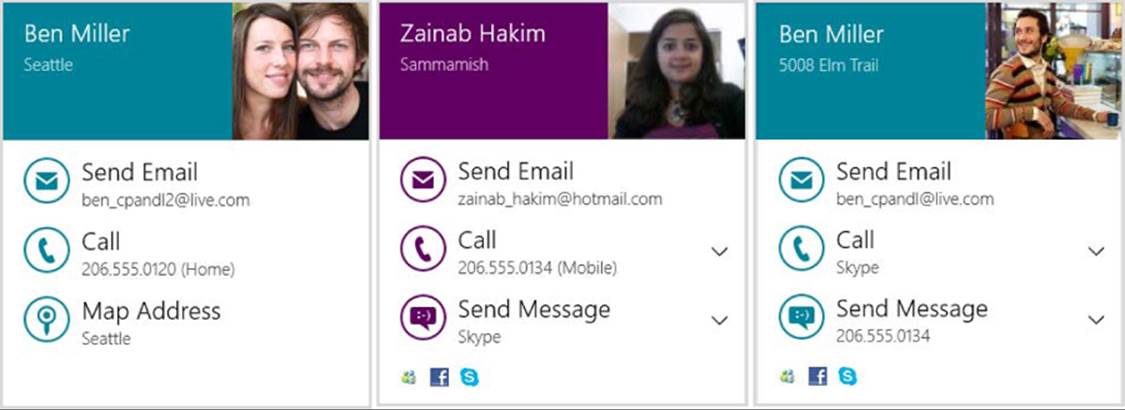
Furthermore, when a contact is found via the Search charm, or opened in the People app (by tapping More Details in the lower right of the contact card, not shown in the images above), these actions are available along with other less common ones, again depending on the information that’s available for that contact. To round out the list, the full set of supported actions are Call, Map, Send Message, Post To, and Video Call. (A View Profile might also appear in the People app specifically for Facebook contacts as well.)
The question we want to answer here is how to create an app that can handle one or more of these actions.
The answer has two parts. First, some actions work through URI associations. The two primary ones are Email that uses mailto: and Call, which uses tel: for simple phone numbers.144 These actions will just launch a URI with either scheme and let Windows take care of the rest. Providers that handle email and phone-number calling thus register themselves to handle these URI schemes, as generally described in Chapter 15 in the section “Launching Apps with URI Scheme Associations.” For more details on the URIs schemes themselves, refer to the URI Scheme page on Wikipedia, where you’ll find links to all the specifications.
For all other actions, and as an optional way to handle Call, there are special entries in the app manifest and special cases of app activation. You can find an example of this in the Handling Contact Actions sample as well as in the Quickstart: Handling contact actions topic in the documentation.
In these cases you’ll need to edit your manifest manually as XML (right-click package.appxmanifest in Visual Studio, and select View Code). Within the Application element, make sure there’s an Extensions section, within which you specify the windows.contact extension with one or more actions. Here’s the XML from the SDK sample (noting that the m2 namespace is for the Windows 8.1 manifest additions):
<Application Id="App" StartPage="default.html">
<!-- Other entries omitted-->
<Extensions>
<m2:Extension Category="windows.contact">
<m2:Contact>
<m2:ContactLaunchActions>
<m2:LaunchAction Verb="call">
<m2:ServiceId>telephone</m2:ServiceId>
</m2:LaunchAction>
<m2:LaunchAction Verb="message">
<m2:ServiceId>skype.com</m2:ServiceId>
</m2:LaunchAction>
<m2:LaunchAction Verb="map"/>
</m2:ContactLaunchActions>
</m2:Contact>
</m2:Extension>
</Extensions>
</Application>
Each supported action is described by an m2:LaunchAction element, whose Verb attribute identifies the action and must be a value from the Windows.ApplicationModel.Contacts.Contact-LaunchActionVerbs class: call, message, map, post, and videoCall. The m2:ServiceId element then describes the service that the app uses to complete the action (not needed for the map verb).
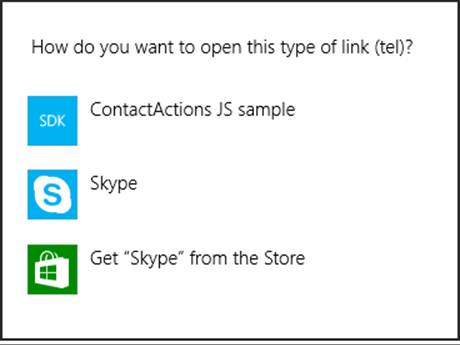
Once an app with such manifest entries is installed, it shows up as a target when the user selects an action. For example, run the Handling Contact Actions sample from Visual Studio and select a Call action from a contact card or the Search charm. If you haven’t yet chosen a default handler for calls, you’ll see something like this:
Tip Users control these associations through PC Settings > Search and Apps > Defaults > Choose Default Apps By Protocol.
Assuming that your app—and we’re using the sample here—is the default provider for that action, it will be launched with ActivationKind.contact, as shown here in the sample’s activated handler alongside the protocol and launch activations for reference (js/default.js):
if (eventObject.detail.kind === Windows.ApplicationModel.Activation.ActivationKind.contact) {
arg = eventObject.detail;
if (arg.verb === Windows.ApplicationModel.Contacts.ContactLaunchActionVerbs.call) {
// Handle calls
} elseif (arg.verb ===Windows.ApplicationModel.Contacts.ContactLaunchActionVerbs.message) {
// Handle messaging
} elseif (arg.verb ===Windows.ApplicationModel.Contacts.ContactLaunchActionVerbs.map) {
// Handle mapping
}
} elseif (eventObject.detail.kind === Windows.ApplicationModel.Activation.ActivationKind.protocol) {
// Protocol activation for URI associations
} elseif (eventObject.detail.kind === Windows.ApplicationModel.Activation.ActivationKind.launch) {
// Normal launch
}
In a contact activation, eventObject.detail.verb will contain one of the ContactLaunchActionVerb values, so you’ll then take appropriate action for each one individually. Here, eventObject.detail will be one of the following object types, depending on the verb. Note that each object type includes the standard properties of kind, previousExecutionState, and splashScreen, which I won’t show individually.

With each activation verb and a Contact object in the contact field, you have all the information you need in hand including display names, thumbnails, and so forth. In the case of the map verb, the other field of interest is ContactAddress, giving you what you need to do the mapping. In all other cases, the serviceId is whatever string is specified in the manifest entry for this action, and serviceUserId is the appropriate data from the contact for that service. For example, when serviceId is telephone, the serviceUserId will be the telephone number. For a video call it could be the user’s Skype ID, and for messaging it would be the appropriate user ID for that service. In short, these two fields supply what you need to complete the basic action, and you build your UI with the other details in contact.
Contact Picker Providers
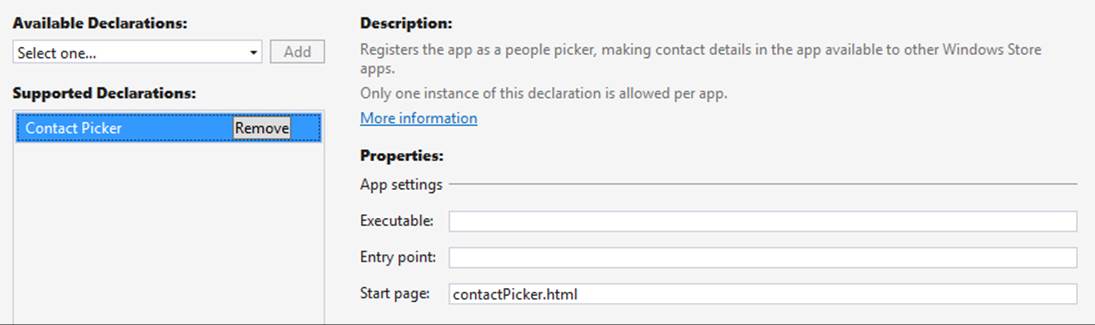
On the provider side of the Contact Picker, which is demonstrated in the Contact Picker app sample that we worked with in Chapter 15, we see the same pattern as for file picker providers. First, a provider app declares the Contact Picker contract in its manifest, indicating the Start page to load within the context of the picker. In the sample, the Start page is contactPicker.html that in turn loads html/contactPickerScenario.html (with their associated JavaScript files):
As with the file picker, having a separate Start page means having a separate activated handler, and in this case it looks for the activation kind of contactPicker (js/contactPicker.js):
function activated(e) {
if (e.detail.kind === Windows.ApplicationModel.Activation.ActivationKind.contactPicker) {
contactPickerUI = e.detail.contactPickerUI;
e.setPromise(WinJS.UI.processAll().then(function () {
// ...
}));
}
}
The e.detail here is a ContactPickerActivatedEventArgs (these names are long, but at least they’re predictable!). As with all activations, it contains kind, previousExecutionState, and splashScreen properties for the usual purposes. Its contactPickerUI property, a ContactPickerUI, contains the information specific to the picker contract:
• The selectionMode and desiredFields properties as supplied by the calling app.
• Three methods—addContact, removeContact, and containsContact—for managing what’s returned to the calling app. These methods correspond to the actions of a typical selection UI.
• One event, contactsRemoved, which informs the provider when the user removes an item from the basket along the bottom of the screen. (Refer to Figure 15-15 in Chapter 15.)
Within a provider, each contact is represented by a Contact object. A provider will create an object for each contact it supplies. In the sample (js/contactPickerScenario.js), there’s an array called sampleContacts that simulates what would more typically come from a database. That array just contains JSON records like this:
{
displayName: "David Jaffe",
firstName: "David",
lastName: "Jaffe",
personalEmail: "david@contoso.com",
workEmail: "david@cpandl.com",
workPhone: "",
homePhone: "248-555-0150",
mobilePhone: "",
address: {
full: "",
street: "",
city: "",
state: "",
zipCode: ""
},
id: "761cb6fb-0270-451e-8725-bb575eeb24d5"
},
Each record is shown as a check box in the sample’s UI (generated in the createContactUI function), but your own provider app will likely use a ListView for this purpose. The sample is just trying to keep things simple so that you can see what’s happening with the contract itself.
When a contact is selected, the sample’s addContactToBasket function is called. This is the point at which we create the actual Contact object and call ContactPickerUI.addContact. The process here for each field follows a chain of other function calls, so let’s see how it works for the single homeEmailfield in the source record, starting with addContactToBasket (again in js/contactPickerScenario.js). The rest of the field values are handled pretty much the same way:
function addContactToBasket(sampleContact) {
var contact = new Windows.ApplicationModel.Contacts.Contact();
contact.firstName = sampleContact.firstName;
contact.lastName = sampleContact.lastName;
contact.id = sampleContact.id;
if (sampleContact.personalEmail) {
var personalEmail = new Windows.ApplicationModel.Contacts.ContactEmail();
personalEmail.address = sampleContact.personalEmail;
personalEmail.kind = Windows.ApplicationModel.Contacts.ContactEmailKind.personal;
contact.emails.append(personalEmail);
}
// Add other fields...
// Add the contact to the basket
switch (contactPickerUI.addContact(sampleContact.id, contact)) {
// Show various messages based on the result, which is of type
// Windows.ApplicationModel.Contacts.Provider.AddContactResult
}
}
Now, when an item is unselected in the list, it needs to be removed from the basket:
function removeContactFromBasket(sampleContact) {
// Programmatically remove the contact from the basket
if (contactPickerUI.containsContact(sampleContact.id)) {
contactPickerUI.removeContact(sampleContact.id);
}
}
Similarly, when the user removes an item from the basket, the contact provider needs to update its selection UI by handling the contactremoved event:
contactPickerUI.addEventListener("contactremoved", onContactRemoved, false);
function onContactRemoved(e) {
// Add any code to be called when a contact is removed from the basket by the user
var contactElement = document.getElementById(e.id);
var sampleContact = sampleContacts[contactElement.value];
contactElement.checked = false;
}
You’ll notice that we haven’t said anything about closing the UI, and in fact the ContactPickerUI object does not have an event for this. Simply said, when the user selects the commit button (with whatever text the caller provided), it gets back whatever the provider has added to the basket. If the user taps the cancel button, the operation returns a null contact. In both cases, the provider app will be suspended and, if it wasn’t running prior to being activated for the contact, closed automatically.
Do note that as with file picker providers, a contact provider should save its session state when suspended and restore that state when relaunched with previousExecutionState==terminated. Although not demonstrated in the sample, a real provider app should save its current selections and viewing position within its list, along with whatever else, to session state and restore that in its activated handler when necessary.
Appointment Providers
An appointment provider app registers itself to handle the four distinct appointment actions apropos to the Appointments API discussed in Chapter 15. Those actions are adding an appointment, removing an appointment, updating (replacing) an appointment, and showing a time frame.
To demonstrate at least the structure of a provider app, I’ve included the AppointmentsProvider example in the companion content for the appendices. This example does not maintain any kind of calendar—it only shows how to handle the activations for the different verbs and the data that’s passed with each one.
To register itself, the provider app must declare appropriate extensions in its manifest XML. As with contact actions described earlier, the Visual Studio manifest editor does not presently have a UI for these entries, so you’ll need to right-click package.appxmanifest in Visual Studio and select View Code to edit the XML directly. Then within Application>Extensions, add an Extension for the windows.appointmentProvider category:
<Application>
<Extensions>
<m2:Extension Category="windows.appointmentsProvider"StartPage="default.html">
<m2:AppointmentsProvider>
<m2:AppointmentsProviderLaunchActions>
<m2:LaunchAction Verb="addAppointment"StartPage="html/manageAppointment.html"/>
<m2:LaunchAction Verb="removeAppointment"StartPage="html/manageAppointment.html"/>
<m2:LaunchAction Verb="replaceAppointment"StartPage="html/manageAppointment.html"/>
<m2:LaunchAction Verb="showTimeFrame"/>
</m2:AppointmentsProviderLaunchActions>
</m2:AppointmentsProvider>
</m2:Extension>
</Extensions>
</Application>
Each action, as you can see, is represented by a LaunchAction entry that maps a verb to a particular page in the app that handles that kind of activation.
Note An appointments provider must implement all four verbs because users set a default calendar app for all verb together. If you don’t handle one of the verbs, you’ll break apps that attempt to use the appointments API.
If a LaunchAction doesn’t specify its own StartPage attribute, the activation will use the StartPage specified with the Extension element. In the declarations above, we use html/manageAppointment.html for add, remove, and replace cases, whereas the showTimeFrame verb will go to default.html.
I’ve chosen to show it this way because if you refer back to Chapter 15, the APIs to add, remove, and replace appointments display the provider’s UI in a flyout within the calling app, and so it makes sense to have a dedicated HTML page for that purpose (or you can use distinct pages if you like). The call that triggers the showTimeFrame verb, on the other hand, launches the provider app in its own view, so it makes some sense to use the same view as the app would if it’s launched standalone and then to navigate to the specific time frame.
The verbs themselves, by the way, come from the AppointmentsProviderLaunchActionVerbs, which is found in the Windows.ApplicationModel namespace, down under Appointments.AppointmentProvider, which, put altogether in code, forms about the longest fully-qualified name I’ve encountered in all of WinRT! Its values are exactly those you see in the manifest above.
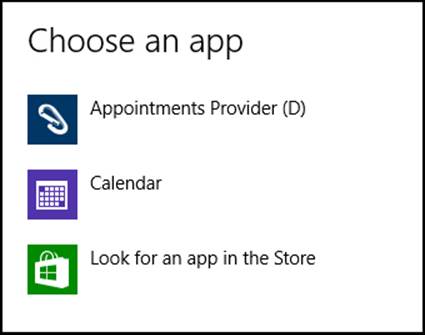
Installing an app with these entries makes it available to handle calendar actions, and the act of installation will cause a prompt to appear the next time the user performs an action that invokes the default calendar. This way your users will have the opportunity to select your app that they just installed and use it in favor of the built-in Calendar. The user can also change the default in PC Settings > Search and Apps > Defaults > Calendar:
When the provider app is launched to handle an appointment action, Windows will load the StartPage specified for that verb and call the activated handler in that page. The activation kind is set to appointmentsProvider, and the appropriate verb in contained in eventObject.detail.verb. In the example’s manageAppointments page, then, we have this basic structure (html/manageAppointments.js):
var app = WinJS.Application;
var activation = Windows.ApplicationModel.Activation;
var verbs =
Windows.ApplicationModel.Appointments.AppointmentsProvider.AppointmentsProviderLaunchActionVerbs
;
app.onactivated = function (args) {
if (args.detail.kind === activation.ActivationKind.appointmentsProvider) {
switch (args.detail.verb) {
case verbs.addAppointment:
break;
case verbs.removeAppointment:
break;
case verbs.replaceAppointment:
break;
}
args.setPromise(WinJS.UI.processAll());
}
};
app.start();
I told you the fully-qualified name of the verbs class was long! Anyway, notice that because this page is being launched by itself, we have the same structure that we have in default.js, including a call to app.start() at the bottom. And speaking of default.js, here’s how we differentiate the showTimeFrame launch case from normal startup (js/default.js):
var verbs =
Windows.ApplicationModel.Appointments.AppointmentsProvider.AppointmentsProviderLaunchActionVerbs;
app.onactivated = function (args) {
if (args.detail.kind === activation.ActivationKind.appointmentsProvider) {
if (args.detail.verb == verbs.showTimeFrame) {
// Launched to show appointments time frame
}
args.setPromise(WinJS.UI.processAll());
}
if (args.detail.kind === activation.ActivationKind.launch) {
// Normal launch
args.setPromise(WinJS.UI.processAll());
}
};
The type of object in eventObject.detail is unique in each case, as described in the following table. I can’t stand typing out the really long types directly, so I’m going to rely on your inherent sense of wildcards with which you can substitute the type noted intoAppointmentsProvider*ActivatedEventArgs. Each of these objects contains the usual kind, previousExecutionState, and splashScreen properties, which I won’t list. The other properties are then typically verb and an operation-specific object, except with showTimeFrame:

With showTimeFrame, the duration and timeToShow values are the same ones the client passed to the AppointmentsManager.showTimeFrameAsync method, so you can just use these to configure your calendar view. The example, for its part, just shows these values in its output. Enough said!

The other three verbs each receive an operation object, whose members are described in the following table. Note that there are a number of common members across all three, and then a few unique members for each:
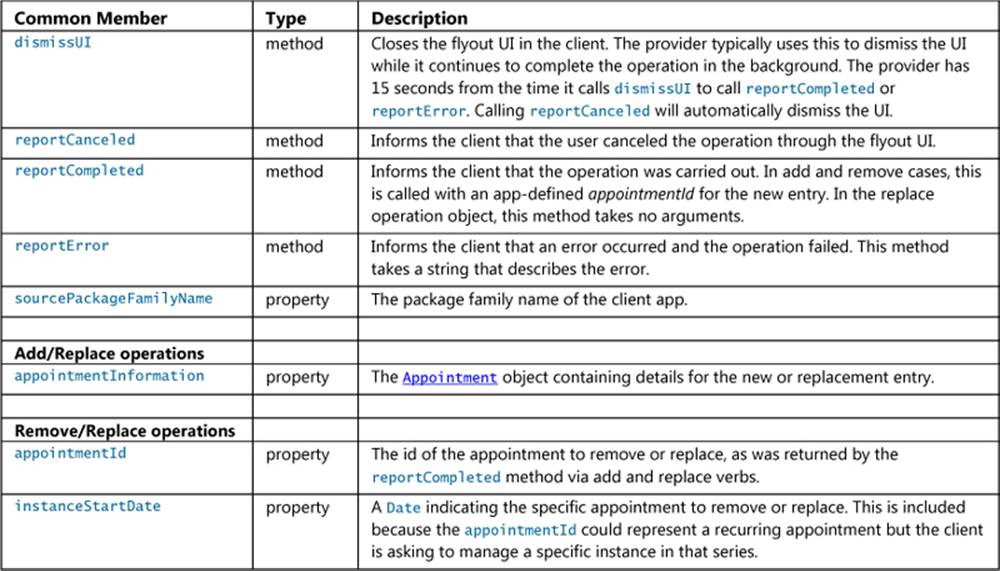
With all this it’s fairly obvious that you handle each verb with an appropriate bit of UI, displaying the relevant change to the calendar with the provided Appointment object and perhaps including a button to save the changes. The AppointmentsProvider example demonstrates the basics, again not showing a calendar but at least displaying the information it receives. Refer to the code in html/manageAppointment.js for details.
What’s interesting about activating the provider app within a flyout is that you’ll be working with a smaller amount of screen real-estate than you ever encounter in normal views: 320x400 pixels. Windows also provides a header with your app’s Display Name (from the Application tab in the manifest) and square 30x30 logo (from Visual Assets), using The Tile > Background Color (from Visual Assets) as the background.
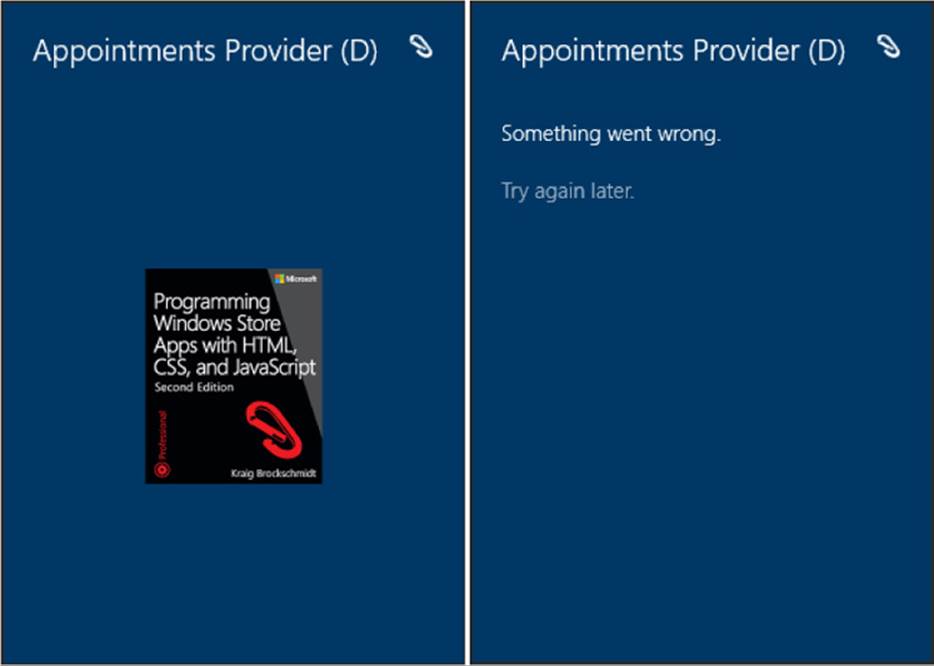
When the provider is first launched, the flyout (below left) will show this header along with a scaled-down splash screen image against your splash screen background color (which in this example is the same as the tile color). And because of the downscaling of your splash screen image, make sure that your image looks good at about 50% of its normal resolution. If your provider app gets stuck on this splash screen, it means that Windows could not find the StartPage for that verb. Double-check that your manifest is pointing to the right HTML page. Windows will eventually time out and show the error below right. The same error will appear if your app crashes while handling the verb.
To debug your provider, run the app in the Visual Studio debugger and let it go through its normal startup path. Later activations through appointments verbs will hit any breakpoints you set in those code paths, including any activations that hit default.html and call your activated handler there again. The caveat here is that if you’re debugging on the local machine, the flyout in the client will be dismissed as soon as you switch focus to the debugger. It works better, then, to debug in the simulator or on a remote machine where focus won’t be affected like this.
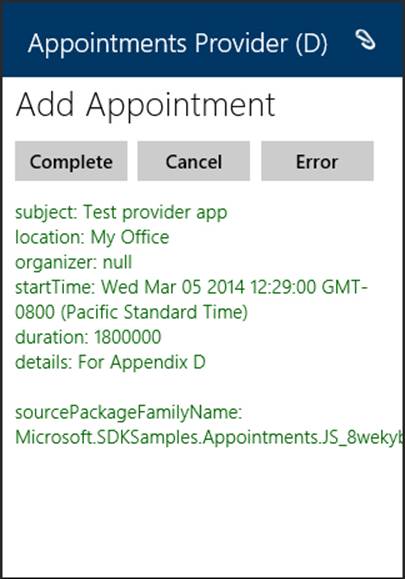
Anyway, if all goes well, you’ll see the UI you’ve defined in your verb-specific pages, such as the image below from the example app. Of course, I wholly expect you to design a much better UI than this!
144 Two other URI schemes are for Facebook-specific messaging and View Profile actions: message-facebook-com: and viewprofile-facebook-com:. You’d use these only if you’re making a dedicated Facebook app.
All materials on the site are licensed Creative Commons Attribution-Sharealike 3.0 Unported CC BY-SA 3.0 & GNU Free Documentation License (GFDL)
If you are the copyright holder of any material contained on our site and intend to remove it, please contact our site administrator for approval.
© 2016-2026 All site design rights belong to S.Y.A.