Microsoft Press Programming Windows Store Apps with HTML, CSS and JavaScript (2014)
Chapter 4 Web Content and Services
The classic aphorism, “No man is an island,” is a way of saying that all human beings are interconnected within a greater social, emotional, and spiritual reality. And what we see as greatness in a person is very much a matter of how deeply he or she has realized this truth.
The same is apparently also true for apps. The data collected by organizations such as Distmo shows that connected apps—those that reach beyond themselves and their host device rather than thinking of themselves as isolated phenomena—generally rate higher and earn more revenue in various app stores. In other words, just as the greatest of human beings are those who have fully realized their connection to an expansive reality, so also are great apps.
This means that we cannot simply take connectivity for granted or give it mere lip service. What makes that connectivity truly valuable is not doing the obvious, like displaying some part of a web page in an app, downloading some RSS feed, or showing a few updates from the user’s social network. Greatness needs to do more than that—it needs to bring online connectedness to life in creative and productive ways that also make full use of the local device and its powerful resources. These are “hybrid” apps at their best.
Beyond social networks, consider what can be obtained from thousands of web APIs that are accessible through simple HTTP requests, as listed on sites like http://www.programmableweb.com/. As of this writing, that site lists over 11000 separate APIs, a number that continues to grow monthly. This means not only that there are over 11000 individual sources of interesting data that an app might employ, but that there are literally billions of combinations of those APIs. In addition to traditional RSS mashups (combining news feeds), a vast unexplored territory of API mashups exists, which means bringing disparate data together in meaningful ways. The Programmable Web, in fact, tracks web applications of this sort, but as of this writing there were several thousand fewer such mashups than there were APIs! It’s like we’ve taken only the first few steps on the shores of a new continent, and the opportunities are many.32
I think it’s pretty clear why connected apps are better apps: as a group, they simply deliver a more compelling and valuable user experience than those that limit themselves to the scope of a client device. Thus, it’s worth taking the time early in any app project to make connectivity and web content a central part of your design. This is why we’re discussing the subject now, even before considerations like controls and other UI elements!
Of course, the real creative effort to find new ways to use online content is both your challenge and your opportunity. What we can cover in this chapter are simply the tools that you have at your disposal for that creativity.
We’ll begin with the essential topic of network connectivity, because there’s not much that can be done without it! Then we’ll explore the options for directly hosting dynamic web content within an app’s own UI, as is suitable for many scenarios. Then we’ll look at the APIs for HTTP requests, followed by those for background transfers that can continue when an app is suspended or not running at all. We’ll then wrap up with the very important subject of authentication, which includes working with the user’s Microsoft account, user profile, and Live Connect services.
One part of networking that we won’t cover here is setting up service connections for live tiles and push notifications, which are covered in Chapter 16, “Alive with Activity.” The subject of roaming app state is something we’ll pick up in Chapter 10, “The Story of State, Part 1,” and navigating to and choosing files from network shares has context with the file pickers that we’ll see in Chapter 11, “The Story of State, Part 2.”
And there is yet more to say on some web-related and networking-related subjects, such as sockets, but I didn’t want those details to intrude on the flow of this chapter. You can find those matters in Appendix C, “Additional Networking Topics.”
Sidebar: Debugging Network Traffic with Fiddler
Watching the traffic between your machine and the Internet can be invaluable when trying to debug networking operations. For this, check out the freeware tool from Telerik called Fiddler (http://fiddler2.com/get-fiddler). In addition to inspecting traffic, you can also set breakpoints on various events and fiddle with (that is, modify) incoming and outgoing data.
Sidebar: Windows Azure Mobile Services
No discussion of apps and services is complete without giving mention to the highly useful features of Windows Azure Mobile Services, especially as you can start using them for free and start paying only when your apps become successful and demand more bandwidth.
• Data: easy access to cloud-based table storage (SQL Server) without the need to use HTTP requests or other low-level mechanisms. The client-side libraries provide very straightforward APIs for create, insert, update, and delete operations, along with queries. On the server side, you can attach node.js scripts to these operations, allowing you to validate and adjust the data as well as trigger other processes if desired.
• Authentication: you can authenticate users with Mobile Services using a Microsoft account or other identity providers. This supplies a unique user id to Mobile Services as you’ll often want with data storage. You can also use server-side node.js scripts to perform other authorization tasks.
• Push Notifications: a streamlined back-end for working with the Windows Notification Service to support live tiles, badges, toasts, and raw notifications in your app.
• Services: sending email, scheduling backend jobs, and uploading images.
To get started, visit the Mobile Services Tutorials and Resources page. We’ll also see some of these features in Chapter 16 when we work with live tiles and notifications. And don’t forget all the other features of Windows Azure that can serve all your cloud needs, which have either free trials or limited free plans to get you started.
Network Information and Connectivity
At the time I was writing on the subject of live tiles for the first edition of this book (see Chapter 16) and talking about all the connections that Windows Store apps can have to the Internet, my home and many thousands of others in Northern California were completely disconnected due to a fiber optic breakdown. The outage lasted for what seemed like an eternity by present standards: 36 hours! Although I wasn’t personally at a loss for how to keep myself busy, there was a time when I opened one of my laptops, found that our service was still down, and wondered for a moment just what the computer was really good for! Clearly I’ve grown, as I suspect you have too, to take constant connectivity completely for granted.
As developers of great apps, however, we cannot afford to be so complacent. It’s always important to handle errors when trying to make connections and draw from online resources, because any number of problems can arise within the span of a single operation. But it goes much deeper than that. It’s our job to make our apps as useful as they can be when connectivity is lost, perhaps just because our customers got on an airplane and switched on airplane mode. That is, don’t give customers a reason to wonder about the usefulness of their device in such situations! A great app will prove its worth through a great user experience even if it lacks connectivity.
Indeed, be sure to test your apps early and often, both with and without network connectivity, to catch little oversights in your code. In Here My Am!, for example, my first versions of the script in html/map.html didn’t bother to check whether the remote script for Bing Maps had actually been downloaded; as a result, the app terminated abruptly when there was no connectivity. Now it at least checks whether the Microsoft namespace (for the Microsoft.Maps.Mapconstructor) is valid. So keep these considerations in the back of your mind throughout your development process.
Be mindful that connectivity can vary throughout an app session, where an app can often be suspended and resumed, or suspended for a long time. With mobile devices especially, one might move between any number of networks without necessarily knowing it. Windows, in fact, tries to make the transition between networks as transparent as possible, except where it’s important to inform the user that there may be costs associated with the current provider. It’s a good idea, for instance, for an app to be aware of data transfer costs on metered networks and prevent “bill shock” from not-always-generous mobile broadband providers. Just as there are certain things an app can’t do when the device is offline, the characteristics of the current network might also cause it to defer or avoid certain operations as well.
Anyway, let’s see how to retrieve and work with connectivity details, starting with the different types of networks represented in the manifest, followed by obtaining network information, dealing with metered networks, and providing for an offline experience. And unless noted otherwise, the classes and other APIs that we’ll encounter are in the Windows.Networking namespace.
Note Network connectivity, by its nature, is an intricate subject, as you’ll see in in the sections that follow. But don’t feel compelled to think about all these up front! If you want to take connectivity entirely for granted for a while and get right into playing with web content and making HTTP requests, feel free to skip ahead to the “Hosting Content” and “HTTP Requests” sections. You can certainly come back here later.
Network Types in the Manifest
Nearly every sample we’ll be working with in this book has the Internet (Client) capability declared in its manifest, thanks to Visual Studio turning that on by default. This wasn’t always the case: early app builders within Microsoft would occasionally scratch their heads wondering just why something really obvious—like making a simple HTTP request to a blog—failed outright. Without this capability, there just isn’t any Internet!
Still, Internet (Client) isn’t the only player in the capabilities game. Some networking apps will also want to act as a server to receive unsolicited incoming traffic from the Internet, and not just make requests to other servers. In those cases—such as file sharing, media servers, VoIP, chat, multiplayer/multicast games, and other bi-directional scenarios involving incoming network traffic, as with sockets—the app must declare the Internet (Client & Server) capability, as shown in Figure 4-1. This lets such traffic through the inbound firewall, though critical ports are always blocked.
There is also network traffic that occurs on a private home or business network, where the Internet isn’t involved at all, as with line-of-business apps, talking to network-attached storage, and local network games. For this there is the Private Networks (Client & Server) capability, also shown in Figure 4-1, which is good for file or media sharing, line-of-business apps, HTTP client apps, multiplayer games on a LAN, and so on. What makes any given IP address part of this private network depends on many factors, all of which are described on How to configure network isolation capabilities. For example, IPv4 addresses in the ranges of 10.0.0.0–10.255.255.255, 172.16.0.0–172.31.255.255, and 192.168.0.0–192.168.255.255 are considered private. Users can flag a network as trusted, and the presence of a domain controller makes the network private as well. Whatever the case, if a device’s network endpoint falls into this category, the behavior of apps on that device is governed by this capability rather than those related to the Internet.
Note The Private Networks capability isn’t necessary when you’ll be using the File Picker (see Chapter 11) to allow users to browse local networks. It’s necessary only if you’re needing to make direct programmatic connections to such resources.
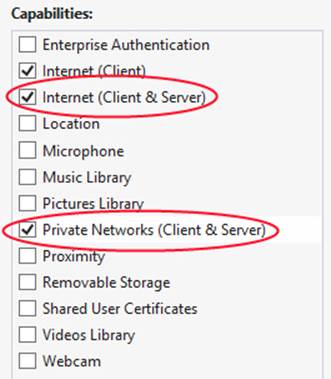
FIGURE 4-1 Additional network capabilities in the manifest.
Sidebar: Localhost Loopback
Regardless of the capabilities declared in the manifest, local loopback—that is, using http://localhost URIs—is blocked for apps distributed through the Windows Store. Exceptions are made for side-loaded enterprise apps, and for machines on which a developer license has been installed, as described in “Sidebar: Using the Localhost” in the “Background Transfer” section of this chapter (we’ll need to use it with a sample there). The developer exception exists only to simplify debugging apps and services together on the same machine during development. You can disable this allowance in Visual Studio through the Project > Property Pages dialog under Debugging > Allow Local Network Loopback, which helps you test your app as a consumer would experience it.
Network Information (the Network Object Roster)
Regardless of the network involved, everything you want to know about that network is available through the Connectivity.NetworkInformation object. Besides a single networkstatuschanged event that we’ll discuss in “Connectivity Events” a little later, the interface of this object is made up of methods to retrieve more specific details in other objects.
Below is the roster of the methods in NetworkInformation and the contents of the objects obtained through them. You can exercise the most common of these APIs through the indicated scenarios of the Network information sample:
• getInternetConnectionProfile (Scenario 1) Returns a single ConnectionProfile object for the currently active Internet connection. If there is more than one connection, this method returns the preferred profile that’s most likely to be used for Internet traffic.
• getConnectionProfiles (Scenario 3) Returns a vector of ConnectionProfile objects, one for each connection, among which will be the active Internet connection as returned by getInternetConnectionProfile. Also included are any wireless connections you’ve made in the past for which you indicated Connect Automatically. (In this way the sample will show you some details of where you’ve been recently!) See the next section for more on ConnectionProfile.
• findConnectionProfilesAsync (Scenario 6) Given a ConnectionProfileFilter object, returns a vector of ConnectionProfile objects that match the filter criteria. This helps you find available networks that are suitable for specific app scenarios such as finding a Wi-Fi connection or one with a specific cost policy.
• getHostNames Returns a vector (see note below) of HostName objects, one for each connection, that provides various name strings (displayName, canonicalName, and rawName), the name’s type (from HostNameType, with values of domainName, ipv4, ipv6, and bluetooth), and anipinformation property (of type IPInformation) containing prefixLength and networkAdapter properties for IPV4 and IPV6 hosts. (The latter is a NetworkAdapter object with various low-level details.) The HostName class is used in various networking APIs to identify a server or some other endpoint.
• getLanIdentifiers (Scenario 4) Returns a vector of LanIdentifier objects, each of which contains an infrastructureId (LanIdentifierData containing a type and value), a networkAdapterId (a GUID), and a portId (LanIdentifierData).
• getProxyConfigurationAsync Returns a ProxyConfiguration object for a given URI and the current user. The properties of this object are canConnectDirectly (a Boolean) and proxyUris (a vector of Windows.Foundation.Uri objects for the configuration).
• getSortedEndpointPairs Sorts an array of EndpointPair objects according to HostNameSortOptions. An EndpointPair contains a host and service name for local and remote endpoints, typically obtained when you set up specific connections like sockets. The two sort options are noneand optimizeForLongConnections, which vary connection behaviors based on whether the app is making short or long duration connection. See the documentation for EndpointPair and HostNameSortOptions for more details.
What is a vector? A vector is a WinRT type that’s often used for managing a list or collection. It has methods like append, removeAt, and clearthrough which you can manage the list. Other methods like getAtand getManyallow retrieval of items, and a vector supports the [] operator like an array. For more details, see “Windows.Foundation.Collections Types” in Chapter 6, ”Data Binding, Templates, and Collections.” In its simplest use, you can treat a vector like a JavaScript array through the [] operator.
The ConnectionProfile Object
Of all the information available through the NetworkInformation object, the most important for apps is found in ConnectionProfile, most frequently that returned by getInternetConnectionProfile because that’s the one through which an app’s Internet traffic will flow. The profile is what contains all the information you need to make decisions about how you’re using the network, especially for cost awareness. It’s also what you’ll typically check when there’s a change in network status. Scenarios 1 and 3 of the Network information sample retrieve and display most of these details.
Each profile has a profileName property (a string), such as “Ethernet” or the SSID of your wireless access point, a serviceProviderGuid property (the network operator ID), plus a getNetworkNames method that returns a vector of friendly names for the endpoint. The networkAdapterproperty contains a NetworkAdapter object for low-level details, should you want them, and the networkSecuritySettings property contains a NetworkSecuritySettings object describing authentication and encryption types.
More generally interesting is the getNetworkConnectivityLevel method, which returns a value from the NetworkConnectivityLevel enumeration: none (no connectivity), localAccess (the level you hate to see when you’re trying to get a good connection!), constrainedInternetAccess(captive portal connectivity, typically requiring further credentials as is often encountered in hotels, airports, etc.), and internetAccess (the state you’re almost always trying to achieve). The connectivity level is often a factor in your app logic and something you typically watch with network status changes. Related to this is the getDomainConnectivityLevel that provides a DomainConnectivityLevel value of none (no domain controller), unauthenticated (user has not been authenticated by the domain controller), and authenticated.
To check if a connection is on Wi-Fi, check the isWlanConnectionProfile flag and, if it’s true, you can look at the wlanConnectionProfileDetails property for more details, such as the SSID. If you’re on a mobile connection, on the other hand, the isWwanConnectionProfile flag will be true, in which case the wwlanConnectionProfileDetails property tells you about the type of data service and registration state of the connection. And if for either of these you want to display the connection’s strength, the getSignalBars method will give you back a value from 0 to 5.
The ups and downs of a connection’s lifetime is retrieved through getConnectivityIntervals-Async, which produces you a vector of ConnectivityInterval objects. Each one describes when this network was connected and how long it remained so.
To track the inbound and outbound traffic on a connection, the getNetworkUsageAsync and method returns a NetworkUsage object that contains bytesReceived, bytesSent, and connectionDuration properties for a given time period and NetworkUsageStates (roaming or shared). Similarly, the getConnectionCost and getDataPlanStatus provide the information an app needs to be aware of how much network traffic is happening and how much it might cost the user. We’ll come back to this in “Cost Awareness” shortly, including how to see per-app usage in Task Manager.
Connectivity Events
It is very common for a running app to want to know when connectivity changes. This way it can take appropriate steps to disable or enable certain functionality, alert the user, synchronize data after being offline, and so on. For this, apps need only watch the onnetworkstatuschanged event of the NetworkInformation object, which is fired whenever there’s a significant change within the hierarchy of objects we’ve just seen (and be mindful that this event comes from a WinRT object, so remove your listeners properly). For example, the event will be fired if the connectivity level of a profile changes or the network is disconnected. It fires when new networks are found, in which case you might want to switch from one to another (for instance, from a metered network to a nonmetered one). It will also be fired if the Internet profile itself changes, as when a device roams between different networks, or when a metered data plan is approaching or has exceeded its limit, at which point the user will start worrying about every megabyte of traffic.
In short, you’ll generally want to listen for this event to refresh any internal state of your app that’s dependent on network characteristics and set whatever flags you use to configure the app’s networking behavior. This is especially important for transitioning between online and offline and between unlimited and metered networks; Windows, for its part, also watches this event to adjust its own behavior, as with the Background Transfer APIs.
Note Windows Store apps written in JavaScript can also use the basic window.nagivator.ononline and window.navigator.onoffline events to track connectivity. The window.navigator.onLine property is also true or false accordingly. These events, however, will not alert you to changes in connection profiles, cost, or other aspects that aren’t related to the basic availability of an Internet connection. For this reason it’s generally better to use the WinRT APIs.
You can play with networkstatuschanged in scenario 5 of the Network information sample. As you connect and disconnect networks or make other changes, the sample will update its details output for the current Internet profile if one is available (code condensed from js/network-status-change.js):
var networkInfo = Windows.Networking.Connectivity.NetworkInformation;
// Remember to removeEventListener for this event from WinRT as needed
networkInfo.addEventListener("networkstatuschanged", onNetworkStatusChange);
function onNetworkStatusChange(sender) {
internetProfileInfo = "Network Status Changed: \n\r";
var internetProfile = networkInfo.getInternetConnectionProfile();
if (internetProfile === null) {
// Error message
} else {
internetProfileInfo += getConnectionProfileInfo(internetProfile) + "\n\r";
// display info
}
internetProfileInfo = "";
}
Of course, listening for this event is useful only if the app is actually running. But what if it isn’t? In that case an app needs to register a background task for what’s known as the networkStateChangetrigger, typically applying the internetAvailable or internetNotAvailableconditions as needed. We’ll talk more about background tasks in Chapter 16; for now, refer to the Network status background samplefor a demonstration. The sample itself simply retrieves the Internet profile name and network adapter id in response to this trigger; a real app would clearly take more meaningful action, such as activating background transfers for data synchronization when connectivity is restored. The basic structure is there in the sample nonetheless.
It’s also very important to remember that network status might have changed while the app was suspended. Apps that watch the networkstatuschanged event should also refresh their connectivity-related state within their resuming handler.
As a final note, check out the Troubleshooting and debugging network connections topic, which has a little more guidance on responding to network changes as well as network errors.
Cost Awareness
If you ever crossed between roaming territories with a smartphone that’s set to automatically download email, you probably learned the hard way to disable syncing in such circumstances. I once drove from Washington State into Canada without realizing that I would suddenly be paying $15/megabyte for the privilege of downloading large email attachments. Of course, since I’m a law-abiding citizen I did not look at my phone while driving (wink-wink!) to notice the roaming network. Well, a few weeks later and $100 poorer I knew what “bill shock” was all about!
The point here is that if users conclude that your app is responsible for similar behavior, regardless of whether it’s actually true, the kinds of rating and reviews you’ll receive in the Windows Store won’t be good! If your app might transfer any significant data, it’s vital to pay attention to changes in the cost of the connection profiles you’re using, typically the Internet profile. Always check these details on startup, within your networkstatuschanged event handler, and within your resuming handler.
Tip A powerful way to deal with cost awareness is through what’s called a filter on which the Windows.Web.Http.HttpClient API is built. This allows you to keep the app logic much cleaner by handling all cost decisions on the lower level of the filter. To see this in action, refer to scenario 11 of the HttpClient sample.
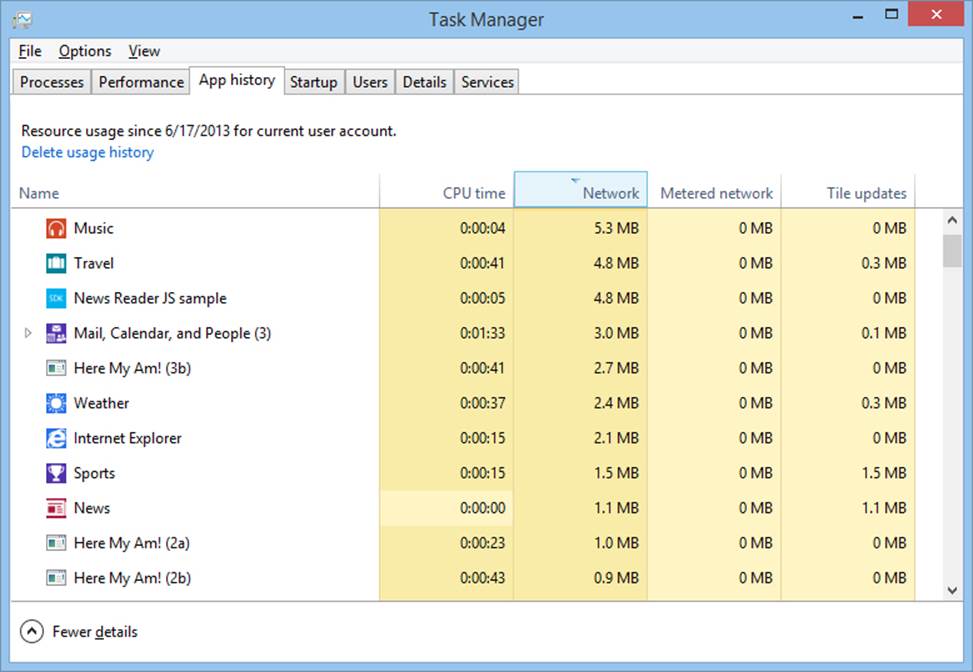
You—and all of your customers, I might add—can track your app’s network usage in the App History tab of Task Manager, as shown below. Make sure you’ve expanded the view by tapping More Details on the bottom left if you don’t see this view. You can see that it shows Network and Metered Network usage along with the traffic due to tile updates:
Programmatically, as noted before, the profile supplies usage information through its getConnectionCost and getDataPlanStatus methods. These return ConnectionCost and DataPlanStatusobjects, respectively, which have the following properties:
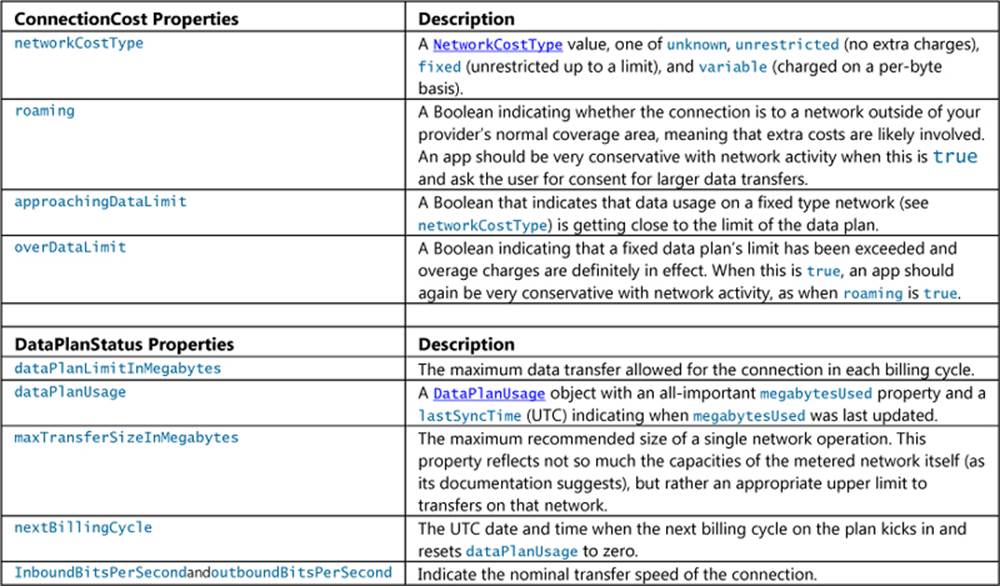
With all these properties you can make intelligent decisions about your app’s network activity, warn the user about possible overage charges, and ask for the user’s consent when appropriate. Clearly, when the networkCostType is unrestricted, you can really do whatever you want. On the other hand, when the type is variable and the user is paying for every byte, especially when roaming is true, you’ll want to inform the user of that status and provide settings through which the user can limit the app’s network activity, if not halt that activity entirely. After all, the user might decide that certain kinds of data are worth having. For example, they should be able to set the quality of a streaming movie, indicate whether to download email messages or just headers, indicate whether to download images, specify whether caching of online data should occur, turn off background streaming audio, and so on.
Such settings, by the way, might include tile, badge, and other notification activities that you might have established, as those can generate network traffic. If you’re also using background transfers, you can set the cost policies for downloads and uploads as well.
An app can, of course, ask the user’s permission for any given network operation. It’s up to you and your designers to decide when to ask and how often. The Windows Store policy once required that you ask the user for any transfer exceeding one megabyte when roaming andoverDataLimit are both true and when performing any transfer over maxTransferSizeInMegabytes. This is no longer required, but it’s still a good starting point—your customers will clearly appreciate careful consideration, especially if your app is making a number of smaller transfers that might add up to multiple megabytes. At the same time, you don’t want to be annoying with consent prompts, so be sure to give the user a way to temporarily disable warnings or ask at reasonable intervals. In short, put yourself in your customer’s shoes and design an experience that empowers their ability to control the app’s behavior.
On a fixed type network, where data is unrestricted up to dataPlanLimitInMegabytes, we find cases where a number of the other properties become interesting. For example, if overDataLimit is already true, you can ask the user to confirm additional network traffic or just defer certain operations until the nextBillingCycle. Or, if approachingDataLimit is true (or even when it’s not), you can determine whether a given operation might exceed that limit. This is where the connection profile’s getNetworkUsageAsync method comes in handy to obtain a NetworkUsage object for a given period (see How to retrieve connection usage data for a specific time period). Call getNetworkUsageAsync with the time period between DataPlanUsage.lastSyncTime and DateTime.now(). Then add that value to DataPlanUsage.megabytesUsed and subtract the result fromDataPlanUsage.dataPlan-LimitInMegabytes. This tells you how much more data you can transfer before incurring extra costs, thereby providing the basis for asking the user, “Downloading this file will exceed your data plan limit and dock your wallet. Is that OK or would you rather save your money for something else?”
For simplicity’s sake, you can think of cost awareness in terms of three behaviors: normal, conservative, and opt-in, which are described on Managing connections on metered networks and, more broadly, on Developing connected apps. Both topics provide additional guidance on making the kinds of decisions described here already. In the end, saving the user from bill shock—and designing a great user experience around network costs—is definitely an essential investment.
Sidebar: Simulating Metered Networks
You may be thinking, “OK, so I get the need for my app to behave properly with metered networks, but how do I test such conditions?” You can, of course, use a real metered network through a mobile provider, such as the Internet Sharing feature on my phone. However, I do have a data limit and I certainly don’t want to test the effect of my app on real roaming fees! Fortunately, you can also simulate the behavior of metered networks with the Visual Studio simulator and, to some extent, directly in Windows with any Wi-Fi connection.
In the simulator, click the Change Network Properties button on the lower right side of the simulator’s frame (it’s the command above Help—refer back to Figure 2-5 in Chapter 2, “Quickstart”). This brings up the following dialog:

In this dialog you can create a profile with whatever name and options you’d like. The variations for cost type, data limit status, and roaming allow you to test all conditions that your app might encounter. As such, this is your first choice for working with cost awareness.
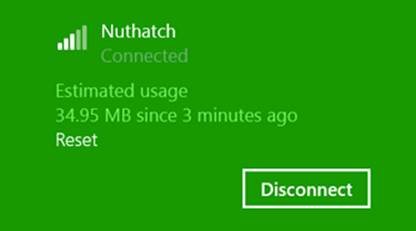
To simulate a metered network with a Wi-Fi connection, go to PC Settings > Network > Connections and then tap your current connection under Wi-Fi (as shown below left). On the next page, turn on Set As A Metered Connection under Data Usage (below right):

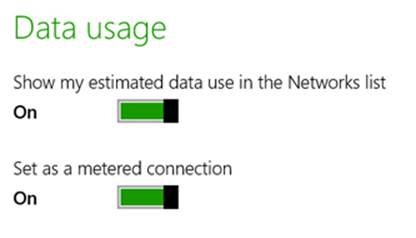
Although this option will not set up DataUsage properties and all that a real metered network might provide, it will return a networkCostType of fixed, which allows you to see how your app responds. You can also use the Show My Estimated Data Use in the Networks List option to watch how much traffic your app generates during its normal operation, and you can reset the counter so that you can take some accurate readings:
Running Offline
The other user experience that is likely to earn your app a better reputation is how it behaves when there is no connectivity or when there’s a change in connectivity. Ask yourself the following questions:
• What happens if your app starts without connectivity, both from tiles(primary and secondary) and through contracts such as search, share, and the file picker?
• What happens if your app runs the first time without connectivity?
• What happens if connectivity is lost while the app is running?
• What happens when connectivity comes back?
As described above in the “Connectivity Awareness” section, use the networkstatuschanged event to handle these situations while running and your resuming handler to check if connection status changed while the app was suspended. If you have a background task for to thenetworkStateChange trigger, it would primarily save state that your resuming handler would then check.
It’s perfectly understood that some apps just can’t run without connectivity, in which case it’s appropriate to inform the user of that situation when the app is launched or when connectivity is lost while the app is running. In other situations, an app might be partially usable, in which case you should inform the user more on a case-by-case basis, allowing them to use unaffected parts of the app. Better still is to cache data that might make the app even more useful when connectivity is lost. Such data might even be built into the app package so that it’s always available on first launch.
Consider the case of an ebook reader app that would generally acquire new titles from an online catalog. For offline use it would do well to cache copies of the user’s titles locally, rather than rely solely on having a good Internet connection (subject to data transfer limits and appropriate user consent, of course). The app’s publisher might also include a number of popular free titles directly in the app package such that a user could install the app while waiting to board a plane and have at least those books ready to go when the app is first launched at 10,000 feet (and you don’t like paying for in-flight WiFi). Other apps might include some set of preinstalled data at first and then add to that data over time (perhaps through in-app purchases) when unrestricted networks are available. By following network costs closely, such an app might defer downloading a large data set until either the user confirms the action or a different connection is available.
Tip Caching a set of default data in your app package has several benefits. First, it allows for a good first-run experience when there’s no connectivity, because at least some data will appear, even if it’s only as current as the last app update in the Store. Second, you can use such cached data to bring the app up very quickly even when there’s connectivity, rather than waiting for an HTTP request to respond. Third, you can store the data in your package in its most optimized form so that you don’t need to process it as you might an XML or JSON response from a service. What can also work very well is implementing a data model (classes that hide the details of your data management) within your app data that is initially populated from your in-package data and then transparently refreshed and updated with data from HTTP requests. This way the most current data is always used on subsequent runs and is always available offline.
How and when to cache data from online resources is probably one of the fine arts of software development. When do you download it? How much do you acquire? Where do you store it? What might you include as default data in the app package? Should you place an upper limit on the cache? Do you allow changes to cached data that would need to be synchronized with a service when connectivity is restored? These are all good questions ask, and certainly there are others to ask as well. Let me at least offer a few thoughts and suggestions.
First, you can use any network transport to acquire data to cache, such as the various HTTP request APIs we’ll discuss later, the background transfer API, as well as the HTML5 AppCache mechanism. Separately, other content acquired from remote resources, such as images and even script (downloaded within x-ms-webview or iframe elements), are also cached automatically like typical temporary Internet files. Note that this caching mechanism and AppCache are subject to the storage limits defined by Internet Explorer (whose subsystems are shared with the app host). You can also exercise some control over caching through the HttpClient API.
How much data you cache depends, certainly, on the type of connection you have and the relative importance of the data. On an unrestricted network, feel free to acquire everything you feel the user might want offline, but it would be a good idea to provide settings to control that behavior, such as overall cache size or the amount of data to acquire per day. I mention the latter because even though my own Internet connection appears to the system as unrestricted, I’m charged more as my usage reaches certain tiers (on the order of gigabytes). As a user, I would appreciate having a say in matters that involve significant network traffic.
Even so, if caching specific data will greatly enhance the user experience, separate that option to give the user control over the decision. For example, an ebook reader might automatically download a whole title while the reader is perhaps just browsing the first few pages. Of course, this would also mean consuming more storage space. Letting users control this behavior as a setting, or even on a per-book basis, lets them decide what’s best. For smaller data, on the other hand—say, in the range of several hundred kilobytes—if you know from analytics that a user who views one set of data is highly likely to view another, automatically acquiring and caching those additional data sets could be the right design.
The best places to store cached data are your app data folders, specifically the LocalFolder and TemporaryFolder. Don’t use the RoamingFolder to cache data acquired from online sources: besides running the risk of exceeding the roaming quota (see Chapter 10), it’s also quite pointless. Because the system would have to roam such data over the network anyway, it’s better to just have the app re-acquire it when it needs to.
Whether you use the LocalFolder or TemporaryFolder depends on how essential the data is to the operation of the app. If the app cannot run without the cache, use local app data. If the cache is just an optimization such that the user could reclaim that space with the Disk Cleanup tool, store the cache in the TemporaryFolder and rebuild it again later on.
In all of this, also consider that what you’re caching really might be user data that you’d want to store outside of your app data folders. That is, be sure to think through the distinction between app data and user data! We’ll think about this more in Chapters 10 and 11.
Finally, you might again have the kind of app that allows offline activity (like processing email) where you will have been caching the results of that activity for later synchronization with an online resource. When connectivity is restored, then, check if the network cost is suitable before starting your sync process.
Hosting Content: the WebView and iframe Elements
One of the most basic uses of online content is to load and render an arbitrary piece of HTML (plus CSS and JavaScript) into a discrete element within an app’s overall layout. The app’s layout is itself, of course, defined using HTML, CSS, and JavaScript, where the JavaScript code especially has full access to both the DOM and WinRT APIs. For security considerations, however, such a privilege cannot be extended to arbitrary content—it’s given only to content that is part of the app’s package and has thus gone through the process of Store certification. For everything else, then, we need ways to render content within a more sandboxed environment.
There are two ways to do this, as we’ll see in this section. One is through the HTML iframe element, which is very restricted in that it can display only in-package pages (ms-appx[-web]:/// URIs) and secure online content (https://). The other more general-purpose choice is the x-ms-webview element, which I’ll just refer to as the webview for convenience. It works with ms-appx-web, http[s], and ms-appdata URIs, and it provides a number of other highly useful features such as using your own link resolver. The caveats with the webview is that it does not at present support IndexedDB, geolocation, clipboard access, or the HTML5 AppCache, which the iframe does. If you require these capabilities, you’ll need to use an iframe through an https URI. At the same time, the webview also has integrated SmartScreen filtering support to protect your app from phishing attacks. Such choices!
In earlier chapters we’ve already encountered the ms-appx-web URI scheme and made mention of the local and web contexts. We’ll start this section by exploring these contexts and other security considerations in more detail, because they apply directly to iframe and webview elements alike.
Wrapping a web experience iframeand x-ms-webviewelements enable you to easily present a website in an app frame, and this is perfectly allowable. Ideally, you want to do a little more than just show a website in a webview. As an app, your content should look like an app, navigate like an app, work well with touch, use the app bar, support contracts like Search and Share, have a live tile, and draw on other system capabilities. There is a project called the Web app template that helps accomplish some of these basics through configuration data, but think of it as a starting point. The best kind of hybrid app will make the best of both the web and the native platform.
Local and Web Contexts (and iframe Elements)
As described in Chapter 1, “The Life Story of a Windows Store App,” apps written with HTML, CSS, and JavaScript are not directly executable like their compiled counterparts written in C#, Visual Basic, or C++. In our app packages, there are no EXEs, just .html, .css, and .js files that are, plain and simple, nothing but text. So something has to turn all this text that defines an app into something that’s actually running in memory. That something is again the app host, wwahost.exe, which creates what we call the hosted environment for Store apps.
Let’s review what we’ve already learned in Chapters 1 and 2 about the characteristics of the hosted environment:
• The app host (and the apps in it) use brokered access to sensitive resources, controlled both by declared capabilities in the manifest and run-time user consent.
• Though the app host provides an environment very similar to that of Internet Explorer (10+), there are a number of changes to the DOM API, documented on HTML and DOM API changes list and HTML, CSS, and JavaScript features and differences. A related topic is Windows Store apps using JavaScript versus traditional web apps.
• HTML content in the app package can be loaded into the local or web context, depending on the hosting element. iframe elements can use the ms-appx:/// scheme to refer to in-package pages loaded in the local context or ms-appx-web:/// to specify the web context. (The third / again means “in the app package”; the Here My Am! app uses this to load its map.html file into a web context iframe.) Remote https content in an iframe and all content in a webview always runs in the web context.
• Any content within a web context can refer to in-package resources (such as images and other media) with ms-appx-web URIs. For example, a page loaded into a webview from an http source can refer to an app’s in-package logo. (Such a page, of course, would not work in a browser!)
• The local context has access to the WinRT API, among other things, but cannot load remote script (referenced via http://); the web context is allowed to load and execute remote script but cannot access WinRT.
• ActiveX control plug-ins are generally not allowed in either context and will fail to load in both iframe and webview elements. The few exceptions are noted on Migrating a web app.
• In the local context, strings assigned to innerHTML, outerHTML, adjacentHTML, and other properties where script injection can occur, as well as strings given to document.write and similar methods, are filtered to remove script. This does not happen in the web context.
• Every iframe and webview element—in either context—has its own JavaScriptglobal namespace that’s entirely separate from that of the parent page. Neither can access the other.
• The HTML5 postMessage function can be used to communicate between an iframe and its containing parent across contexts; with a webview such communication happens with the invokeScriptAsync method and window.external.notify. These capabilities can be useful to execute remote script within the web context and pass the results to the local context; script acquired in the web context should not be itself passed to the local context and executed there. (Again, Windows Store policy disallows this, and apps submitted to the Store are analyzed for such practices.)
• Further specifics can be found on Features and restrictions by context, including which parts of WinJS don’t rely on WinRT and can thus be used in the web context. (WinJS, by the way, is not supported for use on web pages outside of an app, just the web context within an app.)
An app’s home page—the one you point to in the manifest in the Application > Start Page field—always runs in the local context, and any page to which you navigate directly (via <a href> or document.location) must also be in the local context. When using page controls to load HTML fragments into your home page, those fragments are of course rendered into the local context.
Next, a local context page can contain any number of webview and iframe elements. For the webview, because it always loads its content in the web context and cannot refer to ms-appx URIs, it pretty much acts like an embedded web browser where navigation is concerned.
Each iframe element, on the other hand, can load in-package content in either local or web context. (By the way, programmatic read-only access to your package contents is obtained via Windows.ApplicationModel.Package.Current.InstalledLocation.) Referring to a remote location (https) will always place the iframe in the web context.
Here are some examples of different URIs and how they get loaded in an iframe:
<!-- iframe in local context with source in the app package -->
<!-- these formsare allowed only from inside the local context -->
<iframe src="/frame-local.html"></iframe>
<iframe src="ms-appx:///frame-local.html"></iframe>
<!-- iframe in web context with source in the app package -->
<iframe src="ms-appx-web:///frame-web.html"></iframe>
<!-- iframe with an external source automatically assigns web context -->
<iframe src="https://my.secure.server.com"></iframe>
Also, if you use an <a href="..." target="..."> tag with target pointing to an iframe, the scheme in href determines the context. And once in the web context, an iframe can host only other web context iframes such as the last two above; the first two elements would not be allowed.
Tip Some web pages contain frame-busting code that prevents the page from being loaded into an iframe, in which case the page will be opened in the default browser and not the app. In this case, use a webview if you can; otherwise you’ll need to work with the site owner to create an alternate page that will work for you.
Although Windows Store apps typically don’t use <a href> or document.location for page navigation, similar rules apply if you do happen to use them. The whole scene here, though, can begin to resemble overcooked spaghetti, so I’ve simplified the exact behavior for these variations and for iframes in the following table:
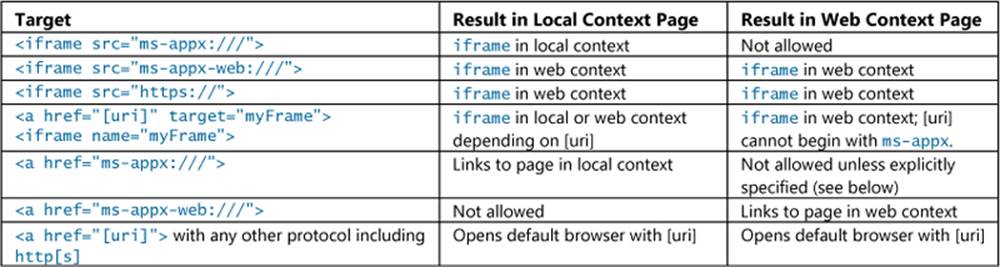
The last two items in the table really mean that a Windows Store app cannot navigate from its top-level page (in the local context) directly to a web context page of any kind (local or remote) and remain within the app—the app host will launch the default browser instead. That’s just life in the app host! Such content must be placed in an iframe or a webview. Similarly, navigating from a web context page to a local context page is not allowed by default but can be enabled, as we’ll see shortly.
In the meantime, let’s see a few simpler iframe examples. Again, in the Here My Am! app we’ve already seen how to load an in-package HTML page in the web context and communicate with the parent page through postMessage (We’ll change this to a webview in a later section.) Very similar and more isolated examples can also be found in scenarios 2 and 4 of the Integrating content and controls from web services sample.
Scenario 3 of that same sample demonstrates how calls to WinRT APIs are allowed in the local context but blocked in the web context. It loads the same page, callWinRT.html, into a separate iframe in each context, which also means the same JavaScript is loaded (and isolated) in both. When running this scenario you can see that WinRT calls will fail in the web context.
A good tip to pick up from this sample is that you can use the document.location.protocol property to check which context you’re running in, as done in js/callWinRT.js:
var isWebContext = (document.location.protocol === "ms-appx-web:");
Checking against the string “ms-appx:” will, of course, tell you if you’re running in the local context.
Scenarios 5 and 6 of the sample are very interesting because they help us explore matters around inserting HTML into the DOM and navigating from the web to the local context. Each of these subjects, however, needs a little more context of their own (forgive the pun!), as discussed in the next two sections.
Tip To prevent selection of content in an iframe, style the iframewith –ms-user-select: none or set its style.msUserSelectproperty to "none" in JavaScript. This does not, however, work for the webview control; its internal content would need to be styled instead.
Dynamic Content
As we’ve seen, the ms-appx and ms-appx-webschema allow an app to navigate iframe and webview elements to pages that exist inside the app package. This begs a question: can an app point to content on the local file system that exists outside its package, such as a dynamically created file in an appdata folder? Can, perchance, an app use the file:// protocol to navigate to and/or access that content?
Well, as much as I’d love to tell you that this just works, the answer is somewhat mixed. First, the file protocol—along with custom protocols—are wholly blocked by design for various security reasons, even for your appdata folders to which you otherwise have full access. Fortunately, there is a substitute, ms-appdata:///, that fulfills part of the need (the third /again allows you to omit the specific package name). Within the local context of an app, ms-appdata is a shortcut to your appdata folder wherein exist local, roaming, and temp folders. So, if you created a picture called image65.png in your appdata local folder, you can refer to it by using ms-appdata:///local/image65.png. Similar forms work with roaming and temp and work wherever a URI can be used, including within a CSS style like background.
Within iframes, ms-appdata can be used only for resources, namely with the src attribute of img, video, and audio elements. It cannot be used to load HTML pages, CSS stylesheets, or JavaScript, nor can it be used for navigation purposes (iframe, hyperlinks, etc.). This is because it wasn’t feasible to create a sub-sandbox environment for such pages, without which it would be possible for a page loaded with ms-appdata to access everything in your app. Fortunately, you can navigate a webview to app data content, as we’ll see shortly, thereby allowing you to generate and display HTML pages dynamically without having to write your own rendering engine (whew!).
You can also load bits of HTML, as we’ve seen with page controls, and insert that markup into the DOM through innerHTML, outerHTML, adjacentHTML and related properties, as well as document.write and DOMParser.parseFromString. But remember that automatic filtering is applied in the local context to prevent injection of script and other risky markup (and if you try, the app host will throw exceptions, as will WinJS.Utilities.setInnerHTML, setOuterHTML, and insertAdjacent-HTML). This is not a concern in the web context, of course.
This brings us to whether you can generate and execute script on the fly in the local context at all. The answer is again qualified. Yes, you can take a JavaScript string and pass it to the eval or execScript functions, even inject script through properties like innerHTML. But be mindful that requirement 3.9 of the App certification requirements (as of this writing) disallows dynamically downloading code or data that changes how the app interacts with the WinRT API. This is admittedly a bit of a gray area—downloading data to configure a game level, for instance, doesn’t quite fall into this category. Nevertheless, this requirement is taken seriously, so be careful about making assumptions.
That said, there are situations where you, the developer, really know what you’re doing and enjoy juggling chainsaws and flaming swords (or maybe you’re just trying to use a third-party library; see the sidebar below). Acknowledging that, Microsoft provides a mechanism to consciously circumvent script filtering: MSApp.execUnsafeLocalFunction. For all the details regarding this, refer to Developing secure apps, which covers this along with a few other obscure topics that I’m not including here (like the numerous variations of the sandbox attribute for iframes, which is also demonstrated in the JavaScript iframe sandbox attribute sample).
And curiously enough, WinJS actually makes it easier for you to juggle chainsaws and flaming swords! WinJS.Utilities.setInnerHTMLUnsafe, setOuterHTMLUnsafe, and insertAdjacentHTML-Unsafe are wrappers for calling DOM methods that would otherwise strip out risky content. Alternately, if you want to sanitize HTML before attempting to inject it into an element (and thereby avoid exceptions), you can use the toStaticHTML method, as demonstrated in scenario 5 of the Integrating content and controls from web services sample.
Sidebar: Third-Party Libraries and the Hosted Environment
In general, Windows Store apps can employ libraries like jQuery, Angular, Prototype, Dojo, and so forth, as noted in Chapter 1. However, there are some limitations and caveats.
First, because local context pages in an app cannot load script from remote sources, apps typically need to include such libraries in their packages unless they’re only being used from the web context. WinJS, mind you, doesn’t need bundling because it’s provided by the Windows Store, but such “framework packages” are not enabled for third parties.
Second, DOM API changes and app container restrictions might affect the library. For example, using window.alert won’t work. One library also cannot load another library from a remote source in the local context. Crucially, anything in the library that assumes a higher level of trust than the app container provides (such as open file system access) will have issues.
The most common problem comes up when libraries inject elements or script into the DOM (as through innerHTML), a widespread practice for web applications that is not automatically allowed within the app container. You can get around this on the app level by wrapping code within MSApp.execUnsafeLocalFunction, but that doesn’t solve injections coming from deeper inside the library. In these cases you really need to work with the library author.
In short, you’re free to use third-party libraries so long as you’re aware that they might have been written with assumptions that don’t always apply within the app container. Over time, of course, fully Windows-compatible versions of such libraries, like jQuery 2.0, will emerge. Note also that for any libraries that include binary components, those must be targeted to Windows 8.1 for use with a Windows 8.1 app.
App Content URIs
When drawing on a variety of web content, it’s important to understand the degree to which you trust that content. That is, there’s a huge difference between web content that you control and that which you do not, because by bringing that content into the app, the app essentially takes responsibility for it. This means that you want to be careful about what privileges you extend to that web content. In an iframe, those privileges include cross-context navigation, geolocation, IndexedDB, HTML5 AppCache, clipboard access, and navigating to web content with an https URI. In a webview, it means the ability for remote content to raise an event to the app.33
If you ask nicely, in other words, Windows will let you enable such privileges to web pages that the app knows about. All it takes is an affidavit signed by you and sixteen witnesses, and…OK, I’m only joking! You simply need to add what are called application content URI rules to your manifest in the Content Uri tab. Each rule—composed of an exact https URI or one with wildcards (*)—says that content from some URI is known and trusted by your app and can thus act on the app’s behalf.You can also exclude URIs, which is typically done to exclude specific pages that would otherwise be allowed by another rule.
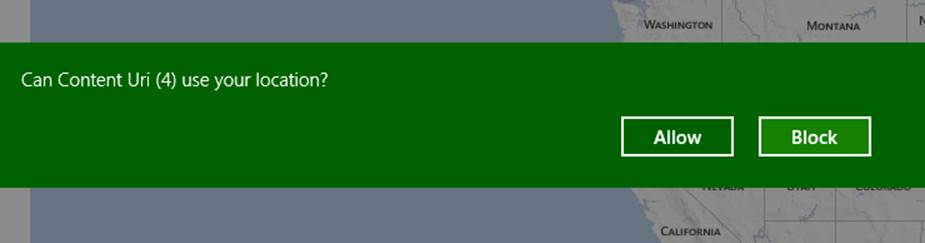
For instance, the very simple ContentUri example in this chapter’s companion content has an iframe pointing to https://www.bing.com/maps/ (Bing allows an https:// connection), and this URI is included in the in the content URI rules. This allows the app to host the remote content as partially shown belowNow click or tap the geolocation crosshair circle on the upper left of the map next to World. Because the rules say we trust this content (and trust that it won’t try to trick the user), a geolocation request invokes a consent dialog (as shown below) just as if the request came from the app. (Note: When run inside the debugger, the ContentUri example will probably show exceptions on startup. If so, press Continue within Visual Studio; this doesn’t affect the app running outside the debugger.)
Such brokered capabilities require a content URI rule because web content loaded into an iframe can easily provide the means to navigate to other arbitrary pages that could potentially be malicious. Lacking a content URI rule for that target page, the iframe will not navigate there at all.
In some app designs you might have occasion to navigate from a web context page in the app to a local context page. For example, you might host a page on a server where it can keep other server-side content fully secure (that is, not bring it onto the client). You can host the page in aniframe, of course, but if for some reason you need to directly navigate to it, you’ll probably need to navigate back to a local context page. You can enable this by calling the super-secret function MSApp.add-PublicLocalApplicationUri from code in a local page (and it actually is well-documented) for each specific URI you need. Scenario 6 of the Integrating content and controls from web services sample gives an example of this. First it has an iframe in the web context (html/addPublicLocalUri.html):
<iframe src="ms-appx-web:///navigateToLocal.html"></iframe>
That page then has an <a href> to navigate to a local context page that calls a WinRT API for good measure; see navigateToLocal.html in the project root:
<a href="ms-appx:///callWinRT.html">Navigate to ms-appx:///callWinRT.html</a>
To allow this to work, we then have to call addPublicLocalApplicationUri from a local context page and specify the trusted target (js/addPublicLocalUri.js):
MSApp.addPublicLocalApplicationUri("callWinRT.html");
Typically it’s a good practice to include the ms-appx:/// prefix in the call for clarity:
MSApp.addPublicLocalApplicationUri("ms-appx:///callWinRT.html");
Be aware that this method is very powerful without giving the appearance of such. Because the web context can host any remote page, be especially careful when the URI contains query parameters. For example, you don’t want to allow a website to navigate to something like ms-appx:///delete.html?file=superimportant.doc and just accept those parameters blindly! In short, always consider such URI parameters (and any information in headers) to be untrusted content.
The <x-ms-webview> Element
Whenever you want to display some arbitrary HTML page within the context of your app—specifically pages that exists outside of your app package—then the x-ms-webview element is your best friend.34 This is a native HTML element that’s recognized by the rendering engine and basically works like the core of a web browser (without the surrounding business of navigation, favorites, and so forth). Anything loaded into a webview runs in the web context, so it can be used for arbitrary URIs except those using the ms-appx schema. It also supports ms-appdata URIs and rendering string literals, which means you can easily display HTML/CSS/JavaScript that you generate dynamically as well as content that’s downloaded and stored locally. This includes the ability to do your own link resolution, as when images are stored in a database rather than as separate files. Webview content again always runs in the web context (without WinRT access), there aren’t restrictions as to what you can do with script and such so far as Store certification is concerned. And the webview even supports additional features like rendering its contents to a stream from which you can create a bitmap. So let’s see how all that works!
What’s with the crazy name? You’re probably wondering why the webview has this oddball x-ms-webview tag. This is to avoid any future conflict with emerging standards, at which point a vendor-prefixed implementation could become ms-webview.
Because the webview is an HTML element like any other, you can style it with CSS however you want, animate the element around, and so forth. Its JavaScript object also has the full set of properties, methods, and events that are shared with other HTML elements, along with a few unique ones of its own. Note, however, that the webview does not have or support any child content of its own, so properties like innerHTML and childNodes are empty and have no effect if you set them.
The simplest use case for the webview (and I call it this because it’s tiresome to type out the funky element name every time) is to just point it to a URI through its src attribute. One example is in scenario 1 of the Integrating content and controls from web services sample(html/webContent.html), with the results shown in Figure 4-2:
<x-ms-webview id="webContentHolder" src
="http://www.microsoft.com/presspass/press/NewsArchive.mspx?cmbContentType=PressRelease">
</x-ms-webview>
The sample lets you choose different links, which are then rendered in the webview by again simply setting its src attribute.
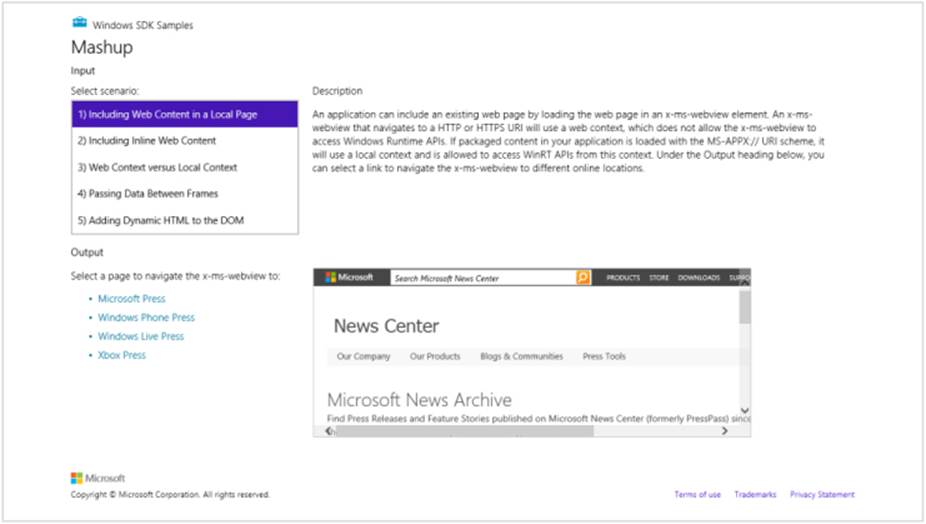
FIGURE 4-2 Displaying a webview, which is an HTML element like any others within an app layout. The webview runs within the web context and allows navigation within its own content.
Clicking links inside a webview will navigate to those pages. In many cases with live web pages, you’ll see JavaScript exceptions if you’re running the app in the debugger. Such exceptions will notterminate the app as a whole, so they can be safely ignored or left unhandled. Outside of the debugger, in fact, a user will never see these—the webview ignores them.
As we see in this example, setting the src attribute is one way to load content into the webview. The webview object also supports four other methods:
• navigate Navigates the webview to a supported URI (http[s], ms-appx-web, and ms-appdata). That page can contain references to other URIs except for ms-appx.
• navigateWithHttpRequestMethod Navigates to a supported URI with the ability to set the HTTP verb and headers.
• navigateToString Renders an HTML string literal into the webview. References can again refer to supported URIs except for ms-appx.
• navigateToLocalStreamUri Navigates to a page in local appdata using an app-provided object to resolve relative URIs and possibly decrypt the page content.
Examples of the most of these can be found in the HTML Webview control sample. Scenario 1 shows navigate, starting with an empty webview and then calling navigate with a URI string (js/1_NavToUrl.js):
var webviewControl = document.getElementById("webview");
webviewControl.navigate("http://go.microsoft.com/fwlink/?LinkId=294155");
Navigating through navigateWithHttpRequestMessage is a little more involved. Though not included in the sample, relevant code can be found on the App Builders Blog in Blending Apps and Sites with the HTML x-ms-webview:
//The site to which we navigate
var siteUrl = new Windows.Foundation.Uri("http://www.msn.com");
//Specify the type of request (get)
var httpRequestMessage = new Windows.Web.Http.HttpRequestMessage(Windows.Web.Http.HttpMethod.get, siteUrl);
// Append headers to request the server to check against the cache
httpRequestMessage.headers.append("Cache-Control", "no-cache");
httpRequestMessage.headers.append("Pragma", "no-cache");
// Navigate the WebView with the request info
webview.navigateWithHttpRequestMessage(httpRequestMessage);
Scenario 2 of the SDK sample shows navigateToString by loading an in-package HTML file into a string variable, which is like calling navigate with the same ms-appx-web URI. Of course, if you have the content in an HTML file already, just use navigate! It’s more common, then, to use navigateToString with dynamically-generated content. For example, let’s say I create a string as follows, which you’ll notice includes a reference to an in-package stylesheet. You can find this in scenario 1 of the WebviewExtras example in this chapter’s companion content (js/scenario1.js):
var baseURI = "http://www.kraigbrockschmidt.com/images/";
var content = "<!doctype HTML><head><style>";
//Refer to an in-package stylesheet (or one in ms-appdata:/// or http[s]://)
content +=
"<head><link rel='stylesheet' href='ms-appx-web:///css/localstyles.css' /></head>";
content += "<html><body><h1>Dynamically-created page</h1>";
content += "<p>This document contains its own styles as well as a remote image references.</p>"
content += "<img src='" + baseURI + "Cover_ProgrammingWinApps-2E.jpg' />" + space;
content += "<img src='" + baseURI + "Cover_ProgrammingWinApps-1E.jpg' />" + space;
content += "<img src='" + baseURI + "Cover_MysticMicrosoft.jpg' />" + space;
content += "<img src='" + baseURI + "Cover_FindingFocus.jpg' />" + space;
content += "<img src='" + baseURI + "Cover_HarmoniumHandbook2.jpg' />"
content += "</body></html>";
With this we can then just load this string directly:
var webview = document.getElementById("webview");
webview.navigateToString(content);
We could just as easily write this text to a file in our appdata and use navigate with an ms-appdata URI (this is what’s shown in js/scenario1.js):
var local = Windows.Storage.ApplicationData.current.localFolder;
local.createFolderAsync("pages",
Windows.Storage.CreationCollisionOption.openIfExists).then(function (folder) {
return folder.createFileAsync("dynamicPage.html",
Windows.Storage.CreationCollisionOption.replaceExisting);
}).then(function (file) {
return Windows.Storage.FileIO.writeTextAsync(file, content);
}).then(function () {
var webview = document.getElementById("webview");
webview.navigate("ms-appdata:///local/pages/dynamicPage.html");
}).done(null, function (e) {
WinJS.log && WinJS.log("failed to create dynamicPage.html, err = " + e.message, "app");
});
In both of these examples, the output (styled with the in-package stylesheet) is the following shameless display of my current written works:

Take careful note of the fact that I create this dynamic page in a subfolder within local appdata. The webview specifically disallows navigation to pages in a root local, roaming, or temp appdata folder to protect the security of other appdata files and folders. That is, because the webview runs in the web context and can contain any untrusted content you might have downloaded from the web, and because the webview allows that content to exec script and so forth, you don’t want to risk exposing potentially sensitive information elsewhere within your appdata. By forcing you to place appdata content in a subfolder, you would have to consciously store other appdata in that same folder to allow the webview to access it. It’s a small barrier, in other words, to give you pause to think clearly about exactly what you’re doing!
In the example I also include a link to an in-package image (not shown), just to show that you can use ms-appx-web URIs for this purpose:
content += "<img src='ms-appx-web:///images/logo.png' />";
Scenario 3 of the SDK’s HTML WebView control sample (js/scenario3.js) also shows an example of using ms-appdata URIs, in this case copying an in-package file to local appdata and navigating to that. Another likely scenario is that you’ll download content from an online service via an HTTP request, store that in an appdata file, and navigate to it. In such cases you’re just building the necessary file structure in a folder and navigating to the appropriate page. So, for example, you might make an HTTP request to a service to obtain multimedia content in a single compressed file. You can then expand that file into your appdata and, assuming that the root HTML page has relative references to other files, the webview can load and render it.
But what if you want to download a single file in a private format (like an ebook) or perhaps acquire a potentially encrypted HTML page along with a single database file for media resources? This is the purpose of navigateToLocalStream, which lets you inject your own content handlers and link resolvers into the rendering process. This method takes two arguments:
• A content URI that’s created by calling the webview’s buildLocalStreamUri method with an app-defined content identifier and the relative reference to resolve.
• A resolver object that implements an interface called IUriToStreamResolver, whose single method UriToStreamAsync takes a relative URI and produces a WinRT IInputStream through which the rendering engine can then load the media.
Scenario 4 of the HTML WebView control sample demonstrates this with resolver objects implemented via WinRT components in C# and C++. (See Chapter 18, “WinRT Components,” for how these are structured.) Here’s how one is invoked:
var contentUri = document.getElementById("webview").buildLocalStreamUri("NavigateToStream",
"simple_example.html");
var uriResolver = new SDK.WebViewSampleCS.StreamUriResolver();
document.getElementById("webview").navigateToLocalStreamUri(contentUri, uriResolver);
In this code, contentUri will be an ms-local-stream URI, such as ms-local-stream://microsoft.sdksamples.controlswebview.js_4e61766967617465546f53747265616d/simple_example.html. Because this starts with ms-local-stream, the webview will immediately call the resolver object’sUriToStreamAsync to generate a stream for this page as a whole. So if you had a URI to an encrypted file, the resolver object could perform the necessary decryption to get the first stream of straight HTML for the webview, perhaps applying DRM in the process.
As the webview renders that HTML and encounters other relative URIs, it will call upon the resolver object for each one of those in turn, allowing that resolver to stream media from a database or perform any other necessary steps in the process.
The details of doing all this are beyond the scope of this chapter, so do refer again to the HTML WebView control sample.
Webview Navigation Events
The idea of navigating to a URI is one that certainly conjures up thoughts of a general purpose web browser and, in fact, the web view can serve reasonably well in such a capacity because it both maintains an internal navigation history and fires events when navigation happens.
Although the contents of the navigation history are not exposed, two properties and methods give you enough to implement forward/back UI buttons to control the webview:
• canGoBack and canGoForward Boolean properties that indicate the current position of the web view within its navigation history.
• goBack and goForward Methods that navigate the webview backwards or forwards in its history.
When you navigate the webview in any way, it will fire the following events:
• MSWebViewNavigationStarting Navigation has started.
• MSWebViewContentLoading The HTML content stream has been provided to the webview (e.g., a file is loaded or a resolver object has provided the stream).
• MSWebViewDOMContentLoaded The webview’s DOM has been constructed.
• MSWebViewNavigationCompleted The webview’s content has been fully loaded, including any referenced resources.
If a problem occurs along the way, the webview will raise an MSWebViewUnviewableContent-Identified event instead. It’s also worth mentioning that the standard change event will also fire when navigation happens, but this also happens when setting other properties, so it’s not as useful for navigation purposes.
Scenario 1 of the HTML WebView control sample, which we saw earlier for navigate, essentially gives you a simple web browser by wiring these methods and events to a couple of buttons. Note that any popups from websites you visit will open in the browser alongside the app.
Tip You’ll find when working with the webview in JavaScript that the object does not provide equivalent on* properties for these events. This omission was a conscious choice to avoid potential naming conflicts with emerging standards. At present, then, you must useaddEventListenerto wire up these events.
In addition to the navigating/loading events for the webview’s main content, it also passes along similar events for iframe elements within that content: MSWebViewFrameNavigationStarting, MSWebViewFrameContentLoading, MSWebViewFrameDOMContentLoaded, and MSWebViewFrame-NavigationCompleted, each of which clearly has the same meaning as the related webview events but also include the URI to which the frame is navigated in eventArgs.uri.
Calling Functions and Receiving Events from Webview Content
The other event that can come from the webview is MSWebViewScriptNotify. This is how JavaScript code in the webview can raise a custom event to its host, similar to how we’ve used postMessage from an iframe in the Here My Am! app to notify the app of a location change. On the flip side of the equation, the webview’s invokeScriptAsync method provides a means for the app to call a function within the webview.
Invoking script in a webview is demonstrated in scenario 5 of the HTML WebView control sample, where the following content of html/script_example.html (condensed here) is loaded into the webview:
<!DOCTYPE html><html><head>
<title>Script Example</title>
<script type="text/javascript">
function changeText(text) {
document.getElementById("myDiv").innerText = text;
}
</script>
</head><body>
<div id="myDiv">Call the changeText function to change this text</div>
</body></html>
The app calls changeText as follows:
document.getElementById("webview").invokeScriptAsync("changeText",
document.getElementById("textInput").value).start();
The second parameter to invokeScriptAsync method is always a string (or will be converted to a string). If you want to pass multiple arguments, use JSON.stringify on an object with suitably named properties and JSON.parse it on the other end.
Take note! Notice the all-important start() tacked onto the end of the invokeScriptAsync call. This is necessary to actually run the async calling operation. Without it, you’ll be left wondering just why exactly the call didn’t happen! We’ll talk more of this in a moment with another example, including how we get a return value from the function.
Receiving an event from a webview is demonstrated in scenario 6 of the sample. An event is raised using the window.external.notify method, whose single argument is again a string. In the sample, the html/scriptnotify_example.html page contains this bit of JavaScript:
window.external.notify("The current time is " + new Date());
which is picked up in the app as follows, where the event arg’s value property contains the arguments from window.external.notify:
document.getElementById("webview").addEventListener("MSWebViewScriptNotify", scriptNotify);
function scriptNotify(e) {
var outputArea = document.getElementById("outputArea");
outputArea.value += ("ScriptNotify event received with data:\n" + e.value + "\n\n");
outputArea.scrollTop = outputArea.scrollHeight;
}
Requirement MSWebViewScriptNotify will be raised only from webviews loaded with ms-appx-web, ms-local-stream, and https content, where https also requires a content URI rule in your manifest, otherwise that event will be blocked. ms-appdata is also allowed if you have a URI resolver involved. Note that a webview loaded through navigateToString does not have this requirement.
As another demonstration of this call/event mechanism with webview, I’ve made some changes to Here My Am! in the HereMyAm4 example in this chapter’s companion content. First, I’ve replaced the iframe we’ve been using to load the map page with x-ms-webview. Then I replaced the postMessage interactions to set a location and pick up the movement of a pin with invokeScriptAsync and MSWebViewScriptNotify. The code structure is essentially the same, and it’s still useful to have some generic helper functions with all this (though we don’t need to worry about setting the right origin strings as we do with postMessage).
One piece of code we can wholly eliminate is the handler in html/map.html that converted the contents of a message event into a function call. Such code is unnecessary as invokeScriptAsync goes straight to the function; just note again that the arguments are passed as a single string so the invoked function (like our pinLocation in html/map.html) needs to account for that.
The piece of code we want to look at specifically is the new callWebviewScript helper, which replaces the previous callFrameScript function. Here’s the core code:
var op = webview.invokeScriptAsync(targetFunction, args);
op.oncomplete = function (args) {/* args.target.result contains script return value */};
op.onerror = function (e) {/* ... */};
//Don't forget this, or the script function won't be called!
op.start();
What might strike you as odd as you look at this code is that the return value of invokeScript-Async is not a promise, but rather a DOM object that has complete and error events (and can have multiple subscribers to those, of course). In addition, the operation does not actually start until you call this object’s start method. What gives? Well, remember that the webview is not part of WinRT: it’s a native HTML element supported by the app host. So it behaves like other HTML elements and APIs (like XMLHttpRequest) rather than WinRT objects. Ah sweet inconsistencies of life!
The reason why start must be called separately, then, is so you can attach completed and error handlers to the object before the operation gets started, otherwise they won’t be called.
Fortunately, it’s not too difficult to wrap such an operation within a promise. Just place the same code structure above within the initialization function passed to new WinJS.Promise, and call the complete and error dispatchers within the operation’s complete and error events (refer toAppendix A, “Demystifying Promises,” on using WinJS.Promise). Notice here that the return value from the script function is in args.target.result, so we use that value to complete the promise:
returnnew WinJS.Promise(function (completeDispatch, errorDispatch) {
var op = webview.invokeScriptAsync(targetFunction, args);
op.oncomplete = function (args) {;
//Return value from the invoked function (always a string) is in args.target.result
completeDispatch(args.target.result);
};
op.onerror = function (e) {
errorDispatch(e);
};
op.start();
});
This works because the promise initializer is attaching completed/error handlers before calling start, where those handlers invoke the appropriate dispatchers. Thus, if you call then or done on the promise after it’s already finished, it will call your completed/error handlers right away. You won’t miss out on anything!
For errors that occur outside this operation (such having an invalid targetFunction), be sure to create an error object with WinJS.ErrorFromName and return a promise in the error state by using WinJS.Promise.wrapError. You can see the complete code in HereMyAm4 (pages/home/home.js).
Capturing Webview Content
The other very useful feature of the webview that really sets it apart is the ability to capture its content, something that you simply cannot do with an iframe. There are three ways this can happen.
First is the src attribute. Once MSWebViewNavigationCompleted has fired, src will contain a URI to the content as the webview sees it. For web content, this will be an http[s] URI, which can be opened in a browser. Local content (loaded from strings or app data files) will start with ms-local-web, which can be rendered into another webview using navigateToLocalStream. Be aware that while navigation is happening prior to MSWebViewNavigationCompleted, the state of the src property is indeterminate; use the uri property in those handlers instead.
Second is the webview’s captureSelectedContentToDataPackageAsync method, which reflects whatever selection the user has made in the webview directly. The fact that a data package is part of this API suggests its primary use: the Share contract. From a user’s perspective, any web content you’re displaying in the app is really part of the app. So if they make a selection there and invoke the Share charm, they’ll expect that their selected data is what gets shared, and this method lets you obtain the HTML for that selection. Of course, you can use this anytime you want the selected content—the Share charm is just one of the potential scenarios.
As with invokeScriptAsync, the return value from captureSelectedContentToDataPackage-Async is again a DOM-ish object with a start method (don’t forget to call this!) along with complete and error events. If you want to wrap this in a promise, you can use the same structure as shown in the last section for invokeScriptAsync. In this case, the result you care about within your complete handler, within its args.target.result, is a Windows.ApplicationModel.DataTransfer.-DataPackage object, the same as what we encountered in Chapter 2 with the Share charm. Calling its getView method will produce a DataPackageView whose availableFormats object tells you what it contains. You can then use the appropriate get* methods like getHtmlFormatAsync to retrieve the selection data itself. Note that if there is no selection, args.target.result will benull, so you’ll need to guard against that. Here, then, is code from scenario 2 of the WebviewExtras example in this chapter’s companion content that copies the selection from one webview into another, showing also how to wrap the operation in a promise (js/scenario2.js):
function captureSelection() {
var source = document.getElementById("webviewSource");
//Wrap the capture method in a promise
var promise = new WinJS.Promise(function (cd, ed) {
var op = source.captureSelectedContentToDataPackageAsync();
op.oncomplete = function (args) {cd(args.target.result);};
op.onerror = function (e) {ed(e);};
op.start();
});
//Navigate the output webview to the selection, or show an error
var output = document.getElementById("webviewOutput");
promise.then(function (dataPackage) {
if (dataPackage == null) { throw"No selection"; }
var view = dataPackage.getView();
return view.getHtmlFormatAsync();
}).done(function (text) {
output.navigateToString(text);
}, function (e) {
output.navigateToString("Error: " + e.message);
});
}
The output of this example is shown in Figure 4-3. On the left is a webview-hosted page (my blog), and on the right is the captured selection. Note that the captured selection is an HTML clipboard format that includes the extra information at the top before the HTML from the webview. If you need to extract just the straight HTML, you’ll need to strip off this prefix text up to <!DOCTYPE html>.
Generally speaking, captureSelectedContentToDataPackageAsync will produce the formats AnsiText, Text, HTML Format, Rich Text Format, and msSourceUrl, but not a bitmap. For this you need to use the third method, capturePreviewToBlobAsync, which again has a start method andcomplete/error events. The results of this capture (in args.target.result within the complete handler) is a blob object for whatever content is contained within the webview’s display area.
FIGURE 4-3 Example output from the WebviewExtras example, showing that the captured selection from a webview includes information about the selection as well as the HTML itself.
You can do a variety of things with this blob. If you want to display it in an img element, you can use URL.createObjectURL on this blob directly. This means you can easily load some chunk of HTML in an offscreen webview (make sure the display style is not “none”) and then capture a blob and display the results in an img. Besides preventing interactivity, you can also animate that image much more efficiently than a full webview, applying 3D CSS transforms, for instance. Scenario 3 of my WebviewExtras example demonstrates this.
For other purposes, like the Share charm, you can call this blob’s msDetachStream method, which conveniently produces exactly what you need to provide to a data package’s setBitmap method. This is demonstrated in scenario 7 of the SDK’s HTML Webview control sample and more completely (and accurately) in scenario 4 of the Webview Extras example. For more about the Share contract in general, see Chapter 15, "Contracts."
HTTP Requests
Rendering web content directly into your layout with the webview element, as we saw in the previous section, is fabulous provided that, well, you want such content directly in your layout! In many cases you instead want to retrieve data from the web via HTTP requests. Then you can further manipulate, combine, and process it either for display in other controls or to simply drive the app’s experience. You’ll also have many situations where you need to send information to the web via HTTP requests as well, where one-way elements like the webview aren’t of much use.
Windows gives you a number of ways to exchange data with the web. In this section we’ll look at the APIs for HTTP requests, which generally require that the app is running. One exception is that Windows lets you indicate web content that it might automatically cache, such that requests you make the next time the app starts (or resumes) can be fulfilled without having to hit the web at all. This takes advantage of the fact that the app host caches web content just like a browser to reduce network traffic and improve performance. This pre-caching capability simply takes advantage of that but is subject to some conditions and is not guaranteed for every requested URI.
Another exception is what we’ll talk about in the next section, “Background Transfers.” Windows can do background uploads and downloads on your behalf, which continue to work even when the app is suspended or terminated. So, if your scenarios involve data transfers that might test the user’s patience for staring at lovely but oh-so-tiresome progress indicators, and which tempt them to switch to another app, use the background transfer API instead of doing it yourself through HTTP requests.
HTTP requests, of course, are the foundation of the RESTful web and many web APIs through which you can get to an enormous amount of interesting data, including web pages and RSS feeds, of course. And because other protocols like SOAP are essentially built on HTTP requests, we’ll be focused on the latter here. There are separate WinRT APIs for RSS and AtomPub as well, details for which you can find in Appendix C.
Right! So I said that there are a number of ways to do HTTP requests. Here they are:
• XMLHttpRequest This intrinsic JavaScript object works just fine in Windows Store apps, which is very helpful for third-party libraries. Results from this async function come through its readystatechanged event.
• WinJS.xhr This wrapper provides a promise structure around XMLHttpRequest, as we did in the last section with the webview’s async methods. WinJS.xhr provides quite a bit of flexibility in setting headers and so forth, and by returning a promise it makes it easy to chain WinJS.xhr calls with other async operations like WinRT file I/O. You can see a simple example in scenario 1 of the HTML Webview control sample we worked with earlier.
• HttpClient The most powerful, high-performance, and flexible API for HTTP requests is found in WinRT in the Windows.Web.Http namespace and is recommended for new code. Its primary advantages are that it performs better, works with the same cache as the browser, serves a wider spectrum of HTTP scenarios, and allows for cookie management, filtering, and flexible transports. You can also create multiple HttpClient instances with different configurations and use them simultaneously.
We’ll be focusing here primarily on HttpClient here. For the sake of contrast, however, let’s take a quick look at WinJS.xhr in case you encounter it in other code.
Note If you have some experience with the .NET framework, be aware that the HttpClient API in Windows.Web.Httpis different from .NET’s System.Net.Http.HttpClientAPI.
Downloadable posters Microsoft’s networking team has made some API posters for the HttpClient, Background Transfer, and Sockets APIs, which make handy at-a-glance references.
Using WinJS.xhr
Making a WinJS.xhr call is quite easy, as demonstrated in the SimpleXhr1 example for this chapter. Here we use WinJS.xhr to retrieve the RSS feed from the Windows App Builder blog, noting that the default HTTP verb is GET, so we don’t have to specify it explicitly:
WinJS.xhr({ url: "http://blogs.msdn.com/b/windowsappdev/rss.aspx" })
.done(processPosts, processError, showProgress);
That is, give WinJS.xhr a URI and it gives back a promise that delivers its results to your completed handler (in this case processPosts) and will even call a progress handler if provided. With the former, the result contains a responseXML property, which is a DomParser object. With the latter, the event object contains the current XML in its response property, which we can easily use to display a download count:
function showProgress(e) {
var bytes = Math.floor(e.response.length / 1024);
document.getElementById("status").innerText = "Downloaded " + bytes + " KB";
}
The rest of the app just chews on the response text looking for item elements and displaying the title, pubDate, and link fields. With a little styling (see default.css), and utilizing the WinJS typography style classes of win-type-x-large (for title), win-type-medium (for pubDate), andwin-type-small (for link), we get a quick app that looks like Figure 4-4. You can look at the code to see the details.35
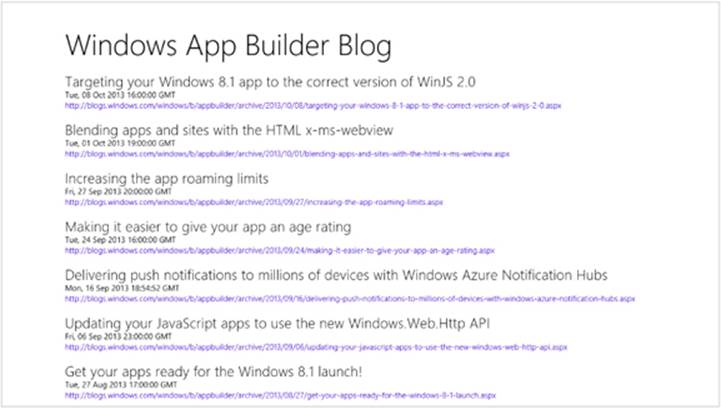
FIGURE 4-4 The output of the SimpleXhr1 and SimpleXhr2 apps.
In SimpleXhr1 too, I made sure to provide an error handler to the WinJS.xhr promise so that I could at least display a simple message.
For a fuller demonstration ofXMLHttpRequest/WinJS.xhr and related matters, refer to the XHR, handling navigation errors, and URL schemes sample and the tutorial called How to create a mashup in the docs. Additional notes on XMLHttpRequest and WinJS.xhr can be found in Appendix C.
Using Windows.Web.Http.HttpClient
Let’s now see the same app implemented with Windows.Web.Http.HttpClient, which you’ll find in SimpleXhr2 in the companion content. For our purposes, the HttpClient.getStringAsync method is sufficient:
var htc = new Windows.Web.Http.HttpClient();
htc.getStringAsync(new Windows.Foundation.Uri("http://blogs.msdn.com/b/windowsappdev/rss.aspx"))
.done(processPosts, processError, showProgress);
This function delivers the response body text to our completed handler (processPosts), so we just need to create a DOMParser object to talk to the XML document. After that we have the same thing as we received from WinJS.xhr:
var parser = new window.DOMParser();
var xml = parser.parseFromString(bodyText, "text/xml");
The HttpClient object provides a number of other methods to initiate various HTTP interactions with a web resource, as illustrated in Figure 4-5.
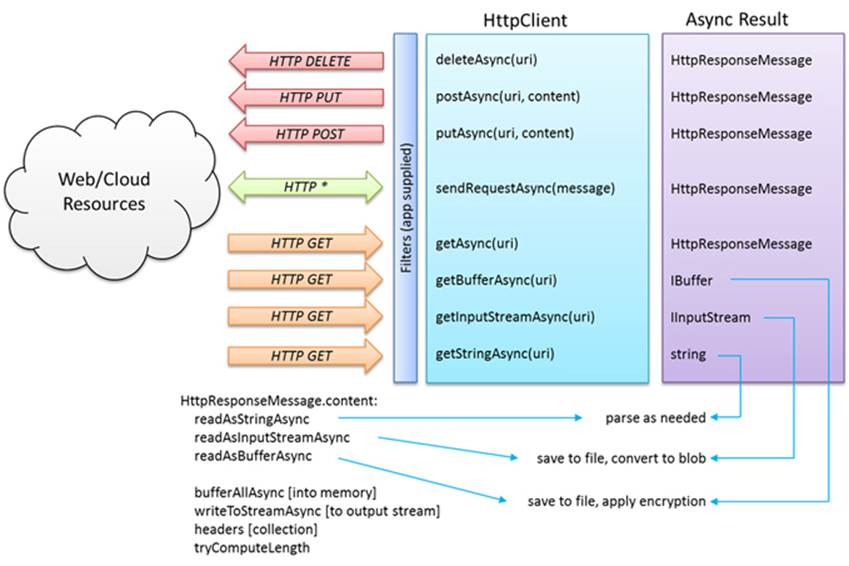
FIGURE 4-5 The methods in the HttpClientobject and their associated HTTP traffic. Note how all traffic is routed through an app-supplied filter (or a default), which allows fine-grained control on a level underneath the API.
In all cases, the URI is represented by a Windows.Foundation.Uri object, as we saw in the earlier code snippet. All of the specific get* methods fire off an HTTP GET and deliver results in a particular form: a string, a buffer, and an input stream. All of these methods (as well assendRequestAsync) support progress, and the progress handler receives an instance of Windows.Web.Http.HttpProgress that contains various properties like bytesReceived.
Working with strings are easy enough, but what are these buffer and input streams? These are specific WinRT constructs that can then be fed into other APIs such as file I/O (see Windows.Storage.Streams and Windows.Storage.StorageFile), encryption/decryption (seeWindows.Security.Cryptography), and also the HTML blob APIs. For example, an IInputStream can be given to MSApp.createStreamFromInputStream, which results in an HTML MSStream object. This can then be given to URL.createObjectURL, the result of which can be assigned directly to an img.src attribute. This is how you can easily fire off an HTTP request for an image resource and show the results in your layout without having to create an intermediate file in your appdata. For more details, see “Q&A on Files, Streams, Buffers, and Blobs” in Chapter 10.
The getAsync method creates a generic HTTP GET request. Its message argument is an HttpRequestMessage object, where you can construct whatever type of request you need, setting the requestUri, headers, transportInformation,36 and other arbitrary properties that you want to communicate to the filter and possibly the server. The completed handler for getAsync will receive an HttpResponseMessage object, as we’ll see in a moment.
Handle exceptions! It’s very important with HTTP requests that you handle exceptions, that is, provide an error handler for methods like getAsync. Unhandled exceptions arising from HTTP requests has been found to be one of the leading causes of abrupt app termination!
For other HTTP operations, you can see in Figure 4-5 that we have putAsync, postAsync, and deleteAsync, along with the wholly generic sendRequestAsync. With the latter, its message argument is again an HttpRequestMessage as used with getAsync, only here you can also set the HTTPmethod that will be used (this is an HttpMethod object that also allows for additional options). deleteAsync, for its part, works completely from the URI parameters.
In the cases of put and post, the arguments to the methods are the URI and content, which is an object that provides the relevant data through methods and properties of the IHttpContent interface (see the lower left of Figure 4-5). It’s not expected that you create such objects from scratch (though you can)—WinRT provides built-in implementations called HttpBufferContent, HttpStringContent, HttpStreamContent, HttpMultipartContent, HttpMultipartFormDataContent, and HttpFormUrlEncodedContent.
What you then get back from getAsync, sendRequestAsync, and the delete, put, and post methods is an HttpResponseMessage object. Here you’ll find all that bits you would expect:
• statusCode, reasonPhrase, and some helper methods for handling errors—namely, ensureSuccessStatusCode (to throw an exception if a certain code is not received) and isSuccessStatusCode (to check for the range of 200–299).
• Acollection of headers (of type HttpResponseHeaderCollection, which then leads to many other secondary classes).
• The original requestMessage (an HttpRequestMessage).
• The source, a value from HttpResponseMessageSource that tells you whether the data was received over the network or loaded from the cache.
• The response content, an object with the IHttpContent interface as before. Through this you can obtain the response data as a string, buffer, input stream, and an in-memory array (bufferAllAsync).
It’s clear, then, that the HttpClient object really gives you complete control over whatever kind of HTTP requests you need to make to a service, including additional capabilities like cache control and cookie management as described in the following two sections. It’s also clear thatHttpClient is still somewhat of a low-level API. For any given web service that you’ll be working with, then, I very much recommend creating a layer or library that encapsulates requests to that API and the process of converting responses into the data that the rest of the app wants to work with. This way you can also isolate the rest of the app from the details of your backend, allowing that backend to change as necessary without breaking the app. It’s also helpful if you want to incorporate additional features of the Windows.Web.Http API, such as filtering, cache control, and cookie management.
I’d love to talk about cookies first (it’s always nice to eat dessert before the main meal!) but it’s all part of filtering. Filtering is a mechanism through which you can control how the HttpClient manages its requests and responses. A filter is either an instance of the defaultHttpBaseProtocolFilterclass (in the Windows.Web.Http.Filtersnamespace) configured for your needs or an instance of a derived class. You pass this filter object to the HttpClient constructor, which will use HttpBaseProtocol-Filter as a default if none is supplied. To do things like cache control, though, you create an instance of HttpBaseProtocolFilter directly, set properties, and then create the HttpClient with it.
Tip It’s perfectly allowable and encouraged, even, to create multiple instances of HttpClient when you need different filters and configurations for different services. There is no penalty in doing so, and it can greatly simplify your programming model.
The filter is essentially a black box that takes an HTTP request and produces an HTTP response—refer to Figure 4-5 again for its place in the whole process. Within the filter you can handle details like credentials, proxies, certificates, and redirects, as well as implement retry mechanisms, caching, logging, and so forth. This keeps all those details in a central place underneath the HttpClient APIs such that you don’t have to bother with them in the code surrounding HttpClient calls.
With cache control, a filter contains a cacheControl property that can be set to an instance of the HttpCacheControl class. This object has two properties, readBehavior and writeBehavior, which determine how caching is applied to requests going through this filter. For reading,readBehavioris set to a value from the HttpCacheReadBehavior enumeration: default (works like a web browser), mostRecent (does an if-modified-since exchange with the server), and onlyFromCache (for offline use). For writing, writeBehavior can be a value from HttpCacheWriteBehavior, which supports default and noCache.
Managing cookies happens on the level of the filter as well. By default—through the HttpBaseProtocolFilter—the HttpClient automatically reads incoming set-cookie headers, saves the resulting cookies as needed, and then adds cookies to outgoing headers as appropriate. To access these cookies, create the HttpClient with an instance of HttpBaseProtocolFilter. Then you can access the filter’s cookieManager property (that sounds like a nice job!). This property is an instance of HttpCookieManager and has three methods: getCookies, setCookie, and deleteCookie. These allow you to examine specific cookies to be sent for a request or to delete specific cookies for privacy concerns.
Cookie behavior in general follows the same patterns as the browser. A cookie will persist across app sessions depending on the normal cookie rules: the cookie must be marked as persistent, is subject to the normal per-app limitations, and so on. Also note that cookies are isolated between apps for normal security reasons, even if those apps are using the same online resource.
For additional thoughts on HttpClient, refer to Updating Your JavaScript Apps to Use the New Windows Web HTTP API on the Windows App Builder blog. Demonstrations of the API, including filtering, can then be found in the HttpClient sample in the Windows SDK. Here’s a quick run-down of what its scenarios demonstrate:
• Scenarios 1–3 GET requests for text (with cache control), stream, and an XML list.
• Scenarios 4–7 POST requests for text, stream, multipart MIME form, and a stream with progress.
• Scenarios 8–10 Getting, setting, and deleting cookies.
• Scenario 11 A metered connection filter that implements cost awareness on the level of the filter.
• Scenario 12 A retry filter that automatically handles 503 errors with Reply-After headers.
To run this sample you must first set up a localhost server along with a data file and an upload target page. To do this, make sure you have Internet Information Services installed on your machine, as described below in “Sidebar: Using the Localhost.” Then, from an administrator command prompt, navigate to the sample’s Server folder and run the command powershell –file setupserver.ps1. This will install the necessary server-side files for the sample on the localhost (c:\inetpub\wwwroot).
Sidebar: Using the Localhost
The localhost is a server process that runs on your local machine, making it possible to debug both sides of client-server interactions. For this you can use a server like Apache or you can use the solution that’s built into Windows and integrated with the Visual Studio tools: Internet Information Services (IIS).
To turn on IIS in Windows, go to Control Panel > Programs and Features > Turn Windows Features On or Off. Check the Internet Information Services box at the top level, as shown below, to install the core features:
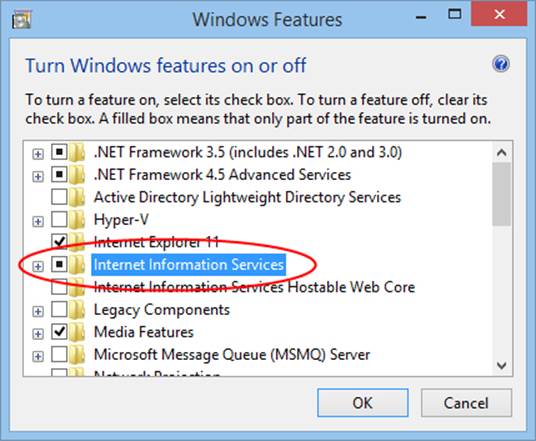
Once IIS is installed, the local site addressed by http://localhost/ is found in the folder c:\inetpub\wwwroot. That’s where you drop any server-side page you need to work with.
With that page running on the local machine, you can hook it into whatever tools you have available for server-side debugging. Here it’s good to know that access to localhost URIs—also known as local loopback—is normally blocked for Windows Store apps unless you’re on a machine with a developer license, which you are if you’re been running Visual Studio or Blend. This won’t be true for your customer’s machines, though! In fact, the Windows Store will reject apps that attempt to do so.37
To install other server-side features on IIS, like PHP or Visual Studio Express for Web (which allows you to debug web pages), use Microsoft’s Web platform installer. We’ll make use of these when we work with live tiles in Chapter 16.
Suspend and Resume with Online Content
Now that we’ve seen the methods for making HTTP requests to any URI, you really have the doors of the web wide open to you. As many web APIs provide REST interfaces, interacting with them is just a matter of putting together the proper HTTP requests as defined by the API documentation. I must leave such details up to you because processing that data within your app has little to do with the Windows platform (except for creating UI with collection controls, but that’s for a later chapter).
Instead, what concerns us here are the implications of suspend and resume. In particular, an app cannot predict how long it will stay suspended before being resumed or before being terminated and restarted.
In the first case, an app that gets resumed will have all its previous data still in memory. It very much needs to decide, then, whether that data has become stale since the app was suspended and whether sessions with other servers have exceeded their timeout periods. You can also think of it this way: after what period of time will users not remember nor care what was happening the last time they saw your app? If it’s a week or longer, it might be reasonable to resume or restart in a default state. Then again, if you pick up right back where they were, users gain increasing confidence that they can leave apps running for a long time and not lose anything. Or you can compromise and give the user options to choose from. You’ll have to think through your scenarios, of course, but if there’s any doubt, resume where the app left off.
To check elapsed time, save a timestamp on suspend (from new Date().getTime()), get another timestamp in the resuming event, take the difference, and compare that against your desired refresh period. A Stock app, for example, might have a very short period. With the Windows App Builder blog, on the other hand, new posts don’t show up more than once per day, so a much longer period on the order of hours is sufficient to keep up-to-date and to catch new posts within a reasonable timeframe.
This is implemented in SimpleXhr2 by first placing the getStringAsync call into a separate function called downloadPosts, which is called on startup. Then we register for the resuming event with WinRT:
Windows.UI.WebUI.WebUIApplication.onresuming = function () {
app.queueEvent({ type: "resuming" });
}
Remember how I said in Chapter 3, “App Anatomy and Performance Fundamentals,” we could use WinJS.Application.queueEvent to raise our own events to the app object? Here’s a great example. WinJS.Application doesn’t automatically wrap the resuming event because it has nothing to add to that process. But the code above accomplishes exactly the same thing, allowing us to register an event listener right alongside other events like checkpoint:
app.oncheckpoint = function (args) {
//Save in sessionState in case we want to use it with caching
app.sessionState.suspendTime = new Date().getTime();
};
app.addEventListener("resuming", function (args) {
//This is a typical shortcut to either get a variable value or a default
var suspendTime = app.sessionState.suspendTime || 0;
//Determine how much time has elapsed in seconds
var elapsed = ((new Date().getTime()) - suspendTime) / 1000;
//Refresh the feed if > 1 hour (or use a small number for testing)
if (elapsed > 3600) {
downloadPosts();
}
});
To test this code, run it in Visual Studio’s debugger and set breakpoints within these events. Then click the suspend button in the toolbar, and you should enter the checkpoint handler. Wait a few seconds and click the resume button (play icon), and you should be in the resuming handler. You can then step through the code and see that the elapsed variable will have the number of seconds that have passed, and if you modify that value (or change 3600 to a smaller number), you can see it call downloadPosts again to perform a refresh.
What about launching from the previously terminated state? Well, if you didn’t cache any data from before, you’ll need to refresh it again anyway. If you do cache some of it, your saved state (including the timestamp) helps you decide whether to use the cache or simply load data anew. You can also take a hybrid approach of drawing on your own cache as much as you can and then updating it with whatever new data comes from the service.
What helps in this context is that you can ask Windows to prefetch the responses for various URIs, such that when you make the request it is fulfilled from that prefetch cache. And that’s our next topic.
Prefetching Content
HTTP requests made through the XMLHttpRequest, WinJX.xhr, and HttpClient APIs all interoperate with the internet cache, such that repeated requests for the same remote resource, whether from an app or Internet Explorer, can be fulfilled from the cache. (HttpClient also gives you control over how the cache is used.) Caching works great for offline scenarios and improving performance generally.38
One of the first things that many connected apps do upon launch is to make HTTP requests for their home page content. If such a request has not been made previously, however, or if the response data has changed since the last request, the user will have to wait for that data to arrive. This clearly affects the app’s startup performance. What would really help, then, is having a way to get that content into the internet cache before the app makes the request directly.
Apps can do this by asking Windows to prefetch online content (any kind of data) into the cache, which will take place even when the app itself isn’t running. Of course, Windows won’t just fulfill such requests indiscriminately, so it applies these limits:
• Prefetching happens only when power and network conditions are met (Windows won’t prefetch on metered networks or when battery power is low).
• Prefetching is prioritized for apps that the user runs most often.
• Prefetching is prioritized for content that apps actually request later on. That is, if an app makes a prefetch request but seldom asks for it, the likelihood of the prefetch decreases.
• Windows limits the overall number of requests to 40.
• Resources are cached only for the length of time indicated in the response headers.
In other words, apps don’t have control over whether their prefetching requests are fulfilled—Windows optimizes the process so that users see increased performance for the apps they use and the content they access most frequently. Apps simply continue to make HTTP requests, and if prefetching has taken place those requests will just be fulfilled right away without hitting the network.
There are two ways to make prefetching requests. The first is to insert Windows.Foundation.Uriobjects into the Windows.Networking.BackgroundTransfer.ContentPrefetcher.contentUris collection. This collection is a vector (see Chapter 6), so you use methods like append to add the URIs and removeAt to delete them. Note that you can modify this list both from the running app and from a background task. The latter especially lets you periodically refresh the list without having the user run the app.
Here’s a quick example from scenario 1 of the ContentPrefetcher sample
(js/S1-direct-content-uris.js, with some error handling omitted):
uri = new Windows.Foundation.Uri(uriToAdd);
Windows.Networking.BackgroundTransfer.ContentPrefetcher.contentUris.append(uri);
The second means is to give the prefetcher the URI of an XML file (local or remote) that contains your list. You store this in the ContentPrefetcher.indirectContentUri property, as shown in scenario 2 of the sample (js/S2-indirect-content-uri.js).
uri = new Windows.Foundation.Uri("http://example.com/prefetchlist.xml");
Windows.Networking.BackgroundTransfer.ContentPrefetcher.indirectContentUri = uri;
This allows your service to maintain a dynamic list of URIs (like those of a news feed) such that your prefetching stays very current. The XML in this case should be structured as follows, with as many URIs as are needed (the exact schema is on the indirectContentUri page linked above):
<?xml version="1.0"encoding="utf-8"?>
<prefetchUris>
<uri>http://example.com/2013-02-28-headlines.json</uri>
<uri>http://example.com/2013-02-28-img1295.jpg</uri>
<uri>http://example.com/2013-02-28-img1296.jpg</uri>
<uri>http://example.com/2013-02-28-ad_config.xml</uri>
</prefetchUris>
Note Prefetch requests will include X-MS-RequestType: Prefetch in the headers if services need to differentiate the request from others. Existing cookies will also be included in the request, but beyond that there are no provisions for authentication.
Lastly, the ContentPrefetcher.lastSuccessfulPrefetchTime property tells you just how fresh the content really is. Scenario 3 of the sample retrieves this timestamp (js/S3-last-prefetch-time.js):
var lastPrefetchTime =
Windows.Networking.BackgroundTransfer.ContentPrefetcher.lastSuccessfulPrefetchTime;
You can use this to decide whether you still want to make a direct request, in which case you’ll need to use the HttpCacheReadBehavior.mostRecent flag with the HttpClient object’s CacheControl to make sure you have the latest data. Note that you must use HttpClientrather thanWinJS.xhr to exercise this degree of control.
Background Transfer
A common use of HTTP requests is to transfer potentially large files to and from an online repository. For even moderately sized files, however, this presents a challenge: very few users typically want to stare at their screen to watch file transfer progress, so it’s highly likely that they’ll switch to another app to do something far more interesting while the transfer is taking place. In doing so, the app that’s doing the transfer will be suspended and possibly even terminated. This does not bode well for trying to complete such operations using a mechanism like HttpClient!
One solution would be to provide a background task for this purpose, which was a common request with early previews of Windows 8. However, there’s little need to run app code for this common purpose, so WinRT provides a specific API, Windows.Networking.BackgroundTransfer(which includes the prefetcher, as we just saw at the end of the previous section). This API supports up to 500 scheduled transfers systemwide and typically runs five transfers in parallel. It offers built-in cost awareness and resiliency to changes in connectivity (switching seamlessly to the user’s preferred network), relieving apps from such concerns. Transfers continue when an app is suspended and will be paused if the app is terminated (including if the user terminates the app with a gesture or Alt+F4), except for uploads (HTTP POST) which cannot be paused. When the app is resumed or launched again, it can then check the status of background transfers it previously initiated and take further action as necessary—processing downloaded information, noting successful uploads in its UI (issuing toasts and tile updates is built into the API), and enumerating pending transfers, which will restart any that were paused or otherwise interrupted.
In short, use the background transfer API whenever you expect the operation to exceed your customer’s tolerance for waiting. This clearly depends on the network’s connection speed and whether you think the user will switch away from your app while such a transfer is taking place. For example, if you initiate a transfer operation but the user can continue to be productive (or entertained) in your app while that’s happening, using HTTP requests directly might be a possibility, though you’ll still be responsible for cost awareness and handling connectivity. If, on the other hand, the user cannot do anything more until the transfer is complete, you might choose to use background transfer for perhaps any data larger than 500K or some other amount based on the current network speed.
In any case, when you’re ready to employ background transfer in your app, the BackgroundDownloader and BackgroundUploader objects will become your fast friends. Both objects have methods and properties through which you can enumerate pending transfers as well as perform general configuration of credentials, HTTP request headers, transfer method, cost policy (for metered networks), and grouping. Each individual operation is then represented by a DownloadOperation or UploadOperation object, through which you can control the operation (pause, cancel, etc.) and retrieve status. With each operation you can also set priority, credentials, cost policy, and so forth, overriding the general settings in the BackgroundDownloader and BackgroundUploader classes. Both operation classes also have a constructor to which you can pass a StorageFile that contains a request body, in case the service you’re working with requires something like form data for the transfer.
Note In both download and upload cases, the connection request will be aborted if a new TCP/SSL connection is not established within five minutes. Once there’s a connection, any other HTTP request involved with the transfer will time out after two minutes. Background transfer will retry an operation up to three times if there’s connectivity and will defer retries if there’s no connectivity.
One of the primary reasons why we have the background transfer API is to allow Windows to automatically manage transfers according to systemwide considerations. Changes in network cost, for example, can cause some transfers to be paused until the device returns to an unlimited network. To save battery power, long-running transfers can be slowed (throttled) or paused altogether, as when the system goes into standby. In the latter case, apps can keep the process going by requesting an unconstrained transfer. This way a user can let a very large download run all day, if desired, rather than coming back some hours later only to find that the transfer was paused. (Note that a user consent prompt appears if the device is on battery power.)
To see the background transfer API in action, let’s start by looking at the Background transfer sample. Note that this sample depends on having the localhost set up on your machine as we did with the HttpClient sample earlier. Refer back to “Sidebar: Using the localhost” for instructions, and be sure to run powershell –file setupserver.ps1 in the sample’s Server folder to set up the necessary files.
Basic Downloads
Scenario 1 (js/downloadFile.js) of the Background transfer sample lets you download any file from the localhost server and save it to the Pictures library. By default the URI entry field is set to a specific localhost URI and the control is disabled. This is because the sample doesn’t perform any validation on the URI, a process that you should always perform in your own app. If you’d like to enter other URIs in the sample, of course, just remove disabled="disabled" from the serverAddressField element in html/downloadFile.html.
By default, scenario 1 here makes a request to http://localhost/BackgroundTransferSample/download.aspx, which serves up a stream of 5 million ‘a’ characters. The sample saves this content in a text file, so you won’t see any image showing up on the display, but you will see progress. Change the URI to an image file39 and you’ll see that image appear on the display. (You can also copy an image file to c:\inetpub\wwwroot and point to it there.) Note that you can kick off multiple transfers to observe how they are all managed simultaneously; the cancel, pause, and resume buttons help with this.
Three flavors of download are supported in the WinRT API and reflected in the sample:
• A normal download at normal priority. Such a transfer continues to run when the app is suspended, but if it’s a long transfer it could be slowed (throttled) or paused depending on system conditions like battery life and network type. The system supports up to five parallel transfers at normal priority.
• A normal download at high priority. Typically an app will set its most important download at a higher priority than others it starts at the same time. A high-priority transfer will start even if there are already five normal-priority downloads running. If you schedule multiple high-priority transfers, up to six of them will run in parallel (one plus replacing all of the five normal-priority downloads) until the high-priority queue is cleared, then normal-priority transfers are resumed.
• An unconstrained download at either priority. As noted before, an unconstrained download will continue to run (subject to user consent) even in modes like connected standby. You use this feature in scenarios where you know the user would want a transfer to continue possibly for along period of time and not have it interrupted or paused.
Starting a download happens as follows. First create a StorageFile to receive the data (though this is not required, as we’ll see later in this section). Then create a DownloadOperation object for the transfer using BackgroundDownloader.createDownload, to which you pass the URI of the data, the StorageFile in which to store it, and an optional StorageFile containing a request body to send to the server when starting the transfer (more on this later). In the operation object you can then set its priority, method, costPolicy, and transferGroup properties to override the defaults supplied by the BackgroundDownloader. The priority is a BackgroundTransferPriority value (default or high), and method is a string that identifies the type transfer being used (normally GET for HTTP or RETR for FTP). We’ll come back to the other two properties later in the “Setting Cost Policy” and “Grouping Transfers” sections.
Once the operation is configured as needed, the last step is to call its startAsync method, which returns a promise to which you attach your completed, error, and progress handlers via then or done. Here’s code from js/downloadFile.js:40
// Asynchronously create the file in the pictures folder (capability declaration required).
Windows.Storage.KnownFolders.picturesLibrary.createFileAsync(fileName,
Windows.Storage.CreationCollisionOption.generateUniqueName)
.done(function (newFile) {
// Assume uriString is the text URI of the file to download
var uri = Windows.Foundation.Uri(uriString);
var downloader = new Windows.Networking.BackgroundTransfer.BackgroundDownloader();
// Create a new download operation.
var download = downloader.createDownload(uri, newFile);
// Start the download
varpromise = download.startAsync().done(complete, error, progress);
}
While the operation underway, the following properties provide additional information on the transfer:
• requestedUri and resultFile The same as those passed to createDownload.
• guid A unique identifier assigned to the operation.
• progress A BackgroundDownloadProgress structure with bytesReceived, totalBytesToReceive, hasResponseChanged (a Boolean, see the getResponseInformation method below), hasRestarted (a Boolean set to true if the download had to be restarted), and status (aBackgroundTransferStatus value: idle, running, pausedByApplication, pausedCostedNetwork, pausedNoNetwork, canceled, error, and completed).
A few methods of DownloadOperation can also be used with the transfer:
• pause and resume Control the download in progress. We’ll talk more of these in the “Suspend, Resume, and Restart with Background Transfers” section below.
• getResponseInformation Returns a ResponseInformation object with properties named headers (a collection of response headers from the server), actualUri, isResumable, and statusCode (from the server). Repeated calls to this method will return the same information until thehasResponseChanged property is set to true.
• getResultStreamAt Returns an IInputStream for the content downloaded so far or the whole of the data once the operation is complete.
In scenario 1 of the sample, the progress function—which is given to the promise returned by startAsync—uses getResponseInformation and getResultStreamAt to show a partially downloaded image:
var currentProgress = download.progress;
// ...
// Get Content-Type response header.
var contentType = download.getResponseInformation().headers.lookup("Content-Type");
// Check the stream is an image.
if (contentType.indexOf("image/") === 0) {
// Get the stream starting from byte 0.
imageStream = download.getResultStreamAt(0);
// Convert the stream to a WinRT type
var msStream = MSApp.createStreamFromInputStream(contentType, imageStream);
var imageUrl = URL.createObjectURL(msStream);
// Pass the stream URL to the HTML image tag.
id("imageHolder").src = imageUrl;
// Close the stream once the image is displayed.
id("imageHolder").onload = function () {
if (imageStream) {
imageStream.close();
imageStream = null;
}
};
}
All of this works because the background transfer API is saving the downloaded data into a temporary file and providing a stream on top of that, hence a function like URL.createObjectURL does the same job as if we provided it with a StorageFile object directly. Once theDownloadOperation object goes out of scope and is garbage collected, however, that temporary file will be deleted.
The existence of this temporary file is also why, as I noted earlier, it’s not actually necessary to provide a StorageFile object in which to place the downloaded data. That is, you can pass null as the second argument to createDownload and work with the data through DownloadOperation.-getResultStreamAt. This is entirely appropriate if the ultimate destination of the data in your app isn’t a separate file.
As mentioned earlier, there is a variation of createDownload that takes a second StorageFile argument whose contents provide the body of the HTTP GET or FTP RETR request that will be sent to the server URI before the download is started. This accommodates some websites that require you to fill out a form to start the download. Similarly, createDownloadAsync supplies the request body through an IInputStream instead of a file, if that’s better suited to your needs.
Sidebar: Where Is Cancel?
You might have already noticed that neither DownloadOperation nor UploadOperation have cancellation methods. So how is this accomplished? You cancel the transfer by canceling the startAsync operation, which means calling the cancel method of the promise returned by startAsync. Thus, you need to hold on to the promises for each transfer you initiate if you want to possibly cancel them later on.
Requesting an Unconstrained Download
To request an unconstrained download, you use pretty much the same code as in the previous section except for one additional step. With the DownloadOperation from BackgroundDownloader.create-Download, don’t call startAsync right away. Instead, place that operation object (and others, if desired) into an array, then pass that array to BackgroundDownloader.requestUnconstrained-DownloadsAsync. This async function will complete with an UnconstrainedTransferRequestResult object, whose single isContrained member will tell you whether the request was granted. Here’s the code from the sample for that case (js/downloadFile.js):
Windows.Networking.BackgroundTransfer.BackgroundDownloader
.requestUnconstrainedDownloadsAsync(requestOperations)
.done(function (result) {
printLog("Request for unconstrained downloads has been " +
(result.isUnconstrained ? "granted" : "denied") + "<br/>");
promise = download.startAsync().then(complete, error, progress);
}, error);
As you can see, you still call startAsync after making the request, which the sample here does regardless of the request result. In your own app, however, you can make other decisions, such as setting a higher priority for the download even if the request was denied.
Basic Uploads
Scenario 2 (js/uploadFile.js) of the Background transfer sample exercises the background upload capability, specifically sending some file (chosen through the file picker) to a URI that can receive it. By default the URI points to http://localhost/BackgroundTransferSample/upload.aspx, a page installed with the PowerShell script that sets up the server. As with scenario 1, the URI entry control is disabled because the sample performs no validation, as you would again always want to do if you accepted any URI from an untrusted source (user input in this case). For testing purposes, of course, you can remove disabled="disabled" from the serverAddressField element in html/uploadFile.html and enter other URIs that will exercise your own upload services. This is especially handy if you run the server part of the sample in Visual Studio Express for Web where the URI will need a localhost port number as assigned by the debugger.
In addition to a button to start an upload and to cancel it, the sample provides another button to start a multipart upload. For more on breaking up large files and multipart uploads, see Appendix C.
In code, an upload happens very much like a download. Assuming you have a StorageFile with the contents to upload, create an UploadOperation object for the transfer with BackgroundUploader.createUpload. If, on the other hand, you have data in a stream (IInputStream), create the operation object with BackgroundUploader.createUploadFrom-StreamAsync instead. This can also be used to break up a large file into discrete chunks, if the server can accommodate it; see “Breaking Up Large Files” in Appendix C.
With the operation object in hand, you can customize a few properties of the transfer, overriding the defaults provided by the BackgroundUploader. These are the same as for downloads: priority, method (HTTP POST or PUT, or FTP STOR), costPolicy, and transferGroup. For the latter two, again see “Setting Cost Policy” and “Grouping Transfers” below.
Once you’re ready, the operation’s startAsync starts the upload:41
// Assume uri is a Windows.Foundation.Uri object and file is the StorageFile to upload
var uploader = new Windows.Networking.BackgroundTransfer.BackgroundUploader();
var upload = uploader.createUpload(uri, file);
promise = upload.startAsync().then(complete, error, progress);
While the operation is underway, the following properties provide additional information on the transfer:
• requestedUri and sourceFile The same as those passed to createUpload (an operation created with createUploadFromStreamAsync supports only requestedUri).
• guid A unique identifier assigned to the operation.
• progress A BackgroundUploadProgress structure with bytesReceived, totalBytesToReceive, bytesSent, totalBytesToSend, hasResponseChanged (a Boolean, see the getResponseInformation method below), hasRestarted (a Boolean set to true if the upload had to be restarted), andstatus (a BackgroundTransferStatus value, again with values of idle, running, pausedByApplication, pausedCostedNetwork, pausedNoNetwork, canceled, error, and completed).
Unlike a download, an UploadOperation does not have pause or resume methods but does have the same getResponseInformation and getResultStreamAt methods. In the upload case, the response from the server is less interesting because it doesn’t contain the transferred data, just headers, status, and whatever body contents the upload page cares to return. If that page returns some interesting HTML, though, you might use the results as part of your app’s output for the upload.
As noted before, to cancel an UploadOperation, call the cancel method of the promise returned from startAsync. You can also see that the BackgroundUploader also has a requestUncon-strained-UploadsAsync method like that of the downloader, to which you can pass an array of Upload-Operation objects for the request. Again, the result of the request tells you whether or not the request was granted, allowing you to decide what you might want to change before calling each operation’s startAsync.
Completion and Error Notifications
With long transfer operations, users typically want to know when those transfers are complete or if an error occurred along the way. However, those transfers might finish or fail while the app is suspended, so the app itself cannot directly issue such notifications. For this purpose, the app can instead supply toast notifications and tile updates to the BackgroundDownloader and BackgroundUploader classes. Notice that you’re not setting notifications on individual operation objects, which means that the content of these notifications should describe all active transfers as a whole. If you have only a single transfer, then of course your language can reflect that, but otherwise you’ll want to be more generic with messages like “Your new photo gallery of 108 images has finished uploading.”
The downloader and uploader objects each have four different notification objects you can set:
• successToastNotification and failureToastNotification Instances of the Windows.UI.Notifications.ToastNotification class.
• successTileNotification and failureTileNotification Instances of the Windows.UI.Notification.TileNotification class.
For details on using these classes, including all the different templates you can use, refer to Chapter 16. Basically you create these instances as if you intend to issue notifications directly from the app, but hand them off to the downloader and uploader objects so that they can do it on your behalf.
Providing Headers and Credentials
Within the BackgroundDownloader and BackgroundUploader you have the ability to set values for individual HTTP headers by using their setRequestHeader methods. Both take a header name and a value, and you call them multiple times if you have more than one header to set.
Similarly, both the downloader and uploader objects have two properties for credentials: serverCredential and proxyCredential, depending on the needs of your server URI. Both properties are Windows.Security.Credentials.PasswordCredential objects. As the purpose in a background transfer operation is to provide credentials to the server, you’d typically create a PasswordCredential as follows:
var cred = new Windows.Security.Credentials.PasswordCredential(resource, userName, password);
where the resource in this case is just a string that identifies the resource to which the credentials applies. This is used to manage credentials in the credential locker, as we’ll see in the “Authentication, the Microsoft Account, and the User Profile” section later. For now, just creating a credential in this way is all you need to authenticate with your server when doing a transfer.
Note At present, setting the serverCredentialproperty doesn’t work with URIs that specify an FTP server. To work around this, include the credentials directly in the URI with the form ftp://<user>: <password>@server.com/file.ext (for example, ftp://admin:password1@server.com/file.bin).
Setting Cost Policy
As mentioned earlier in the “Cost Awareness” section, the Windows Store policy requires that apps are careful about performing large data transfers on metered networks. The Background Transfer API takes this into account, based on values from the BackgroundTransferCostPolicyenumeration:
• default Allow transfers on costed networks.
• unrestricted Only Do not allow transfers on costed networks.
• always Always download regardless of network cost.
To apply a policy to subsequent transfers, set the value of BackgroundDownloader.costPolicy and/or BackgroundUploader.costPolicy. The policy for individual operations can be set through the DownloadOperation.costPolicy and UploadOperation.costPolicy properties.
Basically, you would change the policy if you’ve prompted the user accordingly or allow them to set behavior through your settings. For example, if you have a setting to disallow downloads or uploads on a metered network, you’d set the general costPolicy to unrestrictedOnly. If you know you’re on a network where roaming charges would apply and the user has consented to a transfer, you’d want to change the costPolicy of that individual operation to always. Otherwise the API would not perform the transfer because doing so on a roaming network is disallowed by default.
When a transfer is blocked by policy, the operation’s progress.status property will contain BackgroundTransferStatus.pausedCostedNetwork.
Grouping Transfers
Grouping multiple transfers together lets you enumerate and control related transfers. For example, a photo app that organizes pictures into albums or album pages can present a UI through which the user can pause, resume, or cancel the transfer of an entire album, rather than working on the level of individual files. The grouping features of the background transfer API makes the implementation of this kind of experience much easier, as the app doesn’t need to maintain its own grouping structures.
Note Grouping has no bearing on the individual transfers themselves, nor is grouping information communicated to servers. Grouping is simply a client-side management mechanism.
Grouping is set through the transferGroup property that’s found in the BackgroundDownloader, BackgroundUploader, DownloadOperation, and UploadOperation objects. This property is a BackgroundTransferGroup object created through the static BackgroundTransferGroup.-createGroupmethod using whatever name you want to use for that group. Note that the transferGroup property can be set only through BackgroundDownloader and BackgroundUploader; you would assign this prior to creating a series of individual operations in that group. Each individual operation object will then have that same transferGroup as a read-only property.
In addition to its assigned name, a transferGroup object has a transferBehavior property, which is a value from the BackgroundTransferBehavior enumeration. This allows you to control whether the operations in the group happen serially or in parallel. A video player for a TV series, for example, could place all the episodes in the same group and then set the behavior to BackgroundTransfer-Behavior.serialized. This ensures that the group’s operations are done one at a time, reflecting how the user is likely to consume that content. A photo gallery app that download a composite page of large images, on the other hand, might use BackgroundTransferBehavior.-parallel (the default). As for pausing, resuming, and cancelling groups, that’s best discussed in the context of app lifecycle events, which is the subject of the next section.
Suspend, Resume, and Restart with Background Transfers
Earlier I mentioned that background transfers will continue while an app is suspended, and paused if the app is terminated by the system. Because apps will be terminated only in low-memory conditions, it’s appropriate to also pause background transfers in that case.
When an app is resumed from the suspended state, it can check on the status of pending transfers by using the BackgroundDownloader.getCurrentDownloadsAsync and BackgroundUploader.-getCurrentUploadsAsync methods. To limit that list to a specific transferGroup, use thegetCurrentDownloadsForTransferGroupAsync and getCurrentUploadsForTransferGroupAsyncmethods instead.42
The list that comes back from these methods is a vector of DownloadOperation and UploadOperation objects, which can be iterated like an array:
Windows.Networking.BackgroundTransfer.BackgroundDownloader.getCurrentDownloadsAsync()
.done(function (downloads) {
for (var i = 0; i < downloads.size; i++) {
var download = downloads[i];
}
});
Windows.Networking.BackgroundTransfer.BackgroundUploader.getCurrentUploadsAsync()
.done(function (uploads) {
for (var i = 0; i < uploads.size; i++) {
var upload = uploads[i];
}
});
In each case, the progress property of each operation will tell you how far the transfer has come along. The progress.status property is especially important. Again, status is a BackgroundTransferStatus value and will be one of idle, running, pausedByApplication, pausedCostedNetwork,pausedNoNetwork, canceled, error, and completed). These are clearly necessary to inform users, as appropriate, and to give them the ability to restart transfers that are paused or experienced an error, to pause running transfers, and to act on completed transfers.
Speaking of which, when using the background transfer API, an app should always give the user control over pending transfers. Downloads can be paused through the DownloadOperation.pause method and resumed through DownloadOperation.resume. (There are no equivalents for uploads.) Download and upload operations are canceled by canceling the promises returned from startAsync. Again, if you requested a list of transfers for a particular group, iterate over the results to affect the operations in that group.
This brings up an interesting situation: if your app has been terminated and later restarted, how do you restart transfers that were paused? The answer is quite simple. By enumerating transfers through getCurrentDownloads[ForTransferGroup]Async andgetCurrentUploads[ForTransferGroup]-Async, incomplete transfers are automatically restarted. But then how do you retrieve the promises originally returned by the startAsync methods? Those are not values that you can save in your app state and reload on startup, and yet you need them to be able to cancel those operations, if necessary, and also to attach your completed, error, and progress handlers.
For this reason, both DownloadOperation and UploadOperation objects provide a method called attachAsync, which returns a promise for the operation just like startAsync did originally. You can then call the promise’s then or done methods to provide your handlers:
promise = download.attachAsync().then(complete, error, progress);
and call promise.cancel if needed. In short, when Windows restarts a background transfer and essentially calls startAsync on your app’s behalf, it holds that promise internally. The attachAsync methods simply return that new promise.
Authentication, the Microsoft Account, and the User Profile
If you think about it, just about every online resource in the world has some kind of credentials or authentication associated with it. Sure, we can read many of those resources without credentials, but having permission to upload data to a website is more tightly controlled, as is access to one’s account or profile in a database managed by a website. In many scenarios, then, apps need authenticate with services in some way, using service-specific credentials or perhaps using accounts from other providers like Facebook, Twitter, Microsoft, and so on.
There are two approaches for dealing with credentials. First, you can collect credentials directly through your own UI, which means the app is fully responsible for protecting those credentials. For this there are a number of design guidelines for different login scenarios, such as when an app requires a login to be useful and when a login is simply optional. These topics, as well as where to place login and account/profile management UI, are discussed in Guidelines for login controls.
For storage purposes, the Credential Locker API in WinRT will help you out here—you can securely save credentials when you collect them and retrieve them in later sessions so that you don’t have to pester the user again. Transmitting those credentials to a server, on the other hand, will require encryption work on your part, and there are many subtleties that can get complicated. For a few notes on encryption APIs in WinRT, as well as a few other security matters, see Appendix C.
The simpler and more secure approach—one that we highly recommend—is to use the Web Authentication Broker API. This lets the user authenticate directly with a server in the broker’s UI, keeping credentials entirely on the server, after which the app receives back a token to use with later calls to the service. The Web Authentication Broker works with any service that’s been set up as a provider. This can be your own service, as we’ll see, or an OAuth/OpenID provider.
Tip When thinking about providers that you might use for authentication, remember that non-domain-joined users sign into Windows with a Microsoft account to begin with. If you can leverage that Microsoft account with your own services, signing into Windows means they won’t have to enter any additional credentials or create a separate account for your service, providing a delightfully transparent experience. The Microsoft account also provides access to other features, as we’ll see in “Using the Microsoft Account” later on.
One of the significant benefits of the Web Authentication Broker is that authentication for any given service transfers across apps as well as websites, providing a very powerful single sign-on experience for users. That is, once a user signs in to a service—either in the browser or in an app that uses the broker—they’re already signed into other apps and sites that use that same service (again, signing into Windows with a Microsoft account also applies here). To make the story even better, those credentials also roam across the user’s trusted devices (unless they opt out) so that they won’t even have to authenticate again when they switch machines. Personally I’ve found this marvelously satisfying—when setting up a brand new device, for example, all those credentials are immediately in effect!
Sidebar: User Verification via Fingerprints
If your scenario calls for verification that the user that is logged in to the current Microsoft account is physically present (as opposed to someone who just happens to know a password), check out the API in Windows.Security.Credentials.UI.UserConsentVerifier. This object has just two methods, checkAvailabilityAsync and requestVerificationAsync, and yet provides one of the strongest methods to authenticate a specific human being. For more details, see “Fingerprint (Biometric) Readers” in Chapter 17, “Devices and Printing.”
The Credential Locker
One of the reasons that apps might repeatedly ask a user for credentials is simply because they don’t have a truly secure place to store and retrieve those credentials that’s also isolated from all other apps. This is entirely the purpose of the credential locker, a function that’s also immediately clear from the name of this particular API: Windows.Security.Credentials.PasswordVault. It’s designed to store credentials, of course, but you can use it to store other things like tokens as well.
With the locker, any given credential itself is represented by a PasswordCredential object, as we saw briefly with the background transfer API. You can create an initialized credential as follows:
var cred = new Windows.Security.Credentials.PasswordCredential(resource, userName, password);
Another option is to create an uninitialized credential and set its properties individually:
var cred = new Windows.Security.Credentials.PasswordCredential();
cred.resource = "userLogin"
cred.userName = "username";
cred.password = "password";
A credential object also contains an IPropertySet value named properties, through which the same information can be managed.
In any case, when you collect credentials from a user and want to save them, create a PasswordCredential and pass it to PasswordVault.add:
var vault = new Windows.Security.Credentials.PasswordVault();
vault.add(cred);
Note that if you add a credential to the locker with a resource and userName that already exist, the new credential will replace the old. And if at any point you want to delete a credential from the locker, call the PasswordVault.remove method with that credential.
Furthermore, even though a PasswordCredential object sees the world in terms of usernames and passwords, that password can be anything you need to store securely, such as an access token. As we’ll see in the next section, authentication through OAuth providers might return such a token, in which case you store something like “Facebook_Token” in the credential’s resource property, your app name in userName, and the token in password. This is a perfectly legitimate and expected use.
Once a credential is in the locker, it will remain there for subsequent launches of the app until you call the remove method or the user explicitly deletes it through Control Panel>User Accounts and Family Safety>Credential Manager. On a trusted PC (which requires sign-in with a Microsoft account), Windows will also automatically and securely roam the contents of the locker to the user’s other devices (unless turned off in PC Settings > OneDrive > Sync Settings > Other Settings > Passwords). This help to create a seamless experience with your app as the user moves between devices.43
So, when you launch an app—even when launching it for the first time—always check if the locker contains saved credentials. There are several methods in the PasswordVault class for doing this:
• findAllByResource Returns an array (vector) of credential objects for a given resource identifier. This is how you can obtain the username and password that’s been roamed from another device, because the app would have stored those credentials in the locker on the other machine under the same resource.
• findAllByUserName Returns an array (vector) of credential objects for a given username. This is useful if you know the username and want to retrieve all the credentials for multiple resources that the app connects to.
• retrieve Returns a single credential given a resource identifier and a username. Again, there will only ever be a single credential in the locker for any given resource and username.
• retrieveAll Returns a vector of all credentials in the locker for this app. The vector contains a snapshot of the locker and will not be updated with later changes to credentials in the locker.
There is one subtle difference between the findAll and retrieve methods in the list above. The retrieve method will provide you with fully populated credentials objects. The findAll methods, on the other hand, will give you objects in which the password properties are still empty. This avoids performing password decryption on what is potentially a large number of credentials. To populate that property for any individual credential, call the PasswordCredential.retievePassword method.
For further demonstrations of the credential locker—the code is very straightforward—refer to the Credential locker sample. This shows variations for single user/single resource (scenario 1), single user/multiple resources (scenario 2), multiple users/multiple resources (scenario 3), and clearing out the locker entirely (scenario 4).
The Web Authentication Broker
As described earlier, keeping the whole authentication process on a server is the most secure and trusted way to authenticate with a service, whether you’re using a service-specific account or leveraging one from any number of other OAuth providers (OAuth, in other words, is not a requirement). The Web Authentication Broker provides a means of doing this authentication within the context of an app while yet keeping the authentication process completely isolated from the app.
It works like this. An app provides the URI of the authenticating page of the external site (which must use the https:// URI scheme; otherwise you get an invalid parameter error). The broker then creates a new web host process in its own app container, into which it loads the indicated web page. The UI for that process is displayed as an overlay dialog on the app, as shown in Figure 4-6, for which I’m using scenario 1 of the Web authentication broker sample.
Provider guidance To create authentication pages for your own service to work with the web authentication broker, see Web authentication broker for online providers on the dev center.
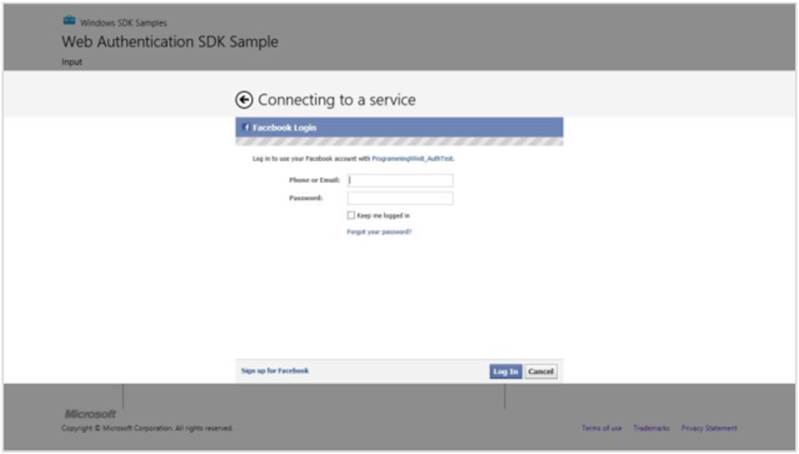
FIGURE 4-6 The Web authentication broker sample using a Facebook login page.
Note To run the sample you’ll need an app ID for each of the authentication providers in the various scenarios. For Facebook in scenario 1, visit http://developers.facebook.com/setup and create an App ID/API Key for a test app.
In the case of Facebook, the authentication process involves more than just checking the user’s credentials. It also needs to obtain permission for other capabilities that the app wants to use (which the user might have independently revoked directly through Facebook). As a result, the authentication process might navigate to additional pages, each of which still appears within the web authentication broker, as shown in Figure 4-7. In this case the app identity, ProgrammingWin8_AuthTest, is just one that I created through the Facebook developer setup page for the purposes of this demonstration.
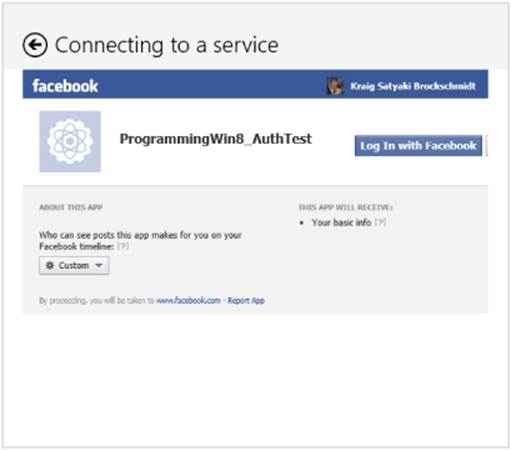
FIGURE 4-7 Additional authentication steps for Facebook within the web authentication broker.
Within the broker UI—the branding of which is under the control of the provider—the user might be taken through multiple pages on the provider’s site (but note that the back button next to the “Connecting to a service” title dismisses the dialog entirely). But this begs a question: how does the broker know when authentication is actually complete? In the second page of Figure 4-7, clicking the Allow button is the last step in the process, after which Facebook would normally show a login success page. In the context of an app, however, we don’t need that page to appear—we want the broker’s UI taken down so that we return to the app with the results of the authentication. What’s more, many providers don’t even have such a page—so what do we do?
Fortunately, the broker takes this into account: the app simply provides the URI of that final page of the provider’s process. When the broker detects that it’s navigated to that page, it removes its UI and gives the response to the app, where that response contains the appropriate token with which the app can access the service API.
As part of this process, Facebook saves these various permissions in its own back end for each particular user and token, so even if the app started the authentication process again, the user would not see the same pages shown in Figure 4-7. The user can, of course, manage these permissions when visiting Facebook through a web browser. If the user deletes the app information there, these additional authentication steps would reappear (a good way to test the process, in fact).
The overall authentication flow, showing how the broker serves as an intermediary between the app and a service, is illustrated in Figure 4-8. The broker itself creates a separate app container in which to load the service’s pages to ensure complete isolation from the app. But then note how the broker is only an intermediary for authentication: once the service provides a token, which the broker returns to the app, the app can talk directly with the service. Oftentimes a service will also provide for renewing the token as needed.
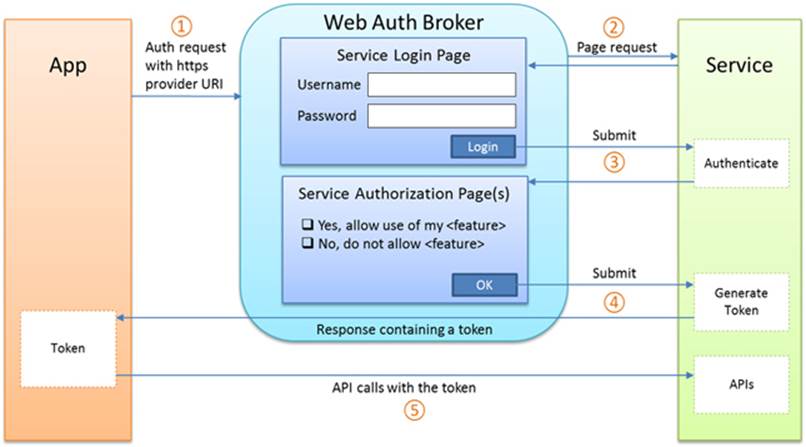
FIGURE 4-8 The authentication flow with the web authentication broker.
In WinRT, the broker is represented by the Windows.Security.Authentication.Web.-WebAuthenticationBroker class. Authentication happens through its authenticateAsync methods. I say “methods” here because there are two variations. We’ll look at one here and return to the second in the next section, “Single Sign-On.”
This first variant of authenticateAsync method takes three arguments:
• options Any combination of values from the WebAuthenticationOptions enumeration (combined with bitwise OR). Values are none (the default), silentMode (no UI is shown), useTitle (returns the window title of the webpage in the results), useHttpPost (sends the authentication token through HTTP POST rather than on the URI, to accommodate long tokens that would make the URI exceed 2K), and useCorporateNetwork (to render the web page in an app container with the Private Networks (Client & Server), Enterprise Authentication, and Shared User Certificatescapabilities; the app must have also declared these).
• requestUri The URI (Windows.Foundation.Uri) for the provider’s authentication page along with the parameters required by the service; again, this must use the https:// URI scheme.
• callbackUri The URI (Windows.Foundation.Uri) of the provider’s final page in its authentication process. The broker uses this to determine when to take down its UI.44
The results given to the completed handler for authenticateAsync is a WebAuthentication-Result object. This contains properties named responseStatus (a WebAuthenticationStatus with either success, userCancel, or errorHttp), responseData (a string that will contain the page title and body if the useTitle and useHttpPost options are set, respectively), and responseErrorDetail (an HTTP response number).
Tip Web authentication events are visible in the Event Viewer under Application and Services Logs > Microsoft > Windows > WebAuth > Operational. This can be helpful for debugging because it brings out information that is otherwise hidden behind the opaque layer of the broker. The Fiddler tool is also very helpful for debugging. For more details, see Troubleshooting web authentication broker.
Generally speaking, the app is most interested in the contents of responseData, because it will contain whatever tokens or other keys that might be necessary later on. Let’s look at this again in the context of scenario 1 of the Web authentication broker sample. Set a breakpoint within the completed handler for authenticateAsync (line 59 or thereabouts), and then run the sample, enter an app ID you created earlier, and click Launch. (Note that the callbackUri parameter is set to https://www.facebook.com/connect/login_success.html, which is where the authentication process finishes up.)
In the case of Facebook, the responseData contains a string in this format:
https://www.facebook.com/connect/login_success.html#access_token=<token>&expires_in=<timeout>
where <token> is a bunch of alphanumeric gobbledygook and <timeout> is some period defined by Facebook. If you’re calling any Facebook APIs—which is likely because that’s why you’re authenticating through Facebook in the first place—the <token> is the real treasure you’re after because it’s how you authenticate the user when making later calls to that API. (This is true of web APIs in general too.)
This token is what you then save in the credential locker for later use when the app is relaunched after being closed or terminated. With Facebook, you don’t need to worry about the expiration of that token because the API generally reports that as an error and has a built-in renewal process. You’d do something similar with other services, referring, of course, to their particular documentation on what information you’ll receive with the response and how to use and/or renew keys or tokens. The Web authentication broker sample, for its part, shows how to also work with Twitter (scenario 2), Flickr (scenario 3), and Google/Picasa (scenario 4), and it also provides a generic interface for any other service (scenario 5). The sample also shows the recommended UI for managing accounts (scenario 6) and how to use an OAuth filter with the HttpClient API to separate authentication concerns from the rest of your app logic.
It’s instructive to look through these various scenarios. Because Facebook and Google use the OAuth 2.0 protocol, the requestUri for each is relatively simple (ignore the word wrapping):
https://www.facebook.com/dialog/oauth?client_id=<client_id>&redirect_uri=<redirectUri>&
scope-read_stream&display=popup&response_type=token
https://accounts.google.com/o/oauth2/auth?client_id=<client_id>&redirect_uri=<redirectUri>&
response_type=code&scope=http://picasaweb.google.com/data
where <client_id> and <redirectUri> are replaced with whatever is specific to the app. Twitter and Flickr, for their parts, use OAuth 1.0a protocol instead, so much more ceremony goes into creating the lengthy OAuth token to include with the requestUri argument to authenticateAsync. I’ll leave it to the sample code to show those details.
Single Sign-On
What we’ve seen so far with the credential locker and the web authentication broker works very well to minimize how often the app needs to pester the user for credentials. Where a single app is concerned, it would ideally only ask for credentials once until such time as the user explicitly logs out. But what about multiple apps? Imagine over time that you acquire some dozens, or even hundreds, of apps from the Windows Store that use services that all require authentication. Even if those services exclusively use well-known OAuth providers, it’d still mean that you’d have to enter your Facebook, Twitter, Google, LinkedIn, Tumblr, Yahoo, or Yammer credentials in each and every app. At that point, the fact that you only need to authenticate each app once gets lost in the overall tedium!
From the user’s point of view, once they’ve authenticated through a given provider in one app, it makes sense that other apps should benefit from that authentication if possible. Yes, some apps might need to prompt for additional permissions and some providers may not support the process, but the ideal is again to minimize the fuss and bother where we can.
The concept of single sign-on is exactly this: authenticating the user in one app (or the system in the case of a Microsoft account) effectively logs the user in to other apps that use the same provider. To make this work, the web authentication broker keep persisted logon cookies for each service in a special app container that’s completely isolated from apps but yet allows those cookies to be shared between apps (like cookies are shared between websites in a browser). At the same time, each app must often acquire its own access keys or tokens, because these should not be shared between apps. So the real trick is to effectively perform the same kind of authentication we’ve already seen, only to do it without showing any UI unless it’s really necessary. (An example of this experience can be seen on the Windows App Builder’s blog post on Facebook login.)
This is the purpose of the variation of authenticateAsync that takes only the options and requestUri arguments (and not an explicit callbackUri). In this case options is often set to WebAuthenticationOptions.silentMode to prevent the broker’s UI from appearing (this isn’t required). But then how does the broker know when authentication is complete? That is, what callbackUri does it use for comparison, and how does the provider know that itself? It sounds like a situation where the broker would just sit there, forever hidden, while the provider patiently waits for input to a web page that’s equally invisible!
What actually happens is that authenticateAsync watches for the provider to navigate to a special callbackUri in the form of ms-app://<SID>, where <SID> is a security identifier that uniquely identifies the calling app. This SID URI, as we’ll call it, is obtained in two ways. In code, call the static method WebAuthenticationBroker.getCurrentApplicationCallbackUri. This returns a Windows.-Foundation.Uri object whose absoluteUri property is the string you need. The second means is through the Windows Store Dashboard. When viewing info for the app in question, go to the “Services” section. There you’ll see a link to the “Live Services site” (rooted at https://account.live.com). On that site, click the link “Authenticating your service” and you’ll see the URI listed here under Package Security Identifier (SID).
To understand how it’s used, let’s follow the entire flow of the silent authentication process:
5. The app registers its SID URI with the service. From code, this could be done through some service API or other endpoint that’s been set up for this purpose. A service could have a page (like Facebook) where you, the developer, registers your app directly and provides the SID URI as part of the process.
6. When constructing the requestUri argument for authenticateAsync, the app inserts its SID URI as the value of the &redirect_uri= parameter. The SID URI will need to be appropriately encoded as other URI parameters, of course, using encodeURIComponent.
7. The app calls authenticateAsync with the silentMode option.
8. When the provider processes the requestUri parameters, it checks whether the redirect_uri value has been registered, responding with a failure if it hasn’t.
9. Having validated the app, the provider then silently authenticates (if possible) and navigates to the redirect_uri, making sure to include things like access keys and tokens in the response data.
10. The web authentication broker will detect this navigation and match it to the app’s SID URI. Finding a match, the broker can complete the async operation and provide the response data to the app.
With all of this, it’s still possible that the authentication might fail for some other reason. For example, if the user has not set up permissions for the app in question (as with Facebook), it’s not possible to silently authenticate. So, an app attempting to use single sign-on would call this form of authenticateAsync first and, failing that, would then revert to calling its longer form (with UI), as described in the previous section.
Using the Microsoft Account
Because various Microsoft services are OAuth providers, it is possible to use the web authentication broker with a Microsoft account such as Hotmail, Live, and MSN. (I still have the same @msn.com email account I’ve had since 1996!) Details can be found on the OAuth 2.0 page on the Live Connect Developer Center.
Live Connect accounts—also known as Microsoft accounts—are in a somewhat more privileged position because they can also be used to sign in to Windows or can be connected to a domain account used for the same purpose. Many of the built-in apps such as Mail, Calendar, OneDrive, People, and the Windows Store itself work with this same account. Thus, it’s something that many other apps might want to take advantage of. Such apps automatically benefit from single sign-on and have access to the same Live Services that the built-in apps draw from themselves (including Skype, which has taken the place of Live Messenger).
The whole gamut of what’s available can be found on the Live Connect documentation.45 You can access Live Connect features directly through its REST API as well as through the client side libraries of the Live SDK. When you install the SDK and add the appropriate references to your project, you’ll have a WL namespace available in JavaScript. Signing in, for example, is accomplished through the WL.login method.
To explore Live Services a little, we’ll first walk through the user experience that applies here and then we’ll turn to the LiveConnect example in this chapter’s companion content, which demonstrates using the Live SDK library. Note that when using Live Services, the app’s package information in its manifest must match what exists in the Windows Store dashboard for your app. To ensure this, create the app profile in the dashboard (to what extent you can), go to Visual Studio, select the Store > Associate App with the Store menu command, sign in to the Store, and select your app.
The OnlineId API in WinRT The Windows.Security.Authentication.OnlineId namespace contains an API that has some redundancy with the Live SDK, providing another route to log in and obtain an access token. The Windows account authorization sample demonstrates this, using the token when making HTTP requests directly to the Live REST API. Although the sample includes a JavaScript version, the API is primarily meant for apps written in C++ where there isn’t another option like the Live SDK. However, the API is also useful when the user logs into Windows with something other than a Microsoft account, such as a domain account. The OnlineIdAuthenticator.canSignOut property, for example, is set to true if the Microsoft account is not the primary login, and thus apps that use it should provide a means to sign out. The OnlineIdAPI also provides for authenticating multiple accounts together (e.g., multiple OneDrive accounts) and can also work with provider like Windows Azure Active Directory and OneDrive Pro.
The Live Connect User Experience
Whenever an app attempts to log in to Live Connect for the first time, a consent dialog such as that in Figure 4-9 will automatically appear to make sure the user understands the kinds of information the app might access. If the user denies consent, then of course the login will fail. For this reason the app should provide a means through which the user can sign in again. (Also see Guidelines for the Microsoft account sign-in experience for additional requirements.)
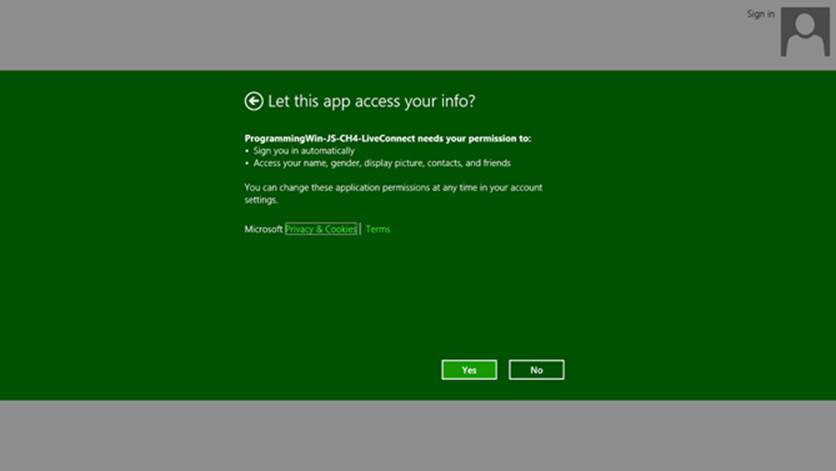
FIGURE 4-9 The Live Connect consent dialog that appears when you first attempt to log in.
With this Live Connect login, the information that appears here (and in the other UI described below) comes through a configuration that’s specific to Live Connect. You can do this in two ways, assuming you’ve created a profile for the app in the Windows Store dashboard. One way is to visit https://account.live.com/Developers/Applications/ and find your app there. The other is to go to the Windows Store dashboard, open your app’s profile, and click Services. There you should see a Live Services Site link. Click that, and then find the link that reads Representing Your App to Live Connect Users. Click that one (talk about runaround!) and you’ll finally arrive at a page where you can set your app’s name, provide URIs for your terms of service and privacy statement, and upload a logo. All of this is independent of other info that exists in your app or in the Store dashboard, though you’ll probably use the same URIs for your terms and privacy policy.
Note that if the user signed in to Windows with a domain account that has not been connected to a Microsoft account (through PC Settings > Accounts > Your Account), the first login attempt will prompt the user for those account credentials, as shown in Figure 4-10. Fortunately, the user will have to do this only once for all apps that use the Microsoft account, thanks to single sign-on.

FIGURE 4-10 The Microsoft account login dialog if the user logged in to Windows with a domain account.
Once you’ve consented to any request from an app, those permissions can be managed through the Microsoft Account portal, https://account.live.com. You can also get there from http://www.live.com by clicking your name on the upper right. This will pop up some options (as shown below), where Account Settings takes you to the account management page.
On the management page, select Permissions on the left side, and then click the Manage Apps And Services link:
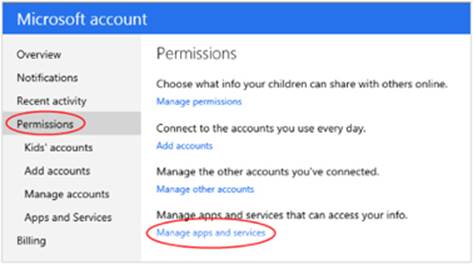
Now you’ll see what permissions you’ve granted to all apps that use the Microsoft account, and clicking an app name (or the Edit link shown under it) takes you to a page where you can manage permissions, including revoking those to which you’ve consented earlier:
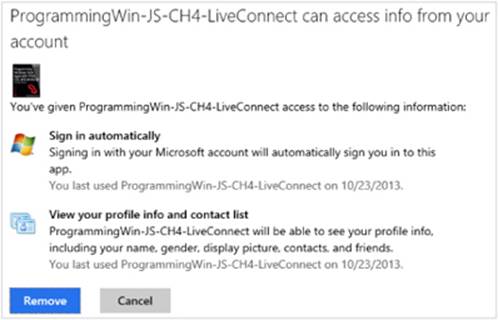
If permissions are revoked, the consent dialog will appear again when the app is next run (though you might need to sign out of Windows first—single sign on is sometimes quite sticky!). It does not appear (from my tests) to affect an app that is already running; those permissions are likely cached for the duration of the app session.
Live SDK Library Basics
Assuming that your app has been defined in Windows Store dashboard and that you’ve associated your Visual Studio project to it as mentioned before (the Store > Associate App with the Store menu command), the first thing you do in code is call WL.init. This can accept various configuration properties, if desired. After this you can subscribe to various events using WL.Event.subscribe; the LiveConnect example watches the login, sessionChange, and statusChange events:
WL.init();
WL.Event.subscribe("auth.login", onLoginComplete);
WL.Event.subscribe("auth.sessionChange", onSessionChange);
WL.Event.subscribe("auth.statusChange", onStatusChange);
Signing in with the Microsoft account, which provides a token, is then done with the WL.login method (js/default.js):
WL.login({ scope: ["wl.signin", "wl.basic"]}).then(
function (response) {
WinJS.log && WinJS.log("Authorization response: " + JSON.stringify(response), "app");
},
function (response) {
WinJS.log && WinJS.log("Authorization error: " + JSON.stringify(response), "app");
}
);
WL.login takes an object argument with a scope property that provides the list of scopes—features, essentially—that we want to use in the app (these can also be given to WL.init). WL.login returns a promise to which we then attach completed and error handlers that log the response. (Note that promises from WL methods supportonly a then method; they don’t have done.)
Again, when you run the app the first time, you’ll see the consent dialog shown earlier in Figure 4-9. Assuming that consent is given and the login succeeds, the response that’s delivered to the completed handler for WL.login will contain status and session properties, the latter of which contains the access token. In the LiveConnect example, the response is output to the JavaScript console:
Authorization response: {"status":"connected","session":{"access_token":"<token_string>"}}
The token itself is easily accessed through the login result. Assuming we call that variable response, as in the code above, the token would be in response.session.access_token.
Note that there really isn’t any need to save the token into persistent storage like the Credential Locker because you’ll always attempt to login when the app starts. If that succeeds, you’ll get the token again; if it fails, you wouldn’t be able to get to the service anyway. If the login fails, by the way, the response object given to your error handler will contain error and error_description properties:
{ "error": "access_denied",
"error_description": "The authentication process failed with error: Canceled" }
Note also that attempting to log out of the Microsoft account with WL.logout, if that’s how the user logged in to Windows, will generate an error to this effect.
Anyway, a successful login will also trigger sessionChange events as well as the login event. In the LiveConnect example, the login handler (a function called onLoginComplete) retrieves the user’s name and profile picture by using the Live API as follows (js/default.js, code condensed and error handlers omitted):
varloginImage = document.getElementById("loginImage");
varloginName = document.getElementById("loginName");
WL.api({ path: "me/picture?type=small", method: "get" }).then(
function (response) {
if (response.location) {img.src = response.location;}
},
);
WL.api({ path: "me", method: "get" }).then(
function (response) {name.innerText = response.name;},
);
Methods in the Live API are invoked, as you can see, with the WL.api function. The first argument to WL.api is an object that specifies the path (the data or API object we want to talk to), an optional method (specifying what to do with it, with “get” as the default), and an optional body (a JSON object with the request body for “post” and “put” methods). It’s not too hard to think of WL.api as essentially generating an HTTP request using method and body to https://apis.live.net/v5.0/<path>?access_token=<token>, automatically using the token that came back from WL.login. But of course you don’t have to deal with those details.
In any case, if all goes well, the app shows your username and image in the upper right, similar to what you see in various apps:

The User Profile (and the Lock Screen Image)
Any discussion about user credentials brings up the question of accessing additional user information that Windows itself maintains (this is separate from anything associated with the Microsoft account). What is available to Windows Store apps is provided through theWindows.System.UserProfile API. Here we find three classes of interest.
The first is the LockScreen class, through which you can get or set the lock screen image or configure an image feed (a slideshow). The image is available through the originalImageFile property (returning a StorageFile) and the getImageStream method (returning anIRandomAccessStream). Setting the image can be accomplished through setImageFileAsync (using a StorageFile) and setImageStreamAsync (using an IRandomAccessStream). This would be utilized in a photo app that has a command to use a picture for the lock screen. For an image feed you use requestSetImageFeedAsync and tryRemoveImageFeedAsync. See the Lock screen personalization sample for a demonstration.
The second is the GlobalizationPreferences object, which contains the user’s specific choices for language and cultural settings. We’ll return to this in Chapter 19, “Apps for Everyone, Part 1.”
Third is the UserInformation class, whose capabilities are clearly exercised within PC Settings > Accounts > Your Account > Account Picture:
• User name If the nameAccessAllowed property is true, an app can then call getDisplayNameAsync, getFirstNameAsync, and getLastNameAsync, all of which provide a string to your completed handler. If nameAccessAllowed is false, these methods will complete but provide an empty result. Also note that the first and last names are available only from a Microsoft account.
• User picture or video Retrieved through getAccountPicture, which returns a StorageFile for the image or video. The method takes a value from AccountPictureKind: smallImage, largeImage, and video.
• If the accountPictureChangeEnabled property is true, you can use one of four methods to set the image(s): setAccountPictureAsync (for providing one image from a StorageFile), setAccountPicturesAsync (for providing small and large images as well as a video from StorageFileobjects), and setAccountPictureFromStreamAsync and setAccountPicturesFromStreamAsync (which do the same given IRandomAccessStream objects instead). In each case the async result is a SetAccountPictureResult value: success, failure, changeDisabled(accountPictureChangeEnabled is false), largeOrDynamicError (the picture is too large), fileSizeError (file is too large), or videorameSizeError (video frame size is too large),
• The accountpicturechanged event signals when the user picture(s) have been altered. Remember that because this event originates within WinRT, you should call removeEventListener if you aren’t listening for this event for the lifetime of the app.
These features are demonstrated in the Account picture name sample. Scenario 1 retrieves the display name, scenario 2 retrieves the first and last name (if available), scenario 3 retrieves the account pictures and video, and scenario 4 changes the account pictures and video and listens for picture changes.
One other bit that this sample demonstrates is the Account Picture Provider declaration in its manifest, which causes the app to appear within PC Settings > Accounts > Your Account, under Create an Account Picture:
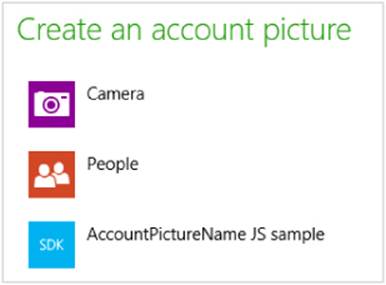
In this case the sample doesn’t actually provide a picture directly but launches into scenario 4. A real app, like the Camera app that’s also in PC Settings by default, will automatically set the account picture when one is acquired through its UI. How does it know to do this? The answer lies in a special URI scheme through which the app is activated. That is, when you declare the Account Picture Provider declaration in the manifest, the app will be activated with the activation kind of protocol (see Chapter 15), where the URI scheme specifically starts with ms-accountpictureprovider. You can see how this is handled in the sample’s js/default.js file:
if (eventObject.detail.kind === Windows.ApplicationModel.Activation.ActivationKind.protocol) {
// Check if the protocol matches the "ms-accountpictureprovider" scheme
if (eventObject.detail.uri.schemeName === "ms-accountpictureprovider") {
// This app was activated via the Account picture apps section in PC Settings.
// Here you would do app-specific logic for providing the user with account
// picture selection UX
}
Returning to the UserInformation class, it also provides a few more details for domain accounts provided that the app has declared the Enterprise Authentication capability in its manifest:
• getDomainNameAsync Provides the user’s fully qualified domain name as a string in the form of <domain>\<user> where <domain> is the full name of the domain controller, such as mydomain.corp.ourcompany.com.
• getPrincipalNameAsync Provides the principal name as a string. In Active Directory parlance, this is an Internet-style login name (known as a user principal name or UPN) that is shorter and simpler than the domain name, consolidating the email and login namespaces. Typically, this is an email address like user@ourcompany.com.
• getSessionInitiationProtocolUriAsync Provides a session initiation protocol URI that will connect with this user; for background, see Session Initiation Protocol (Wikipedia).
The use of these methods is demonstrated in the User domain name sample.
What We’ve Just Learned
• Networks come in a number of different forms, and separate capabilities in the manifest specifically call out Internet (Client), Internet (Client & Server), and Private Networks (Client & Server). Local loopback within these is normally blocked for apps but may be used for debugging purposes on machines with a developer license.
• Rich network information is available through the Windows.Networking.Connectivity.-NetworkInformation API, including the ability to track connectivity, be aware of network costs, and obtain connection profile details.
• Connectivity can be monitored from a background task by using the networkStateChange trigger and conditions such as internetAvailable and internetNotAvailable.
• The ability to run offline can be an important consideration that can make an app much more attractive to customers. Apps need to design and implement such features themselves, using local or temporary app data folders to store the necessary caches.
• Web content can be hosted in an app both in webview and iframe elements, depending on requirements. The local and web contexts for use with iframe elements provide different capabilities for hosted content, whereas the webview can host local dynamically-generated content (usingms-appdata URIs) and untrusted web content.
• To make HTTP requests, you can choose between XMLHttpRequest, WinJS.xhr, and Windows.Web.Http.HttpClient, the latter of which is the most powerful. In all cases, the resuming event if often used to refresh online content as appropriate.
• Windows.Networking.BackgroundTransfer provides for prefetching online content as well as managing transfers while an app isn’t running. It include cost-awareness, credentials, grouping, and muItipart uploads, and is recommended over using your own HTTP requests for larger transfers.
• The Credential Locker is the place to securely store any credentials or sensitive tokens that an app might collect.
• To ideally keep credentials off the client device entirely, apps can log into services through the Web Authentication Broker API, which also provides for single sign-on across apps that use the same identity provider.
• Though the user’s Microsoft account and the Live SDK, apps can access all the information available in Live Services, including OneDrive, contacts, and calendar.
• Apps can obtain and manage some of the user’s profile data, including the user image or video and the lock screen image and video.
32 Increasing numbers of entrepreneurs are also realizing that services and web APIs in themselves can be a profitable business. Companies like Mashape and Mashery also exist to facilitate such monetization by managing scalable access plans for developers on behalf of the service providers. You can also consider creating a marketable Windows Runtime Component that encapsulates your REST API within class-oriented structures.
33 At whatever point the webview supports IndexedDB or AppCache, these features will likely require such permissions.
34 The inclusion of the webview element is one of the significant improvements for Windows 8.1. In Windows 8, apps written in HTML, CSS, and JavaScript have only iframe elements at their disposal. However, iframes don’t work with web pages that contain frame-busting code, can’t load local (appdata) pages, and have some subtle security issues. For this reason, Windows 8.1 has the native x-ms-webviewHTML element for most uses and limits iframe to in-package ms-appx[-web] and https URIs exclusively.
35 Again, WinRT has a specific API for dealing with RSS feeds in Windows.Web.Syndication, as described in Appendix C. You can use this if you want a more structured means of dealing with such data sources. As it is, JavaScript has intrinsic APIs to work with XML, so it’s really your choice. In a case like this, the syndication API along with Windows.Web.AtomPub and Windows.Data.Xml are very much needed by Windows Store apps written in other languages that don’t have the same built-in features as JavaScript.
36 This read-only property works with certificates for SSL connections and contains the results of SSL negotiations; see HttpTransportInformation. To set a client certificate, there’s a property on the HttpBaseProtocolFilter.
37 Visual Studio enables local loopback by default for a project. To change it, right-click the project in Solution Explorer, select Properties, select Configuration Properties > Debugging on the left side of the dialog, and set Allow Local Network Loopback to No. For more on the subject of loopback, see How to enable loopback and troubleshoot network isolation.
38 For readers familiar with .NET languages, note that the .NET System.Net.HttpClient API does not benefit from the cache or precaching.
39 Might I suggest http://kraigbrockschmidt.com/images/photos/kraigbrockschmidt-dot-com-122-10-S.jpg?
40 The code in the sample has more structure than shown here. It defines its own DownloadOperation class that unfortunately has the same name as the WinRT class, so I’m electing to omit mention of it.
41 As with downloads, the code in the sample has more structure than shown here and again defines its own UploadOperationclass with the same name as the one in WinRT, so I’m omitting mention of it.
42 The optional group argument for the other methods is obsolete and replaced with these that work with a transferGroup argument.
43 Such roaming will not happen, however, if a credential is first stored in the locker on a domain joined machine. This protects domain credentials from leaking to the cloud.
44 As described on How the web authentication broker works, requestUri and callbackUri “correspond to an Authorization Endpoint URI and Redirection URI in the OAuth 2.0 protocol. The OpenID protocol and earlier versions of OAuth have similar concepts.”
45 Additional helpful references include Live Connect (Windows Store apps), Single sign-on for apps and websites, Using Live Connect to personalize apps, and Guidelines for the Microsoft account sign-in experience. Also see Bring single sign-on and OneDrive to your Windows apps with the Live SDK and Best Practices when adding single sign-on to your app with the Live SDK on the Windows 8 Developer Blog (prior to the Windows App Builder blog).
All materials on the site are licensed Creative Commons Attribution-Sharealike 3.0 Unported CC BY-SA 3.0 & GNU Free Documentation License (GFDL)
If you are the copyright holder of any material contained on our site and intend to remove it, please contact our site administrator for approval.
© 2016-2026 All site design rights belong to S.Y.A.