Object-Oriented JavaScript Second Edition (2013)
Chapter 7. The Browser Environment
You know that JavaScript programs need a host environment. Most of what you learned so far in this book was related to core ECMAScript/JavaScript and can be used in many different host environments. Now, let's shift the focus to the browser, since this is the most popular and natural host environment for JavaScript programs. In this chapter, you will learn about the following elements:
· The Browser Object Model (BOM)
· The Document Object Model (DOM)
· Browser events
· The XMLHttpRequest object
Including JavaScript in an HTML page
To include JavaScript in an HTML page, you need to use the <script> tag as follows:
<!DOCTYPE>
<html>
<head>
<title>JS test</title>
<script src="somefile.js"></script>
</head>
<body>
<script>
var a = 1;
a++;
</script>
</body>
</html>
In this example, the first <script> tag includes an external file, somefile.js, which contains JavaScript code. The second <script> tag includes the JavaScript code directly in the HTML code of the page. The browser executes the JavaScript code in the sequence it finds it on the page and all the code in all tags share the same global namespace. This means that when you define a variable in somefile.js, it also exists in the second <script> block.
BOM and DOM – an overview
The JavaScript code in a page has access to a number of objects. These objects can be divided into the following types:
· Core ECMAScript objects: All the objects mentioned in the previous chapters
· DOM: Objects that have to do with the currently loaded page (the page is also called the document)
· BOM: Objects that deal with everything outside the page (the browser window and the desktop screen)
DOM stands for Document Object Model and BOM for Browser Object Model.
The DOM is a standard, governed by the World Wide Web Consortium (W3C) and has different versions, called levels, such as DOM Level 1, DOM Level 2, and so on. Browsers in use today have different degrees of compliance with the standard but in general, they almost all completely implement DOM Level 1. The DOM was standardized post-factum, after the browser vendors had each implemented their own ways to access the document. The legacy part (from before the W3C took over) is still around and is referred to as DOM 0, although no real DOM Level 0 standard exists. Some parts of DOM 0 have become de-facto standards as all major browsers support them. Some of these were added to the DOM Level 1 standard. The rest of DOM 0 that didn't find its way to DOM 1 is too browser-specific and won't be discussed here.
BOM historically has not been a part of any standard. Similar to DOM 0, it has a subset of objects that is supported by all major browsers, and another subset that is browser-specific. The HTML5 standard codifies common behavior among browsers, and it includes common BOM objects. Additionally, mobile devices come with their specific objects (and HTML5 aims to standardize those as well) which traditionally have not been necessary for desktop computers, but make sense in a mobile world, for example, geolocation, camera access, vibration, touch events, telephony, and SMS.
This chapter discusses only cross-browser subsets of BOM and DOM Level 1 (unless noted otherwise in the text). Even these safe subsets constitute a large topic, and a full reference is beyond the scope of this book. You can also consult the following references:
· Mozilla DOM reference (http://developer.mozilla.org/en/docs/Gecko_DOM_Reference)
· Mozilla's HTML5 wiki (https://developer.mozilla.org/en-US/docs/HTML/HTML5)
· Microsoft's documentation for Internet Explorer (http://msdn2.microsoft.com/en-us/library/ms533050(vs.85).aspx)
· W3C's DOM specifications (http://www.w3.org/DOM/DOMTR)
BOM
The Browser Object Model (BOM) is a collection of objects that give you access to the browser and the computer screen. These objects are accessible through the global object window.
The window object revisited
As you know already, in JavaScript there's a global object provided by the host environment. In the browser environment, this global object is accessible using window. All global variables are also accessible as properties of the window object as follows:
> window.somevar = 1;
1
> somevar;
1
Also, all of the core JavaScript functions (discussed in Chapter 2, Primitive Data Types, Arrays, Loops, and Conditions) are methods of the global object. Have a look at the following code snippet:
> parseInt('123a456');
123
> window.parseInt('123a456');
123
In addition to being a reference to the global object, the window object also serves a second purpose providing information about the browser environment. There's a window object for every frame, iframe, pop up, or browser tab.
Let's see some of the browser-related properties of the window object. Again, these can vary from one browser to another, so let's only consider the properties that are implemented consistently and reliably across all major browsers.
window.navigator
The navigator is an object that has some information about the browser and its capabilities. One property is navigator.userAgent, which is a long string of browser identification. In Firefox, you'll get the following output:
> window.navigator.userAgent;
"Mozilla/5.0 (Macintosh; Intel Mac OS X 10_8_3) AppleWebKit/536.28.10 (KHTML, like Gecko) Version/6.0.3 Safari/536.28.10"
The userAgent string in Microsoft Internet Explorer would be something like the following:
"Mozilla/5.0 (compatible; MSIE 10.0; Windows NT 6.1; Trident/6.0)"
Because the browsers have different capabilities, developers have been using the userAgent string to identify the browser and provide different versions of the code. For example, the following code searches for the presence of the string MSIE to identify Internet Explorer:
if (navigator.userAgent.indexOf('MSIE') !== -1) {
// this is IE
} else {
// not IE
}
It's better not to rely on the user agent string, but to use feature sniffing (also called capability detection) instead. The reason for this is that it's hard to keep track of all browsers and their different versions. It's much easier to simply check if the feature you intend to use is indeed available in the user's browser. For example have a look at the following code:
if (typeof window.addEventListener === 'function') {
// feature is supported, let's use it
} else {
// hmm, this feature is not supported, will have to
// think of another way
}
Another reason to avoid user agent sniffing is that some browsers allow users to modify the string and pretend they are using a different browser.
Your console is a cheat sheet
The console lets you inspect what's in an object and this includes all the BOM and DOM properties. Just type the following code:
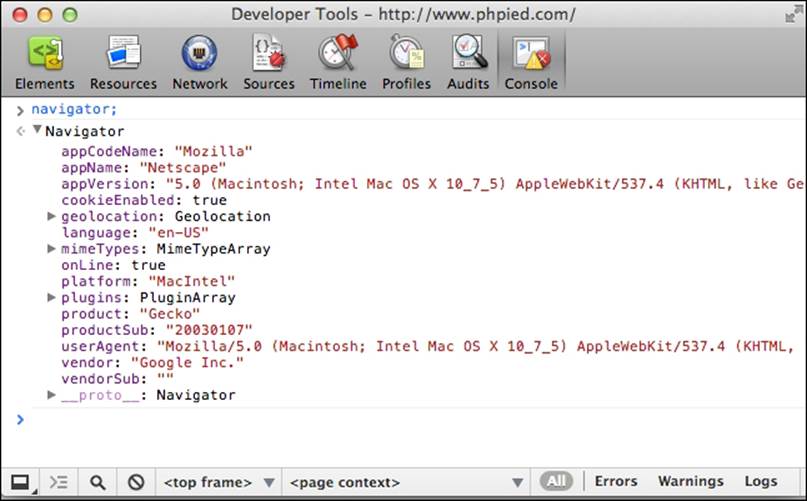
> navigator;
Then click on the result. The result is a list of properties and their values, as shown in the following screenshot:
window.location
The location property points to an object that contains information about the URL of the currently loaded page. For example, location.href is the full URL and location.hostname is only the domain. With a simple loop, you can see the full list of properties of thelocation object.
Imagine you're on a page with a URL http://search.phpied.com:8080/search?q=java&what=script#results.
for (var i in location) {
if (typeof location[i] === "string") {
console.log(i + ' = "' + location[i] + '"');
}
}
href = "http://search.phpied.com:8080/search?q=java&what=script#results"
hash = "#results"
host = "search.phpied.com:8080"
hostname = "search.phpied.com"
pathname = "/search"
port = «8080»
protocol = «http:»
search = "?q=java&what=script"
There are also three methods that location provides, namely reload(), assign(), and replace().
It's curious how many different ways exist for you to navigate to another page. Following are a few ways:
> window.location.href = 'http://www.packtpub.com';
> location.href = 'http://www.packtpub.com';
> location = 'http://www.packtpub.com';
> location.assign('http://www.packtpub.com');
replace() is almost the same as assign(). The difference is that it doesn't create an entry in the browser's history list as follows:
> location.replace('http://www.yahoo.com');
To reload a page you can use the following code:
> location.reload();
Alternatively, you can use location.href to point it to itself as follows:
> window.location.href = window.location.href;
Or, simply use the following code:
> location = location;
window.history
window.history allows limited access to the previously visited pages in the same browser session. For example, you can see how many pages the user has visited before coming to your page as follows:
> window.history.length;
5
You cannot see the actual URLs though. For privacy reasons this doesn't work. See the following code:
> window.history[0];
You can, however, navigate back and forth through the user's session as if the user had clicked on the Back/Forward browser buttons as follows:
> history.forward();
> history.back();
You can also skip pages back and forth with history.go(). This is the same as calling history.back(). Code for history go() is as follows:
> history.go(-1);
For going two pages back use the following code:
> history.go(-2);
Reload the current page using the following code:
> history.go(0);
More recent browsers also support HTML5 History API, which lets you change the URL without reloading the page. This is perfect for dynamic pages because they can allow users to bookmark a specific URL, which represents the state of the application, and when they come back (or share with their friends) the page can restore the application state based on the URL. To get a sense of the history API, go to any page and write the following code in the console:
> history.pushState({a: 1}, "", "hello");
> history.pushState({b: 2}, "", "hello-you-too");
> history.state;
Notice how the URL changes, but the page is the same. Now, experiment with Back and Forward buttons in the browser and inspect the history.state again.
window.frames
window.frames is a collection of all of the frames in the current page. It doesn't distinguish between frames and iframes (inline frames). Regardless of whether there are frames on the page or not, window.frames always exists and points to window as follows:
> window.frames === window;
true
Let's consider an example where you have a page with one iframe as follows:
<iframe name="myframe" src="hello.html" />
In order to tell if there are any frames on the page, you can check the length property. In case of one iframe, you'll see the following output:
> frames.length
1
Each frame contains another page, which has its own global window object.
To get access to the iframe's window, you can do any of the following:
> window.frames[0];
> window.frames[0].window;
> window.frames[0].window.frames;
> frames[0].window;
> frames[0];
From the parent page, you can access properties of the child frame also. For example, you can reload the frame as follows:
> frames[0].window.location.reload();
From inside the child you can access the parent as follows:
> frames[0].parent === window;
true
Using a property called top, you can access the top-most page (the one that contains all the other frames) from within any frame as follows:
> window.frames[0].window.top === window;
true
> window.frames[0].window.top === window.top;
true
> window.frames[0].window.top === top;
true
In addition, self is the same as window as follows:
> self === window;
true
> frames[0].self == frames[0].window;
true
If a frame has a name attribute, you can not only access the frame by name, but also by index as follows:
> window.frames['myframe'] === window.frames[0];
true
Or, alternatively you can use the following code:
> frames.myframe === window.frames[0];
true
window.screen
screen provides information about the environment outside the browser. For example, the property screen.colorDepth contains the color bit-depth (the color quality) of the monitor. This is mostly used for statistical purposes. Have a look at the following code:
> window.screen.colorDepth;
32
You can also check the available screen real estate (the resolution):
> screen.width;
1440
> screen.availWidth;
1440
> screen.height;
900
> screen.availHeight;
847
The difference between height and availHeight is that the height is the whole screen, while availHeight subtracts any operating system menus such as the Windows task bar. The same is the case for width and availWidth.
Somewhat related is the property mentioned in the following code:
> window.devicePixelRatio;
1
It tells you the difference (ratio) between physical pixels and device pixels in the retina displays in mobile devices (for example, value 2 in iPhone).
window.open()/close()
Having explored some of the most common cross-browser properties of the window object, let's move to some of the methods. One such method is open(), which allows you to open new browser windows (pop ups). Various browser policies and user settings may prevent you from opening a pop up (due to abuse of the technique for marketing purposes), but generally you should be able to open a new window if it was initiated by the user. Otherwise, if you try to open a pop up as the page loads, it will most likely be blocked, because the user didn't initiate it explicitly.
window.open() accepts the following parameters:
· URL to load in the new window
· Name of the new window, which can be used as the value of a form's target attribute
· Comma-separated list of features. They are as follows:
· resizable: Should the user be able to resize the new window
· width, height: Width and height of the pop up
· status: Should the status bar be visible
window.open() returns a reference to the window object of the newly created browser instance. Following is an example:
var win = window.open('http://www.packtpub.com', 'packt', 'width=300,height=300,resizable=yes');
win points to the window object of the pop up. You can check if win has a falsy value, which means that the pop up was blocked.
win.close() closes the new window.
It's best to stay away from opening new windows for accessibility and usability reasons. If you don't like sites popping up windows to you, why do it to your users? There are legitimate purposes, such as providing help information while filling out a form, but often the same can be achieved with alternative solutions, such as using a floating <div> inside the page.
window.moveTo() and window.resizeTo()
Continuing with the shady practices from the past, following are more methods to irritate your users, provided their browser and personal settings allow you to.
· window.moveTo(100, 100) moves the browser window to screen location x = 100 and y = 100 (counted from the top-left corner)
· window.moveBy(10, -10) moves the window 10 pixels to the right and 10 pixels up from its current location
· window.resizeTo(x, y) and window.resizeBy(x, y) accept the same parameters as the move methods but they resize the window as opposed to moving it
Again, try to solve the problem you're facing without resorting to these methods.
window.alert(), window.prompt(), and window.confirm()
Chapter 2, Primitive Data Types, Arrays, Loops, and Conditions, talked about the function alert(). Now you know that global functions are accessible as methods of the global object so alert('Watch out!') and window.alert('Watch out!') are exactly the same.
alert() is not an ECMAScript function, but a BOM method. In addition to it, two other BOM methods allow you to interact with the user through system messages. Following are the methods:
· confirm() gives the user two options, OK and Cancel
· prompt() collects textual input
See how this works as follows:
> var answer = confirm('Are you cool?'); > answer;
It presents you with a window similar to the following screenshot (the exact look depends on the browser and the operating system):

You'll notice the following things:
· Nothing gets written to the console until you close this message, this means that any JavaScript code execution freezes, waiting for the user's answer
· Clicking on OK returns true, clicking on Cancel or closing the message using the X icon (or the ESC key) returns false
This is handy for confirming user actions as follows:
if (confirm('Sure you want to delete this?')) {
// delete
} else {
// abort
}
Make sure you provide an alternative way to confirm user actions for people who have disabled JavaScript (or for search engine spiders).
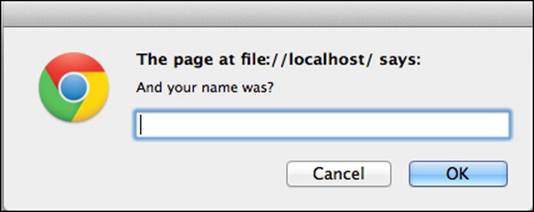
window.prompt() presents the user with a dialog to enter text as follows:
> var answer = prompt('And your name was?');
> answer;
This results in the following dialog box (Chrome, MacOS):
The value of answer is one of the following:
· null if you click on Cancel or the X icon, or press ESC
· "" (empty string) if you click on OK or press Enter without typing anything
· A text string if you type something and then click on OK (or press Enter)
The function also takes a string as a second parameter and displays it as a default value prefilled into the input field.
window.setTimeout() and window.setInterval()
setTimeout() and setInterval() allow for scheduling the execution of a piece of code. setTimeout() attempts to execute the given code once after a specified number of milliseconds. setInterval() attempts to execute it repeatedly after a specified number of milliseconds has passed.
This shows an alert after approximately 2 seconds (2000 milliseconds):
> function boo() { alert('Boo!'); }
> setTimeout(boo, 2000);
4
As you can see the function returned an integer (in this case 4) representing the ID of the timeout. You can use this ID to cancel the timeout using clearTimeout(). In the following example, if you're quick enough, and clear the timeout before 2 seconds have passed, the alert will never be shown as you can see in the following code:
> var id = setTimeout(boo, 2000);
> clearTimeout(id);
Let's change boo() to something less intrusive as follows:
> function boo() { console.log('boo'); }
Now, using setInterval() you can schedule boo() to execute every 2 seconds, until you cancel the scheduled execution with clearInterval():
> var id = setInterval(boo, 2000);
boo
boo
boo
boo
boo
boo
> clearInterval(id);
Note, that both functions accept a pointer to a callback function as a first parameter. They can also accept a string which is evaluated with eval() but as you know, eval() is evil, so it should be avoided. And what if you want to pass arguments to the function? In such cases, you can just wrap the function call inside another function.
The following code is valid, but not recommended:
// bad idea
var id = setInterval("alert('boo, boo')", 2000);
This alternative is preferred:
var id = setInterval(
function () {
alert('boo, boo');
},
2000
);
Be aware that scheduling a function in some amount of milliseconds is not a guarantee that it will execute exactly at that time. One reason is that most browsers don't have millisecond resolution time. If you schedule something in 3 milliseconds, it will execute after a minimum of 15 in older IEs and sooner in more modern browsers, but most likely not in 1 millisecond. The other reason is that browsers maintain a queue of what you request them to do. 100 milliseconds timeout means add to the queue after 100 milliseconds. But if the queue is delayed by something slow happening, your function will have to wait and execute after, say, 120 milliseconds.
More recent browsers implement the requestAnimationFrame() function. It's preferable to the timeout functions because you're asking the browser to call your function whenever it has available resources, not after a predefined time in milliseconds. Try the following in your console:
function animateMe() {
webkitRequestAnimationFrame(function(){
console.log(new Date());
animateMe();
});
}
animateMe();
window.document
window.document is a BOM object that refers to the currently loaded document (page). Its methods and properties fall into the DOM category of objects. Take a deep breath (and maybe first look at the BOM exercises at the end of the chapter) and let's dive into the DOM.
DOM
The Document Object Model (DOM) represents an XML or an HTML document as a tree of nodes. Using DOM methods and properties, you can access any element on the page, modify or remove elements, or add new ones. The DOM is a language-independent API (Application Programming Interface) and can be implemented not only in JavaScript, but also in any other language. For example, you can generate pages on the server-side with PHP's DOM implementation (http://php.net/dom).
Take a look at this example HTML page:
<!DOCTYPE html>
<html>
<head>
<title>My page</title>
</head>
<body>
<p class="opener">first paragraph</p>
<p><em>second</em> paragraph</p>
<p id="closer">final</p>
<!-- and that's about it -->
</body>
</html>
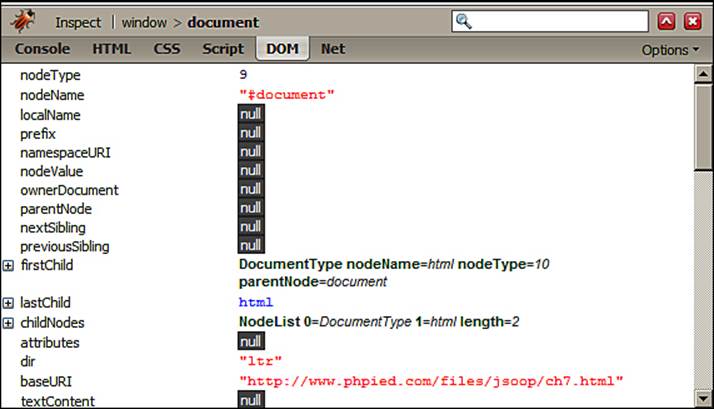
Consider the second paragraph (<p><em>second</em> paragraph</p>). You see that it's a <p> tag and it's contained in the <body> tag. If you think in terms of family relationships, you can say that <body> is the parent of <p> and <p> is the child. The first and the third paragraphs would also be children of the <body>, and at the same time siblings of the second paragraph. The <em> tag is a child of the second <p>, so <p> is its parent. The parent-child relationships can be represented graphically in an ancestry tree, called the DOM tree:
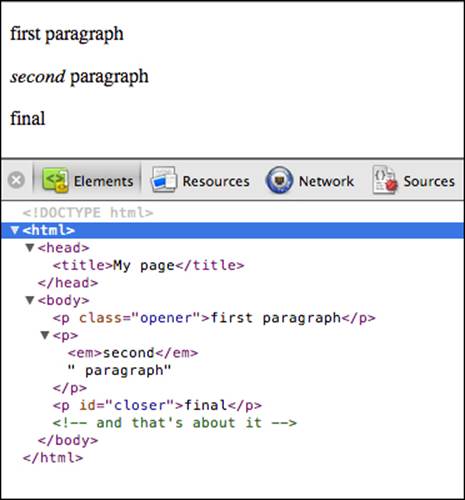
The previous screenshot shows what you'll see in the webkit console's Elements tab after you expand each node.
You can see how all of the tags are shown as expandable nodes on the tree. Although not shown, there exists the so-called text nodes, for example, the text inside the <em> (the word second) is a text node. Whitespace is also considered a text node. Comments inside the HTML code are also nodes in the tree, the <!-- and that's about it --> comment in the HTML source is a comment node in the tree.
Every node in the DOM tree is an object and the Properties section on the right lists all of the properties and methods you can use to work with these objects, following the inheritance chain of how this object was created:
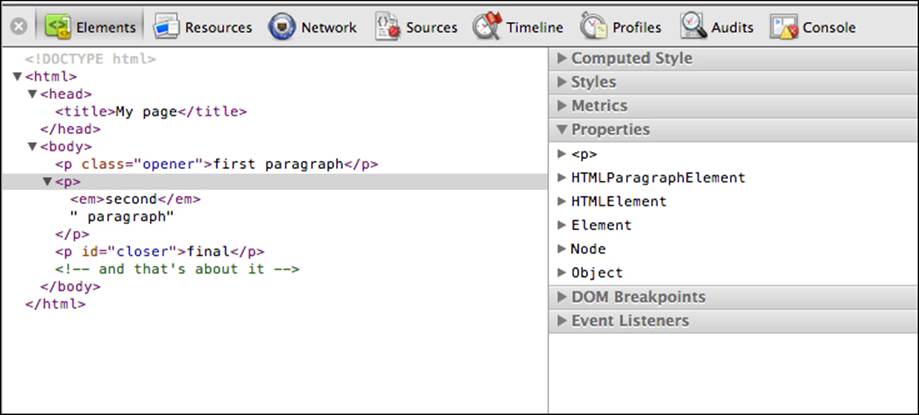
You can also see the constructor function that was used behind the scenes to create each of these objects. Although this is not too practical for day-to-day tasks, it may be interesting to know that, for example, <p> is created by the HTMLParagraphElement() constructor, the object that represents the head tag is created by HTMLHeadElement(), and so on. You cannot create objects using these constructors directly, though.
Core DOM and HTML DOM
One last diversion before moving on to more practical examples. As you now know, the DOM represents both XML documents and HTML documents. In fact, HTML documents are XML documents, but a little more specific. Therefore, as part of DOM Level 1, there is a Core DOM specification that is applicable to all XML documents, and there is also an HTML DOM specification, which extends and builds upon the core DOM. Of course, the HTML DOM doesn't apply to all XML documents, but only to HTML documents. Let's see some examples of Core DOM and HTML DOM constructors:
|
Constructor |
Inherits from |
Core or HTML |
Comment |
|
Node |
Core |
Any node on the tree. |
|
|
Document |
Node |
Core |
The document object, the main entry point to any XML document. |
|
HTMLDocument |
Document |
HTML |
This is window.document or simply document, the HTML-specific version of the previous object, which you'll use extensively. |
|
Element |
Node |
Core |
Every tag in the source is represented by an element. That's why you say "the P element" meaning "the <p></p> tag". |
|
HTMLElement |
Element |
HTML |
General-purpose constructor, all constructors for HTML elements inherit from it. |
|
HTMLBodyElement |
HTMLElement |
HTML |
Element representing the <body> tag. |
|
HTMLLinkElement |
HTMLElement |
HTML |
An A element (an <a href="..."></a> tag). |
|
and other such constructors. |
HTMLElement |
HTML |
All the rest of the HTML elements. |
|
CharacterData |
Node |
Core |
General-purpose constructor for dealing with texts. |
|
Text |
CharacterData |
Core |
Text node inside a tag. In <em>second</em> you have the element node EM and the text node with value second. |
|
Comment |
CharacterData |
Core |
<! -- any comment --> |
|
Attr |
Node |
Core |
Represents an attribute of a tag, in <p id="closer"> the id attribute is a DOM object created by the Attr() constructor. |
|
NodeList |
Core |
A list of nodes, an array-like object that has a length property. |
|
|
NamedNodeMap |
Core |
Same as NodeList but the nodes can be accessed by name, not only by numeric index. |
|
|
HTMLCollection |
HTML |
Similar to NamedNodeMap but specific for HTML. |
These are by no means all of the Core DOM and HTML DOM objects. For the full list consult http://www.w3.org/TR/DOM-Level-1/.
Now that this bit of DOM theory is behind you, let's focus on the practical side of working with the DOM. In the following sections, you'll learn how to do the following things:
· Access DOM nodes
· Modify nodes
· Create new nodes
· Remove nodes
Accessing DOM nodes
Before you can validate the user input in a form on a page or swap an image, you need to get access to the element you want to inspect or modify. Luckily, there are many ways to get to any element, either by navigating around traversing the DOM tree or by using a shortcut.
It's best if you start experimenting with all of the new objects and methods. The examples you'll see use the same simple document that you saw at the beginning of the DOM section, and which you can access at http://www.phpied.com/files/jsoop/ch7.html. Open your console, and let's get started.
The document node
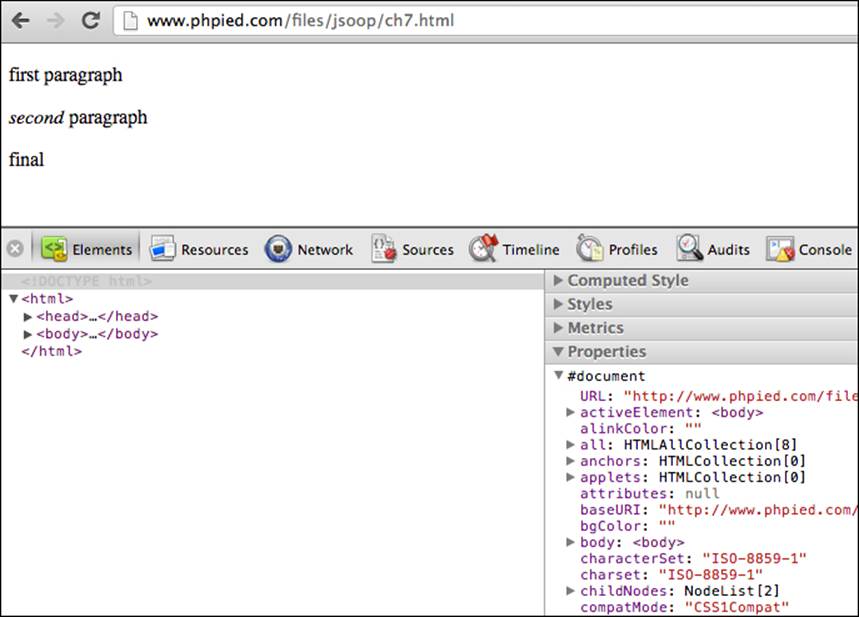
document gives you access to the current document. To explore this object, you can use your console as a cheat sheet. Type console.dir(document) and click on the result:
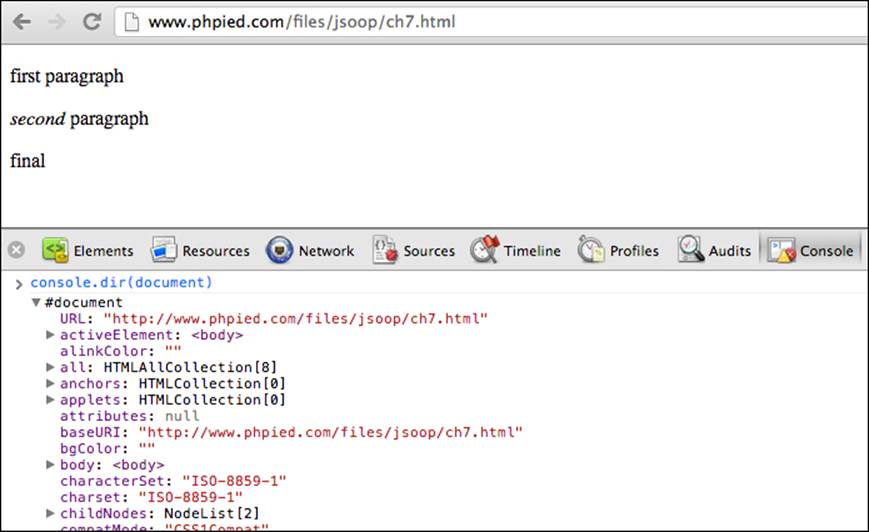
Alternatively, you can you can browse all of the properties and methods of the document object DOM properties in the Elements panel:
All nodes (this also includes the document node, text nodes, element nodes, and attribute nodes) have nodeType, nodeName, and nodeValue properties:
> document.nodeType;
9
There are 12 node types, represented by integers. As you can see, the document node type is 9. The most commonly used are 1 (element), 2 (attribute), and 3 (text).
Nodes also have names. For HTML tags the node name is the tag name (tagName property). For text nodes, it's #text, and for document nodes the name is as follows:
> document.nodeName;
"#document"
Nodes can also have node values. For example, for text nodes the value is the actual text. The document node doesn't have a value which can be seen as follows:
> document.nodeValue;
null
documentElement
Now, let's move around the tree. XML documents always have one root node that wraps the rest of the document. For HTML documents, the root is the <html> tag. To access the root, you use the documentElement property of the document object:
> document.documentElement;
<html>…</html>
nodeType is 1 (an element node) which can be seen as follows:
> document.documentElement.nodeType;
1
For element nodes, both nodeName and tagName properties contain the name of the tag, as seen in the following output:
> document.documentElement.nodeName;
"HTML"
> document.documentElement.tagName;
"HTML"
Child nodes
In order to tell if a node has any children you use hasChildNodes() as follows:
> document.documentElement.hasChildNodes();
true
The HTML element has three children, the head and the body elements and the whitespace between them (whitespace is counted in most, but not all browsers). You can access them using the childNodes array-like collection as follows:
> document.documentElement.childNodes.length;
3
> document.documentElement.childNodes[0];
<head>…</head>
> document.documentElement.childNodes[1];
#text
> document.documentElement.childNodes[2];
<body>…</body>
Any child has access to its parent through the parentNode property, as seen in the following code:
> document.documentElement.childNodes[1].parentNode;
<html>…</html>
Let's assign a reference to body to a variable as follows:
> var bd = document.documentElement.childNodes[2];
How many children does the body element have?
> bd.childNodes.length;
9
As a refresher, here again is the body of the document:
<body>
<p class="opener">first paragraph</p>
<p><em>second</em> paragraph</p>
<p id="closer">final</p>
<!-- and that's about it -->
</body>
How come body has 9 children? Well, three paragraphs plus one comment makes four nodes. The whitespace between these four nodes makes three more text nodes. This makes a total of seven so far. The whitespace between <body> and the first <p> is the eighth node. The whitespace between the comment and the closing </body> is another text node. This makes a total of nine child nodes. Just type bd.childNodes in the console to inspect them all.
Attributes
Because the first child of the body is a whitespace, the second child (index 1) is the first paragraph. Refer to the following piece of code:
> bd.childNodes[1];
<p class="opener">first paragraph</p>
You can check whether an element has attributes using hasAttributes() as follows:
> bd.childNodes[1].hasAttributes();
true
How many attributes? In this example, one is the class attribute which can be seen as follows:
> bd.childNodes[1].attributes.length;
1
You can access the attributes by index and by name. You can also get the value using the getAttribute() method as follows:
> bd.childNodes[1].attributes[0].nodeName;
"class"
> bd.childNodes[1].attributes[0].nodeValue;
"opener"
> bd.childNodes[1].attributes['class'].nodeValue;
"opener"
> bd.childNodes[1].getAttribute('class');
"opener"
Accessing the content inside a tag
Let's take a look at the first paragraph:
> bd.childNodes[1].nodeName;
"P"
You can get the text contained in the paragraph by using the textContent property. textContent doesn't exist in older IEs, but another property called innerText returns the same value, as seen in the following output:
> bd.childNodes[1].textContent;
"first paragraph"
There is also the innerHTML property. It's a relatively new addition to the DOM standard despite the fact that it previously existed in all major browsers. It returns (or sets) HTML code contained in a node. You can see how this is a little inconsistent as DOM treats the document as a tree of nodes, not as a string of tags. But innerHTML is so convenient to use that you'll see it everywhere. Refer to the following code:
> bd.childNodes[1].innerHTML;
"first paragraph"
The first paragraph contains only text, so innerHTML is the same as textContent (or innerText in IE). However, the second paragraph does contain an em node, so you can see the difference as follows:
> bd.childNodes[3].innerHTML;
"<em>second</em> paragraph"
> bd.childNodes[3].textContent;
"second paragraph"
Another way to get the text contained in the first paragraph is by using the nodeValue of the text node contained inside the p node as follows:
> bd.childNodes[1].childNodes.length;
1
> bd.childNodes[1].childNodes[0].nodeName;
"#text"
> bd.childNodes[1].childNodes[0].nodeValue;
"first paragraph"
DOM access shortcuts
By using childNodes, parentNode, nodeName, nodeValue, and attributes you can navigate up and down the tree and do anything with the document. But the fact that whitespace is a text node makes this a fragile way of working with the DOM. If the page changes, your script may no longer work correctly. Also, if you want to get to a node deeper in the tree, it could take a bit of code before you get there. That's why you have shortcut methods, namely, getElementsByTagName(), getElementsByName(), and getElementById().
getElementsByTagName() takes a tag name (the name of an element node) and returns an HTML collection (array-like object) of nodes with the matching tag name. For example, the following example asks "give me a count of all paragraphs" which is given as follows:
> document.getElementsByTagName('p').length;
3
You can access an item in the list by using the brackets notation, or the method item(), and passing the index (0 for the first element). Using item() is discouraged as array brackets are more consistent and also shorter to type. Refer to the following piece of code:
> document.getElementsByTagName('p')[0];
<p class="opener">first paragraph</p>
> document.getElementsByTagName('p').item(0);
<p class="opener">first paragraph</p>
Getting the contents of the first p can be done as follows:
> document.getElementsByTagName('p')[0].innerHTML;
"first paragraph"
Accessing the last p can be done as follows:
> document.getElementsByTagName('p')[2];
<p id="closer">final</p>
To access the attributes of an element, you can use the attributes collection or getAttribute() as shown previously. But a shorter way is to use the attribute name as a property of the element you're working with. So to get the value of the id attribute, you just use idas a property as follows:
> document.getElementsByTagName('p')[2].id;
"closer"
Getting the class attribute of the first paragraph won't work though. It's an exception, because it just happens so that class is a reserved word in ECMAScript. You can use className instead as follows:
> document.getElementsByTagName('p')[0].className;
"opener"
Using getElementsByTagName() you can get all of the elements on the page as follows:
> document.getElementsByTagName('*').length;
8
In earlier versions of IE before IE7, * is not acceptable as a tag name. To get all elements you can use IE's proprietary document.all collection, although selecting every element is rarely needed.
The other shortcut mentioned is getElementById(). This is probably the most common way of accessing an element. You just assign IDs to the elements you plan to play with and they'll be easy to access later on, as seen in the following code:
> document.getElementById('closer');
<p id="closer">final</p>
Additional shortcut methods in more recent browsers include the following:
· getElementByClassName(): This method finds elements using their class attribute
· querySelector(): This method finds an element using a CSS selector string
· querySelectorAll(): This method is the same as the previous one but returns all matching elements not just the first
Siblings, body, first, and last child
nextSibling and previousSibling are two other convenient properties to navigate the DOM tree, once you have a reference to one element:
> var para = document.getElementById('closer');
> para.nextSibling;
#text
> para.previousSibling;
#text
> para.previousSibling.previousSibling;
<p>…</p>
> para.previousSibling.previousSibling.previousSibling;
#text
> para.previousSibling.previousSibling.nextSibling.nextSibling;
<p id="closer">final</p>
The body element is used so often that it has its own shortcut:
> document.body;
<body>…</body>
> document.body.nextSibling;
null
> document.body.previousSibling.previousSibling;
<head>…</head>
firstChild and lastChild are also convenient. firstChild is the same as childNodes[0] and lastChild is the same as childNodes[childNodes.length - 1]:
> document.body.firstChild;
#text
> document.body.lastChild;
#text
> document.body.lastChild.previousSibling;
<!-- and that's about it -->
> document.body.lastChild.previousSibling.nodeValue;
" and that's about it "
The following screenshot shows the family relationships between the body and three paragraphs in it. For simplicity, all the whitespace text nodes are removed from the screenshot:
Walk the DOM
To wrap up, here's a function that takes any node and walks through the DOM tree recursively, starting from the given node:
function walkDOM(n) {
do {
console.log(n);
if (n.hasChildNodes()) {
walkDOM(n.firstChild);
}
} while (n = n.nextSibling);
}
You can test the function as follows:
> walkDOM(document.documentElement);
> walkDOM(document.body);
Modifying DOM nodes
Now that you know a whole lot of methods for accessing any node of the DOM tree and its properties, let's see how you can modify these nodes.
Let's assign a pointer to the last paragraph to the variable my as follows:
> var my = document.getElementById('closer');
Now, changing the text of the paragraph can be as easy as changing the innerHTML value:
> my.innerHTML = 'final!!!';
"final!!!"
Because innerHTML accepts a string of HTML source code, you can also create a new em node in the DOM tree as follows:
> my.innerHTML = '<em>my</em> final';
"<em>my</em> final"
The new em node becomes a part of the tree:
> my.firstChild;
<em>my</em>
> my.firstChild.firstChild;
"my"
Another way to change text is to get the actual text node and change its nodeValue as follows:
> my.firstChild.firstChild.nodeValue = 'your';
"your"
Modifying styles
Often you don't change the content of a node but its presentation. The elements have a style property, which in turn has a property mapped to each CSS property. For example, changing the style of the paragraph to add a red border:
> my.style.border = "1px solid red";
"1px solid red"
CSS properties often have dashes, but dashes are not acceptable in JavaScript identifiers. In such cases, you skip the dash and uppercase the next letter. So padding-top becomes paddingTop, margin-left becomes marginLeft, and so on. Have a look at the following code:
> my.style.fontWeight = 'bold';
"bold"
You also have access to cssText property of style, which lets you work with styles as strings:
> my.style.cssText;
"border: 1px solid red; font-weight: bold;"
And modifying styles is a string manipulation:
> my.style.cssText += " border-style: dashed;"
"border: 1px dashed red; font-weight: bold; border-style: dashed;"
Fun with forms
As mentioned earlier, JavaScript is great for client-side input validation and can save a few round-trips to the server. Let's practice form manipulations and play a little bit with a form located on a popular page www.google.com:

Finding the first text input using the querySelector() method and a CSS selector string is as follows:
> var input = document.querySelector('input[type=text]');
Accessing the search box:
> input.name;
"q"
Changing the search query by setting the text contained in the value attribute is done as follows:
> input.value = 'my query';
"my query"
Now, let's have some fun. Changing the word Lucky with Tricky in the button:
> var feeling = document.querySelectorAll("button")[2];
> feeling.textContent = feelingtextContent.replace(/Lu/, 'Tri');
"I'm Feeling Tricky"

Now, let's implement the tricky part and make that button show and hide for one second. You can do this with a simple function. Let's call it toggle(). Every time you call the function, it checks the value of the CSS property visibility and sets it to visible if it's hidden and vice versa using following code:
function toggle() {
var st = document.querySelectorAll('button')[2].style;
st.visibility = (st.visibility === 'hidden')
? 'visible'
: 'hidden';
}
Instead of calling the function manually, let's set an interval and call it every second:
> var myint = setInterval(toggle, 1000);
The result? The button starts blinking (making it trickier to click). When you're tired of chasing it, just remove the timeout interval:
> clearInterval(myint);
Creating new nodes
To create new nodes, you can use the methods createElement() and createTextNode(). Once you have the new nodes, you add them to the DOM tree using appendChild() (or insertBefore(), or replaceChild()).
Reload http://www.phpied.com/files/jsoop/ch7.html and let's play.
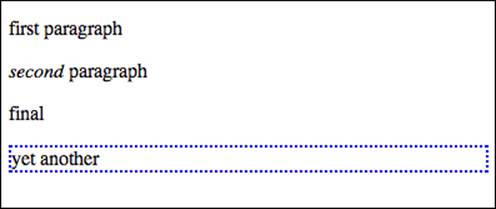
Creating a new p element and set its innerHTML, as shown in the following code:
> var myp = document.createElement('p');
> myp.innerHTML = 'yet another';
"yet another"
The new element automatically gets all the default properties, such as style, which you can modify:
> myp.style;
CSSStyleDeclaration
> myp.style.border = '2px dotted blue';
"2px dotted blue"
Using appendChild() you can add the new node to the DOM tree. Calling this method on the document.body node means creating one more child node right after the last child:
> document.body.appendChild(myp);
<p style="border: 2px dotted blue;">yet another</p>
Here's an illustration of how the page looks like after the new node is appended:
DOM-only method
innerHTML gets things done a little more quickly than using pure DOM. In pure DOM you need to perform the following steps:
1. Create a new text node containing yet another text
2. Create a new paragraph node
3. Append the text node as a child to the paragraph
4. Append the paragraph as a child to the body
This way you can create any number of text nodes and elements and nest them however you like. Let's say you want to add the following HTML to the end of the body:
<p>one more paragraph<strong>bold</strong></p>
Presenting this as a hierarchy would be something like the following:
P element
text node with value "one more paragraph"
STRONG element
text node with value "bold"
The code that accomplishes this is as follows:
// create P
var myp = document.createElement('p');
// create text node and append to P
var myt = document.createTextNode('one more paragraph');
myp.appendChild(myt);
// create STRONG and append another text node to it
var str = document.createElement('strong');
str.appendChild(document.createTextNode('bold'));
// append STRONG to P
myp.appendChild(str);
// append P to BODY
document.body.appendChild(myp);
cloneNode()
Another way to create nodes is by copying (or cloning) existing ones. The method cloneNode() does this and accepts a boolean parameter (true = deep copy with all the children, false = shallow copy, only this node). Let's test the method.
Getting a reference to the element you want to clone can be done as follows:
> var el = document.getElementsByTagName('p')[1];
Now, el refers to the second paragraph on the page that looks like the following code:
<p><em>second</em> paragraph</p>
Let's create a shallow clone of el and append it to the body:
> document.body.appendChild(el.cloneNode(false));
You won't see a difference on the page, because the shallow copy only copied the P node, without any children. This means that the text inside the paragraph (which is a text node child) was not cloned. The line above would be equivalent to the following:
> document.body.appendChild(document.createElement('p'));
But if you create a deep copy, the whole DOM subtree starting from P is copied, and this includes text nodes and the EM element. This line copies (visually too) the second paragraph to the end of the document:
> document.body.appendChild(el.cloneNode(true));
You can also copy only the EM if you want as follows:
> document.body.appendChild(el.firstChild.cloneNode(true));
<em>second</em>
Or, only the text node with value second:
> document.body.appendChild(
el.firstChild.firstChild.cloneNode(false));
"second"
insertBefore()
Using appendChild(), you can only add new children at the end of the selected element. For more control over the exact location there is insertBefore(). This is the same as appendChild(), but accepts an extra parameter specifying where (before which element) to insert the new node. For example, the following code inserts a text node at the end of the body:
> document.body.appendChild(document.createTextNode('boo!'));
And this creates another text node and adds it as the first child of the body:
document.body.insertBefore(
document.createTextNode('first boo!'),
document.body.firstChild
);
Removing nodes
To remove nodes from the DOM tree, you can use the method removeChild(). Again, let's start fresh with the same page with the body:
<body>
<p class="opener">first paragraph</p>
<p><em>second</em> paragraph</p>
<p id="closer">final</p>
<!-- and that's about it -->
</body>
Here's how you can remove the second paragraph:
> var myp = document.getElementsByTagName('p')[1];
> var removed = document.body.removeChild(myp);
The method returns the removed node if you want to use it later. You can still use all the DOM methods even though the element is no longer in the tree:
> removed;
<p>…</p>
> removed.firstChild;
<em>second</em>
There's also the replaceChild() method that removes a node and puts another one in its place.
After removing the node, the tree looks like the following:
<body>
<p class="opener">first paragraph</p>
<p id="closer">final</p>
<!-- and that's about it -->
</body>
Now, the second paragraph is the one with the ID "closer":
> var p = document.getElementsByTagName('p')[1];
> p;
<p id="closer">final</p>
Let's replace this paragraph with the one in the removed variable:
> var replaced = document.body.replaceChild(removed, p);
Just like removeChild(), replaceChild() returns a reference to the node that is now out of the tree:
> replaced;
<p id="closer">final</p>
Now, the body looks like the following:
<body>
<p class="opener">first paragraph</p>
<p><em>second</em> paragraph</p>
<!-- and that's about it -->
</body>
A quick way to wipe out all of the content of a subtree is to set the innerHTML to a blank string. This removes all of the children of the BODY:
> document.body.innerHTML = '';
""
Testing is done as follows:
> document.body.firstChild;
null
Removing with innerHTML is fast and easy. The DOM-only way would be to go over all of the child nodes and remove each one individually. Here's a little function that removes all nodes from a given start node:
function removeAll(n) {
while (n.firstChild) {
n.removeChild(n.firstChild);
}
}
If you want to delete all BODY children and leave the page with an empty <body></body> use the following code:
> removeAll(document.body);
HTML-only DOM objects
As you know already, the Document Object Model applies to both XML and HTML documents. What you've learned above about traversing the tree and then adding, removing, or modifying nodes applies to any XML document. There are, however, some HTML-only objects and properties.
document.body is one such HTML-only object. It's so common to have a <body> tag in HTML documents and it's accessed so often, that it makes sense to have an object that's shorter and friendlier than the equivalent document.getElementsByTagName('body')[0].
document.body is one example of a legacy object inherited from the prehistoric DOM Level 0 and moved to the HTML extension of the DOM specification. There are other objects similar to document.body. For some of them there is no core DOM equivalent, for others there is an equivalent, but the DOM0 original was ported anyway for simplicity and legacy purposes. Let's see some of those objects.
Primitive ways to access the document
Unlike the DOM, which gives you access to any element (and even comments and whitespace), initially JavaScript had only limited access to the elements of an HTML document. This was done mainly through a number of collections:
· document.images: This is a collection of all of the images on the page. The Core DOM equivalent is document.getElementsByTagName('img')
· document.applets: This is the same as document.getElementsByTagName('applet')
· document.links
· document.anchors
· document.forms
document.links contains a list of all <a href="..."></a> tags on the page, meaning the <a> tags that have an href attribute. document.anchors contain all links with a name attribute (<a name="..."></a>).
One of the most widely used collections is document.forms, which contains a list of <form> elements.
Let's play with a page that contains a form and an input, http://www.phpied.com/files/jsoop/ch7-form.html. The following gives you access to the first form on the page:
> document.forms[0];
It's the same as the following:
> document.getElementsByTagName('forms')[0];
The document.forms collection contains collections of input fields and buttons, accessible through the elements property. Here's how to access the first input of the first form on the page:
> document.forms[0].elements[0];
Once you have access to an element, you can access its attributes as object properties. The first field of the first form in the test page is this:
<input name="search" id="search" type="text" size="50" maxlength="255" value="Enter email..." />
You can change the text in the field (the value of the value attribute) by using the following code:
> document.forms[0].elements[0].value = 'me@example.org';
"me@example.org"
If you want to disable the field dynamically use the following code:
> document.forms[0].elements[0].disabled = true;
When forms or form elements have a name attribute, you can access them by name too as in the following code:
> document.forms[0].elements['search']; // array notation
> document.forms[0].elements.search; // object property
document.write()
The method document.write() allows you to insert HTML into the page while the page is being loaded. You can have something like the following code:
<p>It is now
<script>
document.write("<em>" + new Date() + "</em>");
</script>
</p>
This is the same as if you had the date directly in the source of the HTML document as follows:
<p>It is now<em>Fri Apr 26 2013 16:55:16 GMT-0700 (PDT)</em></p>
Note, that you can only use document.write() while the page is being loaded. If you try it after page load, it will replace the content of the whole page.
It's rare that you would need document.write(), and if you think you do, try an alternative approach. The ways to modify the contents of the page provided by DOM Level 1 are preferred and are much more flexible.
Cookies, title, referrer, domain
The four additional properties of document you'll see in this section are also ported from DOM Level 0 to the HTML extension of DOM Level 1. Unlike the previous ones, for these properties there are no core DOM equivalents.
document.cookie is a property that contains a string. This string is the content of the cookies exchanged between the server and the client. When the server sends a page to the browser, it may include the Set-Cookie HTTP header. When the client sends a request to the server, it sends the cookie information back with the Cookie header. Using document.cookie you can alter the cookies the browser sends to the server. For example, visiting cnn.com and typing document.cookie in the console gives you the following output:
> document.cookie;
"mbox=check#true#1356053765|session#1356053704195-121286#1356055565;...
document.title allows you to change the title of the page displayed in the browser window. For example, see the following code:
> document.title = 'My title';
"My title"
Note, that this doesn't change the value of the <title> element, but only the display in the browser window, so it's not equivalent to document.querySelector('title').
document.referrer tells you the URL of the previously-visited page. This is the same value the browser sends in the Referer HTTP header when requesting the page. (Note, that Referer is misspelled in the HTTP headers, but is correct in JavaScript'sdocument.referrer). If you've visited the CNN page by searching on Yahoo first, you can see something like the following:
> document.referrer;
"http://search.yahoo.com/search?p=cnn&ei=UTF-8&fr=moz2"
document.domain gives you access to the domain name of the currently loaded page. This is commonly used when you need to perform so-called domain relaxation. Imagine your page is www.yahoo.com and inside it you have an iframe hosted on music.yahoo.comsubdomain. These are two separate domains so the browser's security restrictions won't allow the page and the iframe to communicate. To resolve this you can set document.domain on both pages to yahoo.com and they'll be able to talk to each other.
Note, that you can only set the domain to a less-specific one, for example, you can change www.yahoo.com to yahoo.com, but you cannot change yahoo.com to www.yahoo.com or any other non-yahoo domain.
> document.domain;
"www.yahoo.com"
> document.domain = 'yahoo.com';
"yahoo.com"
> document.domain = 'www.yahoo.com';
Error: SecurityError: DOM Exception 18
> document.domain = 'www.example.org';
Error: SecurityError: DOM Exception 18
Previously in this chapter, you saw the window.location object. Well, the same functionality is also available as document.location:
> window.location === document.location;
true
Events
Imagine you are listening to a radio program and they announce, "Big event! Huge! Aliens have landed on Earth!" You might think "Yeah, whatever", some other listeners might think "They come in peace" and some "We're all gonna die!". Similarly, the browser broadcasts events and your code could be notified should it decide to tune in and listen to the events as they happen. Some example events include:
· The user clicks a button
· The user types a character in a form field
· The page finishes loading
You can attach a JavaScript function (called an event listener or event handler) to a specific event and the browser will invoke your function as soon the event occurs. Let's see how this is done.
Inline HTML attributes
Adding specific attributes to a tag is the laziest (but the least maintainable) way, for example:
<div onclick="alert('Ouch!')">click</div>
In this case when the user clicks on the <div>, the click event fires and the string of JavaScript code contained in the onclick attribute is executed. There's no explicit function that listens to the click event, but behind the scenes a function is still created and it contains the code you specified as a value of the onclick attribute.
Element Properties
Another way to have some code executed when a click event fires is to assign a function to the onclick property of a DOM node element. For example:
<div id="my-div">click</div>
<script>
var myelement = document.getElementById('my-div');
myelement.onclick = function () {
alert('Ouch!');
alert('And double ouch!');
};
</script>
This way is better because it helps you keep your <div> clean of any JavaScript code. Always keep in mind that HTML is for content, JavaScript for behavior, and CSS for formatting, and you should keep these three separate as much as possible.
This method has the drawback that you can attach only one function to the event, as if the radio program has only one listener. It's true that you can have a lot happening inside the same function, but this is not always convenient, as if all the radio listeners are in the same room.
DOM event listeners
The best way to work with browser events is to use the event listener approach outlined in DOM Level 2, where you can have many functions listening to an event. When the event fires, all functions are executed. All of the listeners don't need to know about each other and can work independently. They can tune in and out at any time without affecting the other listeners.
Let's use the same simple markup from the previous section (available for you to play with at http://www.phpied.com/files/jsoop/ch7.html). It has this piece of markup as follows:
<p id="closer">final</p>
Your JavaScript code can assign listeners to the click event using the addEventListener() method. Let's attach two listeners as follows:
var mypara = document.getElementById('closer');
mypara.addEventListener('click', function () {
alert('Boo!');
}, false);
mypara.addEventListener(
'click', console.log.bind(console), false);
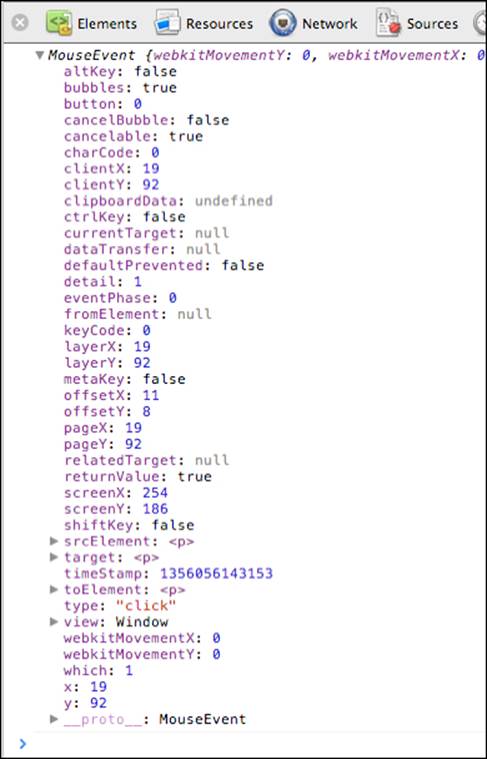
As you can see, addEventListeners() is a method called on the node object and accepts the type of event as its first parameter and a function pointer as its second. You can use anonymous functions such as function () { alert('Boo!'); } or existing functions such as console.log. The listener functions you specify are called when the event happens and an argument is passed to them. This argument is an event object. If you run the preceding code and click on the last paragraph, you can see event objects being logged to the console. Clicking on an event object allows you to see its properties:
Capturing and bubbling
In the calls to addEventListener(), there was a third parameter, false. Let's see what is it for.
Say you have a link inside an unordered list as follows:
<body>
<ul>
<li><a href="http://phpied.com">my blog</a></li>
</ul>
</body>
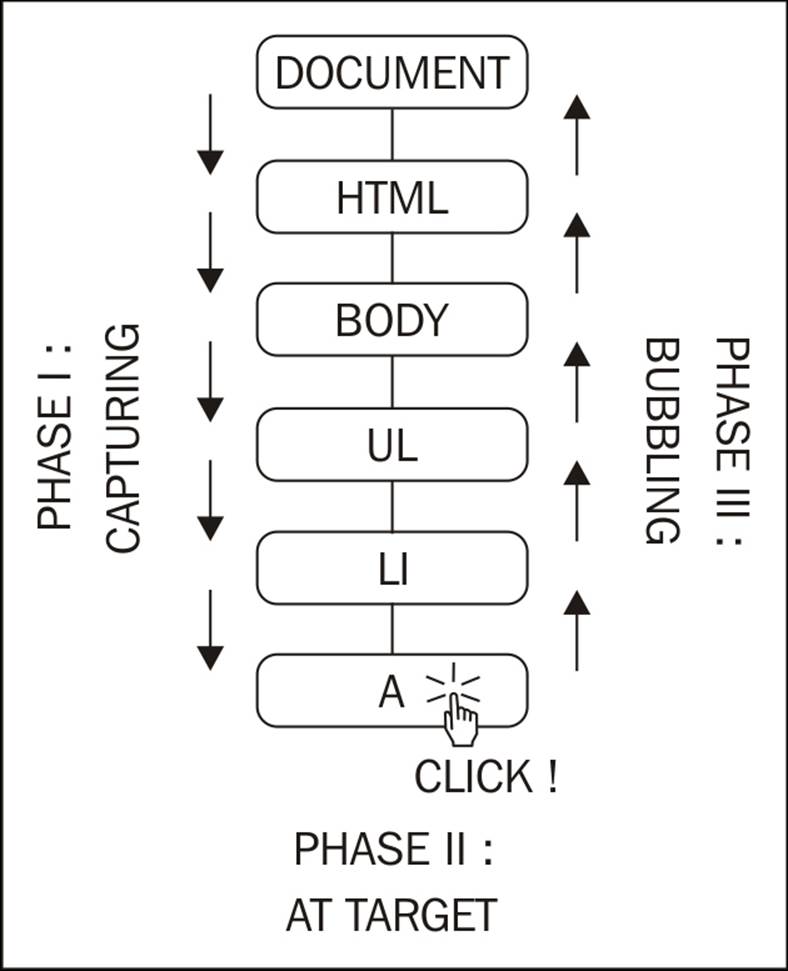
When you click on the link, you're actually also clicking on the list item <li>, the list <ul>, the <body>, and eventually the document as a whole. This is called event propagation. A click on a link can also be seen as click on the document. The process of propagating an event can be implemented in two ways:
· Event capturing: The click happens on the document first, then it propagates down to the body, the list, the list item, and finally to the link
· Event bubbling: The click happens on the link and then bubbles up to the document
DOM Level 2 events specification suggests that the events propagate in three phases, namely, capturing, at target, and bubbling. This means that the event propagates from the document to the link (target) and then bubbles back up to the document. The event objects have an eventPhase property, which reflects the current phase:
Historically, IE and Netscape (working on their own and without a standard to follow) implemented the exact opposites. IE implemented only bubbling, Netscape only capturing. Today, long after the DOM specification, modern browsers implement all three phases.
The practical implications related to the event propagation are as follows:
· The third parameter to addEventListener() specifies whether or not capturing should be used. In order to have your code more portable across browsers, it's better to always set this parameter to false and use bubbling only.
· You can stop the propagation of the event in your listeners so that it stops bubbling up and never reaches the document. To do this you can call the stopPropagation() method of the event object (there is an example in the next section).
· You can also use event delegation. If you have ten buttons inside a <div>, you can always attach ten event listeners, one for each button. But a smarter thing to do is to attach only one listener to the wrapping <div> and once the event happens, check which button was the target of the click.
As a side note, there is a way to use event capturing in old IEs too (using setCapture() and releaseCapture() methods) but only for mouse events. Capturing any other events (keystroke events for example) is not supported.
Stop propagation
Let's see an example of how you can stop the event from bubbling up. Going back to the test document, there is this piece of code:
<p id="closer">final</p>
Let's define a function that handles clicks on the paragraph:
function paraHandler() {
alert('clicked paragraph');
}
Now, let's attach this function as a listener to the click event:
var para = document.getElementById('closer');
para.addEventListener('click', paraHandler, false);
Let's also attach listeners to the click event on the body, the document, and the browser window:
document.body.addEventListener('click', function () {
alert('clicked body');
}, false);
document.addEventListener('click', function () {
alert('clicked doc');
}, false);
window.addEventListener('click', function () {
alert('clicked window');
}, false);
Note, that the DOM specifications don't say anything about events on the window. And why would they, since DOM deals with the document and not the browser. So browsers implement window events inconsistently.
Now, if you click on the paragraph, you'll see four alerts saying:
· clicked paragraph
· clicked body
· clicked doc
· clicked window
This illustrates how the same single click event propagates (bubbles up) from the target all the way up to the window.
The opposite of addEventLister() is removeEventListener() and it accepts exactly the same parameters. Let's remove the listener attached to the paragraph.
> para.removeEventListener('click', paraHandler, false);
If you try now, you'll see alerts only for the click event on the body, document, and window, but not on the paragraph.
Now, let's stop the propagation of the event. The function you add as a listener receives the event object as a parameter and you can call the stopPropagation() method of that event object as follows:
function paraHandler(e) {
alert('clicked paragraph');
e.stopPropagation();
}
Adding the modified listener is done as follows:
para.addEventListener('click', paraHandler, false);
Now, when you click on the paragraph you see only one alert because the event doesn't bubble up to the body, the document, or the window.
Note, that when you remove a listener, you have to pass a pointer to the same function you previously attached. Otherwise doing the following does not work because the second argument is a new function, not the same you passed when adding the event listener, even if the body is exactly the same:
document.body.removeEventListener('click',
function () {
alert('clicked body');
},
false); // does NOT remove the handler
Prevent default behavior
Some browser events have a predefined behavior. For example, clicking a link causes the browser to navigate to another page. You can attach listeners to clicks on a link and you can also disable the default behavior by calling the method preventDefault() on the event object.
Let's see how you can annoy your visitors by asking "Are you sure you want to follow this link?" every time they click a link. If the user clicks on Cancel (causing confirm() to return false), the preventDefault() method is called as follows:
// all links
var all_links = document.getElementsByTagName('a');
for (var i = 0; i < all_links.length; i++) { // loop all links
all_links[i].addEventListener(
'click', // event type
function (e) { // handler
if (!confirm('Sure you want to follow this link?')) {
e.preventDefault();
}
},
false // don't use capturing
);
}
Note, that not all events allow you to prevent the default behavior. Most do, but if you want to be sure, you can check the cancellable property of the event object.
Cross-browser event listeners
As you already know, most modern browsers almost fully implement the DOM Level 1 specification. However, the events were not standardized until DOM 2. As a result, there are quite a few differences in how IE before version 9 implements this functionality compared to modern browsers.
Check out an example that causes the nodeName of a clicked element (the target element) to be written to the console:
document.addEventListener('click', function (e) {
console.log(e.target.nodeName);
}, false);
Now, let's take a look at how IE is different:
· In IE there's no addEventListener() method, although since IE Version 5 there is an equivalent attachEvent(). For earlier versions, your only choice is accessing the property (such as onclick) directly.
· click event becomes onclick when using attachEvent().
· If you listen to events the old-fashioned way (for example, by setting a function value to the onclick property), when the callback function is invoked, it doesn't get an event object passed as a parameter. But, regardless of how you attach the listener in IE, there is always a global object window.event that points to the latest event.
· In IE the event object doesn't get a target attribute telling you the element on which the event fired, but it does have an equivalent property called srcElement.
· As mentioned before, event capturing doesn't apply to all events, so only bubbling should be used.
· There's no stopPropagation() method, but you can set the IE-only cancelBubble property to true.
· There's no preventDefault() method, but you can set the IE-only returnValue property to false.
· To stop listening to an event, instead of removeEventListener() in IE you'll need detachEvent().
So, here's the revised version of the previous code that works across browsers:
function callback(evt) {
// prep work
evt = evt || window.event;
var target = evt.target || evt.srcElement;
// actual callback work
console.log(target.nodeName);
}
// start listening for click events
if (document.addEventListener) { // Modern browsers
document.addEventListener('click', callback, false);
} else if (document.attachEvent) { // old IE
document.attachEvent('onclick', callback);
} else {
document.onclick = callback; // ancient
}
Types of events
Now you know how to handle cross-browser events. But all of the examples above used only click events. What other events are happening out there? As you can probably guess, different browsers provide different events. There is a subset of cross-browser events and some browser-specific ones. For a full list of events, you should consult the browser's documentation, but here's a selection of cross-browser events:
· Mouse events
· mouseup, mousedown, click (the sequence is mousedown-up-click), dblclick
· mouseover (mouse is over an element), mouseout (mouse was over an element but left it), mousemove
· Keyboard events
· keydown, keypress, keyup (occur in this sequence)
· Loading/window events
· load (an image or a page and all of its components are done loading), unload (user leaves the page), beforeunload (the script can provide the user with an option to stop the unload)
· abort (user stops loading the page or an image in IE), error (a JavaScript error, also when an image cannot be loaded in IE)
· resize (the browser window is resized), scroll (the page is scrolled), contextmenu (the right-click menu appears)
· Form events
· focus (enter a form field), blur (leave the form field)
· change (leave a field after the value has changed), select (select text in a text field)
· reset (wipe out all user input), submit (send the form)
Additionally, modern browsers provide drag events (dragstart, dragend, drop, and others) and touch devices provide touchstart, touchmove, and touchend.
This concludes the discussion of events. Refer to the exercise section at the end of this chapter for a little challenge of creating your own event utility to handle cross-browser events.
XMLHttpRequest
XMLHttpRequest() is an object (a constructor function) that allows you to send HTTP requests from JavaScript. Historically, XMLHttpRequest (or XHR for short) was introduced in IE and was implemented as an ActiveX object. Starting with IE7 it's a native browser object, the same way as it's in the other browsers. The common implementation of this object across browsers gave birth to the so-called Ajax applications, where it's no longer necessary to refresh the whole page every time you need new content. With JavaScript, you can make an HTTP request to the server, get the response, and update only a part of the page. This way you can build much more responsive and desktop-like web pages.
Ajax stands for Asynchronous JavaScript and XML .
· Asynchronous because after sending an HTTP request your code doesn't need to wait for the response, but it can do other stuff and be notified (through an event) when the response arrives.
· JavaScript because it's obvious that XHR objects are created with JavaScript.
· XML because initially developers were making HTTP requests for XML documents and were using the data contained in them to update the page. This is no longer a common practice, though, as you can request data in plain text, in the much more convenient JSON format, or simply as HTML ready to be inserted into the page.
There are two steps to using the XMLHttpRequest:
· Send the request: This includes creating an XMLHttpRequest object and attaching an event listener
· Process the response: Your event listener gets notified that the response has arrived and your code gets busy doing something amazing with the response
Sending the request
In order to create an object you simply use the following code (let's deal with browser inconsistencies in just a bit):
var xhr = new XMLHttpRequest();
The next thing is to attach an event listener to the readystatechange event fired by the object:
xhr.onreadystatechange = myCallback;
Then, you need to call the open() method, as follows:
xhr.open('GET', 'somefile.txt', true);
The first parameter specifies the type of HTTP request (GET, POST, HEAD, and so on). GET and POST are the most common. Use GET when you don't need to send much data with the request and your request doesn't modify (write) data on the server, otherwise use POST. The second parameter is the URL you are requesting. In this example, it's the text file somefile.txt located in the same directory as the page. The last parameter is a boolean specifying whether the request is asynchronous (true, always prefer this) or not (false, blocks all the JavaScript execution and waits until the response arrives).
The last step is to fire off the request which is done as follows:
xhr.send('');
The method send() accepts any data you want to send with the request. For GET requests, this is an empty string, because the data is in the URL. For POST request, it's a query string in the form key=value&key2=value2.
At this point, the request is sent and your code (and the user) can move on to other tasks. The callback function myCallback will be invoked when the response comes back from the server.
Processing the response
A listener is attached to the readystatechange event. So what exactly is the ready state and how does it change?
There is a property of the XHR object called readyState. Every time it changes, the readystatechange event fires. The possible values of the readyState property are as follows:
· 0-uninitialized
· 1-loading
· 2-loaded
· 3-interactive
· 4-complete
When readyState gets the value of 4, it means the response is back and ready to be processed. In myCallback after you make sure readyState is 4, the other thing to check is the status code of the HTTP request. You might have requested a non-existing URL for example and get a 404 (File not found) status code. The interesting code is the 200 (OK) code, so myCallback should check for this value. The status code is available in the status property of the XHR object.
Once xhr.readyState is 4 and xhr.status is 200, you can access the contents of the requested URL using the xhr.responseText property. Let's see how myCallback could be implemented to simply alert() the contents of the requested URL:
function myCallback() {
if (xhr.readyState < 4) {
return; // not ready yet
}
if (xhr.status !== 200) {
alert('Error!'); // the HTTP status code is not OK
return;
}
// all is fine, do the work
alert(xhr.responseText);
}
Once you've received the new content you requested, you can add it to the page, or use it for some calculations, or for any other purpose you find suitable.
Overall, this two-step process (send request and process response) is the core of the whole XHR/Ajax functionality. Now that you know the basics, you can move on to building the next Gmail. Oh yes, let's have a look at some minor browser inconsistencies.
Creating XMLHttpRequest objects in IE prior to Version 7
In Internet Explorer prior to version 7, the XMLHttpRequest object was an ActiveX object, so creating an XHR instance is a little different. It goes like the following:
var xhr = new ActiveXObject('MSXML2.XMLHTTP.3.0');
MSXML2.XMLHTTP.3.0 is the identifier of the object you want to create. There are several versions of the XMLHttpRequest object and if your page visitor doesn't have the latest one installed, you can try two older ones, before you give up.
For a fully-cross-browser solution, you should first test to see if the user's browser supports XMLHttpRequest as a native object, and if not, try the IE way. Therefore, the whole process of creating an XHR instance could be like this:
var ids = ['MSXML2.XMLHTTP.3.0','MSXML2.XMLHTTP','Microsoft.XMLHTTP'];
var xhr;
if (XMLHttpRequest) {
xhr = new XMLHttpRequest();
} else {
// IE: try to find an ActiveX object to use
for (var i = 0; i < ids.length; i++) {
try {
xhr = new ActiveXObject(ids[i]);
break;
} catch (e) {}
}
}
What is this doing? The array ids contains a list of ActiveX program IDs to try. The variable xhr points to the new XHR object. The code first checks to see if XMLHttpRequest exists. If so, this means that the browser supports XMLHttpRequest() natively (so the browser is relatively modern). If it is not, the code loops through ids trying to create an object. catch(e) quietly ignores failures and the loop continues. As soon as an xhr object is created, you break out of the loop.
As you can see, this is quite a bit of code so it's best to abstract it into a function. Actually, one of the exercises at the end of the chapter prompts you to create your own Ajax utility.
A is for Asynchronous
Now you know how to create an XHR object, give it a URL and handle the response to the request. What happens when you send two requests asynchronously? What if the response to the second request comes before the first?
In the example above, the XHR object was global and myCallback was relying on the presence of this global object in order to access its readyState, status, and responseText properties. Another way, which prevents you from relying on global variables, is to wrap the callback in a closure. Let's see how:
var xhr = new XMLHttpRequest();
xhr.onreadystatechange = (function (myxhr) {
return function () {
myCallback(myxhr);
};
}(xhr));
xhr.open('GET', 'somefile.txt', true);
xhr.send('');
In this case myCallback() receives the XHR object as a parameter and is not going to look for it in the global space. This also means that at the time the response is received, the original xhr might have been reused for a second request. The closure keeps pointing to the original object.
X is for XML
Although these days JSON (discussed in the next chapter) is preferred over XML as a data transfer format, XML is still an option. In addition to the responseText property, the XHR objects also have another property called responseXML. When you send an HTTP request for an XML document, responseXML points to an XML DOM document object. To work with this document, you can use all of the core DOM methods discussed previously in this chapter, such as getElementsByTagName(), getElementById(), and so on.
An example
Let's wrap up the different XHR topics with an example. You can visit the page located at http://www.phpied.com/files/jsoop/xhr.html to work on the example yourself:
The main page, xhr.html, is a simple static page that contains nothing but three <div> tags.
<div id="text">Text will be here</div>
<div id="html">HTML will be here</div>
<div id="xml">XML will be here</div>
Using the console, you can write code that requests three files and loads their respective contents into each <div>.
The three files to load are:
· content.txt: a simple text file containing the text "I am a text file"
· content.html: a file containing HTML code "I am <strong>formatted</strong> <em>HTML</em>"
· content.xml: an XML file, containing the following code:
· <?xml version="1.0" ?>
· <root>
· I'm XML data.
</root>
All of the files are stored in the same directory as xhr.html.
Note
For security reasons you can only use the original XMLHttpRequest to request files that are on the same domain. However, modern browsers support XHR2 which lets you make cross-domain requests, provided that the appropriate Access-Control-Allow-Origin HTTP header is in place.
First, let's create a function to abstract the request/response part:
function request(url, callback) {
var xhr = new XMLHttpRequest();
xhr.onreadystatechange = (function (myxhr) {
return function () {
if (myxhr.readyState === 4 && myxhr.status === 200) {
callback(myxhr);
}
};
}(xhr));
xhr.open('GET', url, true);
xhr.send('');
}
This function accepts a URL to request and a callback function to call once the response arrives. Let's call the function three times, once for each file, as follows:
request(
'http://www.phpied.com/files/jsoop/content.txt',
function (o) {
document.getElementById('text').innerHTML =
o.responseText;
}
);
request(
'http://www.phpied.com/files/jsoop/content.html',
function (o) {
document.getElementById('html').innerHTML =
o.responseText;
}
);
request(
'http://www.phpied.com/files/jsoop/content.xml',
function (o) {
document.getElementById('xml').innerHTML =
o.responseXML
.getElementsByTagName('root')[0]
.firstChild
.nodeValue;
}
);
The callback functions are defined inline. The first two are identical. They just replace the HTML of the corresponding <div> with the contents of the requested file. The third one is a little different as it deals with the XML document. First, you access the XML DOM object as o.responseXML. Then, using getElementsByTagName() you get a list of all <root> tags (there is only one). The firstChild of <root> is a text node and nodeValue is the text contained in it ("I'm XML data"). Then just replace the HTML of <div id="xml"> with the new content. The result is shown on the following screenshot:
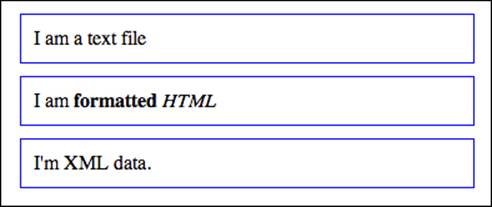
When working with the XML document, you can also use o.responseXML.documentElement to get to the <root> element, instead of o.responseXML.getElementsByTagName('root')[0]. Remember that documentElement gives you the root node of an XML document. The root in HTML documents is always the <html> tag.
Summary
You learned quite a bit in this chapter. You have learned some cross-browser BOM (Browser Object Model) objects:
· Properties of the global window object such as navigator, location, history, frames, screen
· Methods such as setInterval() and setTimeout(); alert(), confirm() and prompt(); moveTo/By() and resizeTo/By()
Then you learned about the DOM (Document Object Model), an API to represent an HTML (or XML) document as a tree structure where each tag or text is a node on the tree. You also learned how to do the following actions:
· Access nodes
· Using parent/child relationship properties parentNode, childNodes, firstChild, lastChild, nextSibling, and previousSibling
· Using getElementsById(), getElementsByTagName(), getElementsByName(), and querySelectorAll()
· Modify nodes:
· Using innerHTML or innerText/textContent
· Using nodeValue or setAttribute() or just using attributes as object properties
· Remove nodes with removeChild() or replaceChild()
· And add new ones with appendChild(), cloneNode(), and insertBefore()
You also learned some DOM0 (prestandardization) properties, ported to DOM Level 1:
· Collections such as document.forms, images, links, anchors, applets. Using these are discouraged as DOM1 has the much more flexible method getElementsByTagName().
· document.body which gives you convenient access to <body>.
· document.title, cookie, referrer, and domain.
Next, you learned about how the browser broadcasts events that you can listen to. It's not straightforward to do this in a cross-browser manner, but it's possible. Events bubble up, so you can use event delegation to listen to events more globally. You can also stop the propagation of events and interfere with the default browser behavior.
Finally, you learned about the XMLHttpRequest object that allows you to build responsive web pages that do the following tasks:
· Make HTTP requests to the server to get pieces of data
· Process the response to update portions of the page
Exercises
In the previous chapters, the solutions to the exercises could be found in the text of the chapter. This time, some of the exercises require you to do some more reading (or experimentation) outside this book.
1. BOM: As a BOM exercise, try coding something wrong, obtrusive, user-unfriendly, and all in all, very Web 1.0, the shaking browser window. Try implementing code that opens a 200 x 200 pop up window and then resizes it slowly and gradually to 400 x 400. Next, move the window around as if there's an earthquake. All you'll need is one of the move*() functions, one or more calls to setInterval(), and maybe one to setTimeout()/clearInterval() to stop the whole thing. Or here's an easier one, print the current date/time in the document.title and update it every second, like a clock.
2. DOM:
· Implement walkDOM() differently. Also make it accept a callback function instead of hard coding console.log()
· Removing content with innerHTML is easy (document.body.innerHTML = ''), but not always best. The problem will be when there are event listeners attached to the removed elements, they won't be removed in IE causing the browser to leak memory, because it stores references to something that doesn't exist. Implement a general-purpose function that deletes DOM nodes, but removes any event listeners first. You can loop through the attributes of a node and check if the value is a function. If it is, it's most likely an attribute like onclick. You need to set it to null before removing the element from the tree.
· Create a function called include() that includes external scripts on demand. This means you need to create a new <script> tag dynamically, set its src attribute and append to the document's <head>. Test by using the following code:
> include('somescript.js');
3. Events:
Create an event utility (object) called myevent which has the following methods working cross-browser:
· addListener(element, event_name, callback) where element could also be an array of elements
· removeListener(element, event_name, callback)
· getEvent(event) just to check for a window.event for older versions of IE
· getTarget(event)
· stopPropagation(event)
· preventDefault(event)
· function myCallback(e) {
· e = myevent.getEvent(e);
· alert(myevent.getTarget(e).href);
· myevent.stopPropagation(e);
· myevent.preventDefault(e);
· }
myevent.addListener(document.links, 'click', myCallback);
Usage example:
The result of the example code should be that all of the links in the document lead nowhere but only alert the href attribute.
Create an absolutely positioned <div>, say at x = 100px, y = 100px. Write the code to be able to move the div around the page using the arrow keys or the keys J (left), K (right), M (down), and I (up). Reuse your own event utility from 3.1.
4. XMLHttpRequest
Create your own XHR utility (object) called ajax. For example, have a look at the following code:
function myCallback(xhr) {
alert(xhr.responseText);
}
ajax.request('somefile.txt', 'get', myCallback);
ajax.request('script.php', 'post', myCallback,'first=John&last=Smith');
All materials on the site are licensed Creative Commons Attribution-Sharealike 3.0 Unported CC BY-SA 3.0 & GNU Free Documentation License (GFDL)
If you are the copyright holder of any material contained on our site and intend to remove it, please contact our site administrator for approval.
© 2016-2026 All site design rights belong to S.Y.A.