JavaScript in Plain Language (2015)
PART II: ENTERING THE SECOND REALM
2.11 Other useful arrays methods
sort( )
In order to sort the contents of an array we can use the JavaScript library method sort():
Using the following array,
var y = ["grape", "apple", "banana"];
We can sort it like this:
y.sort();
Or, for displaying purposes:
console.log(y.sort());
· Please keep in mind that sorting is permanent, it affects the original array.
When it comes to strings, a string type value does not have a method to sort because sorting needs to use individual elements and a string is just one element all together. If you ever want to sort a string you will have to convert it to an array, then sort it, and then reconvert to string again.
We will actual do this exercise in a bit.
join( )
The method join outputs an array value as a string format:
Examples:
var y = ["grape", "apple", "banana"];
y.join();
It outputs: "grape,apple,banana"
We can also use a parameter to determine what separates each word.
Here are a few examples of separation methods:
· Adding a pair of quotes as the parameter but without a space between quotes:
y.join("");
It outputs: "grapeapplebanana"
· Adding a space in between quotes:
y.join(" ");
It outputs: "grape apple banana"
· Adding a comma and a space:
y.join(", ");
It outputs: "grape, apple, banana"
· Adding a dash in between the quotes:
y.join("/");
It outputs: "grape/apple/banana"
· Adding a space, dash, space:
y.join(" / ");
It outputs: "grape / apple / banana"
Notice that I have been writing “it outputs”. In order to convert an array value into a string value we must catch the output by assigning it to a variable. If we assign it to the original variable we convert the array into a string. When we assign it to a different variable, we copy the values into a string format. The original array remains intact.
What about sorting before converting to string?
y.sort().join(" ");
It converts to a sorted array, and then it outputs a string:
"apple banana grape"
Notice the dot syntax at work for multiple attached methods.
· Important: Although join() does not affect the original array unless we assign the output to the original variable name, sort() works differently. When we sort an array, it physically rearranges the locations of each item. Sorting is permanent and it does not have to be explicitly assigned.
Example:
var y = ["grape", "apple", "banana"];
y[0]; <-- It displays "grape"
Now we sort it (without an explicit assignment):
y.sort();
y[0]; <-- It displays "apple"
Sorting is permanent.
indexOf( )
· The indexOf() method returns the location position of an item.
· If the item does not exist, it returns a -1.
This is a very useful method to check if a certain item already exists in an array before we add it, or to search for a specific item as we will see on the next lab work.
In the array
var y = ["grape", "apple", "banana"];
y.indexOf("banana"); <-- returns 2 (for location 2)
y.indexOf("chestnut"); <--- returns -1 ( as in ‘not found’)
Example:
In
var y = ["grape", "apple", "banana"];
We could see if chestnut exists and code a script to dialog with the user:
if(y.indexOf("chestnut") < 0) {
console.log( "Not found, would you like to add it?");
}
It outputs:
“Not found, would you like to add it?”
Then we would write a script to add chestnut to the array as we have done in a previous lab work.
· The < 0 bit is to check if the indexOf is -1, which means that the item does not exist.
· On the other hand, an index of zero or above, means that the item is already in the array.
· Each index corresponds to an item location.
pop( ) and shift( )
The opposite of push(), which is the method used to add an item to the top or rightmost place in an array, is called pop().
Think of "Pop! Goes the Weasel"!
pop() removes one item from the very end of the array.
In
var y = ["grape", "apple", "banana"];
y.pop();
Will remove "banana". Now y is only ["grape", "apple"]
shift() is the opposite of unshift().
We unshift all items to insert an item at the bottom or leftmost place.
When we remove an item from the bottom or leftmost place, all the other items get shifted down.
Let’s remove "grape" which is currently the first item in array y:
y.shift();
Notice how pop() and shift() don’t take any argument in their parentheses. That’s because they specifically remove the last or the first item, not a named item.
Do you still remember how to put the items back?
y.push("banana");
y.unshift("grape");
Now array y is back to its original state:
["grape", "apple", "banana"]
slice( )
The method slice( ) extracts specific items from one array and outputs those items in the same format type: array.
This means that, if we catch the output by assigning it to another variable, we create another array.
What is the difference between join() and slice()?
· join() converts the output into a string value. We use the parentheses to determine how the string words will be separated.
· slice() converts the output from an array into another array. Since we don’t need to determine how to separate the items because they are already separated, we take advantage of the parentheses to pass in some other parameters as follows:
myArray.slice(0,4); <-- zero is the first location to be included in the output, and 4 is the first location to be excluded.
Example:
In
var fruits = ["apples", "bananas", "blueberries", "grapes", "avocado", "peaches"];
I am going to declare a new array an use slice() to extract some fruit items from the fruits array:
var pickedFruits = fruits.slice(0,4);
Array pickedFruits now contains:
["apples", "bananas", "blueberries", "grapes"]
· The two parameters (0,4) have the following meaning:
The first parameter represents the first location to be extracted.
The second parameter represents the first location to be excluded from extraction.
A (0,1) would extract just apples because it excluded bananas, which is in position 1.
A (1,4) would extract bananas, blueberries, grapes, because it extracts from position 1 (location one) which is bananas, and it excludes from position 4 which is avocado.
For more advanced techniques on slice please refer to my eBook
JavaScript Objects Functions and Arrays Explained.
splice( )
The Array method splice( ) is a very interesting one. Do you still remember push() and unshift()? They add items to the end or beginning of an array, right?
· splice() adds items to a specific location in the array.
Let’s see how it works.
Depending on how many arguments you use in the parenthesis, you can do the following:
a) Delete items mode:
When you use only two arguments you are giving the index positions in the following manner:
First argument: where the action is to start (inclusively),
Second argument: How many items will be removed.
In a way, having just two arguments means to delete because there is nothing to add.
splice(0,3) (explanation further down the page)
b) Add items mode,
If you insert more than two arguments, the third and consecutive arguments are data to be inserted, and in that case JavaScript assumes you want to insert items into the array.
splice(2,0, "yellow")
In just add mode, the second argument is zero, which means that no items will be deleted in exchange for the items we are adding with the third and consecutive parameters.
or...
c) Replace items mode.
If the second parameter in add mode is anything other than zero, this number will indicate how many items will be deleted in exchange for the items being added.
splice(2,1, "yellow")
For example, splice(0,3) means to delete 3 items: the first, the second and the third. Number 3 represents the quantity of items to be removed. The number 3 coincides with the third item on the array but it is not necessarily so. If we had splice(2,3) it would remove the third, fourth and fifth items, which correspond to positions 2,3,4 and counting from zero.
· The 3rd and consecutive arguments represent the items to be inserted.
For example,
splice(2,0, "yellow") means to insert yellow in position two (third item) and unshift the others because the zero means that no items are to be deleted.
splice(2,1, "yellow") it means to add yellow to position 2 ( third item) and remove whatever is there (this is a replacement due to the second argument being anything other than zero).
See the next image for a better view of these concepts.
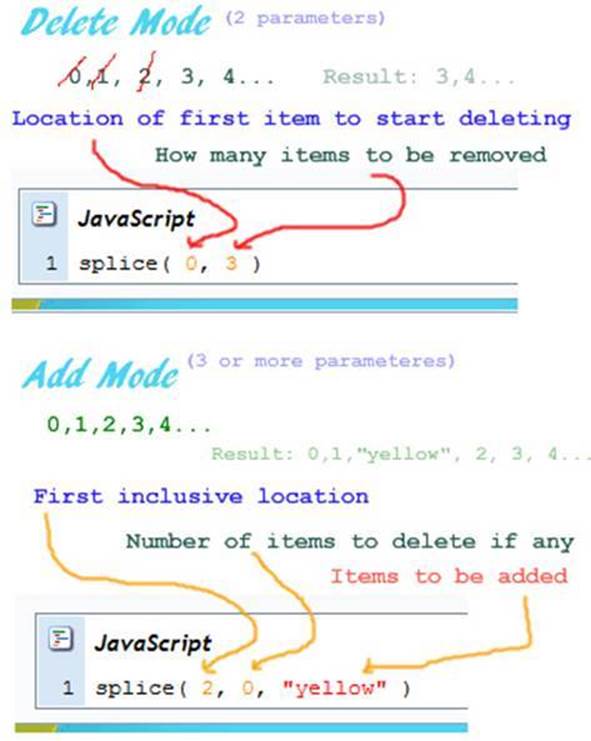
Fig 13
· Please note that, unlike other implementations where we were displaying items, with splice() we are actually editing the original array. It is a permanent operation just like sort().
We could also use splice() to remove and transfer some items into a new array (sort of what we did with slice(), except that now we are also editing the original array)
Here’s an example using the following array:
var x =["blue","red","green","violet","brown"];
a) Splitting the array by copying the first three items into newArray before deleting them:
var newArray = x.splice(0,3);
b) Call array x:
x;
It returns ["violet", "brown"]
c) Call array newArray:
newArray;
It returns ["blue", "red", "green"]
We have split the contents of x into two different arrays. Had we used slice() instead of splice() we would still have the original array x intact.
In summary, splice() is very versatile and it can be used in place of push(), pop(), unshift() and shift() whenever we need to address a specific position in the array instead of generically using the end or the beginning of the array to insert or delete items.
If at this time your head is spinning with so much information know that you’re not alone. You don’t really have to memorize these methods. What you really need to do is to understand how they work. Then later when you need to use them you can always come back and review the concepts one more time. Eventually they will become part of your internal toolset. Just make sure you understand how they work.
Let’s practice a bit more to make sure you get the idea!
Splice lab work
Let’s try a few samples to illustrate the concept of splice().
Deleting items with splice( ):
1- On your Console declare the following array:
var x = ["blue","red","green","violet","brown"];
2- Delete 3 items starting at positions 0 which is blue.
Exclude from deletion position 3, which violet:
x.splice(0,3);
We have just deleted blue, red, green from array x.
3- Call in the array:
x;
It returns ["violet", "brown"] because the original items in positions 0,1,2 were deleted.
Adding items with splice( ):
4- Let’s add our items back into the array, starting at position zero and without deleting any items in exchange:
x.splice(0,0, "blue","red","green");
5- Call the array:
x;
returns ["blue", "red", "green", "violet", "brown"].
We started at position zero and added all the listed items, and deleted zero items.
You may not use splice() extensively on your programming but it is a great tool to understand and call upon it when needed.
There are many more methods we can use with arrays. Learning all of them at once is just overwhelming. It may be a good idea to acquire my other book about JavaScript library methods for reference purposes and for an easy explanation on how they all work. If I thought it would help to include all the other methods here at once, I would have done it. Of course you can always search and hope not to get confused or sidetracked by some bogus explanation on the internet. Knowing these tools is an important step to become a master in the craft.