Java Testing with Spock, Version 6 (2015)
PART 4: APPENDIXES
A. Installing Spock
This appendix explains how you can install and begin using Spock in your Java project (even when you already have existing JUnit tests). It also covers installation of Groovy support in popular development environments and how to best use the source code for the book.
I assume you already have a Java project (that you want to write Spock tests for) and so the following are already available:
· Java development Kit (if you don't have it download it from here http://www.oracle.com/technetwork/java/javase/downloads/index.html)
· Maven build system (http://maven.apache.org/)OR
· Gradle build system (https://gradle.org/)
· Your favorite Integrated Development Environment (e.g. Eclipse)
A.1 Optional Groovy installation
First let's get a big misunderstanding out of the way. It’s perfectly possible to use Spock in your Java project without installing Groovy itself. It is nice to have the groovy tools available for quick tests and small scripts, but they are by no means necessary.
To install Groovy go to http://groovy-lang.org/download.html, and follow the instructions for your operating system. The easiest way is to download the ZIP file, extract it an directory of your choice, and set your PATH variable accordingly.
Once you install Groovy you should have the following commands available
1. groovyc: Groovy compiler.
Apart for simple tests normally you do not use this directly.
2. groovy: Groovy runner.
You can use this to run individual Groovy scripts if you want.
3. groovysh Groovy Shell.
This is an interactive way to run groovy statements.
4. groovyconsole: Graphical Groovy Console.
This is the recommended way to start your Groovy journey, because it provides a friendly GUI application you can use to evaluate Groovy statements.
A.2. Choosing a Spock version
At the time of this writing, there are the following Spock versions
1. Spock 1.0-groovy2.4
2. Spock 1.0-groovy2.3
3. Spock 1.0-groovy2.0
All versions are available in Maven central[1] and are production ready. The groovy versions have little effect for Java projects. If you want to add Spock to a Groovy project, then of course choose the matching Groovy version. In the sample code of the book I chose the version for Groovy 2.4 because it is the latest at the time of writing.
A.3. Master example for Maven, Ant and Gradle
Your first stop regarding Spock installation should be the Spock-example Github repository. This is located at https://github.com/spockframework/spock-example and it is a full project with Spock tests that contains build files for Gradle, Maven and Ant (depending on what is your build system, you do not need all of them). Essentially all my instructions of the next sections are extracted from this project.
All code listings in this appendix are just segments of the pom.xml file located in that repository. I will summarize the instructions for Maven and Gradle[2]. I assume that you already have a Java project up and running and you wish to add Spock tests.
A.3.1 Spock with Maven
If you use Maven add the following in your pom.xml in the build ->plugins section.
Listing A.1 Adding Groovy support in Maven
<plugin> <groupId>org.codehaus.gmavenplus</groupId> <artifactId>gmavenplus-plugin</artifactId> <version>1.4</version> <executions> <execution> <goals> <goal>compile</goal> <goal>testCompile</goal> </goals> </execution> </executions></plugin><plugin> <artifactId>maven-surefire-plugin</artifactId> <version>2.6</version> <configuration> <useFile>false</useFile> <includes> <include>**/*Spec.java</include> <include>**/*Test.java</include> </includes> </configuration></plugin>
This setups Groovy support in Maven and Surefire. Also in pom.xml in the dependencies section add the following.
Listing A.1 Adding Spock dependencies in Maven
<dependency> <groupId>org.spockframework</groupId> <artifactId>spock-core</artifactId> <version>1.0-groovy-2.4</version> <scope>test</scope></dependency><dependency> <!-- enables mocking of classes (in addition to interfaces) --> <groupId>cglib</groupId> <artifactId>cglib-nodep</artifactId> <version>3.1</version> <scope>test</scope></dependency><dependency> <!-- enables mocking of classes without default constructor (together with CGLIB) --> <groupId>org.objenesis</groupId> <artifactId>objenesis</artifactId> <version>2.1</version> <scope>test</scope></dependency>
That's it. Now you can build Spock tests via Maven. Running mvn test from the same directory where the pom file exists should correctly detect and run your Spock tests (assuming they all have names that end in *Spec as I show in the book).
A.3.2. Spock with Gradle
If you use Gradle in your Java project things are even simpler. Groovy compilation is already taken care of, and you just need the Spock dependencies in your build.gradle file, as shown below.
Listing A.3 Gradle settings for Spock
dependencies { [....other dependencies here...] // mandatory dependencies for using Spock compile "org.codehaus.groovy:groovy-all:2.4.1" testCompile "org.spockframework:spock-core:1.0-groovy-2.4" // optional dependencies for using Spock testRuntime "cglib:cglib-nodep:3.1" // allows mocking of classes (in addition to interfaces) testRuntime "org.objenesis:objenesis:2.1" // allows mocking of classes without default constructor (together with CGLIB)}
Make sure also that you already use maven Central.
Listing A.4 Gradle settings for Spock repository
repositories { // Spock releases are available from Maven Central mavenCentral()}
Now you are ready to use Spock from the command line. Running gradle test from the same directory that holds the build.gradle file will run all Spock tests.
A.3.3. Spock in an enterprise environment
If you wish to use Spock inside a company that has a binary repository like Nexus (http://www.sonatype.org/nexus/) or Artifactory (http://www.jfrog.com/open-source/), you should consult their documentation on how to use them as a proxy for Maven central. Talk with the administrator of these repositories and he/she will guide you on company policies regarding external library usage.
Let's see how IDEs handle Spock support.
A.4. Spock tests in your IDE
Because Spock tests are in Groovy, the support of Spock in your IDE would be as good as the existing support for Groovy. As explained in the beginning, you do not need to install Groovy support in your IDE in order to run Spock tests. It is a nice-to-have feature because of syntax highlighting and auto-complete facilities offered. The only thing specific to Spock is the test output result that should be setup to use a fixed-width font so that failure messages show up properly. For more information see http://groovy.codehaus.org/IDE+Support. I personally use Eclipse but Groovy is supported on most major environments.
A.4.1 Spock in Eclipse
To gain Groovy support in Eclipse, either install the vanilla Groovy plugin or the full-featured Groovy/Grails plugin. Both can be found in the Eclipse marketplace, as shown below in Figure A.1.
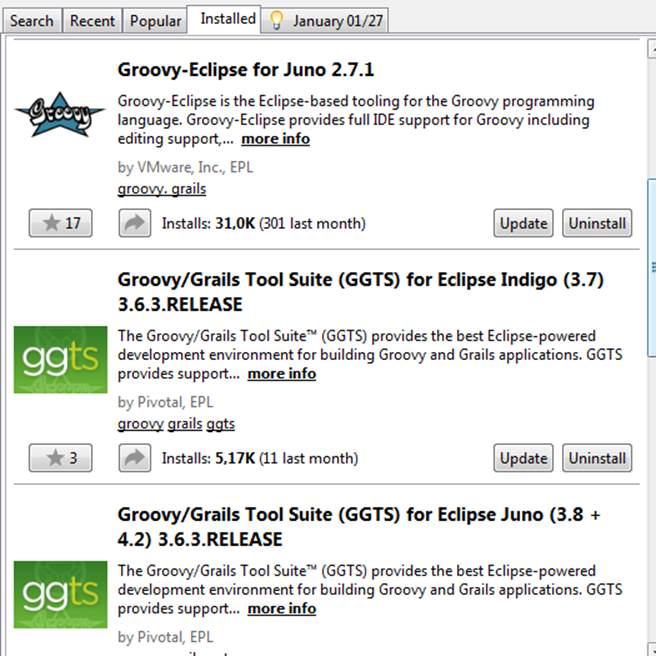
Figure A.1 Eclipse plugins for Groovy
Once you do that, Groovy/Spock files will gain syntax highlighting and auto-complete support, as shown below.
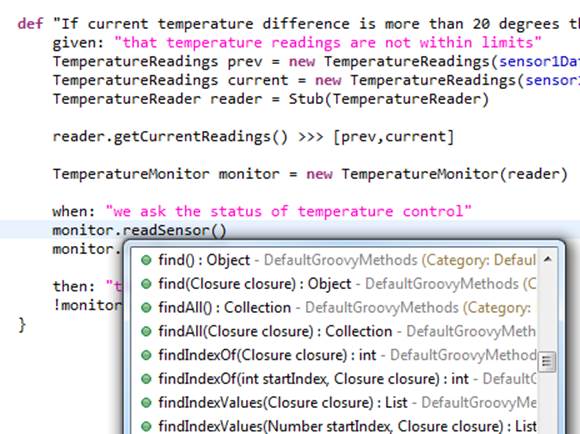
Figure A.2 Groovy support in Eclipse
Of course, you can still use the Maven/Gradle commands to compile and run Spock tests.
There is also a plugin dedicated to Spock but upon installing it I haven't noticed any additional functionality (it also depends on the Groovy plugin so it isn't a true alternative).
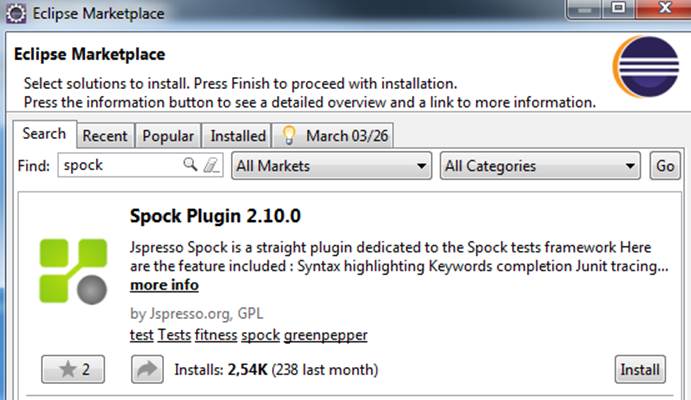
Figure A.3 Jespresso Spock plugin (optional)
A.4.2. Spock in the IntelliJ IDE
Groovy support in Intellij is built in, so there is no need to download an external plugin. You only need to enable it, as shown below.
Figure A.4 Enabling Groovy support in Intellij
Once the Groovy plugin is enabled, you will gain syntax highlighting and auto-complete in Groovy files, as shown below.
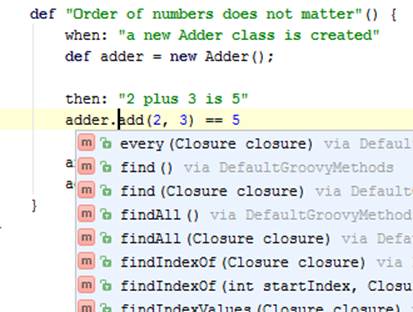
Figure A.5 Groovy support in IntelliJ
Again, as with Eclipse, you can still use the command line Maven/Gradle commands to compile and run Spock tests. There is also a dedicated Spock plugin for Intellij that adds extra optional goodies such as syntax highlighting for Spock labels.
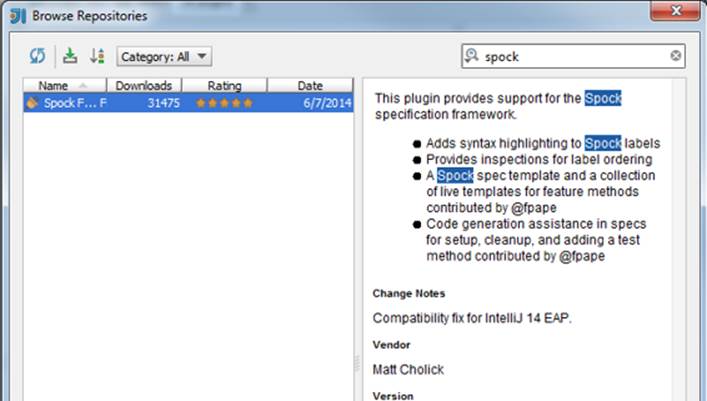
Figure A.6 Intellij plugin for Spock
Again, this is something that is nice to have, but otherwise not essential for running Spock tests.
A.4.3. Spock in Netbeans
I haven't personally tried Netbeans with Groovy, but it also supports Groovy. See https://netbeans.org/features/groovy/ for more details.
A.5. How to use the source code of this book
All the source code is located at https://github.com/kkapelon/java-testing-with-spock. Each chapter is an independent Maven project. You can checkout any chapter by itself and run the command mvn test (or mvn verify) to run all Spock/JUnit tests. You need an active internet connection so that all dependencies are downloaded. There are multiple ways to obtain the code
· if you are not familiar with git and/or github you can download directly all the code as a ZIP file as found in https://github.com/kkapelon/java-testing-with-spock/archive/master.zip
· If you are familiar with git you can also clone the https://github.com/kkapelon/java-testing-with-spock.git repository using your favorite git client
· If you already have a Github account and know how Github works you can directly fork the repository or download it locally with the Github client.
Feel free to import any chapter into your favorite IDE (as a Maven project) to examine the code more thoroughly. All code listings of the book are shown in the github repository. You can click on any of them and you will be transferred directly to the respective source file.
Figure A.7 code listings with links in the home page of the Github repository.
I have setup continuous integration on the Github page. It should be easy to see the status of the code at the front page.
A.6. How to use the chapter code in Eclipse
Here I provide step-by-step instructions on how to import a chapter in Eclipse and run a Spock test. I will talk about chapter 1 but all chapters work the same.
Checkout the source code and place is on your local filesystem. Then from Eclipse choose File -> Import and select a Maven project as shown in Figure A.8 below.
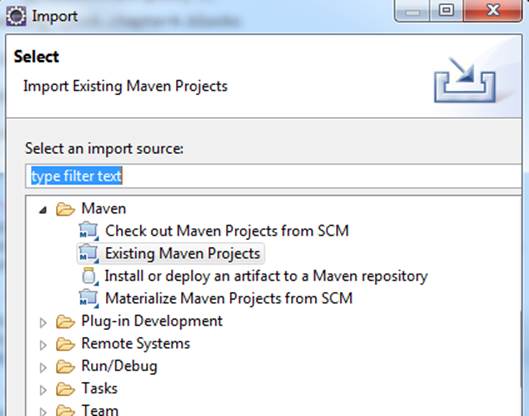
Figure A.8 - Importing as a Maven project
Navigate to the folder that contains the chapter code and click the Finish button in the dialog that appears in figure A.9.
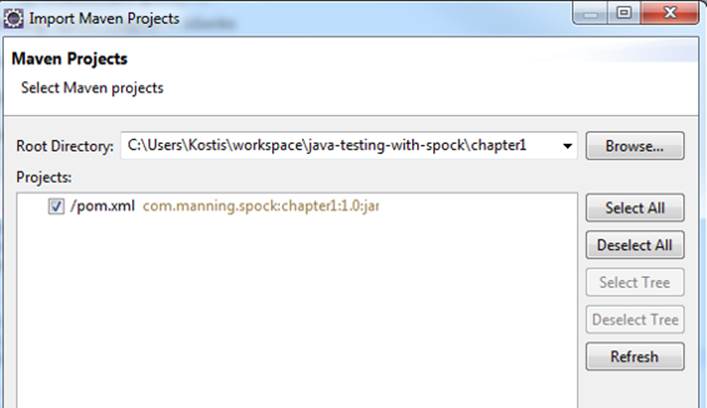
Figure A.9 - Locating the pom file
Eclipse will attempt to find connectors for the Gmaven-plus plugin and will fail because this plugin is fairly new. Choose to ignore this (it will not affect your build in any way)

Figure A.10 Ignoring Eclipse warnings
Once that is done make sure that the src/test/groovy directory is handled as a source directory.
· Right click on the project in Eclipse, select "Properties" (last item on the menu) and from the dialog that appears click on "Java Build Path".
· Then click the "Add Folder button".
· If the test/groovy directory is not already included, then check it yourself.
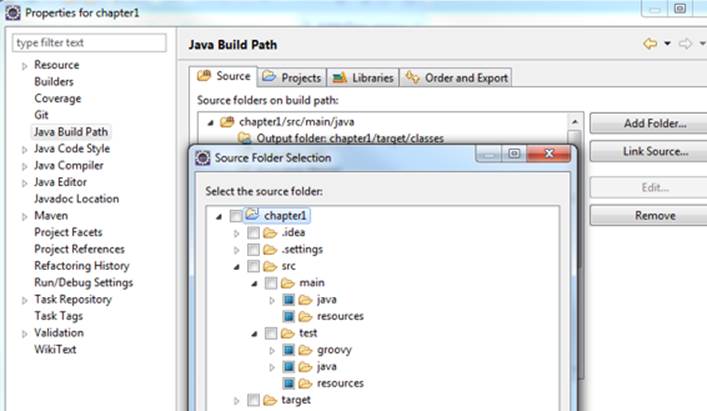
Figure A.11 Ensuring that Eclipse handles src/test/groovy correctly
To build the project you can either run mvn test from the command line or directly via Eclipse as shown in picture A.12 by selecting "Maven test" from the project right-click menu.
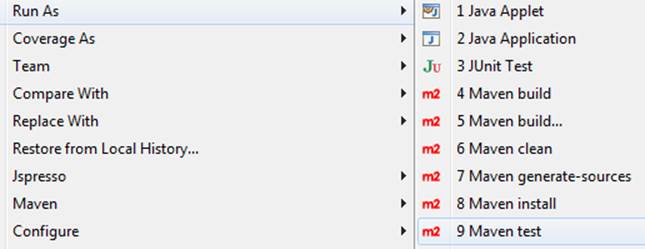
Figure A.12 - Running the Maven build
Once that is done you can run individually any Spock test exactly as you would run a JUnit test (i.e. right clicking on it). as shown in picture A.13

Figure A.13- Running a Spock test in Eclipse
The results of the test will appear in the JUnit console:
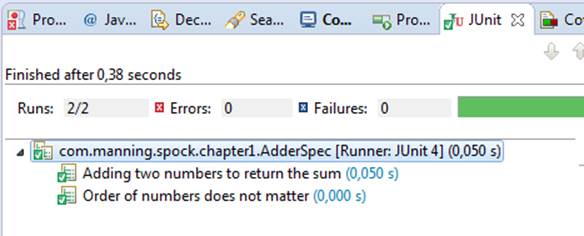
Figure A.14 - Results of a Spock test.
A.7. How to use the chapter code in Intellij
As with Eclipse, I will provide instructions on how to use chapter 1 in Intellij. Repeat the process for each chapter. In the opening screen of Intellij choose to import a new project and navigate to the source code in your filesystem as shown in picture A.15
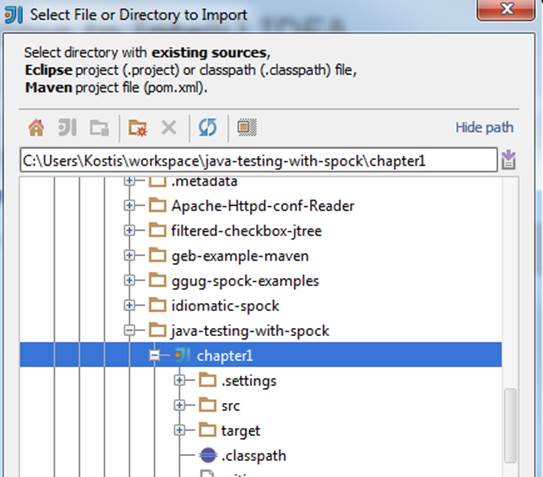
Figure A.14 - importing a project in Intellij
Once you do that you will presented with a series of wizard screens where you just accept the defaults. Just make sure the project is imported as a Maven project.
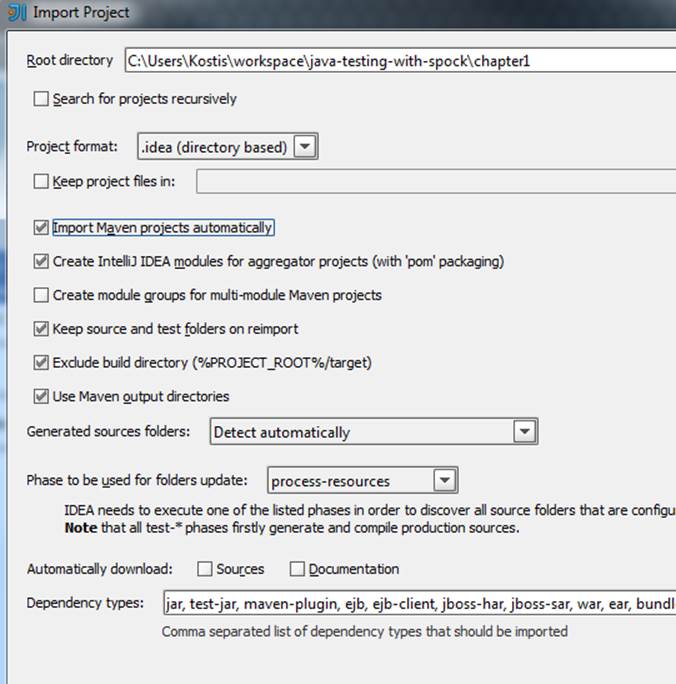
Figure A.15 Importing as a Maven project
Once the import is finished, find the Maven goals window (located on the top right) and double click on the "test" goal. This will build the whole project. As an alternative you can run the command mvn test from the same folder that contains the pom.xml file of the chapter.

Figure A.16 Maven goals inside Intellij
As with Eclipse you need to mark the src/test/groovy folder as a source folder. To do that, right click on the folder select "mark directory as" and choose "Test sources root" as shown in picture A.17
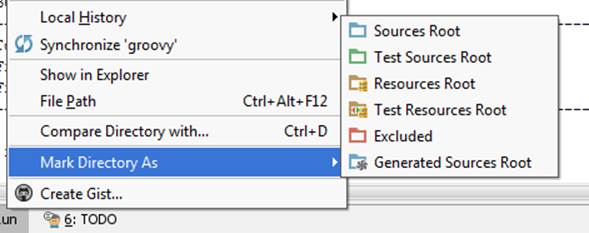
Figure A. 17 Instructing Intellij to handle Spock folders
Finally you can run any Spock test like you run a JUnit (by the right click menu) as shown in Figure A.18 below.
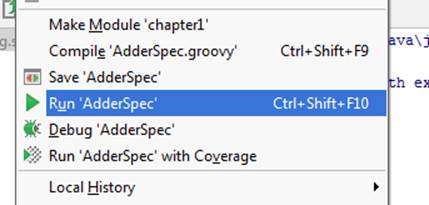
Figure A.18 Running a Spock test inside Intellij
The results will appear in the JUnit console. See Figure A.19.
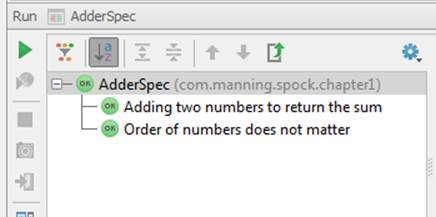
Figure A.19 Results of a Spock test
A.8. Other resources
· Spock web page: https://code.google.com/p/spock/
· Spock mailing list: https://groups.google.com/forum/#!forum/spockframework
· Spock documentation: http://docs.spockframework.org/en/latest/index.html
· Spock at stackoverflow: http://stackoverflow.com/questions/tagged/spock
· Spock at Github: https:/https://github.com/spockframework
[1] http://search.maven.org/
[2] Ant is not a build system. It is a relic of the past and should die in flames. If you are starting a new Java project with Ant, please bang your head against the wall now.