Spring in Action, 4th Edition: Covers Spring 4 (2015)
Part 4. Integrating Spring
Chapter 21. Simplifying Spring development with Spring Boot
This chapter covers
· Adding project dependencies with Spring Boot starters
· Automatic bean configuration
· Groovy and the Spring Boot CLI
· The Spring Boot Actuator
I recall the first few days of my first calculus course where we learned about derivatives of functions. We performed some rather hairy computations using limits to arrive at the derivatives of several functions. Even though the functions were simple, the work involved in calculating the derivatives was nightmarish.
After several homework assignments, study groups, and an exam, most everyone in the class was able to do the work. But the tedium of it was nearly unbearable. If this was the first thing we’d learn in a class named “Calculus I,” then what monstrosity of mathematics awaited us mid-semester in “Calculus II”?
Then the instructor clued us in on a trick. Applying a simple formula made quick work of calculating derivatives (if you’ve ever taken calculus, you’ll know what I’m talking about). With this newfound trick, we were able to compute derivatives for dozens of functions in the time it would’ve previously taken for a single function.
At this point, one of my classmates spoke up and said what the rest of us were thinking: “Why didn’t you show us this on the first day?!?!”
The instructor replied that the hard way helped us appreciate the derivatives for what they mean, told us it built character, and said something about putting hair on our chests.
Now that we’ve gone through an entire book on Spring, I find myself in the same position as that calculus instructor. Although Spring’s chief benefit is to make Java development easy, this chapter will show you how Spring Boot can make it even easier. Spring Boot is arguably the most exciting thing to happen to Spring since the Spring Framework was first created. It layers a completely new development model on top of Spring, taking away much of the tedium of developing applications with Spring.
We’ll get started with an overview of the tricks that Spring Boot employs to simplify Spring. Before this chapter concludes, you’ll have developed a complete (albeit simple) application using Spring Boot.
21.1. Introducing Spring Boot
Spring Boot is an exciting (dare I say “game-changing”?) new project in the Spring family. It offers four main features that will change the way you develop Spring applications:
· Spring Boot starters —Spring Boot starters aggregate common groupings of dependencies into single dependencies that can be added to a project’s Maven or Gradle build.
· Autoconfiguration —Spring Boot’s autoconfiguration feature leverages Spring 4’s support for conditional configuration to make reasonable guesses about the beans your application needs and automatically configure them.
· Command-line interface (CLI) —Spring Boot’s CLI takes advantage of the Groovy programming language along with autoconfiguration to further simplify Spring application development.
· Actuator —The Spring Boot Actuator adds certain management features to a Spring Boot application.
Throughout this chapter, you’ll build a small application using all of these features of Spring Boot. But first, let’s take a quick look at each to get a better feel for how they contribute to a simpler Spring programming model.
21.1.1. Adding starter dependencies
There are two ways to bake a cake. The ambitious baker will mix flour, eggs, sugar, baking powder, salt, butter, vanilla, and milk into a batter. Or you can buy a prepackaged box of cake mix that includes most of the ingredients you’ll need and only mix in a few wet ingredients like water, eggs, and vegetable oil.
Much as a prepackaged cake mix aggregates many of the ingredients of a cake recipe into a single ingredient, Spring Boot starters aggregate the various dependencies of an application into a single dependency.
To illustrate, let’s suppose you’re starting a new Spring project from scratch. This will be a web project, so you’ll need Spring MVC. There will also be a REST API, exposing resources as JSON, so you’ll need the Jackson JSON library in your build.
Because your application will use JDBC to store and fetch data from a relational database, you’ll want to be sure to include Spring’s JDBC module (for JdbcTemplate) and Spring’s transaction module (for declarative transaction support). As for the database itself, the H2 database will do fine.
And, oh yeah, you want to use Thymeleaf for Spring MVC views.
If you’re building your project with Gradle, you’ll need (at least) the following dependencies in build.gradle:
dependencies {
compile("org.springframework:spring-web:4.0.6.RELEASE")
compile("org.springframework:spring-webmvc:4.0.6.RELEASE")
compile("com.fasterxml.jackson.core:jackson-databind:2.2.2")
compile("org.springframework:spring-jdbc:4.0.6.RELEASE")
compile("org.springframework:spring-tx:4.0.6.RELEASE")
compile("com.h2database:h2:1.3.174")
compile("org.thymeleaf:thymeleaf-spring4:2.1.2.RELEASE")
}
Fortunately, Gradle makes it possible to express dependencies succinctly. (For the sake of brevity, I won’t bother showing you what this list of dependencies would look like in a Maven pom.xml file.) Even so, a lot of work went into creating this list, and more will go into maintaining it. How can you know if these dependencies will play well together? As the application grows and evolves, dependency management will become even more challenging.
But if you’re using the prepackaged dependencies from Spring Boot starters, the Gradle dependency list can be a little shorter:
dependencies {
compile("org.springframework.boot:spring-boot-starter-web:
1.1.4.RELEASE")
compile("org.springframework.boot:spring-boot-starter-jdbc:
1.1.4.RELEASE")
compile("com.h2database:h2:1.3.174")
compile("org.thymeleaf:thymeleaf-spring4:2.1.2.RELEASE")
}
As you can see, Spring Boot’s web and JDBC starters replaced several of the finer-grained dependencies. You still need to include the H2 and Thymeleaf dependencies, but the other dependencies are rolled up into the starter dependencies. Aside from making the dependency list shorter, you can feel confident that the versions of dependencies provided by the starters are compatible with each other.
The web and JDBC starters are just two of the starters that Spring Boot has to offer. Table 21.1 lists all of the starters available at the time I was writing this chapter.
Table 21.1. Spring Boot starter dependencies aggregate commonly needed dependency groupings into single project dependencies.
|
Starter |
Provides |
|
spring-boot-starter-actuator |
spring-boot-starter, spring-boot-actuator, spring-core |
|
spring-boot-starter-amqp |
spring-boot-starter, spring-boot-rabbit, spring-core, spring-tx |
|
spring-boot-starter-aop |
spring-boot-starter, spring-aop, AspectJ Runtime, AspectJ Weaver, spring-core |
|
spring-boot-starter-batch |
spring-boot-starter, HSQLDB, spring-jdbc, spring-batch-core, spring-core |
|
spring-boot-starter-elasticsearch |
spring-boot-starter, spring-data-elasticsearch, spring-core, spring-tx |
|
spring-boot-starter-gemfire |
spring-boot-starter, Gemfire, spring-core, spring-tx, spring-context, spring-context-support, spring-data-gemfire |
|
spring-boot-starter-data-jpa |
spring-boot-starter, spring-boot-starter-jdbc, spring-boot-starter-aop, spring-core, Hibernate EntityManager, spring-orm, spring-data-jpa, spring-aspects |
|
spring-boot-starter-data-mongodb |
spring-boot-starter, MongoDB Java driver, spring-core, spring-tx, spring-data-mongodb |
|
spring-boot-starter-data-rest |
spring-boot-starter, spring-boot-starter-web, Jackson annotations, Jackson databind, spring-core, spring-tx, spring-data-rest-webmvc |
|
spring-boot-starter-data-solr |
spring-boot-starter, Solrj, spring-core, spring-tx, spring-data-solr, Apache HTTP Mime |
|
spring-boot-starter-freemarker |
spring-boot-starter, spring-boot-starter-web, Freemarker, spring-core, spring-context-support |
|
spring-boot-starter-groovy-templates |
spring-boot-starter, spring-boot-starter-web, Groovy, Groovy Templates spring-core |
|
spring-boot-starter-hornetq |
spring-boot-starter, spring-core, spring-jms, Hornet JMS Client |
|
spring-boot-starter-integration |
spring-boot-starter, spring-aop, spring-tx, spring-web, spring-webmvc, spring-integration-core, spring-integration-file, spring-integration-http, spring-integration-ip, spring-integration-stream |
|
spring-boot-starter-jdbc |
spring-boot-starter, spring-jdbc, tomcat-jdbc, spring-tx |
|
spring-boot-starter-jetty |
jetty-webapp, jetty-jsp |
|
spring-boot-starter-log4j |
jcl-over-slf4j, jul-to-slf4j, slf4j-log4j12, log4j |
|
spring-boot-starter-logging |
jcl-over-slf4j, jul-to-slf4j, log4j-over-slf4j, logback-classic |
|
spring-boot-starter-mobile |
spring-boot-starter, spring-boot-starter-web, spring-mobile-device |
|
spring-boot-starter-redis |
spring-boot-starter, spring-data-redis, lettuce |
|
spring-boot-starter-remote-shell |
spring-boot-starter-actuator, spring-context, org.crashub.** |
|
spring-boot-starter-security |
spring-boot-starter, spring-security-config, spring-security-web, spring-aop, spring-beans, spring-context, spring-core, spring-expression, spring-web |
|
spring-boot-starter-social-facebook |
spring-boot-starter, spring-boot-starter-web, spring-core, spring-social-config, spring-social-core, spring-social-web, spring-social-facebook |
|
spring-boot-starter-social-twitter |
spring-boot-starter, spring-boot-starter-web, spring-core, spring-social-config, spring-social-core, spring-social-web, spring-social-twitter |
|
spring-boot-starter-social-linkedin |
spring-boot-starter, spring-boot-starter-web, spring-core, spring-social-config, spring-social-core, spring-social-web, spring-social-linkedin |
|
spring-boot-starter |
spring-boot, spring-boot-autoconfigure, spring-boot-starter-logging |
|
spring-boot-starter-test |
spring-boot-starter-logging, spring-boot, junit, mockito-core, hamcrest-library, spring-test |
|
spring-boot-starter-thymeleaf |
spring-boot-starter, spring-boot-starter-web, spring-core, thymeleaf-spring4, thymeleaf-layout-dialect |
|
spring-boot-starter-tomcat |
tomcat-embed-core, tomcat-embed-logging-juli |
|
spring-boot-starter-web |
spring-boot-starter, spring-boot-starter-tomcat, jackson-databind, spring-web, spring-webmvc |
|
spring-boot-starter-websocket |
spring-boot-starter-web, spring-websocket, tomcat-embed-core, tomcat-embed-logging-juli |
|
spring-boot-starter-ws |
spring-boot-starter, spring-boot-starter-web, spring-core, spring-jms, spring-oxm, spring-ws-core, spring-ws-support |
If you were to look under the covers of these starter dependencies, you’d realize that there’s not much mystery to how the starters work. Taking advantage of Maven’s and Gradle’s transitive dependency resolution, the starters declare several dependencies in their own pom.xml file. When you add one of these starter dependencies to your Maven or Gradle build, the starter’s dependencies are resolved transitively. And those dependencies may have dependencies of their own. A single starter could transitively pull in dozens of other dependencies.
Notice that many of the starters reference other starters. The mobile starter, for instance, references the web starter, which in turn references the Tomcat starter. And most of the starters reference spring-boot-starter, which is essentially a base starter (although it references the logging starter). The dependencies are transitively applied; adding the mobile starter as a dependency will effectively add dependencies from all of the starters down the line.
21.1.2. Autoconfiguration
Whereas Spring Boot starters cut down the size of your build’s dependency list, Spring Boot autoconfiguration cuts down on the amount of Spring configuration. It does this by considering other factors in your application and making assumptions about what Spring configuration you’ll need.
As an example, recall from chapter 6 (listing 6.4) that you’ll need at least three beans to enable Thymeleaf templates as views in Spring MVC: a ThymeleafView-Resolver, a SpringTemplateEngine, and a TemplateResolver. With Spring Boot autoconfiguration, however, all you need to do is add Thymeleaf to the project’s classpath. When Spring Boot detects that Thymeleaf is on the classpath, it will assume that you want to use Thymeleaf for Spring MVC views and will automatically configure those three beans.
Spring Boot starters can trigger autoconfiguration. For instance, all you need to do to use Spring MVC in your Spring Boot application is to add the web starter as a dependency in the build. When you add the web starter to your project’s build, it will transitively pull in Spring MVC dependencies. When Spring Boot’s web autoconfiguration detects Spring MVC in the classpath, it will automatically configure several beans to support Spring MVC, including view resolvers, resource handlers, and message converters (among others). All that’s left for you to do is write the controller classes to handle the requests.
21.1.3. The Spring Boot CLI
The Spring Boot CLI takes the magic provided by Spring Boot starters and autoconfiguration and spices it up a little with Groovy. It reduces the Spring development process to the point where you can run one or more Groovy scripts through a CLI and see it run. In the course of running the application, the CLI will also automatically import Spring types and resolve dependencies.
One of the most interesting examples used to illustrate Spring Boot CLI is contained in the following Groovy script:
@RestController
class Hi {
@RequestMapping("/")
String hi() {
"Hi!"
}
}
Believe it or not, that is a complete (albeit simple) Spring application that can be executed through the Spring Boot CLI. Including whitespace, it’s 82 characters in length. You can paste it into your Twitter client and tweet it to your friends.
Eliminate the unnecessary whitespace and you get this 64-character one-liner:
@RestController class Hi{@RequestMapping("/")String hi(){"Hi!"}}
This version is so brief that you can paste it twice into a single tweet on Twitter. But it’s still a complete and runnable (if feature-poor) Spring application. If you have the Spring Boot CLI installed, you can run it with the following command line:
$ spring run Hi.groovy
Although it’s fun to show off a tweetable example of Spring Boot CLI’s capabilities, there’s much more to it than meets the eye. In section 21.3 we’ll look at how you can build a more complete application with Groovy and the CLI.
21.1.4. The Actuator
The Spring Boot Actuator brings a handful of useful features to a Spring Boot project, including
· Management endpoints
· Sensible error handling and a default mapping for an /error endpoint
· An /info endpoint that can communicate information about an application
· An audit events framework when Spring Security is in play
All of these features are useful, but the management endpoints are the most immediately useful and interesting features of the Actuator. In section 21.4 we’ll look at a few examples of how Spring Boot’s Actuator opens a window into the inner workings of your application.
Now that you’ve had a glimpse of each of the four main features of Spring Boot, let’s put them to work and build a small but complete application.
21.2. Building an application with Spring Boot
Throughout the rest of this chapter, I aim to show you how to build complete, real-world applications using Spring Boot. Of course, the qualities that define a “real-world” application are subject to debate and would likely exceed the space and scope of this chapter. Therefore, rather than build a real-world application here, we’ll scale it back a little and develop something a little less real-world, but representative of the kinds of bigger applications you might build with Spring Boot.
Our application will be a simple contact-list application. It will allow a user to enter contact information (name, phone number, email address) and to list all of the contacts that the user has previously entered.
You have the choice of building your application with either Maven or Gradle. I prefer Gradle, but I’ll show you what’s needed for Maven in case that’s your preference. The following listing shows the starter build.gradle file. The dependencies block is empty to start, but we’ll fill it in with dependencies along the way.
Listing 21.1. The Gradle build file for the Contacts application
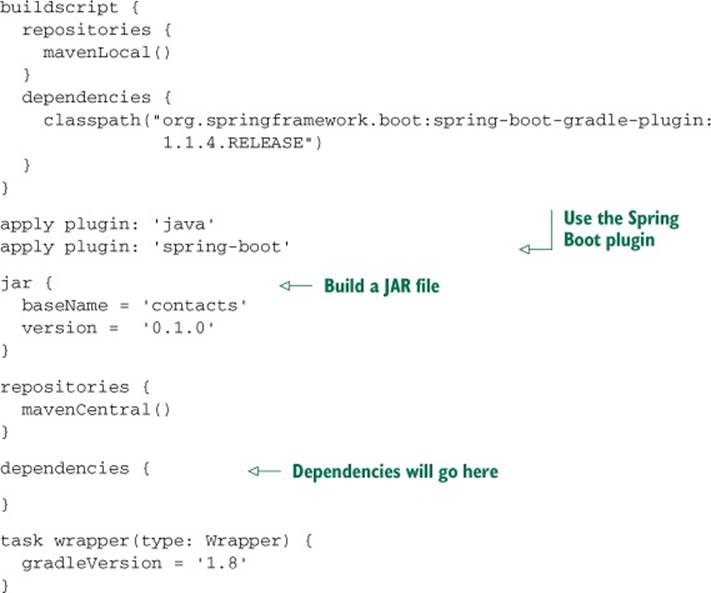
Notice that the build includes a buildscript dependency on the Spring Boot Gradle plugin. As you’ll see later, this will help produce an executable uber-JAR file that contains all of the application’s dependencies.
Alternatively, if you prefer Maven, the following listing shows the complete pom.xml file.
Listing 21.2. The Maven build file for the Contacts application
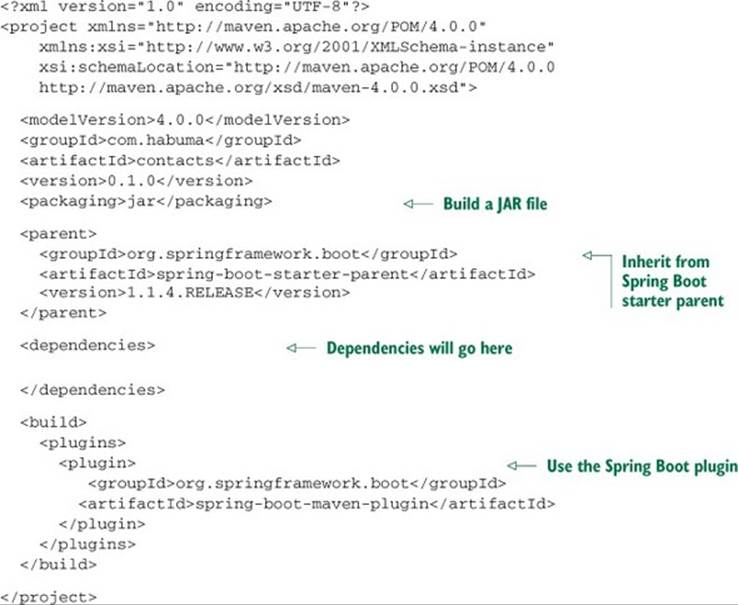
Similar to the Gradle build, this Maven pom.xml file makes use of the Spring Boot Maven plugin. This plugin is the Maven counterpart to the Gradle plugin and enables the build to produce an executable uber-JAR file.
Also notice that unlike the Gradle build, this Maven build has a parent project. By basing your project’s Maven build on the Spring Boot starter parent, you get the benefit of Maven dependency management, and you won’t have to explicitly declare version numbers for many of your project dependencies. The versions will be inherited from the parent.
Following the standard project structure for Maven- and Gradle-based projects, the project will be structured like this when you’re finished:
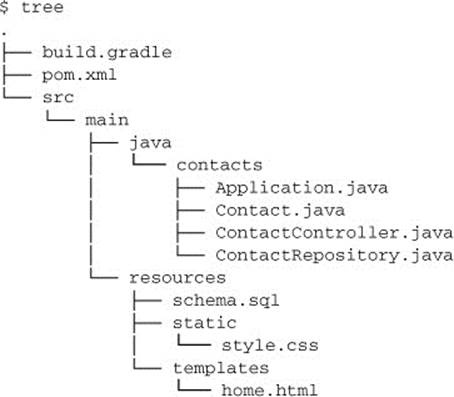
Don’t worry about those missing Java files and other resource files. You’ll create those over the next few sections as we develop the Contacts application. In fact, we’ll start right now by developing the web layer of the application.
21.2.1. Handling requests
Since you’re going to develop the web layer of the application with Spring MVC, you’re going to need to add Spring MVC as a dependency in your build. As we’ve already discussed, Spring Boot’s web starter is the one-stop-shop for adding everything needed for Spring MVC to a build. This is the Gradle dependency you’ll need:
compile("org.springframework.boot:spring-boot-starter-web")
If you’re using Maven to do the build, those dependencies will look like this:
<dependency>
<groupId>org.springframework.boot</groupId>
<artifactId>spring-boot-starter-web</artifactId>
</dependency>
Note that because the Spring Boot parent project specifies the version for the web starter dependency, there’s no need to explicitly specify it in the project’s build.gradle or pom.xml.
With the web starter dependency in place, all of the dependencies you’ll need to work with Spring MVC will be available to your project. Now you’re ready to write a controller class for the application.
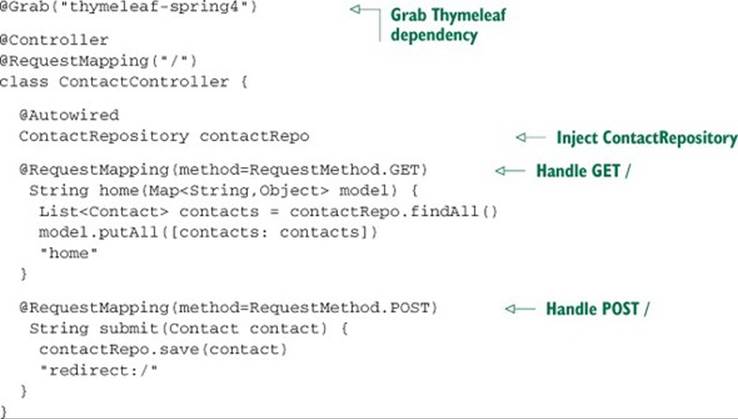
The controller will be relatively simple, presenting a contact form for an HTTP GET request and processing the form submission for a POST request. It won’t do any of the real work itself, but will delegate to a ContactRepository (which you’ll create soon) for persisting contacts. TheContactController class in listing 21.3 captures these requirements.
Listing 21.3. ContactController handles basic web requests for the Contacts application
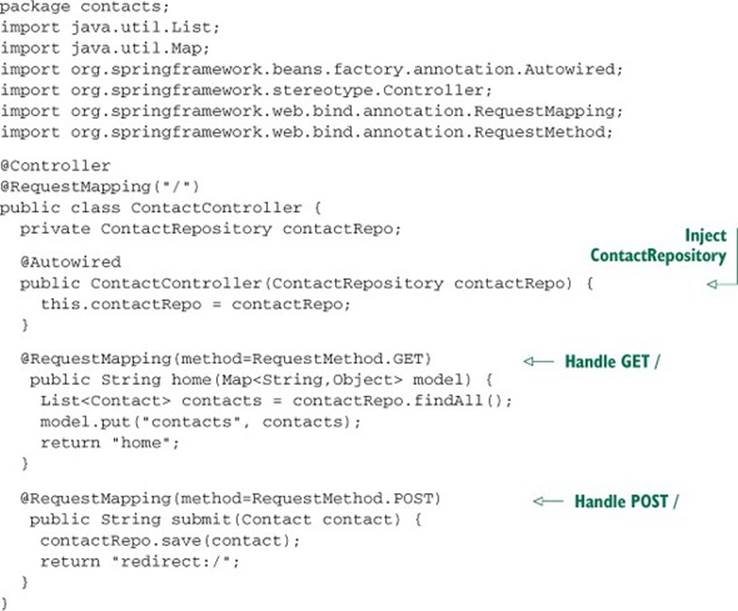
The first thing you should notice about ContactController is that it’s a typical Spring MVC controller. Although Spring Boot gets involved when it comes to managing build dependencies and minimizing Spring configuration, the programming model is the same when it comes to writing much of your application logic.
In this case, ContactController follows the typical pattern for a Spring MVC controller that displays and handles form submission. The home() method uses the injected ContactRepository to retrieve a list of all Contact objects, placing them into the model before handing the request off to the home view. That view will render the list of contacts along with a form to add a new Contact. The submit() method will handle the POST request resulting from the form submission, save the Contact, and redirect to the home page.
And because ContactController is annotated with @Controller, it’s subject to component scanning. Therefore, you won’t have to explicitly configure it as a bean in the Spring application context.
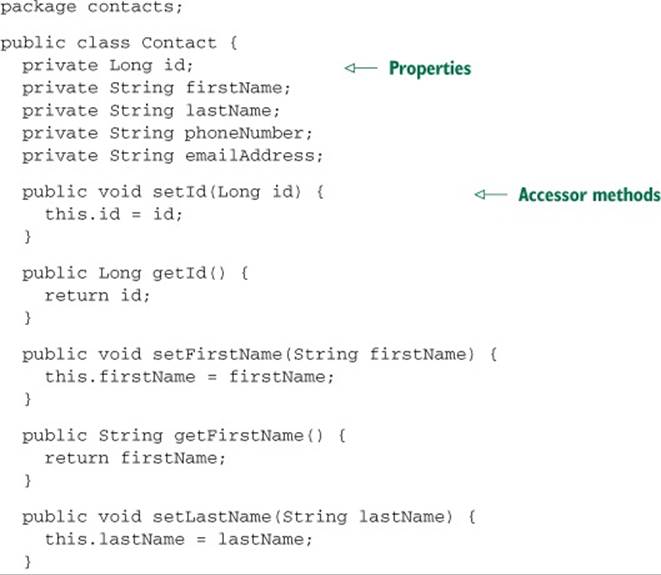
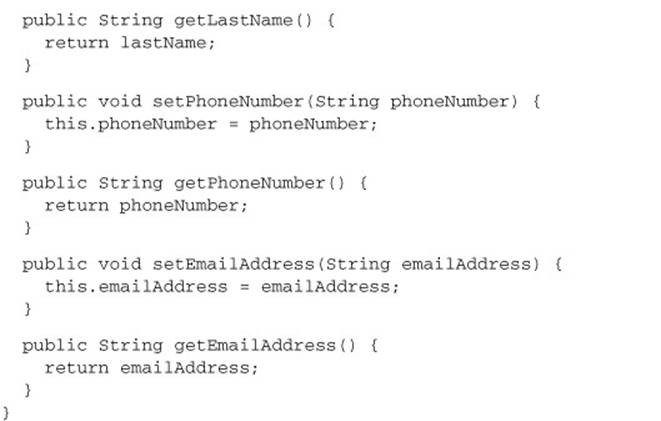
As for the Contact model type, it’s just a simple POJO with a handful of properties and accessor methods, as shown in the following listing.
Listing 21.4. Contact is a simple domain type.
The web layer of your application is almost finished. All that’s left is to create a Thymeleaf template that defines the home view.
21.2.2. Creating the view
Traditionally, Java web applications use JSP as the view-layer technology. But as we discussed in chapter 6, there’s a new kid in town. Thymeleaf’s natural templates are much more pleasant to work with than JSP, and they make it possible for you to write your templates as HTML. Because of that, we’re going to use Thymeleaf to define the home view for the Contacts application.
First, you need to add Thymeleaf to your project’s build. In this example I’m working with Spring 4, so I need to add Thymeleaf’s Spring 4 module to the build. In Gradle, the dependency would look like this:
compile("org.thymeleaf:thymeleaf-spring4")
If you’re using Maven, this is the dependency you’ll need:
<dependency>
<groupId>org.thymeleaf</groupId>
<artifactId>thymeleaf-spring4</artifactId>
</dependency>
Keep in mind that by simply adding Thymeleaf to the project’s classpath, you’re setting Spring Boot autoconfiguration in motion. When the application is run, Spring Boot will detect that Thymeleaf is in the classpath and will automatically configure the view resolver, template resolver, and template engine beans necessary to use Thymeleaf with Spring MVC. Therefore, there’s no explicit Spring configuration required to use Thymeleaf in your application.
Aside from adding the Thymeleaf dependency to the build, the only thing you need to do is define the view template. Listing 21.5 shows home.html, a Thymeleaf template that defines the home view.
Listing 21.5. The home view renders a form to create new contacts and to list contacts
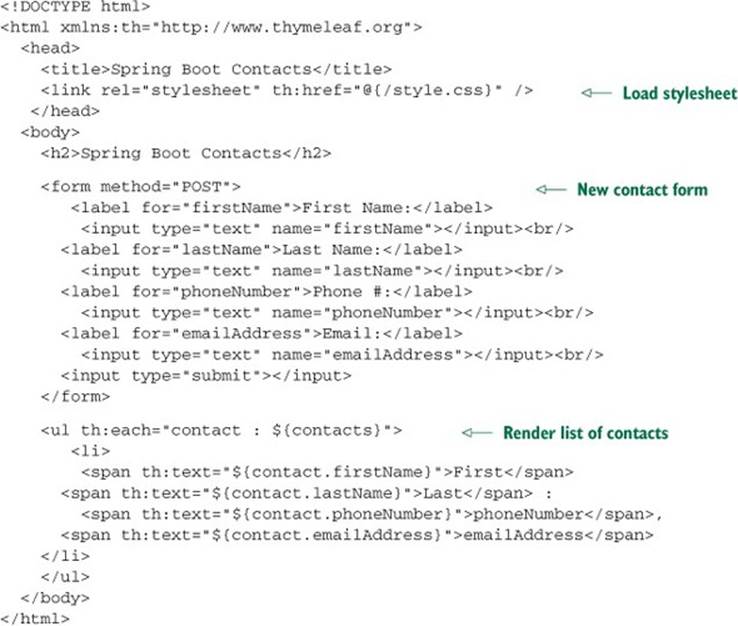
This is a fairly basic Thymeleaf template. It has two parts: a form and then a list of contacts. The form will POST data back to the submit() method of ContactController to create a new Contact. The list cycles through the list of Contact objects in the model.
In order for this template to be used, you need to be careful to name and place it correctly in your project. Because the logical view name returned from the home() method in ContactController is home, the template file should be named home.html. And because the autoconfigured template resolver will look for Thymeleaf templates under a directory named templates relative to the root of the classpath, you’ll need to place home.html in the Maven or Gradle project at src/main/resources/templates.
There’s only one loose end that needs to be tied up with regard to this Thymeleaf template. The HTML it produces will reference a stylesheet named style.css. Therefore, you need to add that stylesheet to the project.
21.2.3. Adding static artifacts
Normally, stylesheets and images are things that I avoid discussing in the context of writing Spring applications. Certainly, those kind of artifacts go a long way toward making any application (including Spring applications) more aesthetically pleasing to a user. But static artifacts aren’t critical to the discussion of writing server-side Spring code.
In the case of Spring Boot, however, it’s worth mentioning how Spring Boot deals with static content. When Spring Boot’s web autoconfiguration is automatically configuring beans for Spring MVC, those beans include a resource handler that maps /** to several resource locations. Those resource locations include (relative to the root of the classpath) the following:
· /META-INF/resources/
· /resources/
· /static/
· /public/
In a conventional Maven/Gradle-built application, you’d typically put static content at src/main/webapp so that it would be placed at the root of the WAR file that the build produces. When building a WAR file with Spring Boot, that’s still an option. But you also have the option of placing static content at one of the four locations mapped to the resource handler.
So, in order to satisfy the Thymeleaf template’s reference to /style.css, you need to create a file named style.css at one of the following locations:
· /META-INF/resources/style.css
· /resources/style.css
· /static/style.css
· /public/style.css
The choice is up to you. I tend to put static content in /public, but each of those four choices works equally well.
Although the content of style.css isn’t relevant to our discussion, here’s a simple stylesheet that will give your application a slightly cleaner look:
body {
background-color: #eeeeee;
font-family: sans-serif;
}
label {
display: inline-block;
width: 120px;
text-align: right;
}
Believe it or not, you’re more than halfway finished building your simple Contacts application! The web layer is completely finished. Now you need to create the Contact-Repository to handle persistence of Contact objects.
21.2.4. Persisting the data
You have a lot of options when it comes to working with databases in Spring. You could use JPA or Hibernate to map objects to tables and columns in a relational database. Or you could abandon the relational database model altogether and use a different kind of database, such as Mongo or Neo4j.
For the purposes of the Contacts application, a relational database is a fine choice. We’ll use the H2 database and JDBC (using Spring’s JdbcTemplate) to keep things simple.
These choices naturally lead to the necessity of adding a few dependencies to the build. The JDBC starter dependency will pull in everything you need to work with Spring’s JdbcTemplate. But you’ll need to add the H2 dependency along with it to use the H2 database. In Gradle, the following two lines in the dependencies block will do the trick:
compile("org.springframework.boot:spring-boot-starter-jdbc")
compile("com.h2database:h2")
For Maven builds, you’ll need these two <dependency> blocks:
<dependency>
<groupId>org.springframework.boot</groupId>
<artifactId>spring-boot-starter-jdbc</artifactId>
</dependency>
<dependency>
<groupId>com.h2database</groupId>
<artifactId>h2</artifactId>
</dependency>
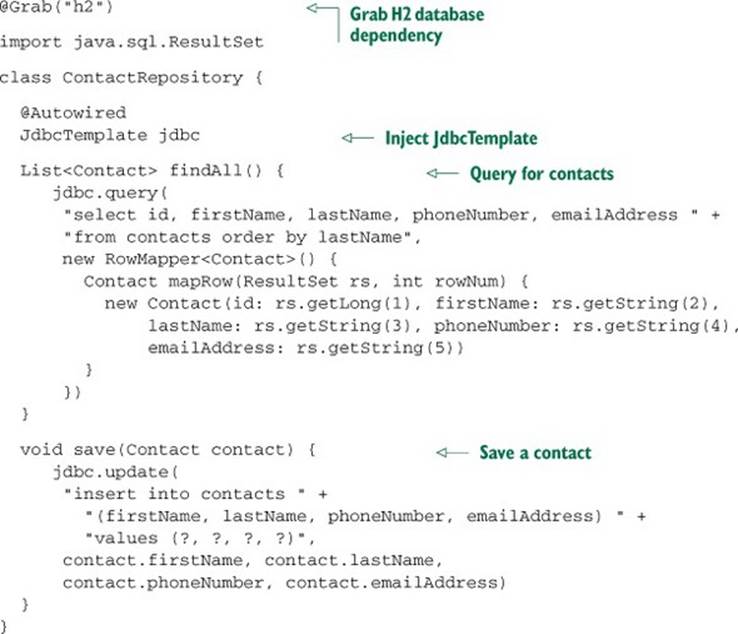
With these two dependencies in the build, you can now write your repository class. ContactRepository in the following listing works with an injected JdbcTemplate to read and write Contact objects from the database.
Listing 21.6. ContactRepository saves and fetches Contacts from the database.
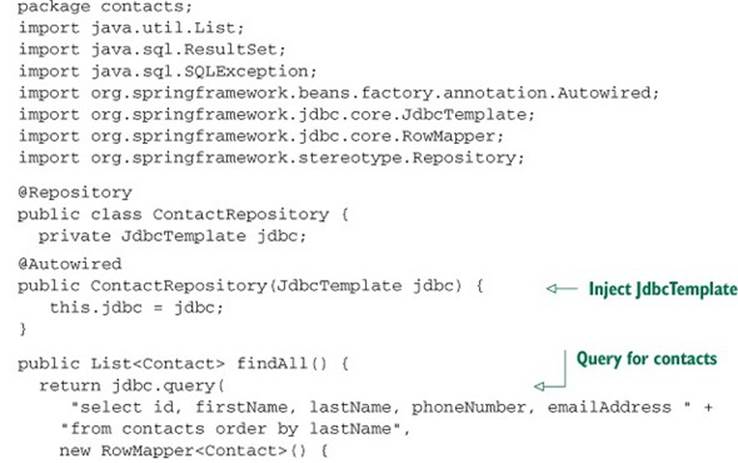
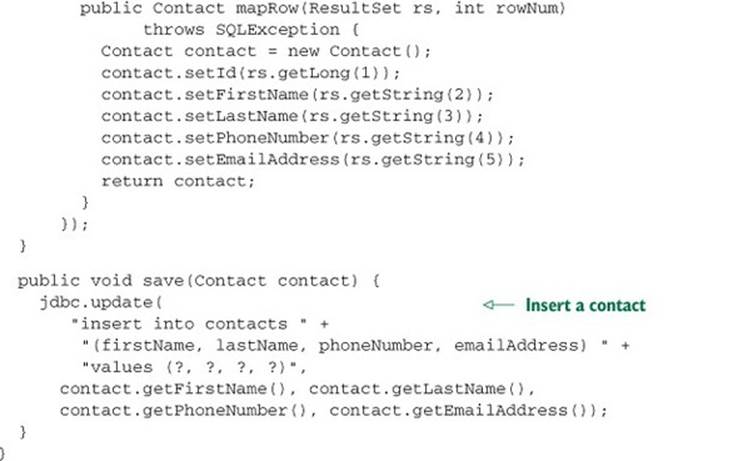
Like ContactController, this repository class is rather straightforward. It looks no different from how it might look in a traditional Spring application. There’s nothing about its implementation that suggests that it’s part of a Spring Boot–enabled application. The findAll() method uses the injected JdbcTemplate to fetch Contact objects from the database. The save() method uses JdbcTemplate to save a new Contact object. And because ContactRepository is annotated with @Repository, it will automatically be picked up by component-scanning and created as a bean in the Spring application context.
But what about JdbcTemplate? Don’t you need to declare a JdbcTemplate bean in the Spring application context? For that matter, don’t you need to declare an H2 DataSource bean?
The short answer to both of those questions is “no.” When Spring Boot detects that Spring’s JDBC module and H2 are on the classpath, autoconfiguration kicks in and automatically configures a JdbcTemplate bean and an H2 DataSource bean. Once again, Spring Boot handles all of the Spring configuration for you.
But what about the database schema? Certainly you must define the schema that creates the contacts table, right?
That’s absolutely right. There’s no way that Spring Boot can guess what the contacts should look like. So you’ll need to define a schema, such as this:
create table contacts (
id identity,
firstName varchar(30) not null,
lastName varchar(50) not null,
phoneNumber varchar(13),
emailAddress varchar(30)
);
Now you just need some way to load this create table SQL and execute it against the H2 database. Fortunately, Spring Boot has this covered, too. If you name this SQL file as schema.sql and place it at the root of the classpath (that is, in src/main/resources in the Maven or Gradle project), it will be found and loaded when the application starts up.
21.2.5. Try it out
The Contacts application is rather simple, but it does qualify as a realistic Spring application. It has a web layer defined by a Spring MVC controller and a Thymeleaf template. And it has a persistence layer defined by a repository and Spring’s JdbcTemplate.
At this point you’ve written all of the application code necessary for the Contacts application. One thing you haven’t written, however, is any form of configuration. You haven’t yet written any Spring configuration, nor have you configured DispatcherServlet in a web.xml file or servlet initializer class.
Would you believe me if I said that you don’t have to write any configuration?
That can’t be right. After all, according to Spring’s critics, Spring is all about configuration. Certainly there’s an XML file or Java configuration class we’ve overlooked. You can’t possibly write a Spring application without any configuration...can you?
Generally speaking, Spring Boot’s autoconfiguration feature eliminates most or all of the configuration. Therefore, it’s entirely possible to write an entire Spring application and not write a single line of configuration code. Of course, autoconfiguration doesn’t cover all scenarios, so a typical Spring Boot application will still include some configuration.
For the Contacts application specifically, there’s no need for any configuration. Spring’s autoconfiguration took care of all of your configuration needs.
You do, however, need a special class that bootstraps the Spring Boot application. On its own, Spring doesn’t know anything about autoconfiguration. The Application class in listing 21.7 is a typical example of a Spring Boot bootstrap class.
Listing 21.7. A simple bootstrapper class to initiate Spring Boot autoconfiguration
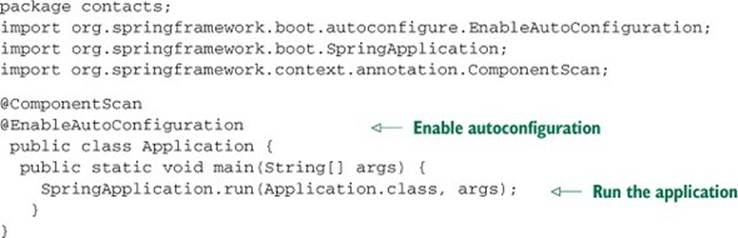
Okay, I’ll admit that Application has a tiny bit of configuration. It’s annotated with @ComponentScan to enable component scanning. And it’s annotated with @EnableAuto-Configuration, which turns on Spring Boot’s autoconfiguration feature. But that’s it! There’s no more configuration in the Contacts application than those two lines.
What’s especially interesting about Application is that it has a main() method. As you’ll see in a moment, Spring Boot applications can be run in a unique way, and the main() method here makes that possible. Within the main() method, there’s a single line that tells Spring Boot (via the SpringApplication class) to run using the configuration in Application itself and any arguments that were given on the command line.
You’re almost ready to run the application. All you need to do now is build it. If you’re using Gradle, then the following command line will build the project into build/libs/contacts-0.1.0.jar:
$ gradle build
If you’re a Maven fan, you’ll need to build the project like this:
$ mvn package
After running the Maven build, you’ll find the build artifact in the target folder.
Now you’re ready to run it. Traditionally, this would mean deploying the application WAR file to a servlet container such as Tomcat or WebSphere. But you don’t even have a WAR file—the build gives you a JAR file.
No problem. You can run it from the command line like this (referencing the Gradle-built JAR file):
$ java -jar build/libs/contacts-0.1.0.jar
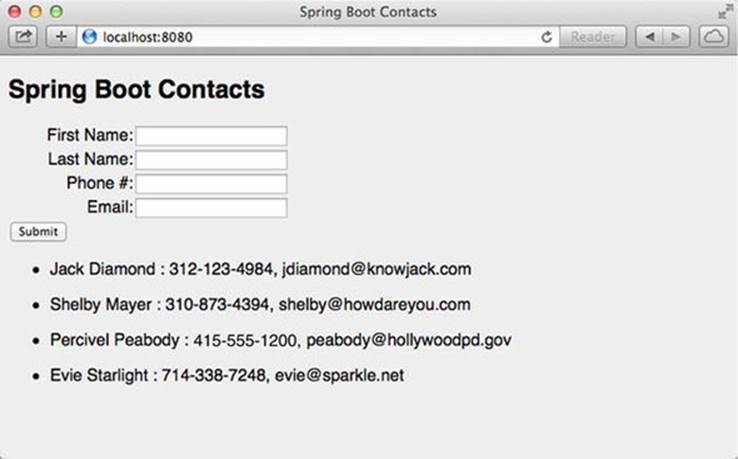
After only a few seconds, the application should start up and be ready to go. Point your browser at http://localhost:8080 and you should be ready to start entering contacts. After entering a few contacts, your browser might look a little something like figure 21.1.
Figure 21.1. The Spring Boot Contacts application
You’re probably thinking that this isn’t how you should run a web application. It’s neat and convenient to be able to run it from the command line like this, but that’s not reality. Where you work, web applications are deployed as WAR files to a web container. The deployment police at your company won’t like it if you don’t give them a WAR file.
Okay, fine.
Even though running the application from the command line is a valid option, even for production applications, I understand that you probably need to work within the parameters of your company’s deployment procedures. And that probably means building and deploying WAR files.
Fortunately, you won’t need to abandon the simplicity of Spring Boot if it’s a WAR file that’s required. All that’s needed is a small tweak to the build. In the Gradle build, you’ll need to add the following line to apply the “war” plugin:
apply plugin: 'war'
Additionally, you’ll need to change the “jar” configuration to a “war” configuration. This essentially comes down to replacing a “j” with a “w”:
war {
baseName = 'contacts'
version = '0.1.0'
}
In the case of a Maven-built project, it’s even easier. Simply change the packaging from “jar” to “war”:
<packaging>war</packaging>
Now you can rebuild the project and find contacts-0.1.0.war in the build directory. That WAR file is deployable to any web container that supports Servlet 3.0. What’s more, you can still run the application from the command line like this:
$ java -jar build/libs/contacts-0.1.0.war
That’s right: an executable WAR file! It’s the best of both worlds!
As you can see, Spring Boot goes a long way to make developing Spring applications in Java as simple as possible. Spring Boot starters simplify project build dependencies, and autoconfiguration eliminates the need for most explicit Spring configuration. But as you’ll see next, if you add Groovy to the mix, it gets even easier.
21.3. Going Groovy with the Spring Boot CLI
Groovy is a much simpler programming language than Java. The syntax allows for shortcuts such as leaving off semicolons and the public keyword. Also, the properties of a Groovy class don’t require setter and getter methods as in Java. And that’s without mentioning the other features of Groovy that eliminate much of the ceremony that goes into Java coding.
If you’re willing to write your application code in Groovy and run it through Spring Boot’s CLI, then Spring Boot can take advantage of Groovy’s simplicity to further simplify Spring development. To illustrate this point, let’s rewrite the Contacts application in Groovy.
Why not? There were only a few small Java classes in the original version of the application, so there’s not much to rewrite in Groovy. You can reuse the same Thymeleaf template and schema.sql file. And if my claims about Groovy simplifying Spring further are true, then rewriting the application won’t be a big deal.
Along the way, you can get rid of a few files, too. The Spring Boot CLI is its own bootstrapper, so you won’t need the Application class you created before. The Maven and Gradle build files can go away too, since you’ll be running uncompiled Groovy files through the CLI. And without Maven and Gradle, the entire project structure can be flattened. The new project structure will look a little like this:
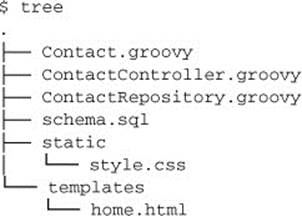
Although the schema.sql, style.css, and home.html files will remain unchanged, you’ll need to convert the three Java classes to Groovy. We’ll start with the web layer in Groovy.
21.3.1. Writing a Groovy controller
As mentioned before, Groovy doesn’t have nearly as much ceremony built into the language as Java. This means that you can write Groovy code without things like
· Semicolons
· Modifiers such as public and private
· Setter and getter methods for properties
· The return keyword to return values from methods
Taking advantage of Groovy’s relaxed syntax (as well as some Spring Boot magic), you can rewrite the ContactController class in Groovy, as shown in listing 21.8.
Listing 21.8. ContactController is simpler in Groovy than in Java.
As you can see, this version of ContactController is much simpler than its Java counterpart. By ditching all of the things that Groovy doesn’t need, ContactController is shorter and arguably easier to read.
There’s also something else missing from listing 21.8. You may have noticed that there are no import lines, as is typical in a Java class. Groovy imports a number of packages and classes by default, including the following:
· java.io.*
· java.lang.*
· java.math.BigDecimal
· java.math.BigInteger
· java.net.*
· java.util.*
· groovy.lang.*
· groovy.util.*
Thanks to these default imports, the List class doesn’t need to be imported by Contact-Controller. It’s in the java.util package, so it’s among the default imports.
But what about Spring types such as @Controller, @RequestMapping, @Autowired, and @RequestMethod? Those aren’t in any of the default imports, so how can you get away with leaving their import line out?
Later when you run the application, the Spring Boot CLI will try to compile these Groovy classes using the Groovy compiler. And because those types aren’t imported, it will fail.
But the Spring Boot CLI doesn’t give up that easily. This is where the CLI takes autoconfiguration to a whole new level. The CLI will recognize that the failures were due to missing Spring types, and it will take two steps to fix that problem. It will first fetch the Spring Boot web starter dependency and transitively all of its dependencies and add them to the classpath. (That’s right, it will download and add JARs to the classpath.) Then it will add the necessary packages to the Groovy compiler’s list of default imports and try to compile the code again.
As a consequence of this auto-dependency/auto-import feature of the CLI, your controller class doesn’t need any imports. And you won’t need to resolve the Spring libraries manually or by using Maven or Gradle. Spring Boot CLI has you covered.
Now let’s take a step back and consider what’s going on here. By simply using a Spring MVC type such as @Controller or @RequestMapping in your code, the CLI will automatically resolve the Spring Boot web starter. With the web starter’s dependencies also being added transitively to the classpath, Spring Boot’s autoconfiguration will kick in and automatically configure the beans necessary to support Spring MVC. But again, all you had to do was use those types. Spring Boot took care of everything else.
Naturally, there are some limits to the CLI’s capabilities. Although it knows how to resolve many Spring dependencies and automatically add imports for many Spring types (as well as a handful of other libraries), it won’t automatically resolve and import everything. The choice to use Thymeleaf templates, for example, is an opt-in choice. So you must explicitly ask for it with an @Grab annotation in the code.
Note that for many dependencies, it’s unnecessary to specify the group ID or version number. Spring Boot plugs itself into the dependency resolution behind @Grab and fills in the missing group ID and version for you.
Also, by adding the @Grab annotation and asking for Thymeleaf, you triggered autoconfiguration to configure the beans necessary to support Thymeleaf templates in Spring MVC.
Although it has little to do with Spring Boot, it’s worth showing the Contact class in Groovy for the sake of a complete example:
class Contact {
long id
String firstName
String lastName
String phoneNumber
String emailAddress
}
As you can see, Contact is also much simpler without semicolons, accessor methods, and modifiers like public and private. This is owed fully to Groovy’s uncomplicated syntax. Spring Boot had absolutely no part in simplifying the Contact class.
Now let’s see how to simplify the repository class with Spring Boot CLI and Groovy.
21.3.2. Persisting with a Groovy repository
All of the Groovy and Spring Boot CLI tricks you applied to ContactController can also be applied to ContactRepository. The following listing shows the new Groovy version of ContactRepository.
Listing 21.9. When written in Groovy, ContactRepository is much more succinct.
Aside from the obvious improvements from Groovy syntax, this new Contact-Repository class takes advantage of Spring Boot CLI’s auto-import feature to automatically import JdbcTemplate and RowMapper. Moreover, the JDBC starter dependency is automatically resolved when the CLI sees that you’re using those types.
There are only a couple of things that the CLI’s auto-import and auto-resolution couldn’t help you with. As you can see, you still had to import ResultSet. And because Spring Boot doesn’t know which database you want to use, you must use @Grab to ask for the H2 database.
You’ve converted all of the Java classes to Groovy and took advantage of Spring Boot magic along the way. Now you’re ready to run the application.
21.3.3. Running the Spring Boot CLI
After compiling the Java application, you had two choices for running it. You could either run it as an executable JAR or WAR file from the command line, or you could deploy a WAR file to a servlet container. Spring Boot’s CLI offers a third option.
As you might guess from its name, running applications through the Spring Boot CLI is a way to run the application from the command line. But with the CLI, there’s no need to build the application into a JAR or WAR file first. You can run the application directly by passing the Groovy source code through the CLI.
Installing the CLI
In order to use the Spring Boot CLI, you’ll need to install it. You have several options to choose from, including
· The Groovy Environment Manager (GVM)
· Homebrew
· Manual installation
To install Spring Boot CLI using GVM, enter this command:
$ gvm install springboot
If you’re on OS X, you can use Homebrew to install Spring Boot CLI:
$ brew tap pivotal/tap
$ brew install springboot
If you’d rather install Spring Boot manually, you can download it using the instructions at http://docs.spring.io/spring-boot/docs/current/reference/htmlsingle/.
Once you have the CLI installed, you can check the installation and which version you’re using with the following command line:
$ spring --version
Assuming everything installs well, you’re ready to run the Contacts application.
Running the Contacts application with the CLI
To run an application with the Spring Boot CLI, you type spring run in the command line, followed by one or more Groovy files that should be run through the CLI. For example, if your application only has a single Groovy class, you can run it like this:
$ spring run Hello.groovy
This runs a single Groovy class named Hello.groovy through the CLI.
If your application has several Groovy class files, you can run them using wildcards like this:
$ spring run *.groovy
Or, if those Groovy class files are in one or more subdirectories, you can use Ant-style wildcards to recursively seek for Groovy classes:
$ spring run **/*.groovy
Because the Contacts application has three Groovy classes to be read, and because they’re all at the project root, either of the last two options will work. After running the application, you should be able to point your browser to http://localhost:8080 and see essentially the same Contacts application that you created earlier.
At this point, you’ve created a Spring Boot application twice: once in Java and another time in Groovy. In both cases, Spring Boot applied a great deal of magic to minimize the boilerplate configuration and build dependencies. Spring Boot has one more trick up its sleeves, though. Let’s see how you can use the Spring Boot Actuator to introduce management endpoints to a web application.
21.4. Gaining application insight with the Actuator
The main thing that the Spring Boot Actuator does is add several helpful management endpoints to a Spring Boot-based application. These endpoints include
· GET /autoconfig —Explains the decisions made by Spring Boot when applying autoconfiguration
· GET /beans —Catalogs the beans that are configured for the running application
· GET /configprops —Lists all properties available for configuring the properties of beans in the application with their current values
· GET /dump —Lists application threads, including a stack trace for each thread
· GET /env —Lists all environment and system property variables available to the application context
· GET /env/{name} —Displays the value for a specific environment or property variable
· GET /health —Displays the current application health
· GET /info —Displays application-specific information
· GET /metrics —Lists metrics concerning the application, including running counts of requests against certain endpoints
· GET /metrics/{name} —Displays metrics for a specific application metric key
· POST /shutdown —Forcibly shuts down the application
· GET /trace —Lists metadata concerning recent requests served through the application, including request and response headers
To enable the actuator, you simply add the actuator starter dependency to your project. If you’re writing your application in Groovy and running through the Spring Boot CLI, you can add the actuator starter with @Grab, like this:
@Grab("spring-boot-starter-actuator")
If you’re building a Java application using Gradle, you can add the following dependency to the dependencies block in build.gradle:
compile("org.springframework.boot:spring-boot-starter-actuator")
Or in your project’s Maven pom.xml file, you can add the following <dependency>:
<dependency>
<groupId> org.springframework.boot</groupId>
<artifactId>spring-boot-actuator</carlsbad>
</dependency>
After adding the Spring Boot Actuator, you can rebuild and restart your application and then point your browser to any of those management endpoints for more information. For example, if you want to see all of the beans that are in the Spring application context, you can make a request for http://localhost:8080/beans. Using the curl command-line tool, the result might look something like this (reformatted and abridged for readability):
$ curl http://localhost:8080/beans
[
{
"beans": [
{
"bean": "contactController",
"dependencies": [
"contactRepository"
],
"resource": "null",
"scope": "singleton",
"type": "ContactController"
},
{
"bean": "contactRepository",
"dependencies": [
"jdbcTemplate"
],
"resource": "null",
"scope": "singleton",
"type": "ContactRepository"
},
...
{
"bean": "jdbcTemplate",
"dependencies": [],
"resource": "class path resource [...]",
"scope": "singleton",
"type": "org.springframework.jdbc.core.JdbcTemplate"
},
...
]
}
]
From this, you can see that there’s a bean whose ID is contactController that depends on another bean named contactRepository. In turn, the contactRepository depends on the jdbcTemplate bean.
Because I abridged the output, there are dozens of other beans not shown that you’d otherwise see in the JSON produced from the /beans endpoint. This offers some insight into the otherwise mysterious outcome of autowiring and autoconfiguration.
Another endpoint that lends some insight into how Spring Boot’s autoconfiguration works is the /autoconfig endpoint. The JSON produced by this endpoint lays bare the decisions that Spring Boot made when autoconfiguring beans. For example, here’s the abridged (and reformatted) JSON received from the /autoconfig endpoint when fetched from the Contacts application:
$ curl http://localhost:8080/autoconfig
{
"negativeMatches": {
"AopAutoConfiguration": [
{
"condition": "OnClassCondition",
"message": "required @ConditionalOnClass classes not found:
org.aspectj.lang.annotation.Aspect,
org.aspectj.lang.reflect.Advice"
}
],
"BatchAutoConfiguration": [
{
"condition": "OnClassCondition",
"message": "required @ConditionalOnClass classes not found:
org.springframework.batch.core.launch.JobLauncher"
}
],
...
},
"positiveMatches": {
"ThymeleafAutoConfiguration": [
{
"condition": "OnClassCondition",
"message": "@ConditionalOnClass classes found:
org.thymeleaf.spring4.SpringTemplateEngine"
}
],
"ThymeleafAutoConfiguration.DefaultTemplateResolverConfiguration":[
{
"condition": "OnBeanCondition",
"message": "@ConditionalOnMissingBean
(names: defaultTemplateResolver; SearchStrategy: all)
found no beans"
}
],
"ThymeleafAutoConfiguration.ThymeleafDefaultConfiguration": [
{
"condition": "OnBeanCondition",
"message": "@ConditionalOnMissingBean (types:
org.thymeleaf.spring4.SpringTemplateEngine;
SearchStrategy: all) found no beans"
}
],
"ThymeleafAutoConfiguration.ThymeleafViewResolverConfiguration": [
{
"condition": "OnClassCondition",
"message": "@ConditionalOnClass classes found:
javax.servlet.Servlet"
}
],
"ThymeleafAutoConfiguration.ThymeleafViewResolverConfiguration
#thymeleafViewResolver": [
{
"condition": "OnBeanCondition",
"message": "@ConditionalOnMissingBean (names:
thymeleafViewResolver; SearchStrategy: all)
found no beans"
}
],
...
}
}
As you can see, the report has two sections: one for negative matches and one for positive matches. The negative matches section shown here indicates that the AOP and Spring Batch autoconfiguration weren’t applied because the requisite classes weren’t found on the classpath. Under the positive matches section, you can see that as a result of SpringTemplateEngine being found on the classpath, the Thymeleaf autoconfiguration goes into effect. You can also see that the default template resolver, view resolver, and template engine beans will be autoconfigured unless you have already explicitly configured those beans. Moreover, the default view resolver bean will only be autoconfigured if the Servlet class is found on the classpath.
The /beans and /autoconfig endpoints are just two examples of the kind of insight that Spring Boot’s Actuator makes available. There isn’t enough space in this chapter to discuss all of the endpoints in detail, but I encourage you to try them out for yourself to see what the Actuator can tell you about your application.
21.5. Summary
Spring Boot is an exciting new addition to the Spring family of projects. Where Spring aims to make Java development simpler, Spring Boot aims to make Spring itself simpler.
Spring Boot employs two main tricks to eliminate boilerplate configuration in a Spring project: Spring Boot starters and automatic configuration.
A single Spring Boot starter dependency can replace several common dependencies in a Maven or Gradle build. For example, adding only Spring Boot’s web starter as a dependency in a project pulls in Spring’s web and Spring MVC modules as well as the Jackson 2 databind module.
Automatic configuration takes full advantage of Spring 4.0’s conditional configuration feature to automatically configure certain Spring beans to enable a certain feature. For example, Spring Boot can detect that Thymeleaf is in the application classpath and automatically configure the beans required to enable Thymeleaf templates as Spring MVC views.
Spring Boot’s command-line interface (CLI) further simplifies Spring projects with Groovy. By simply referencing a Spring component in Groovy code, you can trigger the CLI to automatically add the necessary starter dependency (which may, in turn, trigger automatic configuration). Moreover, many Spring types don’t require explicit import statements in Groovy code run via the Spring Boot CLI.
Finally, the Spring Boot Actuator adds some common management features to a Spring Boot–developed web application, including insight into thread dumps, web request history, and the beans in the Spring application context.
After reading this chapter, you may be wondering why I saved such a helpful topic like Spring Boot until the end of the book. You might even be thinking that had I introduced Spring Boot earlier in the book, that much of what you learned would’ve been even easier. Indeed, Spring Boot layers a very compelling programming model on top of Spring, and once you’ve used it, it’s hard to imagine writing a Spring application without it.
I could say that by saving Spring Boot for last, my intentions were to give you a deeper appreciation for Spring (and perhaps build character and sprout hair on your chest). While that could be true, the real reason is that most of this book had already been written by the time Spring Boot came along. So I slid it in at the only place I could without shuffling the entire book: at the end.
Who knows? Maybe the next edition of this book will start off using Spring Boot.
All materials on the site are licensed Creative Commons Attribution-Sharealike 3.0 Unported CC BY-SA 3.0 & GNU Free Documentation License (GFDL)
If you are the copyright holder of any material contained on our site and intend to remove it, please contact our site administrator for approval.
© 2016-2026 All site design rights belong to S.Y.A.