Data Structures and Algorithms with JavaScript (2014)
Chapter 6. Linked Lists
In Chapter 3 we discussed the use of lists for storing data. The underlying data storage mechanism we use for lists is the array. In this chapter we’ll discuss a different type of list, the linked list. We’ll explain why linked lists are sometimes preferred to arrays, and we’ll develop an object-based, linked-list implementation. We’ll end the chapter with several examples of how linked lists can solve many programming problems you will encounter.
Shortcomings of Arrays
There are several reasons arrays are not always the best data structure to use for organizing data. In many programming languages, arrays are fixed in length, so it is hard to add new data when the last element of the array is reached. Adding and removing data from an array is also difficult because you have to move array elements up or down to reflect either an addition or a deletion. However, these problems do not come up with JavaScript arrays, since we can use the split() function without having to perform additional array element accesses.
The main problem with using JavaScript arrays, however, is that arrays in JavaScript are implemented as objects, causing them to be less efficient than arrays built in languages such as C++ and Java (see Crockford, Chapter 6).
When you determine that the operations performed on an array are too slow for practical use, you can consider using the linked list as an alternative data structure. The linked list can be used in almost every situation where a one-dimensional array is used, except when you need random access to the elements of a list. When random access is required, an array is the better data structure to use.
Linked Lists Defined
A linked list is a collection of objects called nodes. Each node is linked to a successor node in the list using an object reference. The reference to another node is called a link. An example of a linked list is shown in Figure 6-1.

Figure 6-1. A linked list
While array elements are referenced by their position, linked list elements are referenced by their relationship to the other elements of the linked list. In Figure 6-1, we say that “bread” follows “milk”, not that “bread” is in the second position. Moving through a linked list involves following the links of the list from the beginning node to the end node (not including the header node, which is sometimes used as a hook for entry into a linked list). Something else to notice in the figure is that we mark the end of a linked list by pointing to a null node.
Marking the beginning of a linked list can be a problem. Many linked-list implementations include a special node, called the head, to denote the beginning of a linked list. The linked list shown in Figure 6-1 is redesigned in Figure 6-2 to include a head node.

Figure 6-2. A linked list with a head node
Inserting a new node into a linked list is a very efficient task. To insert a new node, the link of the node before the inserted node (the previous node) is changed to point to the new node, and the new node’s link is set to the node the previous node was pointing to before the insertion. Figure 6-3illustrates how “cookies” is added to the linked list after “eggs.”
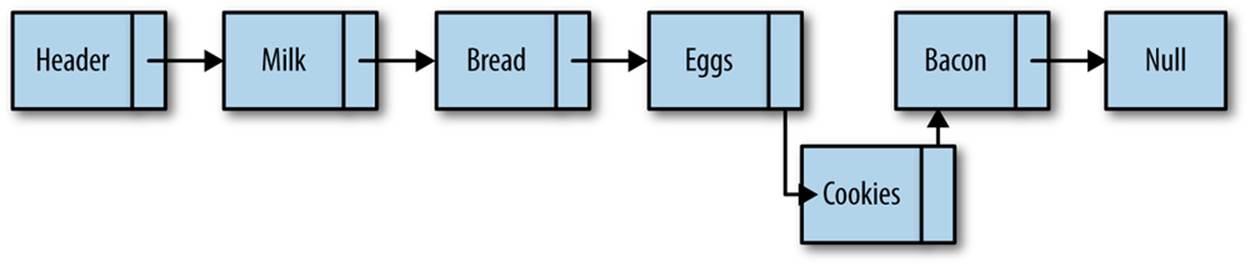
Figure 6-3. Inserting “cookies” into the linked list
Removing an item from a linked list is also easy to do. The link of the node before the removed node is redirected to point to the node the removed node is pointing to, while also pointing the removed node to null, effectively taking the node out of the linked list. Figure 6-4 shows how “bacon” is removed from the linked list.

Figure 6-4. Removing “bacon” from the linked list
There are other functions we can perform with a linked list, but insertion and removal are the two functions that best describe why linked lists are so useful.
An Object-Based Linked List Design
Our design of a linked list will involve creating two classes. We’ll create a Node class for adding nodes to a linked list, and we’ll create a LinkedList class, which will provide functions for inserting nodes, removing nodes, displaying a list, and other housekeeping functions.
The Node Class
The Node class consists of two properties: element, which store’s the node’s data, and next, which stores a link to the next node in the linked list. To create nodes, we’ll use a constructor function that sets the values for the two properties:
function Node(element) {
this.element = element;
this.next = null;
}
The Linked List Class
The LList class provides the functionality for a linked list. The class includes functions for inserting new nodes, removing nodes, and finding a particular data value in a list. There is also a constructor function used for creating a new linked list. The only property stored in a linked list is a node to represent the head of the list.
Here is the definition for the constructor function:
function LList() {
this.head = new Node("head");
this.find = find;
this.insert = insert;
this.remove = remove;
this.display = display;
}
The head node starts with its next property set to null and is changed to point to the first element inserted into the list, since we create a new Node element but don’t modify its next property here in the constructor.
Inserting New Nodes
The first function we’ll examine is the insert function, which inserts a node into a list. To insert a new node, you have to specify which node you want to insert the new node before or after. We’ll start by demonstrating how to insert a new node after an existing node.
To insert a node after an existing node, we first have to find the “after” node. To do this, we create a helper function, find(), which searches through the linked list looking for the specified data. When this data is found, the function returns the node storing the data. Here is the code for thefind() function:
function find(item) {
var currNode = this.head;
while (currNode.element != item) {
currNode = currNode.next;
}
return currNode;
}
The find() function demonstrates how to move through a linked list. First, we create a new node and assign it as the head node. Then we loop through the linked list, moving from one node to the next when the value of the current node’s element property is not equal to the data we are searching for. If the search is successful, the function returns the node storing the data. If the data is not found, the function returns null.
Once the “after” node is found, the new node is inserted into the linked list. First, the new node’s next property is set to the value of the next property of the “after” node. Then the “after” node’s next property is set to a reference to the new node. Here is the definition of the insert()function:
function insert(newElement, item) {
var newNode = new Node(newElement);
var current = this.find(item);
newNode.next = current.next;
current.next = newNode;
}
We’re ready now to test our linked list code. However, before we do that, we need a function that will display the elements of a linked list. The display() function is defined below:
function display() {
var currNode = this.head;
while (!(currNode.next == null)) {
print(currNode.next.element);
currNode = currNode.next;
}
}
This function starts by hooking into the linked list by assigning the head of the list to a new node. We then loop through the linked list, only stopping when the value of the current node’s next property is set to null. In order to display only nodes with data in them (in other words, not thehead node), we access the element property of the node that the current node is pointing to:
currNode.next.element
Finally, we need to add some code to use the linked list. Example 6-1 contains a short program that sets up a linked list of cities in western Arkansas that are located on Interstate 40, along with the complete LList class definition up to this point. Notice that the remove() function is commented out. It will be defined in the next section.
Example 6-1. The LList class and a test program
function LList() {
this.head = new Node("head");
this.find = find;
this.insert = insert;
//this.remove = remove;
this.display = display;
}
function find(item) {
var currNode = this.head;
while (currNode.element != item) {
currNode = currNode.next;
}
return currNode;
}
function insert(newElement, item) {
var newNode = new Node(newElement);
var current = this.find(item);
newNode.next = current.next;
current.next = newNode;
}
function display() {
var currNode = this.head;
while (!(currNode.next == null)) {
print(currNode.next.element);
currNode = currNode.next;
}
}
// main program
var cities = new LList();
cities.insert("Conway", "head");
cities.insert("Russellville", "Conway");
cities.insert("Alma", "Russellville");
cities.display()
The output from Example 6-1 is:
Conway
Russellville
Alma
Removing Nodes from a Linked List
In order to remove a node from a linked list, we need to find the node that is just before the node we want to remove. Once we find that node, we change its next property to no longer reference the removed node, and the previous node is modified to point to the node after the removed node. We can define a function, findPrevious(), to perform this task. This function traverses the linked list, stopping at each node to see if the next node stores the data that is to be removed. When the data is found, the function returns this node (the “previous” node), so that its next property can be modified. Here is the definition for findPrevious():
function findPrevious(item) {
var currNode = this.head;
while (!(currNode.next == null) &&
(currNode.next.element != item)) {
currNode = currNode.next;
}
return currNode;
}
Now we’re ready to write the remove() function:
function remove(item) {
var prevNode = this.findPrevious(item);
if (!(prevNode.next == null)) {
prevNode.next = prevNode.next.next;
}
}
The main line of code in this function looks odd, but makes perfect sense:
prevNode.next = prevNode.next.next
We are just skipping over the node we want to remove and linking the “previous” node with the node just after the one we are removing. Refer back to Figure 6-4 if you need help visualizing this operation.
We are ready to test our code again, but first we need to modify the constructor function for the LList class to include these new functions:
function LList() {
this.head = new Node("head");
this.find = find;
this.insert = insert;
this.display = display;
this.findPrevious = findPrevious;
this.remove = remove;
}
Example 6-2 provides a short program that tests the remove() function:
Example 6-2. Testing the remove() function
var cities = new LList();
cities.insert("Conway", "head");
cities.insert("Russellville", "Conway");
cities.insert("Carlisle", "Russellville");
cities.insert("Alma", "Carlisle");
cities.display();
console.log();
cities.remove("Carlisle");
cities.display();
The output from Example 6-2 before the removal is:
Conway
Russellville
Carlisle
Alma
But Carlisle is in eastern Arkansas, so we need to remove it from the list, resulting in the following output:
Conway
Russellville
Alma
Example 6-3 contains a complete listing of the Node class, the LList class, and our test program:
Example 6-3. The Node class and the LList class
function Node(element) {
this.element = element;
this.next = null;
}
function LList() {
this.head = new Node("head");
this.find = find;
this.insert = insert;
this.display = display;
this.findPrevious = findPrevious;
this.remove = remove;
}
function remove(item) {
var prevNode = this.findPrevious(item);
if (!(prevNode.next == null)) {
prevNode.next = prevNode.next.next;
}
}
function findPrevious(item) {
var currNode = this.head;
while (!(currNode.next == null) &&
(currNode.next.element != item)) {
currNode = currNode.next;
}
return currNode;
}
function display() {
var currNode = this.head;
while (!(currNode.next == null)) {
print(currNode.next.element);
currNode = currNode.next;
}
}
function find(item) {
var currNode = this.head;
while (currNode.element != item) {
currNode = currNode.next;
}
return currNode;
}
function insert(newElement, item) {
var newNode = new Node(newElement);
var current = this.find(item);
newNode.next = current.next;
current.next = newNode;
}
var cities = new LList();
cities.insert("Conway", "head");
cities.insert("Russellville", "Conway");
cities.insert("Carlisle", "Russellville");
cities.insert("Alma", "Carlisle");
cities.display();
console.log();
cities.remove("Carlisle");
cities.display();
Doubly Linked Lists
Although traversing a linked list from the first node to the last node is straightforward, it is not as easy to traverse a linked list backward. We can simplify this procedure if we add a property to our Node class that stores a link to the previous node. When we insert a node into the list, we’ll have to perform more operations to assign the proper links for the next and previous nodes, but we gain efficiency when we have to remove a node from the list, since we no longer have to search for the previous node. Figure 6-5 illustrates how a doubly linked list works.

Figure 6-5. A doubly linked list
Our first task is to assign a previous property to our Node class:
function Node(element) {
this.element = element;
this.next = null;
this.previous = null;
}
The insert() function for a doubly linked list is similar to the insert() function for the singly linked list, except that we have to set the new node’s previous property to point to the previous node. Here is the definition:
function insert(newElement, item) {
var newNode = new Node(newElement);
var current = this.find(item);
newNode.next = current.next;
newNode.previous = current;
current.next = newNode;
}
The remove() function for a doubly linked list is more efficient than for a singly linked list because we don’t have to find the previous node. We first need to find the node in the list that is storing the data we want to remove. Then we set that node’s previous property to the node pointed to by the deleted node’s next property. Then we need to redirect the previous property of the node the deleted node points to and point it to the node before the deleted node. Figure 6-6 makes this situation easier to understand.
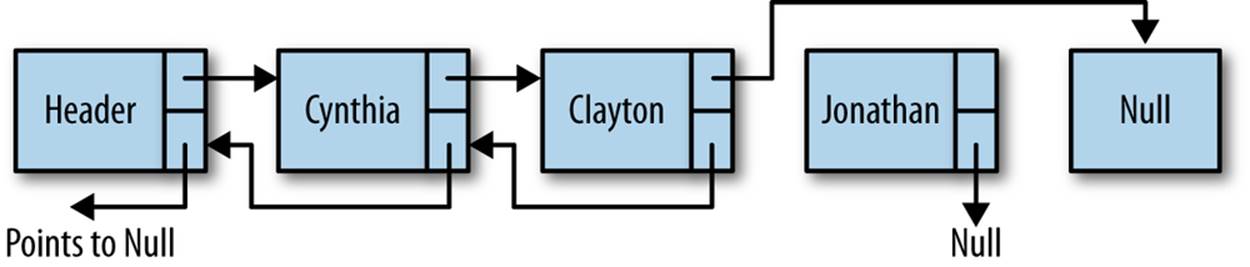
Figure 6-6. Removing a node from a doubly linked list
Here is the code for the remove() function:
function remove(item) {
var currNode = this.find(item);
if (!(currNode.next == null)) {
currNode.previous.next = currNode.next;
currNode.next.previous = currNode.previous;
currNode.next = null;
currNode.previous = null;
}
}
In order to perform tasks such as displaying a linked list in reverse order, we can use a utility function that finds the last node in a doubly linked list. The following function, findLast(), moves us to the last node of a list without going past the end of the list:
function findLast() {
var currNode = this.head;
while (!(currNode.next == null)) {
currNode = currNode.next;
}
return currNode;
}
With the findLast() function written, we can write a function to display the elements of a doubly linked list in reverse order. Here is the code for the dispReverse() function:
function dispReverse() {
var currNode = this.head;
currNode = this.findLast();
while (!(currNode.previous == null)) {
print(currNode.element);
currNode = currNode.previous;
}
}
The last task to accomplish is to add these new functions to the constructor function for the doubly linked list class. Example 6-4 presents this code, along with the rest of the code for implementing a doubly linked list, as well as a short program to test the code.
Example 6-4. The LList class as a doubly linked list
function Node(element) {
this.element = element;
this.next = null;
this.previous = null;
}
function LList() {
this.head = new Node("head");
this.find = find;
this.insert = insert;
this.display = display;
this.remove = remove;
this.findLast = findLast;
this.dispReverse = dispReverse;
}
function dispReverse() {
var currNode = this.head;
currNode = this.findLast();
while (!(currNode.previous == null)) {
print(currNode.element);
currNode = currNode.previous;
}
}
function findLast() {
var currNode = this.head;
while (!(currNode.next == null)) {
currNode = currNode.next;
}
return currNode;
}
function remove(item) {
var currNode = this.find(item);
if (!(currNode.next == null)) {
currNode.previous.next = currNode.next;
currNode.next.previous = currNode.previous;
currNode.next = null;
currNode.previous = null;
}
}
// findPrevious is no longer needed
/*function findPrevious(item) {
var currNode = this.head;
while (!(currNode.next == null) &&
(currNode.next.element != item)) {
currNode = currNode.next;
}
return currNode;
}*/
function display() {
var currNode = this.head;
while (!(currNode.next == null)) {
print(currNode.next.element);
currNode = currNode.next;
}
}
function find(item) {
var currNode = this.head;
while (currNode.element != item) {
currNode = currNode.next;
}
return currNode;
}
function insert(newElement, item) {
var newNode = new Node(newElement);
var current = this.find(item);
newNode.next = current.next;
newNode.previous = current;
current.next = newNode;
}
var cities = new LList();
cities.insert("Conway", "head");
cities.insert("Russellville", "Conway");
cities.insert("Carlisle", "Russellville");
cities.insert("Alma", "Carlisle");
cities.display();
print();
cities.remove("Carlisle");
cities.display();
print();
cities.dispReverse();
The output from Example 6-4 is:
Conway
Russellville
Carlisle
Alma
Conway
Russellville
Alma
Alma
Russellville
Conway
Circularly Linked Lists
A circularly linked list is similar to a singly linked list and has the same type of nodes. The only difference is that a circularly linked list, when created, has its head node’s next property point back to itself. This means that the assignment:
head.next = head
is propagated throughout the circularly linked list so that every new node has its next property pointing to the head of the list. In other words, the last node of the list is always pointing back to the head of the list, creating a circular list, as shown in Figure 6-7.

Figure 6-7. A circularly linked list
The reason you might want to create a circularly linked list is if you want the ability to go backward through a list but don’t want the extra overhead of creating a doubly linked list. You can move backward through a circularly linked list by moving forward through the end of the list to the node you are trying to reach.
To create a circularly linked list, change the constructor function of the LList class to read:
function LList() {
this.head = new Node("head");
this.head.next = this.head;
this.find = find;
this.insert = insert;
this.display = display;
this.findPrevious = findPrevious;
this.remove = remove;
}
This is the only change we have to make in order to make a singly linked list into a circularly linked list. However, some of the other linked list functions will not work correctly unmodified. For example, one function that needs to be modified is display(). As written, if the display()function is executed on a circularly linked list, the function will never stop. The condition of the while loop needs to change so that the head element is tested for and the loop will stop when it gets to the head.
Here is how the display() function is written for a circularly linked list:
function display() {
var currNode = this.head;
while (!(currNode.next == null) &&
!(currNode.next.element == "head")) {
print(currNode.next.element);
currNode = currNode.next;
}
}
Seeing how to modify the display() function, you should be able to modify other functions from a standard linked list to make them work with a circularly linked list.
Other Linked List Functions
There are several other functions you might include in order to have a well-functioning linked list. In the upcoming exercises, you will have the opportunity to develop some of these functions, including:
advance(n)
Advances n nodes in the linked list
back(n)
Moves n nodes backward in a doubly linked list
show()
Displays the current node only
Exercises
1. Implement the advance(n) function so that when executed, the current node is moved n nodes forward in the list.
2. Implement the back(n) function so that when executed, the current node is moved n spaces backward in the list.
3. Implement the show() function, which displays the data associated with the current node.
4. Write a program that uses a singly linked list to keep track of a set of test grades entered interactively into the program.
5. Rewrite your solution to Example 6-4 using a doubly linked list.
6. According to legend, the first-century Jewish historian Flavius Josephus was about to be captured along with a band of 40 compatriots by Roman soldiers during the Jewish-Roman War. The Jewish soldiers decided that they preferred suicide to being captured and devised a plan for their demise. They were to form a circle and kill every third soldier until they were all dead. Josephus and one other decided they wanted no part of this and quickly calculated where they needed to place themselves so they would be the last survivors. Write a program that allows you to place n people in a circle and specify that every mth person will be killed. The program should determine the number of the last two people left in the circle. Use a circularly linked list to solve the problem.
All materials on the site are licensed Creative Commons Attribution-Sharealike 3.0 Unported CC BY-SA 3.0 & GNU Free Documentation License (GFDL)
If you are the copyright holder of any material contained on our site and intend to remove it, please contact our site administrator for approval.
© 2016-2026 All site design rights belong to S.Y.A.