WebGL Textures: Introduction to Mipmaps, Sub Images & Atlases (2015)
Book's Structure
First we discuss texture atlases with the Texture Atlas: Switch Images, Texture Atlas: Animation, and Texture Atlas: Two Meshes, projects. Then we cover the Mipmaps and Sub Images projects. The last project titled Bonus Maze Game, describes a simple game created with sub images. Last we provide an overview of two supporting JavaScript files. The supporting files named GLControl.js and GLEntity.js initialize vertex and texture buffers.
The introductory book WebGL Textures and Vertices: Beginner's Guide, discusses the supporting files in depth. However this book includes diagrams and fully commented source code, for those who haven't read the first book. See the section titled Initialization Activity Diagram for an outline of the supporting files. By default projects use one buffer with interleaved vertices and texels.
You may download thoroughly commented source code for details. You may also download source code without comments, for more lightweight Web page display.
Conventions
Section titles which start with WebGL API, refer to WebGL specific functions and properties. To find WebGL features, look in the table of contents for entries starting with WebGL API. The WebGL API specific features may look a little peculiar. They resemble OpenGL ES features. However WebGL API functions and properties represent the key to interaction with the GPU for high speed graphics.
Text and diagrams represent vertex coordinates within parenthesis (x, y, z). Texel texture coordinates are represented within square brackets [s, t]. Indices are also represented within square brackets [index].
Texture Atlases
The term texture atlas refers to a sequence of graphics saved in one image file. In WebGL initialize one texture, then modify drawing parameters to change mapping coordinates. We'll demonstrate two methods. The first method calls vertexAttribPointer() with different stride and offset parameters. The second method calls drawElements() with different count and offset parameters. Both examples pack all vertex and texel values into one buffer. It's usually more efficient to upload one buffer to the GPU, then access different areas of the buffer, than to upload multiple buffers. The following project explains how to change images on display, with the WebGL methodvertexAttribPointer().
Texture Atlas: Switch Images
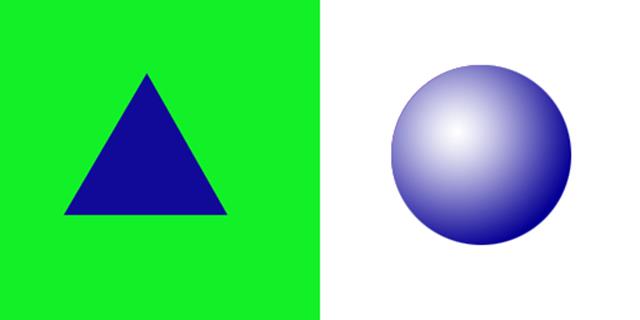
The Texture Atlas: Switch Images project uses the preceding graphic. A blue triangle on a green background displays on the left side, and a blue sphere displays on the right side. Each side entirely covers one square mesh at different points in time.
The first texture atlas project demonstrates how to switch images dynamically. The Texture Atlas: Switch Images project alternately displays sides of the preceding graphic, on one square mesh. Tap the Change Image button to switch back and forth between images mapped to the square. The mesh first displays the triangle. When the user taps the Change Image button, the sphere displays on the mesh.
We demonstrate how to switch images with a texture atlas. This project explains how to calculate offset and stride parameters for the WebGL method to vertexAttribPointer(). Once you understand how to calculate offset and stride, it's relatively easy to adjust texels or animate with texels.
The file GLImageSwitch.js implements image switching. However every project provided with the book follows a similar initialization sequence. The constructor's one parameter is a String representing the path to an image file.
The Web Page
The following line demonstrates constructing a GLImageSwitch instance, when the body of a Web page loads. All the book's examples use a similar pattern. Construct a reference to the project's class. The only parameter is a String path to an image file. Additionally the book's Web pages include a canvas element with id of cv and a debugging element with id of eDebug. See a simplified example Web page.
<body onload="new GLImageSwitch('assets/two-tex.gif')">
In JavaScript prepare a set of indices which eventually serve as an element array buffer. The indices within GLImageSwitch.js, access four vertices to define the shape of a square in counter clockwise winding order. The following listing demonstrates generating a JavaScript array for use as an element array buffer. The vertex buffer will include four vertices. The vertices begin at index 0 and end at index 3 within the buffer. Most of the book's projects use an identical set of indices.
var aIndices = new Uint16Array([
3,2,0,
0,2,1
]);
Listing 1: Switch Images: Index Element Array
The preceding array also serves to map texels. However the vertex shader accesses two sets of four texels each at different times. In other words the vertex buffer includes eight texels which activate in response to user interaction. We demonstrate how to call vertexAttributePointer() to process the first set of texels. Later we use vertexAttribPointer() a second time to process the the second set of texels.
Prepare an array with four vertices which describe the shape of a square. Most of the book's projects interleave vertices with texels. In other words alternate vertex entries with the first set of texel entries, in the array. To map each side of the texture separately, add more texels to the array after the interleaved texels. Include texels interleaved between vertices, to map the left side of the texture to the mesh. Add texels after the vertices, to map the right side of the texture to the mesh.
The following image demonstrates mapping texel S and T coordinates. Texels appear in square brackets. We shaved 1/100 off the S coordinates, where they meet the vertical division between the two graphics. Create a gap between the images to prevent white and green colors from blending along the edges during the rasterization process. The left side triangle image's texels range from the upper left corner at [0.0, 1.0] to the lower right corner at [0.49,0.0]. The right side sphere graphic's texels range from the upper left corner at [0.51,1.0] to the lower right corner at [1.0,0.0].
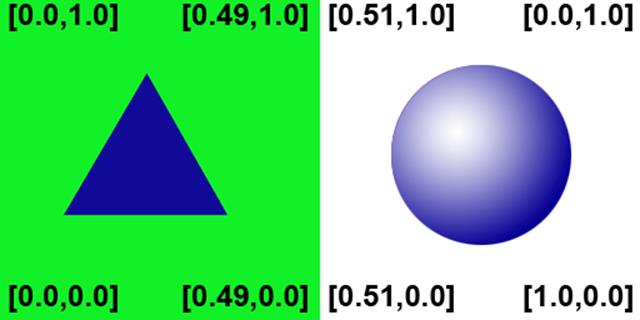
Diagram 1: Switch Images: Texel Assignment
Interleaved Vertices and Texels
This example interleaves the first set of texels between vertices. However the second set of texels are not interleaved. In other words the array begins with alternating sets of vertices and texels. Yet once the array contains all four vertices, simply append the rest of the texels. We arranged the vertices and texels to work with default settings provided by GLControl.js. Include the second set of texels after the the first set. The following listing includes the entire array of vertices and texels for the Texture Atlas: Switch Images project.
This first project includes a slightly more complicated buffer than the second project. You'll learn how to change texel values processed through the shader, in this project. The next project Texture Atlas: Animation, demonstrates a simpler arrangement with non interleaved values.
var aVertices = new Float32Array(
[
// Interleaved
// vertices
// and texels.
// The interleaved
// texels only
// map the left
// side of the texture.
-1.0, 1.0, 0.0,
0.0, 1.0,
1.0, 1.0, 0.0,
0.49, 1.0,
1.0, -1.0, 0.0,
0.49, 0.0,
-1.0, -1.0, 0.0,
0.0, 0.0,
// Texels to
// display the right
// side of the texture.
// These texels
// aren't interleaved
// with vertices.
0.51, 1.0,
1.0, 1.0,
1.0, 0.0,
0.51, 0.0,
]
);
Listing 2: Switch Images: Vertex and Texel Array
The constructor creates an instance variable named bTexOne, of type boolean. Initialize bTexOne to false. When the Web page loads, the first set of texels display. Use the boolean value to maintain the state of the current section of the texture on display. Tap the Change Image button. The button's event listener calls the WebGL method vertexAttribPointer() to display the second set of texels, then changes bTexOne to true.
Create the Texture
The supporting file GLEntity.js defines the GLEntity class. GLEntity initializes a texture for use with WebGL. The first parameter to the GLEntity constructor is the path to an image file. The second parameter determines the texture unit for the WebGLTexture.
The GLImageSwitch constructor's formal parameter s, is a String. The String is the path and name of an image file. Create a new GLEntity reference. Pass s as the first parameter and 0 as the second parameter. The GLEntity creates a WebGLTexture from the image file and assigns it to the first texture unit.
Add the instance of GLEntity to a JavaScript array, then call the GLControl constructor to initialize the texture, mesh, and animation. Pass the array of GLEntity, indices, and vertices with texels to the GLControl constructor. The last argument to GLControl is a reference to this GLImageSwitch class.
See the section titled Initialization Activity Diagram for an overview of GLControl and GLEntity classes. The book's examples use both classes for every project, to simplify initialization. The following listing demonstrates initializing GLControl for this project. Class GLImageSwitch maintains an instance variable named controller which references the GLControl instance.
var aIm = new Array();
// Instantiate
// one GLEntity.
var n = new GLEntity(s,0);
aIm.push(n);
// Create the
// controller.
this.controller = new GLControl
(
aVertices,
aIndices,
aIm,
this
);
Listing 3: Switch Images: Initialize GLControl
Switch Images: Assign a Click Event Listener
The GLImageSwitch constructor assigns a click event listener to the Change Images button. The changeImage() method activates when the user taps the Change Images button. Method setListener() creates a property named controller on the button reference. Assign the GLControl reference to the controller property. When the click event listener fires, then the event's currentTarget.controller property refers to the GLControl reference.
setListener: function(){
// Reference a button element declared
// in the HTML Web page
// with id = "btnChange".
var btnChange = document.getElementById("btnChange");
// Create a controller
// property and assign this
// GLControl reference.
btnChange.controller = this.controller;
btnChange.addEventListener
(
'click',
this.changeImage,
false
);
},
Listing 4: Switch Images: Method setListener()
Change Images
To change images dynamically change the set of texels processed through the vertex shader's attribute, named a_tex_coord0. For context, we'll briefly cover the vertex shader. It's helpful to see how a_tex_coord0 operates in the shader. Next we explain how to change texels processed through the shader.