WebGL Textures: Introduction to Mipmaps, Sub Images & Atlases (2015)
Sub Images
The Sub Images project displays the graphic of a 2D maze. Select the Play button to randomly fill the maze with tiles. A call to the WebGL API method texSubImage2D() draws each tile on the maze texture. Sub images offer a few advantages. First you only need to initialize the base image as a WebGLTexture. Save the sub image data as a JavaScript Image object, UInt8Array, or Float32Array. Second texSubImage2D() offers a quick method to update the appearance of the currently active texture.
This section covers how to display a sub image from an image file. The section titled Sub Image from an Array briefly explains how to display sub images from procedural image data. Store the procedural image data in a UInt8Array. The book WebGL Vertices & Textures: Beginner's Guide describes how to generate procedural image data in more detail.
The sub image projects display a maze as a segue into the final bonus project titled Maze Game. Most of the functionality in this project applies to the Maze Game project.
Load the Base and Sub Images
The JavaScript file GLSubImage.js defines the class GLSubImage. The GLSubImage constructor includes two parameters. Both String parameters provide the path to an image file. The first parameter named sBase is the path to the base image. The second parameter named sSub is the path to the sub image.
Prepare the Maze Array
The JavaScript file GLMaze.js generates an array of data representing the maze. Include GlMaze.js in the header with GLSubImage.js. Create a script tag for both GLMaze.js and GLSubImage.js.
The array looks like a table with 16 x 16 cells. The matrix contains 16 rows and 16 columns. We prepared the array to resemble the base image graphic. A row in the graphic corresponds to a row in the array. A column in the graphic corresponds to a column in the array. Array entries containing the value 1 represent tiles on the path in the maze. Array entries containing the value 0 represent black space, off of the path. The following listing includes the entire GLMaze.js file.
var GLMaze = function(){
this.array=(
[
// columns:
//0,1,2,3,4,5,6,7,8,9,10,11,12,13,14,15
1,1,1,1, 0,0,0,1, 1,1,1,1, 1,1,1,1,
0,0,0,1, 0,0,0,1, 0,0,0,0, 0,0,0,1,
0,1,1,1, 0,0,0,1, 1,1,1,0, 0,0,0,1,
0,1,0,0, 0,0,0,0, 0,0,1,0, 0,0,0,1,
0,1,1,1, 1,1,1,0, 0,0,1,0, 0,1,1,1,
0,1,0,1, 0,0,1,1, 1,1,1,0, 0,1,0,0,
0,1,0,1, 0,0,1,0, 0,0,1,1, 1,1,0,0,
0,1,0,1, 0,0,1,0, 0,0,1,0, 0,1,0,0,
1,1,1,1, 0,0,1,0, 0,0,1,0, 0,1,0,0,
0,0,1,0, 1,1,1,1, 1,1,1,0, 0,1,0,0,
0,0,1,0, 1,0,0,0, 0,0,0,0, 0,1,0,0,
0,0,1,0, 1,0,1,1, 1,1,1,1, 1,1,0,0,
0,0,1,0, 1,0,1,0, 0,0,0,1, 0,0,0,0,
0,0,1,0, 1,0,1,0, 0,0,0,1, 1,1,1,1,
0,0,1,1, 1,0,1,0, 0,0,0,0, 0,0,0,1,
0,0,0,0, 0,0,1,1, 1,1,1,1, 1,1,1,1,
]);
return this;
}
Listing 32: GLMaze Maze Array
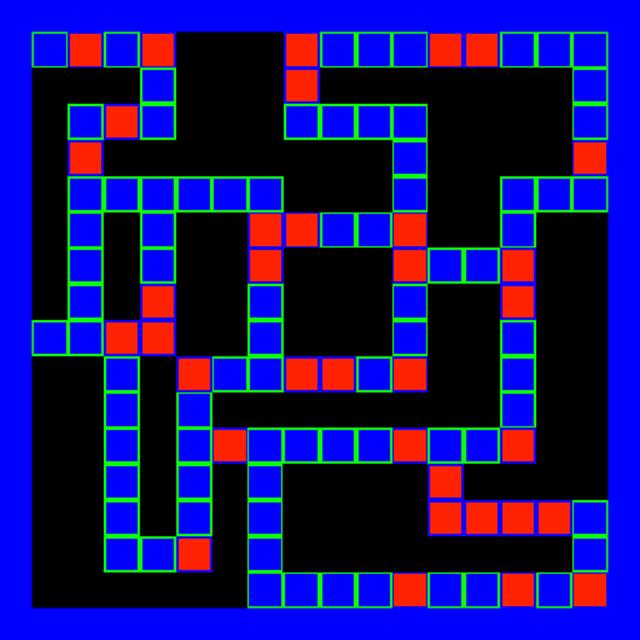
See the base maze graphic named maze.gif, in the following diagram. The array's ones correspond to the blue path in the image. The array's zeros correspond to the black areas. The JavaScript maze and graphical maze should look similar. However, we made code which accesses the maze configurable. Modify the array and graphics for a new maze, if you wish.
Diagram 11: Maze Base Image
The following illustration is the maze graphic representing the player. The graphic's named player.gif. Following sections demonstrate how to apply the player as a sub image on the maze. We also include a method which uses the maze array to determine how to place the player on the path. In other words JavaScript determines where to draw a sub image, which corresponds to path entries in the maze array.
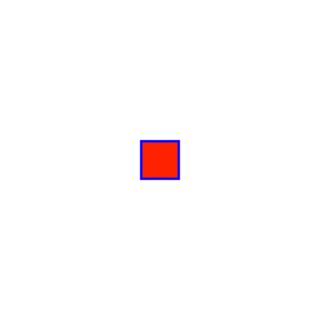
Diagram 12: Player Sub Image
Initialize the Sub Image Project
The constructor saves the maze array to an instance variable named aMaze. The following listing demonstrates creating a new instance of GLMaze, then saving the array.
// Create a
// maze reference.
var glMaze = new GLMaze();
// Save the array.
this.aMaze = glMaze.array;
Listing 33: Maze Array Instance Variable
The GLSubImage constructor creates an instance variable named sBase. The variable maintains the file path to the base maze graphic. The GLSubImage constructor creates two instance variables named nX and nY. The coordinates represent the location within the base graphic, of the upper left hand corner to draw the next sub image.
This project uses one GLEntity for the base texture, and one Image for the player. The GLSubImage constructor creates a new JavaScript instance variable for the player image. We need to load the player image before creating the controller. Otherwise rendering might fail. The render() method needs both the base texture and the player image.
Load the player image before initializing the controller. Initialize the controller in the image's onload event. The image's onload event listener imgLoaded(ev), initializes the controller. When the controller calls render(), the base texture and the image will be available.
The GLSubImage constructor creates a new Image instance variable named image. The constructor assigns the method imgLoaded as the onload event for the Image object, then assigns the sSub parameter to the Image's src property. The following listing includes the entire GLSubImage constructor.
var GLSubImage = function(sBase,sSub){
// Save the
// Maze array
var glMaze = new GLMaze();
this.aMaze = glMaze.array;
// Save X and
// Y coordinates for
// the sub image.
this.nX = Number(0);
this.nY = Number(0);
// Save the
// String file
// path to
// the base
// maze graphic.
this.sBase = sBase;
// Create the
// sub image
// player graphic.
this.image = new Image();
// Load the image
// before creating the
// controller.
this.image.onload = this.imgLoaded;
// Save this
// GLSubImage
// reference.
this.image.glSub = this;
this.image.src = sSub;
}
Listing 34: GLSubImage Constructor
After the Sub Image Loads
The GLSubImage method imgLoaded() executes after the image loads. Method imgLoaded() creates an array of indices, and an array of vertices with texels. Both arrays are identical to the arrays created for the Mipmaps project. The base maze graphic displays on a square mesh. The texture maps from edge to edge. Method imgLoaded() instantiates a new GLControl reference, similar to previous projects in this book. Before returning, imgLoaded() calls method setDefaultMatrix(). See the imgLoaded() method.
Sub Image Default Matrix
The method setDefaultMatrix() defined for the Sub Images project, prepares a matrix similar to setDefaultMatrix() defined for the Texture Atlas Animation project. The Sub Image base maze graphic doesn't rotate, therefore we only need to upload the matrix once for all render frames. We can move the mesh forward along the Z axis, because the mesh stays parallel to the view port.
First setDefaultMatrix() modifies the Z translation entry. The modified matrix moves the plane which displays the maze graphic forward, along the Z axis. Obtain a reference to the first entity's matrix property. Assign the value -2.5 to the matrice's fourteenth entry. The matrix now contains values to render the base maze graphic 2.5 units away from the viewport. The maze graphic appears larger because the mesh is closer to the viewport. The maze almost fills the canvas.
Second setDefaultMatrix() calls the WebGL API method uniformMatrix4fv() to upload the matrix to the shader once. The maze doesn't rotate, therefore we don't need to upload the matrix for every animation frame.
The screen shot of the Sub Image project shows a blue border around the maze. When setDefaultMatrix() adjusts the transformation matrix along the Z axis, less of the canvas background displays around the edges of the mesh. We adjusted the mesh position to use the part of the canvas which displays around the edges of the mesh, as a blue border. The Web page's style section assigns blue to the canvas's background color. The following line demonstrates the canvas's style.
#cv{ background-color:blue; }
See the Sub Image's setDefaultMatrix() method.
Random Tiles in the Maze
The getRandom() method finds a random tile along the path of the maze. Then getRandom() assigns X and Y coordinates for the random tile to the instance variables nX and nY. The render() method uses nX and nY to place the upper left hand corner of the sub image.
Find Tiles on the Path
To find random values along the path of the maze use JavaScript methods Math.random() and Math.floor(). We want whole numbers in the range {0...255}. The 16 x 16 maze array contains 256 entries because 162 = 256. Entries with a value of 1 represent a tile along the path in the maze. Entries with a value of 0 represent empty space in the maze.
The following line assigns random values to the local variable n.
n = Math.ceil(Math.random()*255).
Now determine if the entry at index n, within the maze array equals 1 or 0. The following line tests the random value.
if(glSub.aMaze[n]== 1)
If n represents a tile along the path of the maze, then determine which row and which column the tile represents.
Find the Column
Column numbers range from 0 to 15, because the maze has 16 columns. The following line gives the column number from the array index n.
col = n % 16;
Multiply col by 32 because each tile covers 32 pixels square. Each column equals 32 pixels of the base maze graphic along the horizontal axis. For example the X coordinate for the left most pixel of column 10 equals 320, because 10 * 32 = 320. The following line assigns the instance variable nX the X coordinate for the player tile. In other words nX represents the pixel location along the horizontal axis, for this tile in the maze.
glSub.nX = col * 32;
Find the Row
Row numbers range from 0 to 15, because the maze has 16 rows. The following line gives the row number from the array index n.
var row = Math.floor(n/16)
However row represents the row when counting from the top downward. The top row equals 0 and the bottom row equals 15. However WebGL texels start with zero at the bottom. The following line reverses the row count.
row = 15 - row;.
Multiply row by 32 because each tile covers 32 pixels square. Each row equals 32 pixels of the base maze graphic along the vertical axis. The following line assigns the instance variable nY the Y coordinate for the player tile. In other words nY represents the pixel location along the vertical axis, for this tile in the maze.
glSub.nY = row * 32;
The getRandom() method finds a random tile along the path of the maze. Then getRandom() assigns X and Y coordinates for the random tile to the instance variables nX and nY. The render() method uses nX and nY to place the upper left hand corner of the sub image. See the getRandom() method.
Render Random Sub Images
The controller calls method render(), defined in GLSubImage.js. The render() method executes in response to tapping the Play button or the canvas. Method render() copies a randomly placed player tile onto the maze texture, then displays the modified texture.
The render() method has one parameter, which is a reference to the controller. The controller always stores a reference to the current project's class, in the property named glDemo. Method render() saves a copy of this instance of GLSubImage with the following line.
var glSub = controller.glDemo
render() then calls getRandom() to obtain X and Y coordinates for random tiles on the maze. Method getRandom() saves the X and Y coordinates to the properties glSub.nX and glSub.nY. Copy the sub image onto the active texture with the WebGL API method texSubImage2D().
WebGL API texSubImage2D() for Image Objects
The method texSubImage2D() copies image data onto the currently active texture. Method texSubImage2D() has two overloads, similar to texImage2D(). When the image data originates with a Uint8Array or Float32Array, then call texSubImage2D() with two additional parameters. Include width and height. However when the image data originates with an Image object, don't pass the width and height parameters. Image data already specifies width and height. This section explains how to apply colors to the active texture from an Image object. See the section titled Sub Image from an Array to learn how to display procedurally generated colors, stored within a Uint8Array.
The parameters to texSubImage2D() include target, level, X offset, Y offset, format, type, and pixels.
The target parameter represents the type of texture to modify. The book's examples target a TEXTURE_2D. Cube mapped graphics target TEXTURE_CUBE_MAP<side> where side represents one of the six sides of a cube. Skyboxes use TEXTURE_CUBE_MAP. The book WebGL Skybox covers skyboxes in detail.
The level parameter indicates the level of detail. WebGL currently supports only level 0.
X offset and Y offset parameters indicate where to place the sub image. In other words, copy the image data on the texture at the pixel coordinates (X offset, Y offset). The X and Y offsets place the upper left hand corner of the sub image. The Image object displays at it's default width and height, beginning at the (X offset, Y offset) within the current active texture. Our example uses the instance variables glSub.nX and glSub.nY for the X and Y offsets.
texSubImage2D() throws an exception, if the sub image's dimensions exceed the dimensions of the base image. Additionally texSubImage2D() throws an exception with any other attempt to draw beyond the surface of the currently active texture. For example assume the base texture's dimensions are 256 x 256 and the sub image's dimensions are 16 x 16. Attempting to draw the sub image at coordinates (254,128) causes an exception. The X coordinate 254plus the width of the sub image 16 equals 270. The base image's width equals 256. An attempt to draw to the X location 270, surpasses the width of the surface of the base texture.
format describes layout of the data within the source image. Values for the format parameter include ALPHA, LUMINANCE, LUMINANCE_ALPHA, RGB, and RGBA. This project uses RGBA image data.
The type can be either UNSIGNED_BYTE or FLOAT. Our examples use UNSIGNED_BYTE. You must enable the the WebGL extension OES_texture_float to use FLOAT.
The last parameter pixels, provides the actual image data. In our example use the Image object we previously initialized. The instance variable named image maintains the Image data from the downloaded image file.
gl.texSubImage2D
(
gl.TEXTURE_2D,
0,
glSub.nX,
glSub.nY,
gl.RGBA,
gl.UNSIGNED_BYTE,
glSub.image
);
Listing 35: WebGL API texSubImage2D() for an Image Object
Finally the render() method calls the WebGL method drawElements(), exactly as described for the Texture Atlas Animation project. The controller's instance variable named nBufferLength equals 6 for this project, because the index array's length equals 6. The texture maps across a square mesh defined with two triangles and six vertices. The following listing demonstrates calling drawElements() within GLSubImage's render() method.
gl.drawElements
(
gl.TRIANGLES,
controller.nBufferLength,
gl.UNSIGNED_SHORT,
0
);
Listing 36: WebGL API drawElements(): Sub Image Project
The controller calls method render(), defined in GLSubImage.js. The render() method executes in response to tapping the Play button or the canvas. Method render() copies a randomly placed player tile onto the maze texture, then displays the modified texture. See the render() method for the Sub Images project.
Sub Images Summary
The Sub Images project displays the graphic of a 2D maze. Select the Play button to randomly fill the maze with red tiles. A call to the WebGL API method texSubImage2D() draws each red tile on the maze texture. Sub images offer a few advantages. First you only need to initialize the base image as a WebGLTexture. Save the sub image data as a JavaScript Image object, UInt8Array, or Float32Array. Second texSubImage2D() offers a quick method to update the appearance of the currently active texture. See the JavaScript file GLSubImage.js for thoroughly commented source code.
We used a maze as a segue into the final bonus project Maze Game. Most of the functionality in this project applies to the Maze Game project. However first we discuss how to display sub images from array data.
Sub Image from an Array
The file GLSubImageArray.js defines the GLSubImageArray class which displays the maze background, and randomly fills the path with procedurally generated image data.
The Sub Image from an Array project includes two advantages. First the constructor only requires one parameter. Pass the base image file path, to the constructor. JavaScript generates the sub image file data. Second we don't have to wait for the sub image's file to download, before creating the controller.
This section briefly discusses how to fill a Uint8Array with color data. Change the format applied to the currently active image, and call the WebGL API method texSubImage2D() with color data from an array.
Prepare Array Data
The GLSubImageArray constructor saves an instance variable named nBuffer with the value 3072. We generate an array with 3072 Bytes to fill a 32 x 32 area of the texture. The array contains 322 pixels and each pixel requires three Bytes. The first Byte holds data for the red channel. The second Byte holds data for the green channel. The third Byte holds data for the blue channel. 32 x 32 x 3 = 3072.
The GLSubImageArray includes two methods to generate color data. Method generateTilesRGB() creates colors for four tiles. The tiles are colored red, green, blue, and violet. Method generateSquare() just creates a red square. Both methods initialize a Uint8Array large enough for 3072 entries. The following line demonstrates initializing the array.
var u8a = new Uint8Array(this.nBuffer);
Every three Bytes in the array represent one pixel. The first Byte is the red channel. The second Byte is the green channel. The third Byte is the blue channel. Both methods iterate over the array, assigning values between 0 and 255to individual Bytes. The value 0 provides no color to the channel. The value 255 provides maximum color to the channel. The following listing demonstrates assigning maximum color to the red channel, while leaving other channels at the default 0. The book WebGL Textures & Vertices: Beginner's Guide covers procedural texture generation with a little more detail.
for (i = 3; i < this.nBuffer; i+= 3){
u8a[i] = 255;
}
Listing 37: Generate a Red Procedural Texture
Change the Base Texture's Format
The controller by default initializes an alpha channel for each WebGLTexture. Procedural data generated with this project doesn't include an alpha channel. Both the base texture and sub image must have the same settings. This project includes an init() method to change the base texture's setting from RGBA to RGB. When complete both the base texture and the array of data represent colors in RGB format.
The following WebGL method call to texImage2D(), assigns the RGB format to the active texture. Local variable entity was retrieved from the only element in the GLEntity array. Property entity.img contains the image data for the base texture. See the init() method for the Sub Image from an Array project.
gl.texImage2D(
gl.TEXTURE_2D,
0,
gl.RGB,
gl.RGB,
gl.UNSIGNED_BYTE,
entity.img
);
Listing 38: WebGL API texImage2D() RGB Format
WebGL API texSubImage2D() for Array Data
The method texSubImage2D() copies image data onto the currently active texture. Method texSubImage2D() has two overloads, similar to texImage2D(). When the image data originates with a Uint8Array or Float32Array, then call texSubImage2D() with additional parameters. Include width and height. However when the image data originates with an Image object, don't pass the width and height parameters. Image data already specifies width and height. The section explains how to call texSubImage2D() with color values stored within a Uint8Array. The section titled Sub Images explains how to display data from an image file.
The following listing demonstrates calling texSubImage2D() with width and height parameters. width and height are only used when the pixel data is retrieved from Uint8Array or Float32Array. The GLSubImageArray classgenerates an array with enough color data for a 32 x 32 sub image. Therefore pass 32 for both the width and height parameters, as follows.
texSubImage2D
(
gl.TEXTURE_2D,
0,
glSub.nX,
glSub.nY,
32,
32,
gl.RGB,
gl.UNSIGNED_BYTE,
glSub.imgData
)
Listing 39: WebGL API texSubImage2D with Array Data
Sub Image from an Array Summary
The Sub Image from an Array project includes two advantages. First the constructor only requires one parameter. Pass the base image file path, to the constructor. JavaScript generates the sub image file data. Second we don't have to wait for the sub image's file to download, before creating the controller.
This section briefly discussed how to fill a Uint8Array with color data, change the format applied to the currently active image, and call the WebGL API method texSubImage2D() with color data from an array.
We used a maze as a segue into the final bonus project Maze Game. Most of the functionality in the Sub Image project applies to the Maze Game.
See the entire listing for the Sub Image from an Array project, defined in the file GLSubImageArray.js.