PROFESSIONAL JAVA FOR WEB APPLICATIONS (2014)
Part IV Securing Your Application with Spring Security
Chapter 28 Securing RESTful Web Services with OAuth
IN THIS CHAPTER
· Understanding web service security
· An introduction to OAuth
· A comparison of OAuth 1.0a and 2.0
· Using OAuth with Spring Security
· Finishing the Customer Support application
· Writing an OAuth Client application
WROX.COM CODE DOWNLOADS FOR THIS CHAPTER
You can find the wrox.com code downloads for this chapter at http://www.wrox.com/go/projavaforwebapps on the Download Code tab. The code for this chapter is divided into the following major examples:
· Customer-Support-v21 Project
· OAuth-Client Project
NEW MAVEN DEPENDENCIES FOR THIS CHAPTER
In addition to the Maven dependencies introduced in previous chapters, you also need the following Maven dependencies:
<dependency>
<groupId>org.springframework.security.oauth</groupId>
<artifactId>spring-security-oauth2</artifactId>
<version>1.0.5.RELEASE</version>
<scope>compile</scope>
</dependency>
<dependency>
<groupId>commons-codec</groupId>
<artifactId>commons-codec</artifactId>
<version>1.9</version>
<scope>runtime</scope>
</dependency>
<dependency>
<groupId>org.apache.httpcomponents</groupId>
<artifactId>httpclient</artifactId>
<version>4.3.1</version>
<scope>runtime</scope>
</dependency>
UNDERSTANDING WEB SERVICE SECURITY
So far in Part IV, you have explored the concepts and technologies associated with authentication and authorization and applied your newfound knowledge to securing web-based graphical user interfaces. In Chapter 17 you learned about SOAP and RESTful web services, but up until now, you have left those web services unprotected. In this chapter you learn about web service security and various approaches to securing your web service resources. You explore the OAuth standard and integrate it into the Customer Support application. Finally, you create a very simple web service client for testing the Customer Support RESTful web service.
Comparing Web GUI and Web Service Security
Securing your web services is a very different task from securing your web GUI. You no longer need to worry about certain vulnerabilities. Because you have no graphical forms that your users must fill out, you don’t have to worry about cross-site request forgeries. Because of a lack of JavaScript, you don’t have to worry about cross-site scripting. And because you aren’t using HTTP sessions and cookies, you aren’t affected by session fixation attacks; however, you may face new and similar vulnerabilities.
Now, don’t be mistaken. This isn’t to say that the developers of client web applications that use your web services don’t have to worry about these vulnerabilities — they do. Also, if you use your web services to back your web user interfaces, you still have to keep these vulnerabilities in mind. But if you’re serving up a web service only for other applications to consume, these issues aren’t your concern.
A host of security concerns still apply to your web services. You have to worry about man-in-the-middle attacks, which as usual you can address by using strong SSL mechanisms. You have to worry about stolen authentication tokens, something you learn about in the next section. Presumably you’ll want to authenticate your web service users and ensure they are authorized to perform certain tasks, but it’s possible your web services provide different features than your web GUI and you don’t need authentication. (It’s equally possible the other way around, too.) You also have to remember all kinds of HTTP protocol vulnerabilities, just like you would with a web GUI.
Assuming you want to authenticate users of your web services (which is typical), how do you do it? Forget about authentication mechanisms (basic, form, LDAP, and so on) momentarily. Do you even want the same users? For a lot of organizations, the answer to this question is “Yes.” For others, it’s “No.” As with so many other things, it completely depends on your business needs. There is no requirement, technical or otherwise, that you secure your web GUI and web services with the same set of users. Of course, understand that if you expose the same data through your web GUI and web services, your users will fully expect that the services require the same users because other users shouldn’t see their private data. This chapter emphasizes the approach of using the same set of users.
After you answer these questions, the next step is to determine which authentication mechanism (or mechanisms) to use for your web services. You have plenty of choices along with some standard conventions, which you explore in this chapter.
Choosing an Authentication Mechanism
You explored several authentication mechanisms in Chapter 26, and most of these are applicable to web services in some form or another. For example, you could enforce basic or digest authentication for your web services, which would actually fit really well with the stateless nature of REST. SOAP can be either stateful or stateless, but in either case, basic and digest still work really well for these types of web services. However, both mechanisms have one major problem: The client application must know and retain the credentials for the entire duration that the web services are in use. This may be fine if the client application is the user, but if your users want to use a third-party application that connects to your web services, they will likely be uncomfortable or unwilling to provide that application with their credentials.
Another option is to have your users authenticate directly with your application and then give the client application a token of some type to assert that authentication. This is actually the basic concept behind form authentication and HTTP sessions: Your users authenticate using a form on your site, and in turn your application gives the user’s browser (the client application) a token (a session ID cookie) to assert that authentication on future requests. The advantage of using this approach is that your users never have to give the client application their credentials, which improves both actual and perceived security. This highlights one important concept of security: understanding the difference between actual and perceived security.
If you take some action that makes your users perceive a higher level of security, they are happier, and thus that makes your business more successful. However, the action might not actually make them safer. Sometimes this is okay: If your users are genuinely safe using your site and making them actually safer isn’t achievable, but you can make them feel safer, it can help your business. But if your site is susceptible to one or more attacks and you make your users feel safer, this creates a false sense of security, which is dangerous and can hurt you and your users. Essentially, every security-related change you make to your site can have one of the following consequences, presented in the order you should prefer those consequences to occur:
1. You make a change that actually makes your users safer and also makes them feel safer. This is a win-win and should always be your goal.
2. You make a change that actually makes your users safer but has no impact on how they perceive their safety. This is still a good thing, and you should not altogether avoid it. Your users are still better off regardless of whether they know it.
3. You make a change that actually makes your users safer but makes them feel less safe. This is a bad thing. The increased safety does no good if users stop using your site because they feel unsafe. You can almost always avoid this dilemma by approaching the change with a better public relations approach.
4. You make a change that actually makes your users less safe and also makes them feel less safe. Obviously, this is a very bad thing. Don’t make your users less safe. However, if your users decide they feel unreasonably less safe they’ll stop using your site, and only you suffer the consequences.
5. You make a change that actually makes your users less safe but makes them feel the same or, worse, safer. Yes, this is actually worse than consequence number 4. You may benefit in the short term, and in fact it’s possible you never get caught. But chances are your users will eventually suffer the consequences, and when they figure out they were duped, they will probably come after you for compensation.
Obviously, you want to design an authentication and authorization system such that every feature achieves consequence number 1. Because this is only possible in a perfect world, your realistic goal is to stick to consequences 1 and 2, with as many features resulting in consequence number 1 as possible. If your security features include ones that result in consequences 3, 4, or 5, you must take a step back and re-evaluate your approach.
Returning to the idea of your users authenticating directly with your application and returning an assertion token back to the client application, this approach is not without its downsides.
· You run the risk of the token being stolen. This risk is not substantially different from the risk of the credentials being stolen. In fact, if you change tokens very frequently (at least once per day) you can actually make things more secure because users are typically unwilling to change their passwords that often.
· You have the problem of token forgery. You can mitigate this fairly simply (and you learn about this in the next section).
Regardless of these downsides, tokens are a very safe and effective approach and one used across the industry to protect web services. As usual, it makes little sense to try to reinvent the wheel, and there are already tools available to integrate strong security in web service applications. One of those, which you use in this chapter, is OAuth.
INTRODUCING OAUTH
OAuth is an open standard for authorization founded by Blaine Cook of Twitter, Larry Halff of Ma.gnolia, Chris Messina, an open source advocate who has worked for Google and several other companies, and David Recordon, an open standards advocate from Facebook. You may already wonder about the use of the word authorization to describe OAuth. Aren’t you supposed to be finding a solution to authentication? No, you already have a solution! In fact, you have many solutions! Basic, digest, form, Windows, certificates, smart cards — the list goes on.
You don’t need a new way to establish your users’ identities; you’re already an expert on that. What you really need is a way to continue to use that authentication on future requests to establish that the user is authorized to access the web service. This, of course, emphasizes the blurry line that draws the boundary between authentication and authorization. The two are closely related and very much depend on one another. To an extent, you can even consider authentication as a form of authorization. At the very least, authentication is always the first step in authorization. To be clear, OAuth is an authorization standard, but it is closely tied to authentication.
WARNING This book is not an authoritative guide to any version of OAuth. The many details and nuances of OAuth simply cannot be covered in a single chapter. This chapter helps you start with a simple OAuth system, but you should not deploy OAuth into your production environment without reading the specifications and supporting documents. You can find the IETF standards documents for OAuth 1.0a, OAuth 2.0, and OAuth 2.0 Bearer Tokens here, here, and here, respectively.
Understanding the Key Players
All versions of OAuth have official terms that identify the key players in the authentication and authorization process. It’s important to know these terms and understand the role each player makes during an OAuth session. These terms are used often and without further clarification throughout the text, so make sure you understand them clearly before proceeding.
· The client is any HTTP application capable of making requests to a web service API using OAuth. It can be a JavaScript application, a web browser plug-in, a desktop application, a mobile application, or anything else you can think of. More important, the client is not the user or person authenticating with your application.
· A protected resource is, quite simply, a resource in your application that is protected from unauthorized access. It can be accessed only in an OAuth-authenticated request.
· A resource owner is some entity authorized to access these protected resources. The resource owner might be an organization, a person, or even another application—generally speaking, it is what you think of as the user. The resource owner uses the client to connect to your application and retrieve or manipulate protected resources.
The Beginning: OAuth 1.0
OAuth began when several of its founders were implementing OpenID for their respective organizations. Larry Halff, for example, was trying to come up with a way for his OpenID users to connect their Mac OS X Dashboard Widgets to Ma.gnolia’s web services. After a brief consultation, the founders determined that there was no current open authorization standard for web service APIs, and OAuth was born.
The founders formed an open standards discussion group in April 2007, and started working on the OAuth standard. It went through several revisions, during which Eran Hammer joined the discussion group. In October 2007, the group released the OAuth Core 1.0 final draft. In 2009, it was discovered that OAuth 1.0 was vulnerable to a form of session fixation attack. The details of this attack are outside the scope of this book, but you can read about them on Eran Hammer’s blog. For this reason, you should consider the OAuth 1.0 draft unsafe, and you should not use it.
The Standard: OAuth 1.0a
The Internet Engineering Task Force (IETF) met in 2008, and discussed taking on the OAuth 1.0 draft as an Internet working standard. OAuth enjoyed wide community support, and an IETF group worked on it for nearly 2 years. It was publicly approved and published as Internet standard RFC 5849 in April 2010. Officially, it is OAuth Core 1.0 Revision A and incorporates a fix for the session fixation attack identified in OAuth 1.0 in 2009. It is normally referred to simply as OAuth 1.0a and is considered an authorizationprotocol. (For the purposes of this book, that means it describes how implementations must behave.) This part of the section gives a brief overview of how OAuth 1.0a functions, including identifying the changes made to mitigate the session fixation vulnerability.
Understanding OAuth 1.0a Terminology
The standard defines several terms that are specific to OAuth 1.0a. The server is you, or rather your application. The client makes requests to the server and, assuming it is authorized, the server returns responses to the client. The generic concept of the server is responsible for authentication and authorization services and for hosting your protected resources. Credentials are a pair of values capable of establishing an identity. The pair consists of an identifier (such as a username or public key) and a secret (such as a password or private key). In OAuth 1.0a, there are three types of credentials.
· Client credentials authenticate the client (remember: not the user) making the request. Client credentials are important because they allow you to restrict which applications can access your web services on behalf of your users.
· Temporary credentials are, as the name implies, temporary, and are used during the authentication process to link all the steps together securely.
· Token credentials are credentials returned by the authentication service to the client that the client uses to authorize all future requests for the resource owner. A token, like a username, is a unique identifier (sometimes a completely random string, sometimes more meaningful). After a resource owner properly authenticates, the server issues a token to the client. Combined with a shared secret to form the token credentials, the token associates requests with the authenticated resource owner.
Using OAuth 1.0a to Authenticate and Authorize
The flow of OAuth-authenticated requests is straightforward, even if the concept seems confusing. Diagrams make it easier to understand, so this section has several. When a resource owner wants to access a protected resource on the server using a client, exactly one of three things is true:
NOTE Figures 28-1 through 21-3 are discussed later in this chapter and appear surrounded by more discussion about what’s shown in the figures. Please refer forward to these figures as you work through this list.
· The client has no token credentials for that resource owner and cannot access the protected resource (the upcoming Figure 28-1).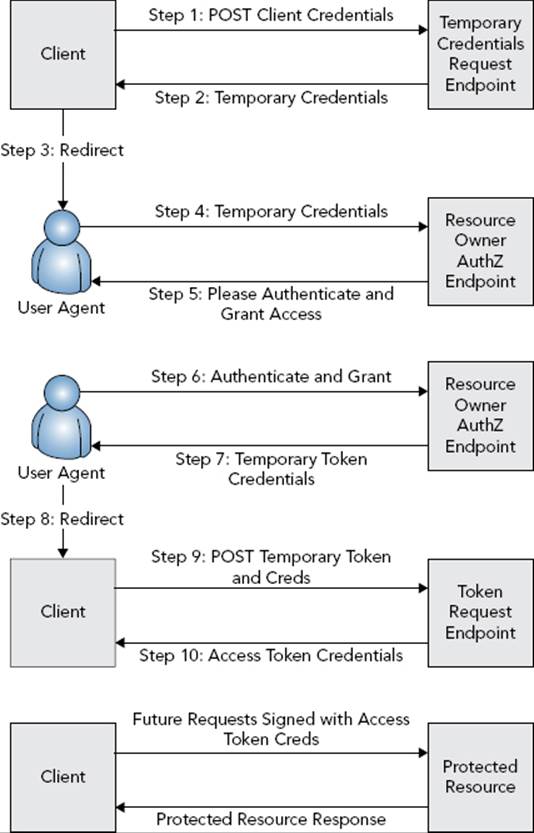
FIGURE 28-1
· The client has valid token credentials for that resource owner and can access the protected resource (Figure 28-2).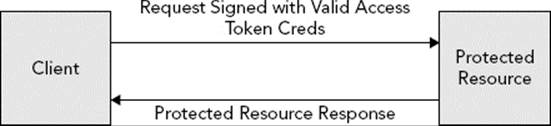
FIGURE 28-2
· The client has expired or revoked token credentials for that resource owner and cannot access the protected resource (Figure 28-3).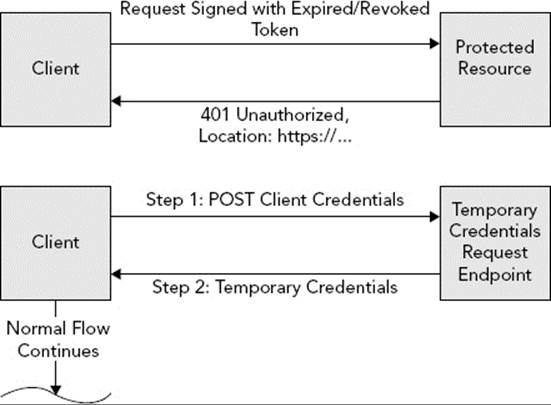
FIGURE 28-3
Each of these situations results in a different set of actions that occur to ultimately grant access to the protected resource (assuming such access is permitted). In the case that the client has no token credentials for the resource owner, it first (transparent to the resource owner) makes an empty HTTP POST request to the temporary credentials request endpoint (for which the client already knows the URL). This request uses the Authorization: OAuth header and several authorization header protocol parameters to authenticate the client with the server.
· realm names the application or resource ultimately being accessed, just like with standard basic or digest authentication.
· oauth_consumer_key contains the identifier from the client credentials (which the client obtained from the server ahead of time).
· oauth_signature_method is the signature mechanism being employed.
· oauth_timestamp is the timestamp of when the request was made, specified in seconds since the Unix epoch.
· oauth_nonce is a unique identifier for the request that is never repeated (to prevent replay attacks).
· oauth_callback is the URI that the server should return the client to after the client has authenticated and granted access to the client.
· oauth_signature is a signature calculated using all these parameters, various parts of the request, and the secret from the client credentials.
NOTE To be clear, the Authorization header is only one approach that the client may use to transmit protocol parameters. It may also use request entity parameters when the request is x-www-form-urlencoded (less preferred) and request URL parameters (least preferred). Use of the Authorization header is the preferred mechanism because Internet proxies tend to be better behaved and not cache these types of requests.
The secret is never transmitted in the request — it doesn’t need to be because the client uses the secret to generate the signature. The signature is always either HMAC-SHA1 (symmetric, using the secret or secrets as a salt) or RSA-SHA1 (asymmetric, using a private key to generate the signature). Because the server also knows the symmetric secret, it can calculate what the signature should be if the client uses the right secret and ensures that the signature matches the expected value. For asymmetric signatures, the server can verify the private key-generated signature using the matching public key.
Either way, if the signature is valid, permission is granted and the server permits the client to proceed with the authorization. The server returns 400 Bad Request if the request contains any unsupported parameters or protocol versions and 401 Unauthorized if the signature fails verification, the credentials are invalid, the token is expired, or the nonce is invalid or has already been used. At this point the server returns an x-www-form-urlencoded format 200 OK response to the client, containing the temporary credentials in the response body. The oauth_token response parameter contains the temporary identifier, whereas oauth_token_secret contains the temporary secret. Because the secret is included in plain text in the response, the standard requires that this request and response happen over TLS (for example, HTTPS). oauth_callback_confirmed is the third required response parameter and differentiates from older versions of the protocol. It must always have the value true. This is all shown as Steps 1 through 2 in Figure 28-1.
Now that the client has temporary credentials, it can redirect the resource owner to the server’s resource owner authorization endpoint with the temporary oauth_token in a request parameter (Steps 3 and 4). This is where the server takes over the authentication process. If the resource owner is already authenticated (for example, has a current HTTP session on the server), the server proceeds directly to the grant screen. (Although, for enhanced security the server may ask the resource owner to authenticate again.) Otherwise, it asks the resource owner to authenticate by the normal means (Step 5, which may be form authentication, basic, digest, Windows — you get the idea).
After the resource owner has successfully authenticated, the server proceeds to the grant screen (also Step 5). On the grant screen, the server tells the resource owner which protected resources the client wants to access and asks for permission to grant that access. If the resource owner approves (Step 6), the server redirects the resource owner to the client’s callback URI. The redirect request contains the temporary oauth_token and a one-use-only oauth_verifier parameter with a random string value (Steps 7 and 8). Theoauth_verifier parameter mitigates the aforementioned session fixation attack.
NOTE You may wonder why the callback URI and not the callback URL is referred to. The callback URI might not be a standard web URL. A web URL wouldn’t work if the client application were a desktop or mobile application instead of a web application. The callback URI could be an application-proprietary protocol URI that the browser or operating system understands. When the browser sees this URI, it can then open the target application and pass the request parameters to it in a previously agreed-upon manner.
For example, mailto:nicholas@example.org opens up a mail client to send a message to nicholas@example.org. More realistically, fb://notifications opens the Facebook app to the notifications list, while twitter://timeline opens the Twitter app to the timeline. Generally speaking, an application developer must register his URI with some recognized authority, such as Apple or Google, in order to use the URI effectively.
When the client receives the callback redirect, it makes a new behind-the-scenes empty POST request to the token request endpoint (Step 9). This request again contains the Authorization: OAuth header with largely the same value. (Obviously, the timestamp and nonce differ.) It also includes the oauth_token and oauth_verifier header parameters contained in the callback redirect and omits the oauth_callback parameter that is no longer needed. This time, the request is signed with the temporary secret. The server authenticates the request, verifies that the token and verifier parameters match the grant approved by the resource owner, and returns token credentials to the client using the oauth_token and oauth_token_secret response parameters. At this point the server expires the temporary credentials so that they can no longer be used (Step 10).
This may seem like a complicated and lengthy process, but it all transpires in a matter of just a few seconds. More important, although the standard strongly recommends using TLS for all communications, the temporary credentials and token retrieval steps are the only steps that the standard requires to use TLS because a secret is included in plain text in each response.
When the client has the token credentials, it can access protected resources (with or without the resource owner’s immediate presence). Each future request to a protected resource again contains the Authorization: OAuth header with the oauth_token from the token credentials and no oauth_verifier or oauth_callback header parameters. These requests are all signed using both the client credentials secret and the token credentials secret. The server verifies that the token and signature are valid before permitting access to protected resources, as shown in Figure 28-2.
Token credentials may be but do not have to be perpetual. Servers may expire token credentials periodically, or a resource owner may request that token credentials be revoked (for example, the resource owner decides he does not want the client to have access to his data anymore). When this happens, the server responds to the next protected resource request with a 401 Unauthorized response. The client can then start the process of obtaining temporary credentials, authorizing the resource owner, and exchanging temporary credentials for token credentials again. This is demonstrated in Figure 28-3.
WARNING The OAuth 1.0a standard includes no specifications for the structure, content, or length of any of the various tokens included in this process (the client credential identifier, temporary credential identifier, and token credential identifier). This can take whatever form and length the provider wants. The tokens can consist of random data, or they can contain a predictable structure that the provider understands. As such, clients should make no assumptions and place no limits on these tokens.
Facing Some Challenges with OAuth 1.0a
OAuth 1.0a is a very secure protocol, but it is not without its weaknesses. First, OAuth initially experienced some ambiguities concerning the order in which various parts of requests would appear in the signature. For example, when listing out the URL, method, headers, and parameters that required signatures, it was not initially clear in what order the request parameters should be placed. This led to different implementations using different orderings and, thus incompatibility between implementations. Since then, the spec was clarified in favor of a determinist order for request parameters appearing in the signature, but some legacy implementations still remain.
OAuth 1.0a took some heavy criticism for its signature requirements in general. Some in the industry felt nothing was gained by signing virtually every part of the request. Although this technique ensures that requests and responses aren’t tampered with, the security it provides could be more easily and effectively achieved using TLS. Instead, many argued, the signature should include only the parameters of the Authorization header. This would be sufficient to achieve the ultimate goal of establishing that the client held the correct secret without sending the secret over the wire or introducing unnecessary complexity.
Another common complaint is that OAuth 1.0a, as written, essentially assumes that the resource owner is a person and that the client is always untrusted. The strict flow of OAuth 1.0a omits two important use cases:
· The client application is also the resource owner and thus can authenticate solely with its client credentials.
· The client application is created by the same organization as the server. This means the resource owner trusts the client application and is willing to enter authentication credentials directly in the client, thus creating a better user experience.
For this reason, many implementations have created extensions to the OAuth 1.0a protocol that better support these two use cases. For example, you can optionally use Spring Security OAuth without a resource owner that authenticates separately (and instead treats the client as the resource owner). In this approach, every request always includes the client credentials identifier and is signed with the client credentials secret. This technique is called Two-Legged OAuth (in contrast to the unofficial name for the standard, Three-Legged OAuth) and is widely supported among implementations. This makes these implementations somewhat at odds with the specification, but only if you configure them in this manner. By default, they should still be standards compliant (that is, Three-Legged).
NOTE After reading about OAuth 1.0a, it may have occurred to you that it is a very stateful protocol. In fact, token credentials are very much like HTTP session ID cookies (although there are some important security differences). But isn’t the point of RESTful web services to provide a stateless architecture? It’s true that OAuth’s statefulness stands in stark contrast to REST’s statelessness. But, really, you simply can’t avoid this (at least, not securely). To achieve true statelessness, the client must send the resource owner’s credentials on every request (similar to the basic and digest approaches discussed earlier). This is simply not as secure with untrusted, third-party clients, and resource owners will not tolerate that lack of trust. A secure authentication and authorization system demands a stateful protocol.
The Evolution: OAuth 2.0
The ink had barely dried on the OAuth 1.0a publication when the IETF OAuth working group began developing OAuth 2.0. Its final draft was published in October 2012 as the Proposed Standard RFC 6749. In the Internet Standards Track, Proposed Standard is the entry-level maturity for standards. After sufficient feedback and revisions, standards eventually move from Proposed Standard to Draft Standard. When in Draft Standard, few changes are made, but some revisions are still possible to resolve problems with the standard. The third and final maturity is Internet Standard, meaning the standard is adopted and is ready for widespread use.
As of October 2013, OAuth 2.0 was still a Proposed Standard. RFC 2026 says this means it is unsuitable for use in “disruption-sensitive environments” (meaning don’t use it in production). Nevertheless, and despite this warning, it has already been widely adopted across the industry, and many providers, such as Facebook and Twitter, require the use of OAuth 2.0.
OAuth 2.0 is the successor to and replacement for OAuth 1.0a, and it is not backward compatible. OAuth 1.0a clients cannot use OAuth 2.0 servers (and OAuth 2.0 clients cannot use OAuth 1.0a servers), but implementations are permitted to support both standards simultaneously. Most important, OAuth 2.0 is not a protocol; instead, it is a framework that describes how a protocol might (but is not required to) be implemented. This has been the source of much controversy, which is covered later in this section.
Using OAuth 2.0 Terminology
Like OAuth 1.0a, OAuth 2.0 defines some of its own terminology. OAuth 2.0 acknowledged that protected resources and the authentication/authorization system do not always reside on the same server, so the server in OAuth 1.0a has been divided into the resource server and authorization server in OAuth 2.0.
Credentials are a different story altogether. In general you still have client credentials in some form, but temporary and token credentials are not directly addressed. Similar concepts may be present based on the authorization grant type chosen, or you can add extensions to OAuth 2.0 that incorporate different credential types.
Understanding Authorization Grants
One of the key features in OAuth 2.0, and certainly one of its strengths, is that it takes into account the various use cases for web service API authorization. The assumption is no longer made that all resource owners are separate from clients and that all clients are untrusted. The standard defines four built-in authorization grant types as well as the process for authenticating and authorizing with each of those types, and it allows you to add additional grant types through extensions. All grant types follow the basic flow demonstrated in Figure 28-4, although each differs in exactly how the authorization grant is obtained.

FIGURE 28-4
As with OAuth 1.0a, the client authenticates with the authorization server (but not the resource server) using the client credentials any time the client makes a direct (behind-the-scenes) request to the authorization server. This always happens regardless of which grant type is chosen. All clients have public client identifiers. Clients may also have secrets that complete the client credentials. Authorization servers must be aware of the difference between confidential clients (clients that can reasonably be expected to keep their secret secret) and public clients (clients who may be unable to hold secrets, such as open source applications whose secrets ship with the applications). Authorization servers must not rely on client credentials authorization alone to establish the identity of a public client. Generally, clients authenticate with the authorization server using HTTP basic authentication. This is the only mechanism providers are required to support for client authentication, although they may support other mechanisms.
The Authorization Code Grant is the functional equivalent of Three-Legged OAuth 1.0a. The client redirects the resource owner to the authorization server’s authorization endpoint when it needs to obtain an access token and includes the request parametersresponse_type (set to “code” for this grant type), client_id (from the client credentials), redirect_uri (the URI to send the resource owner to after authorization is approved), scope (the optional token scope, to restrict its access), and state (an optional but recommended parameter that prevents CSRF attacks).
When the resource owner completes the authentication and grant stage on the authorization server, the server redirects the resource owner to the redirection endpoint as in OAuth 1.0a, including an authorization code in the code response parameter and a stateparameter containing the same value from the request state parameter, if it was provided. This authorization code is the authorization grant from Figure 28-4. The client then makes a behind-the-scenes POST back to the authorization server’s token endpoint and exchanges the authorization code for an access token. The request for an access token includes the request parameters grant_type (set to “authorization_code” for this grant type), code (the authorization code just received), redirect_uri (the original redirect_uriparameter value sent to the authorization endpoint), and client_id. The response is in JSON format, containing root-level values access_token, token_type (for example, bearer), expires_in (a value in seconds), refresh_token (optional, if refresh tokens are enabled), and echoes of any other request parameters sent.
The nature of this token is not actually defined in the framework. Instead, application developers can choose one of several extensions (or create their own) to determine what the access token looks like, where it lives, how it’s derived, and when and if it expires. However it’s implemented, the access token is then used to access protected resources on the resource server. How the access token is used (for example, request parameters or the Authorization header) is also undefined and left up to the access token type chosen.
Implicit Grants are extremely similar to Authorization Code Grants and are still the functional equivalent of Three-Legged OAuth 1.0a, although demonstrably less secure. In an Implicit Grant, the resource owner still goes to the authorization server to authenticate and grant access to the client. This request is nearly identical to the Authorization Code Grant except that the response_type parameter is set to “token.” However, the callback redirect does not include an authorization code to be exchanged for an access token. Instead, the callback contains the access token directly (thus removing the middle step from the basic flow in Figure 28-4). The parameters are access_token, token_type, expires_in, scope, and state. (Refresh tokens are prohibited for this grant type.) Because the client now has the access token, it does not make a request to the token endpoint for it.
You can probably point out some obvious security holes in this grant type, and for this reason the standard indicates you should use it only in very limited circumstances. For example, a browser application might not be susceptible to the problems typically exposed by this grant type. Because most browser applications are written in JavaScript, the Authorization Code Grant can introduce performance hits that the Implicit Grant easily remedies, without seriously impacting security. With that said, it is not recommended that you use Implicit Grants.
A Client Credentials Grant, demonstrated in Figure 28-5, is the functional equivalent of Two-Legged OAuth 1.0a, finally codified within the standard. In this grant type, the client contacts the token endpoint and exchanges its client credentials for an access token. The request contains a grant_type parameter set to “client_credentials” and an optional scope parameter. The client authenticates via the usual process—basic authentication. The response includes the usual access_token, token_type, and expires_in JSON values. (Refresh tokens are also prohibited for this grant type.) In this way, the client acts as its own resource owner, and the client credentials serve as the authorization grant referred to in Figure 28-4. The client can then use the access token to access protected resources on the resource server on its own behalf, instead of on behalf of some other resource owner.
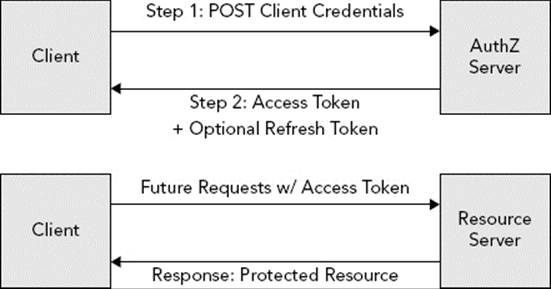
FIGURE 28-5
The Resource Owner Password Credentials Grant, as shown in Figure 28-6, is both the most user-friendly and potentially the most insecure grant type. Using this grant type, the resource owner provides her credentials (username and password, public and private key, and so on) directly to the client and never has to redirect to the authorization endpoint. These resource owner credentials are the authorization grant referred to in Figure 28-4. The client then forwards these credentials on to the token endpoint on the resource owner’s behalf, and exchanges them for an access token.
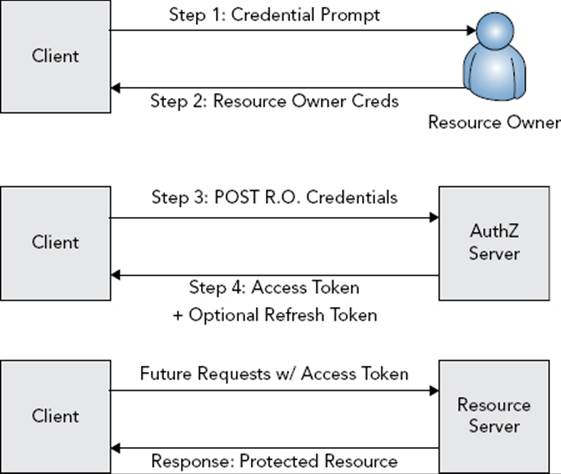
FIGURE 28-6
The request’s grant_type parameter is set to “password” this time, and the request also contains username, password, and scope parameters. The username and password parameters are generic parameters for the resource owner’s credentials and might not actually contain a username and password. The JSON response is the same as for the Authorization Code Grant type. Again, the returned access token can then be used to access protected resources on the resource server.
When dealing with desktop and mobile applications, this grant type undoubtedly provides the best user experience. Instead of swapping between an application and a browser (sometimes frequently) just to authenticate, the resource owner can stay within a single application. Of course, this presents the obvious security implication that the resource owner must give his credentials, unencrypted and unsecured, to the client application. Because of this, the best practice is to use this grant type only when the organization that created the application is also the organization that hosts the authorization server. This is the one circumstance in which the client can be fully trusted with the resource owner’s credentials. You should never allow third-party clients to use Resource Owner Password Credentials Grant.
NOTE You may have noticed that there is no replacement in OAuth 2.0 for the temporary credentials request endpoint. This is because OAuth 2.0 makes no use of temporary credentials and does not make an initial request to get temporary credentials before redirecting the client to the authorization server. Although this does simplify the process somewhat, it can also be seen as a vulnerability. Because of this, you should always employ the state parameter to help defend against some of the problems this might pose.
Using Bearer Tokens
You probably noticed that you haven’t read anything about the format of the Authorization header and the parameters passed to and from the resource server. That’s because it’s not specified! To be more precise, the OAuth 2.0 standard doesn’t mandate these. Instead, these formats and parameters depend entirely on which type of access token you choose. The standard and recommended access token implementation, however, is bearer tokens. Specified in RFC 6750 (also a Proposed Standard), bearer tokens are exactly what they sound like: Whoever bears the token holds the grant. This is identical to HTTP session ID tokens, and at first it might sound identical to OAuth 1.0a token credentials, but in reality it is very, very different (and potentially very insecure).
Recall that OAuth 1.0a token credentials contain two parts: the identity (the token) and the secret. The token is sent with every request, but the secret is not. Instead, the client uses the secret to generate a signature that the server can duplicate or validate. The presence of the correct token and a valid signature establishes authorization. Bearer tokens do not use signatures. In fact, there is no signature process at all.
While the community argued for easier-to-implement signatures that used only the Authorization header contents, the working group decided to get rid of signatures completely. This means that the bearer token is the only thing necessary to access protected resources on behalf of the resource owner. If the bearer token is compromised, there is no specified process for revoking it. Instead, the specification prefers short-lived bearer tokens that expire quickly to mitigate stolen tokens. However, to keep the resource owner from having to constantly authenticate, the standard also specifies a concept of refresh tokens. When issuing a bearer token, the authorization server may also (but is not required to) issue a refresh token. When the bearer token expires, the client may contact the authorization server and exchange the refresh token for new bearer and refresh tokens, all without the resource owner having to authenticate again. This is visualized in Figure 28-7.
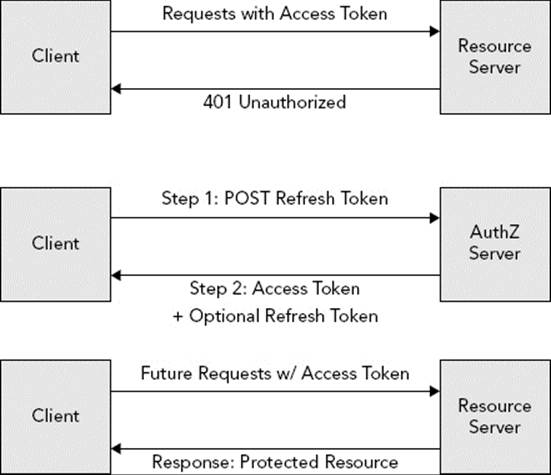
FIGURE 28-7
There are obvious problems with this approach, most notably the ability to steal bearer tokens. The working group also did away with nonces and timestamps while they were at it, making the framework susceptible to replay attacks. (But again, it’s just a framework, and you can build a protocol more secure than the framework specifies.) To mitigate concern about all these issues, the working group made two arguments.
· They asserted that there was no reason to make OAuth more secure than HTTP session IDs because session IDs were already the weakest link in web security.
· The standard states that using TLS should avoid all these problems because the encrypted traffic cannot be intercepted and decrypted. (Use of TLS is an optional part of the standard for most communications, just as it is in OAuth 1.0a. It is required only where secrets are sent in the clear.)
However, there are two powerful counterarguments to these statements:
· Using the weakest link argument results in web security never improving; when the next working group attempts to improve HTTP session ID security, it can point to OAuth 2.0 as the weakest link and claim, again, that there’s no point in improving security.
· SSL is only as strong as the weakest implementation involved in a conversation. Sometimes clients are misconfigured and don’t properly validate the server certificate chain. If this happens, a man-in-the-middle can easily step in and pose as the resource server, stealing the bearer token and using it until it expires. (This particularly impacts RESTful web services, where this vulnerability can make the intended discovery process a more dangerous affair.) For this reason, there has been widespread disagreement with the bearer tokens proposed standard in the open standards community.
Overcoming the Controversy of OAuth 2.0
Bearer tokens are not the only controversy OAuth 2.0 has encountered. A point of contention for many open standards community members is the lack of any real “teeth” in the standard. Nearly every feature is optional or has exceptions in which the implementation is allowed to omit it. In fact, the standard specifically says in Section 1.8 (emphasis added in this book):
OAuth 2.0 provides a rich authorization framework with well-defined security properties. However, as a rich and highly extensible framework with many optional components, on its own, this specification is likely to produce a wide range of non-interoperable implementations.
By 2012, many community members, and even some working group members, decided they had enough. Eran Hammer, who had been with OAuth since almost the beginning, removed his name from the standard, resigned as chief editor, and withdrew from the working group. He wrote a series of blog posts and hosted a series of talks that harshly criticized the process of the working group and the results of the OAuth 2.0 standard. Of particular interest, he claims the standard was intentionally designed with enterprises in mind, making it so vague that the enterprises involved could sell their consulting services for implementing the standard. David Recordon also withdrew from the working group and removed his name from the standard, although he has not spoken publicly about his decision. Even with these departures, the OAuth 2.0 proposed standard was published in October 2012 and is likely to advance to Internet Standard without these major issues resolved.
Using MAC As a Bearer Token Alternative
Several members of the OAuth working group, as well as other community members, have proposed an alternative to the bearer tokens extension that would add a good deal of security to OAuth 2.0 and eliminate many of the current complaints (except for the interoperability problems). The Message Authentication Code (MAC) Tokens extension specifies a different type of token that uses message signatures to establish that the client holds the secret without ever transmitting the secret on the wire. Although this is a significant improvement over the recommended bearer tokens extension — and, arguably, the fact that such an extension can be created is a huge testament to OAuth 2.0’s design — the proposal is not without its drawbacks.
Although the intended track for this proposal is Standards Track, currently it is only an Internet Draft. It has not become a Proposed Standard yet, and it does not have an assigned RFC number. As of this writing, the current draft is version 4, which expires January 16, 2014. At that point, the draft could move to Proposed Standard, be renewed as another draft version, or be abandoned. Even if it isn’t abandoned, it could take several years before it is an Internet Standard, making it an unappealing solution for many organizations.
Which Version of OAuth Should You Use?
So which should you use? Well, that’s up to you. Reasons exist for using and not using each version. OAuth 1.0a is more stable, more mature, and more industry tested. It has no known current vulnerabilities, and most developers familiar with OAuth are at least familiar with OAuth 1.0a. However, OAuth 2.0 is more extensible, does support the useful additional grant types, and is inevitably the future of OAuth. Because the major players (such as Twitter, Facebook, and Google, to name a few) have already adopted OAuth 2.0, it is unlikely that OAuth 1.0a will remain in common use for long. If you don’t like the future of OAuth, you can always explore other solutions. If you do decide to use OAuth 2.0, you should not use bearer tokens. Instead, use a more secure token type (such as MAC tokens) or create your own token system that uses message signatures to establish authorization.
The rest of this chapter explores the create-your-own-token approach. Using Spring Security, you implement OAuth 2.0 with your own token system and create a very simple client capable of consuming your services.
NOTE It is important to point out an irony: One of the goals of the OAuth 2.0 project was to reduce non-interoperability between implementations. Often, OAuth 1.0a clients had to use provider-supplied libraries to work properly with the provider’s authorization/resource servers. However, the non-interoperability built into OAuth 2.0 almost guarantees that this problem will get worse, not better. Creating your own token system—which is essentially required to use OAuth 2.0 securely—ensures that you will have to provide your clients with client libraries that interface with your proprietary OAuth 2.0 implementation.
USING SPRING SECURITY OAUTH
Spring Security provides ample support for OAuth 1.0a and 2.0 through its Spring Security OAuth subproject. In addition to securing your protected resources in a provider application, Spring Security OAuth can also help you securely access OAuth-protected resources in a client application. Spring Security OAuth support is divided into two Maven artifacts:
· spring-security-oauth provides OAuth 1.0 and 1.0a support.
· spring-security-oauth2 provides OAuth 2.0 support.
The classes in these artifacts are organized into different packages, so you can use them simultaneously — but only with some caveats. Although you can protect different sets of URLs with different OAuth versions, you cannot protect the same URLs with OAuth 1.0(a) and OAuth 2.0 simultaneously. You can write a client application that uses Spring Security OAuth to access both OAuth 1.0(a) and OAuth 2.0 services.
This book cannot cover all four Spring Security OAuth scenarios: OAuth 1.0(a) provider, OAuth 1.0(a) client, OAuth 2.0 provider, and OAuth 2.0 client. It must, however, cover provider and client scenarios; otherwise, you won’t have a way to test your application. Because OAuth 2.0 will eventually replace OAuth 1.0a, you learn about Spring Security OAuth 2.0 support in this chapter. Due to the insecurity of Bearer Tokens, this chapter also covers implementing your own token system. Support for OAuth 1.0 has some similarities and also some significant differences. You can learn more about OAuth 1.0 support in the reference documentation.
Creating on OAuth 2.0 Provider
The Spring Security OAuth 2.0 Provider implementation is divided into two components:
· Authorization server implementation
· Resource server implementation
This corresponds to the OAuth 2.0 specification, which accounts for the authorization services and resource services residing on different servers.
If you want, you can use Spring Security OAuth just for the authorization server or just for the resource server. However, more than likely you will use it for both the authorization server and the resource server, on either the same or different servers. For the sake of simplicity, the examples in this chapter assume both the authorization server and the resource server exist on the same server and on all servers in a cluster. This last part is important because you can persist tokens in memory only for simple, non-clustered applications. Any application that is clustered must persist tokens using a more persistent means.
Managing Client Details
In Chapters 26 and 27, you learned about Spring Security’s UserDetails and UserDetailsService interfaces. Spring Security OAuth includes similar interfaces: org.springframework.security.oauth2.provider.ClientDetails andorg.springframework.security.oauth2.provider.ClientDetailsService.
ClientDetails specifies information about an OAuth client that is permitted to access the application. Because clients can access resources on their own behalf (such as for the Client Credentials Grant), ClientDetails includes a Collection of GrantedAuthoritys that the client holds. It provides the client ID and the client secret, which authenticate clients for authorization requests and for Client Credentials Grant access token requests. ClientDetails also indicates the set of grants the client is permitted to request, the resources that the client can access (null if unrestricted), and the OAuth scope or scopes the client is restricted to (null if unrestricted).
Likewise, the ClientDetailsService enables you to load a ClientDetails instance by client ID. Whenever a client authenticates, Spring Security OAuth loads the client using the ClientDetailsService and compares the client secret to the one in the HTTP basicAuthorization header. The authorization server component of Spring Security OAuth requires a UserDetailsService to function properly. The two default implementations of this service are in the same package.
· InMemoryClientDetailsService is configured on its startup with all the clients your application supports.
· JdbcClientDetailsService uses a hard-coded table definition for storing and retrieving client details.
Because clients authenticate using HTTP basic authentication, which Spring Security already supports, you configure a standard authentication manager with a DaoAuthenticationProvider and anorg.springframework.security.oauth2.provider.client.ClientDetailsUserDetailsService.
Understanding the Authorization Server
When a client needs to access one of your protected resources but does not have an access token, it redirects the resource owner to your authorization endpoint. Spring Security OAuth’s authorization server hosts this authorization endpoint. It presents an approval screen, processes its submission, generates the authorization code, and redirects the resource owner back to the client application. It also responds to token endpoint requests to exchange authorization codes for access tokens, as well as to exchange client credentials and resource owner credentials for access tokens. When configuring the authorization server, you must also configure Spring Security to protect the authorization endpoint. This way, Spring Security requires the user to authenticate and have the necessary authority for accessing the authorization endpoint. (Spring Security OAuth already protects the token endpoint with HTTP basic authentication using the client credentials.)
Configuring the authorization server is very complex and varies significantly depending on your application. This book cannot possibly go over all the possible combinations, but this section does provide some general information. The next section shows you an example of one possible configuration.
Configuring Code and Token Services
To configure the authorization server, you must first configure services capable of storing and retrieving authorization codes and access tokens. org.springframework.security.oauth2.provider.code.AuthorizationCodeServices specifies an interface for creating, storing, and consuming authorization codes. The authorization server uses this service to create an authorization code when a resource owner approves authorization for a client. When the client contacts the authorization server to exchange the authorization code for an access token, it uses the AuthorizationCodeServices to “consume” the authorization code. When consumed, the authorization code cannot be used again. The authorization server then uses an implementation oforg.springframework.security.oauth2.provider.token.AuthorizationServerTokenServices to create access and refresh tokens and return those tokens to the client. The implementation must persist the tokens somehow so that the resource server can retrieve them later.
On future requests to the resource server, the org.springframework.security.oauth2.provider.token.ResourceServerTokenServices provides a mechanism for obtaining the Authentication object associated with an access token. The Authentication is originally created when the resource owner authenticates, and it is attached to the authorization code when the resource owner authorizes the client. When the authorization code is later exchanged for an access token, the Authentication is attached to the access token so that it can be referenced each time the client accesses a protected resource. This allows Spring Security’s authorization services to access the resource owner’s user details and authorities during requests to protected resources.
The two standard AuthorizationCodeServices implementations are in the same package as the interface.
· InMemoryAuthorizationCodeServices creates authorization codes made of random letters and numbers and persists them in memory. This implementation is fantastic and optimized to perform well, but it is only useful if your application is not running in a cluster. Even load balancer sticky sessions may not work properly with authorization endpoints and token endpoints. There’s a good chance the client’s next request will hit a different server, and the InMemoryAuthorizationCodeServices bean will have no record of the authorization code generated on another server. So if you plan on clustering your application (which you most likely do), you need to plan on persisting authorization codes in a central location, such as a database.
· JdbcAuthorizationCodeServices also creates random authorization codes and provides a simple mechanism for storing them in a relational database between creation and exchange. You can customize the INSERT, SELECT, and DELETE statements to manage the codes. Of course, you can also create your own implementation if you want.
org.springframework.security.oauth2.provider.token.DefaultTokenServices is the only standard implementation of AuthorizationServerTokenServices. It is also the only standard ResourceServerTokenServices implementation. It handles the creation, storage, and retrieval of bearer tokens and uses an org.springframework.security.oauth2.provider.token.TokenStore to manage the actual persistence of the tokens. You can choose from the InMemoryTokenStore (which suffers from the same drawbacks in a clustered environment) or theJdbcTokenStore, or you can implement these interfaces on your own.
You configure these services as simple Spring beans. If you choose to use in-memory implementations, Spring Security OAuth provides XML namespace elements to simplify creating these beans. In most cases, the in-memory implementations are chosen by default when you configure Spring Security OAuth without specifying otherwise. Because the in-memory implementations are not suitable for clustered environments, you need to change these defaults.
The Spring Security OAuth 2.0 XML schema URI is http://www.springframework.org/schema/security/oauth2. You can add this schema to any Spring Beans XML file (use the recommended oauth2 namespace prefix) to configure OAuth 2.0 support. If you want to configure OAuth 1.0 using XML, use the http://www.springframework.org/schema/security/oauth XML schema URI (and the recommended oauth1 namespace prefix). Because these schemas are separate, you can configure both OAuth 1.0 and OAuth 2.0 components simultaneously. The <oauth2:authorization-server> element configures the authorization server. Its client-details-service-ref attribute allows you to specify a reference to a ClientDetailsService bean, whereas token-services-ref indicates an instance ofAuthorizationServerTokenServices. You can also customize the endpoint URLs using the authorization-endpoint-url and token-endpoint-url attributes (which default to /oauth/authorize and /oauth/token, respectively).
Within this element you can specify several other elements that control which grant types are supported. By default, all grant types are supported. The <authorization-code>, <implicit>, <client-credentials>, and <password> elements control the Authorization Code Grant, Implicit Grant, Client Credentials Grant, and Resource Owner Credentials Grant, respectively. There is also the special <refresh-token> grant element because refresh tokens work very much like a special type of grant.
Each of these grant-control elements has a disabled attribute that you can set to true to disable the grant type. The <authorization-code> element also contains an authorization-code-services-ref attribute that enables you to customize the AuthorizationCodeServices to use. Likewise, <password> includes an authentication-manager-ref attribute that lets you specify an alternative AuthenticationManager instance.
NOTE You probably wondered about the lack of details for Java configuration. Although Java configuration should be present in Spring Security OAuth 1 and 2 version 2.0.x, this version does not come out until after this book is printed, so the Java configuration isn’t covered in this book. At the time of writing, Spring Security OAuth Java configuration is incomplete and lacks many of the features that the XML namespace offers. Be sure to check the next edition of this book for a revised, Java-only configuration of Spring Security OAuth 2.
Using the Resource Server
As you have read, the resource server is responsible for controlling access to protected resources. It ensures that requests are accompanied with access tokens, checks those access tokens for validity, and redirects unauthorized requests to the authorization endpoint. The word “server” can be a confusing term for this feature because it’s not a server at all. The resource server is simply a Filter implementation and some supporting classes. It doesn’t actually serve requests; instead, it intercepts requests to resources that your application serves. The resource server uses the ResourceServerTokenServices bean you read about earlier to look up and verify the access tokens included in resource requests.
The resource server has fewer moving parts and is easier to configure using the <oauth2:resource-server> XML configuration element. In most cases, you need to specify the token-services-ref attribute, which should be a reference to a ResourceServerTokenServicesbean. Also, if you use OAuth resource IDs, you should specify the resource ID that this server is protecting using the resource-id attribute; otherwise all resource IDs are allowed. This is the last piece to put into place to set up Spring Security OAuth in your applications. The next section demonstrates a real-life example.
Using OAuth Security Expressions
In Chapter 27 you learned about Spring Security’s authorization expressions, which you can use for both URL and method security, such as when using the @PreAuthorize annotation. Spring Security OAuth extends this expression support to provide an oauth2 SpEL variable available to all expressions. This variable is essentially a namespace for several authorization functions, and it is never null (even if the method is not executed as part of an OAuth-protected resource). These additional authorization functions are as follows:
· #oauth2.denyOAuthClient() returns true if the current authentication is not an OAuth authentication. This is useful for prohibiting remote (OAuth) end users from accessing certain features in your application, even if they normally have sufficient authority.
· #oauth2.clientHasRole(String) returns true if the client has the specified granted authority. To check whether the resource owner has the granted authority, use the standard hasAuthority or hasRole functions instead.
· #oauth2.clientHasAnyRole(String...) returns true if the client has at least one of the specified granted authorities. To check whether the resource owner has at least one of the granted authorities, use the standard hasAnyAuthority or hasAnyRole functions instead.
· #oauth2.hasScope(String) returns true if the OAuth authentication has the specified OAuth scope.
· #oauth2.hasAnyScope(String...) returns true if the OAuth authentication has at least one of the specified OAuth scopes.
· #oauth2.isClient() returns true if the current authentication belongs to an OAuth client (for example, using Client Credentials Grant).
· #oauth2.isUser() returns true if the current authentication belongs to an OAuth resource owner (for example, using Authorization Code Grant, Implicit Grant, or Resource Owner Password Credentials Grant).
To use these new expressions, you need to configure the extended expression support and replace the existing expression support. If you use XML configuration, you can use the <oauth2:expression-handler> and <oauth2:web-expression-handler> elements to configure the method security and web security expression handlers, specify bean IDs for them, and inject references to those beans into any other configuration components that need them. Java configuration is equally easy. Just extend GlobalMethodSecurityConfiguration and override createExpressionHandler to create an OAuth2MethodSecurityExpressionHandler instead of the default (DefaultMethodSecurityExpressionHandler). Likewise, when defining your URL expressions, replace the default expression handler (DefaultWebSecurityExpressionHandler) with an OAuth2WebSecurityExpressionHandler.
Creating an OAuth 2.0 Client
The flip side to protecting your services with OAuth is accessing OAuth-protected resources from a client application. As mentioned earlier, Spring Security OAuth can take care of this for you, too.
To understand how the Spring Security OAuth client component works, you must first know about Spring Framework’s org.springframework.web.client.RestOperations. This interface specifies a basic set of RESTful web service operations. Using an implementation of this interface, you can GET an entity or collection of entities from a web service, DELETE an entity, POST a new entity, PUT an update to an entity, retrieve the HEAD for a resource, determine the OPTIONS for a resource, and more. The default implementation of this interface,org.springframework.web.client.RestTemplate, is the only class you should ever need to access RESTful web services. The toolset is very complete and very well tested, and also provides mechanisms for intercepting requests and responses and manipulating them (for example, to add or change request headers).
However, RestTemplate does not provide built-in support for any type of security. Although you could manually implement OAuth authorization using an interceptor, this is unnecessary because Spring Security OAuth supplies an implementation that does this already. org.springframework.security.oauth2.client.OAuth2RestOperations extends the RestOperations interface to specify OAuth-related methods. Likewise, org.springframework.security.oauth2.client.OAuth2RestTemplate extends RestTemplate to implementOAuth2RestOperations and provide OAuth 2.0 client support.
Configuring the OAuth REST Template
You should keep one important thing in mind when using OAuth2RestTemplate. With the standard RestTemplate, you can reuse a single RestTemplate bean anywhere in your application for accessing any web service endpoint anywhere on the web. This is because theRestTemplate is completely stateless and stores no identifying information between requests. This is not the case for the OAuth2RestTemplate, however — and it may not be the case for any RestTemplate that you configure with an interceptor, depending on what that interceptor does.
When you configure an OAuth2RestTemplate, you provide it with an org.springframework.security.oauth2.client.resource.OAuth2ProtectedResourceDetails. This specifies the client ID, client secret, and other information that the template should use when authorizing with the resource server. It represents either a single remote resource or a group of resources that all accept the same client credentials and access tokens. As such, if you are going to access multiple web services protected with different resource servers, you need to define multiple OAuth2RestTemplate beans and qualify them on injection using Spring’s @Qualifer or Java EE’s @javax.inject.Qualifier (as covered in Chapter 12).
In a standalone application (one that is not hosted on the web), using the OAuth2RestTemplate is fairly simple. You use it just like any other RestTemplate instance, except that you create an instance per client credentials instead of one, global instance. You need to provide each OAuth2RestTemplate with an org.springframework.security.oauth2.client.OAuth2ClientContext implementation capable of determining the correct client context and access code (if any) for a particular request. Typically, you store this information on either a per-thread basis or globally for the entire JVM.
If an access token is invalid or the OAuth-protected request was otherwise rejected, the OAuth2RestTemplate methods throw the appropriate exceptions. If, however, the resource owner is not authorized yet and needs to be redirected to the authorization endpoint (because you are using Authorization Code Grant or Implicit Grant), the methods throw an org.springframework.security.oauth2.client.resource.UserRedirectRequiredException.
Upon catching this exception your code can launch a browser window, redirect the request, or do whatever else is necessary to send the end user to the authorization endpoint to authorize the client. Remember that even your standalone applications must receive the redirect from the authorization endpoint to receive the authorization code (or access token for Implicit Grants). In a standalone application, this means that your application must register a proprietary application-launcher URI scheme with the operating system and installed browsers, or it must include an embedded browser within the application. If this is not an option, you need to use Client Credentials Grant or Resource Owner Password Credentials Grant.
Using the REST Template in a Web Application
Using the OAuth2RestTemplate in a web application is even simpler than in a standalone application because Spring Security’s filter chain can take care of much of the hard work for you. The <oauth2:resource> element creates an OAuth2ProtectedResourceDetails bean with the given configuration options. You can configure the client ID and secret, authorization endpoint URL, access token endpoint URL, and more with this element. You can use it as many times as necessary to define multiple resources that your application will use. (Alternatively, you could just manually create <bean>s or @Beans instead of using the shortcut element.)
After you define the protected resources your application will use, you can use one or many <oauth2:rest-template> elements to define OAuth2RestTemplate beans that use those protected resource details. You can then use these templates in your other beans to access protected resources. The templates are configured with special session-scoped client contexts, which means that multiple users can execute template code simultaneously and that code will use the access token bound to each user’s session in a thread-safe manner.
For these features to work, you must enable the OAuth client filter in the filter chain. This is easy using the namespace configuration. Just add the <oauth2:client> element to your XML configuration, and add the defined filter to your <http> element or elements:
<oauth2:client id="oauth2ClientFilter" />
<http ...>
...
<custom-filter ref="oauth2ClientFilter"
after="EXCEPTION_TRANSLATION_FILTER" />
</http>
You may find this obvious, but you should note that these special session-scoped templates work only in the course of or in response to HTTP requests to your application. You can use these templates “in the background” as long as the background thread is spawned by an HTTP request handling thread (so that the Authentication and session information is inherited). However, in such a case, you must be careful to ensure the access token is obtained before the thread is handed off. You cannot use these templates for purely scheduled tasks for two obvious reasons:
· A scheduled task cannot be redirected to an authorization endpoint.
· Because the filter is never invoked, the template code running in a scheduled task cannot select the correct access token for an authenticated end user.
If you want to use an OAuth2RestTemplate in a purely scheduled task, you need to use the Client Credentials Grant for those tasks. You must configure the OAuth2RestTemplate manually in these cases.
NOTE Although this may go without saying, you can’t use the Spring Security OAuth Client features without also using Spring Security authentication. The client features require the presence of the Spring Security context and other components.
FINISHING THE CUSTOMER SUPPORT APPLICATION
Customer-Support-v21, available for download on the wrox.com code download site, is the final version of the Customer Support application. You have worked on this project since Chapter 3, and it looks very different from the first version. For the most part, it is very much the same as the project you worked on in the previous chapter. The last and only remaining puzzle piece is in place — securing the web services from unauthorized access. Though OAuth is typically employed for RESTful web services, you do not need to exclude it from consideration for SOAP web services, and for simplicity’s sake the Customer Support application secures both types of web services using OAuth.
The key to making OAuth 2 tokens secure is avoiding transmission of access tokens for protected resource requests. You can easily achieve this by taking a page out of the OAuth 1 playbook — use the token to generate a signature for each request instead of transmitting the actual token. You need to avoid some of the unnecessary complexities of OAuth 1 signatures, so there’s really no need to sign the URL, request parameters, request body, headers, and other request properties.
However, you do need to sign a different piece of data for every request; otherwise, the signature will always be the same and an attacker can easily replay it. This presents an opportunity to tackle two problems at once — you also need to prevent replay attacks in general. The simplest way to do this is to include nonces in your requests, and the nonces can serve as a signature item for ensuring a different signature value on every request. This section covers designing this nonce and token system and implementing it provider-side using Spring Security OAuth. The next section demonstrates creating an OAuth client capable of consuming these protected resources.
Generating Request Nonces and Signatures
Generating secure nonces and signature tokens is actually really simple. Keep in mind that a nonce doesn’t establish the authenticity of a request or the authentication of the user initiating it. It merely serves as a salt for the signature that prevents the token from being stolen and an identifier for the request that prevents it from being replayed. Nonces should be random so that they cannot be predicted. However, because true randomness does not preclude repetition, nonces should be paired with timestamps. The provider should ensure that any given nonce-timestamp combination is unique. Therefore, to prevent an attacker from merely changing the timestamp and reusing the nonce to replay a request, the signature token should include the timestamp in addition to the nonce.
At this point, you already know that your signature token should at least include the access token (but only as a salt for the signature), nonce, and timestamp. What else should it include? Well, for the provider to find the correct access token for verifying the signature, the request needs to include some type of identifier that the provider can use to look up the access token from the token store. Because the request will include this identifier, it makes sense to include the identifier in the signature as well.
OAuth 1.0a includes the client ID in every protected resource request to ensure that only the client to whom the access token was issued can use the access token, but OAuth 2.0 lacks this security feature. Including the client ID in protected resource requests is trivial, and including the client ID in the signature ensures it has not been tampered with. As a final sanity check, including some component of the request in the signature wouldn’t hurt. It doesn’t have to be as complicated as OAuth 1.0a and include request parameters, post variables, and several headers — something as simple as the request method or URL will do. Syntactically, a signature might look something like this:
SHA1( clientId "," tokenId "," nonce "," timestamp "," method "," tokenValue )
With a client ID of TestClient, a token ID of y8FglFPKzW, a nonce of i74K5E4y4B, a timestamp of 1381292470, the request method POST, and a token value of Y4KPI2432489ey50i3hK, the signature can be described as follows:
SHA1( TestClient,y8FglFPKzW,i74K5E4y4B,1381292470,POST,Y4KPI2432489ey50i3hK )
The calculated value of the signature is then as follows:
ead5cea9b0d6474f597467bb13dba9d78ca5923b
The client ID, token ID, and token value are the same for every protected resource request from the same client and resource owner. Only the nonce and timestamp values change every single request. The request method, of course, always reflects the method for the given request.
You need a way to transmit all this data with each request. The standard mechanism for authorizing protected resource requests is to include the Authorization header in each request. When the header value starts with the word “Bearer” followed by a space, the rest of the value represents the bearer token. For this scheme, you can use the word “Signing” instead of “Bearer” and then use comma-separated key-value pairs in the value for the token information. Using the previously described values and signature, theAuthorization header in a request would look like this (new lines added for clarity are omitted from the actual header value):
Authorization: Signing client_id=TestClient, token_id=y8FglFPKzW,
nonce=i74K5E4y4B, timestamp=1381292470,
signature=ead5cea9b0d6474f597467bb13dba9d78ca5923b
Notice that the token value does not appear in the header because the goal is to not have to transmit the token to prove the client holds it. The request method does not appear in the header, either, because it’s simply part of the request. Although the order the values appear in the signature is very important, the order they appear in the header is not. When the provider receives the request, all it has to do is use the token ID to look up the token value, ensure the specified client is the holder of the token, check that the nonce has never been used before, and then recalculate the signature with the given information. If the signature matches the one provided, the authenticity of the access token is established. If the signature does not match, the request must be rejected.
WARNING A theoretical alternative to the standard bearer token system specified in the OAuth 2.0 documentation was just described. This alternative has not been reviewed by the OAuth community or by security experts. Although this proposal provides significantly greater security than bearer tokens, you should evaluate it carefully and thoroughly and consult with your organization’s security officer before using it in your production applications. You should use the same due diligence before using OAuth in general.
NOTE If you wanted to increase the level of security even further, you could use asymmetric public-private key pairs to generate and verify signatures instead of using a shared secret token as a signature salt. The added benefit is that the authorization server never stores the secret (private key) — only the client has this information. Even if the entire OAuth credentials database were stolen, attackers would not be able to use the public keys therein to compromise your system. Furthermore, as long as the client generated the key pair instead of the server, the private key would never need to travel over the wire — that is extremely secure. This technique would require significantly more effort and is left up to the reader to explore further.
Implementing Client Services
You need a way to define the clients that are permitted to access your web services. For a simple system with a very static and stable set of internally developed clients, you could just use Spring Security OAuth’s InMemoryClientDetailsService, but this is not sufficient in most circumstances. You could use the JdbcClientDetailsService, but if you’re already using JPA, Spring Data, and Spring Framework transactions, it might be easier to simply create your own implementation.
Creating a Client Entity
The client entity is fairly straightforward. It needs to implement ClientDetails and map to several database tables. Because you’re customizing this, you’ll encounter some ClientDetails properties that you can safely hardwire for your situation. For example, you might want to require the client to always present a secret and a scope, not be allowed to use refresh tokens, not have any additional information, and always have the same authority or authorities. This is demonstrated in the abbreviated WebServiceClient entity that follows (which uses some of the advanced mapping techniques you learned about in Chapter 24).
@Entity
public class WebServiceClient implements ClientDetails, Serializable
{
// fields
@Id @Column(name = "WebServiceClientId")
@GeneratedValue(strategy = GenerationType.IDENTITY)
public long getId() { ... }
public void setId(long id) { ... }
@Override
public String getClientId() { ... }
public void setClientId(String clientId) { ... }
@Override
public String getClientSecret() { ... }
public void setClientSecret(String clientSecret) { ... }
@Override @Column(name = "Scope")
@ElementCollection(fetch = FetchType.EAGER)
@CollectionTable(name = "WebServiceClient_Scope", joinColumns = {
@JoinColumn(name = "WebServiceClientId",
referencedColumnName = "WebServiceClientId")
})
public Set<String> getScope() { ... }
public void setScope(Set<String> scope) { ... }
@Override @Column(name = "GrantName")
@ElementCollection(fetch = FetchType.EAGER)
@CollectionTable(name = "WebServiceClient_Grant", joinColumns = {
@JoinColumn(name = "WebServiceClientId",
referencedColumnName = "WebServiceClientId")
})
public Set<String> getAuthorizedGrantTypes() { ... }
public void setAuthorizedGrantTypes(Set<String> authorizedGrantTypes) { ... }
@Override @Column(name = "Uri")
@ElementCollection(fetch = FetchType.EAGER)
@CollectionTable(name = "WebServiceClient_RedirectUri", joinColumns = {
@JoinColumn(name = "WebServiceClientId",
referencedColumnName = "WebServiceClientId")
})
public Set<String> getRegisteredRedirectUri() { ... }
public void setRegisteredRedirectUri(Set<String> uri) { ... }
private static final Set<String> RESOURCE_IDS = new HashSet<>();
private static final Set<GrantedAuthority> AUTHORITIES = new HashSet<>();
static {
RESOURCE_IDS.add("SUPPORT");
AUTHORITIES.add(new SimpleGrantedAuthority("OAUTH_CLIENT"));
}
@Override @Transient
public Set<String> getResourceIds() { return RESOURCE_IDS; }
@Override @Transient
public Collection<GrantedAuthority> getAuthorities() { return AUTHORITIES; }
@Override @Transient
public Integer getAccessTokenValiditySeconds() { return 3600; }
@Override @Transient
public Integer getRefreshTokenValiditySeconds() { return -1; }
@Override @Transient
public Map<String, Object> getAdditionalInformation() { return null; }
@Override @Transient
public boolean isSecretRequired() { return true; }
@Override @Transient
public boolean isScoped() { return true; }
}
Providing Client Details
The Spring Data repository interface that supports this entity is simple and eliminates any hard work on your part.
public interface WebServiceClientRepository
extends CrudRepository<WebServiceClient, Long>
{
WebServiceClient getByClientId(String clientId);
}
The WebServiceClientService interface extends ClientDetailsService to clarify that the service always returns WebServiceClient entities, and the implementation is straightforward. Notice that loadClientByClientId never returns null. If a client cannot be found, it throws Spring Security OAuth’s ClientRegistrationException to indicate that the client is not valid. Also notice that the service does not provide any mechanism for registering new clients. (Likewise, there is no UI for doing so.) How this happens varies greatly from one business case to another and is an exercise left up to you.
public interface WebServiceClientService extends ClientDetailsService
{
@Override
WebServiceClient loadClientByClientId(String clientId);
}
public class DefaultWebServiceClientService implements WebServiceClientService
{
@Inject WebServiceClientRepository clientRepository;
@Override
@Transactional
public WebServiceClient loadClientByClientId(String clientId)
{
WebServiceClient client = this.clientRepository.getByClientId(clientId);
if(client == null)
throw new ClientRegistrationException("Client not found");
return client;
}
}
The project’s create.sql file adds four new tables to the Customer Support database and inserts a test client into those tables. If you have not worked with the customer support application in previous chapters, you need to run the entire create.sql script and create the appropriate Tomcat DataSource resource (named jdbc/CustomerSupport). If you have an existing database to upgrade, be sure to run the create statements for these four tables. The data inserted into the new tables for the test client follows. (The client password is the BCrypt-hashed value of “y471l12D2y55U5558rd2.”)
INSERT INTO WebServiceClient (ClientId, ClientSecret) VALUES (
'TestClient', '$2a$10$elDBcfb/ZKyuNgOPK5.70Oi4gN2EuhU2yONPsoF3avx9.Hd/b8BTa'
);
INSERT INTO WebServiceClient_Scope (WebServiceClientId, Scope)
VALUES (1, 'READ'), (1, 'WRITE'), (1, 'TRUST');
INSERT INTO WebServiceClient_Grant (WebServiceClientId, GrantName)
VALUES (1, 'authorization_code');
INSERT INTO WebServiceClient_RedirectUri (WebServiceClientId, Uri)
VALUES (1, 'http://localhost:8080/client/support');
Also if you are upgrading an existing database, you need to grant permissions for accessing the web services. The following statement from the create.sql script adds this permission to the users Nicholas and John (assuming you have kept the default users in your database).
INSERT INTO UserPrincipal_Authority (UserId, Authority)
VALUES (1, 'USE_WEB_SERVICES'), (4, 'USE_WEB_SERVICES');
Implementing Nonce Services
Spring Security OAuth 2 doesn’t specify any type of nonce-related interfaces because nonces aren’t a standard part of OAuth 2.0. However, fabricating a system of your own is really quite trivial. There’s very little to the nonce entity, repository, and service. Be sure to run the SQL create statement if you have an existing database to upgrade.
@Entity
@Table(name = "OAuthNonce")
public class Nonce implements Serializable
{
private static final long serialVersionUID = 1L;
private long id;
private String value;
private long timestamp;
public Nonce() { }
public Nonce(String value, long timestamp) { ... }
@Id @Column(name = "OAuthNonceId")
@GeneratedValue(strategy = GenerationType.IDENTITY)
public long getId() { ... }
public void setId(long id) { ... }
public String getValue() { ... }
public void setValue(String value) { ... }
@Column(name = "NonceTimestamp")
public long getTimestamp() { ... }
public void setTimestamp(long timestamp) { ... }
}
CREATE TABLE OAuthNonce (
OAuthNonceId BIGINT UNSIGNED NOT NULL AUTO_INCREMENT PRIMARY KEY,
Value VARCHAR(50),
NonceTimestamp BIGINT NOT NULL,
UNIQUE KEY OAuthNonce_Value_Timestamp (Value, NonceTimestamp)
) ENGINE = InnoDB;
The NonceRepository uses a technique you learned about in Chapter 22 but didn’t experiment with — using @org.springframework.data.jpa.repository.Query to define a query for a method that doesn’t match a standard Spring Data repository method pattern. The@org.springframework.data.jpa.repository.Modifying annotation tells Spring Data that this method modifies data (as opposed to reading data) and should be executed as such.
public interface NonceRepository extends CrudRepository<Nonce, Long>
{
Nonce getByValueAndTimestamp(String value, long timestamp);
@Modifying
@Query("DELETE FROM Nonce n WHERE n.timestamp < :timestamp")
void deleteWhereTimestampLessThan(long timestamp);
}
The purpose of the delete method is fairly simple. Because nonces must be stored to check for duplication, the nonce table will fill up rather quickly if your server load is heavy. A simple solution to this problem is to periodically delete nonces with timestamps older than a few minutes and simply reject requests with older timestamps. This requires system clocks on client applications to be fairly accurate, which is not an unreasonable requirement for a secure system.
The deleteOldNonces method in DefaultOAuthNonceServices uses Spring Framework scheduling to delete nonces older than 2 minutes each minute. Remember that for a scheduled method to also be transactional, either the method must be specified in the interface or, if you don’t want to expose it, Spring Framework must use CGLIB proxies instead of JDK proxies (proxyTargetClass must be set to true throughout your application). Also note that the OAuthNonceService doesn’t even expose the Nonce entity because it’s simply not necessary for such a simple service.
public interface OAuthNonceServices
{
void recordNonceOrFailIfDuplicate(String nonce, long timestamp);
}
public class DefaultOAuthNonceServices implements OAuthNonceServices
{
@Inject NonceRepository nonceRepository;
@Override @Transactional
public void recordNonceOrFailIfDuplicate(String nonce, long timestamp)
{
if(this.nonceRepository.getByValueAndTimestamp(nonce, timestamp) != null)
throw new InvalidTokenException("Duplicate nonce value [" + nonce +
"," + timestamp + "]");
this.nonceRepository.save(new Nonce(nonce, timestamp));
}
@Transactional @Scheduled(fixedDelay = 60_000L)
public void deleteOldNonces()
{
this.nonceRepository.deleteWhereTimestampLessThan(
(System.currentTimeMillis() - 120_000L) / 1_000L
);
}
}
Implementing Token Services
As you learned earlier, Spring Security OAuth has both an InMemoryTokenStore and a JdbcTokenStore that you can use with the DefaultTokenServices. DefaultTokenServices and the JdbcTokenStore are perfectly sufficient for bearer tokens, but you need something a little more custom for your signature-based tokens.
First, you have to implement OAuth2AccessToken, which you can easily make into an entity and create a repository for. Then you need to implement AuthorizationServerTokenServices and ResourceServerTokenServices.
Designing a Token Entity
When storing access tokens, you must have a way to associate access tokens with the Authentication (user) that authorized access for the client. This Authentication is an OAuth2Authentication to provide additional information for Spring Security OAuth 2 internals.
For the built-in bearer token support, Spring Security OAuth simply serializes the OAuth2Authentication and stores it in a column in the access token table. There’s no reason you can’t do the same in this case. The SigningAccessToken entity implementsOAuth2AccessToken and provides the OAuth2Authentication as an entity property. It also provides a key property for looking up an access token by the token ID included in protected resource requests. The additionalInformation property enables you to add custom key-value pairs that are sent back to the client in the response to the access token request. This is how you tell the client about the token identifier that it must send along with its signed requests.
The SigningAccessToken is lengthy and not printed here, but you can review it in the Customer-Support-v21 project. It’s important to know that the entity maps to two new tables: OAuthAccessToken and OAuthAccessToken_Scope. If you upgrade an existing database, be sure to run the create statements for these tables found in create.sql.
Creating and Retrieving Tokens
The repository for the access token entity is another simple Spring Data repository with two additional lookup methods. Notice that this repository interface is different in that it extends JpaRepository instead of CrudRepository. Though unfortunate, it is necessary to leak the JPA details because the service that uses this repository needs to call the flush method.
public interface SigningAccessTokenRepository
extends JpaRepository<SigningAccessToken, Long>
{
SigningAccessToken getByKey(String key);
SigningAccessToken getByValue(String value);
}
The service that creates and retrieves access tokens is significantly more involved. Not only does it implement both AuthorizationServerTokenServices and ResourceServerTokenServices for simplicity, it also provides an additional method for looking access tokens up by the token identifier (the key property). This method is specified in the SigningAccessTokenServices interface.
public interface SigningAccessTokenServices
extends AuthorizationServerTokenServices, ResourceServerTokenServices
{
SigningAccessToken getAccessToken(String key);
}
DefaultAccessTokenServices in Listing 28-1 implements this interface and supplies all the logic necessary to create and retrieve signature-based access tokens. The refreshAccessToken method throws an UnsupportedOperationException because refresh tokens aren’t necessary for signature-based tokens, and in this particular case you want to require your users to re-authorize clients whenever an access token expires.
The DefaultAuthenticationKeyGenerator can generate a deterministic key (which you use for the token identifier) based on a given OAuth2Authentication. The authorization server calls the createAccessToken method when the client connects to exchange an authorization code for an access token. It might also call getAccessToken(OAuth2Authentication) in some situations, and the deterministic key generator makes it possible to look up the access token. The authorization server also calls refreshAccessToken, except in this project where refresh tokens are disabled.
The getAccessToken(String) method specified in SigningAccessTokenServices is what you use in the resource server to look up the access token using the key provided by the client. The resource server would normally use the other two methods to retrieve tokens and authentications by the token value, but in the custom resource server implementation you create later in this section, these methods are unnecessary. You have to use getAccessToken(String) instead because client connections include the token identifier and not the token value.
LISTING 28-1: DefaultAccessTokenServices.java
public class DefaultAccessTokenServices implements SigningAccessTokenServices
{
AuthenticationKeyGenerator authenticationKeyGenerator =
new DefaultAuthenticationKeyGenerator();
@Inject SigningAccessTokenRepository repository;
@Override @Transactional
public OAuth2AccessToken createAccessToken(OAuth2Authentication auth)
throws AuthenticationException
{
String key = this.authenticationKeyGenerator.extractKey(auth);
SigningAccessToken token = this.repository.getByKey(key);
if(token != null)
{
if(token.isExpired())
{
this.repository.delete(token);
this.repository.flush();
}
else
{
token.setAuthentication(auth); // in case authorities changed
this.repository.save(token);
return token;
}
}
token = new SigningAccessToken(
key,
UUID.randomUUID().toString(),
new Date(System.currentTimeMillis() + 86_400_000L), // one day
auth.getAuthorizationRequest().getScope(),
auth
);
this.repository.save(token);
return token;
}
@Override @Transactional
public OAuth2AccessToken getAccessToken(OAuth2Authentication auth)
{
return this.repository.getByKey(
this.authenticationKeyGenerator.extractKey(auth)
);
}
@Override @Transactional
public SigningAccessToken getAccessToken(String key)
{
return this.repository.getByKey(key);
}
@Override @Transactional
public OAuth2AccessToken readAccessToken(String tokenValue)
{
return this.repository.getByValue(tokenValue);
}
@Override @Transactional
public OAuth2Authentication loadAuthentication(String tokenValue)
throws AuthenticationException
{
SigningAccessToken token = this.repository.getByValue(tokenValue);
if(token == null)
throw new InvalidTokenException("Invalid token " + tokenValue + ".");
if(token.isExpired())
{
this.repository.delete(token);
throw new InvalidTokenException("Expired token " + tokenValue + ".");
}
return token.getAuthentication();
}
@Override
public OAuth2AccessToken refreshAccessToken(String refreshToken,
AuthorizationRequest request)
throws AuthenticationException
{
throw new UnsupportedOperationException();
}
}
Customizing the Resource Server Filter
Normally you would configure the Spring Security OAuth 2 resource server using the XML namespace element <oauth2:resource-server>. This creates an org.springframework.security.oauth2.provider.authentication.OAuth2AuthenticationProcessingFilter that intercepts protected resource requests and then extracts and validates the access token. This filter is written specifically for bearer tokens and is not easily extended, so you must implement your own filter in this case.
The OAuthSigningTokenAuthenticationFilter handles all this for you. This class is also lengthy and most of it isn’t printed here. The parseHeader method parses the Authorization header, ensures that it is a Signing value, and returns a Map<String, String> of the parameters in the header. doFilter calls parseHeader to determine if the header is present and then passes the map of header parameter values on to the authenticate method. This method, which follows, does the hard work of calculating the signature, checking it against the provided signature, validating the token, and ensuring the request doesn’t contain an old or duplicate nonce.
private void authenticate(Map<String, String> header,
HttpServletRequest request)
{
String tokenId = header.get("token_id");
if(tokenId == null)
throw new InvalidTokenException("Header [" + header +
"] missing token_id.");
SigningAccessToken token = this.tokenServices.getAccessToken(tokenId);
if(token == null)
throw new InvalidTokenException("Token [" + tokenId + "] not found.");
OAuth2Authentication authentication = token.getAuthentication();
AuthorizationRequest authorizationRequest =
authentication.getAuthorizationRequest();
String clientId = header.get("client_id");
if(!authorizationRequest.getClientId().equals(clientId))
throw new InvalidTokenException("Client ID does not match token.");
Collection<String> resourceIds = authorizationRequest.getResourceIds();
if(this.resourceId != null && resourceIds != null &&
!resourceIds.isEmpty() && !resourceIds.contains(this.resourceId))
throw new InvalidTokenException("Resource ID not permitted.");
String timestamp = header.get("timestamp");
String nonce = header.get("nonce");
if(timestamp == null || nonce == null)
throw new InvalidTokenException("Header missing timestamp or nonce.");
String toSign = clientId + "," + tokenId + "," + nonce + "," +
timestamp + "," + request.getMethod().toUpperCase() + "," +
token.getValue();
String signature = new String(Base64.getEncoder().encode(
DIGEST.digest(toSign.getBytes(StandardCharsets.UTF_8))
), StandardCharsets.UTF_8);
String presentedSignature = header.get("signature");
if(!signature.equals(presentedSignature))
throw new InvalidTokenException("Missing or invalid signature.");
long timestampValue = Long.parseLong(timestamp);
long now = System.currentTimeMillis() / 1_000L;
if(timestampValue < now - 60L || timestampValue > now + 60L)
throw new InvalidTokenException("Header timestamp out of range.");
this.nonceServices.recordNonceOrFailIfDuplicate(nonce, timestampValue);
request.setAttribute(OAuth2AuthenticationDetails.ACCESS_TOKEN_VALUE,
token.getValue());
authentication.setDetails(this.authenticationDetailsSource.buildDetails(
request
));
SecurityContextHolder.getContext().setAuthentication(authentication);
}
One of the key points of this method is that it accepts only requests with timestamps that are within 1 minute of the current time. Because the nonce service you created earlier deletes nonces after they are 2 minutes old, you should allow only nonces created within a 2-minute window (1 minute before and after the current timestamp). This means clients accessing your web services need to have clocks up to date within 1 minute of your servers’ clocks. Today, Network Time Protocol is standard and enabled by default on all operating systems for all different types of devices, so this shouldn’t be a serious challenge for your users.
NOTE Replacing the standard Spring Security OAuth 2 authentication-processing filter is only necessary because Spring Security OAuth 2 does not provide a mechanism for plugging in additional token types. Hopefully, Spring Security OAuth 2 version 2.0 will provide a plug-in mechanism for supplying alternative token types to avoid this problem, but that won’t be known until after this book is published.
Reconfiguring Spring Security
The last step to completing your OAuth 2 provider is to configure it in Spring Security. Though you configured Spring Security using pure Java in previous chapters, Spring Security OAuth does not yet support Java configuration. Although you could theoretically create a hybrid Spring Security configuration that combines the XML namespace and Java configuration features, this is more trouble than it’s worth. You’re better off using the XML namespace configuration exclusively.
You’ll notice the SecurityConfiguration class no longer exists. It has been replaced with a securityConfiguration.xml file in the resources directory, and the RootContextConfiguration has been changed to import the XML file:
...
@ImportResource({ "classpath:com/wrox/config/securityConfiguration.xml" })
public class RootContextConfiguration implements
AsyncConfigurer, SchedulingConfigurer, TransactionManagementConfigurer
{
...
}
The XML configuration starts with the namespace imports and definition of some basic beans.
<?xml version="1.0" encoding="UTF-8"?>
<beans:beans xmlns="http://www.springframework.org/schema/security"
xmlns:beans="http://www.springframework.org/schema/beans"
xmlns:oauth2="http://www.springframework.org/schema/security/oauth2"
xmlns:xsi="http://www.w3.org/2001/XMLSchema-instance"
xsi:schemaLocation="...">
<beans:bean id="userService" class="com.wrox.site.DefaultUserService" />
<beans:bean id="webServiceClientService"
class="com.wrox.site.DefaultWebServiceClientService" />
<beans:bean id="clientDetailsUserService"
class="org.springframework.security.oauth2.provider.client.
ClientDetailsUserDetailsService">
<beans:constructor-arg ref="webServiceClientService" />
</beans:bean>
<beans:bean id="sessionRegistry"
class="org.springframework.security.core.session.
SessionRegistryImpl" />
<beans:bean id="webSecurityExpressionHandler"
class="org.springframework.security.oauth2.provider.expression.
OAuth2WebSecurityExpressionHandler" />
<beans:bean id="methodSecurityExpressionHandler"
class="org.springframework.security.oauth2.provider.expression.
OAuth2MethodSecurityExpressionHandler" />
<beans:bean id="passwordEncoder"
class="org.springframework.security.crypto.bcrypt.
BCryptPasswordEncoder" />
...
</beans:beans>
Notice the configuration of the password encoder, session registry, and DefaultUserService that you configured with Java in previous chapters. It also configures the Spring Security OAuth 2 expression handlers to replace the stock expression handlers and theDefaultWebServiceClientService you created for looking up your OAuth clients. The ClientDetailsUserDetailsService is a special bridge between the ClientDetailsService and UserDetailsService interfaces, and is necessary for the authentication manager to function properly for the access token endpoint. For bearer tokens you would normally define the DefaultTokenServices and a TokenStore. For example, you could configure this:
<beans:bean id="tokenStore"
class="org.springframework.security.oauth2.provider.token.
InMemoryTokenStore" />
<beans:bean id="tokenServices"
class="org.springframework.security.oauth2.provider.token.
DefaultTokenServices">
<beans:property name="tokenStore" ref="tokenStore" />
<beans:property name="supportRefreshToken" value="true" />
<beans:property name="clientDetailsService"
ref="webServiceClientService" />
</beans:bean>
Instead, you just need to configure your DefaultAccessTokenServices.
<beans:bean id="tokenServices"
class="com.wrox.site.DefaultAccessTokenServices" />
Next you need to configure several other OAuth and authentication management components. The UserApprovalHandler handles the resource owner response to the request to authorize a client. The OAuth2AccessDeniedHandler handles access denied errors and returning responses with the client-requested content type. The OAuth2AuthenticationEntryPoint does the same thing, except for authentication errors instead of access denied errors. The first <authentication-manager> creates the authentication manager for the authentication you configured in Chapter 26, whereas the second one creates a special authentication manager just for handling client requests to the access token endpoint.
<beans:bean id="userApprovalHandler"
class="org.springframework.security.oauth2.provider.approval.
TokenServicesUserApprovalHandler">
<beans:property name="tokenServices" ref="tokenServices" />
</beans:bean>
<beans:bean id="oauthAccessDeniedHandler"
class="org.springframework.security.oauth2.provider.error.
OAuth2AccessDeniedHandler" />
<beans:bean id="oauthAuthenticationEntryPoint"
class="org.springframework.security.oauth2.provider.error.
OAuth2AuthenticationEntryPoint" />
<authentication-manager>
<authentication-provider user-service-ref="userService">
<password-encoder ref="passwordEncoder" />
</authentication-provider>
</authentication-manager>
<authentication-manager id="oauthClientAuthenticationManager">
<authentication-provider user-service-ref="clientDetailsUserService">
<password-encoder ref="passwordEncoder" />
</authentication-provider>
</authentication-manager>
<oauth2:authorization-server token-services-ref="tokenServices"
client-details-service-ref="webServiceClientService"
user-approval-page="oauth/authorize" error-page="oauth/error">
<oauth2:authorization-code />
</oauth2:authorization-server>
The <oauth2:authorization-server> element is an important part of the OAuth configuration. It sets up the authorization endpoint (/oauth/authorize relative to your application root) and access token endpoint (/oauth/token) and handles requests to those URLs. The configured authorization server even handles responding to these requests automatically with an HTML authorization form. However, this form is very generic and obviously won’t be styled to match your site. In most cases, therefore, you’ll want to replace it. Theuser-approval-page attribute enables you to specify a Spring MVC view name for the form that displays the authorization request, whereas the error-page attribute enables you to specify a view name for the error page displayed when an authorization error occurs.
The view names in this case match the /WEB-INF/jsp/view/oauth/authorize.jsp and /WEB-INF/jsp/view/oauth/error.jsp files. The EL variables and form field names in these JSPs are standard to Spring Security OAuth and should not vary.
The next thing you need to configure is the resource server filter. Normally, you would configure it with something like this:
<oauth2:resource-server id="resourceServerFilter" resource-id="SUPPORT"
entry-point-ref="oauthAuthenticationEntryPoint"
token-services-ref="tokenServices" />
This handles bearer tokens out-of-the-box, but because you’re using custom tokens, you need to configure your nonce services and custom resource server filter manually:
<beans:bean id="nonceServices"
class="com.wrox.site.DefaultOAuthNonceServices" />
<beans:bean id="resourceServerFilter"
class="com.wrox.site.OAuthSigningTokenAuthenticationFilter">
<beans:property name="authenticationEntryPoint"
ref="oauthAuthenticationEntryPoint" />
<beans:property name="nonceServices" ref="nonceServices" />
<beans:property name="tokenServices" ref="tokenServices" />
<beans:property name="resourceId" value="SUPPORT" />
</beans:bean>
After you have all this configured, the final step is to configure global method security and HTTP security. Global method security is straightforward, and the first two <http> elements configure URL patterns that are excluded from all security filters.
<global-method-security pre-post-annotations="enabled" order="0"
proxy-target-class="true">
<expression-handler ref="methodSecurityExpressionHandler" />
</global-method-security>
<http security="none" pattern="/resource/**" />
<http security="none" pattern="/favicon.ico" />
The next <http> element configures the security for the access token endpoint. This ensures that clients authenticate with their client ID and secret using HTTP basic authentication before they can exchange authorization codes for access tokens. Note that the order in which these <http> elements appear is very important because each request uses the first configuration that it matches. Also note that this configuration is stateless, meaning HTTP sessions are not created for requests to the access token endpoint.
<http use-expressions="true" create-session="stateless"
authentication-manager-ref="oauthClientAuthenticationManager"
entry-point-ref="oauthAuthenticationEntryPoint" pattern="/oauth/token">
<intercept-url pattern="/oauth/token"
access="hasAuthority('OAUTH_CLIENT')" />
<http-basic />
<access-denied-handler ref="oauthAccessDeniedHandler" />
<expression-handler ref="webSecurityExpressionHandler" />
</http>
The following <http> element is also stateless and uses the custom resource server filter you created earlier to protect your web services with your signature-based access tokens. It also ensures that resource owners are granted the USE_WEB_SERVICES authority before they are allowed to use your web services. This doesn’t replace the @PreAuthorize checks you added to all of your services—those still apply as well.
<http use-expressions="true" create-session="stateless"
entry-point-ref="oauthAuthenticationEntryPoint" pattern="/services/**">
<intercept-url pattern="/services/**"
access="hasAuthority('USE_WEB_SERVICES')" />
<custom-filter ref="resourceServerFilter" before="PRE_AUTH_FILTER" />
<access-denied-handler ref="oauthAccessDeniedHandler" />
<expression-handler ref="webSecurityExpressionHandler" />
</http>
The final <http> element is essentially identical to the HttpSecurity configuration you created with Java in Chapters 26 and 27 but with two minor tweaks.
· Although Java configuration permits the login form to submit to the same URL at which the form displays, XML configuration does not, so the login form now posts to /login/submit.
· This configuration protects the OAuth authorization endpoint with standard web security so that users must log in and have the USE_WEB_SERVICES granted authority before they can grant access to a client.
Note the use of the <csrf> element to enable CSRF protection, which is disabled by default for XML configuration.
<http use-expressions="true">
<intercept-url pattern="/session/list"
access="hasAuthority('VIEW_USER_SESSIONS')" />
<intercept-url pattern="/oauth/**"
access="hasAuthority('USE_WEB_SERVICES')" />
<intercept-url pattern="/login/**" access="permitAll()" />
<intercept-url pattern="/login" access="permitAll()" />
<intercept-url pattern="/logout" access="permitAll()" />
<intercept-url pattern="/**" access="isFullyAuthenticated()" />
<form-login default-target-url="/ticket/list" login-page="/login"
login-processing-url="/login/submit"
authentication-failure-url="/login?loginFailed"
username-parameter="username" password-parameter="password" />
<logout logout-url="/logout" logout-success-url="/login?loggedOut"
delete-cookies="JSESSIONID" invalidate-session="true" />
<session-management invalid-session-url="/login"
session-fixation-protection="changeSessionId">
<concurrency-control error-if-maximum-exceeded="true" max-sessions="1"
session-registry-ref="sessionRegistry" />
</session-management>
<csrf />
<expression-handler ref="webSecurityExpressionHandler" />
</http>
At this point you have successfully created and configured an OAuth 2.0 provider using Spring Security OAuth. You’ll notice that the web service endpoints also take advantage of @AuthenticationPrincipal to obtain the UserPrincipal in their handler methods.
The other thing you’ll want to look at before moving on is the TicketService interface and DefaultTicketService implementation. These were updated so that your code can optionally specify lambda expressions that fetch properties within the transaction that are normally lazy-loaded, ensuring that the values can be properly serialized. The TicketRestEndpoint and TicketSoapEndpoint controllers then take advantage of this expansion capability. Of course, this is just one approach to solve this problem and is far from the best-performing solution. Ultimately, you need a way to tell Jackson Data Processor and other utilities when to ignore lazy-loaded properties that haven’t been fully loaded. This is a difficult task that is left up to you because it is outside the scope of this book.
The changes you’ve made here don’t do you a lot of good just yet because you have no way to test them. The next and final section of this chapter helps you create a simple OAuth 2 client for testing the provider and Customer Support application.
CREATING AN OAUTH CLIENT APPLICATION
Fortunately, Spring Security OAuth doesn’t just include provider implementations. It also has client implementations, making the consumption of OAuth protected resources much simpler. Currently, the Spring Security OAuth 2 client supports accessing only RESTful web services because it is strictly tied to the OAuth2RestTemplate class you read about earlier. Efforts are under way to make this support more generic in the next version so that other clients, such as SOAP clients, can take advantage of the OAuth client features.
The OAuth-Client project, available for download from the wrox.com code download site, demonstrates using Spring Security OAuth and the OAuth2RestTemplate to access the Customer Support application’s RESTful web service.
When you open it up, the first thing you’ll notice is that it has the Ticket, Attachment, and UserPrincipal classes (minus JPA annotations) and TicketWebServiceList class from the Customer-Support-v21 application. This makes it easy for the client to deserialize responses from the Customer Support web service. In fact, it is very common for providers to distribute artifacts containing the published data types like Ticket and Attachment so that clients can more reliably use the related web services.
The OAuth-Client project also provides a very simple AuthenticationController and login screen for handling logins to the application through Spring Security.
Customizing the REST Template
Normally, the out-of-the-box client configuration would be straightforward and work fine for your needs, but you’re using custom signature-based tokens, so you need to perform some customization. This customization is not nearly as extensive as was necessary for your OAuth provider implementation. All you need to do is extend OAuth2RestTemplate to override the createRequest method and use your custom access token protocol instead of the default bearer tokens. The OAuth2SigningRestTemplate in Listing 28-2 implements the client token signature generation. It generates a random nonce using a UUID, creates the signature string, generates the signature, and then adds the header with necessary parameters to the request.
LISTING 28-2: OAuth2SigningRestTemplate.java
public class OAuth2SigningRestTemplate extends OAuth2RestTemplate
{
private static final Logger log = LogManager.getLogger();
private static final MessageDigest DIGEST;
static {
try {
DIGEST = MessageDigest.getInstance("SHA-1");
} catch (NoSuchAlgorithmException e) { // not possible
throw new IllegalStateException(e);
}
}
private final OAuth2ProtectedResourceDetails resource;
public OAuth2SigningRestTemplate(OAuth2ProtectedResourceDetails resource)
{ ... }
public OAuth2SigningRestTemplate(OAuth2ProtectedResourceDetails resource,
OAuth2ClientContext context) { ... }
@Override
protected ClientHttpRequest createRequest(URI uri, HttpMethod method)
throws IOException
{
OAuth2AccessToken token = this.getAccessToken();
String tokenType = token.getTokenType();
if(!StringUtils.hasText(tokenType))
tokenType = OAuth2AccessToken.BEARER_TYPE;
if("Signing".equalsIgnoreCase(tokenType))
{
String clientId = this.resource.getClientId();
String tokenId = token.getAdditionalInformation()
.get("token_id").toString();
String nonce = UUID.randomUUID().toString();
long timestamp = System.currentTimeMillis() / 1_000L;
String toSign = clientId + "," + tokenId + "," + nonce + "," +
timestamp + "," + method + "," + token.getValue();
String signature = new String(Base64.getEncoder().encode(
DIGEST.digest(toSign.getBytes(StandardCharsets.UTF_8))
), StandardCharsets.UTF_8);
String header = "Signing client_id=" + clientId + ", token_id=" +
tokenId + ", timestamp=" + timestamp + ", nonce=" + nonce +
", signature=" + signature;
ClientHttpRequest request =
this.getRequestFactory().createRequest(uri, method);
log.debug("Created [{}] request for [{}].", method, uri);
log.debug("toSign = [{}], signature = [{}]", toSign, signature);
request.getHeaders().add("Authorization", header);
return request;
}
else
throw new OAuth2AccessDeniedException(
"Unsupported access token type [" + tokenType + "].");
}
}
Configuring the Spring Security OAuth Client
Much of the Spring Security configuration for the OAuth-Client project is very boilerplate. It contains many things you’ve already seen and is imported from the RootContextConfiguration just like in the Customer Support application.
The <authentication-manager> element declares a simple in-memory user service with two hard-coded users, whereas the <http> element defines straightforward authentication and authorization rules. <oauth2:resource> and <oauth2:client> are new features that you have not used before. The first defines a third-party protected resource that this client consumes, including its authorization and access token endpoints, the client ID, the client secret, and more. If your client accessed protected resources from multiple providers, you would define multiple resource elements. The client element, however, is always used exactly once — it defines a filter that catches UserRedirectRequiredExceptions and redirects the user to the proper authorization endpoint when one of these occurs.
<?xml version="1.0" encoding="UTF-8"?>
<beans:beans xmlns="http://www.springframework.org/schema/security"
xmlns:beans="http://www.springframework.org/schema/beans"
xmlns:aop="http://www.springframework.org/schema/aop"
xmlns:oauth2="http://www.springframework.org/schema/security/oauth2"
xmlns:xsi="...">
<oauth2:resource id="oAuth2ClientBean" client-authentication-scheme="header"
client-id="TestClient" client-secret="y471l12D2y55U5558rd2"
authentication-scheme="header" type="authorization_code"
scope="READ,WRITE,TRUST"
user-authorization-uri="http://localhost:8080/support/oauth/authorize"
access-token-uri="http://localhost:8080/support/oauth/token" />
...
<authentication-manager>
<authentication-provider>
<user-service>
<user name="Steve" password="apple" authorities="USER" />
<user name="Bill" password="orange" authorities="USER" />
</user-service>
</authentication-provider>
</authentication-manager>
<oauth2:client id="oAuth2ClientFilter" />
<http use-expressions="true">
<intercept-url pattern="/login/**" access="permitAll()" />
<intercept-url pattern="/login" access="permitAll()" />
<intercept-url pattern="/logout" access="permitAll()" />
<intercept-url pattern="/**" access="hasAuthority('USER')" />
<session-management invalid-session-url="/login"
session-fixation-protection="changeSessionId" />
<csrf />
<form-login authentication-failure-url="/login?loginFailed"
login-page="/login" login-processing-url="/login/submit"
username-parameter="username" password-parameter="password"
default-target-url="/" />
<logout logout-url="/logout" logout-success-url="/login?loggedOut"
delete-cookies="JSESSIONID" invalidate-session="true" />
<custom-filter ref="oAuth2ClientFilter"
after="EXCEPTION_TRANSLATION_FILTER" />
</http>
</beans:beans>
The last thing you have to configure is the RestTemplate implementation. If you were using the default bearer token type, this configuration would be as simple as follows:
<oauth2:rest-template id="customerSupportRestTemplate"
resource="oAuth2ClientBean" />
However, because you have created a custom RestTemplate, you must configure it by hand. This is complex and involves creating a request-scoped access token request and wrapping it in a proxy, creating a session-scoped client context and wrapping it in a proxy, and finally creating the custom RestTemplate that consumes these other beans. These are all things that the <oauth2:rest-template> element normally does for you automatically. Like <oauth2:resource>, you configure one RestTemplate for every protected resource your application accesses.
<beans:bean name="accessTokenRequestProxy" scope="request"
class="org.springframework.security.oauth2.client.token.
DefaultAccessTokenRequest">
<aop:scoped-proxy />
<beans:constructor-arg index="0" value="#{request.parameterMap}" />
<beans:property name="currentUri"
value="#{request.getAttribute('currentUri')}" />
</beans:bean>
<beans:bean name="clientContextProxy" scope="session"
class="org.springframework.security.oauth2.client.
DefaultOAuth2ClientContext">
<aop:scoped-proxy />
<beans:constructor-arg index="0" ref="accessTokenRequestProxy" />
</beans:bean>
<beans:bean id="customerSupportRestTemplate"
class="com.wrox.site.OAuth2SigningRestTemplate">
<beans:constructor-arg index="0" ref="oAuth2ClientBean" />
<beans:constructor-arg index="1">
<beans:bean class="org.springframework.security.oauth2.config.
OAuth2ClientContextFactoryBean">
<beans:property name="resource" ref="oAuth2ClientBean" />
<beans:property name="bareContext">
<beans:bean class="org.springframework.security.oauth2.client.
DefaultOAuth2ClientContext" />
</beans:property>
<beans:property name="scopedContext" ref="clientContextProxy" />
</beans:bean>
</beans:constructor-arg>
<beans:property name="messageConverters">
<beans:list value-type="org.springframework.http.converter.
HttpMessageConverter">
<beans:bean class="org.springframework.http.converter.json.
MappingJackson2HttpMessageConverter">
<beans:property name="objectMapper" ref="objectMapper" />
</beans:bean>
</beans:list>
</beans:property>
</beans:bean>
NOTE This complex configuration is required because Spring Security OAuth 2 support provides no mechanism for plugging in additional token types, which means you must extend the OAuth2RestTemplate and configure the extended class instead. Hopefully Spring Security OAuth 2 version 2.0 will provide a plug-in mechanism for supplying alternative token types to avoid this problem, but that won’t be known until after this book is published.
Using the REST Template
Using the custom OAuth2RestTemplate is perhaps the simplest part of the OAuth-Client project. The SupportController retrieves a list of all Tickets from the Customer Support web service and forwards the request to a view that displays all the titles. If the user currently logged in to the client application doesn’t have an access token for the web service, a UserRedirectRequiredException will result and the user will be redirected to the authorization endpoint.
After returning to this controller with an authorization code, Spring Security OAuth 2 contacts the access token endpoint and exchanges the code for an access token. It can then use the access token to securely access the Customer Support web services.
@WebController
public class SupportController
{
private static final Logger log = LogManager.getLogger();
@Inject @Qualifier("customerSupportRestTemplate")
RestTemplate webService;
@RequestMapping("support")
public String getTickets(Map<String, Object> model)
{
TicketWebServiceList list = this.webService.getForObject(
"http://localhost:8080/support/services/Rest/ticket",
TicketWebServiceList.class
);
model.put("tickets", list);
return "support";
}
}
WARNING You probably noticed by now that you aren’t using HTTPS anywhere in these applications. If you use bearer tokens, you must use HTTPS for all requests to the authorization server and the resource server (even though the standard mandates it only for the redirect endpoint and access token endpoint). If you use signature-based tokens like those here, you still must use HTTPS for the redirect endpoint and access token endpoint. However, using it for all resource server communications becomes much less necessary and depends on the sensitivity of the data with which your system works. Either way, setting up HTTPS is overkill for the sample applications in this book and is outside the scope of this chapter. Be sure to follow best security practices in your real applications.
Testing the Provider and Client Together
Testing the provider and client together requires a little more effort but isn’t too difficult.
1. Open up the OAuth-Client project in your IDE, and build the exploded web application artifact.
2. Find this artifact directory (likely named oauth-client-1.0.0-SNAPSHOT) in the Maven target directory, and copy it to your Tomcat webapps directory (probably C:\Program Files\Apache Software Foundation\Tomcat 8.0\webapps on Windows machines).
3. Rename the copied directory to client.
4. Open the Customer-Support-v21 project in your IDE and compile it.
5. Start the Customer Support application in Tomcat from your IDE just like you have throughout the rest of the book. As Tomcat starts up it first deploys the client application because it already exists in the webapps directory, and then it deploys the Customer Support application. (To be clear, the order is not actually important.).
6. After Tomcat has fully started, go to http://localhost:8080/client and log in with one of the users hard-coded into the client application. The landing page gives you instructions for authorizing the application.
7. Simply click the link and you are redirected to the Customer Support application to log in.
8. Log in with one of the Customer Support application users and you land on the authorization page.
9. Grant access to the client application, and you are finally redirected back to http://localhost:8080/client/support with the authorization code. Spring Security OAuth 2 obtains an access token behind the scenes and then accesses the protected resource.
You should now see the list of Ticket subjects in the client application, which means that both your OAuth provider and client work.
SUMMARY
This chapter covered a lot of concepts and technologies involved in securing your web services against unauthorized access. You learned about OAuth and compared the OAuth 1.0a and OAuth 2.0 standards. You did not do a deep dive into the OAuth standards, and you should read the specifications before putting an implementation for either OAuth version into a production environment. You explored how OAuth 2.0 works in Spring Security OAuth, including how Spring Security OAuth can help you create resource provider applications and client applications. Finally, you completed the Customer Support application by securing its web services using OAuth, and you created a sample client application to prove that the OAuth implementation works.
This book started with a simple introduction into the structure of a basic Java EE web application. You learned about Servlets, JSPs, custom JSP tags, HTTP sessions, filters, WebSockets, and application logging with Log4j 2. Next, you explored Spring Framework and its powerful features to help you create world-class applications. After that you experimented with the Java Persistence API and learned how Spring Data makes entity persistence as simple as a few lines of code. Finally, in the last part you learned how to make your application secure using Spring Security, form authentication, and OAuth.
You will never finish learning all there is to learn about Java EE, Spring Framework, and Java persistence (continuous learning is part of the fun!), but this book has handed you the tools you need and put you on the road to creating advanced, enterprise applications that can serve you and your customers well.
Every day new versions of the tools you used in this book are released, and each new version brings with it features that can improve your applications. Look for these new versions and for future editions of this book to stay up to date on the latest technologies and approaches for professional Java web application development.
All materials on the site are licensed Creative Commons Attribution-Sharealike 3.0 Unported CC BY-SA 3.0 & GNU Free Documentation License (GFDL)
If you are the copyright holder of any material contained on our site and intend to remove it, please contact our site administrator for approval.
© 2016-2026 All site design rights belong to S.Y.A.