Wrox Press Java Programming 24-Hour Trainer 2nd (2015)
Lesson 9. Event Handling in Swing GUI
Java Swing, like any other UI library, is event-driven. When a user interacts with a GUI program (such as by clicking a button or pressing a key) a Java Swing program receives an event that can initiate an appropriate reaction.
If you wrote the code to react to a particular event, this code will be invoked. If you haven’t written such code, the event will be fired anyway, but the program won’t respond to it. In this lesson you learn how to handle events in Java GUI programs.
Introduction to Event Listeners
I’m sure you’ve tried to click the buttons of the calculator from Chapter 8, but they were not ready to respond to your actions yet. Swing widgets can process various events, or in the programmers’ jargon can listen to events. To listen to events, a program has to register window components with Java classes called listeners.
You should have components listen only to the events they are interested in. For example, when a person clicks a button, it’s not important where exactly the mouse pointer is as long as it is on the button’s surface. That’s why you do not need to register the button with MouseMotionListener. On the other hand, this listener comes in handy for all kinds of drawing programs.
To process button clicks, Swing provides ActionListener. All listeners are declared Java interfaces and their methods have to be implemented in an object that listens to events.
This is how Java documentation describes the ActionListener interface:
This is the listener interference for receiving action events. The class that is interested in processing an action event implements this interface, and the object created with that class is registered with a component, using the component’s addActionListener() method. When the action event occurs, that object’s actionPerformed() method is invoked.
This interface ActionListener is defined in the java.awt.event package, as presented in Listing 9-1. It declares only one method.
Listing 9-1: ActionListener Interface
public interface ActionListener extends EventListener
void actionPerformed(ActionEvent e);
}
NOTE Starting from Java 8, interfaces that declare a single method are called functional interfaces. You learn more about them in Lesson 15.
The actionPerformed() method is invoked by the JVM if the action happened. Let’s use this listener in the calculator you created in Chapter 8.
Teaching the Calculator to Calculate
The calculator’s buttons should register themselves with a class that implements ActionListener, which means that its method actionPerform() contains the calculation logic. Even though you can implement ActionListener in the Calculator class itself, for better readability and code maintainability it’s best to separate the code defining the UI from the code containing processing logic. Let’s start writing a separate class, CalculatorEngine:
import java.awt.event.ActionListener;
public class CalculatorEngine implements ActionListener {
}
The preceding class won’t compile; Java gives an error message stating that the class must implement the method actionPerformed(ActionEvent e). You remember the rules for interfaces, right? The interface ActionListener declares a single method actionPerformed(), which makes it afunctional interface, as discussed in Listing 9-2 fixes this error.
Listing 9-2: First implementation of ActionListener interface
import java.awt.event.ActionListener;
import java.awt.event.ActionEvent;
public class CalculatorEngine implements ActionListener {
public void actionPerformed(ActionEvent e){
// An empty method body
}
}
Even though the actionPerformed() method doesn’t contain any code yet, it’s considered implemented in Listing 9-2 (the curly braces make the compiler happy). JVM calls this method on the class that’s registered as an event listener and implements the ActionListener interface whenever the user clicks the button.
The next version of CalulatorEngine (see Listing 9-3) will display a message box from the method actionPerformed(). You can display any messages using the Swing class JOptionPane and its method showConfirmDialog().
Listing 9-3: This class displays a message box
import java.awt.event.ActionListener;
import java.awt.event.ActionEvent;
import javax.swing.JOptionPane;
public class CalculatorEngineMsg implements ActionListener {
public void actionPerformed(ActionEvent e){
JOptionPane.showConfirmDialog(null,
"Something happened...",
"Just a test",
JOptionPane.PLAIN_MESSAGE);
}
}
If you register the class CalculatorEngineMsg from Listing 9-3 as a listener for the class Calculator from Listing 8-4, it displays the message box shown in Figure 9-1 when the user clicks inside the calculator window.
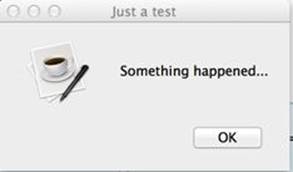
Figure 9-1: A message box with JOptionPane
The class JOptionPane declares several overloaded methods named showConfirmDialog() — I used the version with four arguments in Listing 9-3. The first argument is null, which means that this message box does not have a parent window. The second argument contains the title of the message box. The third contains the message itself, and the fourth argument allows you to select a button(s) to be included in the box; PLAIN_MESSAGE means that it only needs the OK button.
Registering Components with ActionListener
Which program invokes the code in the method actionPerformed() shown in Listing 9-3 and when? Register the calculator’s buttons with the class CalculatorEngine, and Java run time obediently invokes this class’s method actionPerformed() every time any button is clicked.
Callback Methods
The methods that are not called by the Java run time on your application code are often referred to as callback methods.
Add the following two lines at the end of the constructor of the class Calculator (Listing 8-4), and one button (zero) starts responding to clicks with the box from Figure 9-1:
CalculatorEngine calcEngine = new CalculatorEngine();
button0.addActionListener(calcEngine);
The other calculator buttons remain silent because they have not been registered with the action listener yet. Keep adding similar lines to bring all the buttons to life:
button1.addActionListener(calcEngine);
button2.addActionListener(calcEngine);
button3.addActionListener(calcEngine);
button4.addActionListener(calcEngine);
Finding the Source of an Event
The next step is to make the listener a little smarter: It has to display message boxes with different text, depending on which button was pressed. When an action event happens, Java run time calls the method actionPerformed(ActionEvent) on your listener class, and this method provides valuable information about the event in the argument ActionEvent. In particular, the method getSource() in the object ActionEvent supplied to actionPerformed() in Listing 9-3 tells you what object caused this method invocation.
But according to Java documentation for the class ActionEvent, the method getSource() returns an instance of type Object, which is a superclass of all Java classes, including window components. Since buttons in your calculator can be the only reason for an action event, cast the returnedObject to the type JButton:
JButton clickedButton = (JButton) evt.getSource();
Only after performing casting from Object to JButton can you call methods that JButton supports; for example, getText(), which returns the button’s label, as shown in Listing 9-4. If you press the button labeled 5, you see a message box that reads, “You pressed 5.”
Listing 9-4: Getting the label of the clicked button
import java.awt.event.ActionListener;
import java.awt.event.ActionEvent;
import javax.swing.JOptionPane;
import javax.swing.JButton;
public class CalculatorEngine implements ActionListener {
public void actionPerformed(ActionEvent e){
// Get the source object of this action
JButton clickedButton=(JButton) e.getSource();
// Get the button's label
String clickedButtonLabel = clickedButton.getText();
// Concatenate the button's label
// to the text of the message box
JOptionPane.showConfirmDialog(null,
"You pressed " + clickedButtonLabel,
"Just a test",
JOptionPane.PLAIN_MESSAGE);
}
}
What if the window events are produced not only by buttons, but by some other components as well? Then don’t cast every object that has arrived with ActionEvent to JButton. Use the operator called instanceof to perform the proper casting. The next example first determines what type of object caused the event, and then performs casting to either JButton or JTextField:
public void actionPerformed(ActionEvent evt){
JTextField myDisplayField=null;
JButton clickedButton=null;
Object eventSource = evt.getSource();
if (eventSource instanceof JButton){
clickedButton = (JButton) eventSource;
} else if (eventSource instanceof JTextField){
myDisplayField = (JTextField)eventSource;
}
}
Consider the buttons that perform arithmetic operations. Our calculator has to execute different code for each button:
public void actionPerformed(ActionEvent e){
Object src = e.getSource();
if (src == buttonPlus){
// Call the method that adds numbers here
} else if (src == buttonMinus){
// Call the method that subtracts numbers here
}else if (src == buttonDivide){
// Call the method that divides numbers here
} else if (src == buttonMultiply){
// Call the method that multiplies numbers here
}
}
How to Pass Data Between Objects
When you click a numeric button on the real calculator, it does not show a message box, but rather displays the number in the text field on top. Here’s a new challenge: You need to be able to reach the attribute displayField from the object Calculator from the method actionPerformed()defined in another class — CalculatorEngine. In other words, two objects need to communicate. There are different ways of arranging this; for instance, in the class CalculatorEngine you can declare a private variable to store a reference to the instance of the object Calculator.
The next version of the class CalculatorEngine declares a one-argument constructor, which takes an argument of type Calculator.
JVM executes the constructor of the CalculatorEngine class during instantiation of this class in memory. The Calculator object instantiates CalculatorEngine and passes to the engine’s constructor a reference to itself (note this):
CalculatorEngine calcEngine = new CalculatorEngine (this);
The reference this contains the location of the calculator’s instance in memory. The engine’s constructor can store the value from the variable this in its own variable, say parent, and eventually use it from the method actionPerformed() to access the calculator’s display field.
Attention, Bad Practice!
The variable parent in the following code listing serves as a bridge from the object CalculatorEngine to Calculator. And the easy way to access Calculator’s displayField from CalculatorEngine is this:
parent.displayField.getText();
...
parent.displayField.setText(dispFieldText + clickedButtonLabel);
These two lines were taken from the code sample in Listing 9-5. This code works, but it violates one of the principles of object-oriented programming: encapsulation. The problem is that code from CalculatorEngine has direct knowledge of the internals of another object: Calculator. The engine “knows" that there is a field called displayField in Calculator, and the preceding code gets and sets its value directly.
Listing 9-5: Bad execution of object communication
import java.awt.event.ActionListener;
import java.awt.event.ActionEvent;
import javax.swing.JButton;
public class CalculatorEngine implements ActionListener {
Calculator parent; // a reference to the Calculator
// Constructor stores the reference to the
// Calculator window in the member variable parent
CalculatorEngine(Calculator parent){
this.parent = parent;
}
public void actionPerformed(ActionEvent e){
// Get the source of this action
JButton clickedButton = (JButton) e.getSource();
// Get the existing text from the Calculator's
// display field. Reaching inside another object is bad.
String dispFieldText = parent.displayField.getText();
// Get the button's label
String clickedButtonLabel = clickedButton.getText();
parent.displayField.setText(dispFieldText +
clickedButtonLabel);
}
}
Imagine that for whatever reason you decide to use in Calculator something other than the JTextField widget to display the results of calculations. That other widget may not even have such application programming interfaces (APIs) as setText() and getText(). Now you need to modify not only the Calculator class but also the code of the CalculatorEngine to replace the part that displays or reads the displayField. This is not the right way to design interactions between objects.
A Better Solution with a Public API
If Calculator needs to communicate with other objects, it should expose a public API to get or set data but hide details about its internals. The class Calculator from Listing 8-4 declares widgets without using any access-level qualifiers, so default package access level is applied. Hide these user interface (UI) components, as shown in the following code by using the keyword private:
private JPanel windowContent;
private JTextField displayField;
private JButton button0;
private JButton button1;
...
Now CalculatorEngine isn’t able to access displayField directly as it did in Listing 9-5. Defining public getter and setter methods in Calculator allows outsiders to access displayField without knowing it exists. Listing 9-6 demonstrates how a small change can protect data and enforce encapsulation.
Listing 9-6: Adding a public API to Calculator
public class Calculator{
private JTextField displayField;
public void setDisplayValue(String val){
displayField.setText(val);
}
public String getDisplayValue() {
return displayField.getText();
}
// The rest of the code goes here
}
Now if you decide to replace the JTextField widget with another one, only the methods setDisplayValue() and getDisplayValue() need a change; the code of CalculatorEngine don’t need to be touched. Listing 9-7 shows the proper way to access Calculator from the CalculatorEngine.
Listing 9-7: Using a public API of Calculator
import java.awt.event.ActionListener;
import java.awt.event.ActionEvent;
import javax.swing.JButton;
public class CalculatorEngine implements ActionListener {
Calculator parent; // a reference to the Calculator
// Constructor stores the reference to the
// Calculator window in the member variable parent
CalculatorEngine(Calculator parent){
this.parent = parent;
}
public void actionPerformed(ActionEvent e){
// Get the source of this action
JButton clickedButton = (JButton) e.getSource();
// Get the existing text from the Calculator's
// display field. Reaching inside another object is bad.
String dispFieldText = parent.getDisplayValue();
// Get the button's label
String clickedButtonLabel = clickedButton.getText();
parent.setDisplayValue(dispFieldText +
clickedButtonLabel);
}
}
Design Pattern Model-View-Controller
Software engineers often have to implement similar architectural solutions in their projects. Over the years a number of design patterns were published online and in books. One of such architectural patterns is model-view-controller (MVC). The main idea of MVC is that you should separate code that deals with UI (view), stores the application data (model), and triggers the changes of the views and data (controller). The implementation of MVC may vary depending on the application, but the principle remains the same.
Even in such a simple application as your calculator, you can start separating the code. For example, the Calculator class represents view, is responsible only for the UI, and has no application logic.
The event listener CalculatorEngine plays the role of the controller. It serves as a trigger to engage the application logic when the user clicks on the button or updates the view when the result has been calculated.
You don’t have the model layer here as you don’t store any data. But if you need to implement a calculator that remembers the history of calculations, you could create a class CalculationsHistory that would serve as a model in MVC, as shown in Figure 9-2.
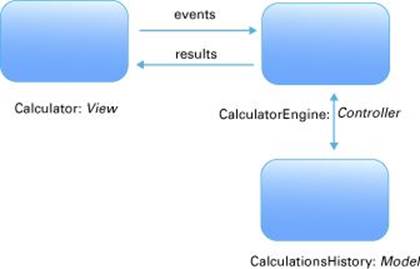
Figure 9-2: MVC in Calculator
Design patterns became a part of the software developer’s jargon. If one programmer says, “We need to implement MVC here,” both know what this is all about.
I keep bringing your attention to various design patterns in the future chapters of this book. Meanwhile you can refer to the online resource Computer Science Design Patterns.
More Swing Listeners
JDK comes with a number of event listeners
located in the package java.awt.event. Here are some of them:
· FocusListener is notified when a widget gains or loses focus (for example, we say that a text field has focus if it has a blinking cursor).
· ItemListener reacts to the selection of items from a list or a drop-down box.
· KeyListener responds to user keypresses.
· MouseListener responds to mouse clicks or the cursor hovering over a widget.
· MouseMotionListener tells you if the mouse is being moved or dragged. To drag means to move the mouse while holding its left button down.
· WindowListener gives you a chance to catch the moments when the user opens, closes, minimizes, or activates the window.
Table 9-1 shows the names of selected listener interfaces and the methods declared in these interfaces. For example, FocusListener declares two methods: focusGained() and focusLost(). This means that even if your class is interested only in knowing when a particular field gains focus, you also must include the empty method focusLost(). Java provides special adapter classes for most of the event listeners to spare you from having to manually code empty methods enforced by listener interfaces.
Table 9-1: Selected Swing Listeners
|
Interface |
Methods to Implement |
|
FocusListener |
focusGained(FocusEvent) focusLost(FocusEvent) |
|
ItemListener |
itemStateChanged(ItemEvent) |
|
KeyListener |
keyPressed(KeyEvent) keyReleased(KeyEvent) keyTyped(KeyEvent) |
|
MouseListener |
mouseClicked(MouseEvent) mouseEntered(MouseEvent) mouseExited(MouseEvent) mousePressed(MouseEvent) mouseReleased(MouseEvent) |
|
MouseMotionListener |
mouseDragged(MouseEvent) mouseMoved(MouseEvent) |
|
WindowListener |
windowActivated(WindowEvent) windowClosed(WindowEvent) windowClosing(WindowEvent) windowDeactivated(WindowEvent) windowDeiconified(WindowEvent) windowIconified(WindowEvent) windowOpened(WindowEvent) |
Java run time has to take care of multiple things: update the content of the screen, apply processing logic and data, and react to events.
Multiple events can be happening at the same time, and Java run time constantly runs a GUI event loop, placing these events in the event queue, as shown in Figure 9-3.
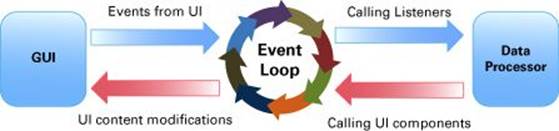
Figure 9-3: GUI event loop
The code that updates the GUI should be processed by a special worker thread (SwingWorker), which we’ll discuss in Lesson 17.
How to use Adapters
Swing adapters are classes with implemented empty functions required by listener interfaces. Let’s say you need to display a warning message and save some data on the disk when the user closes the window. According to table_9-1, a class that implements the WindowListener interface has to include seven methods. This means that you’ll have to write the code that saves the data in the method windowClosing() and also include six empty methods.
The package java.awt.event includes a number of adapter classes that implement corresponding listener interfaces, such as KeyAdapter and WindowAdapter. Instead of implementing WindowListener in a class that handles the window’s events, just extend a class from WindowAdapter and override only the methods you are interested in; for example, the method windowClosing():
class MyWindowEventProcessor extends java.awt.event.WindowsAdapter {
public void windowClosing(WindowEvent e) {
// your code that saves the data goes here.
}
}
The rest is easy: Register the class MyWindowEventProcessor as an event listener in your GUI class (for example, Calculator), as shown in Listing 9-8.
You can register multiple listeners by using adapters in Calculator. For example, to allow the user to enter a number by pressing numeric keys, create a class based on KeyAdapter, instantiate it, and register it with Calculator, too.
Listing 9-8: Registering an adapter-based listener
MyWindowEventProcessor myWindowListener = new MyWindowEventProcessor();
addWindowListener(myWindowListener);
You can achieve the same result using anonymous inner classes, as explained in the next section.
Inner Classes
A class declared inside another one is called an inner class. Listing 9-9 shows an example of the class TaxOptimizer declared inside the class Tax. The class TaxOptimizer is a member inner class and has access to all variables of the class Tax. Placing one class inside another is just a way of saying that the classes belong together. After compilation, the class Tax file produces two output files: Tax.class and Tax$TaxOptimizer.class.
Listing 9-9: Tax class including an inner Taxoptimizer class
class Tax{
double grossIncome;
int dependents;
double calcStateTax(){
TaxOptimizer tOpt = new TaxOptimizer();
return tOpt.optimize(grossIncome, dependents);
}
TaxOptimizer getTaxOptimizer(){
return new TaxOptimizer();
}
class TaxOptimizer{
int taxCode;
void setTaxCode(int tCode){
taxCode=tCode;
}
int optimize(double grossIncome, int dep){
// Some optimization code goes here
return 0;
}
}
}
An inner class defined as static can access only static variables of the outer class. The inner class can even be defined inside a method of an outer class. In this case this local inner class is available only when the outer method is called, and it can access only static variables of the top-level class.
The method getTaxOptimizer() in Listing 9-9 returns an instance of the inner class if external classes need it. For example, if the class TestTax needs to access the method setTaxCode() from the inner class, it could do so as follows:
Tax t = new Tax(2, "NY", 50000);
Tax.TaxOptimizer tOptimizer = t.getTaxOptimizer();
tOptimizer.setTaxCode(12345);
Here’s another syntax producing the same result:
Tax t = new Tax(2, "NY", 50000);
Tax.TaxOptimizer tOptimizer = t.new TaxOptimizer();
tOptimizer.setTaxCode(12345);
Anonymous Inner Classes
If an inner class does not have a name, it’s called anonymous. The use of anonymous inner classes is pretty easy to understand in examples of implementing Swing adapters. You’ve learned by now that using adapters is a three-step process: Extend the adapter class, instantiate it, and register it as an event listener (see Listing 9-8). With anonymous inner classes you can perform all three steps in one shot, as in Listing 9-10.
Listing 9-10: Using an anonymous class as adapter
this.addWindowListener(new WindowAdapter() {
public void windowClosing(WindowEvent e) {
System.exit(0);
}
}
);
Imagine that this code is placed in the Calculator class. The method addWindowListener() requires a subclass of WindowAdapter, and the section in bold in Listing 9-10 demonstrates the syntax of declaring an anonymous class that extends WindowAdapter and overrides the methodwindowClosing().
The new operator instantiates the adapter, and because this is done inside the parentheses of the method addWindowListener() the newly created object is used as its argument. This adapter’s implementation doesn’t have a name, and we don’t need to know its name in this context, do we? The instance of the adapter was created and registered as an event listener, and this is all that matters.
Lambda Expressions as an Alternative to Inner Classes
For many years anonymous inner classes were used as method (function) wrappers because Java did not allow a function to pass as an argument to a method. Java 8 introduced lambda expressions that in many cases eliminate the need to use anonymous inner classes. You read about lambda expressions in Lesson 13.
Try It
The goal of this lesson is to complete the code of the calculator. It has to look as in Figure 9-2 and implement the functionality of all the buttons.
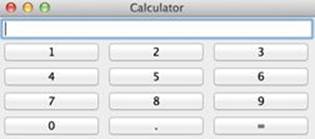
Figure 9-4: The Calculator GUI
Lesson Requirements
For this lesson you should have Java installed.
NOTE You can download the code and resources for this “Try It” from the book’s web page at www.wrox.com/go/javaprog24hr2e. You can find them in Lesson9.zip.
Step-by-Step
1. Create a new Eclipse project called Lesson9 and copy the Calculator from Listing 8-4).
2. Create all missing UI components — use Figure 9-4 as a prototype.
3. Create the event listener CalculatorEngine — all event processing and calculations should be performed there.
4. From Calculator, pass to the CalculatorEngine engine a reference to itself.
5. Register with CalculatorEngine all GUI components that can generate events.
6. Implement the code for the following scenario:
a. The user enters all the digits of the first number.
b. If the user hits one of the action buttons (+, -, /, or *), this indicates that the first number has been entered. Store this number and selected action in class variables (declare them first) and erase the number from the display text field. You need to convert the String value to double with the help of class Double.
c. The user enters the second number and clicks the = button.
d. Convert the String value from the text field into a numeric type double so it is able to store numbers with a decimal point. Perform the selected action using this value and the number stored in the numeric variable from Step b.
e. Display the result in the display field and store this value in the variable that was used in Step b, for future calculations.
f. Run the calculator. If it works, show it to your friends.
TIP Please select the videos for Lesson 9 online at www.wrox.com/go/javaprog24hr2e. You will also be able to download the code and resources for this lesson from the website.
All materials on the site are licensed Creative Commons Attribution-Sharealike 3.0 Unported CC BY-SA 3.0 & GNU Free Documentation License (GFDL)
If you are the copyright holder of any material contained on our site and intend to remove it, please contact our site administrator for approval.
© 2016-2026 All site design rights belong to S.Y.A.