Wrox Press Java Programming 24-Hour Trainer 2nd (2015)
Lesson 31. Introduction to Enterprise JavaBeans
This lesson introduces you to one of the Java EE technologies, Enterprise JavaBeans (JSR 345), which can be used for implementing the business tier in a distributed application (refer to Figure 25-1 in Lesson 25). Chapter 26 and Chapter 27 were about various ways of programming the presentation tier on the web; in Chapter 30 and Chapter 29 you learned how to organize communication between the different tiers of the application using messaging. The application business logic was programmed in POJOs.
In this lesson you see how to program the business tier in EJBs, which are also POJOs, but managed by an EJB container. Java EE 7 includes EJB 3.2 and the Java Persistence API (JPA) 2.1 that offer you a standardized way to implement solutions for business logic and data persistence. Using EJBs as JMS listeners makes your enterprise application more scalable without the need to write additional code.
This lesson introduces you to various types of EJBs, and the next lesson is about persisting data with JPA.
Who Needs EJB Containers?
What’s wrong with POJOs? Why not just implement business logic there? You certainly can, but most likely you’d need to spend additional time manually programming a multithreaded environment for them. The chances are that your application needs transactional support. If the business logic is located in POJO 1 and POJO 2, and the second one fails, you want to roll back whatever has been completed by the first one.
It’s great that you know how to program message receivers using JMS, but how can you make this solution scalable? What if you need a couple of dozen message listeners that concurrently dequeue the messages? Don’t forget about the tasks of integrating your POJOs with other tiers to perform authentication and JDBC operations.
EJB containers take care of all these infrastructure-related concerns without requiring manual programming on your side. Application servers allow you to configure pools of message-driven beans (MDBs) if you need multiple message listeners. You can turn on transactional support if need be. You don’t need to worry about multithreading problems if your beans operate in an EJB container. Turning a POJO into an EJB is as simple as adding Java annotations in the EJB classes. Intercommunication among beans is done via dependency injection or singleton beans.
If you need to scale a distributed application, EJB containers offer clustering and failover support. Security authorization is also the container’s responsibility. Without the need to manually code all these infrastructural functionalities, the code of your EJBs becomes really light.
The other interesting service offered by EJB containers is asynchronous method invocation, which enables asynchronous processing.
EJB supports embeddable containers. You can run EJB applications in a Java SE environment outside of any application servers. This is a good idea for tasks such as testing because there’s no need to depend on the readiness of a Java EE server; you can just test your EJBs locally. Creating an embeddable container comes down to executing one line of code:
EJBContainer myContainer = EJBContainer.createEJBContainer();
If the originally selected application server doesn’t deliver the performance or reliability you expected, deploy your EJBs in a different Java EE 7-compliant server without changing a line of code.
Types of EJBs
There are two major types of EJB: session beans and message-driven beans. MDBs specialize in retrieving messages from JMS queues or topics—this is all they can do. Your application business logic resides in the session beans. There are three types of session beans:
· A stateless session bean is one that contains business logic but doesn’t support state. In other words, it doesn’t “remember” any data specific to the client. If the same client invokes two methods in a row on the stateless bean FindBooks, the container may decide to use two separate instances of the FindBooks bean, as it doesn’t store any intermediate data specific to the client.
· A stateful session bean is one that contains business logic and state. The EJB container allocates a specific instance of the session bean to the client and can store results between subsequent method invocations.
· A singleton session bean is instantiated once per application. Think of a singleton bean as a global repository in which one bean can put some data to be used by another bean. Singleton session beans not only provide easy access to common data but also ensure that there are no race conditions in cases of concurrent access.
Older EJB specifications defined entity beans for data persistence. Formally they still exist in the current EJB specification, but they are pruned (made optional for implementation by the vendors of Java EE 7-compliant application servers).
An EJB container creates and maintains pools of session beans. The instances of the stateless beans are allocated to clients for much less time than stateful ones. Therefore, if you are working on a multiuser application with hundreds or thousands of concurrent requests to the EJB container, stateless beans offer a much more scalable solution because a smaller pool can serve more users’ requests.
But even with stateful session beans, the EJB container is playing smart, and those instances sitting in memory without active interaction with the client are being passivated—removed from memory and stored on the disk. When the client issues another request to a stateful bean that has been passivated, the container activates it again.
Stateless Session Beans
I’ll introduce you to stateless session beans by creating a simple example featuring an EJB that contains the business logic to return the message “Hello World.”
The Bean
Having a class that just returns “Hello World” and lives in a the container can be easily implemented as a stateless session bean: It has only one method, and there is no state to remember. Listing 31-1 shows you how to program such a bean.
Listing 31-1: HelloWorld session bean, take 1
@Stateless
public class HelloWorldBean {
public String sayHello(){
return "Hello World!";
}
}
Basically, you create a POJO and annotate it with one or more Java annotations. There are no special interfaces to be implemented to turn a POJO into an EJB. Accordingly there are @Stateful, @MessageDriven, and @Singleton annotations to mark other types of session beans.
The preceding version of HelloWorldBean doesn’t specify how the clients can access this so-called no interface view bean, which means that when a client gets a reference to the bean it can only be of the bean’s data type (HelloWorldBean in our case). You cannot declare a reference variable of an interface type because the bean doesn’t implement any. Classes that are deployed in the same archive file can access the method sayHello() using resource injection with the @EJB annotation:
@EJB HelloWorldBean myBean;
myBean.sayHello();
The Client’s View
The bean shown in Listing 31-1 runs on the server, but the client that invokes the sayHello() method can run either in the same Java Virtual Machine (JVM) (for example, a servlet or another bean) or in another one (for example, a standalone Java SE application or Java EE class deployed in another container). Beans may or may not implement interfaces. If HelloWorldBean will be used only by clients running in the same JVM, you can mark it with an optional @LocalBean annotation to show that it’s a no-interface bean. If HelloWorldBean in addition to a no-interface view can also be exposed to other clients, the @LocalBean has to explicitly annotate the bean.
If you’d like to expose only certain business methods to local clients, you can create a business interface, declare these methods there, have your bean implement them, and mark the bean with a @Local annotation. The @Local annotation can be used with either a business interface or with the session bean itself.
If you’d like to expose some methods to remote clients, create an interface, declare the business methods there, implement them in the bean, and mark it as @Remote.
Local No-Interface Beans
I am planning to use HelloWorldBean from the servlet running in the same JVM, so the final version of the code looks like Listing 31-2.
Listing 31-2: HelloWorld session bean, take 2
import javax.ejb.LocalBean;
import javax.ejb.Stateless;
@LocalBean
@Stateless
public class HelloWorldBean {
public String sayHello(){
// You can instantiate and use other POJOs
// here if need be
return "Hello World!";
}
}
Any EJB can use regular Java classes to implement business logic: For example, the sayHello() method can create instances of other Java classes with the new operator and invoke their business methods if need be. Or even better, you can instantiate POJOs using Context Dependency Injection (CDI), which is explained in Lesson 33.
Now it’s time to do it hands-on. Create a new Dynamic Web Project in Eclipse named Lesson31. Then create a new servlet class, HelloWorldServlet, in the package lesson31.client (select File → New → Servlet). You use only the doGet() method in this servlet. This servlet becomes your client, communicating with the EJB.
Next create a Java class called HelloWorldBean in the package lesson31.ejb by selecting File → New → Other → EJB → Session Bean (EJB 3.x). Do not select any local or remote business interfaces. By default, Eclipse generates a no-interface view bean and annotates it as @Stateless@LocalBean. Eclipse creates a class with a default constructor. Add to this class the method sayHello() shown earlier in Listing 31-2, and the EJB is ready for use.
The next step is to inject the HelloWorldBean into the servlet code with the @EJB annotation:
@EJB HelloWorldBean myBean;
Eclipse marks this line with a red error bullet. Right-click it and select Quick Fix to automatically insert two import statements: one for the @EJB annotation and the other for HelloWorldBean.
Using JNDI remains an alternative to injecting the bean into the client. Java EE supports portable JNDI names that don’t depend on the application server’s implementation. Instead of the @EJB annotation you could (but we won’t) use the following code:
Context ctx = new InitialContext();
HelloWorldBean myBean = (HelloWorldBean)
ctx.lookup("java:global/Lesson31/HelloWorldBean");
Now add the following two lines in the doGet() method of the servlet to make it invoke the method sayHello() on the EJB:
PrintWriter out = response.getWriter();
out.println(myBean.sayHello());
That’s all there is to it. The complete code of the servlet is shown in Listing 31-3.
Listing 31-3: Servlet client for HelloWorldBean
package lesson31.client;
import java.io.IOException;
import java.io.PrintWriter;
import javax.ejb.EJB;
import javax.servlet.ServletException;
import javax.servlet.annotation.WebServlet;
import javax.servlet.http.HttpServlet;
import javax.servlet.http.HttpServletRequest;
import javax.servlet.http.HttpServletResponse;
import lesson31.ejb.HelloWorldBean;
@WebServlet(urlPatterns = { "/HelloWorldServlet" })
public class HelloWorldServlet extends HttpServlet {
@EJB HelloWorldBean myBean;
protected void doGet(HttpServletRequest request,
HttpServletResponse response)
throws ServletException, IOException {
PrintWriter out = response.getWriter();
out.println(myBean.sayHello()); }
}
Deploy the project Lesson31 in GlassFish server (right-click the server name and use Add and Remove menu) and start the server. Right-click the servlet HelloWorldServlet and select Run As → Run on Server. The servlet calls the method on the EJB, and you see what’s shown in Figure 31-1in the Eclipse internal web browser.
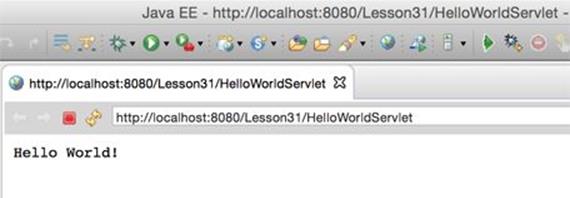
Figure 31-1: Running the servlet, an EJB client
You can copy the servlet’s URL in your web browser and the resulting web page will be the same.
Printing Hello World from an EJB may not look too impressive, but my goal was to illustrate how to move the application logic from servlet to the EJB.
Automatic Redeployments on the Server
While working on your project you might want to make sure that the server performs automatic redeployment of your application when the Java code changes. Just double-click the GlassFish server in the Servers view, which will open the Overview window describing the server. Expand the Publishing panel there and select the option Automatically Publish When Resources Change.
Local Beans
Now to expose a business method to local clients, you can declare the interface marked with the @Local annotation. In Eclipse create a new session bean named HelloWorldLocal, select the Local checkbox, and enter Authorizable as the name of the business interface, as shown in Figure 31-2.
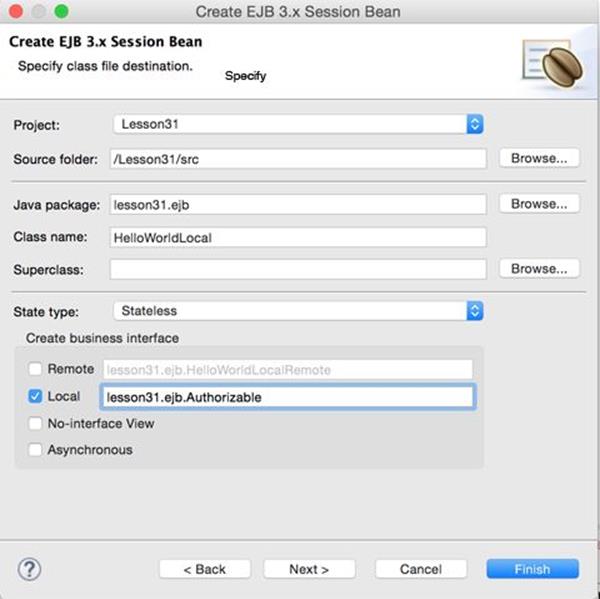
Figure 31-2: Creating an EJB with a business interface
Eclipse generates the interface Authorizable and the EJB class that should implement it.
After I’ve added the declaration of the method authorize(), this interface looks as follows:
package lesson31.ejb;
import javax.ejb.Local;
@Local
public interface Authorizable {
public String authorize();
}
Now you can implement the method authorize() and add sayHello() as before.
Listing 31-4: Local interface and bean
package lesson31.ejb;
import javax.ejb.Stateless;
@Stateless
public class HelloWorldLocal implements Authorizable {
public String authorize(){
return "The user is authorized!";
}
public String sayHello(){
return "Hello World!";
}
}
The difference between HelloWorldBean and HelloWorldLocal is that the former doesn’t implement any interfaces, but the latter does. Accordingly, the latter exposes a Authorizable view to the local clients.
Remote Beans
For clients that may access the bean remotely (for example, from a standalone Java program via a JNDI lookup), you can expose only the interface(s) that you want the remote client to see. Declare an interface marked with @Remote and have your bean class implement it.
An EJB can implement both remote and local interfaces, and you can expose different methods for remote and local clients, too. For example, the following bean HelloWorldLocalRemote exposes only the method sayHello() to the clients that run in a different JVM.
Listing 31-5: An EJB that implements local and remote interfaces
@Local public interface Authorizable {
public String authorize(); }
@Remote
public interface Greeting {
public String sayHello();
}
@Stateless
public class HelloWorldLocalRemote
implements Authorizable, Greeting {
public String authorize(){
return "The user is authorized!";
}
public String sayHello(){
return "Hello World!";
}
}
The clients find remote beans by performing JNDI lookups. Because the remote client runs in different JVMs, all arguments of the remote methods must be serializable.
Asynchronous Methods and Concurrency
There is one more feature in stateless beans that I’d like you to be aware of: asynchronous methods. Imagine that sayHello() is a long-running method performing some lengthy calculations, and you’d like to call it and continue with other operations without waiting for it to complete. In a Core Java application you would start a thread that would eventually return the Future object, as explained in Lesson 17.
Prior to Java EE 7, it was not safe to create and start threads from the Java EE container, which was taking care of all multithreading issues for you. So asynchronous methods were introduced to start a parallel process and free the EJB for handling other clients’ requests.
Just mark the bean’s method with the @Asynchronous annotation and have it return an object of type javax.ejb.AsyncResult, which is an implementation of the Future interface:
@Asynchronous
public Future<String> modelStockPrices(){
// Some lengthy calculations go here
//...
return new AsyncResult<String>("The best stock to buy is...");
}
The client would make a call to modelStockPrices() then execute some other code without waiting for modelStockPrices() to complete. At some point it would request Future by making a blocking call, get(), as in the following code snippet:
//Asynchronous call
Future<String> myFutureStockToBuy = myBean.modelStockPrices();
// Some other code that is executed immediately without
// waiting for modelStockPrices() to complete goes here
// Sometime later the client's code makes a blocking call and starts
// waiting for the result of modelStockPrices()
String stockRecommendations = myFutureStockToBuy.get();
You can also use asynchronous methods if a client needs to start more than one method on the EJB to run in parallel threads. The methods don’t even need to return values; say one is generating large PDF files and the other prepares shipments based on today’s orders. In this case you don’t even need to process returned values; just declare the methods as asynchronous and invoke them from the client (fire and forget). They start immediately and run in parallel. Such asynchronous methods need to return void instead of <Future>.
The Java EE 7 specification includes JSR 236 (Concurrency Utilities) that allows you to create threads from the application code. These threads are controlled by the Java EE container, so your application remains thread safe. In Java EE code, you can use javax.enterprise.concurrent.ManagedExecutorService, which is a peer of the Java SE ExecutorService. You can obtain the reference to the ManagedExecutorService using standard resource injection:
@Resource(lookup="java:comp/DefaultManagedExecutorService")
ManagedExecutorService myExecutor;
The JNDI lookup is supported as well. After obtaining the reference to the instance of ManagedExecutorService, you can execute a task—the class that implements either Runnable or Callable interface; for example:
myExecutor.execute(new Runnable(...));
Future future = meExecutor.submit(new Callable(...));
The rest of the thread processing is done similarly to the Executor Framework routines with the help of Concurrency Utilities for Java EE.
Stateful Session Beans
Although stateless session beans are given to the client just for the time one method execution takes, stateful beans are allocated to the client for longer. They have state; they remember the results of the execution of previous method(s). For example, you can use a stateful bean to implement shopping cart functionality, enabling the user to add more than one item to the cart while browsing the company’s catalog. When the client ends the session the stateful bean can be allocated to another client.
Suppose you have a stateful EJB called MyShoppingCart. The client’s application looks up this bean using JNDI (or gets it injected) and makes the first call to the method addItem(). Then the user continues browsing and adds another item to the shopping cart. Then the user decides to complete the purchase and calls the method placeOrder(). All these method invocations are done on the same instance of the stateful bean MyShoppingCart:
MyShoppingCart myCart = (MyShoppingCart)
ctx.lookup("java:global/OnlineStore/MyShoppingCart");
// The client is browsing the catalog and finds the first item
// to buy
// ...
myCart.addItem(myFirstItem);
// The client continue browsing the catalog and finds the second
// item to buy
...
myCart.addItem(mySecondItem);
// The client is ready to complete the purchase
// ...
myCart.placeOrder();
To complete the shopping process and release the stateful bean for other users, the program needs to call one of the bean’s MyShoppingCart methods marked with the @Remove annotation. In the preceding example the method placeOrder() should be marked with this annotation. You should also provide another @Remove method on the bean to allow the client to cancel the order and release the bean.
There is one more way to release a stateful bean—by using the @StatefulTimeout annotation, which enables you to specify how long a bean can stay allocated to the client without any activity. When this time expires the session times out and the bean is released.
Singleton Beans
Pretty often an application needs a place to keep data that are shared by all the beans. This is when a singleton bean comes in handy. Another use case for a singleton is to control access to some external resources. For example, if a limited number of connections are available to some external Web Service, you can create a singleton that implements throttling for EJBs that need these connections. A singleton bean can be used as global storage (or a cache) for the application; the state of this bean is shared among clients.
Only one singleton bean with any given name can exist per JVM per application. If you need several singletons in an application, give them different names. An EJB container doesn’t create pools of singleton beans. To create a singleton EJB just mark a POJO with the @Singleton annotation:
@Singleton
public class MyGlobalStorage {
...
}
When is the singleton bean created? It’s up to the EJB container to decide, unless you specifically want to request that this bean be created on application startup. This is called eager initialization, and there is a special annotation, @Startup, for it:
@Startup
@Singleton
public class MyGlobalStorage {
// a storage for objects to be shared
private Map<String, Object> = new HashMap<>();
addToStorage(String key, Object objToStore){...}
removeFromStorage(String key){...}
}
Let’s say that you’d like to create a program that at certain times sends some messages into a queue. Write a singleton bean, request that the EJB container instantiates it on application start-up, and start pushing the messages immediately after the singleton has been constructed. There is another handy annotation, @PostConstruct, that causes the container to invoke a method immediately after the bean’s constructor is finished:
@Startup
@Singleton
public class MyStockQuoteServer {
...
@PostConstruct
void sendPriceQuotes(){
// The code connecting to the stock prices feed and
// sending messages to a queue goes here
}
}
To get access to the business methods of a singleton, the client Java classes need to call the public static method getInstance() on the specific singleton, as shown in the following code snippet. If you’ll be implementing the singleton design pattern manually in Java SE you need to declare a private constructor and a public static getInstance() in the class:
MyGlobalStorage.getInstance()
.addToStorage("emplOfTheMonth", bestEmployee);
But in Java EE, the EJB container takes care of this. The EJB container allows concurrent access to singleton beans, and by default it applies the container-managed concurrency policy, sparing the developer worry about race conditions and such. You just need to use the @Lock annotation, specifying whether you want a resource to be locked during the read or write operation. If you prefer to write thread-synchronization code by yourself, switch to bean-managed concurrency. You set the type of concurrency using the @ConcurrencyManagement annotation, as shown here:
@Singleton
@ConcurrencyManagement(ConcurrencyManagementType.BEAN)
public class MyGlobalStorage {
...
}
Deploying EJB
Before deployment to any application server, EJBs are usually packaged into one archive file, which could be a jar; an Enterprise Archive (ear), which is a Java archive with an .ear file name extension; or a .war in case of web applications. Even a simple web application should be compressed and deployed as one file. If your client’s code is located in a web application it’s convenient to keep the EJB inside a .war file, too.
The right way to package the application in an archive file is to use a build automation system like Ant, Maven, or Gradle (see Lesson 36). But for training purposes you can create a .war file in Eclipse, too. Right-click the Deployment Descriptor section in the Eclipse project Lesson31 and select Export → WAR file. In a second you get the file Lesson31.war that contains both the servlet and the EJB.
This file can be deployed in any Java EE-compliant application server. This .war file is small: less than 4 KB! Java EE makes EJB components really lightweight. If you have multiple EJB classes, put them in one or more jars in the WEB-INF/lib directory.
If your client is not a small web application, or you want to keep EJBs deployed separately, you can package them inside a separate .jar or .ear file. The root directory that you’ll be using to create .ear files has to have all compiled Java classes and, if applicable, the optional ejb-jar.xml file. As a matter of fact, you can create an .ear file that contains not only your EJBs, but also the .war file.
The optional configuration file ejb-jar.xml allows you to specify metadata for the EJB, and if you need to change the metadata on a production system without recompiling the code, make the changes in ejb-jar.xml. They override the values specified via annotations. For standalone applications, this file is stored in the application server’s directory META-INF. If the EJBs are packaged with the web application inside the .war file, the ejb-jar.xml has to be located in the directory WEB-INF.
Java Archives - JARs
A typical Java application, library or framework consists of multiple classes, interfaces and configuration files. To simplify deployment and distribution, all these files are packaged into a small number of Java archives (JARs). Most of the third party libraries are distributed as JARs. Both JRE and Java SDK include dozens of JARs. In Eclipse you can see them by opening project properties.
Java comes with a jar utility that is used to archive multiple Java classes and other files into a file having the name extension .jar. Internal formats of .jar and .zip files are the same.
To create a jar that will contain all files with extension .class, open the Command or Terminal window, get into the folder where your classes are, and type the following command:
jar cvf myClasses.jar *.class
After the word jar you should specify the options for this command. In the last example c is for creating a new archive, v is for displaying what goes in there, and f means that the file name of the new archive is provided.
To unjar (extract) the files from the archive myClasses.jar, type the following command:
jar xvf myClasses.jar
All files will be extracted into the current directory. In this example the option x is for extracting files from the archive.
If you just want to see the content of the jar without extracting the files, use the next command where t is for the table of contents:
jar tvf myClasses.jar
If a JAR includes a manifest file that includes the Main-Class entry, you can run such a Java application from a command line without the need to unzip the JAR:
java -jar myApplication.jar
If your project needs to include a third-party library you should add its JAR(s) to the CLASSPATH environment variable. For example, in Lesson 21 we had to add the file derbyclient.jar that contained database drivers for Derby DB to the CLASSPATH. In Eclipse IDE you do this by adding external JARs to the Build Class Path of the project. For more information read Oracle’s tutorial "Packaging programs in JAR Files."
Message-Driven Beans
MDBs (message-driven beans) perform only one function: They retrieve messages from queues and topics via the JMS API. The clients never need to look them up or invoke their methods. The client just needs to drop a message in a queue or publish it to a topic, and the MDBs that were listening to the messages at these destinations get invoked automatically.
MDBs must implement the MessageListener interface. All configuration parameters can be specified in the parameters of the @MessageDriven annotation, as shown in the following example.
Listing 31-6: MDB MyMessageBean
@MessageDriven(mappedName="jms/testQueue", activationConfig = {
@ActivationConfigProperty(propertyName = "acknowledgeMode",
propertyValue = "Auto-acknowledge"),
@ActivationConfigProperty(propertyName = "destinationType",
propertyValue = "javax.jms.Queue")
})
public class MyMessageBean implements MessageListener {
MessageDrivenContext ctx;
// A no-argument constructor is required
public MyListener() {}
public void onMessage(Message message){
// The business logic is implemented here.
}
}
When a message appears in the queue named testQueue, the EJB container picks one of the MDBs from the pool and invokes its callback method onMessage(), passing the message from the queue as an argument. Unlike with the standalone message receivers described in Chapter 30, with MDBs the container gives you excellent freebies: distributed transaction processing, automatic pooling, co-location of receivers and other beans, and simple assignment of queues or topics to the receivers in deployment descriptors. In addition, you can easily configure the number of receivers by specifying the pool size in the deployment descriptor.
You can use any client to send a message in a queue. It can be a standalone client (as shown in how_to_send_a_message), a servlet, an EJB, and so on.
EJB and Transactions
Java EE specification includes Java Transaction API (JTA), which is a standard interface for demarcating transactions in EJB and web containers. Lesson 21 explains how to do transactional updates while working with relational databases. But a logical unit of work may include actions other than updating the database. For example, your application may need to update a database and send a message using JMS in one transaction. If any of these operation fails, the entire transaction should be rolled back.
More than one EJB can perform actions that should be considered a single transaction. The term transaction scope defines all participants of the transaction, which may be declared on the same or different EJBs. For example, one session bean can have a method saveOrder(), which implements the logic for saving order and calls a method notifySupplier()on another bean. If any of these methods fails, the entire transaction should be rolled back.
Say, a transaction started in the method saveOrder(), which called notifySupplier(). Should the code of the latter work as a part of the existing transaction or create a new one? Should a method simply ignore an existing transaction and its failure should not affect the transaction? There are other questions to answer, too.
JTA transactions in EJB containers can be of two types: container-managed and bean-managed. Container-managed transactions are managed by the EJB container, and you just specify transactional behavior in a declarative way by using the annotations @TransactionAttribute that instruct the EJB container when to consider a transaction successful. With a bean-managed transaction you’d need to invoke the methods begin(), commit(), and rollback()of the UserTransaction interface.
But using container-managed declarative transaction is a lot easier. The enum TransactionAttributeType declares a handful of transaction attributes:
· MANDATORY: This method must always be a part of the transaction of the invoking method. If the invoking method has no transaction, the exception EJBTransactionRequired is thrown.
· REQUIRED : This method must be invoked within a transaction scope. If the invoking method was not transactional, the container will create a new transaction.
· REQUIRES_NEW: Always start a new transaction for this method even if the invoking method has its own transaction
· SUPPORT: Execute the code of this method as a part of the transaction of the invoking method.
· NOT_SUPPORTED: Suspend the transaction of the invoking method until this method is complete. If the invoking method is not executed within a transaction, this method also won’t be transactional.
· NEVER: This method must never be a part of the transaction. If the invoking method has a transaction, the EJBException is thrown.
If the class is annotated with a transaction attribute, it applies to all methods from the class. You can override the class attribute on the method level. The next example shows a stateless bean that declares that container must create a new transaction for each method except method3(), which should never be executed inside a transaction:
@Stateless
@TransactionAttribute(TransactionAttributeType.REQUIRES_NEW)
class MySessionBean {
public void method1(){...}
public void method2(){...}
@TransactionAttribute(TransactionAttributeType.NEVER)
public void method3(){...}
}
Message-driven bean can use only NOT_SUPPORTED or REQUIRED transaction attributes.
Timer Service
Many enterprise applications require the use of schedulers to perform certain repetitive tasks at certain times. Cron is a widely used scheduler for UNIX-based applications. Windows also has a task scheduler (Control Panel → Scheduled Tasks). The open-source Quartz Scheduler is also popular among Java developers.
EJB supports the @Schedule annotation, which takes a calendar-based expression so you can schedule the execution of required functionality in your beans. For example, you can create expressions that invoke some business method every second, minute, hour, Monday, weekday, midnight, and so on.
The next code snippet shows how you can create a timer that invokes the method getPriceQuotes() every second during weekdays from 9:30 a.m. to 4:00 p.m.:
@Stateless
public class MyStockQuoteFeed {
@Schedule(second="*", minute="*", hour="9:30-16:00",
dayOfWeek="Mon-Fri")
public List getPriceQuotes(){
// The code to connect to price quote feed goes here
...
}
}
You can also create timers programmatically using the TimeService class and its methods createTimer(), createSingleActionTimer(), createIntervalTimer(), and createCalendarTimer().
In addition to using @Schedule and programmatic timers, you can configure timers in the deployment descriptor ejb-jar.xml.
Summary
Enterprise Java Beans technology is a powerful solution for creating a scalable, easy-to-develop and -deploy, and lightweight solution for enterprise applications. Even a small-scale applications can benefit from EJB. If your application doesn’t need all the features mandated by the EJB specification, consider using EJB Lite, which is a subset of the full specification.
It’s not possible to cover all the features offered by EJB containers in one short lesson. I’ve introduced you to the main EJB concepts, but if you’d like more in-depth coverage, read the EJB section in Oracle’s Java EE 7 tutorial.
Try It
NOTE You can download the code and resources for this “Try It” from the book’s web page at www.wrox.com/go/javaprog24hr2e. You can find them in Lesson31.zip.
The assignment for this lesson is to implement the StockServer class as an EJB and to use the timer to automatically generate and print stock price quotes every second. The new quotes should be sent to testQueue via the JMS API and consumed by a message-driven bean. Reuse the code of the sample stock server application of the StockServerImpl from Listing 24-2 to generate the price quotes.
Lesson Requirements
You should have Java and GlassFish installed.
Hint
If you want to push the stock prices to the end users, consider creating a JMS topic (for example, PriceQuotes) to which the method getQuote() publishes the latest prices. The Java client should subscribe to this topic to get the fresh quotes every second.
Step-by-Step
1. In Eclipse project Lesson31, create a new stateless session bean, StockServerBean, that includes the method getQuote(). The initial version of the bean may look as follows:
2. @Stateless
3. public class StockServerBean {
4. private String price=null;
5. private List<String> nasdaqSymbols = new ArrayList<>();
6. public StockServerBean(){
7. // Define some hard-coded NASDAQ symbols
8. nasdaqSymbols.add("AAPL");
9. nasdaqSymbols.add("MSFT");
10. nasdaqSymbols.add("YHOO");
11. nasdaqSymbols.add("AMZN");
12. }
13. public void getQuote(String symbol){
14. if(nasdaqSymbols.indexOf(symbol.toUpperCase()) != -1) {
15. // Generate a random price for valid symbols
16. price = (new Double(Math.random()*100)).toString();
17. }
18. System.out.println("The price of "+ symbol + " is " + price);
19. }
}
20.Use the @Schedule annotation to have the getQuote() method invoked every second.
21.Replace the println() statement in the method getQuote() with the code sending a text message with the generated price quote to the queue MyJMSTestQueue configured in Chapter 29.
22.Create an MDB called MyPriceConsumer to retrieve and print messages from the queue MyJMSTestQueue.
23.Deploy this application in GlassFish and test it.
TIP Please select the videos for Lesson 31 online at www.wrox.com/go/javaprog24hr2e. You will also be able to download the code and resources for this lesson from the website.
All materials on the site are licensed Creative Commons Attribution-Sharealike 3.0 Unported CC BY-SA 3.0 & GNU Free Documentation License (GFDL)
If you are the copyright holder of any material contained on our site and intend to remove it, please contact our site administrator for approval.
© 2016-2026 All site design rights belong to S.Y.A.