Wrox Press Java Programming 24-Hour Trainer 2nd (2015)
Lesson 33. Working with RESTful Web Services
In the 1990s the web became widely used, and newly created web applications were consumed by millions of people around the world. At the same time lots of legacy applications were available for use only within corporate walls. They were written in a variety of programming languages and deployed on many types of hardware. There was a need to expose corporate data to wider audiences, which resulted in the creation of the standard interface for consuming data over the web.
The difference between traditional JSP/Servlet/JSF web applications and Web Services is that the latter offer just the data and have no interest in what the client’s user interface (UI) looks like. For example, an insurance company could offer information about its products, or a mutual fund could expose its data as a Web Service returning XML documents. Clients didn’t need to know that this insurance company was running its applications using a server from Oracle or that the mutual fund was running on mainframe computers from IBM.
Java EE includes specification for two different implementations of Web Services—JAX-WS and JAX-RS, which I discuss next. Take another look at the sample architectural diagram in Lesson 25 and notice that I put these APIs in two places—one in the Presentation tier and another in the Data tier. Just think of Web Services as a mechanism to expose useful data that can be retrieved using HTTP requests.
Thousands of publicly available Web Services offer various APIs to get the data of some kind. You can find plenty of useful Web Services at the ProgrammableWeb directory. Enterprises use private Web Services for their internal needs, too.
The Soap Web Services
The first standard for publishing and consuming Web Services was the XML-based Simple Object Access Protocol (SOAP). Web clients would form HTTP requests and receive responses using the SOAP syntax.
The clients needed to know the directory of services available from this particular organization, the names of the offered operations (functions), and the address of the endpoint to connect to in order to consume this service.
The directory of services could be published with the XML-based Web Services Description Language (WSDL), which is pretty verbose. In the Java EE world, SOAP messages could be processed by means of JAX-WS API without the need for a directory of services.
Even though SOAP Web Services are verbose, they are still being used as a means of integration with the software produced by third parties. Some SOAP services are publicly available. For example, the web page www.webservicex.net offers descriptions and WSDL locations of such information and services as weather forecasts, U.S. address verification, currency converters, and stock quotes. You can integrate these into your application, but providing a user interface for them remains your responsibility.
The RESTful Web Services
REST stands for representational state of transfer. A Web Service built on REST principles is called a RESTful Web Service. As opposed to SOAP, REST is not a protocol, but a lighter-than-SOAP architectural style of building Web Services. Dr. Roy Fielding identified the REST principles in his PhD dissertation:
· Every resource on the web has a unique ID.
· Use uniform interface: HTTP Get, Post, Put, Delete, and so on.
· A resource can have multiple representations (text, JSON, XML, PDF, and so on).
· Requests are stateless; no client-specific information is stored between requests.
· You can link one resource to another.
· Resources should be cacheable.
· A REST application can be layered.
To put it simply, a resource is anything that you can access with a hyperlink. Each resource has a uniform resource identifier (URI). For example, www.dice.com/yakovsresume identifies a unique resource with Yakov’s résumé on the server dice.com. The résumé might be stored on the server as a file in a plain text format, or it may be located in the database and has to be retrieved by a JDBC query, but in any case it can be represented (served) in different formats like PDF, XML, or JSON.
REST resources have to support standard stateless HTTP requests. If with SOAP creators have to come up with arbitrary names of the supported operations (for example, getCityByZipCode), with REST you use the standard HTTP methods like Get, Post, Put, and Delete.
I’ve seen many web applications that used only the HTTP methods GET for reading the server-side content and POST for updating the content or hiding HTTP parameters inside the HTTP header, but REST is stricter about this. In the RESTful world you should use GET for retrieving the data, POST for creating new resources, PUT for updates, and DELETE for resource removal.
Each of the standard HTTP methods has certain characteristics:
· GET: Safe, idempotent, cacheable
· PUT: Idempotent
· DELETE : Idempotent
· POST : None of the above
Safe means that this method doesn’t modify the resource. Cacheable means that the client application can cache the result. Idempotent means that no matter how many times you call this method, the result will be the same. For example, if you update a person’s name from Smith to Johnson, no matter how many times you try to update this person’s resource with the name Johnson, the last name will still be Smith.
On the same note, no matter how many times you try to delete the resource with the unique ID, it results in removal of this resource only without harming any other data.
While the client communicates with the server both can send application data to each other in various formats. Let’s discuss the most popular format used in web applications: JSON.
Working with JSON-Formatted Data
JSON format is based on the syntax of the JavaScript object literals. All web browsers know how to parse JSON without the need to use any add-ons or plug-ins. Because the majority of today’s web applications use JavaScript on the client side, no wonder that JSON became a de facto standard way of data formatting on the web, replacing XML, which was popular in the 1990s.
Here’s an example of how an instance of the Stock entity can be represented in XML:
<stock>
<country>USA</country>
<currency>USD</currency>
<price>43.12</price>
<symbol>IBM</symbol>
</stock>
In JSON, the same resource would be represented like this:
"stock": {
"country": "USA",
"currency": "USD",
"price": 43.12,
"symbol": "IBM"
}
Comparing XML and JSON
The public community domain www.geonames.org enables you to search for geographical and statistical information about countries, cities, and so on. For the most part, this website uses RESTful Web Services. To compare how the same data is represented in XML and in JSON, visit this web page: www.geonames.org/export/ws-overview.html.
Development of so-called Single-Page Applications (SPA) is a trend in today’s HTML5 world. SPA refers to the applications that don’t refresh the entire web page but rather update the portions of it retrieving the fresh data by making AJAX requests. Google’s GMail client is a good example of SPA; when a new e-mail arrives, just one new line is added to a single web page that shows the content in the inbox. The server sends only the preformatted data, which the web client positions on the screen using HTML, JavaScript, and CSS. No HTML markup is generated by the server as it’s done by Java Servlets, JSP, or JSF.
REST or Websockets
Because RESTful Web Services send only the data (without HTML markup) in client-server communications, they are more efficient in terms of the network throughput compared to servlets, JSP, or JSF. But RESTful Web Services are based on HTTP protocol, which adds an overhead by attaching HTTP headers to the data sent by both the client and the server. If you need to substantially increase the data throughput, by removing these heavy headers consider using websockets, explained in Lesson 28. For real-time applications that need to push the server-side data to a web client, switching from REST to websockets substantially increases the number of messages sent per second. With websockets, the application responsiveness is also increased because there is no need to re-establish the HTTP connection for each request, and there is almost no overhead in the data payload.
SPA needs to use some data format between the client and the server. Because of JSON popularity, Java EE specification standardized its processing in JSR 353. Usually Java application servers implement the JSON processing specification in a separate jar, so you can use it with standalone Java SE applications, too. For example, GlassFish comes with a file, glassfish4/glassfish/modules/javax.json.jar, which you can add to any standalone application.
The package javax.json includes classes supporting two ways of producing JSON from Java:
· Object Model API: With this API your Java code should first create an object tree representing JSON data in memory, and then send it to an I/O stream.
· Streaming API: This is an event-driven API that dispatches events when the beginning or end of the JSON object is found, or when it finds a key or a value in the data load. The streaming API generates the output into a given stream (for example, a file or a network connection).
Although you can create a Java client application that parses or generates JSON, typically JSON is produced or consumed by JavaScript in web browsers. This lesson includes the examples of parsing JSON in server-side Java, assuming that the server receives or builds a JSON-formatted string. For complete coverage of JSON on both the client and the server, see JSON Processing Tutorial by Oracle.
Reading JSON with the Streaming API
The following code snippet shows how reading JSON-formatted data with the streaming API can be structured. The parser dispatches the appropriate event as it parses the JSON string, and you should write the code to process events you’re interested in:
JsonParser parser = Json.createParser(new StringReader(jsonData));
while (parser.hasNext()) {
JsonParser.Event event = parser.next();
switch(event) {
case START_ARRAY:
case END_ARRAY:
case START_OBJECT:
case END_OBJECT:
case VALUE_FALSE:
case VALUE_NULL:
case VALUE_TRUE:
System.out.println(event.toString());
break;
case KEY_NAME:
System.out.print(event.toString() + " " +
parser.getString() + " - ");
break;
case VALUE_STRING:
case VALUE_NUMBER:
System.out.println(event.toString() + " " +
parser.getInt());
break;
}
}
In this example, the code handles only the parser events: VALUE_TRUEa (a JSON element has a value of true), KEY_NAME (a name in a key/value pair is found), and VALUE_NUMBER (a numeric value is found.)
Writing JSON with the Streaming API
The following class—JavaToJSONStreaming—creates an instance of a Product class , turns it into a JSON-formatted string, and saves it in a file named product_from_stream.json:
public class JavaToJSONStreaming {
public static void main(String[] args) {
Product prd1 = new Product(777, "Gucci Handbag", 1000.00);
try (OutputStream fos =
new FileOutputStream("product_from_stream.json");
JsonGenerator jsonGenerator = Json.createGenerator(fos);) {
jsonGenerator.writeStartObject();
jsonGenerator.write("id", prd1.id);
jsonGenerator.write("description", prd1.description);
jsonGenerator.write("price", prd1.price);
// To create nested JSON objects enclose each of them
// into a pair of writeStartObject() and writeEnd()
jsonGenerator.writeEnd();
} catch (IOException ioe) {
ioe.printStackTrace();
}
}
}
The Json object creates a generator JsonGenerator that writes JSON data to an output source in a streaming way. In this example, the output source is a file represented by the variable fos.
I omitted the declaration of the Product class for brevity, but both classes Product and JavaToJSONStreaming come with the book’s code samples. If you run this program, it creates a file with the following content:
{"id":777,"description":"Gucci Handbag","price":1000.0}
Keep in mind that to make this program work as a standalone application you need to include the jar that implements the JSON Processing API (also known as JSON-P API) in the CLASSPATH of your application. If this program will run on the server side, each Java EE server already includes such a jar, and no modification of the CLASSPATH is needed.
Writing JSON with the Object Model API
As opposed to streaming, the Object Model API requires you to build the entire JSON object in memory, and only after to write the whole thing to the destination of your choice. To illustrate this, I re-write the class JavaToJSONStreaming from the previous section:
public class JavaToJSONObject {
public static void main(String[] args) {
Product prd1 = new Product(777, "Chanel Handbag", 1000.00);
try (OutputStream fos =
new FileOutputStream("product_from_object.json");
JsonWriter jsonWriter = Json.createWriter(fos);) {
JsonObjectBuilder prdBuilder = Json.createObjectBuilder();
prdBuilder.add("id", prd1.id)
.add("description", prd1.description)
.add("price", prd1.price);
JsonObject prdJsonObject = prdBuilder.build();
System.out.println("prdJsonObject: " + prdJsonObject);
jsonWriter.writeObject(prdJsonObject);
// Read and parse the newly created file back
JsonReader jsonReader =
Json.createReader(new FileReader("product_from_object.json"));
JsonObject jsonObject = jsonReader.readObject();
System.out.println(jsonObject);
} catch (IOException e) {
e.printStackTrace();
}
}
}
JsonObjectBuilder initializes the model and allows you to add key/value pairs to represent the JSON object. The class Json has methods to create the builder object, which includes a method build() to create a JSON-formatted string. The JsonWriter writes the JSON object to a file, and JsonReader reads and parses the newly created file. If you don’t need to write a JsonObject to a file you can convert it to a String by calling prdJsonObject.toString() . Then, for example, you can send this String to a web client.
The RESTful Stock Server
The Java EE specification includes the JAX-RS API for creating the server- and client-side programs for RESTful Web Services. All Java EE-compliant application servers implement JAX-RS. I’ll continue using the GlassFish server, which comes with the JAX-RS implementation known as Jersey, and you won’t need to download any additional libraries to run the sample code from this lesson. Let’s see how to implement RESTful Web Services by redesigning a familiar stock server example. The representation of the resources (in this case, stocks) can vary and is determined by media type.
Development of a RESTful application with JAX-RS is pretty straightforward:
1. Create a small Java class that extends javax.ws.rs.core.Application, which registers your application with a Java EE server.
2. Create and properly annotate a REST endpoint, which is a POJO.
3. Define a Java bean that will be converted into XML, JSON, or some other format for communicating with the client’s application.
4. Create any number of helper classes that implement application logic.
The following sections show you how this can be done.
Creating the Application
The same Java EE server may host multiple RESTful Web Services. To help the server with routing the client’s requests to the proper application, each application should be mapped to a specific URL pattern. In older versions of Java EE it could be done only by adding a configuration to the file called web.xml. This is not required any longer. Just create a class that extends javax.ws.rs.core.Application, and mark it with an @ApplicationPath annotation containing a URL fragment identifying your application. This is how your application class StockQuoteApplication will look:
package lesson33;
import javax.ws.rs.ApplicationPath;
import javax.ws.rs.core.Application;
@ApplicationPath("resources")
public class StockQuoteApplication extends Application {
}
This is all that the Java EE server needs to redirect to your application all requests containing the pattern resources in the URL. This is how the routing begins, but any application can have multiple endpoints. To identify the right one you need to use the @Path annotation, which you see in the section "Creating the Endpoint StockService.”
Creating the Java Bean Stock
The client and the RESTful server needs to agree on the data format for communications—for example, JSON, XML, and so on. Although JAX-RS is a specification for implementing Java-based RESTful Web Services, JAXB is a specification for converting data to/from XML format. For example, annotating a Java bean with @XmlRootElement can bring into action the JAXB framework for processing XML, which turns a Java bean into an XML or JSON document before sending it to the web client that has no knowledge of the Java object format. Listing 33-1 shows a Java bean called Stock annotated with @XmlRootElement.
Listing 33-1: A Java bean Stock
import javax.xml.bind.annotation.XmlRootElement;
@XmlRootElement
public class Stock {
private String symbol;
private Double price;
private String currency;
private String country;
public Stock() {
}
public Stock(String symbol,Double price, String currency,
String country) {
this.symbol = symbol;
this.price = price;
this.currency = currency;
this.country = country;
}
public String getSymbol() {
return symbol;
}
public void setSymbol(String symbol) {
this.symbol = symbol;
}
public Double getPrice() {
return price;
}
public void setPrice(Double price) {
this.price = price;
}
public String getCurrency() {
return currency;
}
public void setCurrency(String currency) {
this.currency = currency;
}
public String getCountry() {
return country;
}
public void setCountry(String country) {
this.country = country;
}
}
The server-side Java code can retrieve the data about a particular stock and create an instance of the Stock class, which has to be converted into the requested data format and sent to the web client. In the JSON section of this lesson I give examples of how a Java class can be converted into a JSON string.
Creating the Endpoint StockService
The endpoint class is an entry door to a particular Web Service. Its role is to find and invoke the Java method with a signature that matches the client’s request. For example, if the endpoint received an HTTP GET request with one parameter, the endpoint class should have a method that takes one argument and is marked with an @GET annotation.
You need to mark an endpoint class with an @Path annotation, so the server redirects only specific client requests to this class. You also need to annotate the methods of this class to specify which method should be handling GET requests, which - PUT, et al.
Here is a list of the most popular annotations that are used with REST endpoints:
· @Path: A root resource class (POJO). This annotation specifies the URL pattern that this class handles. The endpoint class has at least one method annotated with @Path.
· @GET: The class method that should handle HTTP GET requests. You can have multiple methods annotated with @GET, and each can produce the result in a different MIME type.
· @POST: The class method that handles HTTP Post requests.
· @PUT: The class method that handles HTTP Put requests.
· @DELETE: The class method that handles HTTP Delete requests.
· @Produces: Specifies the MIME type(s) for response; for example,"application/json".
· @Consumes: Specifies the MIME type(s) that a resource can consume when sent by the client.
· @PathParam: Injects the URI fragment into a method parameter (for example, IBM).
· @QueryParam: Injects the parameter from the URL into a method parameter (or example, stock=IBM). It is used with HTTP GET requests.
· @FormParam: Injects the value from an input field of an HTML form into the provided Java variable or a method argument.
The following class StockService is an example of a RESTful endpoint that may return the stock that’s identified by the URI like http://localhost:8080/Lesson33/resources/stock/IBM. The class StockService is sprinkled with annotations. First comes the annotation @Path, which can be used with either a class or a method. JAX-RS maps clients’ requests to class methods. If more than one annotation @Path are used in a class, their values are going to be compared with the URL fragments for finding the matching method.
Listing 33-2: REST endpoint StockService
@Path("/stock")
public class StockService {
@Produces({"application/xml","application/json"})
@Path("{symbol}")
@GET
public Stock getStock(@PathParam("symbol") String symbol) {
Stock stock = StockServiceHelper.getStock(symbol);
if (stock == null) {
return new Stock("NOT FOUND", 0.0, "--", "--");
}
return stock;
}
@POST
@Consumes("application/x-www-form-urlencoded")
public Response addStock(
@FormParam("symbol") String symbol,
@FormParam("currency") String currency,
@FormParam("price") String price,
@FormParam("country") String country) {
if (StockServiceHelper.getStock(symbol) != null)
return Response.status(Response.Status.BAD_REQUEST)
.entity("Stock " + symbol + " already exists")
.type("text/plain").build();
double priceToUse;
try {
priceToUse = new Double(price);
}
catch (NumberFormatException e) {
priceToUse = 0.0;
}
StockServiceHelper.addStock(new Stock(symbol, priceToUse,
currency, country));
return Response.ok().build();
}
}
One of the methods in StockService is marked with an @GET annotation and the other one with @POST. One of these methods is automatically invoked to process the corresponding HTTP requests.
Let’s see how our Java EE server routes the HTTP GET request to get the resource—the data about the IBM’s stock—represented by the following URI:
http://localhost:8080/Lesson33/resources/stock/IBM. First, the Java EE server parses the URI and tries to find the Java class that matches the value from the @ApplicationPath, which is resources in our case (see the section Creating the Application). Then the RESTFul server looks for the class annotated with @Path("/stock") and routes this request to the class StockService.
Because the URI doesn’t end with /stock, the matching process continues. Our URI has a stock symbol after the word stock, (/IBM), and the method-level annotation @Path("{symbol}") helps the server to find (and invoke) the matching method: getStock().
The annotation @PathParam("symbol") indicates that the server should inject the value of the stock symbol included in the URI into the symb argument of the method getStock(). Figure 33-1 shows the annotations that were involved in the parsing process of our URI.
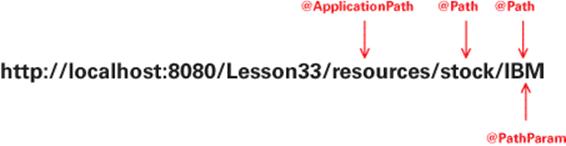
Figure 33-1: Parsing the URI with annotations
The MIME type specified in the annotation @Produces means that the method getStock() can produce the data either in XML or in JSON format. Software developers responsible for creating the client part need to make sure that the header of the client’s HTTP request includes the required MIME format in its Accept header. If no methods that produce the content in the requested MIME type are found, the client gets the HTTP error 406, which you see in action in the “Try It” section. One HTTP client may request the stock data in JSON and another requests it in the XML format, but both of them are served by the same method getStock().
The addStock() method is marked with the @Consumes annotation to consume the HTML form’s data sent by the client. The method addStock() is called when the HTTP POST request is received. If the REST endpoint is unable to consume the requested MIME type, the client gets HTTP error 415.
The @FormParam annotation injects the values entered in the HTML form into the method addStock(). If the web client wouldn’t be using an HTML form but was sending an HTTP GET request with parameters, you’d have to use the annotation @QueryParam instead of @FormParam.
The stock MSFT is considered another resource and can be represented by the URI http://localhost:8080/Lesson33/resources/stock/MSFT. So your StockService endpoint can provide the data about different stocks as long as you know their URIs.
The class StockService uses the helper class StockServiceHelper, shown in stockservicehelper_class. For simplicity, this class has two hard-coded stocks, but in the real world it would be connected to one of the financial data feeds. This class uses static initializer, which calls the method generateStocks() on the first reference to StockService.
Listing 33-3: StockServiceHelper class
public class StockServiceHelper {
public static void addStock(Stock stock) {
stocks.put(stock.getSymbol(), stock);
}
public static void removeStock(String symbol) {
stocks.remove(symbol);
}
public static Stock getStock(String symbol) {
return stocks.get(symbol);
}
private static Map<String, Stock> stocks = new HashMap<>();
static {
generateStocks();
}
private static void generateStocks() {
addStock(new Stock("IBM", 43.12, "USD", "USA"));
addStock(new Stock("AAPL", 120.0, "USD", "USA"));
}
}
Creating RESTFful Clients
A client application that communicates with the server-side endpoint can be written in any programming language that supports HTTP requests. Typically, the REST clients are HTML applications that use JavaScript functions that issue such requests. Because this book is about Java programming, I do not cover how to do this in the JavaScript, but in the “Try It” section, I show you how to use a tool called Postman that can be used to test RESTful services from the Chrome web browser.
Because RESTful applications can be layered, the following sample scenario is possible: An HTML client requests a resource implemented in Java, which in turn becomes a client for another resource implemented on another, say, .NET server. This is perfectly legal because both technologies support JSON as a data exchange format.
If you need to write RESTful clients in Java, use the JSON API discussed earlier in the section "Working with JSON-Formatted Data.”
Contexts and Dependency Injection
When your Java code runs in a Java EE container, it may need to use instances of some objects. Lesson 29 familiarized you with injecting JNDI resources, but you can inject instances of your application objects as well. The Java EE specification includes JSR 346, which defines Contexts and Dependency Injection (CDI).
For example, the StockService class might have needed a modeling engine that would apply some technical analysis algorithms to give recommendations on buying or selling a stock. As an example, you can write a class TechAnalysisEngine that implements the Recommendations interface, and with CDI you don’t need to create an instance of this class yourself; you could ask the container to inject the instance of this class into your code using the CDI annotation @Inject, which could be placed before the field, constructor, or a method. The following example injects the method argument:
@Path("/stock")
public class StockService {
Recommendations theEngine;
@Inject
public void setRecommendationsEngine(Recommendations theEngine){
this.theEngine = theEngine;
}
@Produces({"application/xml","application/json"})
@Path("{symbol}")
@GET public Stock getStock(@PathParam("symbol") String symbol) {
Stock stock = StockServiceHelper.getStock(symbol);
String tradeRecommendations =
theEngine.getRecommendations(stock);
}
...
}
CDI bean is a POJO that can be managed by Java EE container. If you are planning to use CDI, you need to add an empty file bean.xml, which signals the Java EE container to discover CDI beans in the application. To continue the example with the technical analysis engine, you could define it as follows:
public interface Recommendations {
public String getRecommendations (Stock stock);
}
Accordingly the CDI bean could be declared like this:
public class TechAnalysisEngine implements Recommendations{
public TechAnalysisEngine(){
}
public String getRecommendations(Stock stock){
String recommendations;
// Implement the technical analysis logic here
return recommendations;
}
}
A Use Case for a Singleton
You don’t want Java EE container to create multiple instances of the class TechAnalysisEngine. The same instance can serve multiple client requests. Just annotate the class TechAnalysisEngine as @Singleton, and CDI injects it only once. To ensure that you use CDI, import the javax.inject.Singleton implementation of the annotation @Singleton, which is not the same as creating a singleton EJB implemented in javax.ejb.Singleton.
But what if more than one class implements the Recommendation interface? How will the container know which implementation to inject? To avoid ambiguity you should use custom qualifier annotations. For example, you can declare an annotation @Fundamental like this:
@Qualifier
@Retention(RUNTIME)
@Target({TYPE, METHOD, FIELD, PARAMETER})
public @interface Fundamental {}
Now you can annotate with @Fundamental another class that also implements the Recommendations interface:
@Fundamental
public class FundamentalAnalysisEngine implements Recommendations{
public FundamentalAnalysisEngine(){
}
public String getRecommendations(Stock stock){
String recommendations;
// Implement the fundamental analysis logic here
return recommendations;
}
}
The line that injects the instance of the FundamentalAnalysisEngine class into StockService looks like this:
@Inject @Fundamental
public void setRecommendationsEngine(Recommendations theEngine) {
...
}
The ambiguity is resolved!
Because you are not creating the instances of the objects manually, you need to have a way to specify how long the injected instance will live. This is done using CDI scope annotations: @RequestScoped, @SessionScoped, @ApplicationScoped, @Dependent, and @ConversationScoped. You can find more details about these annotations in the CDI chapter of the Java EE Tutorial.
Java EE Samples
This lesson concludes the coverage of selected Java EE 7 technologies. Refer to the GitHub repository https://github.com/javaee-samples/javaee7-samples that contains lots of Java EE 7 code samples that illustrate the usage of all Java EE 7 JSRs.
Try It
Your assignment is to make the code related to the stock quote examples work. You need to create an Eclipse project and copy the code samples from the book’s web page at working_with_restful_web_services there. Then you need to deploy this project in GlassFish and run it.
Lesson Requirements
You should have Java and GlassFish v4 server installed.
Note
You can download the code and resources for this “Try It” from the book’s web page at www.wrox.com/go/javaprog24hr2e. You can find them in the working_with_restful_web_services folder in the download.
Hints
Eclipse IDE for Java EE Developers has a template for the creation of REST resources. After the Eclipse project is created, right-click the project name, select New, and then select RESTful Web Service from Pattern (Java EE 7). Eclipse creates for you an annotated class similar to the one from rest_resource_stockresource, which you can edit to meet your application’s requirements.
Step-by-Step
1. Create a dynamic web project called Lesson33 in the Java EE perspective of Eclipse.
2. Download the source files for Lesson 33 from the working_with_restful_web_services folder.
3. Create packages called lesson33 and lesson33.service.
4. Copy the class StockQuoteApplication to the folder lesson33.
5. Copy the classes Stock, StockService, and StockServiceHelper from the downloaded code samples into thе folder lesson33/service.
6. Deploy the project Lesson33 under GlassFish. Right-click the server name, select Add and Remove, and in the pop-up window move the entry Lesson33 from the left box to the right one by clicking Add. Then click Finish. The RESTFul service is deployed on the server.
7. For the client, use Google Chrome Web browser with the Postman REST Client add-on. Open Chrome browser and launch the Postman from http://bit.ly/18JpMha.
8. In the URL field on top enter the following URL: http://localhost:8080/Lesson33/resources/IBM.
9. Click the Send button, and your RESTful service responds with the JSON-formatted data. Your Postman window should look similar to Figure 33-2. 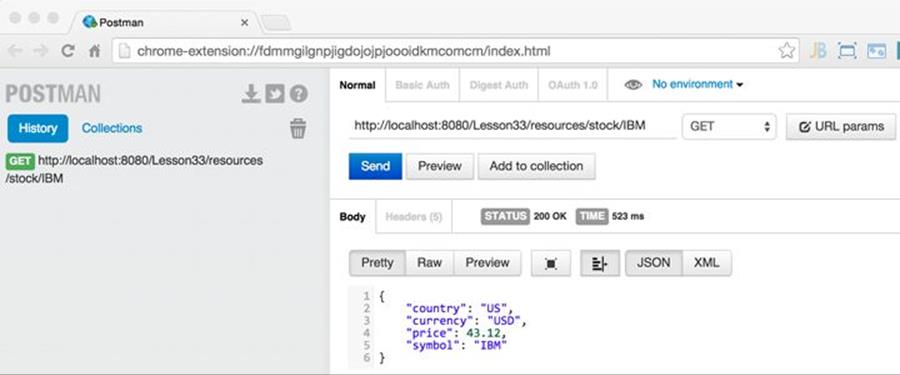
Figure 33-2: Getting the stock/IBM resource using Postman REST Client
The GlassFish Server found the REST endpoint StockService and invoked the method getResource("IBM") on it.
10.Remove IBM from the URL, so it looks like this: http://localhost:8080/Lesson33/resources. Press Send, and you get the error 405 because the endpoint StockService from rest_resource_stockresource has no @GET annotated methods that don’t require arguments.
11.To test the Add New Stock functionality, select POST in the method drop-down menu, select the x-www-form-urlencoded tab, click the URL Params button, and fill out the parameters required by the method addStock() of StockService from rest_resource_stockresource. After you click the Send button, your Postman window should look like Figure 33-3.
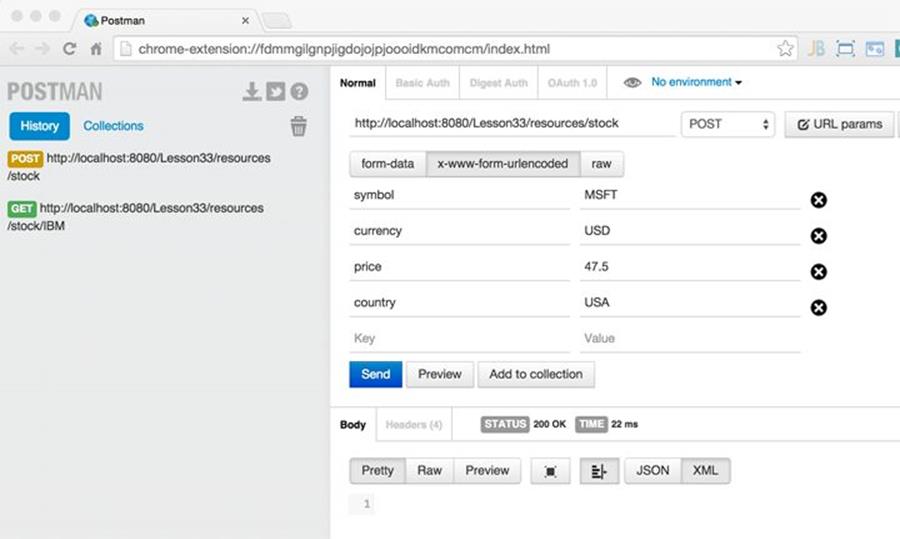
Figure 33-3: Added new stock using the POST request
The RESTful endpoint properly matched the @POST annotated method addStock() with four arguments. To ensure that the information about MSFT has been added on the server side, issue a GET request: http://localhost:8080/Lesson33/resources/MSFT.
TIP Please select the videos for Lesson 33 online at www.wrox.com/go/javaprog24hr2e. You will also be able to download the code and resources for this lesson from the website.
All materials on the site are licensed Creative Commons Attribution-Sharealike 3.0 Unported CC BY-SA 3.0 & GNU Free Documentation License (GFDL)
If you are the copyright holder of any material contained on our site and intend to remove it, please contact our site administrator for approval.
© 2016-2026 All site design rights belong to S.Y.A.