Wrox Press Java Programming 24-Hour Trainer 2nd (2015)
Lesson 35. Introduction to Unit Testing with JUnit Framework
Software developers are not perfect, and bugs happen. Even if your program has no bugs, you may have used someone else’s code, which does have bugs. Moreover, code modification in one class or interface can break previously working code in another; this is called regression. Thorough testing is an important phase of any software development project.
Every developer knows how to test his or her code manually, and they do it. Periodically. But manual testing is a pretty boring routine. Would you want to start each day with manual testing to see if creating, updating, and deleting a sample purchase order still works? Neither do I. Testing should be automated.
The sooner your project team implements automated testing routines, the shorter the development cycle will be. The concept of test-driven development (TDD) suggests that testing should be embedded in the software development process from the very start of any new project.
There are different types of testing routines that have different goals. Here’s a description of the main types of testing (see more at the Wikipedia article Software Testing) :
· Unit testing is performed by a software developer and is targeted at small pieces of code. For example, if you invoke a method calcTax() with particular arguments, it should return the expected result. Java classes performing application-specific unit tests are written by software developers. Sometimes unit testing is called white-box testing because a developer is familiar with the code being tested.
· Integration testing is a process when several unit tests are combined to ensure that different pieces of code work properly with each other. In other words, the goal here is to test interfaces between different software components. If John wrote the method calcTax(), which uses the method getTaxBrackets() that Mary wrote, there is a chance that Mary decided to change this method’s signature without notifying John about the change.
· If John and Mary work with the same source code, the Java compiler may catch this error. But what if Mary packages compiled code in a JAR that John adds to the runtime CLASSPATH variable? The application would break. Integration tests ensure that all pieces of software work well together. Integration tests are written by software developers.
· QA testing is not performed by software developers; instead specially trained IT people use the application written by software developers and identify issues in the functionality—for example, a Place Order button in the graphical user interface (GUI) allows the user to place an order even though the user hasn’t entered the shipping address.
· In some scenarios, QA engineers test the software manually, but in many cases they use test-automation software (such as Selenium or QuickTest Pro). They write scripts for different use cases using scripting languages. All errors are reported in an issue-tracking system (such asRedmine or JIRA) and are assigned to software developers for providing code fixes.
· User-acceptance testing is performed by end users. It is often referred as black-box testing because the users don’t know how the software was constructed. Although QA engineers can catch a large number of usability issues, they’re not experts in the business domain for which the software was written. For example, an application for insurance agents should check that the agent is licensed for business in certain states and her license is not expired. These kind of errors can be caught by the business users.
· Stress or load testing must ensure that the application remains operational if a large number of users decide to use the application simultaneously. Load-testing tools (such as Apache JMeter or NeoLoad) make it possible to set up several computers that emulate a large number of users working with your application. How good is an application that works fine for 10 users but becomes unresponsive if the number of users increases to 100?
Ideally, there should be a written document called Service Level Agreement (SLA) that defines the number of concurrent users and acceptable response time for the software being developed. A savvy project manager signs an SLA with the users before the software development begins. If a user starts complaining about a 10-second wait, you should check the SLA and either improve the response or reject the user’s request.
This lesson covers just the unit testing procedures as they apply to the software developed in Java. JUnit is the most popular tool for testing Java framework.
Introduction to JUnit
JUnit is a an open source unit testing framework available for download at http://junit.org. Before you start writing test classes, you should get familiar with the JUnit terminology:
· Assertions compare expected and received results.
· Test setup is a process of preparing the test data before running the test.
· Test teardown means getting rid of the test data after it runs.
· Test suite is a group of test classes that run together.
· Exceptions testing checks that an exception is thrown where it should be or is not thrown where it shouldn’t.
· Test runner is a utility that can run tests.
· Rules allow to add functionality that applies to all tests within a test class, but in a more generic way.
· Theories allow to combine assertions to state the test assumptions more clearly.
· Assumptions selectively ignore certain tests based on some criteria.
· Parameters allow you to prepare a set of data and pass it to a test as parameter.
A class that unit-tests the application’s code is a Plain Old Java Object (POJO) that includes methods marked with the @Test annotation. Each method represents a test case.
To run a unit test you need the following:
· A test Java class
· System Under Test (SUT), which is a class method
· A test runner
Installing JUnit
JUnit is so popular that all major integraged development environments (IDEs) include the JUnit library, so you don’t even need to download it unless you want to use a newer JUnit version. In Eclipse, you simply add the JUnit library to the Project Build Path. You can run JUnit tests right from Eclipse or from a command line using test runners.
If you’re not using an IDE or prefer running tests from a command line, you need to download JUnit; no installation is required. JUnit is packaged in two JAR files junit.jar and hamcrest-core.jar, and you need to add them to the CLASSPATH of your application. You can download these JARs from the Maven Central repository. Search for these files by names and click the jar link to download. Lesson 36 shows you how to automate downloading required JARs from Maven Central using build tools.
Changing the Default Directory Structure in Eclipse
Popular build tools like Maven and Gradle recommend the following standard directory structure for Java sources:
src
main
java
test
java
The source code of the application classes should originate from src/main/java, and the test classes originate from src/test/java. But Eclipse originates all Java sources from the directory src, and it doesn’t force you to write test classes. If you create a new Eclipse project, change the directory structure up front to be prepared for automating the build process in the future.
Create a new Eclipse Java project called Lesson35 and change its default directory structure. Open the project properties and select the Java Build Path option. Open the Source tab and remove the src folder from the Source Folders on the Build Path field. After that add the folderssrc/main/java and src/test/java. This is it. Your project directory structure should look like Figure 35-1.
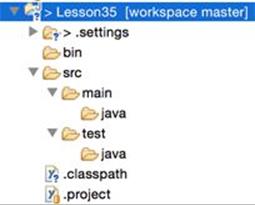
Figure 35-1: New Eclipse project with modified directory structure
Now your test classes are separated from your application source code.
Your First JUnit Test Case
Following standard naming conventions you name the test class the same as the class under test but with the additional suffix Test. For example, if you are planning to unit test the class Tax, the name of the test class should be TaxTest. Start with creating a new package tax in the directorysrc/main/java. Then create a new interface Taxable and the class Tax there. The interface Taxable has the following content:
package tax;
interface Taxable {
double calcTax(double grossIncome, int dependents)
throws IllegalArgumentException;
double applyStudentDeduction(double taxAmount, int numOfStudents);
}
The class Tax implements Taxable as follows:
package tax;
class Tax implements Taxable {
final static double STUDENT_DEDUCTION = 300.00;
public double calcTax(double grossIncome, int dependents)
throws IllegalArgumentException{
if (grossIncome <0 ){
throw new IllegalArgumentException(
"Gross income can't be negative");
}
return (grossIncome*0.33 - dependents*100);
}
public double applyStudentDeduction(double taxAmount,
int numOfStudents){
return taxAmount - STUDENT_DEDUCTION*numOfStudents;
}
}
Why Using an Interface?
You may ask, “Why do I even need to create a separate interface for such a simple class?” Designing to interfaces is a good idea in general, as it clearly declares the application programming interface (API) and allows changing implementation without the need to change classes that use this API. From the testing perspective, interfaces clearly expose the methods that should be unit tested.
Now create a package tax inside src/test/java. Select this package and ask Eclipse to generate a test class by selecting the menu File → New → JUnit Test Case.
Eclipse displays a window where you enter the class name as TaxTest and the name of the class under test as tax.Tax. (See Figure 35-2.)
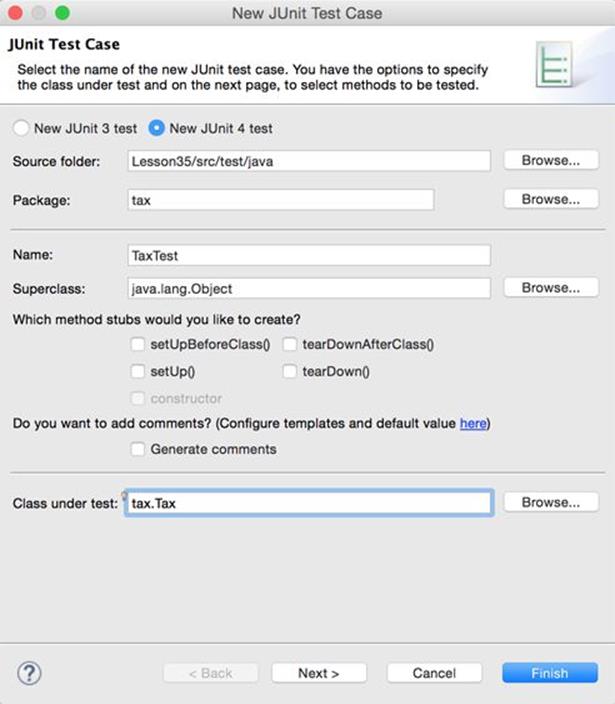
Figure 35-2: Creating a new JUnit Test Case in Eclipse
Click the Next button, and you can select the methods from the class Tax that you want to test, such as calcTax(). Then Eclipse displays a pop-up message asking if JUnit 4 should be added to the build path of the project. Agree to this and you see a newly generated class that looks like the following:
package tax;
import static org.junit.Assert.*;
import org.junit.Test;
public class TaxTest {
@Test
public void testCalcTax() {
fail("Not yet implemented");
}
}
Now run this test. Right-click the TaxTest class name and select Run As → Unit Test.
Eclipse starts its default JUnit test runner, which displays a red bar and a test failure message producing the AssertionError with a message “Not yet implemented,” as shown in Figure 35-3.
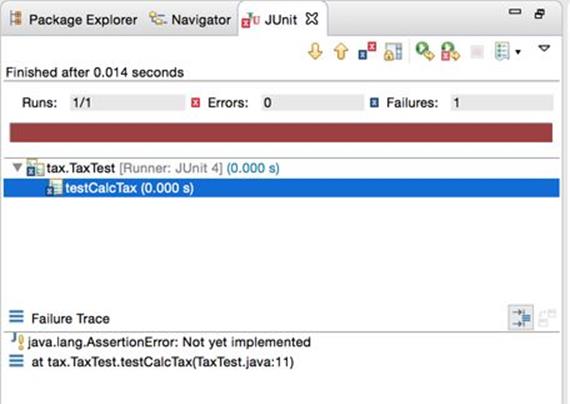
Figure 35-3: The first test failed: Not yet implemented
The test runner found one method annotated with @Test and ran it. The invocation of JUnit’s method fail() reported an error with the message “Not yet implemented." If you comment out the fail() method and rerun the test, it passes and you see a green bar. Before learning how to write the real tests, the next section familiarizes you with JUnit annotations.
JUnit Annotations
JUnit comes with a handful of annotations that you need to use in your test classes. The test runner reads these runtime annotations and performs the testing according to your code. Here’s the list of selected JUnit annotations:
· @Test annotation declares that a public void method is a unit test.
· @Before is used with a method to write some code to be executed before each test.
· @After is used with a amethod to be executed after each test.
· @BeforeClass is used with a method to be executed before the very first test starts.
· @AfterClass is used with a method to be executed after the very last test is complete.
· @Ignore disables a test (the test runner skips such a method).
You can use the @Test annotation with optional parameters expected and timeout. For example, the annotation @Test(expected=Exception.class) fails the test if the specified exception is not thrown. The annotation @Test(timeout=1000) fails the test if it runs longer than 1000 milliseconds.
Applying Annotations for Testing Tax
It’s time to see the @Test annotation in action. You’re going to write a test to ensure that if you assign zero values to the arguments grossIncome and dependents, the method calcTax() returns a zero tax. For that you use the static method assertEquals() from the class org.junit.Assert. Names of the test methods should be descriptive; call it testZeroTax(). The new version of your class TaxTest is shown next:
package tax;
import static org.junit.Assert.*;
import org.junit.Test;
public class TaxTest {
@Test
public void testZeroTax() {
Tax tax = new Tax();
assertEquals("Tax on zero income is not zero",
0, tax.calcTax(0, 0), 0 );
}
}
The class Assert has several overloaded versions of the method assertEquals() , which checks whether the expected value is equal to the actual. I used the method with the following four arguments:
· The message to display if the test fails
· The expected value
· The method to invoke on the test subject
· The maximum difference (delta) between expected and actual, for which both numbers are still considered equal
Executing this test with the test runner returns success. Change the expected value or delta while invoking assertEquals() in the preceding example, and the test fails. JUnit has many flavors of the assert() method, for example, assertTrue() that check that the boolean value is true and assert NotNull() checks that the value is not null. The names of these methods are self-explanatory and are pretty easy to understand.
Static imports
In the class TestTax, I use the import static keywords to import the class Assert. This allows me to use the static method assertEquals() without specifying the name of the class where it was declared. With a regular import statement I should have written Assert.assertEquals(). In general static imports should be used rarely, as the code is more difficult to understand.
In a small program such as TaxTest, you remember that the method assertEquals() was declared in JUnit, but in larger classes with lots of import statements static imports would make it less obvious where a method without the class qualification was declared.
Add one more test to see if the tax deduction is properly applied for a household with one student. The classTax has a method applyStudentDeduction() that should deduct $300 per student. The method testOneStudentTaxDeductionIs300() in the following class TaxTest asserts this:
package tax;
import static org.junit.Assert.*;
import org.junit.Test;
public class TaxTest {
@Test
public void testZeroTax() {
Tax tax = new Tax();
assertEquals("Tax on zero income is not zero", 0,
tax.calcTax(0, 0),0 );
}
@Test
public void testOneStudentTaxDeductionIs300(){
Tax tax = new Tax();
assertEquals("The $300 student discount was not applied",
2000, tax.applyStudentDeduction(2300, 1), 0);
}
}
The test runner runs both testZeroTax() and testOneStudentTaxDeductionIs300(), and both of them are successful. By default, JUnit runs tests in arbitrary order unless you use a special annotation @FixMethodOrder that expects you to name the test methods in alphabetical order.
If you replace one of the @Test annotations with @Ignore, the test runner won’t run this test.
Let’s improve the code of the class TestTax a little bit. I don’t like that we create a new instance of Tax in each test method. You can create a set up method that instantiates Tax so it’s available for each test method. To perform some actions before the first test method run, you should use a set up method (for example, connect to a database and insert test data) annotated with @BeforeClass. If you need to run some cleanup procedure (for example, remove the test data from a database and disconnect) add a tear down method annotated with @AfterClass. The following version of the class TestTax illustrates the use of the annotations @BeforeClass and @AfterClass (the latter just prints the “In tearDown” message on the console):
package tax;
import static org.junit.Assert.*;
import org.junit.*;
public class TaxTest {
static Tax tax;
@BeforeClass
public static void setUp(){
tax = new Tax();
System.out.println("In setUp");
}
@Test
public void testZeroTax() {
assertEquals("Tax on zero income is not zero", 0,
tax.calcTax(0, 0),0 );
}
@Test
public void testOneStudentTaxDeductionIs300(){
assertEquals("The $300 student discount was not applied",
2000, tax.applyStudentDeduction(2300, 1), 0);
}
@AfterClass
public static void tearDown(){
System.out.println("In tearDown");
}
}
If you want to create a test class that invokes setUp() and tearDown() before invoking each test method, replace @BeforeClass and @AfterClass with @Before and @After,respectively. Although @BeforeClass and @AfterClass annotations can be used only with static methods, @Before and @After don’t have this restriction.
Test Suites
A test suite is a container for test classes that the test runner should execute together. In large applications test cases are grouped into suites by some criteria—for example, long running tests, or tests that should check a particular software module of the application.
For a demonstration of how to create a test suite, create a second JUnit test case in the same folder as TaxTest. Name this class TaxExceptionTest; it has one test method to check whether the exception is thrown if the method Tax.calcTax() gets a negative number as grossIncome:
package tax;
import static org.junit.Assert.*;
import org.junit.Test;
public class TaxExceptionTest {
@Test(expected=IllegalArgumentException.class)
public void testForNegativeGrossIncome() {
Tax tax = new Tax();
tax.calcTax(-100, 2);
fail("grossIncome in calcTax() can't be negative.");
}
}
The test TaxEceptionTest is considered successful when the calcTax() throws an IllegalArgumentException if it gets the negative number in grossIncome. If you want to see it fail, comment out the throw statement in the method calcTax(). In this example, I was usingIllegalArgumentException, which is included in Java SE. But you can use the same mechanism with custom exceptions as well.
Now create a test suite that consists of two test cases: TaxTest and TaxExceptionTest. In Eclipse select File → New → Other → Java → JUnit → JUnit Test Suite; you see the window shown in Figure 35-4.
Click the Finish button and Eclipse generates the class AllTests with the following content:
package tax;
import org.junit.runner.RunWith;
import org.junit.runners.Suite;
import org.junit.runners.Suite.SuiteClasses;
@RunWith(Suite.class)
@SuiteClasses({ TaxExceptionTest.class, TaxTest.class })
public class AllTests {
}
The annotation @RunWith instructs the test runner Suite to be used instead of a default test runner. The annotation @SuiteClasses includes both of the test classes: TaxExceptionTest and TaxTest. Run the test suite AllTests as JUnit Test Case and you see that all of the tests have succeeded, as shown in Figure 35-5.
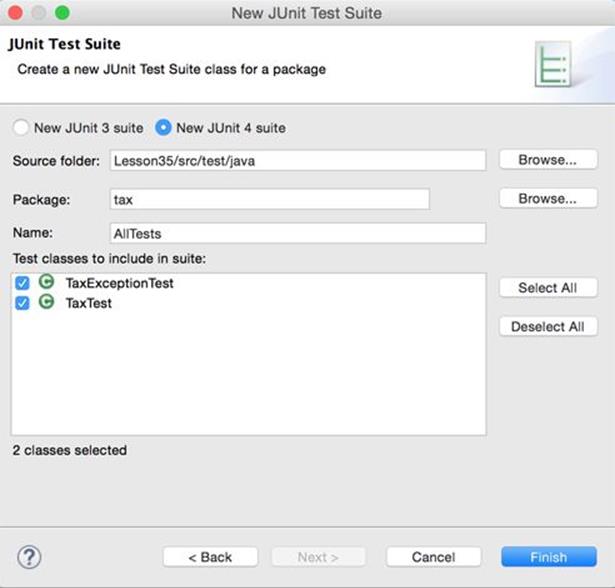
Figure 35-4: Creating a test suite in Eclipse
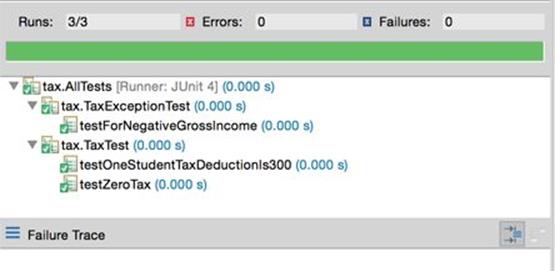
Figure 35-5: Running a test suite in Eclipse
JUnit Test Runners
JUnit comes with several test runners classes located in the package org.junit.runner. The class JUnit4 is a default runner that was used for most of the examples in this lesson. To specify a non-default runner you need to use the annotation @RunWith. As you saw in the previous section, the test suite AllClasses used the runner implemented in the Suite class:
@RunWith(Suite.class)
There are other specialized runners implemented in the classes Parameterized, Categories, and Enclose. There are also several third-party runners.
Using test runners inside Eclipse is convenient for development, but in real-world projects you should incorporate unit tests into build scripts. Hence you need to know how to launch JUnit test runners without an IDE. You can launch the runners outside of any IDE using one of these methods:
· Create a Java class that invokes the method run() on the JUnitCore object.
· Run the JUnitCore from a command line providing the names of the test classes as command-line arguments.
With the first method, you need to create a Java class, instantiate JUnitCore, and invoke its method run() providing test classes or a test suite as arguments. For example:
JUnitCore junitCore= new JUnitCore();
Result result = junitCore.run(AllTests.class);
Then you can get a collection of the Failure objects each of which represents one failed test, if any:
List<Failure> failedTests = result.getFailures();
To have better control and improved logging during the test run, you can create a listener—a subclass of RunListener—and assign it to the instance of the JUnitCore object using the method addListener():
JUnitCore junitCore= new JUnitCore();
jUnitCore.addListener(new MyRunListener());
jUnitCore.run(AllTests.class);
In the listener class, you can override methods testStarted(), testFinished(), testFailure(), and several others. Then add logging statements inside these methods.
If you decide to run JUnitCore directly from the command line, you need to make sure that the JUnit JAR and the directories of your test classes and the classes under test are included to the CLASSPATH variable in your runtime environment. Then you can run a command similar to this one:
java org.junit.runner.JUnitCore tax.TaxTest
Lesson 36 explains how to automate builds with Gradle. If you’ve written unit tests for your application, you can easily incorporate them into the build process, so they run without manual interaction via an IDE. In the “Try It” section you practice using JUnit test runners from the command line.
In this lesson you’ve learned how to write simple unit tests using JUnit framework. For writing more advanced tests you should study JUnit online documentation. The other popular frameworks that can be used for unit testing are TestNG and Spock. I can also recommend you to watch a presentation "Tooling for Test-Driven Development in Java" by Pawel Lipinski.
Try It
In this assignment you need to run the test classes described in this lesson from the command line. First, you create a Java class with the code that invokes a test runner. Then you try an alternative way of launching the test runner; you start the JUnitCore runner directly from a command line.
Lesson Requirements
You should have Java installed and the JUnit JARS available.
NOTE You can download the code and resources for this “Try It” from the book’s web page at www.wrox.com/go/javaprog24hr2e. You can find them in the Lesson35 folder in the download.
Step-by-Step
1. Continue using the directory structure created for Eclipse project Lesson35. In the directory src/test/java/tax create a class TaxCommanLineRunner with the following code:
2. package tax;
3. import java.util.List;
4. import org.junit.internal.TextListener;
5. import org.junit.runner.JUnitCore;
6. import org.junit.runner.Result;
7. import org.junit.runner.notification.Failure;
8. public class TaxCommandLineRunner {
9. public static void main(String[] args) {
10.
11. JUnitCore junitCore = new JUnitCore();
12.
13. Result result = junitCore.run(AllTests.class);
14.
15. if (result.wasSuccessful()){
16.
17. System.out.println(
18. "All Tax Test cases ran successfully");
19. } else{
20.
21. System.out.println("These Tax Test cases failed:");
22. List<Failure> failedTests = result.getFailures();
23. failedTests.forEach(failure ->
24. System.out.println(failure.getMessage()));
25. }
26. }
27. }
This program runs the AllTests suite and either prints the message that all tests were successful or prints specific error descriptions from the failed tests.
28. Open the Command or Terminal window and change to the bin directory of the project Lesson35 where all the compiled classes are located.
29. Run TestCommandLineRunner adding the JARs junit.jar and hamcrest-core.jar to the CLASSPATH (the option -cp). In my case these JARs were located in the directory /Users/yfain11/junit, and Figure 35-6 shows how I launched my test runner in the Terminal window.
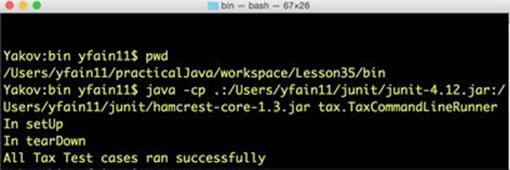
Figure 35-6: Running TaxCommandLineRunner in Mac OS
30. Replace the System.out.println() calls with logging as explained in Lesson 34.
31. Use an alternative way of invoking the JUnitCore. Run it directly from a Command or Terminal window specifying the test suite AllTests as a command-line argument. I did it, as shown in Figure 35-7.
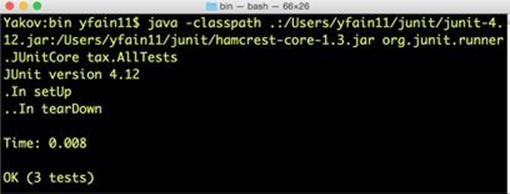
Figure 35-7: Invoking org.junit.runner.JUnitCore directly
The output of the AllTests program looks a little different now, but the results are the same: All tests completed successfully.
TIP Please select the videos for Lesson 35 online at www.wrox.com/go/javaprog24hr2e. You will also be able to download the code and resources for this lesson from the website.
All materials on the site are licensed Creative Commons Attribution-Sharealike 3.0 Unported CC BY-SA 3.0 & GNU Free Documentation License (GFDL)
If you are the copyright holder of any material contained on our site and intend to remove it, please contact our site administrator for approval.
© 2016-2026 All site design rights belong to S.Y.A.