Wrox Press Java Programming 24-Hour Trainer 2nd (2015)
Lesson 5. Java Syntax: Bits and Pieces
This tutorial didn’t start with detailed coverage of basic constructs of the Java language such as the syntax of if statements, loops, and the like. You started learning Java programming with getting used to object-oriented terms and constructs of the language. This lesson is a grab bag of basic language elements, terms, and data structures. You also find out how to debug Java programs in Eclipse IDE and how to pass parameters to a program started from a command line.
Arrays
An array is data storage that’s used to store multiple values of the same type. Let’s say your program has to store names of 20 different girls, such as Masha, Matilda, Rosa, and so on. Instead of declaring 20 different String variables, you can declare one String array with the capacity to store 20 elements:
String [] friends = new String [20]; // Declare and instantiate array
friends[0] = "Masha"; //Initialize the first element
friends[1] = "Matilda"; //Initialize the second element
friends[2] = "Rosa";
// Keep initializing other elements of the array here
friends[19] = "Natasha"; //Initialize the last element
The first element of an array in Java always has an index of 0. Arrays in Java are zero-based. While declaring an array you can place brackets either after the data type or after the variable name. Both of the following declarations are correct:
String friends[];
String[] friends;
You must know the size of the array before assigning values to its elements. If you want to be able to dynamically change the size of an array during run time, consider other Java collection classes from the package java.util, such as Vector and ArrayList. Besides arrays, Java has lots of collection classes that can store multiple related values; for example, HashMap, List, and LinkedList. You have a chance to see their use in the code samples accompanying this book. Listing 5-1 contains sample code that partially populates an array.
Listing 5-1: Populating a simple array
public class Girlfriends1 {
public static void main(String[] args) {
String [] friends = new String [20]; // Declare and instantiate array
friends[0] = "Masha"; //Initialize the first element
friends[1] = "Matilda"; //Initialize the second element
friends[2] = "Rosa";
// ...
friends[18] = "Hillary";
friends[19] = "Natasha";
System.out.println("The third girl's name is " + friends[2]);
System.out.println("The twentieth girl's name is " + friends[19]);
}
}
An array has a property length that “knows” the number of elements in the array. The next line shows how you can get this number:
int totalElements = friends.length;
If you know all the values that will be stored in the array at the time of its declaration, you can declare and initialize an array at the same time. The following line declares, instantiates, and populates an array of four elements:
String [] friends = {"Masha", "Matilda", "Rosa", "Sharon"};
Our array friends is not as practical as a contacts list in your phone, though — it does not store girls’ phone numbers. Luckily, Java supports multidimensional arrays. For example, to create a two-dimensional array (names and phone numbers), declare it with two sets of square brackets:
String friends [][] = new String [20][2];
friends[0][0] = "Masha";
friends[0][1] = "732 111-2222";
friends[1][0] = "Matilda";
friends[1][1] = "718 111-2222";
...
friends[19][0] = "Sharon";
friends[19][1] = "212 111-2222"
More About Strings
Strings are special objects in Java. They are stored in a pool of strings for reusability. They are immutable; you can’t change the value of a String that has been initialized. However, this doesn’t mean that you can’t create new Strings based on the existing one. Consider the following code sample:
String bestFriend = "Mary";
bestFriend = bestFriend + " Smith";
String greeting = "Hello " + bestFriend;
The first line creates an entry in the pool of strings with the value of “Mary." The second line doesn’t modify the first one but creates a new entry with the value “Mary Smith." The third line creates yet another entry in the pool with the value “Hello Mary Smith.”
A program can consist of hundreds classes, and if any other class will need a String with any of these three values, they’ll be taken from the pool.
If your program needs to do lots of manipulations with strings, consider using a class StringBuffer, which is mutable. For example:
StringBuffer sbf = new StringBuffer();
sbf.append("Mary");
sbf.append(" Smith");
String fullName = sbf.toString(); // Converting back to String
Another way to create a mutable object for storing textual data is the class StringBuilder. It’s based on arrays and has capacity. For example, you can allocate memory for 50 characters and fill 10 of them as follows:
StringBuilder sbld = new StringBuilder(50);
sbld.append("Mary");
sbld.append(" Smith");
String fullName = sbld.toString(); // Converting back to String
StringBuilder has lots of convenient methods, such as methods that insert characters into a certain position in a character sequence or remove one or more characters. Refer to Oracle’s tutorial at http://docs.oracle.com/javase/tutorial/java/data/buffers.html for more examples.
Have you noticed that although String is an object (not a primitive), I have not used the new operator to instantiate these objects? You can instantiate strings as regular objects, too. For example:
String friend1=new String("Mary");
String friend2=new String("Joe");
String friend3=new String("Mary");
Now, I’d like to bring your attention to String comparison. Revisit the beginning of Lesson 3, and take another look at the diagram illustrating two instances of the car. The variables car1 and car2 point at different memory addresses. On the same note, the variables friend1, friend2, andfriend3 point at three different memory locations, and the values stored in these variables are the addresses of two different objects. Hence, even though the name of the first and third friend are the same, comparing friend1 and friend3 returns false. You can test it by trying the following line of code:
System.out.println("Is friend1==friend3? " + (friend1==friend3));
The == Operator
Note the double equal sign in the code above. You are comparing the variables for equality and not assigning one value to another.
But if you’d like to compare values of the strings (not the memory addresses), use the equals() method. The following code prints the sentence that ends with true:
System.out.println("Is friend1.equals(friend3)? " +
(friend1.equals(friend3)));
Loops
Loops are used to repeat the same action multiple times. When you know in advance how many times you want to repeat an action, use the for loop. Try printing the names from the one-dimensional array friends.
int totalElements = friends.length;
for (int i=0; i < totalElements;i++){
System.out.println("I love " + friends[i]);
}
The preceding code reads “Print the value of the element i from the array friends starting from i=0 and incrementing i by one (i++) until i reaches the value equal to the value of totalElements.” Listing 5-2 adds a for loop to the program shown in Listing 5-1.
Listing 5-2: Looping through the array
public class Girlfriends2 {
public static void main(String[] args) {
String [] friends = new String [20];
friends[0] = "Masha";
friends[1] = "Matilda";
friends[2] = "Rosa";
friends[18] = "Hillary";
friends[19] = "Natasha";
int totalElements = friends.length;
int i;
for (i=0; i<totalElements;i++){
System.out.println("I love " + friends[i]);
}
}
}
Because the friends array has been declared with a size of 20, the Java run time has allocated memory for 20 elements. But the code in Listing 5-2 has populated only five of the 20 elements of the array, which explains why the output of this program looks as follows:
I love Masha
I love Matilda
I love Rosa
I love null
I love null
I love null
I love null
I love null
I love null
I love null
I love null
I love null
I love null
I love null
I love null
I love null
I love null
I love null
I love Hillary
I love Natasha
The keyword null represents an absence of any value in an object. Even though the size of this array is 20, only five elements were initialized.
There’s another syntax of the for loop, known as the for-each loop. You simply declare a variable of the same type as the objects stored in an array and specify the array to iterate. The following code snippet declares the variable girl, and the colon means “in.” Read this loop’s condition expression as “for each element in friends.” This syntax allows you to not worry about checking the size of the array, and there is no need to increment any loop variable either. This is an elegant and short loop notation:
for (String girl: friends){
System.out.println("I love " + girl);
}
Looping through collections with forEach()
Java 8 introduced a new way of looping through data collection with the method forEach(). You see it in action in Lesson 13. Just keep in mind that for-each loops and the forEach() method are different animals.
You can rewrite the program in Listing 5-2 using the while loop, which is used when you do not know the exact size of the array but do know the condition of exit from the loop. Use the keyword while:
int totalElements = friends.length;
int i=0;
while (i<totalElements){
System.out.println("I love " + friends[i]);
i++; // the same as i=i+1;
}
Just think of a program that reads and processes the records from a database (see Chapter 21). When you write a Java program, you don’t know how many elements the database has, and even if you do know, this number can change in the future, so it’s better to use loops with the exit condition than to use a hard-coded number of repetitions.
Use the keyword break to prematurely jump out of the loop on the line below the ending curly brace. For example, if you want to find the first null element in the friends array, write the following:
while (i<totalElements){
if (friends[i]==null){
System.out.println("The element " + (i+1) + " is null");
break;
}
System.out.println("I love " + friends[i]);
i++;
} // closing curly brace for the loop
The if statement in the preceding code checks the value of each element of the array, and as soon as it finds null, the loop prints the message about it, stops the iteration process, and goes to the line below the closing curly brace of the loop, if any.
The keyword continue enables you to force the loop to return to its first line and retest the loop exit condition. The following code snippet prints only those values from the array that are not null:
while (i<totalElements){
if (friends[i]==null){
i++;
continue;
}
System.out.println("I love " + friends[i]);
i++;
}
System.out.println("The iteration is over");
The preceding code uses an if statement, which allows you to check a certain condition and redirect the program to execute or skip a portion of the code. In this case, if the loop runs into a null value, it increments by one the value of the variable i and goes to the beginning of the while loop, skipping the rest of the code within the loop body. (Later in this lesson there’s a section explaining the syntax of the various if statements in greater detail.) The complete code of the program, illustrating a while loop with a continue statement, is shown in Listing 5-3.
Listing 5-3: While loop with continue statement
public class WhileLoopDemo {
public static void main(String[] args) {
String [] friends = new String [20];
friends[0] = "Masha";
friends[1] = "Matilda";
friends[2] = "Rosa";
friends[18] = "Hillary";
friends[19] = "Natasha";
int totalElements = friends.length;
int i=0;
while (i<totalElements){
if (friends[i]==null){
i++;
continue;
}
System.out.println("I love " + friends[i]);
i++;
}
System.out.println("The iteration is over");
}
}
The output of the WhileLoopDemo program is shown here:
I love Masha
I love Matilda
I love Rosa
I love Hillary
I love Natasha
The iteration is over
There is a rarely used do-while version of the while loop. It starts with the do keyword followed by the body of the loop in curly braces, and the while condition comes last. Such loop syntax guarantees that the code written in the body of the loop will be executed at least once, because the loop condition will be tested only after the first pass into the loop. In the following loop, at the very minimum the statements about reading the element zero of array friends will be printed for each element of the array even if every one of them is null:
do {
System.out.println("Reading the element" + i +" of array friends");
if (friends[i]==null){
i++;
continue;
}
System.out.println("I love " + friends[i]);
i++;
} while (i<totalElements);
The worst thing that can happen in any loop is a programmer’s mistake in the loop exit condition that always evaluates the loop condition as true. In programming this is known as an infinite loop. To get a better feeling for what this term means, comment out the line that increments the value of the variable i inside the if statement in the do-while sample, and your program will never end unless you forcefully stop it or your computer runs out of power. The reason is clear: If the program enters the code block that just has the statement continue, the value of the variable i will never increase and the loop execution condition i<totalElements will hold true forever.
Debugging Java Programs
In programmer’s lingo, a bug is an error in a program that causes the program to work in an unexpected way. Don’t confuse a bug with a syntax error in the code. The latter will be caught by the Java compiler before you even start the program, while bugs are your run-time enemies. To debuga program is to identify and fix the run-time errors in code.
The simplest way to debug a program is to print the value of the “suspicious variables” with System.out.println() or the like. You may think that a certain variable will get a particular value during the execution, but you might be wrong, and printing its value from the running program may reveal why your code produces unexpected results.
Logging API
Java also comes with a logging application program interface (API) — seehttp://docs.oracle.com/javase/8/docs/technotes/guides/logging/index.html — that allows you to log the run-time values in a file or other destination. Logging is out of the scope of this book, but you can find Logger and other supporting classes in the Java package java.util.logging.
You’ll find daily use for the debugger that comes with your IDE.
Even though Chapter 2 was dedicated to Eclipse IDE, explaining debugging back then would have been a bit premature because it didn’t have much Java code to debug. Now you’re ready to learn how the Eclipse debugger can help you.
Let’s see how the while loop from Listing 5-3 works by running the WhileLoopDemo program with the Eclipse debugger. First, download Lesson5.zip from this book’s website and import it into Eclipse. Open the source code of the class WhileLoopDemo and set a breakpoint on the line of code where you want the program to pause execution so you can start watching the program internals.
I’d like to pause this program right before it enters the while loop, so set the breakpoint on the following line:
while (i<totalElements){...}
Double-click the blue vertical bar located at the left side of the Editor view — you should see an image of a little bullet there. This line becomes a breakpoint, and if the program runs into the code with the set breakpoint, Eclipse IDE switches to Debug perspective and pauses the program, highlighting the line that’s about to execute.
To run WhileLoopDemo in the debugger, right-click the name of this program in Package Explorer and select the Debug As Java Application menu option.
On the first run you will see a warning that Eclipse wants to switch to the Debug perspective; agree with this. Figure 5-1 shows how the Debug perspective looks when the program reaches the breakpoint.
Note the little arrow in the Editor view next to the bullet; it shows you the line of code that will be executed next. The Variables view shows you the values of the program variables at this moment. The variable i is equal to 0; the value of totalElements is 20. If you click the little plus sign by the variable friends, you see the contents of this array.
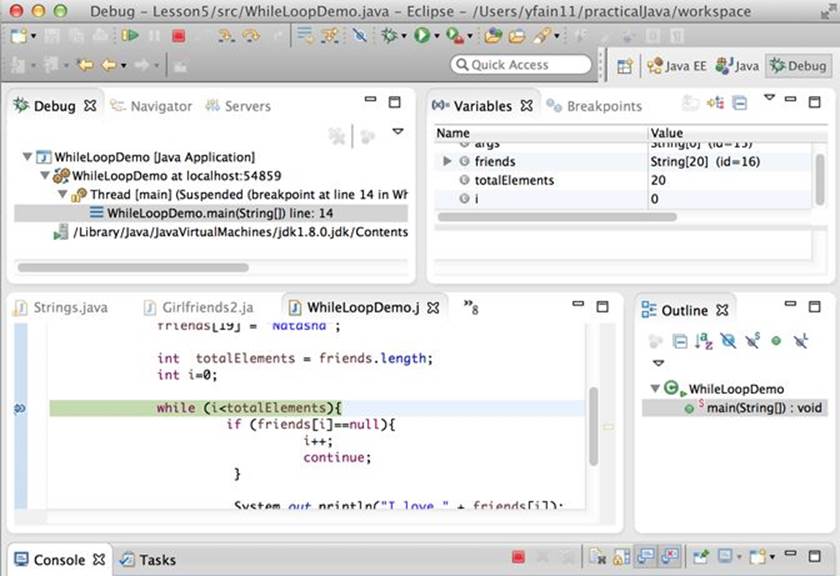
Figure 5-1: Debugger paused at the breakpoint
Now try to execute this program step by step, watching how the value of the variable i changes. You control program execution by clicking the buttons in the toolbar for the Debug view (see Figure 5-2).
![]()
Figure 5-2: The Debug View tab
The green play button means “Continue executing the program until it ends or hits another breakpoint.” The red square button stops the debugging process. The first curvy yellow arrow (Step Into) is used if the code has been paused on a line that calls a method, and you’d like to debug the code of the method being called. The second curvy arrow (Step Over) allows you to execute the current line without stepping into any methods that may be called in this line of code.
There are other and less frequently used buttons on this toolbar, which you can study on your own; for now, enter the loop by clicking the Step Over button. Keep clicking this button and observe that the program doesn’t enter the if statement, which is correct — the first element of the friends array is not null. Then if prints “I love Masha” in the console view, increments the value of the variable i to 1 (see the Variables view in Figure 5-3), and returns to the loop condition to check whether the value of i is still less than the value of totalElements.
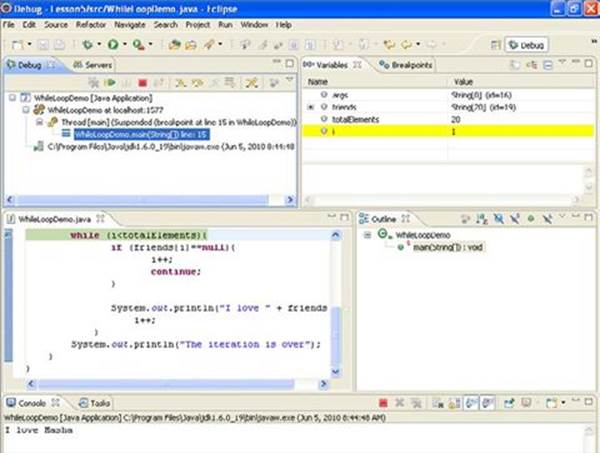
Figure 5-3: A snapshot of a Debug perspective
Keep clicking the Step Over button, and expand the variable friends in the Variables view to see its elements in order to better understand why the program skips or enters the if statement in the loop. Note the moment when the program exits the loop and prints the message “The iteration is over.” After spending some time debugging the program, you should appreciate the value of the Eclipse Debugger. In my opinion, the best way to learn a new programming language is to run someone else’s code through a good debugger. The program may be bug-free, but running the program through the debugger helps you to better understand the program’s flow.
More About if and switch Statements
If you need to change the execution of the program based on a certain condition then you can use either if or switch statements, which were introduced in Chapter 3. In this section you see more flavors of the conditional statements.
The Flavors of if Statements
In Listing 5-3 you saw one version of the if statement:
if (friends[i]==null){
i++;
continue;
}
The curly braces must be used in the if statement to specify a block of code that has to be executed if the condition is true. Even though the curly braces are not required if there’s only one statement in the code block, using the braces is considered a good practice. They make the program more understandable for other people who may need to read your code (or for yourself six months from now):
if (friends[i]==null){
System.out.println("I found an array element with null value");
}
// Some other code goes here
The code below the closing curly brace is always executed, which may not be desirable. In this case use the if-else syntax:
if (friends[i]==null){
System.out.println("I found an array element with null value");
} else{
// Some other code goes here
}
In the preceding code snippet, the “some other code” is executed only if the current element of the array is not null (or, as it’s put it in Java, friends[i]!=null). You can write an if statement with multiple else clauses. For example, the following code prints only one love confession:
if (friends[i]==null){
System.out.println("I found an array element with null value");
} else if (friends[i] == "Natasha"){
System.out.println("I love my wife so much!");
} else if (friends[i] == "Masha"){
System.out.println("I fell in love with Masha when I was in the 8th grade.");
} else{
System.out.println("I used to love " + friends[i] + " at some point.");
}
Using conditional statements can be a lot more complex than comparing two values. You can build expressions using boolean AND, OR, and NOT operators. The AND operation is represented as &&, like this:
if (age<20 && gender=="male") {
// do something only for males under 20 years old
}
For the OR condition use ||; for example:
if (age < 30 || yearsInArmy > 0) {
// do something with people younger than 30 or those who served
// in the army regardless of their age
}
For the NOT condition (aka negation) use the ! sign:
boolean hasBachelorDegree;
// Read the person record and assign the value true or false
// to the variable hasBachelorDegree
if (!hasBachelorDegree) {
// do something with people without bachelor degree
}
The negation symbol can be placed either in front of a boolean variable, as in the preceding code snippet, or in front of the expression that returns boolean. The next code example shows how to use negation. Note that the comparison expression was placed inside the parentheses; otherwise the Java compiler would assume that you’re trying to negate a String value called friends[i], which is not allowed.
if (!(friends[i]=="Hillary")){
System.out.println("Still looking for Hillary.");
}
Imagine a situation in which you need to assign a value to a variable, but the value depends on the result of a certain condition. To assign the variable in a verbose way you can use a regular if statement and test some condition, writing one assignment operator for a result of true, and another in the else section for a result of false. But if you use a special construct called a conditional operator (?), the same task can be done more simply.
The conditional operator consists of the following parts: an expression that returns boolean, a question mark, an expression that returns some value if the first expression evaluates to true, a colon, and an expression that returns a value to be used if the first expression returns false. It sounds complicated, but it’s not. The following code sample shows how to assign a $3,000 bonus if a person’s salary is greater than $90,000, and only $2,000 otherwise:
float salary;
// Retrieve the salary of the person from some data source here
int bonus = salary > 90000 ? 3000 : 2000;
Command-Line Arguments
In Chapter 1 you learned how to start a Java program from a command line. After development in Eclipse or another IDE is done, Java programs are deployed in production and will be started from a command line — usually you get an icon to click that runs a command to start a program, but under the hood the operating system executes a command that starts your program. You can’t expect an accountant to have Eclipse installed to run a tax calculation program, right? For example, to run the TestTax program (see Lesson 4) from the command window you need to open a command (or Terminal) window, change the directory to Lesson4 in your Eclipse workspace, and enter the following:
java TestTax
You can run as standalone programs only those Java classes that have the method main, which takes a String array as an argument. This array is the means of passing some data from the command line to your program during start-up. For example, you can pass gross income, state, and number of dependents to TestTax by starting it from the command line as follows:
java TestTax 50000 NJ 2
The method main(String[] args) of the class TestTax receives this data as a String array that I decided to call args. This array is automatically created by JVM, and it’s large enough to accommodate all the arguments entered from the command line. This array will be populated as follows:
args[0] = "50000";
args[1] = "NJ";
args[2] = "2";
Command-line arguments are always being passed to a program as String arrays. It’s the responsibility of the programmer to convert the data to the appropriate data type. The wrapper Java classes that were introduced in Chapter 3 can come in handy. For example, the wrapper class Doublehas the function parseDouble to convert String to double:
double grossIncome = Double.parseDouble(args[0]);
Review the code of the TestTax program from Listing 4-6, which has hard-coded values of gross income, state, and number of dependents. By using command-line arguments you can make the program more generic and use for more people — not only those from New Jersey who have two dependents and an annual income of $50,000.
You’ll work on this assignment in the Try It section.
Try It
Your assignment is to introduce command-line arguments into the program from Listing 4-6.
Lesson Requirements
For this lesson you should have Java installed.
NOTE You can download the code and resources for this “Try It” from the book’s web page at www.wrox.com/go/javaprog24hr2e. You can find them in Lesson5.zip.
Step-by-Step
1. In Eclipse IDE, copy the TestTax class from the Lesson4 project to the src folder of the project Lesson5. Also, copy the Tax class from the project Chapter 3 that has an if statement in the calcTax() method.
2. Remove the three lines that initialize grossIncome, state, and dependents with hard-coded values.
3. Add the following code fragment to ensure that the program has been started with three arguments. If it has not, print the error message and exit the program.
4. if (args.length != 3){
5. System.out.println("Sample usage of the program:" +
6. " java TestTax 50000 NJ 2");
7. System.exit(0);
}
8. Add the following statements to the method main() to get the values passed from the command line, convert them to appropriate data types, and initialize the variables grossIncome, state, and dependents:
9. double grossIncome = Double.parseDouble(args[0]);
10. String state = args[1];
int dependents = Integer.parseInt(args[2]);
11.Even though there is a way to specify command-line arguments in Eclipse, I want you to leave the IDE and do the rest in the command-line window. Right-click the Lesson5 project in Eclipse IDE and select the Properties menu item (note the location of the compiled classes of your project — in my case it was c:\practicalJava\workspace\Lesson5\bin).
12.Open the command window and change the directory to the one that contains the file TestTax.class.
13.Run your program several times, specifying different values for the command-line arguments. The program should print different values for the calculated tax.
TIP Please select the videos for Lesson 5 online at www.wrox.com/go/javaprog24hr2e. You will also be able to download the code and resources for this lesson from the website.
All materials on the site are licensed Creative Commons Attribution-Sharealike 3.0 Unported CC BY-SA 3.0 & GNU Free Documentation License (GFDL)
If you are the copyright holder of any material contained on our site and intend to remove it, please contact our site administrator for approval.
© 2016-2026 All site design rights belong to S.Y.A.