Linux All-in-One For Dummies, 5th Edition (2014)
Book IV. The Internet
Chapter 6. Managing DNS
In This Chapter
![]() Understanding DNS
Understanding DNS
![]() Exploring BIND
Exploring BIND
![]() Finding out how to configure DNS
Finding out how to configure DNS
![]() Setting up a caching name server
Setting up a caching name server
![]() Configuring a primary name server
Configuring a primary name server
Domain Name System (DNS) is an Internet service that converts a fully qualified domain name, such as www.debian.org, into its corresponding IP address, such as 194.109.137.218. You can think of DNS as the directory of Internet hosts — DNS is the reason why you can use easy-to-remember hostnames even though TCP/IP requires numeric IP addresses for data transfers. DNS is basically a hierarchy of distributed DNS servers. This chapter provides an overview of DNS and shows you how to set up a caching DNS server on your Linux system.
Understanding Domain Name System (DNS)
In TCP/IP networks, each network interface (for example, an Ethernet card or a dial-up modem connection) is identified by an IP address. Because IP addresses are hard to remember, an easy-to-remember name is assigned to the IP address — much like the way a name goes with a telephone number. For example, instead of having to remember that the IP address of Debian’s web server is 194.109.137.218, you can simply refer to that host by its name, www.debian.org. When you type www.debian.org as the URL in a web browser, the namewww.debian.org is translated into its corresponding IP address. This process is where the concept of DNS comes in.
What is DNS?
Domain Name System is a distributed, hierarchical database that holds information about computers on the Internet. That information includes hostname, IP address, and mail-routing specifications. Because this information resides on many DNS hosts on the Internet, DNS is called adistributed database. The primary job of DNS is to associate hostnames to IP addresses and vice versa.
In ARPANET — the precursor to today’s Internet — the list of hostnames and corresponding IP addresses was maintained in a text file named HOSTS.TXT, which was managed centrally and periodically distributed to every host on the network. As the number of hosts grew, this static host table quickly became unreasonable to maintain. DNS was proposed by Paul Mockapetris to alleviate the problems of a static host table. As formally documented in Requests for Comment (RFCs) 882 and 883 (published in November 1983; seewww.faqs.org/rfcs/rfc882.html and www.faqs.org/rfcs/rfc883.html), the original DNS introduced two key concepts:
· The use of hierarchical domain names, such as www.ee.umd.edu and www.debian.org
· The use of DNS servers throughout the Internet — a form of distributed responsibility — as a means of managing the host database
Today, DNS is an Internet standard documented that has been updated and extended. Earlier updates defined data encoding, whereas later ones focus on improving DNS security. To read these and other RFCs online, visit the RFC page at the Internet Engineering Task Force (IETF) website at www.ietf.org/rfc.html.
DNS defines the following:
· A hierarchical domain-naming system for hosts
· A distributed database that associates every domain name with an IP address
· Library routines (resolvers) that network applications can use to query the distributed DNS database (this library is called the resolver library)
· A protocol for DNS clients and servers to exchange information about names and IP addresses
Nowadays, all hosts on the Internet rely on DNS to access various Internet services on remote hosts. As you may know from experience, when you obtain Internet access from an Internet Service Provider (ISP), your ISP provides you with the IP addresses of name servers — the DNS servers your system accesses whenever hostnames are mapped to IP addresses.
If you have a small LAN, you may decide to run a DNS server on one of the hosts or use the name servers provided by the ISP. For medium-sized networks with several subnets, you can run a DNS server on each subnet to provide efficient DNS lookups. On a large corporate network, the corporate domain (such as www.microsoft.com) is further subdivided into a hierarchy of subdomains; several DNS servers may be used in each subdomain.
The following sections provide an overview of the hierarchical domain-naming convention and describe BIND — the DNS software used on most Unix systems, including Linux.
Discovering hierarchical domain names
DNS uses a hierarchical tree of domains to organize the namespace — the entire set of names. Each higher-level domain has authority over its lower-level subdomains. Each domain represents a distinct block of the namespace and is managed by a single administrative authority. Figure 6-1 illustrates the hierarchical organization of the DNS namespace.
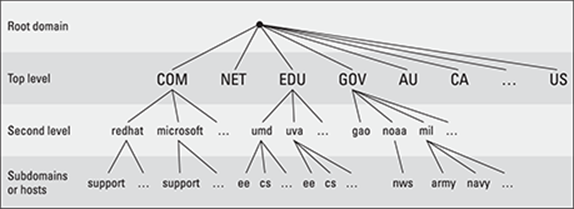
Figure 6-1: The DNS namespace is organized as a hierarchy.
The root of the tree is called the root domain and is represented by a single dot (.). The top-level, or root-level, domains come next. The top-level domains are further divided into second-level domains, which, in turn, can be broken into further subdomains.
The top-level domains are relatively fixed and include well-known domains such as COM, NET, ORG, EDU, GOV, and MIL. These are the commonly used top-level domains in the United States. These top-level domains came about as the Internet came to widespread use in the early 1990s.
Another set of top-level domain names is for the countries. These domain names use the two-letter country codes assigned by the International Organization for Standardization (abbreviated as ISO, see www.iso.org). For example, the top-level country code domain for the United States is US. In the United States, many local governments and organizations use the US domain. For example, mcps.k12.md.us is the domain name of the Montgomery County Public Schools in the state of Maryland, in the United States.
To this list, you can add other generic top-level domain names that have been added since the original set. These include BIZ (for business), .NAME (for family names), .MUSEUM, .TRAVEL, and others (with more proposed on the way).
The fully qualified domain name (FQDN) is constructed by stringing together the subdomain names, from lower-level to higher-level, using a period (.) as a separator. For example, REDHAT.COM is a fully qualified domain name; so is EE.UMD.EDU. Note that each of these may also refer to a specific host computer. Figure 6-2 illustrates the components of a fully qualified domain name.

Figure 6-2: A fully qualified domain name has a hierarchy of components.
Domain names are case-insensitive. Therefore, as far as DNS is concerned, the domains UMD.EDU and umd.edu both represent University of Maryland’s domain. The norm, however, is to type domain names in all lowercase.
Exploring Berkeley Internet Name Domain (BIND)
Most Unix systems, including Linux, come with the BIND system — a well-known implementation of DNS. The BIND software is installed during the Linux installation as long as you select the name server when selecting the packages for installation.
 In Debian, Ubuntu, and Xandros, type dpkg -l bind* to see if BIND is installed. In Fedora and SUSE, type rpm -q bind and see if the BIND package is installed.
In Debian and Ubuntu, type apt-get install bind9 to install BIND. In Fedora, log in as root, mount the DVD, and type cd /media/cdrom/Fedora/RPMS followed by rpm -ivh bind*. In SUSE, click Software Management in the YaST Control Center’s Software category. Then use YaST’s search facility to look for bind, select the relevant packages, and install them. In Xandros, first run Xandros Networks, choose Edit⇒Set Application Sources, and click the Debian Unsupported Site link as a source. Then type apt-get install bind9 to install the BIND server.
BIND includes three major components:
· The named daemon (the name server), which responds to queries about hostnames and IP addresses
· A resolver library that applications can use to resolve hostnames into IP addresses (and vice versa)
· Command-line DNS utility programs (DNS clients), such as dig (Domain Internet Groper) and host, that users can use to query DNS
The next few sections describe these components of BIND. Later sections explain how to configure the resolver and the name server.
named — the BIND name server
The named daemon is the name server that responds to queries about hostnames and IP addresses. Based on the configuration files and the local DNS database, named either provides answers to queries or asks other servers and caches their responses. The named server also performs a function referred to as zone transfer, which involves copying data among the name servers in a domain.
The name server operates in one of three modes:
· Primary, or master: In this case, the name server keeps the master copy of the domain’s data on disk. One primary server is for each domain or subdomain.
· Secondary, or slave: A secondary name server copies its domain’s data from the primary server using a zone transfer operation. You can have one or more secondary name servers for a domain.
· Caching: A caching name server loads the addresses of a few authoritative servers for the root domain and gets all domain data by caching responses to queries it has resolved by contacting other name servers. Primary and secondary servers also cache responses.
A name server can be authoritative or not, depending on what information it’s providing. As the term implies, the response from an authoritative name server is supposed to be accurate. The primary and secondary name servers are authoritative for their own domains, but they are not authoritative for responses provided from cached information.
 Caching name servers are never authoritative because all their responses come from cached information.
To run a name server on your Linux system, you have to run named with the appropriate configuration files. Later in this chapter, you’ll find out about the configuration files and data files that control how the name server operates.
Resolver library
Finding an IP address for a hostname is referred to as resolving the hostname. Network-aware applications, such as a web browser or an FTP client, use a resolver library to perform the conversion from the name to an IP address. Depending on the settings in the /etc/host.conf file, the resolver library consults the /etc/hosts file or makes a DNS query to resolve a hostname to its IP address. The resolver library queries the name servers listed in the /etc/resolv.conf file.
You don’t have to know much about the resolver library unless you’re writing network-aware applications. To run Internet services properly, all you have to know is how to configure the resolver. Later in this chapter, you will see how to configure the server and other aspects of DNS.
DNS utility programs
You can use the DNS utility programs — dig and host — to try out DNS interactively from the shell prompt. These utility programs are DNS clients. You can use them to query the DNS database and debug any name server set up on your system. By default, these programs query the name server listed in your system’s /etc/resolv.conf file.
You can use dig, the Domain Internet Groper program, to look up IP addresses for a domain name or vice versa. For example, to look up the IP address of ftp.redhat.com, type
dig ftp.redhat.com
dig prints the results of the DNS query in great detail. Look in the part of the output labeled ANSWER SECTION: for the result. For example, here’s what that section looks like for this sample query:
;; ANSWER SECTION:
ftp.redhat.com. 300 IN A 209.132.183.61
This output means that the name ftp.redhat.com refers to the IP address 209.132.183.61.
Reverse lookups (finding hostnames for IP addresses) are also easy with dig. For example, to find the hostname corresponding to the IP address 209.132.183.61, type the following:
dig -x 209.132.183.61
Again, the answer appears in the ANSWER SECTION of the output, which, for this example, looks like this:
;; ANSWER SECTION:
61.132.183.209.in-addr.arpa. 600 IN PTR ftp.redhat.com.
In this case, the hostname corresponding to the IP address 209.132.183.61 is ftp.redhat.com.
You can also query DNS by using the host program, which produces output in a compact format. For example, here’s a typical use of host to look up an IP address for a hostname:
host www.gao.gov
This command generates the following output:
www.gao.gov has address 161.203.16.77
www.gao.gov mail is handled by 5 listserv.gao.gov.
By default, host prints the IP address and any MX record. These records list the names of mail handlers for the host.
For a reverse lookup, use the -t ptr option along with the IP address as an argument, like this:
host -t ptr 161.203.16.2
Here’s the relay from host:
2.16.203.161.in-addr.arpa domain name pointer www.gao.gov.
In this case, host prints the PTR record (from the DNS database) that shows the hostname corresponding to the IP address. (PTR refers to pointer, and the PTR record specifies the name corresponding to an address.)
You can also try other types of records, such as CNAME (for canonical name), as follows:
host -t cname www.ee.umd.edu
The response from host is
www.ee.umd.edu is an alias for ajclark.eng.umd.edu.
This output indicates that the canonical name (or alias) for www.ee.umd.edu is ajclark.eng.umd.edu.
Configuring DNS
You configure DNS by using a number of configuration files. The exact set of files depends on whether you’re running a name server and, if so, the type of name server — caching or primary. Some configuration files are needed whether you run a name server or not.
Configuring the resolver
You don’t need a name server running on your system to use the DNS clients (dig and host). You can use them to query your domain’s name server. Typically, your ISP provides you with this information. You have to list the IP addresses of these name servers in the/etc/resolv.conf file — the resolver library reads this file to determine how to resolve hostnames. The format of this file is
domain your-domain.com
search your-domain.com
nameserver A.B.C.D
nameserver X.Y.Z.W
where A.B.C.D and X.Y.Z.W are the IP addresses (dot-separated numeric addresses, such as 192.168.0.1) of the primary and secondary name servers that your ISP provides you.
The domain line lists the local domain name. The search line specifies the domains on which a hostname is searched first (usually, you put your own domain in the search line). The domain listed on the search line is appended to any hostname before the resolver library tries to resolve it. For example, if you look for a host named mailhost, the resolver library first tries mailhost.your-domain.com; if that fails, it tries mailhost. The search line applies to any hostname that you try to access. For example, if you’re trying to accesswww.redhat.com, the resolver first tries www.redhat.com.your-domain.com and then www.redhat.com.
Another important configuration file is /etc/host.conf. This file tells the resolver what to do when attempting to resolve a hostname. A typical /etc/host/conf file contains the following line:
order hosts,bind
This command tells the resolver to consult the /etc/hosts file first, and if the resolver does not find an entry there, query the name server listed in the /etc/resolv.conf file. The /etc/hosts file usually lists any local hostnames and their IP addresses. Here’s a typical line from the /etc/hosts file:
127.0.0.1 lnbp200 localhost.localdomain localhost
This line says that the IP address 127.0.0.1 is assigned to the hostnames lnbp200, localhost.localdomain, and localhost.
In the latest version of the Linux kernel — the one that uses GNU C Library version 2 (glibc 2) or later — the name service switch (NSS) file, /etc/nsswitch.conf, controls how services such as the resolver library, NIS, NIS+, and local files such as /etc/hosts and/etc/shadow interact. For example, the following hosts entry in the /etc/nsswitch.conf file specifies that the resolver library first try the /etc/hosts file, then try NIS+, and finally try DNS:
hosts: files nisplus dns
To find more about the /etc/nsswitch.conf file, type man nsswitch.conf in a terminal window.
Configuring a caching name server
A caching name server is a simple-but-useful name server that finds answers to hostname queries (by using other name servers) and then remembers the answer (by saving it in a cache) for the next time you need it. This caching name server can shorten the time it takes to access hosts you have accessed recently because the answer is already in the cache.
When you install BIND, the configuration files for a caching name server are installed as well, so you can start running the caching name server without much work. This section describes the configuration files and what you have to do to start the caching name server.
The /etc/named.conf file
The first configuration file you need is /etc/named.conf. (That’s the name in Fedora and SUSE; in Debian, Ubuntu, and Xandros, the BIND configuration file is called /etc/bind/named.conf.) The named server reads this configuration file when it starts. You already have this file if you installed BIND. Here’s an example /etc/named.conf file:
options {
directory "/var/named";
dump-file "/var/named/data/cache_dump.db";
statistics-file "/var/named/data/named_stats.txt";
/*
* If there is a firewall between you and nameservers you want
* to talk to, you might need to uncomment the query-source
* directive below. Previous versions of BIND always asked
* questions using port 53, but BIND 8.1 uses an unprivileged
* port by default.
*/
// query-source address * port 53;
};
//
// a caching only nameserver config
//
controls {
inet 127.0.0.1 allow { localhost; } keys { rndckey; };
};
zone "." IN {
type hint;
file "named.ca";
};
zone "localdomain" IN {
type master;
file "localdomain.zone";
allow-update { none; };
};
zone "localhost" IN {
type master;
file "localhost.zone";
allow-update { none; };
};
zone "0.0.127.in-addr.arpa" IN {
type master;
file "named.local";
allow-update { none; };
};
zone "0.0.0.0.0.0.0.0.0.0.0.0.0.0.0.0.0.0.0.0.0.0.0.0.0.0.0.0.0.0.0.ip6.arpa" IN
{
type master;
file "named.ip6.local";
allow-update { none; };
};
zone "255.in-addr.arpa" IN {
type master;
file "named.broadcast";
allow-update { none; };
};
zone "0.in-addr.arpa" IN {
type master;
file "named.zero";
allow-update { none; };
};
include "/etc/rndc.key";
Comments are C-style (/* … */) or C++-style (starts with //). The file contains block statements enclosed in curly braces ({ … }) and terminated by a semicolon (;). A block statement, in turn, contains other statements, each ending with a semicolon.
This /etc/named.conf file begins with an options block statement with a number of option statements. The directory option statement tells named where to look for all other files that appear on file lines in the configuration file. In this case, named looks for the files in the/var/named directory.
In SUSE, the directory option in /etc/named.conf refers to the /var/lib/named directory, which means that all other BIND configuration files are in /var/lib/named. In Debian and Xandros, the configuration files are explicitly specified to be in the/etc/bind directory.
 The controls statement in /etc/named.conf contains security information so that the rndc command can connect to the named service at port 953 and interact with named. In this case, the controls statement contains the following line:
inet 127.0.0.1 allow { localhost; } keys { rndckey; };
This command says that rndc can connect from localhost with the key named rndc. (The file /etc/rndc.key defines the key and the encryption algorithm to be used.)
The rndc (remote name daemon control) utility is a successor to the older ndc (name daemon controller) utility used to control the named server by sending it messages over a special control channel, a TCP port where named listens for messages. The rndc utility uses a cryptographic key to authenticate itself to the named server. The named server has the same cryptographic key so that it can decode the authentication information sent by rndc.
After the options statement, the /etc/named.conf file contains several zone statements, each enclosed in curly braces and terminated by a semicolon. Each zone statement defines a zone. The first zone is named . (root zone); it’s a hint zone that specifies the root name servers. (When the DNS server starts, it uses the hint zone to find a root name server and get the most recent list of root name servers.)
The next two zone statements in /etc/named.conf are master zones. (A master zone is simply the master copy of data for a domain.) The syntax for a master zone statement for an Internet class zone (indicated by the IN keyword) is as follows:
zone "zone-name" IN {
type master;
file "zone-file";
[ . . . other optional statements . . .]
};
zone-name is the name of the zone, and zone-file is the zone file that contains the resource records (RR) — the database entries — for that zone. The next two sections describe zone file formats and resource record formats.
Zone file formats
The zone file typically starts with a number of directives, each of which begins with a dollar sign ($) followed by a keyword. Two commonly used directives are $TTL and $ORIGIN.
For example, the line
$TTL 86400
uses the $TTL directive to set the default Time To Live (TTL) for subsequent records with undefined TTLs. The value is in seconds, and the valid TTLs are in the range 0 to 2147483647 seconds. In this case, the directive sets the default TTL as 86400 seconds (or one day).
The $ORIGIN directive sets the domain name that is appended to any unqualified records. For example, the following $ORIGIN directive sets the domain name to localhost:
$ORIGIN localhost.
If there is no $ORIGIN directive, the initial $ORIGIN is the same as the zone name that comes after the zone keyword in the /etc/named.conf file.
After the directives, the zone file contains one or more resource records. These records follow a specific format, which are outlined in the next section.
Resource record (RR) formats
You have to understand the format of the resource records before you can understand and intelligently work with zone files. Each resource record (RR) has the following format. (Optional fields are shown in square brackets.)
[domain] [ttl] [class] type data [;comment]
The fields are separated by tabs or spaces and may contain some special characters, such as an @ for the domain and a semicolon (;) to indicate the start of a comment.
The first field, which must begin at the first character of the line, identifies the domain. You can use the @ to use the current $ORIGIN for the domain name for this record. If you have multiple records for the same domain name, leave the first field blank.
The optional ttl field specifies the Time To Live — the duration for which the data can be cached and considered valid. You can specify the duration in one of the following formats:
· N, where N is the number of seconds
· NW, where N is the number of weeks
· ND, where N is the number of days
· NH, where N is the number of hours
· NM, where N is the number of minutes
· NS, where N is the number of seconds
The letters W, D, H, M, and S can also be lowercase. Thus you can write 86400 or 1D (or 1d) to indicate a duration of one day. You can also combine these letters to specify more precise durations, such as 5w6d16h to indicate 5 weeks, 6 days, and 16 hours.
The class field specifies the network type. The most commonly used value for this field is IN for Internet.
Next in the resource record is the type field, which denotes the type of record (such as SOA, NS, A, or PTR). Table 6-1 lists the DNS resource record types. The data field comes next, and its content depends on the type field.
Table 6-1 DNS Resource Record Types
|
Type |
Name |
Description |
|
A |
IPv4 to IPv6 Transition Address |
Specifies the IPv6 address corresponding to a name using a format suitable for transition from IPv4 to IPv6 |
|
AAAA |
IPv6 Address |
Specifies the IPv6 host address corresponding to a name |
|
AS |
Address |
Specifies the IP address corresponding to a hostname |
|
CERT |
Digital Certificate |
Holds a digital certificate |
|
CNAME |
Canonical Name |
Defines the nickname or alias for a hostname |
|
DNAME |
Delegation Name |
Replaces specified domain name with another name to be looked up |
|
HINFO |
Host Info |
Identifies the hardware and operating system for a host |
|
KEY |
Public Key |
Stores a public key associated with a DNS name |
|
MX |
Mail Exchanger |
Identifies the host that accepts mail meant for a domain (used to route e-mail) |
|
NS |
Name Server |
Identifies authoritative name servers for a zone |
|
PTR |
Pointer |
Specifies the name corresponding to an address (used for reverse mapping — converting an IP address to a hostname) |
|
RP |
Responsible Person |
Provides the name of a technical contact for a domain |
|
SIG |
Signature |
Contains data authenticated in the secure DNS (see RFC 2535 for details) |
|
SOA |
Start of Authority |
Indicates that all subsequent records are authoritative for this zone |
|
SRV |
Services |
Lists well-known network services provided by the domain |
|
TXT |
Text |
Includes comments and other information in the DNS database |
Read the resource records in the zone files, at least the ones of type SOA, NS, A, PTR, and MX, which are some of the most commonly used. (You’ll find the zone files in the /etc/bind directory in Debian and Xandros, the /var/named directory in Fedora, and the/var/lib/named directory in SUSE.) Next there is a brief description of these records, illustrating each record type through an example.
A typical SOA record follows:
@ 1D IN SOA @ root (
42 ; serial
3H ; refresh -- 3 hours
15M ; retry -- 15 minutes
1W ; expiry -- 1 week
1D ) ; minimum -- 1 day
The first field specifies the domain as @, which means the current domain (by default, the zone name, as shown in the /etc/named.conf file). The next field specifies a TTL of one day for this record. The class field is set to IN, which means the record is for Internet. The type field specifies the record type as SOA. The rest of the fields constitute the data for the SOA record. The data includes the name of the primary name server (in this case, @, or the current domain), the e-mail address of the technical contact, and five times enclosed in parentheses.
The NS record specifies the authoritative name servers for a zone. A typical NS record looks like the following:
. 3600000 IN NS A.ROOT-SERVERS.NET.
In this case, the NS record lists the authoritative name server for the root zone. (Note that the name of the first field is a single period.) The Time To Live field specifies that the record is valid for 1,000 hours (3,600,000 seconds). The class is IN, for Internet; and the record type is NS. The final field lists the name of the name server (A.ROOT-SERVERS.NET.), which ends with a period.
An A record specifies the address corresponding to a name. For example, the following A record shows the address of A.ROOT-SERVERS.NET. as 198.41.0.4:
A.ROOT-SERVERS.NET. 3600000 A 198.41.0.4
In this case, the network class isn’t specified because the field is optional, and the default is IN.
PTR records are used for reverse mapping — converting an address to a name. Consider the following example:
1 IN PTR localhost.
This record comes from a file for a zone named 0.0.127.in-addr.arpa. Therefore, this record says that the name associated with the address 127.0.0.1 is localhost.
An MX record specifies the name of a host that accepts mail on behalf of a specific domain. For example, here’s a typical MX record:
Server7 IN MX 10 mailhub.lnbsoft.com.
This record says that mail addressed to the host named server7 in the current domain is sent to mailhub.lnbsoft.com. (This host is called a mail exchanger.) The number 10 is the preference value. For a list of multiple MX records with different preference values, the ones with lower preference values are tried first.
Armed with this bit of information about resource records, you can go through the zone files for the caching name server.
The root zone file
There are 13 root name servers for the Internet; most root servers are located in the United States. Information about the 13 root name servers is in the zone file referenced in the zone statement for the root zone in the /etc/named.conf file. (The root zone file is/var/named/named.ca in Fedora, /etc/bind/db.root in Debian, Ubuntu, and Xandros, and /var/lib/named/root.hint in SUSE.) The following listing shows the root zone file:
; This file holds the information on root name servers needed to
; initialize cache of Internet domain name servers
; (e.g. reference this file in the "cache . <file>"
; configuration file of BIND domain name servers).
;
; This file is made available by InterNIC
; under anonymous FTP as
; file /domain/named.cache
; on server FTP.INTERNIC.NET
; -OR- RS.INTERNIC.NET
;
; last update: Jan 29, 2004
; related version of root zone: 2004012900
;
;
; formerly NS.INTERNIC.NET
;
. 3600000 IN NS A.ROOT-SERVERS.NET.
A.ROOT-SERVERS.NET. 3600000 A 198.41.0.4
;
; formerly NS1.ISI.EDU
;
. 3600000 NS B.ROOT-SERVERS.NET.
B.ROOT-SERVERS.NET. 3600000 A 192.228.79.201
;
; formerly C.PSI.NET
;
. 3600000 NS C.ROOT-SERVERS.NET.
C.ROOT-SERVERS.NET. 3600000 A 192.33.4.12
;
; formerly TERP.UMD.EDU
;
. 3600000 NS D.ROOT-SERVERS.NET.
D.ROOT-SERVERS.NET. 3600000 A 128.8.10.90
;
; formerly NS.NASA.GOV
;
. 3600000 NS E.ROOT-SERVERS.NET.
E.ROOT-SERVERS.NET. 3600000 A 192.203.230.10
;
; formerly NS.ISC.ORG
;
. 3600000 NS F.ROOT-SERVERS.NET.
F.ROOT-SERVERS.NET. 3600000 A 192.5.5.241
;
; formerly NS.NIC.DDN.MIL
;
. 3600000 NS G.ROOT-SERVERS.NET.
G.ROOT-SERVERS.NET. 3600000 A 192.112.36.4
;
; formerly AOS.ARL.ARMY.MIL
;
. 3600000 NS H.ROOT-SERVERS.NET.
H.ROOT-SERVERS.NET. 3600000 A 128.63.2.53
;
; formerly NIC.NORDU.NET
;
. 3600000 NS I.ROOT-SERVERS.NET.
I.ROOT-SERVERS.NET. 3600000 A 192.36.148.17
;
; operated by VeriSign, Inc.
;
. 3600000 NS J.ROOT-SERVERS.NET.
J.ROOT-SERVERS.NET. 3600000 A 192.58.128.30
;
; operated by RIPE NCC
;
. 3600000 NS K.ROOT-SERVERS.NET.
K.ROOT-SERVERS.NET. 3600000 A 193.0.14.129
;
; operated by ICANN
;
. 3600000 NS L.ROOT-SERVERS.NET.
L.ROOT-SERVERS.NET. 3600000 A 198.32.64.12
;
; operated by WIDE
;
. 3600000 NS M.ROOT-SERVERS.NET.
M.ROOT-SERVERS.NET. 3600000 A 202.12.27.33
; End of File
This file contains NS and A resource records that specify the names of authoritative name servers and their addresses for the root zone (indicated by the . in the first field of each NS record).
The comment lines in the file begin with a semicolon. These comments give you hints about the location of the 13 root name servers. This file is a necessity for any name server because the name server has to be able to reach at least one root name server.
The localhost.zone file
The /etc/named.conf file includes a zone statement for the localhost zone that specifies the zone file as localhost.zone. That file is located in the /var/named directory in Fedora, in the /var/local/named directory in SUSE, and in /etc/bind/db.local in Debian and Xandros. Here’s a listing of what the localhost.zone file contains:
$TTL 86400
$ORIGIN localhost.
@ 1D IN SOA @ root (
42 ; serial (d. adams)
3H ; refresh
15M ; retry
1W ; expiry
1D ) ; minimum
1D IN NS @
1D IN A 127.0.0.1
This zone file starts with a $TTL directive that sets the default TTL (Time To Live) to one day (86400 seconds) for subsequent records with undefined TTLs. Next, the $ORIGIN directive sets the domain name to localhost.
After these two directives, the localhost.zone file contains three resource records (RRs): an SOA record, an NS record, and an A record. The SOA and NS records specify localhost as the primary authoritative name server for the zone. The A record specifies the address oflocalhost as 127.0.0.1.
The zone file for reverse mapping 127.0.0.1
The third zone statement in the /etc/named.conf file specifies a reverse-mapping zone named 0.0.127.in-addr.arpa. For this zone, the zone file is /var/named/named.localhost in Fedora, /var/lib/named/127.0.0.zone in SUSE, and/etc/bind/db.127 in Debian, Ubuntu, and Xandros. This zone file contains the following:
$TTL 86400
@ IN SOA localhost. root.localhost. (
1997022700 ; Serial
28800 ; Refresh
14400 ; Retry
3600000 ; Expire
86400 ) ; Minimum
IN NS localhost.
1 IN PTR localhost.
The SOA and NS records specify localhost as the primary name server. The PTR record specifies localhost as the name corresponding to the address 127.0.0.1.
The SOA record also shows root.localhost. as the e-mail address of the technical contact for the domain. The DNS zone files use the format user.host. (note the ending period) format for the e-mail address. When sending any e-mail to the contact, you have to replace the first period with @ and remove the final period.
Caching name server: Startup and test
After you’ve studied the configuration files for the caching name server, you can start the name server and see it in operation.
To start the name server, log in as root and type /etc/init.d/named start in Fedora and SUSE. To ensure that the named server starts every time you reboot the system, type chkconfig -- level 35 named on in Fedora and SUSE. In Debian, Ubuntu, and Xandros, type/etc/init.d/bind9 start to start the named server.
The named server writes diagnostic log messages in the /var/log/messages file. After you start named, you can check the log messages by opening /var/log/messages in a text editor. If no error messages are from named, you can proceed to test the name server.
Before you try the caching name server, you have to specify that name server as your primary one. To do so, make sure that the first line in the /etc/resolv.conf file is the following:
nameserver 127.0.0.1
Now you can use host to test the name server. For example, to look up the IP address of www.gao.gov by using the caching name server on localhost, type the following command:
host www.gao.gov localhost
Here’s the resulting output from the host command:
Using domain server:
Name: localhost
Address: 127.0.0.1#53
Aliases:
www.gao.gov. has address 161.203.16.77
As the output shows, the host command uses localhost as the DNS server and returns the IP address of www.gao.gov. If you get output similar to this, the caching name server is up and running.
Configuring a primary name server
The best way to configure a primary name server is to start by configuring a caching name server (as explained in the previous sections). Then, add master zones for the domains for which you want this name server to be the primary name server. For example, suppose you want to define a primary name server for the server7.net domain. Here are the steps I go through to configure that primary name server on a Fedora system (after logging in as root):
1. Add the following zone statements to the /etc/named.conf file:
zone "server7.net" IN {
type master;
file "server7.zone";
};
zone "0.168.192.in-addr.arpa" IN {
type master;
file "0.168.192.zone";
};
2. Create the zone file /var/named/server7.zone with the following lines in it:
$TTL 86400
$ORIGIN server7.net.
@ 1D IN SOA @ root.server7.net (
100 ; serial
3H ; refresh
15M ; retry
1W ; expiry
1D ) ; minimum
1D IN NS @
1D IN A 192.168.0.7
wxp IN A 192.168.0.2
3. Create the zone file /var/named/0.168.192.zone with the following lines in it:
$TTL 86400
; Remember zone name is: 0.168.192.in-addr.arpa
@ IN SOA server7.net. root.server7.net (
1 ; Serial
28800 ; Refresh
14400 ; Retry
3600000 ; Expire
86400 ) ; Minimum
IN NS server7.net.
7 IN PTR server7.net.
2 IN PTR wxp.server7.net.
4. To test the new configuration, restart the named server with the following command:
/etc/init.d/named restart
5. Use dig or host to query the DNS server.
For example, here’s how to use host to check the address of the host wxp.server7.net at the DNS server running on localhost:
host wxp.server7.net localhost
This command results in the following output:
Using domain server:
Name: localhost
Address: 127.0.0.1#53
Aliases:
wxp.server7.net has address 192.168.0.2
If you want to use dig to check the DNS server, type the following command:
dig @localhost wxp.server7.net
That @localhost part specifies the DNS server that dig contacts.
When you successfully use dig to contact a DNS server, you can get a bit fancier with what you ask that server to do. Here, for example, is the command to type to try a reverse lookup with the IP address 192.168.0.2:
host 192.168.0.2 localhost
This command displays the following output:
Using domain server:
Name: localhost
Address: 127.0.0.1#53
Aliases:
2.0.168.192.in-addr.arpa domain name pointer wxp.server7.net