Linux All-in-One For Dummies, 5th Edition (2014)
Book V. Administration
Chapter 3. Managing File Systems
In This Chapter
 Navigating the Linux file system
Sharing files with NFS
Backing up and restoring files
Mounting the NTFS file system
Accessing MS-DOS files
A file system refers to the organization of files and directories. As a system administrator, you have to perform certain operations to manage file systems on various storage media. For example, you have to know how to mount — add a file system on a storage medium by attaching it to the overall Linux file system. You also have to back up important data and restore files from a backup. Other file-system operations include sharing files with the Network File System (NFS) and accessing MS-DOS files. This chapter shows you how to perform all file-system management tasks.
Exploring the Linux File System
 The files and directories in your PC store information in an organized manner, just like paper filing systems. When you store information on paper, typically you put several pages in a folder and then store the folder in a file cabinet. If you have many folders, you probably have some sort of filing system. For example, you may label each folder’s tab and then arrange them alphabetically in the file cabinet. You might have several file cabinets, each with lots of drawers, which, in turn, contain folders full of pages.
Operating systems, such as Linux, organize information in your computer in a manner similar to your paper filing system. Linux uses a file system to organize all information in your computer. Of course, the storage medium isn’t a metal file cabinet and paper. Instead, Linux stores information on devices such as hard drives, USB drives, and DVD drives.
To draw an analogy between your computer’s file system and a paper filing system, think of a disk drive as the file cabinet. The drawers in the file cabinet correspond to the directories in the file system. The folders in each drawer are also directories — because a directory in a computer file system can contain other directories. You can think of files as the pages inside the folder — and that’s where the actual information is stored. Figure 3-1 illustrates the analogy between a file cabinet and the Linux file system.
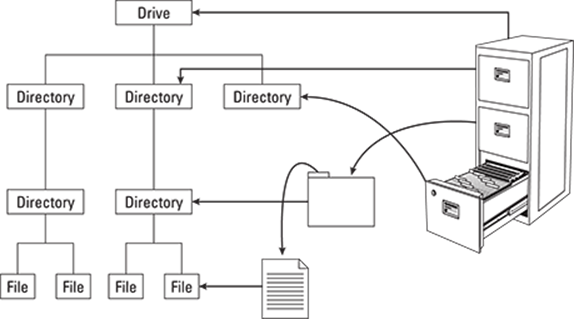
Figure 3-1: It’s a bit of a stretch, but you can think of the Linux file system as similar to a filing cabinet.
The Linux file system has a hierarchical structure — directories can contain other directories, which in turn contain individual files.
Everything in your Linux system is organized in files and directories. To access and use documents and programs on your system, you have to be familiar with the file system.
Understanding the file-system hierarchy
The Linux file system is organized like a tree, with a root directory from which all other directories branch out. When you write a complete pathname, the root directory is represented by a single slash (/). Then there’s a hierarchy of files and directories. Parts of the file system can be on different physical drives or in different hard drive partitions.
Linux uses a standard directory hierarchy. Figure 3-2 shows some of the standard parts of the Linux file system. You can create new directories anywhere in this structure.
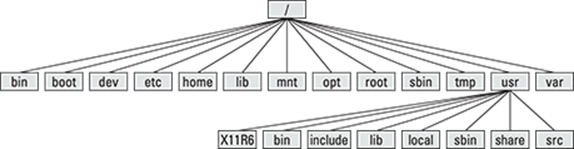
Figure 3-2: The Linux file system uses a standard directory hierarchy similar to this one.
Write the name of any file or directory by concatenating the names of directories that identify where that file or directory is and by using the forward slash (/) as a separator. For example, in Figure 3-2, the usr directory at the top level is written as /usr because the root directory (/) contains usr. On the other hand, the X11R6 directory is inside the usr directory, which is inside the root directory (/). Therefore the X11R6 directory is uniquely identified by the name /usr/X11R6. This type of full name is a pathname because the name identifies the path you take from the root directory to reach a file. Thus /usr/X11R6 is a pathname.
 The Filesystem Hierarchy Standard (FHS) specifies the organization of files and directories in Unix-like operating systems, such as Linux. FHS defines a standard set of directories and their intended use. The FHS, if faithfully adopted by all Linux distributions, should help improve the interoperability of applications, system administration tools, development tools, and scripts across all Linux distributions. FHS even helps the system documentation (as well as books like this one) because the same description of the file system applies to all Linux distributions. Version 2.3 of FHS was announced on January 29, 2004. FHS 2.3 is part of the Linux Standard Base version 3.x (LSB 3.0), which was released on July 1, 2005. The standard was updated with 3.1 on October 25, 2005, and 3.2 on January 28, 2008. LSB 3.x (seewww.linuxbase.org) is a set of binary standards aimed at reducing variations among the Linux distributions and promoting portability of applications. As of this writing, the most current Base is 4.1, which came out in early 2011. To find out more about the Linux Standard Base, check out the home page at
www.linuxfoundation.org/collaborate/workgroups/lsb.
Each of the standard directories in the Linux file system has a specific purpose. Table 3-1, Table 3-2, and Table 3-3 summarize these directories.
Table 3-1 Standard Directories in Linux File System
|
Directory |
Used to Store |
|
/bin |
Executable files for user commands (for use by all users) |
|
/boot |
Files needed by the boot loader to load the Linux kernel |
|
/dev |
Device files |
|
/etc |
Host-specific system configuration files |
|
/home |
User home directories |
|
/lib |
Shared libraries and kernel modules |
|
/media |
Mount point for removable media |
|
/mnt |
Mount point for a temporarily mounted file system |
|
/opt |
Add-on application software packages |
|
/root |
Home directory for the root user |
|
/sbin |
Utilities for system administration |
|
/srv |
Data for services (such as web and FTP) offered by this system |
|
/tmp |
Temporary files |
Table 3-2 The /usr Directory Hierarchy
|
Directory |
Secondary Directory Hierarchy |
|
/usr/bin |
Most user commands |
|
/usr/include |
Directory for include files — files that are inserted into source code of applications by using various directives — used in developing Linux applications |
|
/usr/lib |
Libraries used by software packages and for programming |
|
/usr/libexec |
Libraries for applications |
|
/usr/local |
Any local software |
|
/usr/sbin |
Nonessential system administrator utilities |
|
/usr/share |
Shared data that doesn’t depend on the system architecture (whether the system is an Intel PC or a Sun SPARC workstation) |
|
/usr/src |
Source code |
Table 3-3 The /var Directory Hierarchy
|
Directory |
Variable Data |
|
/var/cache |
Cached data for applications |
|
/var/lib |
Information relating to the current state of applications |
|
/var/lock |
Lock files to ensure that a resource is used by one application only |
|
/var/log |
Log files organized into subdirectories |
|
/var/mail |
User mailbox files |
|
/var/opt |
Variable data for packages stored in the /opt directory |
|
/var/run |
Data describing the system since it was booted |
|
/var/spool |
Data that’s waiting for some kind of processing |
|
/var/tmp |
Temporary files preserved between system reboots |
|
/var/yp |
Network Information Service (NIS) database files |
Mounting a device on the file system
The storage devices that you use in Linux contain Linux file systems. Each device has its own local file system consisting of a hierarchy of directories. Before you can access the files on a device, you have to attach the device’s directory hierarchy to the tree that represents the overall Linux file system.
Mounting is the operation you perform to cause the file system on a physical storage device (a hard drive partition or a CD-ROM) to appear as part of the Linux file system. Figure 3-3 illustrates the concept of mounting.
Figure 3-3 shows each device with a name that begins with /dev. For example, /dev/cdrom is the first DVD/CD-ROM drive. Physical devices are mounted at specific mount points on the Linux file system. For example, the DVD/CD-ROM drive, /dev/cdrom, is mounted on/media/cdrom in the file system. After mounting the CD-ROM in this way, the Fedora directory on a CD-ROM or DVD-ROM appears as /media/cdrom/Fedora in the Linux file system.
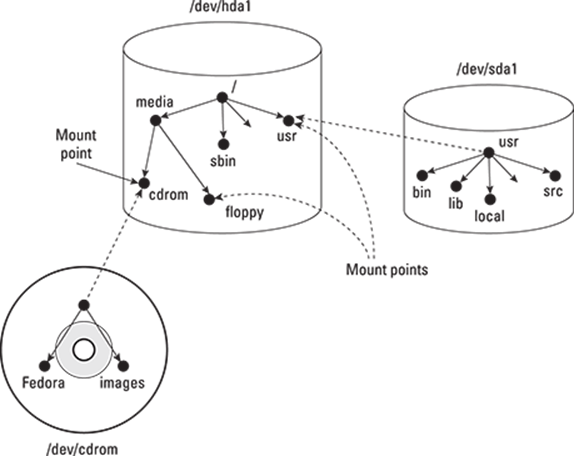
Figure 3-3: You have to mount a device on the Linux file system before accessing it.
You can use the mount command to manually mount a device on the Linux file system at a specified directory. That directory is the mount point. For example, to mount the DVD/CD-ROM drive at the /media/cdrom directory, type the following command (after logging in as root):
mount /dev/cdrom /media/cdrom
The mount command reports an error if the DVD/CD-ROM device is mounted already or if no CD or DVD media is in the drive. Otherwise the mount operation succeeds, and you can access the contents of the DVD or CD through the /media/cdrom directory.
 You can use any directory as the mount point. If you mount a device on a nonempty directory, however, you can’t access the files in that directory until you unmount the device by using the umount command. Therefore always use an empty directory as the mount point.
 To unmount a device when you no longer need it, use the umount command. For example, for a DVD/CD-ROM device with the device name /dev/cdrom, type the following command to unmount the device:
umount /dev/cdrom
The umount command succeeds as long as no one is using the DVD/CD-ROM. If you get an error when trying to unmount the DVD/CD-ROM, check to see if the current working directory is on the DVD or CD. If you’re currently working in one of the DVD/CD-ROM’s directories, that also qualifies as a use of the DVD/CD-ROM.
Examining the /etc/fstab file
 The mount command has the following general format:
mount device-name mount-point
However, you can mount by specifying only the CD-ROM device name or the mount-point name, provided there’s an entry in the /etc/fstab file for the CD-ROM mount point. That entry specifies the CD-ROM device name and the file-system type. That’s why you can mount the CD-ROM with a shorter mount command.
 For example, in Debian, you can mount the CD-ROM by typing one of the following commands:
mount /dev/cdrom
mount /media/cdrom
The /etc/fstab file is a configuration file — a text file containing information that the mount and umount commands use. Each line in the /etc/fstab file provides information about a device and its mount point in the Linux file system. Essentially, the /etc/fstab file associates various mount points within the file system with specific devices, which enables the mount command to work from the command line with only the mount point or the device as argument.
Here’s a /etc/fstab file from a SUSE system. (The file has a similar format in other Linux distributions.)
/dev/hda7 /boot ext3 acl,user_xattr 1 2
/dev/hda6 /data1 auto noauto,user 0 0
/dev/hda9 /data2 auto noauto,user 0 0
/dev/hda10 /data3 auto noauto,user 0 0
/dev/hda5 /data4 auto noauto,user 0 0
/dev/hda2 /windows/C ntfs ro,users,gid=users,umask=0002,nls=utf8 0 0
/dev/hda8 swap swap pri=42 0 0
devpts /dev/pts devpts mode=0620,gid=5 0 0
proc /proc proc defaults 0 0
usbfs /proc/bus/usb usbfs noauto 0 0
sysfs /sys sysfs noauto 0 0
/dev/cdrecorder /media/cdrecorder subfs fs=cdfss,ro,procuid,nosuid,nodev,exec,iocharset=utf8 0 0
The first field on each line shows a device name, such as a hard drive partition. The second field is the mount point, and the third field indicates the type of file system on the device. You can ignore the last three fields for now.
This /etc/fstab file shows that the /dev/hda8 device functions as a swap device for virtual memory, which is why both the mount point and the file-system type are set to swap.
The Linux operating system uses the contents of the /etc/fstab file to mount various file systems automatically. During Linux startup, the init process executes a shell script that runs the mount -a command. That command reads the /etc/fstab file and mounts all listed file systems (except those with the noauto option). The third field on each line of /etc/fstab specifies the type of file system on that device, and the fourth field shows a comma-separated list of options that the mount command uses when mounting that device on the file system. Typically, you find the defaults option in this field. The defaults option implies — among other things — that the device mounts at boot time, that only the root user can mount the device, and that the device mounts for both reading and writing. If the options include noauto, the device doesn’t mount automatically when the system boots.
In Fedora, you often find the managed option in the fourth field of /etc/fstab entries. The managed option indicates that the line was added to the fstab file by the HAL (hardware abstraction layer) daemon, which runs the fstab-sync command to add entries in the/etc/fstab file for each removable drive that it detects. You typically find that the entries for DVD/CD-ROM drive(s) (/dev/hdc in most systems) have the managed option in the fourth field.
Sharing Files with NFS
Sharing files through the NFS is simple and involves two basic steps:
· On the NFS server, export one or more directories by listing them in the /etc/exports file and by running the /usr/sbin/exportfs command. In addition, you must run the NFS server.
· On each client system, use the mount command to mount the directories the server has exported.
How you start the NFS server depends on the Linux distribution. If a GUI sysadmin tool is available, you can start the NFS server from the GUI tool. Otherwise, you can type a command in a terminal window to start the NFS server:
· In Debian, you can type invoke-rc.d nfs-kernel-server start and invoke-rc.d nfs-common start to start the NFS server.
· In Fedora, type service nfs start.
· To start the NFS server in SUSE, you can use the YaST Control Center: From the main menu, choose the Kickoff Application Launcher⇒YaST⇒System⇒System Services (run level).
Doing so brings up a screen such as that shown in Figure 3-4.
In Xandros, you can start the NFS server from the Xandros Control Center (Main Menu⇒Control Center) or by typing invoke-rc.d nfs-user-server start in a terminal window.
The only problem in using NFS is that each client system must support it. Most PCs don’t come with NFS — that means you have to buy NFS software separately if you want to share files by using NFS. If, however, all systems on your LAN run Linux (or other variants of Unix with built-in NFS support), using NFS makes sense.
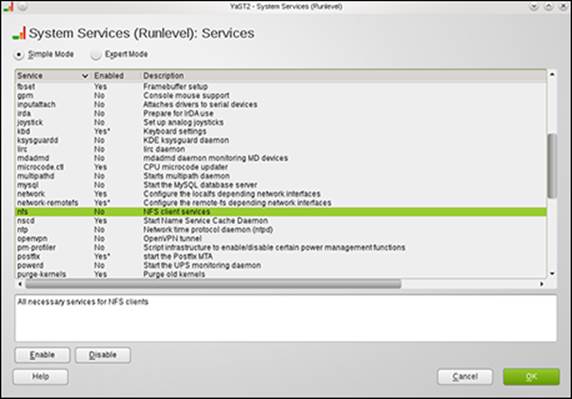
Figure 3-4: You can start NFS in openSUSE from YaST.
 NFS has security vulnerabilities. Therefore don’t set up NFS on systems directly connected to the Internet.
The upcoming section walks you through an NFS setup, using an example of two Linux PCs on a LAN.
Exporting a file system with NFS
To export a file system with NFS, start with the server system that exports — makes available to the client systems — the contents of a directory. On the server, you must run the NFS service and also designate one or more file systems to be exported to the client systems.
You have to add an appropriate entry to the /etc/exports file. For example, suppose you want to export the /home directory and you want to enable the hostname LNBP75 to mount this file system for read and write operations. (You can use a host’s IP address in place of the hostname.) You can do so by adding the following entry to the /etc/exports file:
/home LNBP75(rw)
If you use the IP address of a host, the entry might look like this:
/home 192.168.1.200(rw)
This specifies that 192.168.1.200 is the IP address of the host that’s allowed full access to the /home directory.
After adding the entry in the /etc/exports file, start the NFS server using a method appropriate for your Linux distribution. For example, in Fedora, log in as root and type the following command in a terminal window:
service nfs start
When the NFS service is up, the server side of NFS is ready. Now you can try to mount the exported file system from a client system and access the exported file system.
If you ever make any changes to the exported file systems listed in the /etc/exports file, remember to restart the NFS service. For example, in Fedora, type service nfs restart in a terminal window. In Xandros, type invoke-rc.d nfs-user-server restart.
Mounting an NFS file system
To access an exported NFS file system on a client system, you have to mount that file system on a mount point — which is, in practical terms, nothing more than a local directory. For example, suppose you want to access the /home/public directory exported from the server named LNBP200 at the local directory /mnt/lnbp200 on the client system. To do so, follow these steps:
1. Log in as root and create the directory with the following command:
mkdir /mnt/lnbp200
2. Type the following command to perform the mount operation:
mount lnbp200:/home/public /mnt/lnbp200
If you know only the IP address of the server, replace the hostname (in this case, lnbp200) with the IP address.
3. Change the directory to /mnt/lnbp200 with the command cd /mnt/lnbp200.
Now you can view and access exported files from this directory.
To confirm that the NFS file system is indeed mounted, log in as root on the client system and type mount in a terminal window. You see a line similar to the following about the NFS file system:
lnbp200:/home/public on /mnt/lnbp200 type nfs (rw,addr=192.168.1.200)
Backing Up and Restoring Files
Backing up and restoring files is a crucial system administration task. If something happens to your system’s hard drive, you have to rely on the backups to recover important files. The following discussion presents some backup strategies, describes several backup media, and explains how to back up and restore files by using the tape archiver (tar) program that comes with Linux. Also, you find out how to perform incremental and automatic backups on tapes.
If you have a CD burner, you can back up files also by recording them on a CD-R. Consult Book II, Chapter 5, for information on what application you can use to burn a data CD.
Selecting a backup strategy and media
Your Linux system’s hard drive contains everything you need to keep the system running — as well as other files (such as documents and databases) that keep your business running. You have to back up these files so you can recover quickly and bring the system back to normal in case the hard drive crashes. Typically, you have to follow a strict regimen of regular backups because you can never tell when the hard drive may fail or the file system may get corrupted. To implement such a regimen, first decide which files you want to back up, how often, and what backup storage media to use. This process is what is meant by selecting a backup strategy and backup media.
Your choice of backup strategy and backup media depends on your assessment of the risk of business disruption due to hard drive failure. Depending on how you use your Linux system, a disk failure may or may not have much effect on you.
For example, if you use your Linux system as a learning tool (to find out more about Linux or programming), all you may need are backup copies of some system files required to configure Linux. In this case, your backup strategy can be to save important system configuration files on your preferred storage media every time you change any system configuration.
On the other hand, if you use your Linux system as an office server that provides shared file storage for many users, the risk of business disruption due to disk failure is much higher. In this case, you have to back up all the files every week and back up any new or changed files every day. You can perform these backups in an automated manner (with the job-scheduling features described in Chapter 1 of this minibook). Also, you probably need a backup storage medium that can store many gigabytes of data. In other words, for high-risk situations, your backup strategy has to be more elaborate and requires additional equipment (such as a high-capacity external hard drive).
Your choice of backup media depends on the amount of data you have to back up. For a small amount of data (such as system configuration files), you can use USB flash drives as backup media. If your PC has an old Zip drive, you can use Zip disks as backup media; these are good for backing up a single-user directory. To back up entire servers, use an external hard drive (which could be attached to the computer or the network) or other storage device.
When backing up files to these media, you have to refer to the backup device by name. You will find these devices under the /dev directory.
Commercial backup utilities for Linux
The next section explains how to back up and restore files using the tape archiver (tar) program that comes with Linux. Although you can manage backups with tar, a number of commercial backup utilities come with graphical user interfaces and other features to simplify backups. Here are some well-known commercial backup utilities for Linux:
· BRU: A backup and restore utility from the TOLIS Group, Inc. (www.tolisgroup.com)
· LONE-TAR: Tape backup software package from Lone Star Software Corp. (www.cactus.com)
· Arkeia: Backup and recovery software for heterogeneous networks from Arkeia (www.arkeia.com)
· CA ARCserve Backup for Linux: Data-protection technology for Linux systems from Computer Associates (http://www.arcserve.com)
Using the tape archiver — tar
You can use the tar command to archive files to a device, such as a hard drive or tape. The tar program creates an archive file that can contain other directories and files and (optionally) compress the archive for efficient storage. The archive is then written to a specified device or another file. Many software packages are distributed in the form of a compressed tar file.
The command syntax of the tar program is as follows:
tar options destination source
Here options are usually specified by a sequence of single letters, with each letter specifying what tar does. The destination is the device name of the backup device. And source is a list of file or directory names denoting the files to back up.
Backing up and restoring a single-volume archive
Suppose you want to back up the contents of the /etc/X11 directory on a hard drive. Log in as root, and type the following command, where xxx represents your drive:
tar zcvf /dev/xxx /etc/X11
The tar program displays a list of filenames as each file is copied to the compressed tar archive. In this case, the options are zcvf, the destination is /dev/xxx (the drive), and the source is the /etc/X11 directory (which implies all its subdirectories and their contents). You can use a similar tar command to back up files to a tape — simply replace the hard drive location with that of the tape device — such as /dev/st0 for a SCSI tape drive.
Table 3-4 defines a few common tar options.
Table 3-4 Common tar Options
|
Option |
Does the Following |
|
c |
Creates a new archive. |
|
f |
Specifies the name of the archive file or device on the next field in the command line. |
|
M |
Specifies a multivolume archive. (The next section describes multivolume archives.) |
|
t |
Lists the contents of the archive. |
|
v |
Displays verbose messages. |
|
x |
Extracts files from the archive. |
|
z |
Compresses the tar archive using gzip. |
To view the contents of the tar archive you create on the drive, type the following command (replacing xxx with the drive device):
tar ztf /dev/xxx
You see a list of filenames (each begins with /etc/X11) indicating what’s in the backup. In this tar command, the t option lists the contents of the tar archive.
To extract the files from a tar backup, follow these steps while logged in as root:
1. Change the directory to /tmp by typing this command:
cd /tmp
This step is where you can practice extracting the files from the tar backup. For a real backup, change the directory to an appropriate location (typically, you type cd /).
2. Type the following command:
tar zxvf /dev/xxx
This tar command uses the x option to extract the files from the archive stored on the device (replace xxx with the drive).
Now if you check the contents of the /tmp directory, you notice that the tar command creates an etc/X11 directory tree in /tmp and restores all the files from the tar archive into that directory. The tar command strips the leading / from the filenames in the archive and restores the files in the current directory. If you want to restore the /etc/X11 directory from the archive, use this command (substituting the device name for xxx):
tar zxvf /dev/xxx -C /
The -C does a cd to the directory specified (in this case, the root directory of /) before doing the tar; the / at the end of the command denotes the directory where you want to restore the backup files.
You can use the tar command to create, view, and restore an archive. You can store the archive in a file or in any device you specify with a device name.
Backing up and restoring a multivolume archive
Sometimes the capacity of a single storage medium is less than the total storage space needed to store the archive. In this case, you can use the M option for a multivolume archive — meaning the archive can span multiple tapes or even floppies (if you happen to be using an older machine that still has them). Note, however, that you can’t create a compressed, multivolume archive. That means you have to drop the z option.
Note: The M tells tar to create a multivolume archive. The tar command prompts you for a second media when the first one is filled. Take out the first media, and insert another when you see the following prompt:
Prepare volume #2 and hit return:
When you press Enter, the tar program continues with the second media. For larger archives, the tar program continues to prompt for new media as needed.
To restore from this multivolume archive, type cd /tmp to change the directory to /tmp. (I use the /tmp directory for illustrative purposes, but you have to use a real directory when you restore files from archive.) Then type (replacing xxx with the device you are using)
tar xvfM /dev/xxx
The tar program prompts you to feed the media as necessary.
Use the du -s command to determine the amount of storage you need for archiving a directory. For example, type du -s /etc to see the total size of the /etc directory in kilobytes. Here’s a typical output of that command:
35724 /etc
The resulting output shows that the /etc directory requires at least 35,724 kilobytes of storage space to back up.
Backing up on tapes
Although backing up on tapes is as simple as using the right device name in the tar command, you do have to know some nuances of the tape device to use it well. When you use tar to back up to the device named /dev/st0 (the first SCSI tape drive), the tape device automatically rewinds the tape after the tar program finishes copying the archive to the tape. The /dev/st0 device is called a rewinding tape device because it rewinds tapes by default.
If your tape can hold several gigabytes of data, you may want to write several tar archives — one after another — to the same tape (otherwise much of the tape may be left empty). If you plan to do so, your tape device can’t rewind the tape after the tar program finishes. To help you with scenarios like this one, several Linux tape devices are nonrewinding. The nonrewinding SCSI tape device is called /dev/nst0. Use this device name if you want to write one archive after another on a tape.
After each archive, the nonrewinding tape device writes an end-of-file (EOF) marker to separate one archive from the next. Use the mt command to control the tape — you can move from one marker to the next or rewind the tape. For example, after you finish writing several archives to a tape using the /dev/nst0 device name, you can force the tape to rewind with the following command:
mt -f /dev/nst0 rewind
After rewinding the tape, you can use the following command to extract files from the first archive to the current disk directory:
tar xvf /dev/nst0
After that, you must move past the EOF marker to the next archive. To do so, use the following mt command:
mt -f /dev/nst0 fsf 1
This positions the tape at the beginning of the next archive. Now use the tar xvf command again to read this archive.
If you save multiple archives on a tape, you have to keep track of the archives yourself. The order of the archives can be hard to remember, so you may be better off simply saving one archive per tape.
Performing incremental backups
Suppose you use tar to back up your system’s hard drive on a tape. Because such a full backup can take quite some time, you don’t want to repeat this task every night. (Besides, only a small number of files may have changed during the day.) To locate the files that need backing up, you can use the find command to list all files that have changed in the past 24 hours:
find / -mtime -1 -type f -print
This command prints a list of files that have changed within the last day. The -mtime -1 option means you want the files that were last modified less than one day ago. You can now combine this find command with the tar command to back up only those files that have changed within the last day:
tar cvf /dev/st0 'find / -mtime -1 -type f -print'
When you place a command between single back quotes, the shell executes that command and places the output at that point in the command line. The result is that the tar program saves only the changed files in the archive. This process gives you an incremental backup of only the files that have changed since the previous day.
Performing automated backups
Chapter 1 of this minibook shows how to use crontab to set up recurring jobs (called cron jobs). The Linux system performs these tasks at regular intervals. Backing up your system is a good use of the crontab facility. Suppose your backup strategy is as follows:
· Every Sunday at 1:15 a.m., your system backs up the entire hard drive on the tape.
· Monday through Saturday, your system performs an incremental backup at 3:10 a.m. by saving only those files that have changed during the past 24 hours.
To set up this automated backup schedule, log in as root and type the following lines in a file named backups (this example assumes that you are using a SCSI tape drive):
15 1 * * 0 tar zcvf /dev/st0 /
10 3 * * 1-6 tar zcvf /dev/st0 'find / -mtime -1 -type f -print'
Next, submit this job schedule by using the following crontab command:
crontab backups
Now you’re set for an automated backup. All you need to do is to place a new tape in the tape drive every day. Remember also to give each tape an appropriate label.
Accessing a DOS or Windows File System
If you’re using a legacy machine that you just don’t want to throw out and have a really old version of Microsoft Windows installed on your hard drive, you’ve probably already mounted the DOS or Windows partition under Linux. If not, you can easily mount DOS or Windows partitions in Linux. Mounting makes the DOS or Windows directory hierarchy appear as part of the Linux file system.
Mounting a DOS or Windows disk partition
To mount a DOS or Windows hard drive partition or storage device in Linux, use the mount command but include the option -t vfat to indicate the file-system type as DOS. For example, if your DOS partition happens to be the first partition on your IDE (Integrated Drive Electronics) drive and you want to mount it on /dosc, use the following mount command:
mount -t vfat /dev/hda1 /dosc
The -t vfat part of the mount command specifies that the device you mount — /dev/hda1 — has an MS-DOS file system. Figure 3-5 illustrates the effect of this mount command.
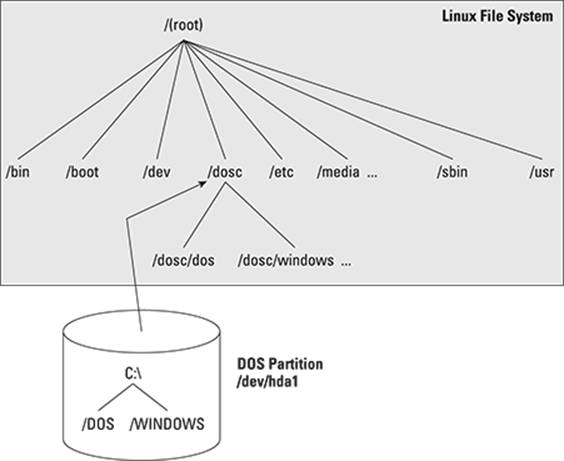
Figure 3-5: Here’s how you mount a DOS partition on the /dosc directory.
Figure 3-5 shows how directories in your DOS partition map to the Linux file system. What was the C:\DOS directory under DOS becomes /dosc/dos under Linux. Similarly, C:\WINDOWS now is /dosc/windows. You probably can see the pattern. To convert a DOS filename to Linux (when you mount the DOS partition on /dosc), perform the following steps:
1. Change the DOS names to lowercase.
2. Change C:\ to /dosc/.
3. Change all backslashes (\) to slashes (/).
Mounting those ancient DOS floppy disks
Just as you mount a DOS hard drive partition on the Linux file system, you can also mount a DOS floppy disk on a legacy machine. You must log in as root to mount a floppy, but you can set up your system so that any user can mount a DOS floppy disk. You also have to know the device name for the floppy drive. By default, Linux defines the following two generic floppy device names:
· /dev/fd0 is the A drive (the first floppy drive)
· /dev/fd1 is the B drive (the second floppy drive, if you have one)
You can use any empty directory in the file system as the mount point, but the Linux system comes with a directory, /media/floppy, specifically for mounting a floppy disk.
To mount a DOS floppy disk on the /media/floppy directory, put the floppy in the drive and type the following command:
mount -t vfat /dev/fd0 /media/floppy
After you mount the floppy, you can copy files to and from the floppy by using the Linux copy command (cp). To copy the file gnome1.pcx from the current directory to the floppy, type the following:
cp gnome1.pcx /media/floppy
Similarly, to see the contents of the floppy disk, type the following:
ls /media/floppy
If you want to remove the floppy disk from the drive, first unmount the floppy drive. Unmounting removes the association between the floppy disk’s file system and the mount point on the Linux file system. Use the umount command to unmount the floppy disk like this:
umount /dev/fd0
You can set up your Linux system so that any user can mount a DOS floppy. To enable any user to mount a DOS floppy in the A drive on the /a directory, for example, perform the following steps:
1. Log in as root.
2. Create the /a directory (the mount point) by typing the following command in a terminal window:
mkdir /a
3. Edit the /etc/fstab file in a text editor (such as vi or emacs) by inserting the following line, and then save the file and quit the editor:
/dev/fd0 /a vfat noauto,user 0 0
The first field in that line is the device name of the floppy drive (/dev/fd0); the second field is the mount directory (/a); the third field shows the type of file system (vfat). The user option (which appears next to noauto) enables all users to mount DOS floppy disks.
4. Log out and then log back in as a normal user.
5. To confirm that you can mount a DOS floppy as a normal user and not just as root, insert a DOS floppy in the A drive and type the following command:
mount /a
The mount operation succeeds, and you see a listing of the DOS floppy when you type the command ls /a.
6. To unmount the DOS floppy, type umount /a.
Mounting an NTFS partition
Nowadays, most PCs come with Windows 7 or Windows 8 pre-installed on the hard drive. Both of these versions of Windows, as well as Windows XP, typically use the NT File System (NTFS). Linux supports read-only access to NTFS partitions, and many distributions come with the ntfs.ko kernel module, which is needed to access an NTFS partition.
If you’ve installed Linux on a Windows system and want to access files on the NTFS partition but your distribution doesn’t include the ntfs.ko module, you can build the kernel after enabling an NTFS module during the kernel configuration step.
After rebuilding and booting from the new kernel, log in as root and type the following command to create a mount point for the NTFS partition. (In this case, I’m creating a mount point in the /mnt directory.)
mkdir /mnt/windir
Now you can mount the NTFS partition with the following command:
mount /dev/hda2 /mnt/windir -t ntfs -r -o umask=0222
If necessary, replace /dev/hda2 with the device name for the NTFS partition on your system. On most PCs that come with Windows pre-installed, the NTFS partition is the second one (/dev/hda2) — the first partition (/dev/hda1) is usually a hidden partition used to hold files used for the Windows installation.
All materials on the site are licensed Creative Commons Attribution-Sharealike 3.0 Unported CC BY-SA 3.0 & GNU Free Documentation License (GFDL)
If you are the copyright holder of any material contained on our site and intend to remove it, please contact our site administrator for approval.
© 2016-2026 All site design rights belong to S.Y.A.