Learning Ubuntu: A Beginners Guide to Using Linux (2016)
CHAPTER 4
CREATING A NEW USER
The user ‘root’ has full access to the system. While we used it to learn some basic navigation, we should not use it as our main username for the system. It defeats the security model that is great and makes Linux systems so secure. By not using root, it also prevents accidental typo errors that could result in disasters. It’s just good practice. What we will do in our next command is create a new user, named milo, and then we will provide him with sudo access.
Sudo before a command, will allow our user, milo, to be able to elevate it to higher security privileges to install software and make changes. Sudo runs the command as a super user, even though the user milo would normally only have more limited access. This will come together soon, when we dive into using it, but first we need to create milo’s account.
|
Add a New User |
|
|
Command |
adduser milo |
|
Result |
System sets up user milo |
|
CLI Display |
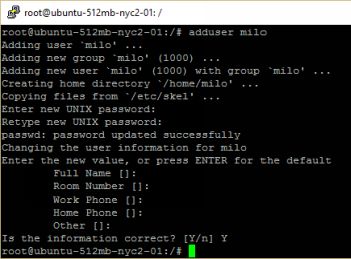
root@ubuntu:/# adduser milo Adding user ‘milo’ … |
Once you run that command, the system will then have you setup the account. You will be prompted for a password first. Then it will prompt you for user information, such as Full Name that you can skip by pressing ENTER for default settings. If this was a production system, adding the name, room number, work phone, home phone, and other information could be useful, but for right now there is no reason not to skip through it. Once you have reached the end, you will need to enter Y and then press enter.
You can see a screenshot of my process adding milo below, if you need some added help.
Earlier, we learned how to change our password. If you are root or a sudo user you can change a user’s password as well by following the steps below. Since we just set milo’s password you may not want to change it, but these are the steps you would take.
|
Change a User’s Password |
|
|
Command |
passwd milo |
|
Result |
System will prompt for you to set a new password for user milo. |
|
CLI Display |
root@ubuntu:/# passwd milo Enter new UNIX password: Retype new UNIX password: passwd: password updated successfully |
Ok, so now that we have milo setup, we still need to grant him access to sudo. We would only do this for users, who may need to increase their security privileges.
First we need to open the sudoer’s configuration file to modify it. We can do this by using the visudo command.
|
Giving a User Sudo Privileges |
|
|
Command |
visudo |
|
Result |
System will open the sudoer’s file. |
|
CLI Display |
root@ubuntu:/# visudo # This file MUST be edited with the 'visudo' command as root. # # Please consider adding local content in /etc/sudoers.d/ instead of # Directly modifying this file. # # See the man page for details on how to write a sudoers file. # Defaults env_reset Defaults mail_badpass Defaults secure_path="/usr/local/sbin:/usr/local/bin:/usr/sbin:/usr/bin:/sbin:/bin" # Host alias specification # User alias specification # Cmnd alias specification # User privilege specification root ALL=(ALL:ALL) ALL … |
There is a lot of text in this file, but do not be intimidated. In the table above I highlighted: root ALL=(ALL:ALL) ALL.
Below that selection we need to add the following:
milo ALL=(ALL:ALL) ALL
Press the down key until you are in the blank space under root in User privilege specification. Once there type milo, press tab, type ALL=(ALL:ALL), then press space, and type ALL. Now press the control key and X. The system will ask you if you wish to save modified buffer. Press Y and press enter.
Now you can breathe. I know we dived in deep a little fast, but it is important that we start using a user id other than root. It is also important that at the same time we can install software and learn more, so this was needed.
Before we move on, we can learn two quick commands. Right now there is probably a lot of text on your CLI. If you want to clean that up, we can use the clear command.
|
Clearing the Screen |
|
|
Command |
clear |
|
Result |
System will clear the screen |
|
CLI Display |
root@ubuntu:/# clear |
Now that we have a clear screen we can close out of PuTTY, before continuing on our new user id, milo.
|
Logging Out |
|
|
Command |
exit |
|
Result |
System will close SSH session and exit PuTTY |
|
CLI Display |
root@ubuntu:/# exit |
QUICK RECAP
1) We should avoid using the ‘root’ user as a good usage practice.
2) sudo before a command, allows a user to have super user privileges.
3) We can add a user by using the command adduser, with the username afterwards.
1. Example: adduser nathan
4) We can change a user’s password by using the passwd command before their name.
1. Example: passwd nathan
5) To have access to use sudo, a user must first be added to the configuration file, which can be edited by using the visudo command.
6) If our CLI gets too cluttered, we can clear it by using the clear command.
7) To end our session and sign out of PuTTY we can use exit.
All materials on the site are licensed Creative Commons Attribution-Sharealike 3.0 Unported CC BY-SA 3.0 & GNU Free Documentation License (GFDL)
If you are the copyright holder of any material contained on our site and intend to remove it, please contact our site administrator for approval.
© 2016-2026 All site design rights belong to S.Y.A.