Ubuntu Linux Toolbox: 1000+ Commands for Power Users (2013)
Chapter 13
Doing Remote System Administration
IN THIS CHAPTER
· Configuring SSH
· Using SSH for remote login
· Using SSH to do tunneling
· Using SSH to provide proxy service
· Using SSH with private keys
· Using screen and byobu remote multiplexing terminals
· Accessing remote Windows desktops
· Sharing remote Linux desktops with VNC
Most professional Linux administrators do not run a graphical interface on their Internet servers. As a result, when you need to access other computers for remote administration, you will almost surely need to work from the command line at some time. Fortunately, there are many feature-rich Linux commands to help you do so.
Tools associated with the Secure Shell (SSH) service not only allow remote login and file transfer, but they also offer encrypted communication to keep your remote administration work secure. With tools such as Virtual Network Computing (VNC), you can have a server’s remote desktop appear on your local client computer. These and other features for doing remote systems administration are described in this chapter.
Doing Remote Login and Tunneling with SSH
Linux’s big brother UNIX grew up on university networks. At a time when the only users of these networks were students and professors, and with networks mostly isolated from each other, there was little need for security.
Applications and protocols that were designed in those times (the 1970s and 1980s) reflect that lack of concern for encryption and authentication. SMTP is a perfect example of that. This is also true of the first generation of UNIX remote tools: telnet, ftp (file transfer protocol), rsh (remote shell), rcp (remote copy), rexec (remote execution), and rlogin (remote login). These tools send user credentials and traffic in clear text. For that reason, they are very dangerous to use on the public, untrusted Internet, and have become mostly deprecated and replaced with the Secure Shell (SSH) commands (ssh, scp, sftp commands and related services).
Although there are still some uses for the legacy remote commands (see the section “Using Legacy Communications Tools”), most of this section describes how to use SSH commands to handle most of your needs for remote communications commands.
Using Legacy Communications Tools
Despite the fact that SSH provides better tools for remote communications, legacy communications commands, sometimes referred to as “r” commands, are still included with most major Linux distributions. Some of these tools will perform faster than equivalent SSH commands because they don’t need to do encryption. So some old-school UNIX administrators may use them occasionally on private networks or still include them in old scripts. Although for the most part you should ignore these legacy remote commands, one of these commands in particular can be useful in some cases: telnet.
The telnet command is still used to communicate with some network appliances (routers, switches, UPSes, and so on) that do not have the horsepower to run an ssh daemon. Even though it poses a security risk, some appliance manufacturers include telnet support anyway.
One good way to use the telnet command, however, is for troubleshooting many Internet protocols such as POP3, SMTP, HTTP, and others. Under the hood, these plain-text protocols are simply automated telnet sessions during which a client (such as a browser or mail user agent) exchanges text with a server. The only difference is the TCP port in use. Here is an example of how you could telnet to the HTTP port (80) of a web server:
$ telnet www.example.com 80
Trying 208.77.188.166...
Connected to www.example.com.
Escape character is '^]'.
GET / HTTP/1.0
Enter a second carriage return here
HTTP/1.1 200 OK
Similarly, you can telnet to a mail server on port 25 (SMTP) and 110 (POP3) and issue the proper commands to troubleshoot e-mail problems.
Note For more complete descriptions of using the telnet command to troubleshoot network protocols, refer to Linux Troubleshooting Bible (Christopher Negus and Thomas Weeks, Wiley Publishing, 2004), pages 505-508.
If you need to forcibly exit your telnet session, type the escape sequence (Ctrl+] by default). This will stop sending your keyboard input to the remote end and bring you to telnet’s command prompt where you can type quit or ?for more options.
Configuring SSH
Nowadays, the Swiss Army knife of remote system administration is Secure Shell (SSH). SSH commands and services replace all the old remote tools and add strong encryption, public keys, and many other features. The most common implementation of SSH in the Linux world is OpenSSH (www.openssh.com), maintained by the OpenBSD project. OpenSSH provides both client and server components.
If it’s not already installed, install the OpenSSH server by running the following command:
$ sudo apt-get install openssh-server
Here are a few facts about SSH:
· For Windows, you can use the Linux SSH tools within Cygwin (www.cygwin.com). But unless you’re already using Cygwin (a Linux-like environment for Windows), we recommend PuTTY (www.chiark.greenend.org/uk/sgatatham/putty). PuTTY is a powerful open source Telnet/SSH client.
· Use SSH version 2 whenever possible because it is the most secure. Some SSH-enabled network appliances may only support older, less secure versions. OpenSSH supports all versions. Some older versions of Ubuntu accepted SSH v1 and v2 connections. Newer releases accept version 2 by default.
· In Ubuntu, run service ssh start to start the SSH service (sshd daemon). To configure the service, edit the /etc/ssh/sshd_config file.
· To configure the ssh client, edit the /etc/ssh/ssh_config file.
If you prefer to use graphical tools to administer your remote Linux system, you can enable X11 Tunneling (also called X11 Port Forwarding). With X11 Tunneling enabled (on both the SSH client and server), you can start an X application on the server and have it displayed on the client. All communication across that connection is encrypted.
Ubuntu comes with X11 forwarding turned on (X11Forwarding yes) for the server (sshd daemon). You still need to enable it on the client side. To enable X11 forwarding on the client for a one-time session, connect with the following command:
$ ssh -X chris@myserver
To enable X11 forwarding permanently for all users, add ForwardX11 yes to /etc/ssh/ssh_config. To enable it permanently for a specific user only, add the line to that user’s ~.ssh/config. To test that the tunneling is working, run xclock after ssh’ing into the remote machine, and it should appear on your client desktop. To get these commands, you must install the x11-apps package.
SSH tunneling is an excellent way to securely use remote graphical tools!
Logging in Remotely with ssh
To securely log in to a remote host, you can use either of two different syntaxes to specify the username:
$ ssh -l chris myserver
$ ssh chris@myserver
However, scp and sftp commands (discussed in Chapter 12) support only the user@server syntax, so we recommend you get used to that one. If you don’t specify the username, ssh will attempt to log in using the same user you are logged in as locally. Once connected, if you need to forcibly exit your ssh session, type the escape sequence of a tilde followed by a period (~.). If that doesn’t work, try Ctrl+c.
Accessing SSH on a Different Port
For security purposes, a remote host may have its SSH service listening on a different port than the default port number 22. If that’s the case, use the -p option to ssh to contact that service:
$ ssh -p 12345 chris@turbosphere.com Connect to SSH on port 12345
Using SSH to Do Tunneling (X11 Port Forwarding)
With SSH tunneling configured as described earlier, the SSH service forwards X Window System clients to your local display. However, tunneling can be used with other TCP-based protocols as well.
Tunneling for X11 Clients
The following sequence of commands illustrates starting an SSH session, and then starting a few X applications so they appear on the local desktop:
$ ssh -X chris@myserver Start ssh connection to myserver
chris@myserver's password: *******
[chris@myserver ~}$ echo $DISPLAY Show the current X display entry
localhost:10.0 SSH sets display to localhost:10.0
[chris@myserver ~}$ xeyes& Show moving desktop eyes
[chris@myserver ~}$ gnome-calculator& Use the GNOME calculator
[chris@myserver ~}$ gksu system-config-printer& Configure printers
Tunneling for CUPS Printing Remote Administration
X11 is not the only protocol that can be tunneled over SSH. You can forward any TCP port with SSH. This is a great way to configure secure tunnels quickly and easily. No configuration is required on the server side.
For example, myserver is a print server with the CUPS printing service’s web-based user interface enabled (running on port 631). That GUI is accessible from the local machine only. On the following client PC, you tunnel to that service using ssh with the following options:
$ ssh -L 1234:localhost:631 myserver
This example forwards port 1234 on the client PC to localhost port 631 on the server. You can now browse to http://localhost:1234 on the client PC. This will be redirected to cupsd listening on port 631 on the server.
Tunneling to an Internet Service
When your local machine is blocked from connecting to the Internet, but you can get to another machine (myserver) that has an Internet connection, SSH tunneling can provide Internet access to the local machine. The following example lets you visit the Google.com website (HTTP, TCP port 80) across an SSH connection to a computer named myserver that has a connection to the Internet:
$ ssh -L 12345:google.com:80 chris@myserver
With this example, any connection to the local port 12345 is directed across an SSH tunnel to myserver, which in turn opens a connection to Google.com port 80. The command tries to log into myserver as the user chris (if a user name is not provided, the current user name is used on the remote system).
You can now browse to http://localhost:12345 and use myserver as a relay to the Google.com website. Because you’re using ssh only to forward a port and not to obtain a shell on the server, you can add the -N option to prevent the execution of remote commands:
$ ssh -L 12345:google.com:80 -N myserver
Using SSH as a SOCKS Proxy
The previous example demonstrates that you can forward a port from the client to a machine other than the server. In the real world, the best way to get your browser traffic out of your local network via an encrypted tunnel is to use the SSH built-in SOCKS proxy feature. For example:
$ ssh -D 12345 myserver
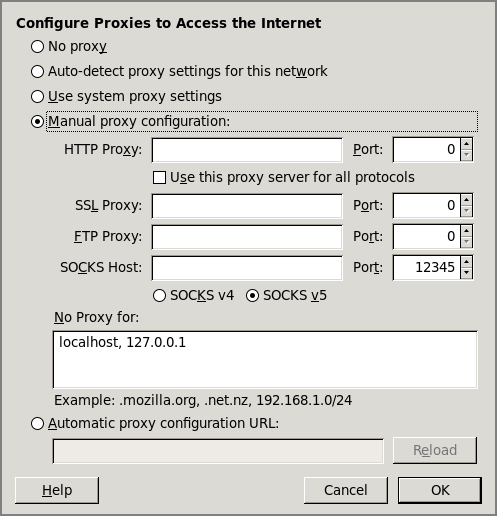
The dynamic (-D) option of ssh enables you to log in to myserver (as usual). As long as the connection is open, all requests directed to port 12345 are then forwarded to myserver. Next, set your browser of choice to use localhostport 12345 as a SOCKS v5 proxy and you’re good to go. Do not enter anything on the fields for HTTP and other protocols. They all work over SOCKS. See the Firefox Connections Settings window in Figure 13-1.
Figure 13-1: Use the Firefox Connections Settings window for proxy configuration.
To test your setup, try disconnecting your ssh session and browsing to any website. Your browser should give you a proxy error.
From a Windows client, the same port forwarding can be accomplished in Putty by selecting Connection ⇒ SSH ⇒ Tunnels.
Using ssh with Public Key Authentication
Up to this point, we’ve only used ssh with the default password authentication. The ssh command also supports public key authentication. This offers several benefits:
· Automated logins for scripts and cron jobs—By assigning an empty passphrase, you can use ssh in a script to log in automatically. Although this is convenient, it is also dangerous, because anybody who gets to your key file can connect to any machine you can. Configuring for automatic login can also be done with a passphrase and a key agent. This is a compromise between convenience and security, as explained in the “Using Public Key Logins” section.
· A two-factor authentication—When using a passphrase-protected key for interactive logins, authentication is done using two factors (the key and the passphrase) instead of one.
Using Public Key Logins
Here’s the process for setting up key-based communications between two Linux systems. In the following example, we use empty passphrases for no-password logins. If you prefer to protect your key with a passphrase, simply enter it when prompted during the first step (key pair creation).
On the client system, run the following ssh-keygen command to generate the key pair while logged in as the user that needs to initiate communications:
$ ssh-keygen
Generating public/private rsa key pair.
Enter file in which to save the key (/home/chris/.ssh/id_rsa): <Enter>
Enter passphrase (empty for no passphrase): <Enter>
Enter same passphrase again: <Enter>
Your identification has been saved in /home/chris/.ssh/id_rsa.
Your public key has been saved in /home/chris/.ssh/id_rsa.pub.
The key fingerprint is:
ac:db:a4:8e:3f:2a:90:4f:05:9f:b4:44:74:0e:d3:db chris@host.example.com
Note that at each prompt, you pressed the Enter key to create the default key filename and to enter (and verify) an empty passphrase. You now have a private key that you need to keep very safe, especially because in this procedure you didn’t protect it with a passphrase.
You also now have a public key (id_rsa.pub), which was created by the previous command. This public key needs to be installed on hosts you want to connect to. The content of ~/.ssh/id_rsa.pub needs to be copied (securely) to ~/.ssh/authorized_keys for the user you want to ssh to on the remote server. The authorized_keys file can contain more than one public key, if multiple users use ssh to connect to this account.
Although it used to be a manual process to copy your public key to a user account on another system, now you can do it quite easily with the ssh-copy-id command. While you are logged into the user account where you created the key, you would run the following command to copy your public key to the authorized_keys file of a user on another system:
$ ssh-copy-id chris@host1.example.com
chris@host1's password:
*********
Now try logging into the machine, with "ssh 'chris@host1'",
and check in:
~/.ssh/authorized_keys
to make sure we haven't added extra keys that you weren't expecting.
In this example, you are prompted for the remote user chris’s password. Once you type it in, that should be the last time you have to type that password to log in from your local user account to that remote user account.
As the message instructs, log in to the remote user account and check the authorized_keys file. You will be automatically logged in without being prompted to type a password. Here’s an example:
$ ssh chris@host1
Last login: Wed Mar 20 11:48:58 2013
$ cat .ssh/authorized_keys
ssh-rsa AAAAB3NzaC1yc2EAAAADAQABABABAQCdinPlzlSjW5IfsbfGBk05VDLb+5hNl
PaJhTJLv+8478yox4N1Ub0KhEhjVZqcEd8YFpMgUjJqkEQ0IVO+TneGyFPDW5666k5nKo
cgA1w2lVELGfHZtTMS1Aaq0vwK/bUE2+rrDgwo+YlKhaA+/2DPaU4XRcnI86yS4NEdENi
PAfoYIZj8DTMI+G0KnHqunIfkiP9g8wnvKIrJsFOJSi62ZeQ2CbXp3PQCAASNSt2r/o0S
tXI9rpdIwLPuwKkSj+FDJaFX5cbbecG5m6uH5IcGbTjeZgf1UpWNZEK/AkhA2E8HEta/D
4HqtbqfeqNq48x5zGEgyQphwqn8cD1nEYc7 chris@mydesktop
At this point, any of the ssh commands (scp, sftp, rsync, and so on) will also work without being prompted for a password from the local to the remote system. Keep in mind, however, that if you set a passphrase on your key, you will be asked for it before your key can be used to connect to the remote system.
Saving Private Keys to Use from a USB Flash Drive
If you’d like to store your private key somewhere safer than your hard drive, you can use a USB flash drive (sometimes called a thumbdrive or pen drive):
$ mv ~/.ssh/id_rsa /media/THUMBDRIVE1/myprivatekey
And then, when you want to use the key, insert the USB drive and type the following:
$ ssh -i /media/THUMBDRIVE1/myprivatekey chris@myserver
Using keys with passphrases is more secure than simple passwords but also more cumbersome. To make your life easier, you can use ssh-agent to store unlocked keys for the duration of your session. When you add an unlocked key to your running ssh-agent, you can run ssh using the key without being prompted for the passphrase each time.
To see what the ssh-agent command does, run the command with no option. A three-line bash script appears, as follows:
$ ssh-agent
SSH_AUTH_SOCK=/tmp/ssh-SkEQZ18329/agent.18329; export SSH_AUTH_SOCK;
SSH_AGENT_PID=18330; export SSH_AGENT_PID;
echo Agent pid 18330;
The first two lines of the output just shown need to be executed by your shell. Copy and paste those lines into your shell now. You can avoid this extra step by starting ssh-agent and having the bash shell evaluate its output by typing the following:
$ eval `ssh-agent`
Agent pid 18408
You can now unlock keys and add them to your running agent. Assuming you have already run the ssh-keygen command to create a default key, let’s add that default key using the ssh-add command:
$ ssh-add
Enter passphrase for /home/chris/.ssh/id_rsa: *******
Identity added: /home/chris/.ssh/id_rsa (/home/chris/.ssh/id_rsa)
Next, you can add the key you stored on the USB thumbdrive:
$ ssh-add /media/THUMBDRIVE1/myprivatekey
Use the -l option to ssh-add to list the keys stored in the agent:
$ ssh-add -l
2048 f7:b0:7a:5a:65:3c:cd:45:b5:1c:de:f8:26:ee:8d:78
/home/chris/.ssh/id_rsa
(RSA)
2048 f7:b0:7a:5a:65:3c:cd:45:b5:1c:de:f8:26:ee:8d:78
/media/THUMBDRIVE1/myprivatekey (RSA)
To remove one key from the agent, for example the one from the USB thumbdrive, run ssh-add with the -d option as follows:
$ ssh-add -d /media/THUMBDRIVE1/myprivatekey
To remove all the keys stored in the agent, use the -D option:
$ ssh-add -D
Using byobu and screen for Remote Shells
The ssh command gives you only one screen (shell). If you close that screen, you lose all you were doing on the remote computer. That can be very bad if you were in the middle of something important, such as a 12-hour compile. And if you want to do three things at once—for example, vi httpd.conf, tail -f error_log, and service httpd reload—you need to open three separate ssh sessions.
Traditionally, the screen command has been used to provide multiple, active shell sessions through a single login session. With screen, you can also detach from that screen session and then reattach to that session to pick up where you left off the next time you log in.
Instead of using screen directly, the byobu command offers a simplified interface and more powerful features to screen. The next section describes how to use the screen command directly, followed by a description of the byobucommand.
Managing Remote Shells with Screen
Essentially, screen is a terminal multiplexer. If you are a system administrator working on remote servers, screen is a great tool for managing a remote computer with only a command line interface available. Besides allowing multiple shell sessions, screen also lets you disconnect from it, and then reconnect to that same screen session later.
The screen software package is installed by default with Ubuntu.
To use screen, run the ssh command from a client system to connect to the Linux server where screen is installed. Then simply type the following command:
$ screen
If you ran screen from a Terminal window, you should first see a welcome message asking for pizza and beer, and then see a regular bash prompt in the window. The next message suggests that you might want to use byobu instead (as described in the “Using byobu to Manage Remove Shells” section).
To control screen, press the Ctrl+a key combination, followed by another keystroke. For example, Ctrl+a followed by ? (noted as Ctrl+a, ?) displays the help screen. With screen running, here are some commands and control keys you can use to operate screen.
$ screen -ls List active screens
There is a screen on:
7089.pts-2.myserver (Attached) Shows screen is attached
1 Socket in /var/run/screen/S-chris.
$ Ctrl+a, Shift+a Change window title
Set window's title to: My Server Type a new title
$ Ctrl+a, c Create a new window
$ Ctrl+a, " Show active window titles
Num Name Flags
0 My Server Up/down arrows change windows
1 bash
$ Ctrl+a, d Detach screen from terminal
$ screen -ls List active screens
There is a screen on:
7089.pts-2.myserver (Detached) Shows screen is detached
1 Socket in /var/run/screen/S-chris.
The screen session just shown resulted in two windows (each running a bash shell) being created. You can create as many as you like and name them as you choose. Also, instead of detaching from the screen session, you could have just closed it by exiting the shell in each open window (type exit or Ctrl+d).
When the screen session is detached, you are returned to the shell that was opened when you first logged into the server. You can reconnect to that screen session as described in the following section, “Reconnecting to a screen Session.”
The following list shows some other useful control key sequences available with screen:
· Ctrl+a, ?—Show help screen.
· Ctrl+a, c—Create new window.
· Ctrl+a, d—Detach screen from terminal. The screen session and its windows keep running.
· Ctrl+a, "—View list of windows.
· Ctrl+a, '—Prompt for number or name of window to switch to.
· Ctrl+a, n—View next window.
· Ctrl+a, p—View previous window.
· Ctrl+a, [—Terminal’s vertical scroll is disabled in screen. These keys turn on screen’s scrollback mode. Press Enter twice to exit.
· Ctrl+a, Shift+a—Rename the current window.
· Ctrl+a, w—Show the list of window names in the title bar.
Reconnecting to a screen Session
After you detach from a screen session, you can return to that screen again later (even after you log out and disconnect from the server). To reconnect when only one screen is running, type the following:
$ screen -r
If there are several screen sessions running, screen -r won’t work. For example, this shows what happens when two detached screen sessions are running:
$ screen -r
There are several suitable screens on:
7089.pts-2.myserver (Detached)
7263.pts-2.myserver (Detached)
Type "screen [-d] -r [pid.]tty.host" to resume one of them.
As the output suggests, you can identify the screen session you want by its name (which, by default, is a combination of the session’s process ID, tty name, and hostname). For example:
$ screen -r 7089.pts-2.myserver
Naming screen Sessions
Instead of using the default names, you can create more descriptive names for your screen sessions when you start screen. For example:
$ screen -S mysession
$ screen -ls
There is a screen on:
26523.mysession (Attached)
Sharing screen Sessions
The screen command also allows the sharing of screens. This feature is great for tech support because each person connected to the session can both type into and watch the current session. Creating a named screen, as in the preceding section, makes this easier. Then another person on a different computer can ssh to the server (using the same username) and type the following:
$ screen -x mysession
As with screen -r, if there’s only one screen running, you don’t need to specify which screen you’re connecting to:
$ screen -x
Using byobu to Manage Remote Shells
The byobu command was developed by the Ubuntu community to provide a configuration layer to screen. It offers more features and an easier interface that relies more on function keys than Ctrl keys. It also has some nice extras, such as the ability to show status information of the machine you are logged into.
To start byobu on a remote shell session, log in to the remote system using ssh, and then either type byobu to start a session immediately or type byobu-enable to have byobu enabled as your default shell session when you open any text-based login session from the system (type byobu-disable to disable this behavior).
When byobu first starts, you have the choice of operating in screen mode or emacs mode (see man 1 tmux). For our purposes, I selected byobu mode:
Configure Byobu's ctrl-a behavior...
When you press ctrl-a in Byobu, do you want it to operate in:
(1) Screen mode (GNU Screen's default escape sequence)
(2) Emacs mode (go to beginning of line)
Note that:
- F12 also operates as an escape in Byobu
- You can press F9 and choose your escape character
- You can run 'byobu-ctrl-a' at any time to change your selection
Select [1 or 2]: 1
Once byobu has started, a status bar appears at the bottom of the page. You can use function keys (F1 through F12) on the top of the keyboard to create new shell windows and manage them. Here are examples of how to use function keys to make and manage shell windows in byobu:
F2 Opens a new shell window (try opening a few)
F3 Goes to the previous window
F4 Goes to the next window
To refresh the status of notifications, use the F5 function key:
F5 Status notifications refresh
When you are done with your byobu session, you can disconnect from byobu, leaving it active to return to later. Type Shift+F6 keys to not log out of the login session when you disconnect:
F6 Disconnect (detach) from byobu session and logout
Shift-F6 Disconnect (detach) from byobu session, don't logout
While in the byobu session, you can go back to up to 10,000 lines of text on the screen. With a bunch of text on the screen, press F7 to go into scrollback mode. Then use the PgUp and PgDn keys to refer back to the text on the screen. Press Enter to exit this mode:
$ find / Run some command to fill the screen with text
F7 Go into the scrollback/search mode
PgUp Page back through the text on the screen
PgDn Page forward through the text on the screen
You can change the byobu configuration in different ways. Use F8 to change the name of the current window. Use F9 to see the Byobu Configuration Menu, which allows you to change many settings.
F8 Change the name of the current window
F9 Open up the Byobu Configuration Menu
With the Byobu Configuration Menu open, you can change several settings. Here’s what that menu looks like:
Byobu Configuration Menu
Help -- Quick Start Guide
Toggle status notifications
Change escape sequence
Byobu currently does not launch at login (toggle on)
<Exit>
Use arrow keys, the Tab key, Enter, and PgUp or PgDn keys to navigate the menus. Press Esc to return to earlier menus. The Help selection shows descriptions of keystrokes to use in byobu. Select Toggle status notifications to change the status that is shown in the bottom status bar. Use the other selections to change escape sequences and change whether or not byobu is used by default when you log into a text-based login session.
To close the current byobu window, simply exit the shell (type exit or Ctrl+d). Closing the last shell associated with a byobu session ends that session.
For more information on byobu, type man byobu or visit the Byobu documentation page at the Ubuntu Community site: https://help.ubuntu.com/community/Byobu.
Using a Remote Windows Desktop
Many system administrators who become comfortable using a Linux desktop prefer to do administration of their Windows systems from Linux whenever possible. Linux provides tools such as rdesktop and tsclient, which allow you to connect to a Windows system running Windows Terminal Services.
· To be able to connect to your Windows system desktop from Linux, you have to enable Remote Desktop from your Windows system. How that is done differs between different Windows systems: To enable remote desktop access to a Windows XP system (and others) right-click My Computer and select Properties. Then choose the Remote tab from the System Properties window and select the Allow users to connect remotely to this computer checkbox. Select which users you want to let connect to the Windows box and click OK.
· To enable remote desktop access from Ubuntu to a Windows 7 system, select System and Security from the Windows Control Panel. Click Remote settings in the left pane. From the System Properties dialog box on the Remote tab, choose Allow Connections from Computers Running Any Version of Remote Desktop. Next, choose Select Users to choose which user accounts are allowed access.
· In Windows 8, to gain remote access to an Ubuntu remote desktop, right-click on the Windows 8 Style Menu, select All Apps, then right-click on the Computer menu entry. Then select the Properties entry. In the Properties dialog box, click Remote settings link.
Now, from Linux, you can use either rdesktop or remmina to connect to the Windows system using Remote Desktop Protocol (RDP). Ubuntu comes with both of these applications installed.
Connecting to a Windows Desktop with Remmina
If you are used to using Windows’ Remote Desktop Connection (formerly known as Terminal Services Client) to connect from one Windows box to another, you will probably find the Remmina Remote Desktop (remmina) tool a good way to connect to a Windows desktop from Linux. Running remmina opens a Remmina Remote Desktop Client window, which provides access to a Windows remote desktop client’s user interface.
When the remmina package is installed (apt-get install remmina), launch remmina by typing Remmina Remote Desktop from the Ubuntu Dashboard or by typing the following from the shell:
$ remmina &
When the window appears, select Connection ⇒ New. Figure 13-2 shows the Remmina Remote Desktop Client and Preferences windows.
Figure 13-2: Remmina Remote Desktop Client (remmina) connects to Windows desktops.
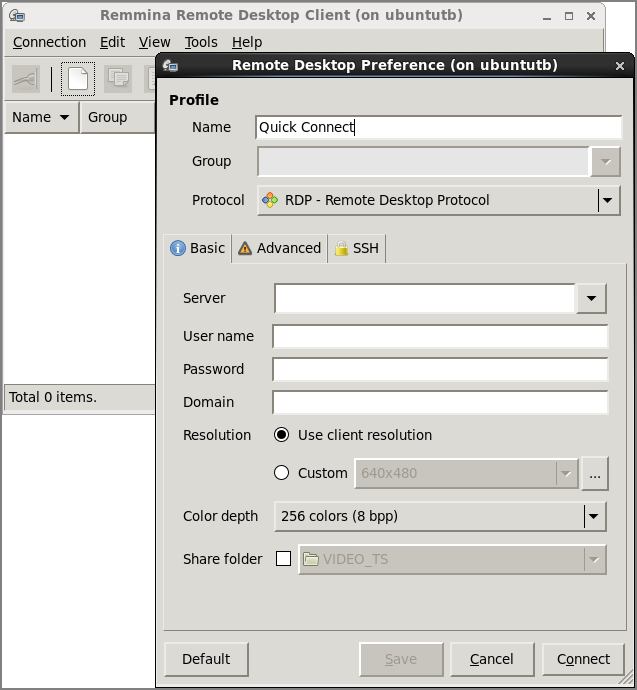
Probably all you need to enter on this screen is the hostname or IP address of the Windows system. Next enter the username and password. Select different tabs to further refine your connection to the remote Windows desktop.
Note that remmina can also be used as a client for VNC, SSH, and SFTP services.
Connecting to a Windows Desktop with rdesktop
If you prefer not to use the remmina described previously, you can log in to a remote Windows desktop using the rdesktop command. To install rdesktop, type the following:
$ sudo apt-get install rdesktop
The rdesktop command requests a login to the Windows machine, and then opens the Windows desktop for the user after you log in. Here are examples of the rdesktop command:
$ rdesktop 172.16.18.66 Login to desktop at IP address
$ rdesktop -u chris -p M6pyXX win1 Identify user/password for host win1
$ rdesktop -f win1 Run rdesktop in full-screen mode
$ rdesktop -0 -r sound:local win1 Direct sound from server to client
$ rdesktop -E win1 Disable client/server encryption
If you disable client/server encryption, the login packet is encrypted, but everything after that is not. Although this can improve performance greatly, anyone sniffing your LAN would be able to see your clear-text communications (including any interactive logins after the initial login packet). Other rdesktop options that can improve performance or your Windows desktop include -m (don’t send mouse motion events), -D (hide window manager’s decorations), and -K (don’t override window manager key bindings).
Using Remote Linux Desktop and Applications
The X Window System (X) should not be run on typical production servers for security and performance reasons. But thanks to the client-server nature of X, you can run an X-enabled program on a remote machine with its graphical output directed to your local desktop. In that relationship, the application running from the remote machine is referred to as the X client, and your desktop is the X server. When running remote X applications on untrusted networks or the Internet, use SSH forwarding as described earlier. On trusted LANs, do it without SSH, as described here.
By default, your X desktop will not allow remote X applications to connect (pop up) on your desktop. You can allow remote apps on your desktop using the xhost command. On your local Linux display, use the xhost command to control which remote machines can connect to X and display applications on your desktop. Here are examples of xhost:
$ xhost List allowed hosts
access control enabled, only authorized clients can connect
SI:localuser:chris
$ xhost + Disable access control (dangerous)
access control disabled, clients can connect from any host
$ xhost - Re-enable access control
access control enabled, only authorized clients can connect
$ xhost remotemachine Add an allowed host
remotemachine being added to access control list
Access control should be completely disabled only for troubleshooting purposes. However, with access enabled for a particular host machine (remotemachine in this case), you can do the following from a shell on the remote computer to have X applications from that machine appear on the local desktop (in this case called localmachine):
$ export DISPLAY=localmachine:0 Set the DISPLAY to localmachine:0
$ xterm & Open remote Terminal on local
$ xclock & Open remote clock on local
$ gnome-calculator & Open remote calculator game on local
After setting the DISPLAY variable on remotemachine to point to localmachine, any application run from that shell on remotemachine should appear on Desktop 0 on localmachine. In this case, we started the Terminal window, clock, and calculator applications.
Note In the past few versions of Ubuntu, the X server doesn’t listen for TCP connections by default. To allow remote X connections, edit the /etc/lightdm/lightdm.conf file on the X server to add the line xserver-allow-tcp=true, so it appears as follows:
[SeatDefaults]
greeter-session=unitygreeter
user-session=ubuntu
xsserver-allow-tcp=true
Then restart the X Window server or the window manager (sudo restart lightdm).
Sharing X applications in this way between Linux and UNIX hosts is pretty easy. However, running X applications so they appear on other desktop computer platforms takes a little more setup. If your desktop runs Windows, you have to run an X server. A free solution is Cygwin, which includes an X server. There are also feature-rich commercial X servers, but they can be very expensive. To share remote desktops across different operating system platforms, we suggest you use Virtual Network Computing (VNC).
Sharing Desktops Using VNC
Virtual Network Computing (VNC) consists of server and client software that lets you assume remote control of a full desktop display from one computer on another. In Ubuntu, the vncviewer command comes preinstalled to access a remote desktop on your display (client), but you need the vncserver package to share a desktop from your computer (server). To install the vncserver package, type the following:
$ sudo apt-get install vncserver
VNC clients and servers are available for, and interoperable with, many different operating systems. VNC servers are available on Linux, Windows (32-bit), Mac OS X, and UNIX systems. VNC clients are offered on those and many other types of systems (including OS/2, PalmOS, and even as a Java application running in a web browser).
Setting Up the VNC Server
From your Linux desktop, we’ll assume you are using the default display (DISPLAY=:0) as your local desktop. So we’ll set out to create independent displays accessible via VNC.
Then, as each user, run the vncpasswd command to create the password each of those users will need to connect to their own desktops on the VNC server. In our example, we run the following as the user chris:
$ vncpasswd
Password: *******
Verify: *******
Finally, you can start the VNC server (vncserver). Type the following as a regular user (in our example, we used chris):
$ vncserver
New 'myserver:1 (chris)' desktop is myserver:1
Starting applications specified in /home/chris/.vnc/xstartup
Log file is /home/chris/.vnc/myserver:1.logs
If you are using the iptables firewall built into your system, make sure you open the port(s) for VNC. Each display runs on its own port. Display number N is accessed on TCP port 5900+N. For example, display 1 is accessible on port 5901. Refer to Chapter 14 for more details on iptables.
To change how your VNC servers are configured, edit the xstartup file in your $HOME/.vnc directory. Also in that directory are a passwd file (to store the user password protecting the VNC session) and log files for each VNC session started.
When you are done with a VNC session, use the vncserver command to kill that session. For example, to end session :1, type:
$ vncserver -kill :1
Killing Xvnc4 process ID 11651
Starting Up the VNC Client
With the VNC server running, you can connect to a desktop on that server from any of the client systems mentioned earlier (Windows, Linux, Mac OS X, UNIX, and so on). For example, assuming your VNC server is on a system named myserver, you could type the following command to start that remote desktop from another Linux system:
$ apt-get install vncviewer
$ vncviewer myserver:1 Connect as chris on display 1
Connected to RFB server, using protocol version 3.8
Performing standard VNC authentication
Password: *********
$ vncviewer myserver:2 Connect as joe on display 2
Unless you define some commands to start up, you will only see the background screen for an X Window System display, with cross-hatching. To get beyond this, you need to run X Window programs on the server system, or from your client system, pointing to the VNC X display. For example:
$ xterm -display myserver:1 &
$ metacity --display myserver:1 &
Note Most X Window programs specify which X server to use (the VNC server in this example) with a -display option. The metacity window manager, however, uses two leading dashes for --display.
You can also use remmina to connect; for this example, you would just specify myserver:1 as the computer and VNC as the protocol. You can also type in the username and password or wait to be prompted for it.
Using VNC on Untrusted Networks with SSH
VNC is considered to be an insecure protocol. The password is sent using fairly weak encryption, and the rest of the session is not encrypted at all. For that reason, when using VNC over an untrusted network or the Internet, we recommend you tunnel it over SSH.
For a general description of how the SSH service works, refer to the “Doing Remote Login and Tunneling with SSH” section earlier in this chapter. To forward VNC display 2 (port 5902) on the computer named myserver to the same local port, type the following:
$ ssh -L 5902:localhost:5902 myserver
Note If you start using VNC routinely, you may want to look at tightvnc (in the package of the same name). Although it’s not included with Ubuntu, tightvnc is another open source implementation of the VNC protocol, under active development and with newer features and optimizations. These features include built-in SSH tunneling.
Summary
If you ever find yourself in a position where you need to administer multiple Linux systems, you have a rich set of commands with Linux for doing remote system administration. The Secure Shell (SSH) facility offers encrypted communications between clients and servers for remote login, tunneling, and file transfer.
Virtual Network Computing (VNC) lets one Linux system share its desktop with a client system so that the remote desktop appears right on the client’s desktop. Both graphical tools (such as the Remmina Remote Desktop Client) and commands (such as vncserver and vncviewer) can be used to share remote desktops in Linux.