Ubuntu Linux Toolbox: 1000+ Commands for Power Users (2013)
Chapter 15
Setting Up a Virtualization Host and Virtual Machines
IN THIS CHAPTER
· Checking your computer for virtualization support
· Installing virtualization software
· Creating and managing VMs with virt-manager
· Working with VMs from the command line
By using your Ubuntu system as a virtualization host, you can run multiple computer operating systems on a single computer. The systems you create on the host are referred to as virtual machines (VMs). A VM can be running Microsoft Windows, Fedora, another Linux system, or just about any operating system that can run directly on the computer architecture of the host.
Once a VM is installed, you can work with it in much the same way as you would work with operating systems installed directly on computer hardware. However, with VMs, it’s easier to duplicate them, migrate them to other virtual hosts to improve performance, or configure them to failover to another host when a host becomes inoperable. With VMs, you can make more efficient use of your computer infrastructure.
There are lots of reasons for setting up a virtual host. For example, you may want to:
· Try out a different operating system without consuming a whole computer.
· Run an application that requires a specific operating system version and configuration that’s different from what you normally run.
· Configure a system to test a new application, without interrupting the other work on your computer.
· Create a copy of an installed operating system and quickly spin off a new version from that copy.
· Experiment with an operating system in a way that doesn’t disrupt the host system.
By using your Ubuntu system as a virtualization host, you can start building a computer infrastructure that can scale up as you need more computing power. By having multiple hosts, you can migrate your virtual machines to get better performance or shut down hosts that you underutilize.
This chapter describes how to configure Ubuntu as a virtualization host using Kernel-based Virtual Machine (KVM), which is a feature built into the Linux kernel. It then describes commands you can use to create and manage virtual machines.
Can Your Computer Support Virtualization?
The most critical requirement for running Ubuntu as a KVM virtualization host is to have a CPU that supports virtualization. Beyond that, you mostly need to make sure that the computer has enough resources to effectively run virtual machines.
Besides the right CPU, the KVM host needs to have enough memory (RAM) and disk space available to provide the appropriate level of performance needed to run your VMs. Likewise, you need to plan for the network bandwidth needed to provide the level of service required.
The following sections describe how to check your computer to make sure that you have the right assets available to run as a virtualization host.
Checking for CPU Virtualization Support
To use KVM, the processors on your system must support either Intel VT technology or AMD-V virtualization support. Ubuntu has a command named kvm-ok available from the cpu-checker package that you can use to test your CPU for virtualization support. Here’s how to install and use the kvm-ok command:
$ sudo apt-get install cpu-checker
$ sudo kvm-ok
INFO: /dev/kvm does not exist
HINT: sudo modprobe kvm_intel
INFO: Your CPU supports KVM extensions
KVM acceleration can be used
The output from kvm-ok indicates that the CPU does support the proper CPU extensions needed by KVM. However, the software needed to use KVM is not yet installed and the modules needed are not yet loaded. I’ll do that later.
In the meantime, there’s a more manual way to check for virtualization support. You can check the flags set for the CPU in /proc/cpuinfo. Using the egrep command, you can search that file for Intel-VT support (vmx) or AMD-V support (svm) as follows:
$ egrep "(svm|vmx)" /proc/cpuinfo
flags : fpu vme de pse tsc msr pae mce cx8 apic sep mtrr
pge mca cmov pat pse36 clflush dts acpi mmx fxsr sse sse2 ss ht tm
pbe syscall nx lm constant_tsc arch_perfmon pebs bts rep_good nopl
aperfmperf pni dtes64 monitor ds_cpl vmx est tm2 ssse3 cx16 xtpr
pdcm xsave lahf_lm dtherm tpr_shadow vnmi flexpriority
You should see either the vmx or svm flag (but not both). If you don’t get any output from the egrep command, it means that the computer’s CPU(s) doesn’t support KVM virtualization. At that point, the next step is to check the BIOS.
Enabling Virtualization Support in the BIOS
If you believe that your computer can support virtualization, but the appropriate flag is not set, you may need to turn on virtualization support in the BIOS. To do that, reboot your computer and interrupt the boot process when you see the first BIOS screen. The screen will probably say something like “Press F12 to go into Setup.” Press the Delete key, Function key, or other key that is noted.
From the BIOS screen that appears, look for something like a CPU or Performance heading and select it. Then look for a virtualization selection such as “Intel Virtualization Tech” and enable it. Figure 15-1 shows an example of such a BIOS screen with virtualization enabled.
Figure 15-1: Turning on virtualization support in the BIOS

After you change the virtualization BIOS setting and save it, you should power down the computer to make sure the BIOS settings take effect. After that, you can check the other features of your computer.
Is the Host Computer 32- or 64-Bit?
If at all possible, use a 64-bit computer as your virtualization host. Some operating systems, such as Red Hat Enterprise Linux, don’t even support KVM on 32-bit systems. One of the main drawbacks of a 32-bit KVM host is that each VM is limited to 2GB of memory.
To check if your computer is a 32- or 64-bit computer, you can examine the CPU flags (much as you did when you were checking for virtualization support). Here’s how:
$ sudo egrep lm /proc/cpuinfo
Flags : fpu vme de pse tsc msr pae mce cx8 apic sep mtrr
pge mca cmov pat pse36 clflush dts acpi mmx fxsr sse sse2 ss ht tm
pbe syscall nx lm constant_tsc arch_perfmon pebs bts rep_good nopl
aperfmperf pni dtes64 monitor ds_cpl vmx est tm2 ssse3 cx16 xtpr
pdcm xsave lahf_lm dtherm tpr_shadow vnmi flexpriority
The flag lm stands for long mode. If the flag is present, it means that the processor is a 64-bit processor.
Checking Available RAM and Disk Space
Because you are running multiple operating systems on one physical computer, the amount of RAM and disk space needed is likewise multiplied. When thinking about how much RAM and disk space you need on your virtualization host, consider the following:
· For RAM, you need enough memory to service the host plus all the VMs you plan to run at the same time.
· You can over-commit memory, meaning that you can allocate more total memory to the VMs that are running than is actually available. The assumption is that not all VMs will need all the memory they are allocated at the same time.
· Although with KVM, the disk space used for a VM’s virtual image can be consumed from the hard disk on the local host, if you have more than one host, consider using some sort of networked storage (such as iSCSI). Having shared storage allows you to do live migration of your VMs to other hosts.
To check your available memory, use the free command:
$ free -m
total used free shared buffers cached
Mem: 3920 3442 478 0 165 2616
-/+ buffers/cache: 659 3261
Swap: 4059 0 4059
The total amount of RAM on this system is 4GB (3920MB). This is not very much RAM for a virtualization host. However, I can run one or two VMs simultaneously on this system, just to confirm that virtualization is working.
Keep in mind that as you evaluate how much memory you need, you can use a command such as top to get a sense of how much memory you require. When adding up actual memory used in top, total the resident memory column and not the virtual memory (which indicates how much each process allocated, but is usually more than the amount actually used).
For disk space, you want to make sure that there is plenty available in the directory that will store the disk images used by the VMs. By default, the location is: /var/lib/libvirt/images. So try the df command to check the disk space available in that location:
Note The /var/lib/libvirt/images directory won’t be created until the libvirt-bin package is installed in the next section, so you can just use the /var/lib directory it it’s not installed yet.
$ df -h /var/lib/libvirt/images
Filesystem Size Used Avail Use% Mounted on
/dev/mapper/ubuntutb-root 88G 12G 72G 14% /
In this case, the selected directory is part of the root (/) filesystem, which has 72GB of available space. What some people do is mount a filesystem from some form of networked storage or create an LVM logical volume on the local system that can be grown as needed. In any case, 72GB is enough to try out a couple of VMs.
Adding Virtualization Software
The software components you want to add to perform KVM virtualization include:
· libvirt—Provides the interface to the virtualization hardware
· qemu—Emulates PC hardware to the virtual machines
· bridge-utils—Offers a way to bridge your networking from the virtual machines through the host
Run the following apt-get command to install the basic software needed for KVM virtualization:
$ sudo apt-get install libvirt-bin kvm bridge-utils qemu-common \
qemu-kvm qemu-utils
In addition to the basic KVM software, you can add a graphical interface for managing your virtual machines. Here’s how to install the virt-manager graphical software for managing VMs:
$ sudo apt-get install virt-manager
With virt-manager installed, you now have the choice of managing your virtual machines from a graphical interface or from the command line. Next, you want to make sure that the user account you want to manage virtualization is configured to do so.
Adding Your User Account to libvirtd
If the user account you are going to use to manage KVM is not a member of the libvirtd group, that user needs to be added to the group. For example, if you want the user account chris to manage virtualization, here’s how to add the user to the libvirtd group:
$ sudo adduser chris libvirtd
Adding user `chris' to group `libvirtd' ...
Adding user chris to group libvirtd
Done.
At this point, your system should be ready to start using virtualization. However, you may want to reboot your system to make sure that all the necessary services are up and running and that the user account you just added to the libvirtd group is logged in and ready.
Managing Virtual Machines with virt-manager
The Virtual Machine Manager (virt-manager) graphical interface is a popular tool for managing your KVM virtual machines. Before using commands, such as virt-install (to install a new VM) or virsh (to manage VMs), you might want to try out virt-manager, which can lead you through the creation of your first VMs in an intuitive way.
Here are a few things you need to do to get started with virt-manager:
· Get ISO images. Download ISO images of the operating systems you either want to install or run live as a VM. For the examples in this chapter, I use Ubuntu and Fedora live CDs as installation and live media.
· Start virt-manager. From the Ubuntu Dashboard, choose the Virtual Machine Manager icon (or run virt-manager from the command line) as the user you added to the kvm group. The Virtual Machine Manager window will appear.
Before you create your first VM, explore your Virtual Machine Manager window for information about your virtualization settings. Here are some examples:
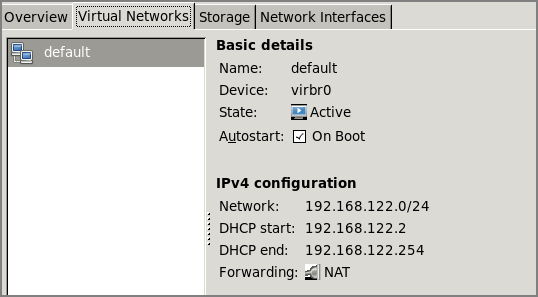
· Virtual networks—Select Edit and then Connection Details. From the Connection Details window that appears, choose the Virtual Networks tab. You can see that the default network managed by your virtual host is 192.168.122.0/24. The virtual host will hand out IP addresses to VMs from the range 192.168.122.2 to 192.168.122.254. To make this work, the host does network address translation (NAT) on device vibr0. Figure 15-2 shows an example of this window.
Figure 15-2: The default virtual network uses NAT and a private pool of network addresses.
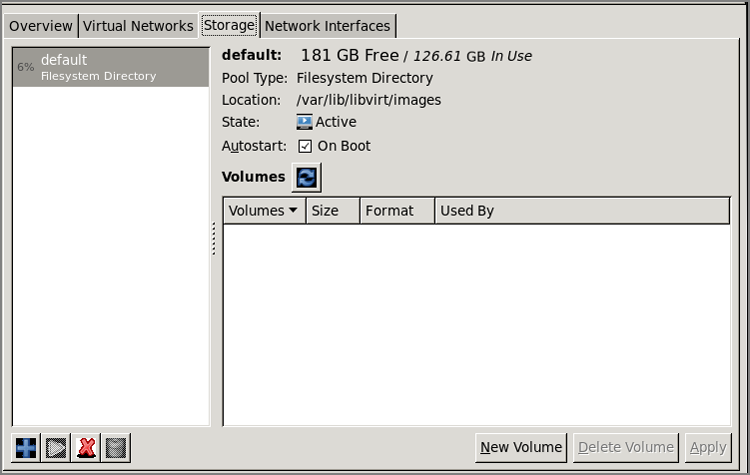
· Storage—Again, select Edit and then Connection Details. From the Connection Details window, choose the Storage tab. The /var/lib/libvirt/images directory is the default location for storing volumes. In the example shown in Figure 15-3, you can see the amount of free disk space and a list of any existing volumes. You can create new volumes here or do that when you create your VMs.
Figure 15-3: Check available free space for volumes.
With everything in place, you can begin configuring and installing your first VM.
Creating a Virtual Machine in virt-manager
To begin creating a new VM, select the “Create a new virtual machine” icon from the Virtual Machine Manager window. The following is a list of steps you go through to create a new virtual machine:
1. Name and install the type. Type a name for the virtual machine and select how you would like to install it. I used an ISO image that I downloaded to the local host. If you have installation media available from a PXE server or network server (HTTP, FTP, or NFS), choose either of those selections. Then click Forward.
2. Install the media and operating system type. Choose the exact location of your installation medium. I chose “Use ISO image” and clicked the Browse button to browse to select my ISO image from the local filesystem. I left the operating system as generic. Then click Forward.
3. Memory and CPU. Choose the amount of RAM the VM will consume and the number of CPUs. Then click Forward.
4. Storage. To install a new system, make sure the “Enable storage” check box is on. Then select the amount of space you want to devote to the VM. Click Forward to continue.
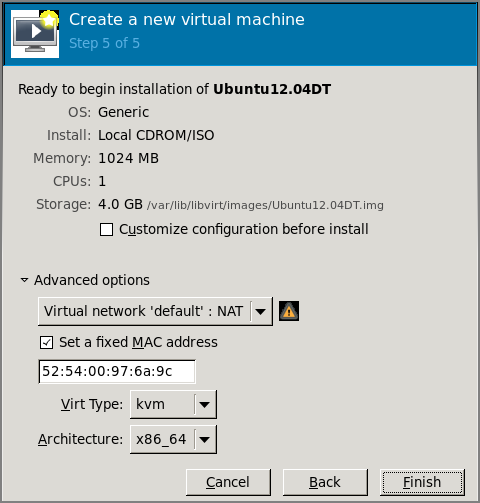
5. Review VM configuration. Before you launch the VM, you get a chance to review the settings, as shown in Figure 15-4. If they look all right, click Finish.
Figure 15-4: Review settings for your VM before launching the installer.
At this point, the ISO image boots up in a new window. What happens next depends on whether it is a live CD, installer, or other type of bootable image. Assuming it is an installer, run through the installation process as you would if you were installing directly on the computer hardware.
Once the operating system is installed on the VM, you can use virt-manager to manage that VM, as described in the next section.
Starting and Stopping Virtual Machines with virt-manager
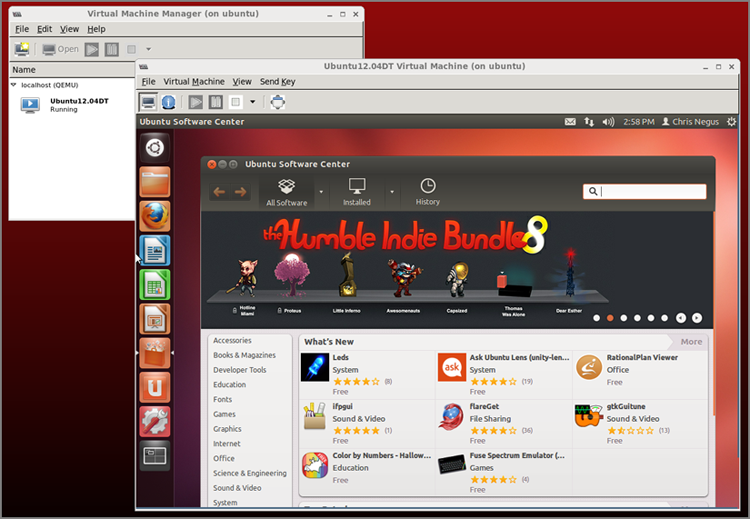
Once you install a VM using virt-manager, an entry for that VM appears in the Virtual Machine Manager window. To open a console window to use the VM, just double-click the VM’s entry. Figure 15-5 shows a VM that was just launched from the Virtual Machine Manager window.
Figure 15-5: Open a console to your VM from the Virtual Machine Manager window.
When you are done using the VM for the moment, just close the window. The VM will keep running and be accessible through any network interface you configured for the VM. Here are other actions you can do with the VM by right-clicking the VM’s entry:
· Run—If the VM is not currently running, this selection boots it up.
· Pause—This selection pauses a running VM.
· Shutdown—After making this selection, you can choose to Reboot, Shut Down, Force Off, or Save. A Force Off is similar to just pulling out the plug on a physical machine. A Save saves everything in your VM’s memory to a file that you can explore later.
· Clone—This selection lets you make a clone of the current VM, so you can have multiple instances of the VM.
· Migrate—If you have another compatible KVM host available, you can migrate the VM to that other host.
Now that you have seen what you can do with KVM virtual machines using graphical tools, the next section will help you use commands to accomplish many of the same things.
Managing Virtual Machines with Commands
If you can install and manage VMs with a nice graphical tool like virt-manager, why bother managing your VMs with commands? There are lots of reasons. Maybe your KVM host doesn’t have a desktop installed. Or you may want to run commands to work with VMs from a shell script.
To get started, you can use the virt-install command to install a virtual machine. With virt-clone you can clone an existing virtual image. For managing VMs, you can use the virsh command to list information about VMs, as well as start, stop, and reboot them.
Creating a Virtual Machine with virt-install
Instead of clicking through the Virtual Machine Manager window to create a VM, you can pass options required to create a VM using the virt-install command. Before using virt-install, you need to create a storage image. One way to do that is with the qemu-img command.
Create Storage for the VM with qemu-img
You can use the qemu-img command to create image files that VMs can utilize as their storage media. To the installer, the images look like regular hard disks or other block storage devices. Here are descriptions of supported image formats:
· raw—This is the default, raw image type for qemu-img. This image type is simple. It is the format you should use if you expect to export the image to other virtual environments.
· qcow2—If you expect the image to continue to be used by qemu, use qcow2. The qcow2 format does not immediately consume all space that is allocated, but instead grows as space is needed. It also supports encryption.
· Other formats—Most other image formats supported by qemu-img are supported mostly for compatibility with older versions. These include qcow, cow, vdi, vmdk, vpc, and cloop. Type man qemu-img to see information about those image types.
The following example of qemu-img creates a qcow2 image at /var/stuff/mine.qcow2. There is 8GB of disk space allocated for the image (although it will actually consume only the amount that the VM uses). The preallocation=metadata option can improve the performance of the image as it grows.
$ sudo qemu-img create -f qcow2 -o preallocation=metadata \
/var/stuff/mine.qcow2 8G
Once the qcow2 image is created, you can do a consistency check on it using qemu-img with the check option:
$ sudo qemu-img check /var/stuff/mine.qcow2 Check that image is OK
At any point in the process, you might want to check the amount of space being consumed by your VM. Do that with the info option to qemu-img:
$ sudo qemu-img info mine.qcow2
See allocated/actual image sizes
image: mine.qcow2
file format: qcow2
virtual size: 8.0G (8589934592 bytes)
disk size: 2.6G
cluster_size: 65536
The qemu-img info example was run after the VM was installed. You can see that although 8GB of space is allocated, only 2.6GB is currently being consumed.
Installing a VM with virt-install
The virt-install command is a versatile tool for creating new virtual machines. On the command line, you can identify the attributes of the VM’s environment.
Here’s an example of a virt-install command line that creates an Ubuntu virtual machine. This command incorporates many of the options you would have to click on or fill in on the virt-manager window. Note that this command incorporates the image that I created earlier in this chapter using the qemu-img command.
$ virt-install --connect qemu:///system --name cn_ubuntu12.04 \
--ram 1024 --disk path=/var/stuff/mine.qcow2,format=qcow2 \
--network=bridge:virbr0,model=virtio --vnc --os-type=linux \
--cdrom /var/stuff/ubuntu-12.04.2-desktop-amd64.iso \
--noautoconsole --keymap=en-us
Here is what the different options to virt-install mean:
· --connect Identifies the location of the virtualization service on the hypervisor. The qemu:///system argument that is identified here is the default location used by KVM.
· --name Identifies the name to represent the VM. You can call it anything you like, but typically the name will indicate the type of operating system and possibly a release number.
· --ram Lets you set how much RAM the VM can consume.
· --disk_path Tells the location of the disk image and its format (in this case, qcow2).
· network=bridge:virbr0 Identifies the network interface the VM should use from the host to communicate to other hosts.
· --vnc Says to use virtual network computing (VNC) to provide access to the VM’s console.
· --os-type Identifies the VM as a Linux system.
· --cdrom Indicates the location of the ISO image that the installation is run from.
· --noautoconsole Prevents a console to the VM from automatically opening. This allows you to use other viewers to watch the VM, such as virt-manager or virt-viewer.
· --keymap=en-us Sets the keyboard to US English.
Check the virt-install man page (type man virt-install) to see other options you can use with the virt-install command.
Once the virt-install command starts, you can open an application from the desktop to see the progress of your installation. The virt-manager and virt-viewer commands are among those you can use to view your VM’s console. In the case of the Ubuntu live CD used in this example, you would have to click through the install process and enter some information to complete the installation.
After the VM is installed, you can manage your VMs using the virsh command.
Starting and Stopping Virtual Machines with virsh
The virsh command provides a good way to manage your VMs after they are created. You can use virsh to see what VMs are running; then you can start, stop, pause, and otherwise manage them.
Here are some examples of the virsh command:
$ virsh help View the list of subcommands to virsh
$ virsh list Show currently running VMs
Id Name State
----------------------------------
5 Ubuntu12.04DT running
6 Fedora17DT running
$ virsh shutdown Fedora17DT Shutdown the Fedora VM
Domain Fedora17DT is being shutdown
$ virsh destroy Ubuntu12.04DT Immediately stop the Ubuntu VM
Domain Fedora17DT destroyed
$ virsh undefine Fedora17DT Totally remove VM's definition
Domain Fedora17DT has been undefined
$ virsh version Show current version information
Compiled against library: libvir 0.9.8
Using library: libvir 0.9.8
Using API: QEMU 0.9.8
Running hypervisor: QEMU 1.0.0
$ virsh hostname Show hostname of the hypervisor
$ virsh autostart Ubuntu12.04DT Set VM to start at boot time
There are many more options to the virsh command that you can use to manage your VMs. Refer to the virsh man page (type man virsh) for details.
Summary
To make efficient use of computing infrastructures, more and more computers are being used as virtualization hosts (also sometimes called hypervisors). By using a computer as a virtual host, you can run multiple, different operating systems at once on the same physical computer.
The KVM features of Linux provide a means of running Ubuntu or other Linux systems as a virtual host. If you want to use your computer as a virtual host, the chapter takes you through some steps you can take to make sure your computer hardware includes virtualization support.
The Virtual Machine Manager window (virt-manager command) provides a graphical way of installing and managing VMs. Because it is fairly intuitive to use, it’s a good way to start using virtualization in Ubuntu.
If you prefer command-line tools for virtualization, the qemu-img command can be used to create image files needed for storage by a VM. Then the virt-install command can be used to actually create the virtual machine.
Once created, your VMs can be managed using the virsh command. With virsh, you can start, stop, pause and perform other actions on your VMs.
All materials on the site are licensed Creative Commons Attribution-Sharealike 3.0 Unported CC BY-SA 3.0 & GNU Free Documentation License (GFDL)
If you are the copyright holder of any material contained on our site and intend to remove it, please contact our site administrator for approval.
© 2016-2026 All site design rights belong to S.Y.A.