Ubuntu Linux Toolbox: 1000+ Commands for Power Users (2013)
Chapter 4
Working with Files
IN THIS CHAPTER
· Setting permissions
· Traversing the filesystem
· Creating/copying files
· Using hard/symbolic links
· Changing file attributes
· Searching for files
· Listing and verifying files
Everything in a Linux filesystem can be viewed as a file. This includes data files, directories, devices, named pipes, links, and other types of files. Associated with each file is a set of information that determines who can access the file and how they can access it. This chapter covers many commands for exploring and working with files.
Understanding File Types
Directories and regular files are by far the file types you will use most often. However, there are several other types of files you will encounter as you use Linux. From the command line, there are many ways you can create, find, and list different types of files.
Files that provide access to the hardware components on your computer are referred to as device files. There are character and block devices. There are hard linksandsoft links you can use to make the same file accessible from different locations. Less often used directly by regular users are named pipes and sockets, which provide access points for processes to communicate with each other.
Using Regular Files
Regular files consist of data files (documents, music, images, archives, and so on) and commands (binaries and scripts). You can determine the type of a file using the file command. In the following example, you change to the directory containing bash shell documentation (available if you have the doc-base package installed) and use the file command to view some of the file types in that directory:
$ cd /usr/share/doc/
$ file doc-base/install-docs.html
doc-base/install-docs.html: XML document text
$ file doc-base/copyright
doc-base/copyright: ASCII English text
$ file doc-base/doc-base.html
doc-base/doc-base.html/: directory
$ file doc/doc-base/changelog.gz
doc-base/changelog.gz: gzip compressed data, from Unix, max compression
$ file shared-mime-info/shared-mime-info-spec.pdf
shared-mime-info/shared-mime-info-spec.pdf: PDF document, version 1.4
The file command that was run shows document files in the Ubuntu documentation directories of different formats. It can look inside the files and determine that a file contains text that has been compressed, PDF or PostScript that can be sent to a printer, plain text, or HTML (web page) markup. There is even a subdirectory shown, which is unexpected because it has an odd name for a directory (doc-base.html).
You can create regular files with any application that can save its data. If you just want to create some blank files to start with, there are many ways to do that. Here are two examples:
$ touch /tmp/newfile.txt Create a blank file
$ > /tmp/newfile2.txt Create a blank file
Displaying a long list on a file is another way to determine its file type. For example:
$ ls -l /tmp/newfile2.txt List a file to see its type
-rw-r--r-- 1 chris chris 0 Sep 5 14:19 newfile2
A dash in the first character of the 10-character permission information (-rw-r--r--) indicates that the item is a regular file. (Permissions are explained in the “Setting File/Directory Permissions” section later in this chapter.) Commands are also regular files, but are saved as executables. Here are some examples:
$ ls -l /usr/bin/apt-key
-rwxr-xr-x 1 root root 8067 Dec 12 08:48 /usr/bin/apt-key
$ file /usr/bin/apt-key
/usr/bin/apt-key: POSIX shell script, UTF-8 Unicode text executable
$ file /bin/ls
/bin/ls: ELF 64-bit LSB executable, x86-64, version 1 (SYSV), ...
You can see that the apt-key command is executable by the x settings for owner, group, and others. By running file on apt-key, you can see that it is a shell script. Commands that are not scripts are binary executables, such as the ls command indicated earlier.
Using Directories
A directory is a container for files and subdirectories. Directories are set up in a hierarchy from the root (/) down to multiple subdirectories, each separated by a slash (/). Directories are called folders when you access them from graphical file managers.
To create new directories for storing your data, you can use the mkdir command. Here are examples of using mkdir to create directories in different ways:
$ mkdir /tmp/new Create "new" directory in /tmp
$ mkdir -p /tmp/a/b/c/new Create parent directories as needed for "new"
$ mkdir -m 700 /tmp/new2 Create new2 with drwx——— permissions
The first mkdir command simply adds the new directory to the existing /tmp directory. The second example creates directories as needed (subdirectories a, b, and c) to create the resulting new directory. The last command adds the -moption to set directory permissions as well.
You can identify the file as a directory because the first character in the 10-character permission string for a directory is a d:
$ file /tmp/new
/tmp/new: directory
$ ls -ld /tmp/new
drwxrwxr-x 2 chris chris 4096 Feb 10 15:40 /tmp/new
Another thing to notice about directories is that the execute bits (x) must be on if you want people to use the directory as their current directory.
Using Symbolic and Hard Links
Instead of copying files and directories to different parts of the filesystem, links can be set up to access that same file from multiple locations. Linux supports both soft links(usually called symbolic links) and hard links.
When you try to open a symbolic link that points to a file or change to one that points to a directory, the command you run acts on the file or directory that is the target of that link. The target has its own set of permissions and ownership that you cannot see from the symbolic link. The symbolic link can exist on a different disk partition than the target. In fact, the symbolic link can exist, even if the target doesn’t.
A hard link, alternatively, can only be used on files (not directories) and is basically a way of giving multiple names to the same physical file. Every physical file has at least one hard link, which is commonly thought of as the file itself. Any additional names (hard links) that point to that single physical file must be on the same partition as the original target file (in fact, one way to tell that files are hard links is that they all have the same inode number). Changing permissions, ownership, date/timestamps, or content of any hard link to a file results in all others being changed as well. However, deleting one link will not remove the file; it will continue to exist until the last link to the file is deleted.
Here are some examples of using the ln command to create hard and symbolic links:
$ touch myfile
$ ln myfile myfile-hardlink
$ ln -s myfile myfile-symlink
$ ls -li myfile*
4460742 -rw-rw-r-- 2 chris chris 0 Feb 10 18:01 myfile
4460742 -rw-rw-r-- 2 chris chris 0 Feb 10 18:01 myfile-hardlink
4460748 lrwxrwxrwx 1 chris chris 6 Feb 10 18:02 myfile-symlink -> myfile
Note that after creating the hard and symbolic link files, I used the ls -li command to list the results. The -li option shows the inodes associated with each file. You can see that myfile and myfile-hardlink both have the inode number of 4460742 (signifying the exact same file on the hard disk). The myfile-symlink symbolic link has a different inode number. And although the hard link simply appears as a file (-), the symbolic link is identified as a link (l) with wide-open permissions. You won’t know if you can access the file the symbolic link points to until you try it or list the link target.
Using Device Files
When applications need to communicate with your computer’s hardware, they direct data to device files. By convention, device files are stored in the /dev directory. Devices are generally divided into block devices (such as storage media) and character devices (such as serial ports and terminal devices).
Note Device files are often called device drivers. In Linux and UNIX, the operating system treats almost everything as a file, hence the term device files.
Each device file is associated with a major number (indicating the type of device) and minor number (indicating the instance number of the device). For example, terminal (tty) devices are represented by major character device 4, while SCSI hard disks are represented by major block device number 8. Here are examples of device files:
$ ls -l /dev/tty0 /dev/sda1 List character and block special devices
brw-rw---- 1 root disk 8, 1 Feb 3 17:24 /dev/sda1
crw--w---- 1 root tty 4, 0 Feb 3 17:24 /dev/tty0
A listing of device names and numbers allocated in Linux is available in Ubuntu in the online manual page for the MAKEDEV command. Most device files are created automatically for you at boot time or by udev when new hardware is connected live (such as when you plug in a USB flash drive). Most people never create device files manually. However, you can create your own device file using the mknod command. Here’s an example:
$ sudo mknod /dev/ttyS40 c 4 68 Add device for 41st serial port
$ ls -l /dev/ttyS40 List new device file
crw-rw---- 1 root dialout 4, 68 Feb 3 17:24 /dev/ttyS4
Using Named Pipes and Sockets
When you want to allow one process to send information to another process, you can simply pipe (|) the output from one to the input of the other. However, to provide a presence in the filesystem from which a process can communicate with other processes, you can create named pipes or sockets. Named pipes are typically used for interprocess communication on the local system, while sockets can be used for processes to communicate over a network.
Named pipes and sockets are often set up by applications in the /tmp directory. Here are some examples of named pipes and sockets:
$ ls -l /tmp/.TV-chris/tvtimefifo-local /tmp/.X11-unix/X0
prw------- 1 chris chris 0 Sep 26 2007 /tmp/.TV-chris/tvtimefifo-local
srwxrwxrwx 1 root root 0 Sep 4 01:30 /tmp/.X11-unix/X0
The first listing is a named pipe set up by the tvtime TV card player (note the p at the beginning indicating a named pipe). The second listing is a socket set up by the X GUI for interprocess communications.
To create your own named pipe, use the mkfifo command as follows:
$ mkfifo mypipe
$ ls -l mypipe
prw-rw-r-- 1 chris chris 0 Sep 26 00:57 mypipe
Setting File/Directory Permissions
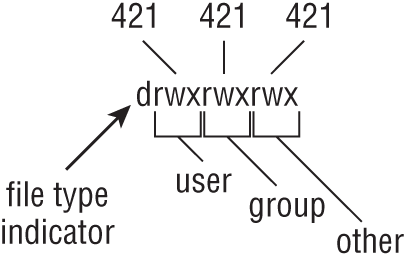
The ability to access files, run commands, and change to a directory can be restricted with permission settings for user, group, and other users. When you display a long list (ls -l) of files and directories in Linux, the beginning 10 characters shown indicate what the item is (file, directory, block device, and so on) along with whether or not the item can be read, written, and/or executed. Figure 4-1 illustrates the meaning of those 10 characters.
Figure 4-1: Read, write, and execute permissions are set for files and directories.
To follow along with examples in this section, create a directory called /tmp/test and a file called /tmp/test/hello.txt. Then do a long listing of those two items, as follows:
$ mkdir /tmp/test
$ echo "some text" > /tmp/test/hello.txt
$ ls -ld /tmp/test/ /tmp/test/hello.txt
drwxrwxr-x 2 chris sales 4096 Feb 10 19:24 /tmp/test/
-rw-rw-r-- 1 chris sales 16 Feb 10 19:24 /tmp/test/hello.txt
After creating the directory and file, the first character of the long listing shows /tmp/test as a directory (d) and hello.txt as a file (-). Other types of files available in Linux that would appear as the first character include character devices (c), block devices (b) or symbolic links (l), named pipes (p), and sockets (s).
The next nine characters represent the permissions set on the file and directory. The first rwx indicates that the owner (chris) has read, write, and execute permissions on the directory. Likewise, the group sales has the same permissions (rwx). Then all other users have only read and execute permissions (r-x); the dash indicates the missing write permission. For the hello.txt file, the user and members of the group have read and write permissions (rw-) and all others have read permission (r--).
When you set out to change permissions, each permission can be represented by an octal number (where read is 4, write is 2, and execute is 1) or a letter (rwx). Generally speaking, read permission lets you view the contents of the directory, write lets you change (add or modify) the contents of the directory, and execute lets you change to (in other words, access) the directory.
If you don’t like the permissions you see on files or directories you own, you can change those permissions using the chmod command.
Changing Permissions with chmod
The chmod command lets you change the access permissions of files and directories.
The following sections show several chmod command lines and how access to the directory or file changes.
chmod 0700 directory
Original Permission:any
New Permission:drwx------
Description: The directory’s owner can read or write files in that directory as well as change to it. All other users (except root) have no access.
chmod 0711 directory
Original Permission:any
New Permission:drwx--x--x
Description: Same as for the owner. All others can change to the directory, but not view or change files in the directory. This can be useful for server hardening, where you prevent someone from listing directory contents but allow access to a file in the directory if someone already knows it’s there.
chmod go+r directory
Original Permission:drwx------
New Permission:drwxr--r--
Description: Adding read permission to a directory may not give desired results. Without execute on, others can’t view the contents of any files in that directory.
chmod 0777 directory and chmod a=rwx directory
Original Permission:any
New Permission:drwxrwxrwx
Description: All permissions are wide open.
chmod 0000 directory and chmod a-rwx directory
Original Permission:any
New Permission:d---------
Description: All permissions are closed. Good to protect a directory from errant changes. However, backup programs that run as non-root may fail to back up the directory’s contents.
chmod 666 file
Original Permission:any
New Permission:-rw-rw-rw-
Description: Open read-write permissions completely on a file.
chmod go-rw file
Original Permission:-rw-rw-rw-
New Permission:-rw-------
Description: Don’t let anyone except the owner view, change, or delete the file.
chmod 644 file
Original Permission:any
New Permission:-rw-r--r--
Description: Only the owner can change or delete the file, but all can view it.
General Information on Changing Permissions
This section discusses what you should know generally on changing permissions using the command line.
The first 0 in the mode line can usually be dropped (so you can use 777 instead of 0777). That placeholder has special meaning. It is an octal digit that can be used on commands (executables) to indicate that the command can run as a set-UID program (4), run as a set-GID program (2), or become a sticky program (1). With set-UID and set-GID, the command runs with the assigned user or group permissions (instead of running with permission of the user or group that launched the command).
Warning SUID should not be used on shell scripts. Here is a warning from the Linux Security HOWTO: “SUID shell scripts are a serious security risk, and for this reason the kernel will not honor them. Regardless of how secure you think the shell script is, it can be exploited to give the cracker a root shell.”
Having the sticky bit on for a directory keeps users from removing or renaming files from that directory that they don’t own (/tmp is an example). Given the right permission settings, however, users can change the contents of files they don’t own in a sticky bit directory. The final permission character is t instead of x on a sticky directory. A command with sticky bit on used to cause the command to stay in memory, even while not being used. This is an old UNIX feature that is not supported in Linux.
The -R option is a handy feature of the chmod command. With -R, you can recursively change permissions of all files and directories starting from a point in the filesystem. Here are some examples:
$ sudo chmod -R 700 /tmp/test Open permission to owner below /tmp/test
$ sudo chmod -R 000 /tmp/test Close all permissions below /tmp/test
$ sudo chmod -R a+rwx /tmp/test Open all permissions below /tmp/test
Note that the -R option is inclusive of the directory you indicate. So the permissions in the preceding code, for example, would change for the /tmp/test directory itself, and not just for the files and directories below that directory.
Setting the umask
Permissions given to a file or directory are assigned originally at the time that item is created. How those permissions are set is based on the user’s current umask value. Using the umask command, you can set the permissions given to files and directories when you create them.
$ umask 0066 Make directories drwx--x--x and files -rw-------
$ umask 0077 Make directories drwx------ and files -rw-------
$ umask 0022 Make directories drwxr-xr-x and files -rw-r--r--
$ umask 0777 Make directories d--------- and files ----------
Changing Ownership
When you create a file or directory, your user account is assigned to that file or directory. So is your primary group. As root user, you can change the ownership (user) and group assigned to a file to a different user and/or groupusing the chown and chgrp commands. Here are some examples:
$ chown chris test/ Change owner to chris
$ chown chris:market test/ Change owner to chris and group to market
$ chgrp market test/ Change group to market
$ chown -R chris test/ Change all files below test/ to owner chris
The recursive option to chown (-R) just shown is useful if you need to change the ownership of an entire directory structure. As with chmod, using chown recursively changes permissions for the directory named, along with its contents. You might use chown recursively when a person leaves a company or stops using your web service. You can use chown -R to reassign their entire /home directory to a different user.
Related commands for changing group assignments and passwords include newgrp and gpasswd, as well as the /etc/gshadow file.
Traversing the Filesystem
Basic commands for changing directories (cd), checking the current directory (pwd), and listing directory contents (ls) are well-known to even casual shell users. So this section focuses on some less-common options to those commands, as well as other lesser-known features for moving around the filesystem. Here are some quick examples of cd for moving around the filesystem:
$ cd Change to your home directory
$ cd $HOME Change to your home directory
$ cd ~ Change to your home directory
$ cd ~chris Change to chris' home directory
$ cd - Change to previous working directory
$ cd $OLDPWD Change to previous working directory
$ cd ~/public_html Change to public_html in your home directory
$ cd .. Change to parent of current directory
$ cd /usr/bin Change to usr/bin from root directory
$ cd usr/bin Change to usr/bin beneath current directory
If you want to find out what your current directory is, use pwd (print working directory):
$ pwd
/home/chris
Creating symbolic links is a way to access a file from other parts of the filesystem (see the section “Using Symbolic and Hard Links” earlier in the chapter for more information on symbolic and hard links). However, symbolic links can cause some confusion about how parent directories are viewed. The following commands create a symbolic link to the /tmp directory from your home directory and show how to tell where you are related to a linked directory:
$ cd $HOME
$ ln -s /tmp tmp-link
$ ls -l tmp-link
lrwxrwxrwx 1 chris chris 13 Mar 24 12:41 tmp-link -> /tmp
$ cd tmp-link/
$ pwd
/home/chris/tmp-link
$ pwd -P
/tmp
$ pwd -L
/home/chris/tmp-link
$ cd -L ..
$ pwd
/home/chris
$ cd tmp-link
$ cd -P ..
$ pwd
/
Using the -P and -L options to pwd and cd, you can work with symbolically linked directories in their permanent or link locations, respectively. For example, cd -L .. takes you up one level to your home directory, whereas cd -P .. takes you up one level above the permanent directory (/). Likewise, -P and -L options to pwd show permanent and link locations.
Bash can remember a list of working directories. Such a list can be useful if you want to return to previously visited directories. That list is organized in the form of a stack. Use pushd and popdto add and remove directories:
$ pwd
/home/chris
$ pushd /usr/share/man/
/usr/share/man ~
$ pushd /var/log/
/var/log /usr/share/man ~
$ dirs
/var/log /usr/share/man ~
$ dirs -v
0 /var/log
1 /usr/share/man
2 ~
$ popd
/usr/share/man ~
$ pwd
/usr/share/man
$ popd
~
$ pwd
/home/chris
The dirs, pushd, and popd commands can also be used to manipulate the order of directories on the stack. For example, pushd -0 pushes the last directory on the stack to the top of the stack (making it the current directory). The pushd -2 command pushes the third directory from the bottom of the stack to the top.
Copying Files
Provided you have write permission to the target directory, copying files and directories can be done with some fairly simple commands. The standard cp command will copy a file to a new name or the same name in a new directory, with a new timestamp associated with the new file. Other options to cp let you retain date/timestamps, copy recursively, and prompt before overwriting. Here are some examples:
$ cd ; touch index.html
$ mkdir /tmp/html
$ cp -i index.html /tmp/html/
$ cp -il index.html /tmp/html/index2.html
$ mkdir /tmp/back
$ cp -a /tmp/html /tmp/back/
$ cp -R /tmp/html /tmp/back/
The preceding examples show ways of copying files. In the first cp example, if an index.html file exists in /tmp/html, you are prompted before overwriting it with the new file. In the next example, the index.html file is hard-linked to a file of the same name in the /tmp/html directory. In that case, because both hard links point to the same file, editing the file from either location will change the contents of the file in both locations. (The link can only be made if /tmp/html and your home directory are in the same filesystem.)
The cp -a command copies all files below the /tmp/html directory, retaining all ownership and permission settings. If, for example, /tmp/back represented a USB flash drive, that command would be a way to copy the contents of your web server to that drive. The -R option also recursively copies a directory structure, but assigns ownership to the current user and adds current date/timestamps.
The dd command is another way to copy data. This command is very powerful because on Linux systems, everything is a file, including hardware peripherals. Here is an example:
$ dd if=/dev/zero of=/tmp/mynullfile count=1
1+0 records in
1+0 records out
512 bytes (512 B) copied, 4.5447e-05 s, 11.3 MB/s
/dev/zero is a special file that generates null characters. In the example just shown, the dd command takes /dev/zero as input file and outputs to /tmp/mynullfile. The count is the number of blocks. By default, a block is 512 bytes. The result is a 512-bytes-long file full of null characters. You could use less or vi to view the contents of the file. However, a better tool to view the file would be the od (Octal Dump) command:
$ od -vt x1 /tmp/mynullfile View an octal dump of a file
Here’s another example of the dd command:
$ dd if=/dev/zero of=/tmp/mynullfile count=10 bs=2
10+0 records in
10+0 records out
20 bytes (20 B) copied, 0.000173996 s, 115 kB/s
This time, set the block size to 2 bytes and copy 10 blocks (20 bytes). The following command lineclones the first partition of the primary master IDE drive to the second partition of the primary slave IDE drive (back up all data before trying anything like this):
$ sudo dd if=/dev/hda1 of=/dev/hdb9
Warning Be very careful with this command. You normally do not want to blindly overwrite parts of your hard drives.
The next example makes a compressed backup of the first partition of the primary master IDE drive. Typically the partition should be unmounted before a backup such as this.
$ sudo umount /dev/hda1
$ sudo dd if=/dev/hda1 | gzip > bootpart.gz
The following command copies an ISO image file from a CD or DVD to your USB flash drive (assuming the drive appears as /dev/sdb1):
$ sudo dd if=whatever.iso of=/dev/sdb9
Note that this command is making a binary copy of the bytes in the file, which may not be what you want to do.
This next example copies the Master Boot Record from the primary master IDE hard drive to a file named mymbrfile:
$ dd if=/dev/hda of=mymbrfile bs=512 count=1
If you want to make a copy of the ISO image that was burned to a CD or DVD, insert that medium into your CD/DVD drive and (assuming /dev/cdrom is associated with your computer’s CD drive) type the following command:
$ dd if=/dev/cdrom of=whatever.iso
Note Ubuntu also creates /dev/cdrw and /dev/dvd devices files as well as /dev/cdrom.
Changing File Attributes
Files and directories in Linux filesystems all have read, write, and execute permissions associated with user, group, and others. However, there are also other attributes that can be attached to files and directories that are specific to certain filesystem types.
Files on ext2 and ext3 filesystems have special attributes that you may choose to use. You can list these attributes with the lsattr command. Most attributes are obscure and not turned on by default. Here’s an example of using lsattr to see some files’ attributes:
$ lsattr /etc/host*
-------------e- /etc/host.conf
-------------e- /etc/hosts
-------------e- /etc/host.allow
-------------e- /etc/host.deny
$ lsattr -aR /tmp/ | less Recursively list all /tmp attributes
The dashes represent 13 ext2/ext3 attributes that can be set. None are on by default. Those attributes are the following: a (append only), c (compressed), d (no dump), e (extent format), i (immutable), j (data journaling), s (secure deletion), t (no tail-merging), u (undeletable), A (no atime updates), D (synchronous directory updates), S (synchronous updates), and T (top of directory hierarchy). You can change these attributes using the chattr command. Here are some examples:
$ sudo chattr +d whatever.iso
$ sudo chattr +A -R /home/chris/images/*
$ sudo chattr +d ubuntu.iso
$ lsattr whatever.iso /home/chris/images/* ubuntu.iso
----i-------- whatever.iso
-------A----- /home/chris/images/einstein.jpg
-------A----- /home/chris/images/goth.jpg
------d------ ubuntu.iso
As shown in the preceding example, with the +i option set, the whatever.iso file becomes immutable, meaning that it can’t be deleted, renamed, or changed, or have a link created to it. Here, this prevents any arbitrary changes to the file. (Not even the root user can change the file until the i attribute is gone.) You can use this to help protect system files.
The -R option in the example recursively sets the +A option, so all files in the images directory and below can’t have access times (atime record) modified. Setting A attributes can save some disk I/O on laptops or flash drives. If you use the dump command to back up your ext2/ext3 filesystems, the +d option can prevent selected files from being backed up. In this case, you can choose to not have a large ISO image backed up.
To remove an attribute with chatter, use the minus sign (-). For example:
$ sudo chattr -i whatever.iso
Note Crackers who successfully break into a machine will often replace some system binaries (such as ls or ps) with corrupt versions and make them immutable. It’s a good idea to occasionally check the attributes set for your executables (in /bin, /usr/bin, /sbin, and /usr/sbin, for example).
Searching for Files
Ubuntu keeps a database of all the files in the filesystem (with exceptions defined in /etc/updatedb.conf) using features of the mlocate package. The locate command allows you to search that database. (In Ubuntu, the locatecommand is a symbolic link to the secure version of the command, mlocate.)
The results of the locate command come back instantly because the database is searched and not the actual filesystem. Before locate was available, most Linux users ran the find command to find files in the filesystem. Both locate and find are covered here.
Finding Files with locate
Because the database contains the name of many different kinds of files in the filesystem, and not just commands, you can use locate to find commands, devices, man pages, data files, or anything else identified by a name in the filesystem. Here is an example:
$ locate e1000
/lib/modules/2.6.20-16-generic/kernel/drivers/net/e1000
/lib/modules/2.6.20-16-generic/kernel/drivers/net/e1000/e1000.ko
/lib/modules/2.6.20-15-generic/kernel/drivers/net/e1000
/lib/modules/2.6.20-15-generic/kernel/drivers/net/e1000/e1000.ko
/usr/src/linux-headers-2.6.20-16-generic/include/config/e1000
/usr/src/linux-headers-2.6.20-16-generic/include/config/e1000/napi.h
/usr/src/linux-headers-2.6.20-16-generic/include/config/e1000.h
/usr/src/linux-headers-2.6.20-15-generic/include/config/e1000
/usr/src/linux-headers-2.6.20-15-generic/include/config/e1000/napi.h
/usr/src/linux-headers-2.6.20-15-generic/include/config/e1000.h
/usr/src/linux-headers-2.6.20-15/include/config/e1000.h
/usr/src/linux-headers-2.6.20-15/drivers/net/e1000
/usr/src/linux-headers-2.6.20-15/drivers/net/e1000/Makefile
/usr/src/linux-headers-2.6.20-16/include/config/e1000.h
/usr/src/linux-headers-2.6.20-16/drivers/net/e1000
/usr/src/linux-headers-2.6.20-16/drivers/net/e1000/Makefile
The preceding example found two versions of the e1000.ko and e1000.ko kernel modules. locate is case sensitive unless you use the -i option. Here’s an example:
$ locate -i itco_wdt
/lib/modules/2.6.20-16-generic/kernel/drivers/char/watchdog/iTCO_wdt.ko
/lib/modules/2.6.20-15-generic/kernel/drivers/char/watchdog/iTCO_wdt.ko
The mlocate package includes a cron job that runs the updatedb command once per day to update the locate database of files.
To update the locate database immediately, you can run the updatedb command manually:
$ sudo updatedb
As mentioned earlier, the /etc/updatedb.conf file contains information that excludes certain directories and filesystem types from having their files gathered by the update database. Here is an example of information in the updatedb.conf file:
PRUNEPATHS="/tmp /var/spool /media /home/.ecryptfs"
PRUNEFS="NFS nfs nfs4 rpc_pipefs afs binfmt_misc proc smbfs
autofs iso9660 ncpfs coda devpts ftpfs devfs mfs shfs sysfs cifs
lustre_lite tmpfs usbfs udf fuse.glusterfs fuse.sshfs curlftpfs
ecryptfs fusesmb devtmpfs"
The PRUNEPATHS variable sets directories for which files and subdirectories are loaded into the locate database. These include places where temporary files are stored (such as /var/spool and /tmp). Filesystem types that are excluded by the PRUNEFS line include those of temporary filesystem types and remotely mounted filesystem types (such as nfs and cifs).
Locating Files with find
Before the days of locate, users would utilize the find command to find files. Although locate will come up with a file faster, find has many other powerful options for finding files based on attributes other than the name.
Note Searching the entire filesystem can take a long time to complete. Before searching the whole filesystem, consider searching a subset of the filesystem or excluding certain directories or remotely mounted filesystems.
This example searches the root filesystem (/) recursively for files named e100:
$ find / -name "e100*" -print
find: /usr/lib/audit: Permission denied
find: /usr/libexec/utempter: Permission denied
/sys/module/e100
/sys/bus/pci/drivers/e100
...
Running find as a normal user can result in long lists of Permission denied as find tries to enter a directory you do not have permissions to. You can filter out the inaccessible directories:
$ find / -name e100 -print 2>&1 | grep -v "Permission denied"
or send all errors to the /dev/null bit bucket:
$ find / -name e100 -print 2> /dev/null
Because searches with find are case sensitive and must match the name exactly (e100 won’t match e100.ko), you can use regular expressions to make your searches more inclusive. (To be case-insensitive, you could use -inameinstead.) Here’s an example:
$ find / -name 'e100*' -print
/lib/modules/2.6.20-16-generic/kernel/drivers/net/e1000
/lib/modules/2.6.20-16-generic/kernel/drivers/net/e1000/e1000.ko
/lib/modules/2.6.20-16-generic/kernel/drivers/net/e100.ko
/lib/modules/2.6.20-15-generic/kernel/drivers/net/e1000
/lib/modules/2.6.20-15-generic/kernel/drivers/net/e1000/e1000.ko
/lib/modules/2.6.20-15-generic/kernel/drivers/net/e100.ko
/usr/src/linux-headers-2.6.20-16-generic/include/config/e100.h
/usr/src/linux-headers-2.6.20-16-generic/include/config/e1000
/usr/src/linux-headers-2.6.20-16-generic/include/config/e1000.h
/usr/src/linux-headers-2.6.20-15-generic/include/config/e100.h
/usr/src/linux-headers-2.6.20-15-generic/include/config/e1000
/usr/src/linux-headers-2.6.20-15-generic/include/config/e1000.h
/usr/src/linux-headers-2.6.20-15/include/config/e100.h
/usr/src/linux-headers-2.6.20-15/include/config/e1000.h
/usr/src/linux-headers-2.6.20-15/drivers/net/e1000
/usr/src/linux-headers-2.6.20-16/include/config/e100.h
/usr/src/linux-headers-2.6.20-16/include/config/e1000.h
/usr/src/linux-headers-2.6.20-16/drivers/net/e1000
You can also find files based on timestamps. The following command line finds files in /usr/bin/ that have been accessed in the past two minutes:
$ find /usr/bin/ -amin -2 -print
/usr/bin/
/usr/bin/find
The following command line finds files that have not been accessed in /home/chris for more than 60 days:
$ find /home/chris/ -atime +60
Use the -type d option to find directories. The following command line finds all directories under /etc and redirects stderr to the bit bucket (/dev/null):
$ find /etc -type d -print 2> /dev/null
This command line finds files in /sbinby permissions that match 755:
$ find /sbin/ -perm 755 -print
The exec option to find is very powerful because it lets you act on the files found with the find command. The following command finds all the files in /var owned by the user chris (must be a valid user) and executes the ls -lcommand on each one:
$ find /var -user chris -exec ls -l {} \;
An alternative to find’s exec option is xargs:
$ find /var -user chris -print | xargs ls -l
There are big differences on how the two commands just shown operate, leading to very different performance. The find -exec spawns the command ls for each result it finds. The xargs command works more efficiently by passing many results as input to a single ls command. (Note that for the ls -l command, you can use -ls on the find command line instead of using xargs ls -l.)
To negate a search criterion, place an exclamation point (!) before it. The next example finds all the files that are not owned by the group root and are regular files, and then does an ls -l on each:
$ find / ! -group root -type f -print 2> /dev/null | xargs ls -l
The next example finds the files in /sbin that are regular files and are not writable by others, and then feeds them to an ls -l command:
$ find /sbin/ -type f ! -perm /o+w -print | xargs ls -l
-rwxr-xr-x 1 root root 3056 2007-03-07 15:44 /sbin/acpi_available
-rwxr-xr-x 1 root root 43204 2007-02-18 20:18 /sbin/alsactl
Finding files by size is a great way to determine what is filling up your hard disks. The following command line finds all files that are greater than 10MB (+10M), lists those files from largest to smallest (ls -lS), and directs that list to a file (/tmp/bigfiles.txt):
$ find / -xdev -size +10M -print | xargs ls -lS > /tmp/bigfiles.txt
In this example, the -xdev option prevents any mounted filesystems, besides the root filesystem, from being searched. This is a good way to keep the find command from searching the /proc directory and any remotely mounted filesystems, as well as other locally mounted filesystems.
Using Other Commands to Find Files
Other commands for finding files include the whereis and which commands. Here are some examples of those commands:
$ whereis man
man: /usr/bin/man /usr/X11R6/bin/man /usr/bin/X11/man /usr/local/man
/usr/share/man /usr/share/man/man1/man.1.gz
/usr/share/man/man7/man.7.gz
$ which ls
/bin/ls
The whereis command is useful because it finds not only commands, but also man pages and configuration files associated with a command. From the example of whereis for the word man, you can see the man executable, its configuration file, and the location of man pages for the man command. The which example shows where the ls executable is (/bin/ls). The which command is useful when you’re looking for the actual location of an executable file in your PATH, as in this example:
$ dpkg-query -S `which ps`
procps: /bin/ps
Finding Out More about Files
Now that you know how to find files, you can get more information about those files. Using less common options to the ls command enables you to list information about a file that you won’t see when you run ls without options. Commands such as file help you identify a file’s type. With md5sum and sha1sum, you can verify the validity of a file.
Listing Files
Although you are probably quite familiar with the ls command, you may not be familiar with many of the useful options for ls that can help you find out a lot about the files on your system. Here are some examples of using ls to display long lists (-l) of files and directories:
$ ls -l Files and directories in current directory
$ ls -la Includes files/directories beginning with dot (.)
$ ls -lt Orders files by time recently changed
$ ls -lu Orders files by time recently accessed
$ ls -lS Orders files by size
$ ls -li Lists the inode associated with each file
$ ls -ln List numeric user/group IDs, instead of names
$ ls -lh List file sizes in human-readable form (K, M, etc.)
$ ls -lR List files recursively, from current and subdirectories
When you list files, there are also ways to have different types of files appear differently in the listing:
$ ls -F Add a character to indicate file type
myfile-symlink@ config/ memo.txt pipefile| script.sh* xpid.socket=
$ ls --color=always Show file types as different colors
$ ls -C Show files listing in columns
In the -F example, the output shows several different file types. The myfile-symlink@ indicates a symbolic link to a directory, config/ is a regular directory, memo.txt is a regular file (no extra characters), pipefile| is a named pipe (created with mkfifo), script.sh* is an executable file, and xpid.socket= is a socket. The next two examples display different file types in different colors and lists output in columns, respectively.
Verifying Files
When files such as software packages and CD or DVD images are shared over the Internet, often each has a SHA1SUM or MD5SUM file that is published with it. Those files contain checksums that can be used to make sure that the file you downloaded is exactly the one that the repository published.
The following are examples of the md5sum and sha1sum commands being used to produce checksums of files:
$ md5sum whatever.iso
d41d8cd98f00b204e9800998ecf8427e whatever.iso
$ sha1sum whatever.iso
da39a3ee5e6b4b0d3255bfef95601890afd80709 whatever.iso
Which command you choose depends on whether the provider of the file you are checking distributed md5sum or sha1sum information. There are also other sha* commands that use a higher number of bits for encryption. For example, here is what some of the md5 hashes for the Ubuntu Quantal Quetzal distribution ISO images looked like:
7b7c56c74008da7d97bd49669c8a045d ubuntu-12.10-desktop-amd64+mac.iso
7ad57cadae955bd04019389d4b9c1dcb ubuntu-12.10-desktop-amd64.iso
b4191c1d1d6fdf358c154f8bf86b97dd ubuntu-12.10-desktop-i386.iso
b8a4d9513ed53dc1be05576113b113e8 ubuntu-12.10-server-amd64+mac.iso
4bd3270bde86d7e4e017e3847a4af485 ubuntu-12.10-server-amd64.iso
...
Within each Ubuntu ISO image, there is also an mdsum.txt file in the top-level directory of that image. This file lists the MD5 checksums for all files on the CD or DVD image.
Any time you have stored the md5sums in a file, you can use that file to check the files it contains. That way, you can validate the md5sums for many files at once. For example, I mounted the ISO image ubuntu-11.10-desktop-amd64.iso and, from the top level of that image, I ran the md5sum -c command as follows:
$ md5sum -c md5sum.txt
./casper/initrd.lz: OK
./casper/filesystem.manifest-remove: OK
./casper/filesystem.manifest: OK
./casper/filesystem.squashfs: OK
./casper/vmlinuz: OK
./casper/filesystem.size: OK
./dists/oneiric/Release: OK
...
To verify only one of the files listed in the file, you could do something like the following:
$ cat md5sum.txt | grep initrd.lz |md5sum -c
./dists/feisty/Release.gpg: OK
If you had an SHA1SUM file instead of an md5sum.txt file to check against, you could use the sha1sum command in the same way. By combining the find command described earlier in this chapter with the md5sum command, you can verify any part of your filesystem. For example, here’s how to create an MD5 checksum for every file in the /etc directory so they can be checked later to see if any have changed:
$ sudo find /etc -type f -exec md5sum {} \; > /tmp/md5.lst 2> /dev/null
The result of the previous command line is a /tmp/md5.lst file that contains a 128-bit checksum for every file in the /etc directory. Later, you could type the following command to see if any of those files have changed:
$ cd /etc
$ md5sum -c /tmp/md5.list | grep -v 'OK'
./hosts.allow: FAILED
md5sum: WARNING: 1 of 1668 computed checksums did NOT match
As you can see from the output, only one file changed (hosts.allow). So the next step is to check the changed file and see if the changes to that file were intentional.
Summary
There are dozens of commands for exploring and working with files in Linux. Commands such as chmod can change the permissions associated with a file, whereas commands that include lsattr and chattr can be used to list and change file attributes that are associated with ext2 and ext3 filesystem types.
To move around the filesystem, people use the cd command most often. However, to move repeatedly among the same directories, you can use the pushd and popd commands to work with a stack of directories.
Copying files is done with the cp command. However, the dd command can be used to copy files (such as disk images) from a device (such as a CD-ROM drive). For creating directories, you can use the mkdir command.
Instead of keeping multiple copies of a file around on the filesystem, you can use symbolic links and hard links to have multiple filenames point to the same file or directory. Symbolic links can be anywhere in the filesystem, while hard links must exist on the same partition that the original file is on.
To search for files, Linux offers the locate and find commands. To verify the integrity of files you download from the Internet, you can use the md5sum and sha1sum commands.
All materials on the site are licensed Creative Commons Attribution-Sharealike 3.0 Unported CC BY-SA 3.0 & GNU Free Documentation License (GFDL)
If you are the copyright holder of any material contained on our site and intend to remove it, please contact our site administrator for approval.
© 2016-2026 All site design rights belong to S.Y.A.