Ubuntu Linux Toolbox: 1000+ Commands for Power Users (2013)
Chapter 6
Playing with Multimedia
IN THIS CHAPTER
· Playing music with play, ogg123, and mpg321
· Adjusting audio with alsamixer and aumix
· Ripping music CDs with cdparanoia
· Encoding music with oggenc, flac, and lame
· Streaming music with icecast and ices
· Converting audio files with sox
· Transforming digital images with convert
· Playing video DVDs
There’s no need to go to a GUI tool if all you need to do is play a song or convert an image or audio file to a different form. There are commands for working with multimedia files (audio or images) that are quick and efficient if you find yourself working from the shell. And if you need to manipulate batches of multimedia files, the same command you use to transform one file can be added to a script to repeat the process on many files.
This chapter focuses on tools for working with audio, digital image, and video files from the shell.
Working with Audio
There are commands available for Linux systems that can manipulate files in dozens of audio formats. Commands such as ogg123, mpg321, and play can be used to listen to audio files. There are commands for ripping songs from music CDs and encoding them to store efficiently. There are even commands to let you stream audio so anyone on your network can listen to your playlist.
Playing Music
Depending on the audio format you want to play, you can choose from several command line players for Linux. The play command (based on the sox facility, described later) can play audio files in multiple, freely available formats. You can use ogg123 to play popular open source music formats, including Ogg Vorbis, Free Lossless Audio Codec (FLAC), and Speex files. The mpg321 player, which is available via third-party repositories, is popular for playing MP3 music files.
The play command requires the sox package. Install it with the following command:
$ sudo apt-get install sox
Type sox -h to see audio formats and effects available to use with play:
$ sox -h
...
Supported file formats: 8svx aif aifc aiff aiffc al alsa au auto
avr cdda cdr cvs cvsd dat dvms fssd gsm hcom ima ircam la lu maud
nist nul null ogg ossdsp prc raw s3 sb sf sl smp snd sndt sou sph
sw txw u3 u4 ub ul uw vms voc vorbis vox wav wve xa
Supported effects: allpass band bandpass bandreject bass chorus
compand dcshift deemph dither earwax echo echos equalizer fade
filter flanger highpass lowpass mcompand mixer noiseprof noisered
pad pan phaser pitch polyphase repeat resample reverb reverse
silence speed stat stretch swap synth treble tremolo trim vibro vol
The play command uses the sox code to play sounds.
Here are some examples of playing files using play:
$ play inconceivable.wav Play WAV file (may be ripped from CD)
$ play *.wav Play all WAV files in directory (up to 32)
$ play hi.au vol .6 AU file, lower volume (can lower distortion)
$ play -r 14000 short.aiff AIFF, sampling rate of 14000 hertz
To play Ogg Vorbis files, install the vorbis-tools package by typing the following:
$ sudo apt-get install vorbis-tools
Here are examples for playing Ogg Vorbis (www.vorbis.com/) files with ogg123:
$ ogg123 mysong.ogg Play ogg file
$ cd /usr/share/example-content/Ubuntu_Free_Culture_Showcase/
$ ogg123 How\ fast.ogg Play example file
$ ogg123 http://vorbis.com/music/Lumme-Badloop.ogg Play web address
$ ogg123 -z *.ogg Play files in pseudo-random order
$ ogg123 /var/music/ Play songs in /var/music and sub dirs
$ ogg123 -@ myplaylist Play songs from playlist
A playlist is simply a list of directories or individual Ogg files to play. When a directory is listed, all Ogg files are played from that directory or any of its subdirectories. When playing multiple files, press Ctrl+c to skip to the next song. Press Ctrl+c twice to quit.
To use the mpg321 player to play MP3 files, you need to install the mpg321 package. Because of patent claims associated with MP3 codecs, MP3 codecs are not included with most Linux distributions automatically. You need to choose to install MP3 codecs and players separately. To do that, type the following:
$ sudo apt-get install mpg321
Here are examples for playing MP3 audio files with mpg321:
$ mpg321 yoursong.mp3 Play MP3 file
$ mpg321 -@ mp3list Play songs from playlist of MP3s
$ cat mp3list | mpg321 -@ - Pipe playlist to mpg321
$ mpg321 -z *.mp3 Play files in pseudo-random order
$ mpg321 -Z *.mp3 Same as -z, but repeat forever
An mpg321 playlist is simply a list of files. You can produce the list using a simple ls command and directing the output to a file. Use full paths to the files, unless you plan to use the list from a location from which relative paths make sense.
Adjusting Audio Levels
The command line audio tools you use to enable audio devices and adjust audio levels depend on the type of audio system you use. Advanced Linux Sound Architecture (ALSA) is the sound system used by most Linux systems these days. The Open Source Sound System (OSS) has been around longer and is still used on older hardware. In general, you can use alsamixer to adjust sound when ALSA is used and aumix with OSS.
ALSA is the default sound system for many Linux systems. By adding loadable modules that enable OSS device interfaces to work as well, audio applications that require the OSS device interface can work with ALSA as well. To see if OSS modules are loaded, such as snd-pcm-oss (emulates /dev/dsp and /dev/audio), snd-mixer-oss (emulates /dev/mixer), and snd-seq-oss (emulates /dev/sequencer), type the following:
# lsmod | grep snd
If they are not loaded, you can install and load the OSS modules:
$ sudo apt-get install oss4
$ sudo modprobe snd-pcm-oss
$ sudo modprobe snd-mixer-oss
$ sudo modprobe snd-seq-oss
If the modules are loaded, you can use alsamixer to adjust audio levels for OSS sound applications. Start alsamixer as follows:
$ alsamixer Show alsamixer playback view (Esc to quit)
$ alsamixer -V playback Show only playback channels (default)
$ alsamixer -V all Show with playback and capture views
$ alsamixer -c 1 Use alsamixer on second (1) sound card
Volume bars appear for each volume channel:
· Move right and left arrow keys to highlight different channels (Master, PCM, Headphone, and so on).
· Use the up and down arrow keys to raise and lower the volume on each channel.
· With a channel highlighted, press m to mute or unmute that channel.
· Press the spacebar on a highlighted input channel (Mic, Line, and so on) to assign the channel as the capture channel (to record audio input).
· To quit alsamixer, press Alt+q or the Esc key.
· Press Tab to cycle through settings for Playback, Capture, and All.
The aumix audio mixing application (for which you need to install the aumix package) can operate in screen-oriented or plain command mode. In plain text, you use options to change or display settings. Here are examples of aumix command lines:
$ sudo apt-get install aumix
$ aumix -q Show left/right volume and type for all channels
vol 62, 62
pcm 100,100
igain 53,53
$ aumix -l q -m q List current settings for line and mic only
$ aumix -v 80 -m 0 Set volume to 70% and microphone to 0
$ aumix -m 80 -m R -m q Set mic to 80%, set it to record, list mic
$ aumix With no options, aumix runs screen-oriented
When run screen-oriented, aumix displays all available audio channels. In screen-oriented mode, use keys to highlight and change displayed audio settings:
· Use PageUp, PageDown, and the up arrow and down arrow keys to select channels.
· Use the right or left arrow key to increase or decrease volume.
· Type m to mute the current channel.
· Press the spacebar to select the current channel as the recording device.
· If a mouse is available, you can use it to select volume levels, balance levels, or the current recording channel.
Ripping CD Music
To be able to play your personal music collection from Linux, you can use tools such as cdparanoia to rip tracks from music CDs to WAV files on your hard disk. The ripped files can then be encoded to save disk space, using tools such as oggenc (Ogg Vorbis), flac (FLAC), or lame (MP3).
Note There are some excellent graphical tools for ripping and encoding CDs, such as grip and sound-juicer. Because they are CDDB-enabled, those tools can also use information about the music on the CD to name the output files (artist, album, song, and so on). This section, however, describes how to use some of the underlying commands to rip and encode CD music manually.
Using cdparanoia, you can check that your CD drive is capable of ripping Compact Disc Digital Audio (CDDA) CDs, retrieve audio tracks from your CD drive, and copy them to hard disk. If cdparanoia is not installed, install it with apt-get. Then start by inserting a music CD in your drive and typing the following:
$ sudo apt-get install cdparanoia
$ cdparanoia -vsQ
...
Checking /dev/cdrom for cdrom...
Checking for SCSI emulation...
Checking for MMC style command set...
Verifying CDDA command set...
...
Table of contents (audio tracks only):
track length begin copy pre ch
===========================================================
1. 18295 [04:03.70] 0 [00:00.00] no no 2
2. 16872 [03:44.72] 18295 [04:03.70] no no 2
...
11. 17908 [03:58.58] 174587 [38:47.62] no no 2
12. 17342 [03:51.17] 192495 [42:46.45] no no 2
TOTAL 209837 [46:37.62] (audio only)
The snipped output shows cdparanoia checking the capabilities of /dev/cdrom, looking for SCSI emulations and MMC command set support, and verifying that the drive can handle CDDA information. Finally, it prints information about each track. Here are examples of cdparanoia command lines for ripping a CD to a hard drive:
$ cdparanoia -B Rip tracks as WAV files by track name
$ cdparanoia -B -- "5-7" Rip tracks 5-7 into separate files
$ cdparanoia -- "3-8" abc.wav Rip tracks 3-8 to one file (abc.wav)
$ cdparanoia -- "1:[40]-" Rip track 1 from 40 secs to end of CD
$ cdparanoia -f -- "3" Rip track 3 and save to AIFF format
$ cdparanoia -a -- "5" Rip track 5 and save to AIFC format
$ cdparanoia -w -- "1" my.wav Rip track 1 and name it my.wav
Encoding Music
After a music file is ripped from CD, encoding that file to save disk space is usually the next step. Popular encoders include oggenc, flac, and lame, for encoding to Ogg Vorbis, FLAC, and MP3 formats, respectively.
With oggenc, you can start with audio files or streams in WAV, AIFF, FLAC, or raw format and convert them to Ogg Vorbis format. Although Ogg Vorbis is a lossy format, the default encoding from WAV files still produces very good quality audio and can result in a file that’s about one-tenth the size. Here are some examples of oggenc:
$ oggenc ab.wav Encodes WAV to Ogg (ab.ogg)
$ oggenc ab.flac -o new.ogg Encodes FLAC to Ogg (new.ogg)
$ oggenc ab.wav -q 9 Raises encoding quality to 9
By default, the quality (-q) of the oggenc output is set to 3. You can set the quality to any number from -1 to 10 (including fractions such as 5.5).
$ oggenc NewSong.wav -o NewSong.ogg \
-a Bernstein -G Classical \
-d 06/15/1972 -t "Simple Song" \
-l "Bernsteins Mass" \
-c info="From Kennedy Center"
The command just shown converts MySong.wav to MySong.ogg. The artist’s name is Bernstein and the music type is Classical. The date is June 15, 1972, the song title is “Simple Song,” and the album name is Bernsteins Mass. A comment is “From Kennedy Center.” The backslashes aren’t needed if you just keep typing the whole command on one line. However, if you do add backslashes, make sure there are no spaces after the backslash.
The preceding example adds information to the header of the resulting Ogg file. You can see the header information, with other information about the file, using ogginfo:
$ ogginfo NewSong.ogg
Processing file "NewSong.ogg"...
...
Channels: 2
Rate: 44100
Nominal bitrate: 112.000000 kb/s
User comments section follows...
info=From Kennedy Center
title=Simple Song
artist=Bernstein
genre=Classical
date=06/15/1972
album=Bernsteins Mass
Vorbis stream 1:
Total data length: 3039484 bytes
Playback length: 3m:25.240s
Average bitrate: 118.475307 kb/s
Logical stream 1 ended
Here you can see that comments were added during encoding. The -c option was used to set an arbitrary field (in this case, info) with some value to the header. In addition to the comment information, you can see that this file has two channels and was recorded at a 44100 bitrate. You can also see the data length, playback time, and average bitrate.
The flac command is an encoder similar to oggenc, except that the WAV, AIFF, RAW, FLAC, or Ogg file is encoded to a FLAC file. Because flac is a free lossless audio codec, it is a popular encoding method for those who want to save some space but still want top-quality audio output in an open source format. Using default values, our encoding from WAV to FLAC resulted in files one-half the size, as opposed to one-tenth the size with oggenc. Install the flac package to use the flac command. Here is how to install the flac package, followed by examples of the flac command:
$ sudo apt-get install flac
$ flac now.wav Encodes WAV to FLAC (now.flac)
$ sox now.wav now.aiff Encodes WAV to AIFF (now.aiff)
$ flac now.aiff -o now2.flac Encodes AIFF to FLAC (now.flac)
$ flac -8 top.wav -o top.flac Raises compression level to 8
The compression level is set to -5 by default. A range from -0 to -8 can be used, with the highest number giving the greatest compression and the lower number giving faster compression time. To convert files to MP3 formatusing the lame command, you must first install the lame package. Here are some examples of the lame command to encode from WAV and AIFF files:
$ sudo apt-get install lame
$ lame in.wav Encodes WAV to MP3 (in.wav.mp3)
$ lame in.wav --preset standard Encodes to MP3 with std presets
$ lame tune.aiff -o tune.mp3 Encodes AIFF to MP3 (tune.mp3)
$ lame -h -b 64 -m m in.wav out.mp3 High quality, 64-bit, mono mode
$ lame -q 0 in.wav -o abcHQ.mp3 Encodes with quality set to 0
With lame, you can set the quality from 0 to 9 (5 is the default). Setting the quality to 0 uses the best encoding algorithms, while setting it to 9 disables most algorithms (but the encoding process moves much faster). As with oggenc, you can add tag information to your MP3 file that can be used later when you play back the file. Here’s an example:
$ lame NewSong.wav NewSong.mp3 \
--ta Bernstein --tg Classical \
--ty 1972 --tt "Simple Song" \
--tl "Bernsteins Mass" \
--tc "From Kennedy Center"
Like the wav-to-ogg example shown earlier in this chapter, the command just shown converts MySong.wav to MySong.mp3. As before, the artist’s name is Bernstein and the music type is Classical. The year is 1972, the song title is “Simple Song,” and the album name is Bernsteins Mass. A comment is “From Kennedy Center.” The backslashes aren’t needed if you just keep typing the whole command on one line. However, if you do add backslashes, make sure there are no spaces after the backslash.
The tag information appears on the screen in graphical MP3 players (such as Rhythmbox and Totem, when they have been enabled to play MP3 format). You can also see tag information when you use command line players, such as the following mpg321 example:
$ mpg123 NewSong.mp3
High Performance MPEG 1.0/2.0/2.5 Audio Player for Layer 1, 2, and 3.
...
Title : Simple Song Artist: Bernstein
Album : Bernsteins Mass Year : 1972
Comment: From Kennedy Center Genre : Classical
Playing MPEG stream from NewSong.mp3 ...
MPEG 1.0 layer III, 128 kbit/s, 44100 Hz joint-stereo
Streaming Music
If your music is on one machine, but you’re working from another machine, setting up a streaming music server is a quick way to broadcast your music so it can be picked up from one or more computers on your network. The Icecast streaming media server (icecast2 package) and Ices audio source client (ices2 package) can be installed in Ubuntu by typing the following:
$ sudo apt-get install icecast2 ices2
As you install icecast2, you have the choice of configuring it during installation or after (as described in the following procedure).
Here’s a quick and dirty procedure for setting up Icecast and Ices to stream your music. Perform these steps on the computer that contains the music you want to serve, choosing to configure the service later:
1. Edit the /etc/icecast2/icecast.xml file to change all passwords listed. Search for hackme to find the current passwords. You probably want different user and administrative passwords, especially if you allow others to stream music to the server. Remember the passwords you set for later. You may want to change other settings in this file as well, such as the hostname:
$ sudo vi /etc/icecast2/icecast.xml
2. If you have a firewall, check that TCP port 8000 is accessible.
3. Edit the /etc/default/icecast2 file and change the ENABLE line to read ENABLE=true.
4. Start the icecast2 server as the root user by typing the following (the server will actually run as the icecast2 user), and verify with the netstat command:
$ sudo /etc/init.d/icecast2 start
$ sudo netstat -topnavel | grep 8000
tcp 0 0 0.0.0.0:8000 0.0.0.0:* LISTEN
115 35790 21494/icecast off (0.00/0/0)
5. Create the directories needed by the ices2 program, which provides the playlist and music to the icecast2 server. Run the following commands:
$ sudo mkdir /var/log/ices
$ sudo mkdir /etc/ices2
$ sudo mkdir /etc/ices2/music
6. Create a playlist using any text editor or by directing a listing of your music to a file. For example, if all your Ogg music files are in /var/music subdirectories, type the following:
$ find /var/music -name *.ogg > playlist.txt
7. The playlist.txt file must contain full paths to every music file, and the files must be accessible to the icecast2 server. Then, copy the playlist file to the /etc/ices2 directory:
$ sudo cp playlist.txt /etc/ices2
With the playlist file created, use any text editor to remove or add files or directories to make your playlist as you would like it. (If you want some files to try out for your playlist, download some from http://vorbis.com/music.)
8. As root user, edit the /etc/ices2/ices-playlist.xml file so it will play from your playlist and feed that music to your running icecast2 server. Start with the example configuration file and then edit it. Run the following commands:
$ sudo cp /usr/share/doc/ices2/examples/ices-playlist.xml /etc/ices2
$ sudo vi /etc/ices2/ices-playlist.xml
9. In particular, you want to modify the metadata, input, and instance modules (be sure to change /etc/ices2/playlist.txt to the path where you put your playlist.txt file):
<metadata>
<name>My Music Server</name>
<genre>Different music styles</genre>
<description>Mix of my personal music</description>
</metadata>
<input>
<module>playlist</module>
<param name="type">basic</param>
<param name="file">/etc/ices2/playlist.txt</param>
<!-- random play -->
<param name="random">1</param>
...
</input>
<instance>
<hostname>localhost</hostname>
<port>8000</port>
<password>MIcePw</password>
<mount>/mymusic.ogg</mount>
...
</instance>
Of the values just shown (in bold), the most critical are the location of your playlist and the information about the instance of your icecast2 server. The password must match the source password you added to your /etc/icecast2/icecast.xml file.
10. Launch the ices audio feed by typing the following:
$ sudo ices2 /etc/ices2/ices-playlist.xml &
11. Test that you can play music from the local computer as follows:
$ ogg123 http://localhost:8000/mymusic.ogg
12. If that test works, try playing the icecast2 stream from another computer on your network by replacing localhost with the server’s IP address or hostname.
13. If there are problems, check /var/log/icecast2 and /var/log/ices log files. Recheck your passwords and locations of configuration files.
14. When you are done, just kill the icecast2 service:
$ sudo /etc/init.d/icecast2 stop
When the icecast and ices servers are running, you should have access to that streaming music from any computer that can access your server computer. Use any music player that can play from an HTTP address (ogg123, Rhythmbox, XMMS, and so on). Windows music players that can support the type of content you are serving should work as well.
Note If you want to skip a song, type this from the server: killall -HUP ices.
Converting Audio Files
The sox utility is an extremely versatile tool for working with audio files in different freely available formats. The following material provides a few examples of things you can do with sox.
The following command concatenates two WAV files to a single output file:
$ sox head.wav tail.wav output.wav
This command mixes two WAV files:
$ soxmix sound1.wav sound2.wav output.wav
To use sox to display information about a file, use the stat effect as follows:
$ sox sound1.wav -e stat
Samples read: 208512
Length (seconds): 9.456327
Scaled by: 2147483647.0
Maximum amplitude: 0.200592
Minimum amplitude: -0.224701
Midline amplitude: -0.012054
Mean norm: 0.030373
Mean amplitude: 0.000054
RMS amplitude: 0.040391
Maximum delta: 0.060852
Minimum delta: 0.000000
Mean delta: 0.006643
RMS delta: 0.009028
Rough frequency: 784
Volume adjustment: 4.450
Use trim to delete seconds of sound from an audio file. For example:
$ sox sound1.wav output.wav trim 4 Trim 4 seconds from start
$ sox sound1.wav output.wav trim 2 6 Keep from 2-6 seconds of file
The first example deletes the first 4 seconds from sound1.wav and writes the results to output.wav. The second example takes sound1.wav, keeps the section between second 2 and second 6 and deletes the rest, and writes to output.wav.
Transforming Images
With directories full of digital images, the ability to manipulate images from the command line can be a huge timesaver. The ImageMagick package (use apt-get install imagemagick to install the package on Ubuntu) comes with some very useful tools for transforming your digital images into forms you can work with. This section shows some commands for manipulating digital images, and provides examples of simple scripts for making those changes in batches.
Getting Information about Images
To get information about an image, use the identify command, as follows:
$ identify p2090142.jpg
p2090142.jpg JPEG 2048x1536+0+0 DirectClass 8-bit 402.037kb
$ identify -verbose p2090142.jpg | less
Standard deviation: 61.1665 (0.239869)
Colors: 205713
Rendering intent: Undefined
Resolution: 72x72
Units: PixelsPerInch
Filesize: 402.037kb
Interlace: None
Background color: white
Border color: rgb(223,223,223)
Matte color: grey74
Transparent color: black
Page geometry: 2048x1536+0+0
Compression: JPEG
Quality: 44
...
The first command in the preceding example displays basic information about the image (its filename, format, geometry, class, channel depth, and file size). The second command shows every bit of information it can extract from the image. In addition to the information you see in the example, the verbose output also shows creation times, the type of camera used, aperture value, and ISO speed rating.
Converting Images
The convert command is a Swiss Army knife of file converters. Here are some ways to manipulate images using the convert command. The following examples convert image files from one format to another:
$ convert tree.jpg tree.png Convert a JPEG to a PNG file
$ convert icon.gif icon.bmp Convert a GIF to a BMP file
$ convert photo.tiff photo.pcx Convert a TIFF to a PCX file
Image types that convert supports include .jpg, .bmp, .pcx, .gif, .png, .tiff, .xpm, and .xwd. Here are examples of convert being used to resize images:
$ convert -resize 1024x768 hat.jpg hat-sm.jpg
$ convert -sample 50%x50% dog.jpg dog-half.jpg
The first example creates an image (hat-sm.jpg) that is 1024 x 768 pixels. The second example reduced the image dog.jpg in half (50%x50%) and saves it as dog-half.jpg.
You can rotate images from 0 to 360 degrees. Here are examples:
$ convert -rotate 270 sky.jpg sky-final.jpg Rotate image 270 degrees
$ convert -rotate 90 house.jpg house-final.jpg Rotate image 90 degrees
You can add text to an image using the -draw option:
$ convert -fill black -pointsize 60 -font helvetica \
-draw 'text 10,80 "Copyright NegusNet Inc."' \
p10.jpg p10-cp.jpg
The previous example adds copyright information to an image, using 60-point black Helvetica font to write text on the image. The text is placed 10 points in and 80 points down from the upper-left corner. The new image name is p10-cp.jpg to indicate that the new image had copyright information added.
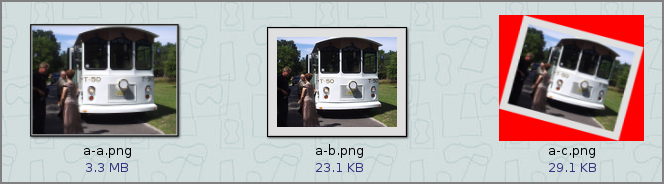
Here are some interesting ways to create thumbnails with the convert command:
$ convert -thumbnail 120x120 a.jpg a-a.png
$ convert -thumbnail 120x120 -border 8 a.jpg a-b.png
$ convert -thumbnail 120x120 -border 8 -rotate 8 a.jpg a-c.png
All three examples create a 120 x 120-pixel thumbnail. The second adds the -border option to put a border around the thumbnail so it looks like a Polaroid picture. The last example rotates the image. Figure 6-1 shows the results of these three examples.
Figure 6-1: Use convert to create a thumbnail, add borders, and rotate images.
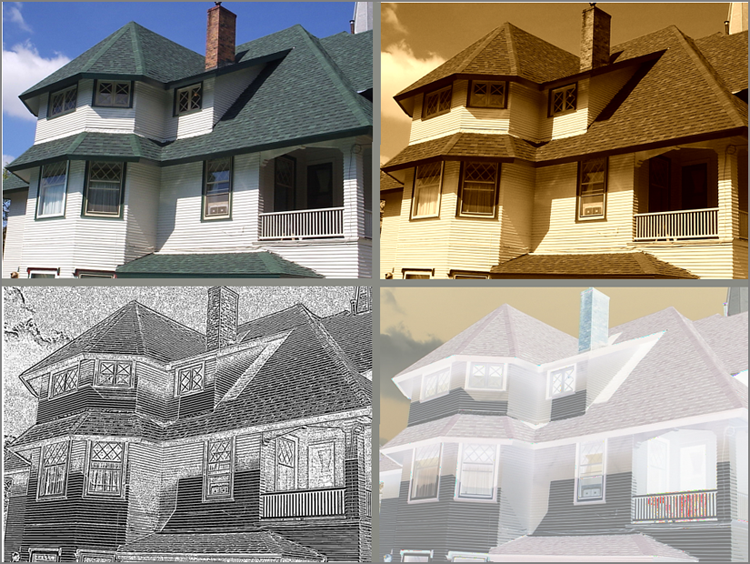
Besides the things you can do to make images useful and manageable, there are also ways of making your images fun and even weird. Here are some examples:
$ convert -sepia-tone 75% house.jpg oldhouse.png
$ convert -charcoal 5 house.jpg char-house.png
$ convert -colorize 175 house.jpg color-house.png
The -sepia-tone option gives the image an Old West sort of look. The -charcoal option makes the image look as if the picture was hand-drawn using charcoal. By using the -colorize option, every pixel in the image is modified using the colorize number provided (175 in this case). Figure 6-2 shows the original house picture in the upper-left corner, the Sepia Tone in the upper right, the charcoal in the lower left, and the colorized house in the lower right.
If you are looking for one more example of weird image conversions, try swirling your image. For example:
$ convert -swirl 300 photo.pcx weird.pcx
Converting Images in Batches
Most of the image conversions described in this chapter can be done quite easily using a graphical image manipulation tool such as The GIMP. However, the convert commands I described can really shine when you use them in scripts. So, instead of resizing, rotating, writing on, or colorizing a single file, you can do any (or all) of those things to a whole directory of files.
You may want to create thumbnails for your duck decoy collection images. Or perhaps you want to reduce all your wedding photos so they can play well on a digital photo frame. You might even want to add copyright information to every image in a directory before you share them on the web. All of these things can be done quite easily with the convert commands already described and some simple shell scripts.
Figure 6-2: Start with a normal image and sepia-tone, then charcoal, and then colorize it.
Here’s an example of a script you can run to resize an entire directory of photos to 1024 × 768 pixels to play on a digital photo frame:
$ cd $HOME/myimages
$ mkdir small
$ for pic in `ls *.png`
do
echo "converting $pic"
convert -resize 1024x768 $pic small/sm-$pic
done
Before running the script, this procedure changes to the $HOME/myimages directory (which happens to contain a set of high-resolution images). Then it creates a subdirectory to hold the reduced images called small. The script itself starts with a for loop that lists each file ending in .png in the current directory (you might need to make that .jpg or another image suffix). Then, each file is resized to 1024 × 768 and copied to the small directory, with sm- added to each filename.
Using that same basic script, you can use any of the convert command lines shown earlier, or make up your own to suit your needs. You might be able to convert a whole directory of images in a few minutes that would have taken you hours of clicking in the GUI.
Playing with Video
Playing, recording, copying, and otherwise working with video has long been a contentious issue in Linux. Although there were many open source tools early on for working with video, those who produced commercial video codecs and video content (particularly commercial movies) were not always keen on others being so free with their properties.
The capability to play and copy commercial DVD movies in Linux relies on special software for accessing and converting video into a viewable format. At first, decryption software called DeCSS was obtained from a cracked DVD player. Since then, libdvdcss was created to allow Linux users to decrypt commercial DVD content so it can be played or copied.
Even though libdvdcss has not faced the same legal challenges that DeCSS has, most Linux distributions leave it up to the individual to assess the legality of using libdvdcss for decrypting movies. All the other software needed for managing and playing commercial DVD movies is readily available and capable of playing movies once you add libdvdcss.
Just for fun, the following subsection tells you how to get the software you need to play your DVD movies.
Playing Video Files
There is a handful of high-quality video players available for Ubuntu. The following is a list of a few of the most popular Linux video players:
· Totem—This is the default movie player available with the GNOME desktop. It is based on the GStreamer project, which produces many plug-ins needed to provide audio and video codecs. In Ubuntu, the Movie Player icon launches Totem by default. So if you installed a desktop system, the basic Totem player is automatically installed.
· Mplayer—The Mplayer movie player for Linux is one of the oldest video projects for Linux. It plays dozens of audio and video types and is especially good at playing damaged media files that won’t play on Windows players. You install the mplayer package to get the basic mplayer video player.
$ sudo apt-get install mplayer
· Xine—The Xine project is actually a media player engine that can be used in different audio/video player front-ends. You install the xine-ui package to get a basic front-end for playing videos with the xine engine.
$ sudo apt-get install xine-ui
· VLC—VLC is another popular media player. It supports a variety of audio and video codecs (www.videolan.org/vlc/features.html). To get it in Ubuntu, install the vlc package:
$ sudo apt-get install vlc
To avoid legal issues of playing DVD movies in Linux, you can buy the Fluendo DVD Player from the company that does the GStreamer project (www.fluendo.com/shop/product/fluendo-dvd-player/). It sells for about 20 Euros (That’s about $26 USD). The next section describes how to install the software needed for open source video players.
Installing Video Software
After you have installed any of the video players described in the previous section, you still need extra software to be able to play different audio and video formats. To play content that is not already built into a player, you can add codecs.
In addition to providing its own commercial DVD player, the GStreamer project creates a set of GStreamer plug-in packages that support a variety of audio/video formats. To see what codecs are supported by each GStreamer plug-in package, refer to the GStreamer plug-in documentation:
http://gstreamer.freedesktop.org/documentation/plugins.html
For a description of the Good, Bad, and Ugly sets of codecs available with GStreamer, refer to the Wikipedia description of GStreamer (http://en.wikipedia.org/wiki/GStreamer). If, for example, if you wanted to install the GStreamer plug-ins from the Good set, you could type the following:
$ sudo apt-get install gstreamer0.10-plugins-good
As I mentioned earlier, however, the most crucial (and contentious) piece of software for playing commercial DVD movies is libdvdcss. The Ubuntu community help pages describe how to get and install libdvdcss without enabling any special third-party repositories. It warns that you should make sure it is legal to use in your area:
https://help.ubuntu.com/community/RestrictedFormats/PlayingDVDs
For Ubuntu, the libdvdcss2 package provides the software for reading commercial DVD movies. You can get that package by installing the libdvdread4 package and running the following script:
$ sudo /usr/share/doc/libdvdread4/install-css.sh
At this point, you should be able to read and play most commercial DVD movies from your Linux system. If you need help setting the DVD region code on your Ubuntu system, you can refer again to the Ubuntu community Playing DVDs page (https://help.ubuntu.com/community/RestrictedFormats/PlayingDVDs).
Starting the DVD player
You can start any of the video players described earlier in this chapter from an Ubuntu desktop by simply inserting a DVD movie into your DVD drive and selecting Movie Player. This will start the Totem movie player, by default. If you prefer, you could choose Xine or other players instead.
Alternatively, you can start your video players at the command line. For example, to start the Mplayer movie player, type the following from the shell:
$ mplayer dvd://
Once the software is installed, playing DVD movies is actually quite intuitive. If, however, you want to refine your DVD playing or play back your movies in some special way, refer to the man pages for your DVD player. For example:
$ man mplayer
For example, say that you have installed Ubuntu, but you don’t install a desktop, you can output your video from the Mplayer video player in ASCII art. The following is an example of a command line for directing video output to your local shell for viewing a movie in ASCII art:
$ mplayer dvd:// -vo aa -monitorpixelaspect 0.5
Press the spacebar to pause and unpause the movie. When you are done, press Esc to exit the movie.
You may need to adjust the number you give the monitorpixelaspect option to fit your monitor. Refer to the mplayer man page for other useful settings to adjust other aspects of your movie.
Summary
The shell can provide a quick and efficient venue for working with your audio and digital image files. This chapter described ways of playing, ripping, encoding, converting, and streaming audio files from the command line. As for digital images, there are many examples of using the convert command for resizing, rotating, converting, writing on, and otherwise manipulating those images. For playing video, once you get the right software installed, you have several choices, including displaying video in ASCII art in your shell.