Ubuntu: Questions and Answers (2014)
Kernel
Skip to questions, Wiki by user nathan-osman
The Linux kernel is a monolithic kernel originally developed by Linus Torvalds who still directs its development to this day. The latest kernel can be downloaded from kernel.org
For more details, see the documentation maintained by the Ubuntu Kernel Team.
Questions
Q: Does Ubuntu support USB 3.0?
Tags: kernel (Next Q), usb (Next Q)
I have a Western Digital My Book 3.0 - 1 TB USB 3.0 Desktop External Hard Drive, and I wanted to know if it would work on Ubuntu 10.10 Maverick Meerkat.
Tags: kernel (Next Q), usb (Next Q)
User: sudobash
Answer by sid
Yes, Ubuntu supports USB 3.0.
Linux started supporting USB 3.0 in the September 2009 release of the 2.6.31 kernel, and Ubuntu 9.10 Karmic Koala was the first version of Ubuntu to support USB 3.0.
In Ubuntu releases older than Ubuntu 11.04 Natty Narwhal, there is a bug in the XHCI (USB 3.0) kernel module that prevents suspend: Bug #522998.
Answer by hhlp
apparently there is an issue : (522998)
When the XHCI module is loaded for USB 3.0 operation the system cannot suspend. Manually unloading XHCI will allow suspend to complete normally.
To avoid future suspend problems, the workaround is to add SUSPEND_MODULES="xhci-hcd" to /etc/pm/config.d/unload_module then the system can suspend normally.
Tags: kernel (Next Q), usb (Next Q)
Q: How do we get this magic performance-boosting 200 line patch?
Tags: kernel (Next Q), performance (Next Q)
I read today on Phoronix that there is a 200 line patch to the Linux Kernel which dramatically improves desktop responsiveness.
How can Ubuntu users get this in a way that's supported?
Tags: kernel (Next Q), performance (Next Q)
User: popey
Answer by leann-ogasawara
Discussion regarding this specific patch took place on the Ubuntu kernel-team mailing list:
https://lists.ubuntu.com/archives/kernel-team/2010-November/013498.html
But let me try to elaborate even more generically about the best way for any patch to make it's way into the Ubuntu kernel...
First, it's the preferred policy of the Ubuntu Kernel Team that patches be submitted and accepted upstream before being pulled into the Ubuntu kernel. It's a large maintenance burden on the Ubuntu Kernel Team to have to maintain out of tree patches. Additionally, if the patch will benefit the entire Kernel Community, it should go upstream first.
Once the patch has been accepted upstream, it will eventually make its way into the Ubuntu kernel automatically. A cherry-pick or pull request could also be made if one so desired, see this page for more information:
https://wiki.ubuntu.com/Kernel/Dev/KernelPatches
If the patch needs to be applied as an SRU (stable release update) to a previous Ubuntu release it's best to get the patch accepted into the corresponding upstream stable 2.6.x.y tree. As a part of our normal kernel SRU process, we continually rebase to the latest upstream stable kernel. Thus we would again eventually get the patch automatically.
Answer by roger-light
I've just read the lkml thread and hope I can offer some information - although not about getting the patch into Ubuntu. As a post on the linked Ubuntu list says, it's probably going to be in 2.6.38 anyway.
The patch automatically groups process based on TTYs. There is a lot of discussion/argument on the lkml that says this means it isn't relevant for typical desktop usage - that it makes no difference to interactive applications. The test cases are all based around "start a CPU intensive task from a terminal then look at the responsiveness of another task". So compiling a kernel and trying to watch a video, for example.
That's not to say it's not good, but the general "desktop responsivity improved by an order of magnitude" type headlines could be misleading if you never run CPU intensive tasks connected to a TTY. I could be wrong of course though!
There were some mentions of ways of achieving a very similar result by adding to your bash scripts and allowing all users to create cgroups. This will only work if current Ubuntu kernels have cgroups enabled. The relevant posts are:
· http://marc.info/?l=linux-kernel&m=128993140308849&w=2
· http://marc.info/?l=linux-kernel&m=128993874020246&w=2
Obviously this isn't answering the question, but it could be used to determine whether the patch is as magical as hoped.
Answer by oli
How can Ubuntu users get this in a way that's supported?
Emphasis mine. The only way you'll get it in a supported way is by waiting for Ubuntu to pull it into the Ubuntu kernel. As this is really just making it to the kernel mailing list, it's fresh to the point where all testing is fairly anecdotal and I imagine it will be some time before it's ready to be mass-deployed.
Somewhere between the next release and a long time would be my uneducated guess.
But if you're a big boy (or girl) and you can cope with a broken kernel if things go wrong (ie you know how to use grub), you can patch and compile your own kernel.
1. Download a patch. There are different versions but the best on its own was posted below by another user: http://pavlinux.ru/krnl/sched_autogroup-2.6.36.patch.bz2
2. Download the kernel source for the version your patch targets. In this case 2.6.36. You can get vanilla (that is original, unmodified by the Ubuntu kernel team) kernel sources from kernel.org and extract it.
3. Save the patch somewhere and apply it by cding into the kernel source dir and running: patch -p1 < /path/to/patch (you need the patch package for this... Which I think comes as part of build-essential if it's not installed by default)
4. And then continue with the rest of the "old fashioned" build process... I really wouldn't bother with the newer methods as they're aimed at Ubuntu/Debian-sanctioned kernel sources... Plus the old way seems easier (to me).
Building kernels isn't hard but you can mess it up if you stray too far from the accepted path. And you won't get official support if things go wrong.
Alternatively, there are more and more kernels emerging with the patch built in (or at least in the source tree, awaiting the next release).
· I believe Zen Kernel has this patch in their tree but I'm not sure if it's in any builds yet.
· The Liquorix Kernel has this baked in now too.
Note: both these kernels (and probably others too) deviate from the Ubuntu way of doing kernels somewhat. You may find (as I did when I moved to Liquorix) that CPU frequency scaling stops working or suspend gets broken. There are usually fixes and workarounds, but chances are you won't get support from AskUbuntu or the rest of the Ubuntu communtiy as we can't check every single kernel out there.
Tags: kernel (Next Q), performance (Next Q)
Q: What is the path to the kernel headers so I can install vmware?
Tags: kernel (Next Q)
I installed the VMware bundle on my Ubuntu 11.04 successfully but when I open it it gives me this window
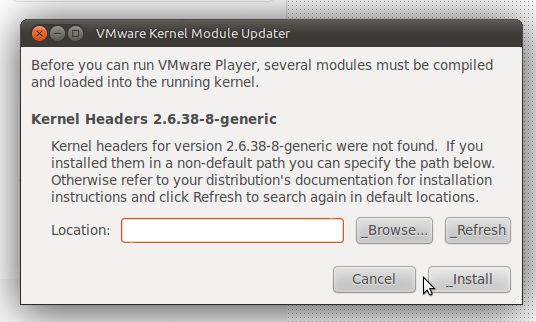
and I don't know the path to this C headers.
Tags: kernel (Next Q)
User: wazery
Answer by zhe
cd /lib/modules/$(uname -r)/build/include/linux
sudo ln -s ../generated/utsrelease.h
sudo ln -s ../generated/autoconf.h
sudo ln -s ../generated/uapi/linux/version.h
After adding the symlink, the path is /usr/src/linux-headers-$(uname -r)/include (Thanks @Kariem!)
Answer by manikandan
Below commands are very helpful for you:
Step 1 : Ctrl + Alt + T
Step 2 : sudo apt-get install linux-headers-$(uname -r)
Step 3 : The path to the kernel headers is then /usr/src/linux-headers-$(uname -r)/include
Answer by user115271
There are a few files in locations that the installer doesn't expect, I run this and it works:
ifrantz@ifrantz:~$ cat ~/update_version.sh
#!/bin/bash
cd /lib/modules/$(uname -r)/build/include/linux
sudo ln -s ../generated/utsrelease.h
sudo ln -s ../generated/autoconf.h
sudo ln -s ../generated/uapi/linux/version.h
Tags: kernel (Next Q)
Q: Can't upgrade due to low disk space on /boot
Tags: kernel (Next Q), upgrade (Next Q), disk-usage (Next Q)
I try to do do-release-upgrade but then I get:
Not enough free disk space
The upgrade has aborted. The upgrade needs a total of 25.7 M free space on disk '/boot'. Please free at least an additional 25.7 M of disk space on '/boot'. Empty your trash and remove temporary packages of former installations using 'sudo apt-get clean'.
Output of df:
237251272 214797108 10402504 96% /
udev 488120 4 488116 1% /dev
tmpfs 198676 668 198008 1% /run
none 5120 0 5120 0% /run/lock
none 496684 0 496684 0% /run/shm
/dev/sda1 233191 225867 0 100% /boot
How come there is no space left on boot? Here's the output of ls -as /boot:
Skip code block
total 221839
4 .
4 ..
645 abi-2.6.32-34-generic-pae
698 abi-2.6.35-30-generic-pae
727 abi-2.6.38-12-generic-pae
727 abi-3.0.0-12-generic-pae
727 abi-3.0.0-13-generic-pae
727 abi-3.0.0-14-generic-pae
727 abi-3.0.0-15-generic-pae
727 abi-3.0.0-16-generic-pae
727 abi-3.0.0-17-generic-pae
727 abi-3.0.0-19-generic-pae
761 abi-3.0.0-20-generic-pae
115 config-2.6.32-34-generic-pae
128 config-2.6.35-30-generic-pae
136 config-2.6.38-12-generic-pae
140 config-3.0.0-12-generic-pae
140 config-3.0.0-13-generic-pae
140 config-3.0.0-14-generic-pae
140 config-3.0.0-15-generic-pae
140 config-3.0.0-16-generic-pae
140 config-3.0.0-17-generic-pae
140 config-3.0.0-19-generic-pae
140 config-3.0.0-20-generic-pae
5 grub
10773 initrd.img-2.6.32-34-generic-pae
13619 initrd.img-2.6.35-30-generic-pae
15365 initrd.img-2.6.38-12-generic-pae
16481 initrd.img-3.0.0-12-generic-pae
16487 initrd.img-3.0.0-13-generic-pae
16501 initrd.img-3.0.0-14-generic-pae
16476 initrd.img-3.0.0-15-generic-pae
16481 initrd.img-3.0.0-16-generic-pae
16478 initrd.img-3.0.0-17-generic-pae
12 lost+found
174 memtest86+.bin
176 memtest86+_multiboot.bin
1700 System.map-2.6.32-34-generic-pae
1841 System.map-2.6.35-30-generic-pae
2115 System.map-2.6.38-12-generic-pae
2141 System.map-3.0.0-12-generic-pae
2141 System.map-3.0.0-13-generic-pae
2143 System.map-3.0.0-14-generic-pae
2146 System.map-3.0.0-15-generic-pae
2147 System.map-3.0.0-16-generic-pae
2147 System.map-3.0.0-17-generic-pae
2148 System.map-3.0.0-19-generic-pae
2149 System.map-3.0.0-20-generic-pae
2 vmcoreinfo-2.6.32-34-generic-pae
2 vmcoreinfo-2.6.35-30-generic-pae
2 vmcoreinfo-2.6.38-12-generic-pae
2 vmcoreinfo-3.0.0-12-generic-pae
2 vmcoreinfo-3.0.0-13-generic-pae
2 vmcoreinfo-3.0.0-14-generic-pae
2 vmcoreinfo-3.0.0-15-generic-pae
2 vmcoreinfo-3.0.0-16-generic-pae
2 vmcoreinfo-3.0.0-17-generic-pae
2 vmcoreinfo-3.0.0-19-generic-pae
2 vmcoreinfo-3.0.0-20-generic-pae
4092 vmlinuz-2.6.32-34-generic-pae
4347 vmlinuz-2.6.35-30-generic-pae
4567 vmlinuz-2.6.38-12-generic-pae
4675 vmlinuz-3.0.0-12-generic-pae
4676 vmlinuz-3.0.0-13-generic-pae
4681 vmlinuz-3.0.0-14-generic-pae
4698 vmlinuz-3.0.0-15-generic-pae
4700 vmlinuz-3.0.0-16-generic-pae
4700 vmlinuz-3.0.0-17-generic-pae
4703 vmlinuz-3.0.0-19-generic-pae
4705 vmlinuz-3.0.0-20-generic-pae
Output of uname -a:
Linux kitsch 3.0.0-17-generic-pae #30-Ubuntu SMP Thu Mar 8 17:53:35 UTC 2012 i686 i686 i386 GNU/Linux
Tags: kernel (Next Q), upgrade (Next Q), disk-usage (Next Q)
User: clamp
Answer by jippie
Your /boot partition is filled with old kernels. It does that sometimes, not sure why it is never fixed. You can easily remove the old kernels if you know which packages they came in.
First check uname -a to check your current version.
Then run the following command:
dpkg -l 'linux-*' | sed '/^ii/!d;/'"$(uname -r | sed "s/\(.*\)-\([^0-9]\+\)/\1/")"'/d;s/^[^ ]* [^ ]* \([^ ]*\).*/\1/;/[0-9]/!d'
This command will list all packages that you no longer need. I don't like removing them automatically, I like to be in control when it comes to removing kernels. So for every package listed do the following:
sudo apt-get -y purge some-kernel-package
Intermezzo
This intermezzo describes in more detail how the commands work and tries to fix an issue with linux-libc-dev:amd64. Most users can skip this paragraph.
· dpkg -l 'linux-*' list all packages that have a name starting with 'linux-'
· sed '/^ii/!d; remove all lines that do *not* start withii`
· uname -r | sed "s/\(.*\)-\([^0-9]\+\)/\1/" find the current running kernel version
· /'"$(uname -r | sed "s/\(.*\)-\([^0-9]\+\)/\1/")"'/d Remove all lines, except the ones containing the current running kernel version number
· s/^[^ ]* [^ ]* \([^ ]*\).*/\1/ For each line list only the package name
· /[0-9]/!d Remove lines that do not contain numbers.
To fix Frederick Nord's issue I think the command can be amended as follows:
dpkg -l 'linux-*' | sed '/^ii/!d;/'"$(uname -r | sed "s/\(.*\)-\([^0-9]\+\)/\1/")"'/d;s/^[^ ]* [^ ]* \([^ ]*\).*/\1/;/[0-9]/!d;/^linux-\(headers\|image\)/!d'
It basically adds an extra filter:
· /^linux-(headers\|image)/!d Delete all lines that do not start with linux-headers or linux-image
/Intermezzo
Where some-kernel-package can be replaced with one of the packages listed. Just beware that you don't remove the kernel packages that are in current use (as listed by the uname -a) eg. sudo apt-get purge -y linux-headers-3.0.0-12 etc.
It can be automated further using the xargs command, but I don't like that. It is a personal thing. However, here's the command to do so:
dpkg -l 'linux-*' | sed '/^ii/!d;/'"$(uname -r | sed "s/\(.*\)-\([^0-9]\+\)/\1/")"'/d;s/^[^ ]* [^ ]* \([^ ]*\).*/\1/;/[0-9]/!d' | xargs sudo apt-get -y purge
This is what my /boot looks like, one spare kernel (2.6.38-11) just in case and 3.2.0-24 being current:
Skip code block
$ ls -l /boot
total 59388
-rw-r--r-- 1 root root 730545 Sep 13 2011 abi-2.6.38-11-generic
-rw-r--r-- 1 root root 791023 Apr 25 13:51 abi-3.2.0-24-generic
-rw-r--r-- 1 root root 130326 Sep 13 2011 config-2.6.38-11-generic
-rw-r--r-- 1 root root 140341 Apr 25 13:51 config-3.2.0-24-generic
drwxr-xr-x 3 root root 5120 May 27 17:46 grub
-rw-r--r-- 1 root root 20883146 Oct 1 2011 initrd.img-2.6.38-11-generic
-rw-r--r-- 1 root root 22474219 May 5 09:04 initrd.img-3.2.0-24-generic
drwxr-xr-x 2 root root 12288 Apr 16 2009 lost+found
-rw-r--r-- 1 root root 176764 Nov 27 11:00 memtest86+.bin
-rw-r--r-- 1 root root 178944 Nov 27 11:00 memtest86+_multiboot.bin
-rw------- 1 root root 2656297 Sep 13 2011 System.map-2.6.38-11-generic
-rw------- 1 root root 2884358 Apr 25 13:51 System.map-3.2.0-24-generic
-rw------- 1 root root 1369 Sep 13 2011 vmcoreinfo-2.6.38-11-generic
-rw------- 1 root root 4526784 Sep 13 2011 vmlinuz-2.6.38-11-generic
-rw------- 1 root root 4965776 Apr 25 13:51 vmlinuz-3.2.0-24-generic
And file system usage:
$ df -h /boot
Filesystem Size Used Avail Use% Mounted
/dev/sda5 228M 63M 154M 29% /boot
Tags: kernel (Next Q), upgrade (Next Q), disk-usage (Next Q)
Q: Why is swap being used even though I have plenty of free RAM?
Tags: kernel (Next Q), swap (Next Q)
I thought the whole essence of swap was to act as a temporary storage safety net when RAM was full but my swap partition is constantly being used even though I sometimes have as much as 3GB free RAM. Is this normal?
Tags: kernel (Next Q), swap (Next Q)
User: mysterio
Answer by jpetersen
You could try changing your "swappiness" value:
From the Ubuntu's Swap FAQ:
What is swappiness and how do I change it?
The swappiness parameter controls the tendency of the kernel to move processes out of physical memory and onto the swap disk. Because disks are much slower than RAM, this can lead to slower response times for system and applications if processes are too aggressively moved out of memory.
1. swappiness can have a value of between 0 and 100
2. swappiness=0 tells the kernel to avoid swapping processes out of physical memory for as long as possible
3. swappiness=100 tells the kernel to aggressively swap processes out of physical memory and move them to swap cache
The default setting in Ubuntu is swappiness=60. Reducing the default value of swappiness will probably improve overall performance for a typical Ubuntu desktop installation. A value of swappiness=10 is recommended, but feel free to experiment. Note: Ubuntu server installations have different performance requirements to desktop systems, and the default value of 60 is likely more suitable.
To check the swappiness value
cat /proc/sys/vm/swappiness
To change the swappiness value A temporary change (lost on reboot) with a swappiness value of 10 can be made with
sudo sysctl vm.swappiness=10
To make a change permanent, edit the configuration file with your favorite editor:
gksudo gedit /etc/sysctl.conf
Search for vm.swappiness and change its value as desired. If vm.swappiness does not exist, add it to the end of the file like so:
vm.swappiness=10
Save the file and reboot.
Also you can check out: http://askubuntu.com/a/103916/54187
Answer by neon_overload
There are a few different aspects to your question.
Firstly, what your definition of "free" is. It is actually not as simple as it sounds in Linux (or any modern operating system).
How Linux uses RAM (very simplified)
Each application can use some of your memory. Linux uses all otherwise unoccupied memory (except for the last few Mb) as "cache". This includes the page cache, inode caches, etc. This is a good thing - it helps speed things up heaps. Both writing to disk and reading from disk can be sped up immensely by cache.
Ideally, you have enough memory for all your applications, and you still have several hundred Mb left for cache. In this situation, as long as your applications don't increase their memory use and the system isn't putting too much pressure on the cache, there is no need for any swap.
So, when someone refers to "free" RAM, this may or may not include cache, since cache will only occupy "free" RAM. The cache will shrink as RAM is occupied by more critical stuff, like applications.
How Linux uses swap (even more simplified)
Once you have used up enough memory that there is not enough left for a smooth-running cache, Linux may re-allocate some unused application memory from RAM to swap.
It doesn't do this according to a definite cutoff though. It's not like you reach a certain percentage of allocation then Linux starts swapping. It has a rather "fuzzy" algorithm. It takes a lot of things into account, which can best be described by "how much pressure is there for memory allocation". If there is a lot of "pressure" to allocate new memory, then it will increase the chances some will be swapped to make more room. If there is less "pressure" then it will decrease these chances.
Your system has a "swappiness" setting which helps you tweak how this "pressure" is calculated. It's normally not recommended to alter this at all, and I would certainly never recommend you alter it. Swapping is overall a very good thing - although there are a few edge cases where it harms performance, if you look at overall system performance it's a net benefit for a wide range of tasks. If you reduce the swappiness, you let the amount of cache memory shrink a little bit more than it would otherwise, even when it may really be useful. Whether this is a good enough trade-off for whatever problem you're having with swapping is up to you. You should just know what you're doing, that's all.
There is a well-known situation in which swap really harms perceived performance on a desktop system, and that's in how quickly applications can respond to user input again after being left idle for a long time and having background processes heavy in IO (such as an overnight backup) run. This is a very visible sluggishness, but not enough to justify turning off swap all together and very hard to prevent in any operating system. Turn off swap and this initial sluggishness after the backup/virus scan may not happen, but the system may run a little bit slower all day long. This is not a situation that's limited to Linux, either.
When choosing what is to be swapped to disk, the system tries to pick memory that is not actually being used - read to or written from. It has a pretty simple algorithm for calculating this that chooses well most of the time.
If you have a system where you have a huge amount of RAM (at time of writing, 8GB is a huge amount for a typical Linux distro), then you will very rarely ever hit a situation where swap is needed at all. You may even try turning swap off. I never recommend doing that, but only because you never know when more RAM may save you from some application crashing. But if you know you're not going to need it, you can do it.
But how can swap speed up my system? Doesn't swapping slow things down?
The act of transferring data from RAM to swap is a slow operation, but it's only taken when the kernel is pretty sure the overall benefit will outweigh this. For example, if your application memory has risen to the point that you have almost no cache left and your I/O is very inefficient because of this, you can actually get a lot more speed out of your system by freeing up some memory, even after the initial expense of swapping data in order to free it up.
It's also a last resort should your applications actually request more memory than you actually have. In this case, swapping is necessary to prevent an out-of-memory situation which will often result in an application crashing or having to be forcibly killed.
Swapping is only associated with times where your system is performing poorly because it happens at times when you are running out of usable RAM, which would slow your system down (or make it unstable) even if you didn't have swap. So to simplify things, swapping happens because your system is becoming bogged down, rather than the other way around.
Once data is in swap, when does it come out again?
Transferring data out of swap is (for traditional hard disks, at least) just as time-consuming as putting it in there. So understandably, your kernel will be just as reluctant to remove data from swap, especially if it's not actually being used (ie read from or written to). If you have data in swap and it's not being used, then it's actually a good thing that it remains in swap, since it leaves more memory for other things that are being used, potentially speeding up your system.
Answer by scott-severance
Setting the swappiness value doesn't work in every situation. If it works for you, great. If not, I've written a script to periodically clear out swap by turning it off and back on again.
Toggling swap is a bit risky if you're not careful. If you don't have enough free RAM to hold everything in RAM plus everything in swap, trying to disable swap will cause your system to become unresponsive. My script first checks whether there's enough free RAM (which takes a bit of doing, as the actual amount of free RAM is different from what free reports as free), then only toggles swap if so. But, if you're a bit short on RAM, don't start another major process while the script is running. Here it is:
Skip code block
#!/bin/bash
# Make sure that all text is parsed in the same language
export LC_MESSAGES=en_US.UTF-8
export LC_COLLATE=en_US.UTF-8
export LANG=en_US.utf8
export LANGUAGE=en_US:en
export LC_CTYPE=en_US.UTF-8
# Calculate how much memory and swap is free
free_data="$(free)"
mem_data="$(echo "$free_data" | grep 'Mem:')"
free_mem="$(echo "$mem_data" | awk '{print $4}')"
buffers="$(echo "$mem_data" | awk '{print $6}')"
cache="$(echo "$mem_data" | awk '{print $7}')"
total_free=$((free_mem + buffers + cache))
used_swap="$(echo "$free_data" | grep 'Swap:' | awk '{print $3}')"
echo -e "Free memory:\t$total_free kB ($((total_free / 1024)) MB)\nUsed swap:\t$used_swap kB ($((used_swap / 1024)) MB)"
# Do the work
if [[ $used_swap -eq 0 ]]; then
echo "Congratulations! No swap is in use."
elif [[ $used_swap -lt $total_free ]]; then
echo "Freeing swap..."
swapoff -a
swapon -a
else
echo "Not enough free memory. Exiting."
exit 1
fi
You must run this script as root (e.g., with sudo). This script won't leave your system unresponsive; if you've got insufficient RAM, it will refuse to toggle swap. I've used this script without problems for close to five years now.
Tags: kernel (Next Q), swap (Next Q)
Q: Desktop does not show when I installed nvidia drivers!
Tags: kernel nvidia (Next Q)
The desktop does not show after I installed nvidia experimental drivers. I tried nvidia simple proprietary drivers, and they did not work either.
Here is how it looks. This is not cropped or any thing. This is how it looks, after the installation of the drivers the desktop resolution decreased from 1440x900 to 1024x768
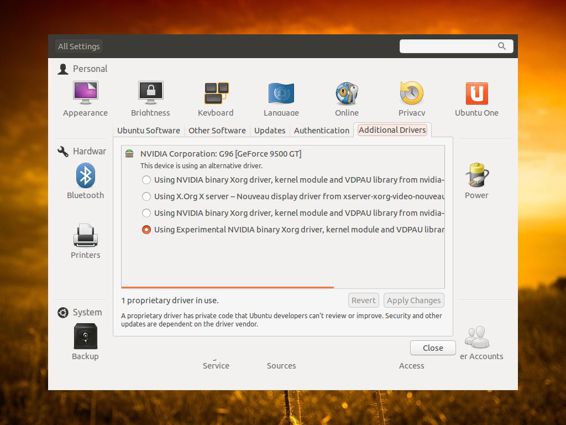
The desktop only shows desh and panels when I use the open source drivers.
Is there any way to fix this so I can get better performance?
Tags: kernel nvidia (Next Q)
User: levan
Answer by rft183
I had the same thing happen. Here is how I fixed it:
1. Switch to a terminal Ctrl+Alt+F1.
2. Login as your username.
3. Install linux headers:
4. sudo apt-get install linux-headers-generic
4. Uninstall nvidia driver - this depends on which version you installed :
5. sudo apt-get remove nvidia-current
or
sudo apt-get remove nvidia-current-updates
or
sudo apt-get remove nvidia-experimental-304
5. Reinstall nvidia driver
6. sudo apt-get install nvidia-current-updates
When you do this, it must say something like:
Building initial module for 3.5.0-17-generic
Done.
If it says
Module build for the currently running kernel was
skipped since the kernel source for this kernel
does not seem to be installed.
then the problem will not be solved. Do not believe the message. It is not asking for linux-source to be install, it does only want the headers but you must install the specific -generic headers for your kernel. Run:
sudo apt-get install linux-headers-`uname -r`
It will not work with just linux-headers-generic or linux-headers-3.5.0-17 (for example).
6. If it successfully installs, restart the computer :
7. sudo shutdown -r now
This should allow the kernel module to compile and install properly. It did for me!
Tags: kernel nvidia (Next Q)
Q: Does Ubuntu support USB 3.0?
Q: How do we get this magic performance-boosting 200 line patch?
Q: What is the path to the kernel headers so I can install vmware?
Q: How can I install on a non-PAE CPU? (error "Kernel requires features not present on the CPU: PAE")
Q: Can't upgrade due to low disk space on /boot
Q: Why is swap being used even though I have plenty of free RAM?
Q: Desktop does not show when I installed nvidia drivers!