Pro ASP.NET SignalR: Real-Time Communication in .NET with SignalR 2.1 (2014)
Chapter 3. Developing SignalR Applications Using Hubs
Chapter 1 provided some background information about real-time web development and ASP.NET SignalR that is necessary for understanding the content of this book. In Chapter 2, we went through some basic information about ASP.NET SignalR to get you started with this technology. In this chapter and Chapter 4, you get your feet wet with some technical details about ASP.NET SignalR that can actually help you develop real-world SignalR applications. This chapter is about hubs, and Chapter 4 is about persistent connections.
Hubs are discussed in detail in this chapter, but as a quick starter, hubs are an abstraction on top of persistent connections that enable ease of access to a set of APIs for the .NET Framework, jQuery, or other client types that allow web developers to build real-time web applications.
By nature, hubs are a high-level abstraction offered for those who want to build real-time web applications faster and easier and do not need to worry about extensibility and other professional aspects of their applications. Hubs are very dependent on persistent connections (see Chapter 4), and the same principles for persistent connections apply to hubs as well. Hubs are discussed before persistent connections because they are easier to learn and can prepare you to understand persistent connections better. Thanks to the good abstraction and independence of components in ASP.NET SignalR, hubs can be learned totally independently from persistent connections; you do not need to know persistent connections to build real-world ASP.NET SignalR applications. Understanding hubs suffices for most common scenarios, whereas persistent connections can be used for more-advanced cases.
This chapter discusses the following topics:
· The concept of hubs and how they work in general
· How to configure routing to use hubs
· How to implement hubs
· Client-side implementation of hubs
· The concept of groups and how to use them
· How the JavaScript proxy for hubs is generated and works
· Connection lifetime and how to control it
· State management between server and client with hubs
· The foundation of the hubs ecosystem and how HubDispatcher and HubPipelineModule work.
Overview of Hubs
Building a real–time web development platform from scratch can be an intimidating task, especially if you plan to build a thorough framework. ASP.NET SignalR is built to provide a complete set of APIs for web developers to simplify this task. ASP.NET SignalR provides these APIs in a very clean and layered structure, so you have a set of easy-to-use, high-level APIs as well as a set of lower-level extensible ones. Those high-level APIs appear under the name hubs and provide an abstraction on top of the lower-level APIs called persistent connections (see Chapter 4).
Hubs provide a set of two groups of libraries that expose easy-to-use APIs for programmers:
· Server-side libraries: These ASP.NET libraries provide a mechanism to implement server-side methods that can be called by clients as well as mechanisms to call some methods defined on the clients from the server side.
· Client-side libraries: These libraries (written in JavaScript, .NET, Objective-C, Java, and other platforms) provide a mechanism to implement client-side methods that can be called by server as well as mechanisms to call server-side methods.
![]() Note As discussed in Chapter 1, an ASP.NET SignalR application usually has a single server component (although this software component can be distributed among several physical servers), and there can be various clients connecting to this server component. The server-side component is implemented in the .NET Framework (or Mono), but the client(s) can be implemented in various languages and technologies. The most common client-side implementations are with JavaScript, but there are .NET desktop clients as well as iOS, Android, and Windows Phone implementations.
Note As discussed in Chapter 1, an ASP.NET SignalR application usually has a single server component (although this software component can be distributed among several physical servers), and there can be various clients connecting to this server component. The server-side component is implemented in the .NET Framework (or Mono), but the client(s) can be implemented in various languages and technologies. The most common client-side implementations are with JavaScript, but there are .NET desktop clients as well as iOS, Android, and Windows Phone implementations.
The basis of the hubs ecosystem on server and client is the remote procedure call (RPC), which has a wide meaning in computer science. In general, an RPC is a mechanism that enables methods on a system/computer/component to be called by an external or independent system/computer/component. In the case of ASP.NET SignalR, because the architecture is a client-server architecture, and these two sides are independent, RPCs are made from one of these two components to the other one.
The previous description of hubs is depicted in Figure 3-1 with a visual representation. A single–server software component can serve multiple clients and receive RPCs from them or make such calls to individual clients to trigger particular actions.
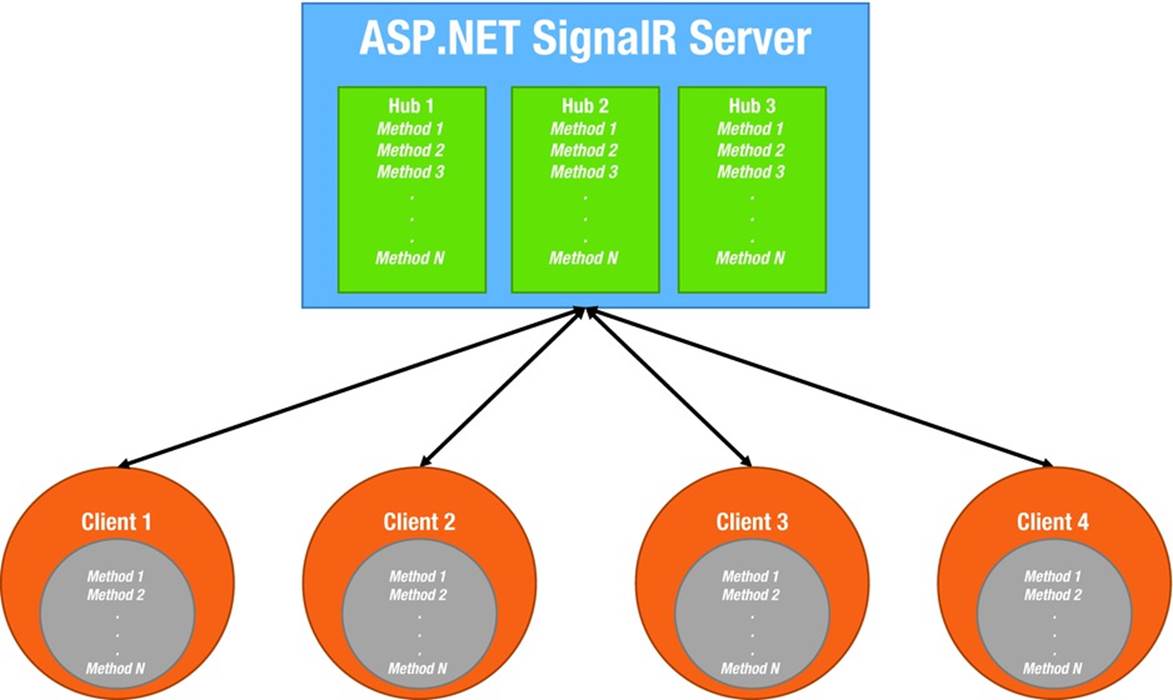
Figure 3-1. General hub structure
How does it work in general? This question is critical: making calls from the client(s) to server is a fairly common task, but making calls from the server to a particular client (or all clients) is not.
ASP.NET SignalR employs the concept of a persistent HTTP connection that is in contrast with the traditional HTTP connections that can be disconnected. Persistent HTTP connections remain open for a long time, which enables the ASP.NET SignalR server component to push any content that it wants to the client using this persistent connection.
The hubs ecosystem in ASP.NET SignalR applies the concept of hub proxies to simplify the process of working with server-side methods on the client as well as the process of working with client-side methods from the server. Hub proxies (discussed later in this chapter) are a set of JavaScript libraries automatically generated on the fly by the ASP.NET SignalR server based on the code implemented on the server to simplify the previously mentioned process.
To discuss this in more detail, we have to know that whenever server code calls a client-side method, the persistent connection is used to pass a set of data to the client with the name of the client-side method to be called, along with the parameters. Objects passed as parameters are serialized as JavaScript Object Notation (JSON), and if a method name is matched on the client side, the parameters (metadata) are deserialized and used to execute that particular method.
Getting Started with Hubs
Let’s get started with some code. The first point about implementing hubs in ASP.NET SignalR is to know that a hub is nothing but a C# class that derives from the Microsoft.Aspnet.Signalr.Hub base class and implements a set of methods. These methods can take primitive .NET types or your custom types as their parameter(s) and return them as well.
The code in Listing 3-1 shows the basic implementation of a hub called Chapter3Hub that derives from the Hub base class.
Listing 3-1. Basic Hub Implementation
using Microsoft.AspNet.SignalR;
namespace Chapter3.Code
{
public class Chapter3Hub : Hub
{
}
}
Let’s take it a step farther and convert this basic implementation to a more realistic one. We can add a single method to this hub that receives a message and broadcasts it to all clients by calling a method on them. Listing 3-2 shows this code.
Listing 3-2. More Realistic Server-Side Hub Implementation
using Microsoft.AspNet.SignalR;
namespace Chapter3.Code
{
public class Chapter3Hub : Hub
{
public void BroadcastMessage(string text)
{
Clients.All.displayText(text);
}
}
}
Do not worry about the details because we will discuss them later in this chapter, but for now you need to know that we have defined a public method in our hub called BroadcastMessage that gets a string parameter. It then uses the Clients object provided by ASP.NET SignalR that refers to the clients connecting to the server. Using the All property that refers to all clients (in contrast with a particular one or a group of them), it calls a client-side method called displayText by passing the text parameter. We will implement this client-side method in a moment.
Listing 3-3 shows the client-side implementation of this simple broadcasting system. This code is embedded within a simple HTML page and does not even need to be inside any ASP.NET web form or ASP.NET model-view-controller (MVC) view.
Listing 3-3. Client-Side Implementation
<!DOCTYPE html>
<html xmlns="http://www.w3.org/1999/xhtml">
<head runat="server">
<title>Chapter 3 - Getting Started with Hub Implementation</title>
</head>
<body>
<script src="Scripts/jquery-1.6.4.js"></script>
<script src="Scripts/jquery.signalR-2.0.0-beta2.js"></script>
<script src="/signalr/hubs" type="text/javascript"></script>
<script type="text/javascript">
$(function () {
var broadcaster = $.connection.chapter3Hub;
broadcaster.client.displayText = function (text) {
$('#messages').append('<li>' + text + '</li>');
};
$.connection.hub.start().done(function () {
$("#broadcast").click(function () {
broadcaster.server.broadcastMessage($('#msg').val());
});
});
});
</script>
<div>
<input type="text" id="msg" />
<input type="button" id="broadcast" value="Broadcast" />
<ul id="messages">
</ul>
</div>
</body>
</html>
There are few important features of this code. First, there are three JavaScript references to the SignalR jQuery library and dynamic hubs proxy generated by SignalR. The first two are straightforward references that are typically done in any web application. The version of jQuery depends on the version of ASP.NET SignalR being used, even though there are some proxy libraries that create backward compatibility for ASP.NET SignalR for older versions of jQuery. You can find these proxy implementations by searching on the Internet, or you can easily implement your own.
The third JavaScript reference to /signalr/hubs is a reference to a library generated dynamically when the ASP.NET application loads. As discussed later, ASP.NET SignalR looks at your hubs implementation and generates a JavaScript library that can be accessed at this URL by default. We will discuss how to customize the location of this library and how it is generated later on.
There are also a few lines of JavaScript implementation with jQuery that connect the pieces of the user interface to the previously mentioned JavaScript libraries. First, we create a connection to the particular hub class by calling $.connection.chapter3Hub. We use this connection to get access to the client part and define our client-side method called displayText (already used to call on the client). This method adds a text message to a list of messages. After that, we use the hub object of the connection to start a connection and use its callback to handle any click event to a button. Inside this event, we use the server object of the connection to call the server-side method called broadcastMessage by passing the entered message.
![]() Note A common fact about ASP.NET SignalR happens to be a source of issues for newcomers as well. ASP.NET SignalR translates the Pascal naming of method names on the server side (e.g., MethodName) to a camel case (e.g., methodName). If you forget to apply such a change in your client-side code, your application will not function correctly.
Note A common fact about ASP.NET SignalR happens to be a source of issues for newcomers as well. ASP.NET SignalR translates the Pascal naming of method names on the server side (e.g., MethodName) to a camel case (e.g., methodName). If you forget to apply such a change in your client-side code, your application will not function correctly.
At this point, we have all the elements we need to run this application and test it, but if we do, we will not get the expected result. Figure 3-2 shows the application window. Pressing the Broadcast button has no visible effect.

Figure 3-2. The code does not function correctly, and the message is not broadcast
By debugging the client-side execution of this application using Google Chrome Developer Tools (or any other client-side debugger such as Firebug), you see that there is a JavaScript error: the application cannot find any resource at the dynamic hub proxy location (see Figure 3-3).
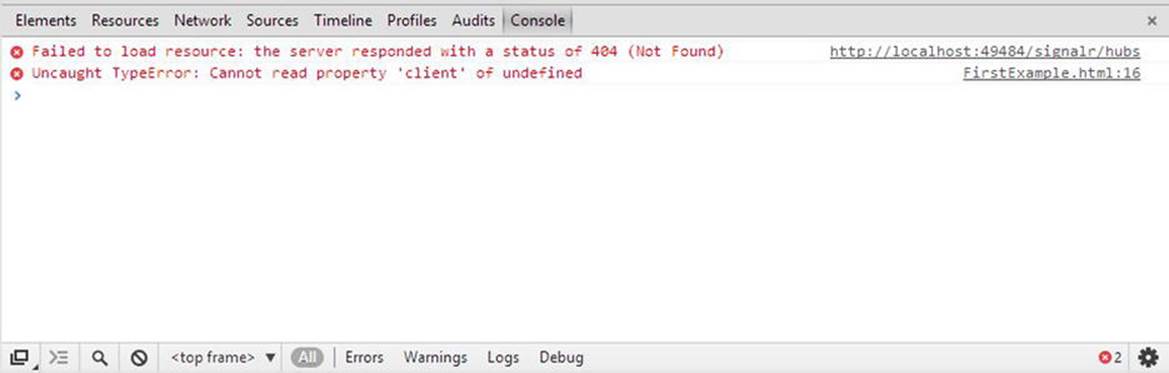
Figure 3-3. The hub proxy library cannot be found
This problem is caused because we are missing one vital step in any ASP.NET SignalR application development: we need to map the hubs during application startup. To do this, we need to create a class called Startup in our application. This class must be available in the form ofAssemblyName.Startup, where assembly name is the name of the assembly we assign to the project that executes the ASP.NET SignalR application. Inside this class, we must implement a method called Configuration. Listing 3-4 shows such an implementation. You often need to use the same code and change the namespace only to reflect your assembly name.
Listing 3-4. Mapping Hubs at Startup
using Owin;
// This needs to be AssemblyName.Startup or it will fail to load
namespace Chapter3
{
public class Startup
{
// The name *MUST* be Configuration
public void Configuration(IAppBuilder app)
{
app.MapHubs();
}
}
}
![]() Note We host our SignalR applications in this chapter using OWIN. We will discuss this in detail, along with alternatives, in Chapter 8. As a quick background for starters, OWIN stands for Open Web Interface for .NET and is a set of standards defined for communications between a .NET server and web application. There can be different implementations of this standard to host a web application on different types of servers, such as Internet Information Services (IIS), among others. For now, let’s ignore the details and postpone the rest of the discussion to Chapter 8.
Note We host our SignalR applications in this chapter using OWIN. We will discuss this in detail, along with alternatives, in Chapter 8. As a quick background for starters, OWIN stands for Open Web Interface for .NET and is a set of standards defined for communications between a .NET server and web application. There can be different implementations of this standard to host a web application on different types of servers, such as Internet Information Services (IIS), among others. For now, let’s ignore the details and postpone the rest of the discussion to Chapter 8.
Now we are ready to run our application and get the result shown in Figure 3-4.
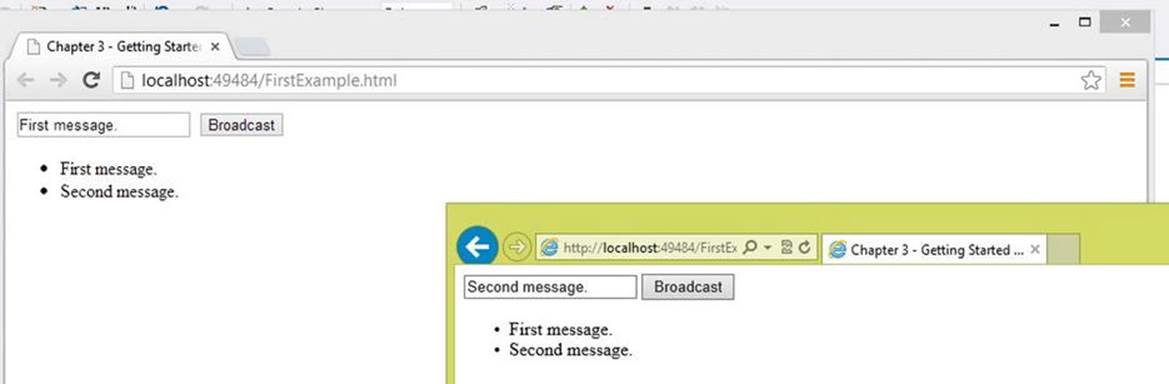
Figure 3-4. Simple broadcasting application
This was a quick start to the main steps and points needed to use hubs in ASP.NET SignalR. In the rest of this chapter, we discuss more details about each step and some related notes that would come in handy when developing ASP.NET SignalR applications using hubs.
Route Configuration
A vital step of the functioning of any ASP.NET SignalR application using hubs is to have the hubs mapped in routing, which was done in the Startup class and within the Configuration method (refer to Listing 3-4). This particular class name is called at the startup time of any ASP.NET SignalR application to map the routes for hubs.
You can modify this URL however you want, and we show you how in a moment. By default, ASP.NET SignalR is configured to serve requests in the same domain meaning that it assumes that you are calling the ASP.NET SignalR server component from the same client-side domain in which the server-side component is hosted. This might not be the case in the real world, however, so we need to enable cross-domain calls, which is another topic related to route configuration that we discuss here.
Customize the Hubs Proxy Location
As mentioned in the previous section, the hubs proxy is configured to be available at /signalr (this is different from /signalr/hubs, which is where you access your hubs). There might be some particular circumstances under which you have to change this default URL to something else. For example, you might have a folder with the name signalr in your project that has a conflict with this name. This part is easily configurable, both on the server side and on the client side.
On the server side, all you need to do is to modify the Configuration method in the Startup class to use an alternative overload of the MapHubs method to specify this new URL (see Listing 3-5).
Listing 3-5. Specifying an Alternative Location for the Hubs Proxy at Startup
using Owin;
// This needs to be AssemblyName.Startup or it will fail to load
namespace Chapter3
{
public class Startup
{
// The name *MUST* be Configuration
public void Configuration(IAppBuilder app)
{
app.MapHubs("/chapter3signalr", new Microsoft.AspNet.SignalR.HubConfiguration());
}
}
}
This particular overload requires the string value of the new location along with an instance of the Microsoft.AspNet.SignalR.HubConfiguration object.
On the client side, we can change the location of the JavaScript reference to the dynamic hubs proxy to use this new URL (see Listing 3-6).
Listing 3-6. Changing the JavaScript Reference Location for the Hubs Proxy
<!DOCTYPE html>
<html xmlns="http://www.w3.org/1999/xhtml">
<head runat="server">
<title>Chapter 3 - Getting Started with Hub Implementation</title>
</head>
<body>
<script src="Scripts/jquery-1.6.4.js"></script>
<script src="Scripts/jquery.signalR-2.0.0-beta2.js"></script>
<script src="/chapter3signalr/hubs" type="text/javascript"></script>
<script type="text/javascript">
$(function () {
var broadcaster = $.connection.chapter3Hub;
broadcaster.client.displayText = function (text) {
$('#messages').append('<li>' + text + '</li>');
};
$.connection.hub.start().done(function () {
$("#broadcast").click(function () {
broadcaster.server.broadcastMessage($('#msg').val());
});
});
});
</script>
<div>
<input type="text" id="msg" />
<input type="button" id="broadcast" value="Broadcast" />
<ul id="messages">
</ul>
</div>
</body>
</html>
Cross-Domain Connections
By default, ASP.NET SignalR assumes that your clients are connecting to your server component on the same domain as the execution location. For example, if you have a web site such as apress.com, your application is running on the same domain as the ASP.NET SignalR domain. In reality, it might not be the case for bigger-scale applications. You might want to host your ASP.NET SignalR server independently from your main application on a separate domain and probably on separate servers.
In this case, you can run your application on apress.com, but run the ASP.NET SignalR server on signalr.apress.com. You have to enable cross-domain connections in ASP.NET SignalR that are disabled by default. To enable these cross-domain connections in your application, go to the Startup class and its Configuration method again to modify the construction and initiation of routes to handle cross-domain connections.
After constructing your own HubConfiguration object, you can set its EnableCrossDomain property to true and then pass this custom HubConfiguration object to the MapHubs method. Listing 3-7 shows this and applies the default hub proxy location (i.e., /signalr).
Listing 3-7. Enabling Cross-Domain Connections on a Server
using Microsoft.AspNet.SignalR;
using Owin;
// This needs to be AssemblyName.Startup or it will fail to load
namespace Chapter3
{
public class Startup
{
// The name *MUST* be Configuration
public void Configuration(IAppBuilder app)
{
HubConfiguration configuration = new HubConfiguration();
configuration.EnableCrossDomain = true;
app.MapHubs(configuration);
}
}
}
![]() Note Different versions of browsers handle cross-domain connections differently, so it is recommended that you research these differences before implementing a real ASP.NET SignalR application. As a common example, IE10 considers anything on the local host as the same domain and does not treat it as a cross-domain connection. Remember that you cannot set jQuery.support.cors to true because it makes ASP.NET SignalR assume that the browser supports CORS and disables JSONP.
Note Different versions of browsers handle cross-domain connections differently, so it is recommended that you research these differences before implementing a real ASP.NET SignalR application. As a common example, IE10 considers anything on the local host as the same domain and does not treat it as a cross-domain connection. Remember that you cannot set jQuery.support.cors to true because it makes ASP.NET SignalR assume that the browser supports CORS and disables JSONP.
On the client side, you can reference your JavaScript library from the external domain, as is shown in Listing 3-8.
Listing 3-8. Cross-Domain Connections on the Client
<!DOCTYPE html>
<html xmlns="http://www.w3.org/1999/xhtml">
<head runat="server">
<title>Chapter 3 - Getting Started with Hub Implementation</title>
</head>
<body>
<script src="Scripts/jquery-1.6.4.js"></script>
<script src="Scripts/jquery.signalR-2.0.0-beta2.js"></script>
<script src="http://signalr.apress.com/signalr/hubs" type="text/javascript"></script>
<script type="text/javascript">
$(function () {
var broadcaster = $.connection.chapter3Hub;
broadcaster.client.displayText = function (text) {
$('#messages').append('<li>' + text + '</li>');
};
$.connection.hub.start().done(function () {
$("#broadcast").click(function () {
broadcaster.server.broadcastMessage($('#msg').val());
});
});
});
</script>
<div>
<input type="text" id="msg" />
<input type="button" id="broadcast" value="Broadcast" />
<ul id="messages">
</ul>
</div>
</body>
</html>
Now let’s take a deeper look at the server-side elements of ASP.NET SignalR hubs. There are few main elements:
· Declaration of multiple hubs on the server
· Use of custom hub names and methods
· How to use complex types as parameters and return the types of method
· How to access and deal with particular clients
· Asynchronous execution of hub methods
Multiple Hub Declaration
In practice, you need to create a modular ASP.NET SignalR program that needs to deal with smaller units of the business domain. For example, you might have a system that manages the online status of users to show when they come online or leave, as well as an online chat system. This requirement might impose the need to separate your hub’s logic into different hubs that serve different areas of your application.
This is certainly possible in ASP.NET SignalR, and it is as easy as implementing different hub classes. For example, assume that you want to add the functionality to the existing broadcaster application to not only broadcast the message but also to send it to all the clients except the one sending it. For the sake of this example, also assume that this functionality better fits into a separate hub. Listing 3-9 shows the source code for the new hub that we define here.
Listing 3-9. Declaring a Second Hub on the Server
using Microsoft.AspNet.SignalR;
namespace Chapter3.Code
{
public class Chapter3SecondHub : Hub
{
public void SendMessage(string text)
{
Clients.Others.displayText(text);
}
}
}
This is very similar to the first hub. It only has a different class name and a different internal logic to use the Others property rather than All to refer to all the clients except the caller.
Declaring multiple hubs on the server side does not need any special action on the hubs proxy generation because they are added to the same hubs proxy and work fine out of the box. There is no performance penalty associated with declaring multiple hubs, either, so feel free to use them to create a good level of abstraction in your program and make it easier to maintain.
The client side of code is also very simple and is shown in Listing 3-10. The JavaScript implementation can be refactored to be simpler, but for education purposes we keep it as is for now.
Listing 3-10. Consuming Multiple Hubs on the Client Side
<!DOCTYPE html>
<html xmlns="http://www.w3.org/1999/xhtml">
<head runat="server">
<title>Chapter 3 - Getting Started with Hub Implementation</title>
</head>
<body>
<script src="Scripts/jquery-1.6.4.js"></script>
<script src="Scripts/jquery.signalR-2.0.0-beta2.js"></script>
<script src="/signalr/hubs" type="text/javascript"></script>
<script type="text/javascript">
$(function () {
var broadcaster = $.connection.chapter3Hub;
broadcaster.client.displayText = function (text) {
$('#messages').append('<li>' + text + '</li>');
};
var sender = $.connection.chapter3SecondHub;
sender.client.displayText = function (text) {
$('#messages').append('<li>' + text + '</li>');
};
$.connection.hub.start().done(function () {
$("#broadcast").click(function () {
broadcaster.server.broadcastMessage($('#msg').val());
});
$("#send").click(function () {
sender.server.sendMessage($('#msg').val());
});
});
});
</script>
<div>
<input type="text" id="msg" />
<input type="button" id="broadcast" value="Broadcast" />
<input type="button" id="send" value="Send" />
<ul id="messages">
</ul>
</div>
</body>
</html>
Here we add a new button to the user interface that sends the message to all clients except the caller. Inside the JavaScript code, we create a connection to chapter3SecondHub and we add our client method implementation, similar to the first hub.
![]() Note Multiple hubs do not affect the way you need to map your hubs in the Startup class, so you can leave them as they are.
Note Multiple hubs do not affect the way you need to map your hubs in the Startup class, so you can leave them as they are.
Figure 3-5 shows the output of this application with the new hub in action.
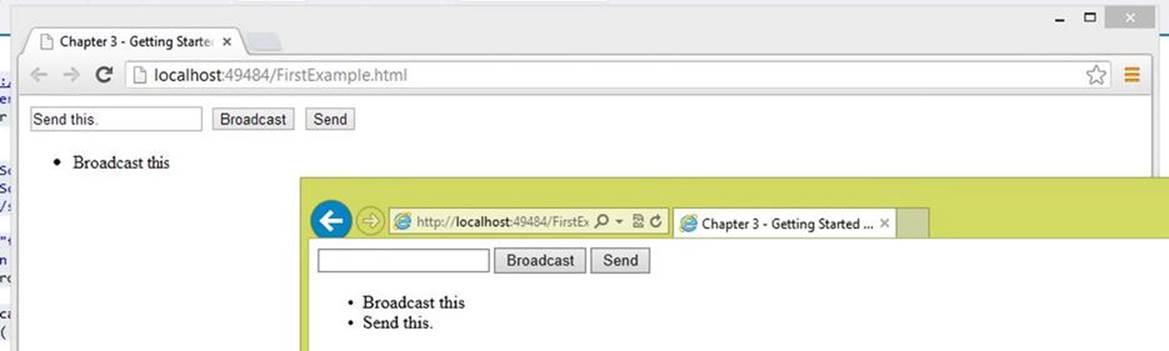
Figure 3-5. Testing multiple hubs in action
Custom Hub Names
ASP.NET SignalR takes the declared class names in hubs and applies camel casing to them to generate the hubs proxy. Sometimes you might need to customize this behavior to use your own custom names, which you can do by applying a HubName attribute to your hub classes (see Listings 3-11 and 12-12).
Listing 3-11. Applying a Custom Hub Name to the First Hub Class
using Microsoft.AspNet.SignalR;
using Microsoft.AspNet.SignalR.Hubs;
namespace Chapter3.Code
{
[HubName("FirstHub")]
public class Chapter3Hub : Hub
{
public void BroadcastMessage(string text)
{
Clients.All.displayText(text);
}
}
}
Listing 3-12. Applying a Custom Hub Name to the Second Hub Class
using Microsoft.AspNet.SignalR;
using Microsoft.AspNet.SignalR.Hubs;
namespace Chapter3.Code
{
[HubName("SecondHub")]
public class Chapter3SecondHub : Hub
{
public void SendMessage(string text)
{
Clients.Others.displayText(text);
}
}
}
The client-side code is very straightforward and only needs to apply the new hub names (see Listing 3-13).
Listing 3-13. Using Custom Hub Names on the Client Side
<!DOCTYPE html>
<html xmlns="http://www.w3.org/1999/xhtml">
<head runat="server">
<title>Chapter 3 - Getting Started with Hub Implementation</title>
</head>
<body>
<script src="Scripts/jquery-1.6.4.js"></script>
<script src="Scripts/jquery.signalR-2.0.0-beta2.js"></script>
<script src="/signalr/hubs" type="text/javascript"></script>
<script type="text/javascript">
$(function () {
var broadcaster = $.connection.FirstHub;
broadcaster.client.displayText = function (text) {
$('#messages').append('<li>' + text + '</li>');
};
var sender = $.connection.SecondHub;
sender.client.displayText = function (text) {
$('#messages').append('<li>' + text + '</li>');
};
$.connection.hub.start().done (function () {
$("#broadcast").click(function () {
broadcaster.server.broadcastMessage($('#msg').val());
});
$("#send").click(function () {
sender.server.sendMessage($('#msg').val());
});
});
});
</script>
<div>
<input type="text" id="msg" />
<input type="button" id="broadcast" value="Broadcast" />
<input type="button" id="send" value="Send" />
<ul id="messages">
</ul>
</div>
</body>
</html>
![]() Note With the custom hub names, no camel casing convention is done in the hubs proxy; we had to use the original custom hub name on the client side in the Pascal naming convention. We took this approach to clarify it, but it is recommended to use a camel casing convention for custom hub names to be consistent with JavaScript coding styles.
Note With the custom hub names, no camel casing convention is done in the hubs proxy; we had to use the original custom hub name on the client side in the Pascal naming convention. We took this approach to clarify it, but it is recommended to use a camel casing convention for custom hub names to be consistent with JavaScript coding styles.
Custom Types
So far, we applied only the string type in the .NET Framework as a parameter to our methods and consumed them. However, you might have more complex entities in your business domain that require you to declare custom complex types that employ a set of these primitive types. For example, you might need to pass around user information, including username, e-mail address, user ID, and last login time to and from your hubs. In this case, it is much easier to create a compound type to handle it.
The good news is that ASP.NET SignalR provides an easy way to use your own custom types in action just by defining them and using them in your hub declarations. ASP.NET SignalR uses its JSON serializer to automatically serialize and deserialize these objects out of the box. You only need to make sure that your custom types are serializable.
Let’s modify our original broadcaster application to take advantage of this. We want to alter the functionality so it displays the name of the sender along with the message sent. To do this, we declare a custom type called Person (shown in Listing 3-14) that has two string properties for this purpose.
Listing 3-14. Custom Person Type
namespace Chapter3.Code
{
public class Person
{
public string Name { get; set; }
public string Message { get; set; }
}
}
Now we can modify the hub class to get an instance of this object and then use these two properties to call a new version of the client-side method (see Listing 3-15).
Listing 3-15. Using Custom Types with Hubs on the Server
using Microsoft.AspNet.SignalR;
using Microsoft.AspNet.SignalR.Hubs;
namespace Chapter3.Code
{
[HubName("firstHub")]
public class Chapter3Hub : Hub
{
public void BroadcastMessage (Person person)
{
Clients.All.displayText(person.Name, person.Message);
}
}
}
We get an instance of the Person object as a parameter and then call the client-side displayText method by passing the Name and Message properties as its parameters.
On the client side, we have to make some modifications to pass an instance of this custom Person type with the additional data needed and then customize the client-side displayText method to accept an additional parameter and display it (see Listing 3-16).
Listing 3-16. Consuming Custom Types on the Client
<!DOCTYPE html>
<html xmlns="http://www.w3.org/1999/xhtml">
<head runat="server">
<title>Chapter 3 - Getting Started with Hub Implementation</title>
</head>
<body>
<script src="Scripts/jquery-1.6.4.js"></script>
<script src="Scripts/jquery.signalR-2.0.0-beta2.js"></script>
<script src="/signalr/hubs" type="text/javascript"></script>
<script type="text/javascript">
$(function () {
var broadcaster = $.connection.firstHub;
broadcaster.client.displayText = function (name, message) {
$('#messages').append('<li>' + name + ' said: ' + message + '</li>');
};
$.connection.hub.start().done(function () {
$("#broadcast").click(function () {
broadcaster.server.broadcastMessage({ Name: $('#name').val(), Message: $('#message').val() });
});
});
});
</script>
<div>
<input type="text" id="name" />
<input type="text" id="message" />
<input type="button" id="broadcast" value="Broadcast" />
<ul id="messages">
</ul>
</div>
</body>
</html>
Here we customize the displayText method to receive two parameters from the server and display them appropriately. We also modify the click handle for the Broadcast button to construct the custom Person type by passing its properties to the server. Pretty simple, right?
Now we test this application and get the desired result shown in Figure 3-6.
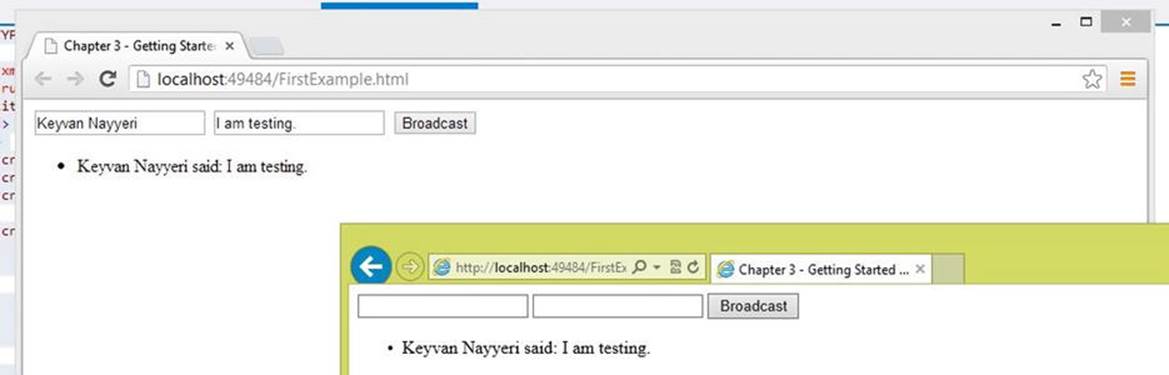
Figure 3-6. Testing custom types in an application
Groups
Under several different circumstances, you might need to deal with a particular set of clients in your application. One good example is a chat room in which particular clients want to connect and discuss things related to a particular topic. In such a case, you need to deliver messages from a server only to these clients.
ASP.NET SignalR provides the concept of groups along with an easy-to-use set of APIs for this purpose. These facilities are provided in the Groups class, and all you need to do is join and leave clients to particular groups as you want.
Let’s modify the broadcaster example to include a new option to put users in groups and broadcast messages only within a particular group. First, we modify the Person class to also have a Group property (see Listing 3-17).
Listing 3-17. Modify the Person Class to Include a Group Property
namespace Chapter3.Code
{
public class Person
{
public string Name { get; set; }
public string Message { get; set; }
public string Group { get; set; }
}
}
The server-side hub is modified to allow clients to join and leave groups and also send a message to the groups that the user is a member of (see Listing 3-18).
Listing 3-18. Declare Groups on the Server
using Microsoft.AspNet.SignalR;
using Microsoft.AspNet.SignalR.Hubs;
using System.Threading.Tasks;
namespace Chapter3.Code
{
[HubName("firstHub")]
public class Chapter3Hub : Hub
{
public void BroadcastMessage(Person person)
{
Clients.Group(person.Group).displayText(person.Name, person.Message);
}
public Task Join(string groupName)
{
return Groups.Add(Context.ConnectionId, groupName);
}
public Task Leave(string groupName)
{
return Groups.Remove(Context.ConnectionId, groupName);
}
}
}
Here we use the Group property of Clients to broadcast the message to only a particular group name rather than everyone. Inside the Join and Leave methods, we use the Groups class to add and remove the current client (identified by Context.ConnectionId) to a particular group name passed in.
On the client side, we need to introduce a new text box to enter a group name and then adjust everything to take advantage of the groups. We also have to ensure that the client is joined to the particular group before broadcasting and leaves that groups afterward (see Listing 3-19).
Listing 3-19. Use Groups on the Client Side
<!DOCTYPE html>
<html xmlns="http://www.w3.org/1999/xhtml">
<head runat="server">
<title>Chapter 3 - Getting Started with Hub Implementation</title>
</head>
<body>
<script src="Scripts/jquery-1.6.4.js"></script>
<script src="Scripts/jquery.signalR-2.0.0-beta2.js"></script>
<script src="/signalr/hubs" type="text/javascript"></script>
<script type="text/javascript">
$(function () {
var broadcaster = $.connection.firstHub;
broadcaster.client.displayText = function (name, message) {
$('#messages').append('<li>' + name + ' said: ' + message + '</li>');
};
$.connection.hub.start().done(function () {
$("#broadcast").click(function () {
broadcaster.server.join($('#groupName').val());
broadcaster.server.broadcastMessage({ Name: $('#name').val(), Message: $('#message').val(), Group: $('#groupName').val() });
broadcaster.server.leave($('#groupName').val());
});
});
});
</script>
<div>
<input type="text" id="groupName" />
<input type="text" id="name" />
<input type="text" id="message" />
<input type="button" id="broadcast" value="Broadcast" />
<ul id="messages">
</ul>
</div>
</body>
</html>
These changes are straightforward. The only point to note is the use of the broadcaster.server.join and broadcaster.server.leave methods that are similar to other hub method calls on the server that you have seen before. They make the client join and leave a group.
After running this code, we get the result shown in Figure 3-7.
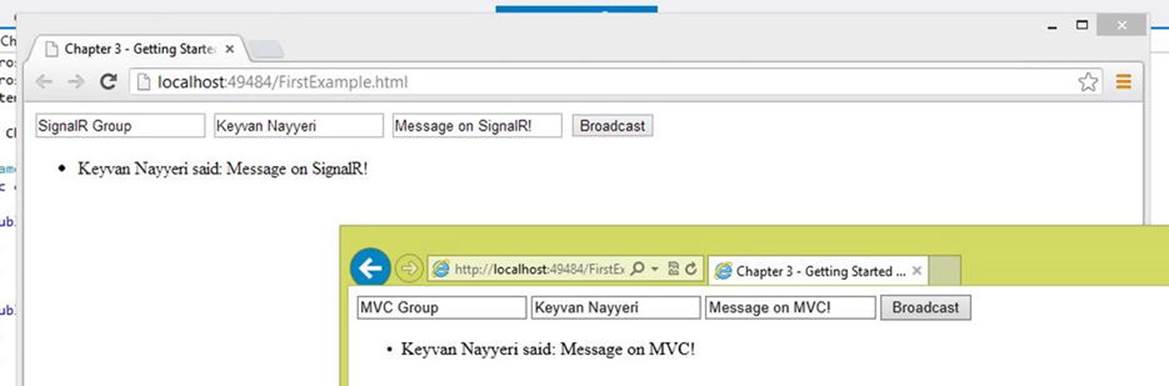
Figure 3-7. Groups in action
Accessing Particular Clients
So far, we have mainly relied on a broadcasting scenario in which the server calls a method on all the clients. This is not always true, however. Sometimes we need to target a particular set of clients as a group, sometimes we need to exclude some clients, and there are many other scenarios that depend on our business needs. ASP.NET SignalR provides a good set of APIs to support such scenarios.
The first case that we already used several times is to broadcast a message to all the clients. We use Clients.All for this purpose (see Listing 3-20).
Listing 3-20. Using Clients.All to Broadcast to All Clients
public void BroadcastMessage(Person person)
{
Clients.All.displayText(person.Name, person.Message);
}
Sometimes we want to send a message to all clients except the current client that is calling the server. We can apply Clients.Others in this case (see Listing 3-21).
Listing 3-21. Using Clients.Others to Broadcast to Other Clients
public void BroadcastMessage(Person person)
{
Clients.Others.displayText(person.Name, person.Message);
}
The other case is when we want to send a message only to the particular client that is calling the server. We use Clients.Caller for this purpose (see Listing 3-22).
Listing 3-22. Using Clients.Caller to Broadcast to the Caller Client
public void BroadcastMessage(Person person)
{
Clients.Caller.displayText(person.Name, person.Message);
}
One way to identify clients is to apply the connection ID. Each client in ASP.NET SignalR is assigned a unique connection ID in globally unique identifier (GUID) format. We can direct messages to particular clients by using their client IDs. For example, we can send a message to the caller client by using Context.ConnectId in conjunction with Clients.Client. This process is identical to using Clients.Caller (see Listing 3-23).
Listing 3-23. Using a Connection ID to Access a Particular Client
public void BroadcastMessage(Person person)
{
Clients.Client(Context.ConnectionId).displayText(person.Name, person.Message);
}
We can also exclude one or more particular connection IDs from a message by calling Clients.AllExcept and passing one or more connection IDs. The following code excludes the caller to simulate a behavior identical to Clients.Others (see Listing 3-24).
Listing 3-24. Using Clients.AllExcept to Exclude a Particular Client
public void BroadcastMessage(Person person)
{
Clients.AllExcept(Context.ConnectionId).displayText(person.Name, person.Message);
}
The same operations can be extended to the context of a group. We can send a message to all other clients (except the caller) in a group by using Clients.OthersInGroup (see Listing 3-25).
Listing 3-25. Using Clients.OthersInGroup to Access All Other Clients in a Group
public void BroadcastMessage(Person person)
{
Clients.OthersInGroup(person.Group).displayText(person.Name, person.Message);
}
Last but not least, we can exclude particular clients by connection ID from receiving a message in a group. All we need to do is to use Clients.Group and pass the list of connection IDs as secondary parameters (see Listing 3-26).
Listing 3-26. Using Clients.Group to Exclude Particular Clients in a Group
public void BroadcastMessage(Person person)
{
Clients.Group(person.Group, Context.ConnectionId).displayText(person.Name, person.Message);
}
Connection Lifetime Management
Persistent connections (see Chapter 4) are the basis of the hubs ecosystem. Connections play the key role in ASP.NET SignalR, hence hubs. Whenever you open a new page and navigate away from one, you close a connection and open a new one. There are three main connection events in ASP.NET SignalR:
· Connected: Occurs whenever a new connection is established between a client and the server. For example, in a chat application, it can be used to update the status of the user as online.
· Disconnected: Occurs whenever the connection from a client to the server is closed. For example, in a chat application, it can be used to update the status of the user to offline.
· Reconnected: Occurs whenever the connection is reestablished from a client to the server due to various reasons such as an inactive connection. For example, in a chat application, it can be used to update the status of the user to offline after a period of inactivity.
ASP.NET SignalR offers three events: OnConnected, OnDisconnected, and OnReconnected in the Hub base class that corresponds to these three events in order. You can override these events and implement them in your hubs to add your own business logic (see Listing 3-27).
Listing 3-27. Connection Lifetime Events
using Microsoft.AspNet.SignalR;
using Microsoft.AspNet.SignalR.Hubs;
using System.Threading.Tasks;
namespace Chapter3.Code
{
[HubName("firstHub")]
public class Chapter3Hub : Hub
{
public void BroadcastMessage(Person person)
{
Clients.Group(person.Group, Context.ConnectionId).displayText(person.Name, person.Message);
}
public Task Join(string groupName)
{
return Groups.Add(Context.ConnectionId, groupName);
}
public Task Leave(string groupName)
{
return Groups.Remove(Context.ConnectionId, groupName);
}
public override Task OnConnected()
{
return base.OnConnected();
}
public override Task OnDisconnected(bool stopCalled)
{
return base.OnDisconnected(stopCalled);
}
public override Task OnReconnected()
{
return base.OnReconnected();
}
}
}
![]() Note Similar to many other operations in ASP.NET SignalR, these events are asynchronous. ASP.NET SignalR is built to be an asynchronous technology. For more on asynchronous programming in .NET, you can read Apress Pro Asynchronous Programming in .NET (ISBN 978-1430259206).
Note Similar to many other operations in ASP.NET SignalR, these events are asynchronous. ASP.NET SignalR is built to be an asynchronous technology. For more on asynchronous programming in .NET, you can read Apress Pro Asynchronous Programming in .NET (ISBN 978-1430259206).
The only possible sequences of these events are OnConnected -> OnReconnected -> OnDisconnected or OnConnected -> OnDisconnected, and it is impossible to have OnConnected -> OnDisconnected -> OnReconnected for a client. Note that under particular circumstances, OnDisconnected might not be called—when the application is recycled, for example.
Context
ASP.NET SignalR needs to offer some information about the context of application execution (similar to the HttpContext object in ASP.NET). It can be done via the Context property of the Hub base class.
The most common use of the Context property was to use ConnectionId to find the connection ID for the caller client. But you can also use the Headers property to have access to HTTP headers of the request or the QueryString property to retrieve query string parameters. You can also use the Request and RequestCookies properties, respectively, to access the request and its cookies. There is also a User property that allows you to find information about the authenticated user.
Listing 3-28 shows how the Headers property of Context is used to write the value of the Date header to the debugger.
Listing 3-28. Use Context.Headers to Access HTTP Headers
using Microsoft.AspNet.SignalR;
using Microsoft.AspNet.SignalR.Hubs;
using System.Diagnostics;
using System.Threading.Tasks;
namespace Chapter3.Code
{
[HubName("firstHub")]
public class Chapter3Hub : Hub
{
public void BroadcastMessage(Person person)
{
Debug.WriteLine(Context.Headers["Date"]);
Clients.Group(person.Group, Context.ConnectionId).displayText(person.Name, person.Message);
}
public Task Join(string groupName)
{
return Groups.Add(Context.ConnectionId, groupName);
}
public Task Leave(string groupName)
{
return Groups.Remove(Context.ConnectionId, groupName);
}
}
}
State Management
By default, ASP.NET SignalR is built on top of the stateless HTTP protocol, so it is not easy to persist and communicate data between client(s) and the server. The hubs proxy provides a mechanism to facilitate this using the state property of the client and Clients.Caller on the server. By using these two tools, you can easily pass data from the client to the server or from the server to the client.
![]() Caution It is extremely important to know that the data passed between client(s) and the server in ASP.NET SignalR is added to each request that travels between them. Therefore, these mechanisms are intended to be used for smaller sizes of data, not bigger data sets. If used inappropriately, these mechanisms can have a huge performance impact on your application.
Caution It is extremely important to know that the data passed between client(s) and the server in ASP.NET SignalR is added to each request that travels between them. Therefore, these mechanisms are intended to be used for smaller sizes of data, not bigger data sets. If used inappropriately, these mechanisms can have a huge performance impact on your application.
Let’s go back and modify the group example to remove the Group property from the Person class and instead pass the name of the group using this mechanism. Listing 3-29 shows the new code for the Person class.
Listing 3-29. The Person Class with No Group Property
namespace Chapter3.Code
{
public class Person
{
public string Name { get; set; }
public string Message { get; set; }
}
}
Now we modify the client code to pass the group name using the state property of the client proxy object (see Listing 3-30).
Listing 3-30. Client Code to Pass the State
<!DOCTYPE html>
<html xmlns="http://www.w3.org/1999/xhtml">
<head runat="server">
<title>Chapter 3 - Getting Started with Hub Implementation</title>
</head>
<body>
<script src="Scripts/jquery-1.6.4.js"></script>
<script src="Scripts/jquery.signalR-2.0.0-beta2.js"></script>
<script src="/signalr/hubs" type="text/javascript"></script>
<script type="text/javascript">
$(function () {
var broadcaster = $.connection.firstHub;
broadcaster.client.displayText = function (name, message) {
$('#messages').append('<li>' + name + ' said: ' + message + '</li>');
};
$.connection.hub.start().done(function () {
$("#broadcast").click(function () {
broadcaster.server.join($('#groupName').val());
broadcaster.state.GroupName = $('#groupName').val();
broadcaster.server.broadcastMessage({ Name: $('#name').val(), Message: $('#message').val() });
broadcaster.server.leave($('#groupName').val());
});
});
});
</script>
<div>
<input type="text" id="groupName" />
<input type="text" id="name" />
<input type="text" id="message" />
<input type="button" id="broadcast" value="Broadcast" />
<ul id="messages">
</ul>
</div>
</body>
</html>
Here we use the broadcaster.state.GroupName property to pass the state value for the group name to the server. The server-side hub implementation is also very simple (see Listing 3-31).
Listing 3-31. Hub Implementation to Use the State Values
using Microsoft.AspNet.SignalR;
using Microsoft.AspNet.SignalR.Hubs;
using System.Threading.Tasks;
namespace Chapter3.Code
{
[HubName("firstHub")]
public class Chapter3Hub : Hub
{
public void BroadcastMessage(Person person)
{
Clients.Group(Clients.Caller.GroupName).displayText(person.Name, person.Message);
}
public Task Join(string groupName)
{
return Groups.Add(Context.ConnectionId, groupName);
}
public Task Leave(string groupName)
{
return Groups.Remove(Context.ConnectionId, groupName);
}
}
}
Here, Clients.Caller.GroupName is the same value passed from the client for this state.
Running this application results in the desired output (see Figure 3-8).
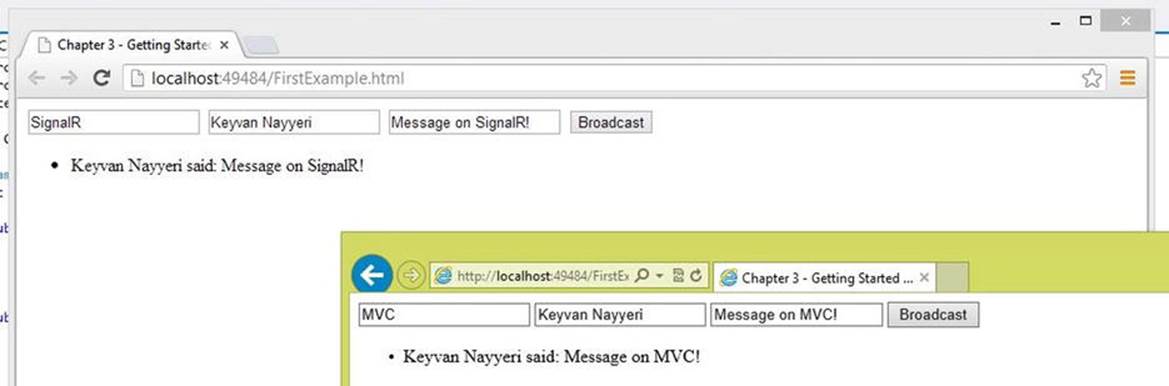
Figure 3-8. Output of state management application
Tracing
Tracing an ASP.NET SignalR application can become an important task to find out about the issues in your application. Just like ASP.NET, which provides some tracing mechanisms by configuration, ASP.NET SignalR offers a built-in set of tools that enables you to trace the execution of your program.
All you need to do is to modify the Web.Config file to include some new elements that take advantage of these tools. Listing 3-32 shows the code needed for this purpose.
Listing 3-32. Enabling Tracing in ASP.NET SignalR Applications
<?xml version="1.0"?>
<configuration>
<system.web>
<compilation debug="true" targetFramework="4.5" />
<httpRuntime targetFramework="4.5" />
</system.web>
<system.diagnostics>
<sources>
<source name="SignalR.SqlMessageBus">
<listeners>
<add name="SignalR-Bus" />
</listeners>
</source>
<source name="SignalR.ServiceBusMessageBus">
<listeners>
<add name="SignalR-Bus" />
</listeners>
</source>
<source name="SignalR.ScaleoutMessageBus">
<listeners>
<add name="SignalR-Bus" />
</listeners>
</source>
<source name="SignalR.Transports.WebSocketTransport">
<listeners>
<add name="SignalR-Transports" />
</listeners>
</source>
<source name="SignalR.Transports.ServerSentEventsTransport">
<listeners>
<add name="SignalR-Transports" />
</listeners>
</source>
<source name="SignalR.Transports.ForeverFrameTransport">
<listeners>
<add name="SignalR-Transports" />
</listeners>
</source>
<source name="SignalR.Transports.LongPollingTransport">
<listeners>
<add name="SignalR-Transports" />
</listeners>
</source>
<source name="SignalR.Transports.TransportHeartBeat">
<listeners>
<add name="SignalR-Transports" />
</listeners>
</source>
</sources>
<switches>
<add name="SignalRSwitch" value="Verbose" />
</switches>
<sharedListeners>
<add name="SignalR-Transports"
type="System.Diagnostics.TextWriterTraceListener"
initializeData="transports.log.txt" />
<add name="SignalR-Bus"
type="System.Diagnostics.TextWriterTraceListener"
initializeData="bus.log.txt" />
</sharedListeners>
<trace autoflush="true" />
</system.diagnostics>
</configuration>
By running the ASP.NET SignalR application with tracing, you can monitor different information about your application execution in the Output window (see Figure 3-9).
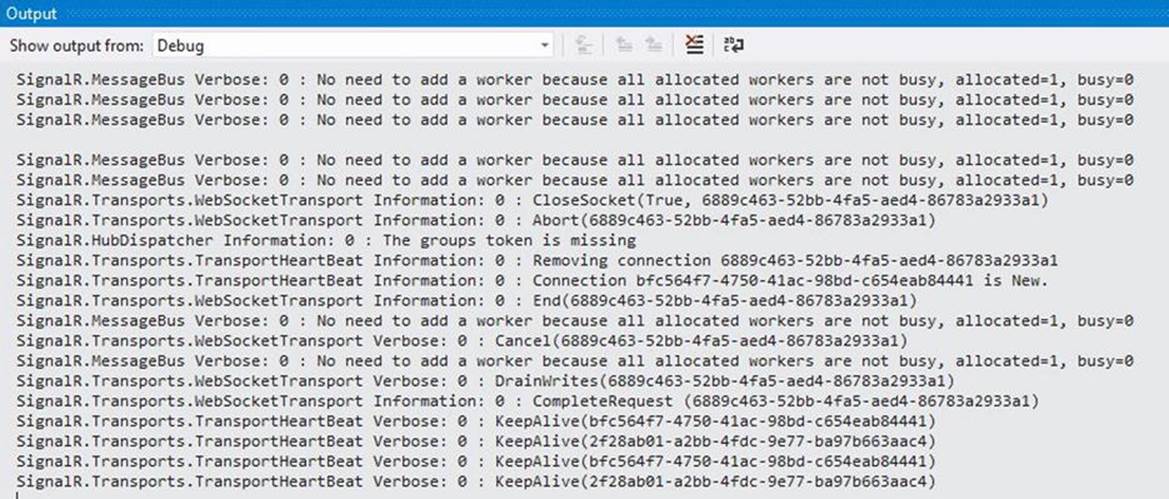
Figure 3-9. Tracing an ASP.NET SignalR application
This was a brief introduction to tracing in ASP.NET SignalR although it pretty much covers the main uses of tracing. Later in this book in Chapter 5 we come back to tracing again when we discuss troubleshooting and monitoring ASP.NET SignaslR applications.
HubDispatcher
We talked a lot about hubs in this chapter and how they simplify the task of building an ASP.NET SignalR application. We also mentioned that hubs are nothing but an abstraction on top of the persistent connection that we will discuss in chapter 4. However, it would be a good idea to have a brief discussion on how hubs achieve this goal.
Hubs apply a persistent connection in their core to communication with the clients and take care of serialization and serialization of data and complex types. In order to achieve this goal, they apply a class called HubDispatcher which is derived from PersistentConnectionclass. In fact, this means that HubDispatcher is nothing but a derivation of a persistent connection that overrides the key methods and properties on this class and adds some extra functionality to manage certain scnearios that we already discussed in this chapter.
For example, HubDispatcher override ProcessRequest method from PersistentConnection with its own logic shown in Listing 3-33. As you see, this code simply adds certain functionality to handle the hubs JavaScript.
Listing 3-33. ProcessRequest implementation in HubDispatcher
public override Task ProcessRequest(HostContext context)
{
if (context == null)
{
throw new ArgumentNullException("context");
}
// Trim any trailing slashes
string normalized = context.Request.LocalPath.TrimEnd('/');
int suffixLength = -1;
if (normalized.EndsWith(HubsSuffix, StringComparison.OrdinalIgnoreCase))
{
suffixLength = HubsSuffix.Length;
}
else if (normalized.EndsWith(JsSuffix, StringComparison.OrdinalIgnoreCase))
{
suffixLength = JsSuffix.Length;
}
if (suffixLength != -1)
{
// Generate the proper JS proxy url
string hubUrl = normalized.Substring(0, normalized.Length - suffixLength);
// Generate the proxy
context.Response.ContentType = JsonUtility.JavaScriptMimeType;
return context.Response.End(_proxyGenerator.GenerateProxy(hubUrl));
}
_isDebuggingEnabled = context.Environment.IsDebugEnabled();
return base.ProcessRequest(context);
}
HubPipelineModule
Another fundamental concept about how hubs work in ASP.NET SignalR that we would like to briefly touch before wrapping up this chapter is around IHubPipelineModule and its common base class, HubPipelineModule.
Different instances of HubPipelineModule implement the IHubPipelineModule and can be added to an ASP.NET SignalR application to handle different stages of processing requests to hubs such as connecting, reconnecting, disconnecting, and others. Such modules need to be added to the IHubPipeline which allows another interface called IHubPipelineInvoker to invoke them in order.
There are different cases where you would need to apply your own HubPipelineModule implementations to customize the handling of various actions on your hubs. One example would be around exception handling and what you want to do with an incoming error. In this case, you can observe any incoming exception from hubs by implementing OnIncomingError method in your module.
Summary
This chapter was dedicated to hubs in ASP.NET SignalR. Hubs are the high-level set of APIs available for web developers to build ASP.NET SignalR applications quickly and easily without worrying about the underlying complexities of persistent connections.
You learned about the basics of hubs and how route configuration, cross-domain connections, multiple hub declarations, and custom types work.
You also learned how groups work to send messages to particular clients or a set of clients, along with connection lifetime management, context property, and state management. The next chapter focuses on the persistent connections that underlie hubs and how to work with them directly.
All materials on the site are licensed Creative Commons Attribution-Sharealike 3.0 Unported CC BY-SA 3.0 & GNU Free Documentation License (GFDL)
If you are the copyright holder of any material contained on our site and intend to remove it, please contact our site administrator for approval.
© 2016-2026 All site design rights belong to S.Y.A.