Pro ASP.NET SignalR: Real-Time Communication in .NET with SignalR 2.1 (2014)
Chapter 8. Configuration, Deployment, and Security Aspects of SignalR
In the previous chapters of this book, you learned how to implement an ASP.NET SignalR application using hubs or persistent connections, how to troubleshoot these applications, and how to communicate with ASP.NET SignalR server applications from different client types.
After building and debugging your applications, the final step of developing any software is to configure it to be deployed to production. With this comes the importance of security before you launch an application and expose it to users who can abuse or misuse your software. It also can protect the user from the ill intent of others, depending on the application and its function.
This chapter covers how to secure an ASP.NET SignalR application using authentication and authorization, and how to configure and deploy an ASP.NET SignalR application.
ASP.NET SignalR is designed to be a very customizable and configurable platform to suit different needs. Because an ASP.NET SignalR application consists of several dependent and independent components on the server and client sides, each part comes with different sets of options to be customizable and configurable.
Although the topic of security is not limited to authentication and authorization, ASP.NET SignalR has taken care of many details that developers normally worry about. Authentication and authorization on ASP.NET SignalR applications is integrated into the server-side component in a consistent way like normal authentication and authorization mechanisms in ASP.NET, so being familiar with these topics in ASP.NET web form or ASP.NET MVC is required. As you discover in this chapter, hubs and persistent connections provide mechanisms for authentication and authorization, and there are different techniques to customize them for your needs.
The configuration part of an ASP.NET SignalR application is critical, especially if you are dealing with an enterprise software that has the potential to receive a heavy load from its users. Because ASP.NET SignalR comes with different transport protocols, some of which need a long-held HTTP connection, there are some recommended customizations in the hosting environment (e.g., Internet Information Services [IIS]) to optimize the use of resources. We discuss them in this chapter.
Fortunately, the deployment of ASP.NET SignalR applications is very integrated and similar to other ASP.NET web applications (for web-based applications), and you can easily deploy your applications. We go over this topic briefly as well.
The other topic covered in this chapter is the Open Web Interface for .NET (OWIN) startup in ASP.NET SignalR because it is one of the first Microsoft technologies that supported OWIN. It is important to know how OWIN support works in ASP.NET SignalR.
In a nutshell, the following major topics are covered in this chapter:
· How authentication works in ASP.NET SignalR to prevent anonymous access to hubs and persistent connections
· How to use authorization to limit access to hubs and persistent connections to particular groups or roles of users
· Major configuration aspects of an ASP.NET SignalR application to consider
· Recommended settings for ASP.NET SignalR, IIS, and ASP.NET execution to host ASP.NET SignalR applications
· Deployment considerations for an ASP.NET SignalR application
· How to use performance counters to monitor an ASP.NET SignalR application
· Relationship of OWIN and ASP.NET SignalR
Authentication and Authorization in ASP.NET SignalR
Authentication in ASP.NET SignalR is built on top of authentication in the ASP.NET infrastructure, so all the principles you know about ASP.NET authentication also apply to ASP.NET SignalR. The implementation is slightly different between hubs and persistent connections, as discussed in the following sections.
Authentication and Authorization for Hubs
The Authorize attribute located in the Microsoft.AspNet.SignalR namespace is a very simple and powerful tool provided in ASP.NET SignalR for authentication and authorization. This attribute can be applied to individual methods on hubs or to the hub itself (in that case, it applies to all the methods defined within that hub). You can pass a comma-separated string list of roles to this attribute to allow access to the hub or individual method for those roles.
Let’s see this in an example. We skip some of the general details here about setting up an ASP.NET application with basic cookie authentication, but you can find the full source code in the downloadable samples for this book. Our example applies the ASP.NET project template to generate the default HTML template as well as the basic authentication and authorization code we need. We implement our examples as new views and action methods for the HomeController.
Listing 8-1 shows the view that we use for these examples. It is already familiar to you from the previous chapters, with the minor difference that it is now an ASP.NET model-view-controller (MVC) view with some markup in the Razor view engine.
Listing 8-1. ASP.NET MVC View for Hubs Authentication Examples
@{
ViewBag.Title = "Chapter 8 - Authentication and Authorization";
}
<h2>@ViewBag.Title</h2>
<h3>@ViewBag.Message</h3>
<script type="text/javascript" src="@Url.Content("/Scripts/jquery-1.10.2.js")"></script><script type="text/javascript" src="@Url.Content("/Scripts/jquery.signalR-2.0.3.min.js")"></script><script type="text/javascript" src="@Url.Content("/Signalr/hubs")"></script>
<script type="text/javascript">
$(function () {
var chat = $.connection.broadcastHub;
chat.client.BroadcastMessage = function (message) {
$('#messages').append('<li>' + message + '</li>');
};
$.connection.hub.start().done(function () {
$("#broadcast").click(function () {
chat.server.broadcast($('#msg').val());
});
});
});</script>
<div>
<input type="text" id="msg" />
<input type="button" id="broadcast" value="broadcast" />
<ul id="messages"></ul></div>
Listing 8-2 shows modifications in the HomeController to handle the new view introduced for the examples.
Listing 8-2. ASP.NET MVC Controller for Hubs Authentication Examples
using System.Web.Mvc;
namespace Chapter8.Controllers
{
public class HomeController : Controller
{
public ActionResult Index()
{
return View();
}
[Authorize]
public ActionResult AuthenticationHubs()
{
ViewBag.Message = "Authentication with Hubs";
return View();
}
}
}
We develop a simple broadcasting hub on top of this authentication, but we want to make sure that only authenticated users can broadcast messages to other authenticated users and that anonymous access is prevented.
Listing 8-3 shows how this works. This code is actually the hub implementation for broadcasting.
Listing 8-3. Authentication for Hubs
using Microsoft.AspNet.SignalR;
namespace Chapter8.Hubs
{
public class BroadcastHub : Hub
{
[Authorize]
public void Broadcast(string message)
{
Clients.All.broadcastMessage(message);
}
}
}
This example is the same example we used a few times in the previous chapters of this book, except that it works only when you are logged in; otherwise, the hub throws a 401 (Unauthorized) HTTP status code. (We don’t provide the output here because it is similar to what you have already seen in this book.)
You can also apply authorization on top of this example. It is as simple as passing a comma-separated list of roles to the Roles property of the Authorize attribute (see Listing 8-4).
Listing 8-4. Role-based Authorization for Hubs
using Microsoft.AspNet.SignalR;
namespace Chapter8.Hubs
{
public class BroadcastHub : Hub
{
[Authorize(Roles="Admins, Users")]
public void Broadcast(string message)
{
Clients.All.broadcastMessage(message);
}
}
}
You can also use authorization based on usernames rather than roles, and you have to pass the usernames to the Users property of the Authorize attribute (see Listing 8-5).
Listing 8-5. User-based Authorization for Hubs
using Microsoft.AspNet.SignalR;
namespace Chapter8.Hubs
{
public class BroadcastHub : Hub
{
[Authorize(Users="keyvan, darren")]
public void Broadcast(string message)
{
Clients.All.broadcastMessage(message);
}
}
}
Authentication and Authorization for Persistent Connections
Authentication and authorization for persistent connections is slightly different from hubs, but it relies on the same principles. Just like everything else about persistent connections, you have more control over your security logic as well.
Before discussing the implementation, we show Listing 8-6, in which we update the ASP.NET MVC controller to handle a new action method and view needed for these examples.
Listing 8-6. ASP.NET MVC Controller for Persistent Connection Authentication Examples
using System.Web.Mvc;
namespace Chapter8.Controllers
{
public class HomeController : Controller
{
public ActionResult Index()
{
return View();
}
[Authorize]
public ActionResult AuthenticationHubs()
{
ViewBag.Message = "Authentication with Hubs";
return View();
}
[Authorize]
public ActionResult AuthenticationPersistentConnections()
{
ViewBag.Message = "Authentication with Persistent Connections";
return View();
}
}
}
We also introduce a new view for the new action method introduced here (see Listing 8-7). Please note that the reference to the hubs proxy in the listing is present in the master view template.
Listing 8-7. ASP.NET MVC View for Hubs Authentication Examples
@{
ViewBag.Title = "Chapter 8 - Authentication and Authorization";
}
<h2>@ViewBag.Title</h2>
<h3>@ViewBag.Message</h3>
<script type="text/javascript" src="@Url.Content("/Scripts/jquery-1.10.2.js")"></script><script type="text/javascript" src="@Url.Content("/Scripts/jquery.signalR-2.0.3.min.js")"></script>
<script type="text/javascript">
$(function () {
var connection = $.connection('/broadcast');
connection.received(function (data) {
$('#messages').append('<li>' + data + '</li>');
});
connection.start().done(function () {
$("#broadcast").click(function () {
connection.send($('#msg').val());
});
});
});</script>
<input type="text" id="msg" /><input type="button" id="broadcast" value="broadcast" />
<ul id="messages"></ul>
Authentication and authorization for persistent connections is as simple as overriding and implementing the AuthorizeRequest method of a persistent connection. This method receives an instance of an IRequest object in SignalR and returns a Boolean value that determines whether a request should have access to that persistent connection.
A basic implementation for authentication is shown in Listing 8-8, but (as you can guess) you can easily build your own complex authorization logic here as well.
Listing 8-8. Authentication for Persistent Connections
using Microsoft.AspNet.SignalR;
using System.Threading.Tasks;
namespace Chapter8.PersistentConnections
{
public class BroadcastConnection : PersistentConnection
{
protected override bool AuthorizeRequest(IRequest request)
{
return request.User.Identity.IsAuthenticated;
}
protected override Task OnReceived(IRequest request, string connectionId, string data)
{
return Connection.Broadcast(data);
}
}
}
These simple concepts are all you need to know to secure your ASP.NET SignalR application from public access using authentication and authorization (role based or user based).
Configuration Aspects of ASP.NET SignalR Applications
ASP.NET SignalR does not come with many custom configurations specific to this technology. As mentioned throughout the previous chapters of this book, ASP.NET SignalR works closely with ASP.NET applications and derives their configurations for several uses, including security.
ASP.NET SignalR has a set of diagnosis configurations that allow you to trace the whole ecosystem of your application. (We do not repeat these configurations here and refer you to Chapter 5 to read more about them.)
Besides these configurations, there is nothing special about ASP.NET SignalR applications to apply; just configure your application the same way you configure an ASP.NET web application.
Recommended IIS Settings for ASP.NET SignalR Applications
As discussed later in this chapter when we talk about OWIN and ASP.NET SignalR, you probably want to host your ASP.NET SignalR applications in IIS. You know that the nature of ASP.NET SignalR applications is slightly different from typical ASP.NET web applications because they employ the concept of long-held HTTP connections between client(s) and server(s), and this difference can introduce some challenges when configuring a host environment for the best performance.
With this fact in mind, the ASP.NET SignalR team has documented some recommended settings for configuring IIS for the best performance for this type of application.
![]() Note Although these settings are recommended, you might want to adjust them to better fit your needs, depending on your individual case. The built-in performance counters in ASP.NET SignalR discussed later in this chapter can assist you to monitor the behavior of your own application in the context of your hosting environment and your user base to allow you to adjust these settings accordingly.
Note Although these settings are recommended, you might want to adjust them to better fit your needs, depending on your individual case. The built-in performance counters in ASP.NET SignalR discussed later in this chapter can assist you to monitor the behavior of your own application in the context of your hosting environment and your user base to allow you to adjust these settings accordingly.
The customizations on IIS and your web application have to do with a few different settings, discussed briefly in the following sections.
Default Message Buffer Size
ASP.NET SignalR has a default value of 1,000 messages in memory per hub per connection. Although it is designed for typical messaging scenarios in your application, it might introduce memory issues if the messages are large. In this case, you have to decrease the number of messages you keep in memory, which is a relatively easy change in your configurations (see Listing 8-9).
Listing 8-9. Decreasing the Message Buffer Size for ASP.NET SignalR Applications
using Microsoft.AspNet.SignalR;
using Microsoft.Owin;
using Owin;
[assembly: OwinStartupAttribute(typeof(Chapter8.Startup))]
namespace Chapter8
{
public partial class Startup
{
public void Configuration(IAppBuilder app)
{
GlobalHost.Configuration.DefaultMessageBufferSize = 500;
app.MapSignalR();
ConfigureAuth(app);
}
}
}
We decreased this value to 500.
Maximum Concurrent Requests per Application
The default number of concurrent requests per application in IIS is 5,000. Increasing this value can enable more resources to serve ASP.NET SignalR applications, especially if you’re applying an extensive use of long polling. You can make this IIS configuration change by executing the command in Listing 8-10.
Listing 8-10. Increasing the Maximum Number of Concurrent Requests per Application in IIS
cd %windir%\System32\inetsrv\
appcmd.exe set config /section:system.webserver/serverRuntime
/appConcurrentRequestLimit:10000
Here we change this value to 10000 rather than the default 5000 value.
Maximum Concurrent Requests per CPU
You can configure ASP.NET on a server to handle more concurrent requests per CPU available on that server, which can have a positive performance impact on your servers. It can be applied in the aspnet.config file on your server, depending on the version of .NET you use. Listing 8-11 shows how to change this setting.
Listing 8-11. Increasing Maximum Number of Concurrent Requests per CPU in ASP.NET
<?xml version="1.0" encoding="UTF-8" ?>
<configuration>
<system.web>
<applicationPool maxConcurrentRequestsPerCPU="20000" />
</system.web>
</configuration>
Here we increased this value to 20000.
Request Queue Limit
If the number of incoming requests to each CPU exceeds the limit you defined in the previous section, IIS automatically throttles these requests into a queue. Increasing the size of this queue can improve the performance of an ASP.NET SignalR application as well. As Listing 8-12 shows, you can increase this value in aspnet.config by adding an element.
Listing 8-12. Increasing Request Queue Limit in ASP.NET
<processModel autoConfig="false" requestQueueLimit="250000" />
Here we increased the value to 250000.
Note that we discussed four different performance settings to improve the execution of an ASP.NET SignalR application. The first change (default message buffer size) is an ASP.NET SignalR application change at the application level. The second change (maximum concurrent requests per application) is an IIS change. The third and fourth changes (maximum number of concurrent requests per CPU and request queue limit) are changes at the ASP.NET level at the server level.
Deploying ASP.NET SignalR Applications
Deploying an ASP.NET SignalR application is not very different from deploying any other ASP.NET web application. You can deploy it by using the Deployment option in Visual Studio: right-click on your web project in Solution Explorer and select from file, IIS, or FTP deployments. You can also deploy your application into the cloud.
ASP.NET SignalR applications can be deployed to a variety of hosting environments, including Windows (with the .NET Framework installed) and Linux (with Mono Framework installed). However, you gain the best tools, especially for Web Sockets access, in Windows Server 2012.
If you deploy your SignalR application on a different domain or subdomain from your main web application (in which case you make requests to ASP.NET SignalR application), you have to take care of your cross-domain calls before starting the deployment process.
Make sure that your hosting environment does not override the application path in which your ASP.NET SignalR JavaScript hub proxies are located. If that is the case, you can change this path in your ASP.NET SignalR application or change the settings for your hosting environment.
Performance Counters
Although an application may run with visible issues, in today’s software world it is very important to make sure that you have an efficient program that doesn’t overuse resources and performs in a reasonable and fast manner. This is particularly important for a real-time web application that needs to communicate data in real time. Any delay caused by a performance issue can have a big impact on the quality of software.
The ASP.NET SignalR team has considered this fact and has bundled a set of performance counters inside the framework that enables software developers and administrators to monitor the performance of the application and make sure that it is running in an efficient manner.
Before talking about these performance counters, we want to emphasize an important point about ASP.NET SignalR hosting (discussed in more detail in the next sections). Because ASP.NET SignalR may use long-polling connections for transport, it has a good potential for having a higher number of concurrent connections with lightweight resource use on IIS or other hosting options. This is in contrast with normal web applications, in which there are fewer concurrent connections with higher resource needs.
With this fact about ASP.NET SignalR applications, having these performance counters can help a lot in determining the quality of the running application.
To install ASP.NET SignalR performance counters, you have to download and install a tool called SignalR.exe. The best way to do this is to download it with the NuGet Package Manager. Search for signalr.util to find a package called Microsoft ASP.NET SignalR Utilities. After installing this package, you should have the SignalR.exe file in the <project folder>/packages/Microsoft.AspNet.SignalR.Utils.<version>/tools location on your local drive storage.
If you run the command signalr.exe ipc or simply signalr ipc as an administrator, the performance counters are installed on your machine (see Figure 8-1).
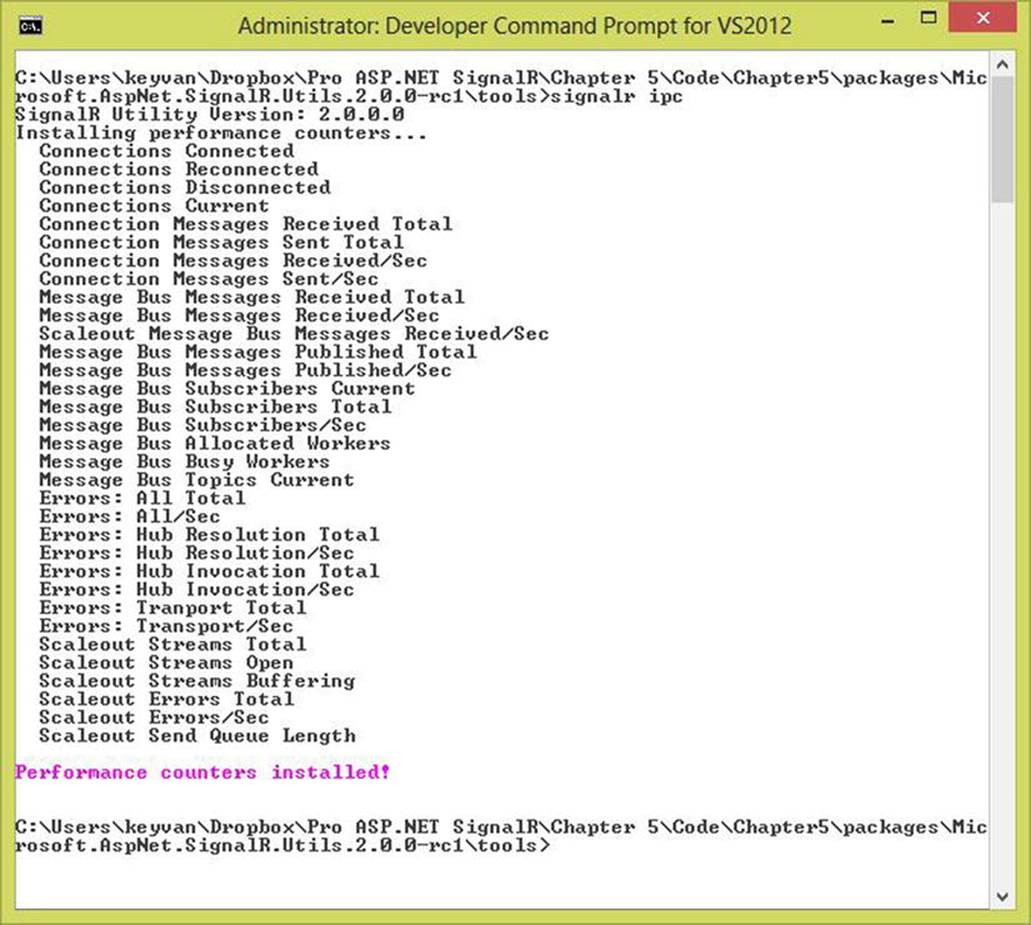
Figure 8-1. Installing ASP.NET SignalR performance counters
You can remove these performance counters by running the command signalr.exe upc or simply signalr upc.
Here is a list of the built-in custom performance counters that come with ASP.NET SignalR:
· Connection counters: Counters for connection lifetime events
· Connections Connected
· Connections Reconnected
· Connections Disconnected
· Connections Current
· Message counters: Counters for the number of messages generated by ASP.NET SignalR
· Connection Messages Received Total
· Connection Messages Sent Total
· Connection Messages Received/Sec
· Connection Messages Sent/Sec
· Message bus counters: Counters for messages communicated with the internal ASP.NET SignalR message bus
· Message Bus Messages Received Total
· Message Bus Messages Received/Sec
· Message Bus Messages Published Total
· Message Bus Messages Published/Sec
· Message Bus Subscribers Current
· Message Bus Subscribers Total
· Message Bus Subscribers/Sec
· Message Bus Allocated Workers
· Message Bus Busy Workers
· Message Bus Topics Current
· Error counters: Counters for errors generated by ASP.NET SignalR applications
· Errors: All Total
· Errors: All/Sec
· Errors: Hub Resolution Total
· Errors: Hub Resolution/Sec
· Errors: Hub Invocation Total
· Errors: Hub Invocation/Sec
· Errors: Transport Total
· Errors: Transport/Sec
· Scaleout counters: Counters to measure messages and errors generated by the scaleout provider
· Scaleout Message Bus Messages Received/Sec
· Scaleout Streams Total
· Scaleout Streams Open
· Scaleout Streams Buffering
· Scaleout Errors Total
· Scaleout Errors/Sec
· Scaleout Send Queue Length
With these counters, you can easily go to the perfmon tool on your Windows machine and add the custom performance counters listed under the SignalR category (see Figure 8-2).
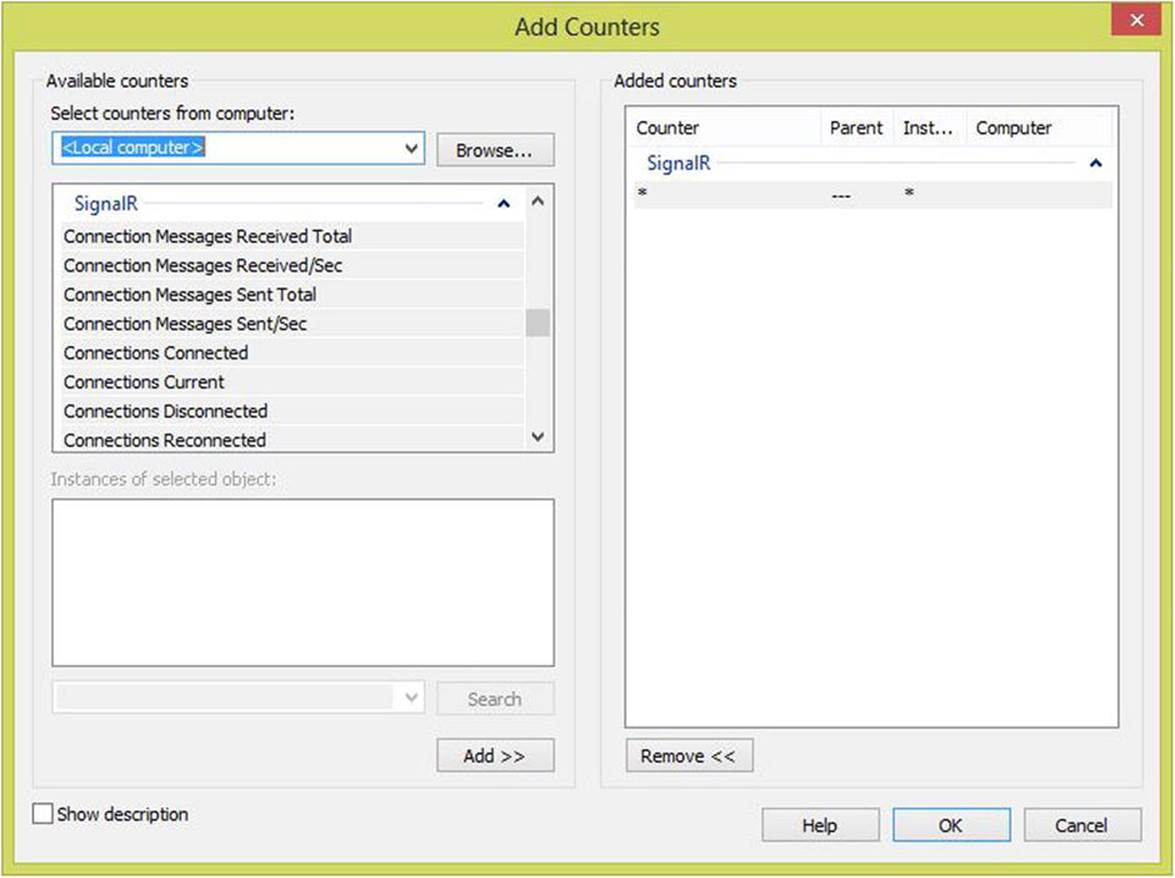
Figure 8-2. Adding SignalR performance counters
Figure 8-3 shows these performance counters working for a simple one-connection application.
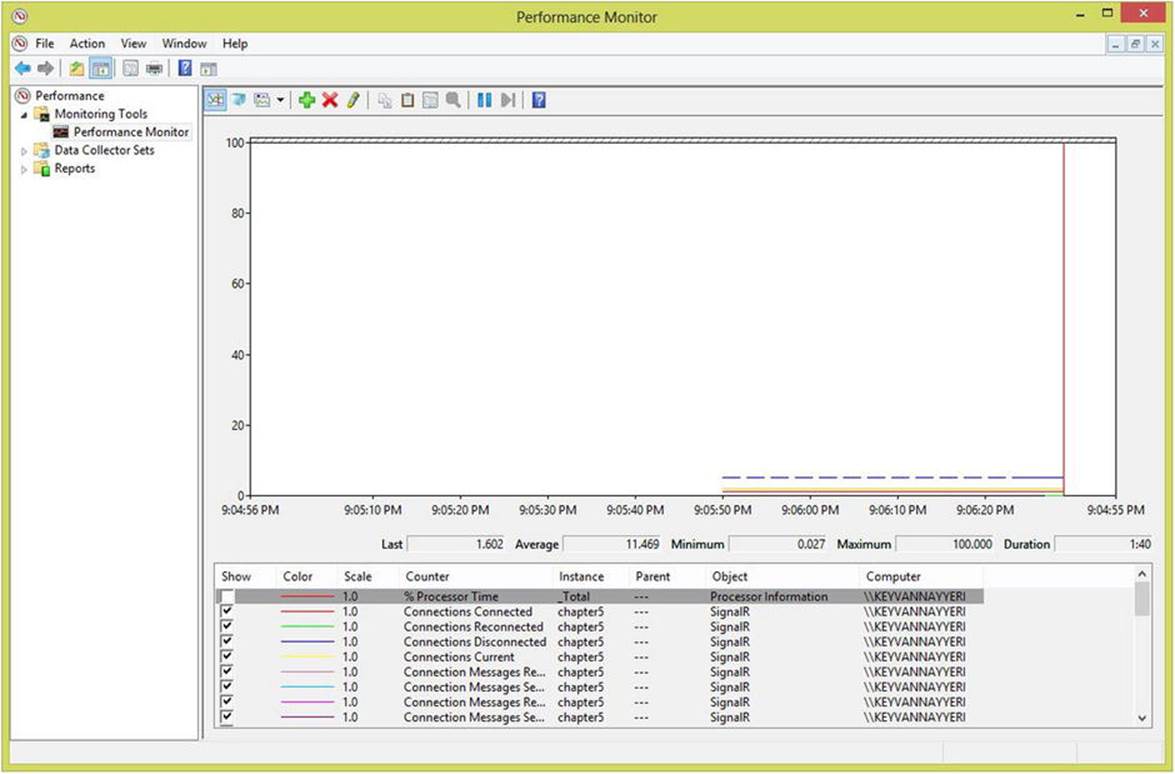
Figure 8-3. ASP.NET SignalR performance counters monitoring
OWIN and ASP.NET SignalR
When.NET Framework and ASP.NET were built—and even for almost a decade after that—IIS was an essential part of hosting any ASP.NET application, and there was a close relationship between IIS and ASP.NET. However, in the past few years, the community as well as Microsoft teams have come to the correct conclusion that this level of coupling between ASP.NET, IIS, and the hosting Windows operating system is not beneficial and can introduce limitations.
OWIN can resolve this issue by decoupling the associations between ASP.NET and IIS. OWIN is nothing but a standard defined for communicating between a .NET web application and a web server. This web application can be of any type and can be any server software (IIS or a custom web server on any platform).
Remember that OWIN is nothing but a set of standards; it is not software, components, or anything else. There are implementations of this standard available to developers, though. Microsoft has provided its own implementation for .NET web applications on IIS called Katana(http://katanaproject.codeplex.com). There is also an open-source, community-driven implementation called Nowin (https://github.com/Bobris/Nowin).
Microsoft has been transitioning from the traditional coupled structure in its web platforms with IIS toward OWIN, and ASP.NET SignalR was one of the very first projects that actually adopted this standard and supported OWIN out of the box.
So far in this book, we have been configuring our applications to set up and work and have not discussed how the settings work. Here is a good place to dig further into OWIN in ASP.NET SignalR and learn how to configure your application to work with the hosting environment.
As you remember from several examples in this book, you always have to go to the Startup class and implement a Configuration method similar to that shown in Listing 8-13, which is the implementation for the earlier examples in this chapter.
Listing 8-13. Common OWIN Setup for ASP.NET SignalR Applications
using Chapter8.PersistentConnections;
using Microsoft.Owin;
using Owin;
[assembly: OwinStartupAttribute(typeof(Chapter8.Startup))]
namespace Chapter8
{
public partial class Startup
{
public void Configuration(IAppBuilder app)
{
app.MapSignalR();
app.MapSignalR<BroadcastConnection>("/broadcast");
ConfigureAuth(app);
}
}
}
The IAppBuilder interface used in the method is in the Microsoft.Owin namespace, in which everything related to OWIN can be found. The IAppBuilder interface comes with a very handy set of methods needed to communicate between the ASP.NET application and the OWIN host (regardless of the implementation for an OWIN standard).
As you can easily guess, it is simple to introduce any hosting environment or platform for an ASP.NET application (hence an ASP.NET SignalR application).
Let’s develop a self-hosting environment for ASP.NET SignalR applications to showcase how easy it is to integrate OWIN. We need to implement a self-hosted web server as a Windows console application, so we create a new project for that.
First, we have to execute the NuGet command shown in Listing 8-14 to download the self-hosting components of ASP.NET SignalR in the project.
Listing 8-14. Installing Self-hosting ASP.NET SignalR Components
Install-Package Microsoft.AspNet.SignalR.SelfHost
Next, we need to install the Microsoft OWIN CORS libraries from NuGet that are responsible for CORS cross-domain communications between clients and a remote server (see Listing 8-15).
Listing 8-15. Installing CORS Components of Microsoft OWIN
Install-Package Microsoft.Owin.Cors
We are ready to implement the self-hosted server in the console application that we just created. Listing 8-16 shows the very simple implementation of the self-hosted server.
Listing 8-16. Self-hosted OWIN Server
using Microsoft.Owin.Hosting;
using System;
namespace SelfHosting
{
class Program
{
static void Main(string[] args)
{
string url = "http://localhost:9091";
using (WebApp.Start(url))
{
Console.WriteLine("Self-Hosted server running at {0}", url);
Console.ReadLine();
}
}
}
}
Now we can develop the Startup class for this server (see Listing 8-17).
Listing 8-17. Startup Class for Self-hosted Server
using Microsoft.Owin.Cors;
using Owin;
namespace SelfHosting
{
class Startup
{
public void Configuration(IAppBuilder app)
{
app.UseCors(CorsOptions.AllowAll);
app.MapSignalR();
}
}
}
This is a very familiar code. We use CorsOptions to allow cross-domain communication now that the server is hosted on a different domain.
Finally, we implement a very simple hub inside the console application, which is totally outside ASP.NET and IIS (see Listing 8-18).
Listing 8-18. A Simple Self-hosted Hub
using Microsoft.AspNet.SignalR;
namespace SelfHosting
{
public class BroadcastHub : Hub
{
public void Broadcast(string message)
{
Clients.All.broadcastMessage(message);
}
}
}
It is no surprise to see the same hub implementation as before appear in a self-hosted environment because all these implementations are totally independent from the hosting server. We have to worry only about the connections between the application with OWIN and then from OWIN to the server in which we are hosted.
The next step is nothing but a simple change into the client JavaScript code to use this new server in a cross-domain fashion by using the full server URL (see Listing 8-19).
Listing 8-19. Accessing SignalR across different domains
@{
ViewBag.Title = "Chapter 8 - Authentication and Authorization";
}
<h2>@ViewBag.Title</h2>
<h3>@ViewBag.Message</h3>
<script type="text/javascript" src="@Url.Content("/Scripts/jquery-1.10.2.js")"></script>
<script type="text/javascript" src="@Url.Content("/Scripts/jquery.signalR-2.0.3.min.js")"></script>
<script type="text/javascript" src="@Url.Content("http://localhost:9091/signalr/hubs")"></script>
<script type="text/javascript">
$(function () {
$.connection.hub.url = "http://localhost:9091/signalr";
var chat = $.connection.broadcastHub;
chat.client.BroadcastMessage = function (message) {
$('#messages').append('<li>' + message + '</li>');
};
$.connection.hub.start().done(function () {
$("#broadcast").click(function () {
chat.server.broadcast($('#msg').val());
});
});
});
</script>
<div>
<input type="text" id="msg" />
<input type="button" id="broadcast" value="broadcast" />
<ul id="messages"></ul>
</div>
Yes, it is as easy as that. Now we just need to run these two projects simultaneously to get things rolling.
Summary
This chapter discussed securing ASP.NET SignalR applications using authentication and authorization on hubs and persistent connections. We also discussed important topics pertaining to configuring, hosting, and deploying ASP.NET SignalR applications.
This chapter also discussed built-in performance counters for ASP.NET SignalR (for monitoring application performance) and OWIN in ASP.NET SignalR.