Excel 2016 All-in-One For Dummies (2016)
Book VIII
Macros and VBA
Chapter 2
VBA Programming
In This Chapter
![]() Getting familiar with Visual Basic for Applications and the Visual Basic Editor
Getting familiar with Visual Basic for Applications and the Visual Basic Editor
![]() Editing a macro in the Visual Basic Editor
Editing a macro in the Visual Basic Editor
![]() Creating a dialog box that prompts you for input for your macro
Creating a dialog box that prompts you for input for your macro
![]() Writing new macros in the Visual Basic Editor
Writing new macros in the Visual Basic Editor
![]() Using VBA to create user-defined functions
Using VBA to create user-defined functions
![]() Using your user-defined functions in your spreadsheets
Using your user-defined functions in your spreadsheets
![]() Saving user-defined functions as Excel add-ins
Saving user-defined functions as Excel add-ins
The subject of this chapter is Visual Basic for Applications (usually known simply as VBA), which is the official programming language of Excel, and how you can use it to edit the macros that you record (as described in Book VIII, Chapter 1) as well as to write new macros. The key to editing and writing macros in VBA is its editing program, the Visual Basic Editor (often abbreviated as VBE). The Visual Basic Editor offers a rich environment for coding and debugging VBA code with an interface that rivals Excel itself in terms of features and complexity.
VBA is a huge subject, well beyond the scope of this book. In this chapter, I simply introduce you to the Visual Basic Editor, and I explain how to use it to do basic macro editing. I also show you how to use the Visual Basic Editor to create custom Excel functions that you can then use when building formulas in your Excel spreadsheets. Custom functions (also known as user-defined functions or UDFs) work just like built-in functions except that they perform only the calculations that you define, by using just the arguments that you specify.
If this basic introduction to Visual Basic for Applications and using the Visual Basic Editor inspires you to go on and try your hand at real VBA project development in Excel, I recommend VBA For Dummies, 5th Edition by John Paul Mueller as an excellent next step. Their book gives you the lowdown on all the ins and outs of VBA programming in that old, familiar, down-home For Dummies style that you’ve come to know and love.
Using the Visual Basic Editor
The first question that you may have is where the heck did they stick this Visual Basic Editor that you’ve heard so much about? Actually, the Visual Basic Editor is always ready to step forward whenever you press Alt+F11 or click the Visual Basic command button on the Developer tab or press Alt+LV when this optional tab is displayed on the Ribbon.
 The Developer tab is not one of the permanent tabs on the Excel Ribbon. If your Ribbon doesn’t have a Developer tab, this just means that you haven’t yet added it to the Ribbon, something you definitely want to do when working with macros. To add the Developer tab, click the Developer check box in the Main Tabs list box on the Customize Ribbon tab of the Excel Options dialog box (Alt+FTC) to select it.
Figure 2-1 shows the arrangement of the typical components in the Visual Basic Editor after you first open its window and open a new module sheet. As you can see, this window contains its own menu bar (with a few more menus than the regular Excel window uses). Beneath the menu bar, you find a Visual Basic Editor Standard toolbar. This toolbar, shown in Figure 2-2, contains a number of buttons that you may use when creating and editing VBA code.
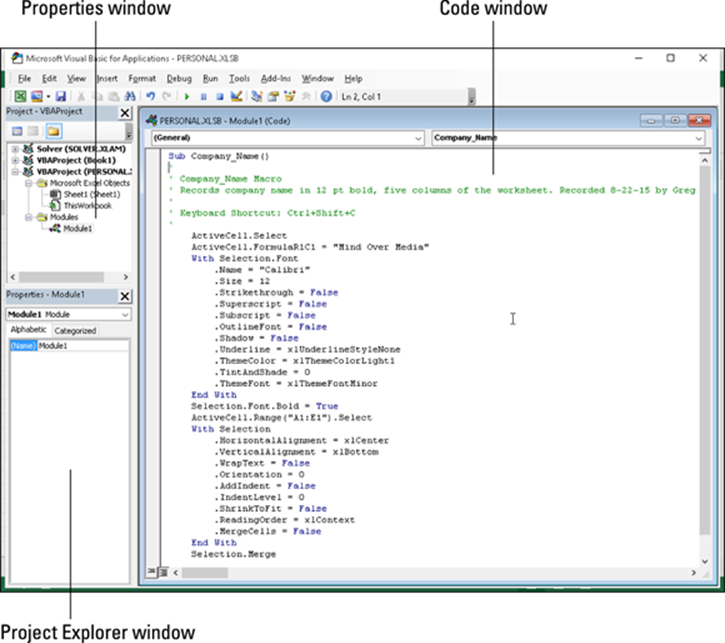
Figure 2-1: The Visual Basic Editor window as it normally appears when editing a macro.

Figure 2-2: The buttons on the Visual Basic Editor’s Standard toolbar.
Beneath the Standard toolbar in the Visual Basic Editor, you find a number of tiled windows of various sizes and shapes. Keep in mind that these are the default windows. They aren’t the only windows that you can have open in the Visual Basic Editor (as though it weren’t crowded and confusing enough), nor is this the only way that they can be arranged.
The two most important windows (at least, when you’re first starting out using the Visual Basic Editor) are the Project Explorer window and the Code window. The Project Explorer window, which is located to the immediate left of the Code window (refer to Figure 2-1), shows you all the projects that you have open in the Visual Basic Editor and enables you to easily navigate their various parts. Note that in VBA, a project consists of all the code and user forms that belong to a particular workbook along with the sheets of the workbook itself.
The macros that you record in the workbook, as well as any that you write for it in the Visual Basic Editor, are recorded on module sheets to which generic names are assigned, such as Module1, Module2, and so forth. The actual lines of VBA programming code for the macro that are stored on a particular module sheet appear in the Code window when you select its module in the Project Explorer window. (The Code window appears to the immediate right of the Project Explorer window.)
To open a module in the Code window, double-click its module icon in the Project Explorer or right-click the module icon and then choose View Code at the top of its shortcut menu.
 If you want to rename a module in your VBA project to something a little more descriptive than Module1, Module2, and so on, you can do this in the Properties window that appears immediately below the Project Explorer. Simply click and drag through the name (such as Module1 or Module2) that appears after the label (Name) on the Alphabetic tab in the Properties window and replace it with a more descriptive name before you press Enter. When renaming a module, remember that you must use the same naming guidelines as when naming a range name in a worksheet: Begin the module name with a letter of the alphabet and don’t put any spaces between words. (Use underlines instead.)
Editing recorded macros
After you’ve created a macro, you don’t necessarily have to re-record it to change the way it behaves. In many cases, you will find it more expedient to change its behavior by simply editing its contents in the Visual Basic Editor. Note that if the macro you want to edit is stored in your Personal Macro Workbook (that personal.xlsb file in the XLSTART folder — see Book VIII, Chapter 1 for details), you must unhide this workbook before you edit it in the Visual Basic Editor.
To unhide the Personal Macro Workbook, follow these steps:
1. Click the Unhide command button on the Ribbon’s View tab or press Alt+WU.
Excel opens the Unhide dialog box showing the workbook, PERSONAL.XLSB, in its Unhide Workbook list box.
2. Click PERSONAL.XLSB in the Unhide Workbook list box and then press Enter.
This action makes the Personal Macro Workbook visible and activates it so that you can now edit its macros in the Visual Basic Editor.
To open a macro for editing in the Visual Basic Editor, follow these steps:
1. Click the View Macros option on the Macros command button on the View tab or press Alt+WMV or Alt+F8.
This action opens the Macro dialog box showing all the names of the macros that you’ve defined in the workbook and in your Personal Macro Workbook.
2. Click the name of the macro that you want to edit in the Macro Name list box and then click the Edit button.
This action opens the Visual Basic Editor with the code for your macro displayed in the Code window unless you select the name of a macro saved in the Personal Macro Workbook and this workbook is still hidden. In that case, Excel displays an Alert dialog box telling you that you can’t edit a hidden macro and informing you that you need to unhide this workbook. You then need to click OK in the Alert dialog box, press Escape to close the Macro dialog box, and then follow the steps for unhiding the Personal Macro Workbook immediately preceding these steps before you repeat these first two macro editing steps.
After you have the lines of code for the macro displayed in the Code window in the Visual Basic Editor, you can edit any of its statements as needed. If you want to obtain a printout of the lines of code in your macro before you begin making changes, choose File ⇒ Print on the Visual Basic Editor menu bar or press Ctrl+P. This action opens a Print - VBAProject dialog box with the Current Module option button selected in the Range section and the Code check box selected in the Print What section so that you can go ahead and click OK to have Excel print all the statements in the macro.
When editing the macro’s commands, remember that you can use the Edit ⇒ Undo (Ctrl+Z) command to undo any deletion that you make by mistake.
3. Edit the statements in the Code window of the Visual Basic Editor as needed.
After you finish editing the macro, you’re ready to return to your spreadsheet, where you can test out the modified macro and make sure that you haven’t added some wacky, unwanted command to the macro or, even worse, crippled it so that it no longer runs at all.
4. Click the View Microsoft Excel button at the beginning of the Standard toolbar or click the workbook’s minimized button on the Windows taskbar.
Select an appropriate or safe place in which to test your modified macro and then run it, either by pressing its shortcut keys or by pressing Alt+F8, clicking it in the Macro list box, and then clicking the Run button.
If something doesn’t work as intended or if the macro doesn’t work at all, you need to return to the Visual Basic Editor and find and correct your error(s). Click the Visual Basic command button on the Developer tab of the Ribbon (Alt+LV) to return to the Visual Basic Editor and have a try at editing the code one more time.
If everything checks out and runs as planned, you need to save your changes as outlined in Step 5.
5. Click the Save button on the Quick Access toolbar to save the changes to the modified macro if it’s stored as part of the current workbook.
If you modified a global macro saved as part of the Personal Macro Workbook, you have to exit Excel in order to save your changes to the macro. When you click the Excel program window’s Close button or press Alt+FX or Alt+F4, Excel displays an alert dialog box asking whether you want to save the changes you made to the personal.xlsb file. Click the Yes button to save your macro modifications as you close down Excel.
Keep in mind that Excel automatically hides the Personal Macro Workbook when you exit Excel if you don’t click the Hide command button on the View tab or press Alt+WH when the PERSONAL.XLSB workbook is active sometime before exiting the program. This means that you must remember to click the Unhide command button on the View tab (Alt+WU) and select this personal macro workbook in the Unhide dialog box to make it visible before the next time you launch Excel and need to edit any of its macros during any subsequent editing session.
Finding and replacing code in the macro
You can use the Find feature in the Visual Basic Editor to quickly locate the statements or properties that need editing in your macro. You open the Find dialog box, shown in Figure 2-3, by choosing Edit ⇒ Find on the menu bar, clicking the Find button on the Standard toolbar, or by pressing Ctrl+F. This dialog box is very similar to the one you use when finding entries in your Excel spreadsheet. The main difference is that the Find dialog box gives you different choices for what to search for (in addition to the familiar options for finding whole words only and matching case):
· Current Procedure option button to search only the current programming procedure in the Code window
· Current Module option button to search only the macros in the current module (the default)
· Current Project option button to search all the macros in all modules within the current project
· Selected Text option button to search only the text that you’ve selected in the Code window (this option is not available unless you’ve selected a block of text in the current code)
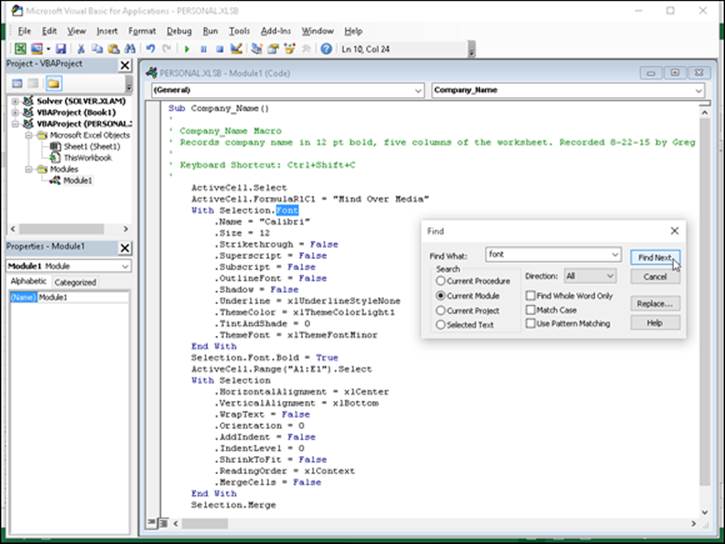
Figure 2-3: Using the Find feature to locate the code to edit in the Code window.
After you enter the Visual Basic property or statement as your search string in the Find What text box, select the search options, and click the Find Next button, Excel attempts to locate its first occurrence in the code. When it does, the program highlights that occurrence in the current procedure, module, VBA project, or selected text block (depending on which Search option you use). To find the next occurrence, you can click the Find Next button in the Find dialog box again or, if you close this dialog box, press F3.
If you have a number of occurrences throughout the macro that require the same type of updating, you can use the Replace feature to both find and replace them in the macro code. This is particularly useful when you decide to change a particular value throughout a macro (such as selecting the cell range named “income_08” for processing instead of the range “income_07”), and you want to make sure that you don’t miss any occurrences.
To open the Replace dialog box, choose Edit ⇒ Replace on the Visual Basic Editor menu bar or press Ctrl+H. Note that you can open the Replace dialog box from within the Find dialog box by clicking its Replace button.
The Replace dialog box that appears is just like the Find dialog box, except that it contains a Replace With text box along with the Find What text box and has Replace and Replace All buttons in addition to the Find Next button. After entering the property or statement to find in the Find What text box and the one to replace it with in the Replace With text box, click the Find Next button to locate the first occurrence in the current procedure, module, VBA project, or selected text block (depending on which Search option you use). After this occurrence is selected in the Code window, you have it replaced with the replacement text by clicking the Replace button. Excel then locates the next occurrence, which you can then replace by clicking the Replace button or pass over to find the next occurrence by clicking the Find Next button.
 Don’t use the Replace All button to replace all the occurrences in your macro unless you’re 100 percent sure that you won’t be globally replacing something that shouldn’t be replaced and possibly screwing up your macro big time. I once typed “selection.font.bold = ture” into the Replace With text box when I intended to enter “selection.font.bold = true” as the replacement text when searching for the property “Selection.Font.Bold = False” in the macro. I then clicked the Replace All button only to discover to my dismay that I introduced this error throughout the code! Of course, I then had to turn around and use the Replace feature to find all the instances of “selection.font.bold = ture” and replace them with “Selection.Font.Bold = true”.
Changing settings for VBA properties
Even when you don’t know anything about programming in VBA (and even if you aim to keep it that way), you can still get the gist of some of the more obvious properties in a macro that change certain settings, such as number format or font attribute, by experimenting with assigning them new values.
In the Company_Name macro shown previously in Figure 2-3, for example, you can tell that the section of VBA commands between the line
With Selection.Font
and the line
End With
contains the procedure for assigning various font attributes for the current cell selection.
Going a step further, you probably can figure out that most of these attributes are being reset by making the attribute equal to a new entry or value, such as
.Name = "Calibri"
or
.Size = 14
or an attribute is being reset by turning it on or off by setting it equal to True or False, such as
Selection.Font.Bold = True
to make the text in the current cell selection bold.
Now, it doesn’t require a programming degree (at least, not the last time I checked) to get the bright idea that you can make your macro behave differently just by — carefully — editing these settings. For example, suppose that you want the final font size to be 24 points instead of 14. All you have to do is change
.Size = 14
to
.Size = 24
Likewise, you can have the macro apply single underlining to the cell selection by changing
.Underline = xlUnderlineStyleNone
to
.Underline = xlUnderlineStyleSingle
Getting macro input by adding a dialog box
One of the biggest problems with recording macros is that any text or values that you have the macro enter for you in a worksheet or chart sheet can never vary thereafter. If you create a macro that enters the heading “Bob’s Barbecue Pit” in the current cell of your worksheet, this is the only heading you’ll ever get out of that macro. However, you can get around this inflexibility by using the InputBox function. When you run the macro, this Visual Basic function causes Excel to display an Input dialog box where you can enter whatever title makes sense for the new worksheet. The macro then puts that text into the current cell and formats this text, if that’s what you’ve trained your macro to do next.
To see how easy it is to use the InputBox function to add interactivity to an otherwise staid macro, follow the steps for converting the Company_Name macro that currently inputs the text “Mind Over Media” to one that actually prompts you for the name that you want entered. The InputBox function uses the following syntax:
InputBox(prompt[,title][,default][,xpos][,ypos][,helpfile,context])
In this function, only the prompt argument is required with the rest of the arguments being optional. The prompt argument specifies the message that appears inside the Input dialog box, prompting the user to enter a new value (or in this case, a new company name). The prompt argument can be up to a maximum of 1,024 characters. If you want the prompt message to appear on different lines inside the dialog box, you enter the functions Chr(13) and Chr(10) in the text (to insert a carriage return and a linefeed in the message, respectively).
The optional title argument specifies what text to display in the title bar of the Input dialog box. If you don’t specify a title argument, Excel displays the name of the application on the title bar. The optional default argument specifies the default response that automatically appears in the text box at the bottom of the Input dialog box. If you don’t specify a default argument, the text box is empty in the Input dialog box.
The xpos and ypos optional arguments specify the horizontal distance from the left edge of the screen to the left edge of the dialog box and the vertical distance from the top edge of the screen to the top edge of the dialog box. If you don’t specify these arguments, Excel centers the input dialog box horizontally and positions it approximately one-third of the way down the screen vertically.
The helpfile and context optional arguments specify the name of the custom Help file that you make available to the user to explain the workings of the Input dialog box as well as the type of data that it accepts. As part of the process of creating a custom help file for use in the Excel Help system, you assign the topic a context number appropriate to its content, which is then specified as the context argument for the InputBox function. When you specify a help file and context argument for this function, Excel adds a Help button to the custom Input dialog box that users can click to access the custom help file in the Help window.
Before you can add the line of code to the macro with the InputBox function, you need to find the place in the Visual Basic commands where the line should go. To enter the Mind Over Media text into the active cell, the Company_Name macro uses the following Visual Basic command on Line 9:
ActiveCell.FormulaR1C1 = "Mind Over Media"
To add interactivity to the macro, you need to insert the InputBox function on a line in the Code window right above this ActiveCell.FormulaR1C1 statement, as follows:
1. Position the insertion point in the Code window at the beginning of the ActiveCell.FormulaR1C1 statement and press Enter to insert a new line.
Now that you’ve added a new line, you need to move the insertion point up to it.
2. Press the ↑ key to position the insertion point at the beginning of the new line.
On this line, you want to create a variable that supplies the prompt argument to the InputBox function. To do this, you state the name of the variable (InputMsg in this case) followed by its current entry. Be sure to enclose the message text on the right side of the equal sign in a closed pair of double quotation marks.
3. Type the following code to create the InputMsg variable on line 9 and then press the Enter key to start a new line 10:
InputMsg = "Enter the company name or title for this worksheet in the text box below and then click OK:"
Next, you create a variable named InputTitle that supplies the optional title argument for the InputBox function. This variable makes the text “Spreadsheet Title” appear as the title of the Input dialog box. Again, be sure to enclose the name for the dialog box title bar in quotation marks.
4. Type the following code to create the InputTitle variable on line 10 and then press Enter to insert a new line 11:
InputTitle = "Spreadsheet Title"
Next, you create a variable name DefaultText that supplied the optional default argument to the InputBox function. This variable makes the text, “Mind Over Media,” appear as the default entry on the text box at the bottom of the custom Company Name Input dialog box.
5. Type the following code to create the DefaultText variable on line 11 and then press Enter to insert a new line 12:
DefaultText = "Mind Over Media"
Next, you create a final variable named CompanyName that specifies the InputBox function as its entry (using the InputMsg, InputTitle, and DefaultText variables that you just created) and stores the results of this function.
6. Type the following code to create the SpreadsheetTitle variable that uses the InputBox function on line 1:
SpreadsheetTitle = InputBox(InputMsg, InputTitle, DefaultText)
Finally, you replace the value, “Mind Over Media”, in the ActiveCell.FormulaR1C1 property with the SpreadsheetTitle variable (whose value is determined by whatever is input into the Spreadsheet Title Input dialog box), thus effectively replacing this constant in the macro with the means for making this input truly interactive.
7. Select “Mind Over Media” on line 1 and replace it with SpreadsheetTitle (with no quotation marks).
8. Save the edited macro by clicking the Save button on the Visual Basic toolbar and then return to the worksheet by clicking the View Microsoft Excel button or pressing Alt+F11. Then, click the Hide button in the Window group of the VIEW tab.
Now, you’re ready to open a new workbook and run the edited macro by pressing Ctrl+N.
Figure 2-4 shows the Code window with the edited Company_Name macro after adding the statements that make it interactive. Figure 2-5 shows the Spreadsheet Title dialog box in action in the worksheet. This input dialog box now automatically appears and prompts you for input whenever you run the edited and now fully interactive version of the Company_Name macro.
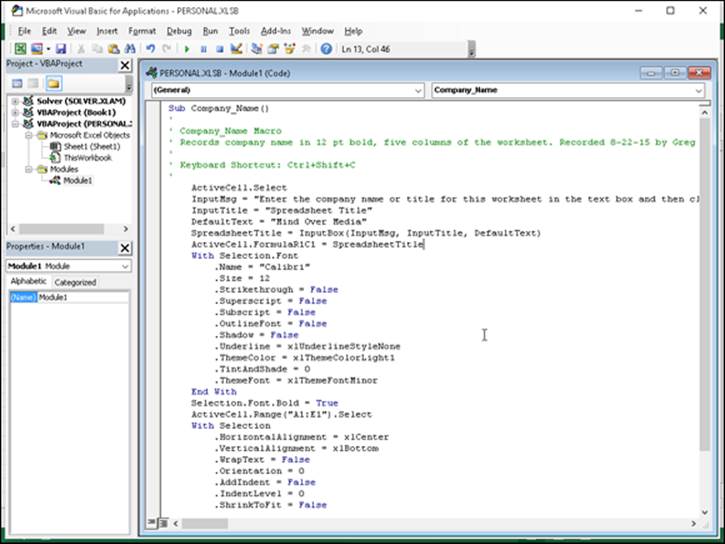
Figure 2-4: The Company_Name Code window after adding variables and the InputBox function.
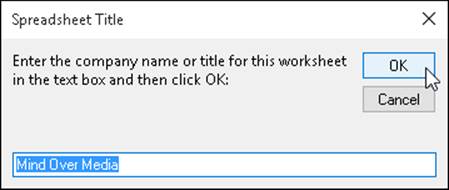
Figure 2-5: The Spreadsheet Title dialog box that appears when you run the Company_Name macro.
To go ahead and enter Mind Over Media into the current cell and then format it by using the rest of the macro commands, you just click OK in this custom dialog box. To enter and format the name of another company, you simply type the name of the company (which automatically replaces Mind Over Media in the text box) before you click OK.
 Why not simply type in the arguments of the InputBox function?
The biggest reason for using the variables InputMsg, InputTitle, and DefaultText to supply the prompt, title, and default arguments of the InputBox function — rather than just typing them into the function — is their length. If you typed in all three pieces of text within the parentheses of the InputBox function, you would end up with one of the longest (and hardest to read) lines of code in history. When you use variables to do the job, as in the example shown previously, you end up with lines of code that fit on one screen, thus making the lines of code easier to read and also making it possible to print them on a normal piece of paper. If you use the variables on other procedures in the macro, declaring them all together at the beginning of the code also makes it easy to update their values.
Writing new macros in the Visual Basic Editor
After you have the skill in the VBA language, you can write new macros from scratch in the Visual Basic Editor instead of just editing ones that you’ve previously recorded in your spreadsheet by using Excel’s macro recorder. When creating a macro from scratch in the Visual Basic Editor, you need to follow these general steps:
1. Click the name of the VBA project in the Project Explorer window where you want to add the new macro.
If you want to write a macro just for the current workbook, click the VBAProject function that contains its filename in parentheses, as in VBAProject (My Spreadsheet). If you want to write a global macro in the Personal Macro Workbook, click VBAProject (PERSONAL.XLSB) in the Project Explorer window.
2. Choose Insert ⇒ Module on the Visual Basic Editor menu bar.
Excel responds by opening a new, blank Code window in the Visual Basic Editor window and by adding another Module icon (named with the next available number) in the outline in the Project Explorer window under the appropriate VBA Project.
Next, you begin your macro by creating a subroutine (all macros, even the ones you record in the spreadsheet, are really Visual Basic subroutines). To do this, you just type sub (for subroutine).
3. Type sub and then press the spacebar.
Now, you need to name your new macro, which you do by naming your subroutine. Remember that in naming your new macro (or a subroutine), you follow the same rules as when naming a range name (begin with a letter and no spaces).
4. Type the name of your macro and then press the Enter key.
As soon as you press the Enter key, the Visual Basic Editor inserts a closed pair of parentheses after the macro’s name, a blank line, and an End Sub statement on its own line below that. It then positions the insertion point at the beginning of the blank line between the lines with the Sub and End Sub statements. It’s here that you enter the lines of code for the macro that you’re writing.
5. Enter the lines of VBA code for the macro in between the Sub and End Sub statements.
Before you begin writing the VBA statements that your macro is to execute, you should first document the purpose and functioning of this macro. To do this, type an apostrophe (’) at the beginning of each line of this text to enter it as a comment. (Excel knows not to try to execute any line of code that’s prefaced with an apostrophe.) When you press the Enter key to start a new line that begins with an apostrophe, the line of text turns green, indicating that the Visual Basic Editor considers it to be a comment that’s not to be executed when the macro runs.
After you document the purpose of the macro with your comments, you begin entering the statements that you want the macro to execute (which must not be prefaced by apostrophes). To indent lines of code to make them easier to read, press Tab. If you need to outdent the line, press Shift+Tab. For help on writing VBA code, refer to the VBA online help. When you finish writing the code for your macro, you need to save it before you test it.
6. Choose File ⇒ Save on the Visual Basic Editor menu bar or press Ctrl+S.
After you save your new macro, you can click the View Microsoft Excel button on the Standard toolbar to return to your worksheet where you can try it. To run the new macro that you’ve written, choose View ⇒ Macros on the Ribbon or press Alt+F8 to open the Macro dialog box and then click the name of the macro that you just wrote before you click OK.
If Excel encounters an error when running the macro, it returns you to the Visual Basic Editor, and an Alert Microsoft Visual Basic dialog box appears, indicating (in very cryptic form) the nature of the error. Click the Debug button in this dialog box to have the Visual Basic Editor highlight the line of code that it can’t execute. You can then attempt to find the mistake and edit it in the line of code. If you do eliminate the cause of the error, the Visual Basic Editor removes the highlighting from that line of code, and you can then click the Continue button (which automatically replaces the Run button when the Editor goes into debug mode) with the blue triangle pointing to the right on the Standard toolbar to continue running the macro.
Creating Custom Excel Functions
One of the best uses of VBA in Excel is to create custom spreadsheet functions also known as user-defined functions (UDFs for short). User-defined functions are great because you don’t have to access the Macro dialog box to run them. In fact, you enter them into your spreadsheets just like you do any of the other built-in spreadsheet functions, either with the Insert Function button on the Formula bar or by typing them directly into a cell.
To create a user-defined function, you must do four little things:
· Create a new module sheet where the custom function is to be defined in the Visual Basic Editor by selecting its project in the Project Explorer window and then choosing Insert ⇒ Module on the Visual Basic Editor menu bar.
· Enter the name of the custom function and specify the names of the arguments that this function takes on in the first line in the Code window — note that you can’t duplicate any built-in function names, such as SUM or AVERAGE functions, and so on, and you must list argument names in the order in which they are processed and enclosed in parentheses.
· Enter the formula, or set of formulas, that tells Excel how to calculate the custom function’s result by using the argument names listed in the Function command with whatever arithmetic operators or built-in functions are required to get the calculation made on the line or lines below.
· Indicate that you’ve finished defining the user-defined function by entering the End Function command on the last line.
To see how this procedure works in action, consider this scenario: Suppose that you want to create a custom function that calculates the sales commissions for your salespeople based on the number of sales they make in a month as well as the total amount of their monthly sales. (They sell big-ticket items, such as RVs.) Your custom Commission function will then have two arguments — TotalSales and ItemsSold — so that the first line of code on the module sheet in the Code window is
Function Commission(TotalSales,ItemsSold)
In determining how the commissions are actually calculated, suppose that you base the commission percentage on the number of sales made during the month. For five sales or fewer in a month, you pay a commission rate of 4.5 percent of the salesperson’s total monthly sales; for sales of six or more, you pay a commission rate of 5 percent.
To define the formula section of the Commission custom function, you need to set up an IF construction. This IF construction is similar to the IF function that you enter into a worksheet cell except that you use different lines in the macro code for the construction in the custom function. An ELSE command separates the command that is performed if the expression is True from the command that is performed if the expression is False. The macro code is terminated by an END IF command. To set the custom function so that your salespeople get 4.5 percent of total sales for five or fewer items sold and 5 percent of total sales for more than five items sold, you enter the following lines of code underneath the line with the Function command:
If ItemsSold <= 5 Then
Commission = TotalSales * 0.045
Else
Commission = TotalSales * 0.05
End If
Figure 2-6 shows you how the code for this user-defined function appears in the Code window for its module sheets. The indents for the IF…END IF statements are made with the Tab key and make differentiating the parts of the IF construction easy. The first formula, Commission = TotalSales * 0.045 is used when the IF expression ItemsSold <= 5 is found to be True. Otherwise, the second formula underneath the Else command, Commission = TotalSales * 0.05 is used.
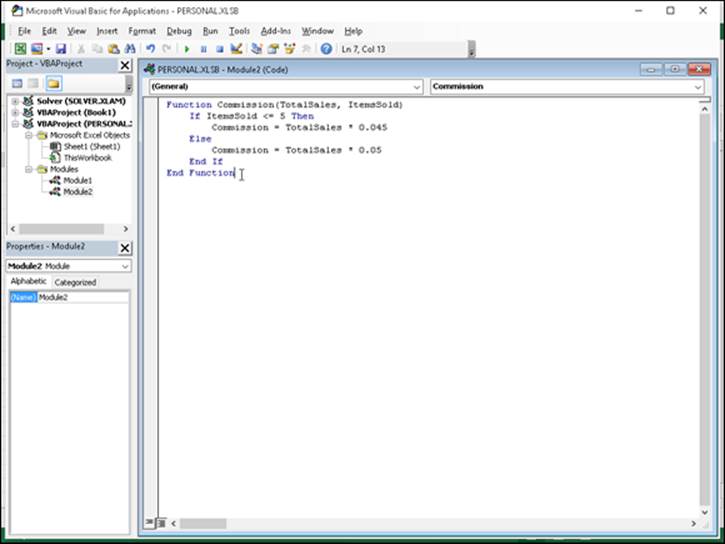
Figure 2-6: Entering the Commission user-defined function in the Personal Macro Workbook.
After entering the definition for your user-defined function, you are ready to save it by choosing File ⇒ Save on the Visual Basic Editor menu bar or by pressing Ctrl+S. Then, you can click the View Microsoft Excel button on the Standard toolbar to return to the worksheet where you can try out your new custom function.
 If you want to be able to use your user-defined function in any spreadsheet you create, be sure that you select VBAProject (personal.xlsb) in the Project Explorer window before you open a new module and define the custom function there.
Adding a description to a user-defined function
To help your user understand the purpose of your custom functions, you can add descriptions that appear in Insert Function and Function Arguments dialog boxes that help explain what the function does. To add this kind of description to your user-defined function, you use the Object Browser, a special window in the Visual Basic Editor that enables you to get information about particular objects available to the project that you have open.
To add a description for your user-defined function, follow these steps:
1. Open the Visual Basic Editor from Excel by clicking the Visual Basic button on the Developer tab of the Ribbon or pressing Alt+LV or Alt+F11.
Now, you need to open the Object Browser.
2. Choose View ⇒ Object Browser from the Visual Basic Editor menu bar or press F2.
This action opens the Object Browser window, which obscures the Code window.
3. Click the drop-down list box that currently contains the value <All Libraries> and then select VBAProject from the drop-down list.
When you select VBAProject from this drop-down list, the Object Browser then displays your user-defined function as one of the objects in one of the Classes in the pane on the left.
4. Right-click the name of your user-defined function.
This action selects the function and displays it in the Members pane on the right, while at the same time displaying the object’s shortcut menu.
5. Click Properties on the shortcut menu.
This action opens the Member Options dialog box for your user-defined function, where you can enter your description of this function, as shown in Figure 2-7.
6. Type the text that you want to appear in the Insert Function and Function Arguments dialog box for the user-defined function in the Description text box and then click OK.
Now, you can close the Object Browser and save your changes.
7. Click the Close Window button to close the Object Browser and then choose the File ⇒ Save command.
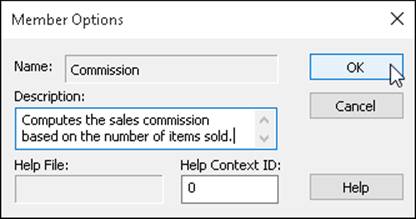
Figure 2-7: Adding a description for the Commission user-defined function.
Using a custom function in your spreadsheet
The great thing about custom functions is that they can be inserted into your worksheets with the Insert Function button on the Formula bar. Figures 2-8 through 2-10 illustrate how easy it is to enter the custom Commission function in a worksheet with this button.
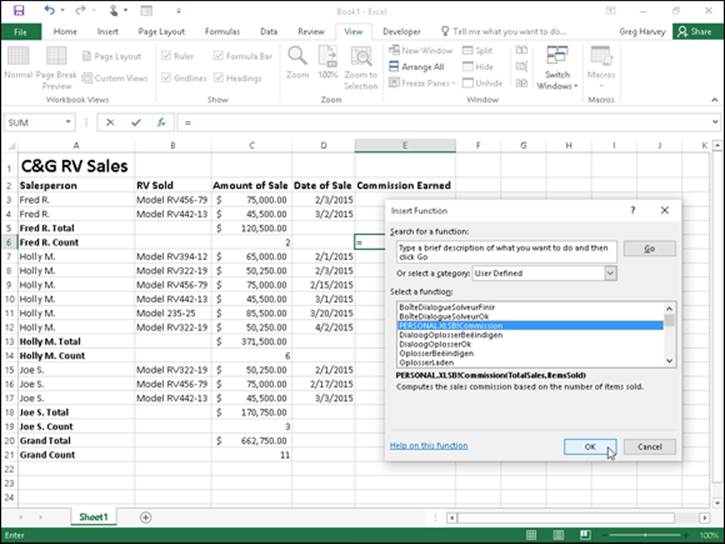
Figure 2-8: Selecting a cell in the RV Sales spreadsheet into which to enter the Commission function.
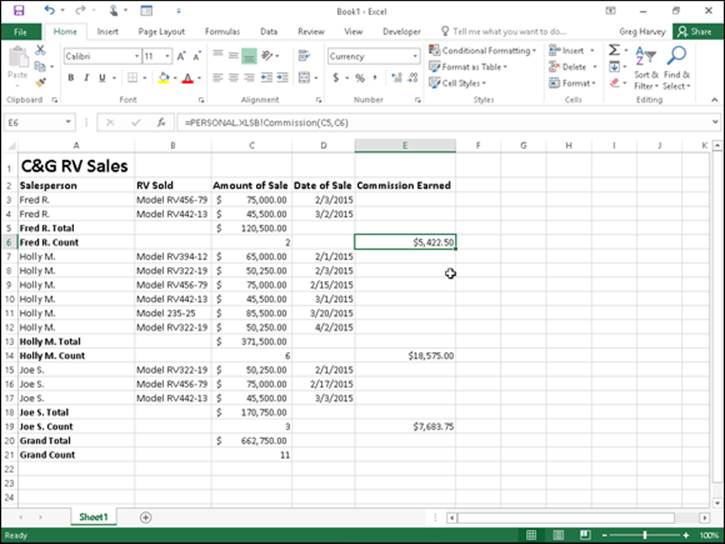
Figure 2-9: Specifying the TotalSales and ItemsSold arguments in the RV Sales spreadsheet.
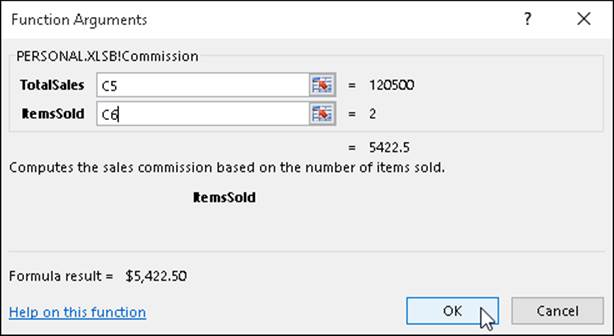
Figure 2-10: Completed spreadsheet for all salespeople computed with the Commissions function.
Figure 2-8 shows a worksheet that contains a table with the April 2015 RV sales for three salespeople: Fred, Holly, and Jack. As you can see, the Automatic Subtotals feature (covered in Book VI, Chapter 1) has been used to compute both the monthly total sales (with the SUM function) and the number of sales (with the COUNT function) for each of these three salespeople.
To calculate the April monthly commissions for each salesperson in this table, you select the cell where you want the first commission to be calculated (Fred’s commission in cell E5). Click the Insert Function button on the Formula bar and then click User Defined at the very bottom of the Or Select a Category drop-down list. Doing this displays the PERSONAL.XLSB!Commission custom function in the Select a Function list box.
When you click OK after selecting the PERSONAL.XLSB!Commission function in the Insert Function dialog box, the Function Arguments dialog box appears, shown in Figure 2-9. Here, you select cell C4 with Fred’s total sales amount for April as the TotalSales argument and cell C5 with the number of sales made in that month as the ItemsSold argument.
When you click OK in the Function Arguments dialog box, Excel calculates Fred’s commission by using the 4.5 percent commission rate because his two sales made in April are well below the five sales necessary to bump him up to the 5 percent commission rate used by the custom Commission function. Figure 2-10 shows the completed April sales table after calculating the monthly commissions for Fred, Holly, and Jack. In using the custom Commission function, both Fred and Holly fall into the 4.5 percent commission rate. Only Jack, the April RV sales king, gets paid the higher 5 percent commission rate for his six sales during this month.
Saving custom functions in add-in files
The only limitation to the user-defined functions that you save as part of a regular workbook file or the Personal Macro Workbook file is that when you enter them directly into a cell (without the use of the Insert Function dialog box), you must preface their function names with their filenames. For example, if you want to type in the custom Commission function that’s saved in the Personal Macro Workbook, you enter the following formula:
=Commission(C9,C10)
Assuming that cell C9 contains the total sales and cell C10 contains the number of items sold, Excel returns the #NAME? error value to the cell. If you then edit the function to include the Personal Macro Workbook’s filename as follows
=PERSONAL.XLSB!Commission(C9,C10)
Excel calculates the sales commission based on the TotalSales in C9 and the ItemsSold in C10, returning this calculated value to the cell containing this user-defined function.
To be able to omit the filename from the custom functions that you create when you enter them directly into a cell, you need to save the workbook file that contains them as a special add-in file. (For details on using add-ins in Excel, see Book I, Chapter 2.) Then, after you’ve saved the workbook with your user-defined functions as an add-in file, you can start entering them into any worksheet sans their filename qualifier by activating the add-in in the Add-Ins dialog box. (Press Alt+FTAA and then click the Go command button when Excel Add-Ins is displayed on the Manage drop-down list button.)
To convert a workbook containing the user-defined functions that you want to be able to enter into worksheets without their filenames, follow these steps:
1. Unhide the PERSONAL workbook in which you’ve saved your user-defined functions in Excel by clicking the Unhide button on the View tab and then selecting PERSONAL followed by OK.
2. Press Alt+F11 or click the Visual Basic command button on the Developer tab or press Alt+LV.
This action opens the Visual Basic Editor window with the workbook file containing the user-defined functions selected in the Project Explorer window. Now you want to set up protection for this workbook so that no one but you can modify its contents.
3. Choose Tools ⇒ VBAProject Properties from the Visual Basic Editor’s menu bar.
This action opens the VBAProject — Project Properties dialog box with a General and a Protection tab, shown in Figure 2-11.
4. Click the Protection tab and then select the Lock Project for Viewing check box.
Putting a check mark in this check box prevents other users from viewing the custom functions so that they can’t make any changes to them. Next, you add a password that prevents them from removing the view protection status.
5. Click the Password text box, enter the password there, and then click the Confirm Password text box and re-enter the password exactly as you entered it in the text box above before you click OK.
Now you’re ready to return to the worksheet where you need to add a title and description for the new add-in file.
6. Click the View Microsoft Excel button at the beginning of the Standard toolbar.
This action returns you to the worksheet in Excel. Before saving the workbook as an add-in, you should add a title for the user-defined functions that it contains. (This information then appears in the Add-Ins dialog box whenever you select the add-in file.)
7. Choose File ⇒ Info.
Excel 2016 displays the Info screen about the workbook in the Backstage view. Here you enter a brief name for the add-in in the Title field and a longer description of its custom functions.
8. Click the Title text box and enter a descriptive title for the add-in, and then click the Save As option on the menu in the Backstage view.
This action opens the Save As screen where the XLSTART folder is currently selected.
9. Click XSTART under Current Folder in the right-hand panel.
Excel opens the Save As dialog box, where you need to change the file type to Excel Add-In (*.xlam) and then specify the filename (to which Excel automatically appends the .xlam filename extension) under which to save it.
10. Click the Save as Type pop-up button and then select Excel Add-In (*.xlam) as the type.
11. Click the File Name combo box and make any necessary changes to the filename (without changing the .xlam filename extension) before you click the Save button.
After saving your workbook as an add-in file, you’re ready to activate the add-in so that you can enter its user-defined functions in any worksheet.
12. Choose File ⇒ Options ⇒ Add-Ins or press Alt+FTAA.
13. Click the Go button near the bottom of the Add-Ins tab after checking to make sure that Excel Add-Ins is displayed on the Manage drop-down list button.
This action opens the Add-Ins dialog box showing the names of all the available add-ins. You must now add the name of your new add-in to this list.
14. Click the name of your new add-in file in the Browse list box and then click OK.
This action closes the Browse dialog box and returns you to the Add-Ins dialog box that now lists your new add-in file. Now all you have to do is make sure that the check box in front of the name of the new add-in (which displays the title and description you gave the add-in at the bottom of the Add-Ins dialog box) is selected before you click OK. (See Figure 2-12.)
15. Select the check box in front of the name of the new add-in and then click OK.
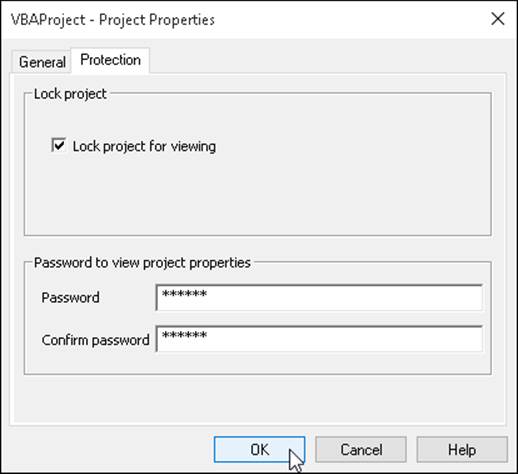
Figure 2-11: Protecting the VBA project so that its user-defined functions can’t be changed.
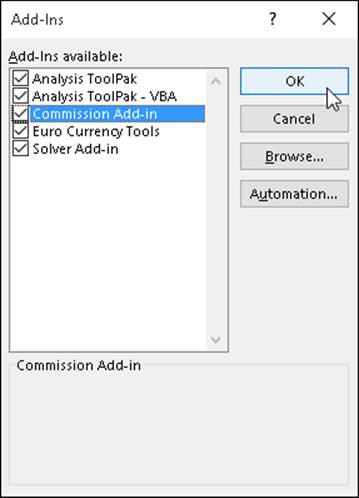
Figure 2-12: Activating the new add-in file in the Add-Ins dialog box.
As soon as you click OK, Excel closes the Add-Ins dialog box and returns you to the VBA Editor window. You can then select the Save button (Ctrl+S) followed by the View Microsoft Excel button (Alt+F11) on the VBA standard toolbar. When you’re back in the PERSONAL workbook, you can then hide it again by clicking the Hide button on the View tab (Alt+WH).
 After that, you can start entering the custom functions that this add-in file contains directly into the cells of any spreadsheet without having to open the Insert Function dialog box.