Node.js for .NET Developers (2015)
Chapter 3. Coding Node.js
Before you write any real code, inside of Microsoft Visual Studio, let’s complete the setup of the project. If you take a look, you’ll see that you have a couple of new folders, called node_modules and bower_components, which are the results of your command-line installs.
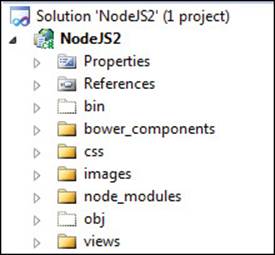
On top of that, as you’ll see, you’ll just be adding a couple of folders. This won’t take long. My project is called NodeJS2; yours should look pretty much the same. If it doesn’t, it soon will after you complete the next few steps.
Using the MVVM pattern
If you have any kind of Model-View-Controller (MVC) background, that will be a big plus when trying to understand how to structure your file tree. If you’ve worked with the MVVM (Model-View-ViewModel) version of MVC, this structure will be old hat for you. If you do not know,MVVM is MVC that insists you separate your View (the HTML and its spaghetti—I mean embedded—server code) from the JavaScript that supports the View. The separate .js file you create is called the ViewModel.
This is not to be confused with the Model itself of the MVC pattern, which is the data bag of properties to which the embedded fields of the View are bound. You don’t have to worry about the Model in Node.js, because you don’t have one. You might or might not have a data layer or business layer of code to connect to with your JavaScript.
Just to clarify, for all the fevered clamor about its superiority, MVC is just a way to generate a UI. It does not, in any way (contrary to the claims of its evangelists), force you to write your code any better than in any other n-tier style of application.
As I mentioned, a Model is just a collection of properties on which you base a View—hence the name. A Model should not, under any circumstances, make direct contact with a data layer. If it does, it becomes a data class and it belongs not in the UI layer of code but in the business-layer DLL. (It belongs here unless you think it should also do business logic against the data it carries and still be able to be called a “Model.” That is a definition I would call “murky” at best. You are clearly mixing tiers in such a case. So much for the natural superiority of MVC!)
The point is that a well-designed, well-built, scalable application has a database, a UI of some kind, and then some number (n) of tiers (supporting DLLs, npm packages, JavaBeans, or whatever) containing code to which you bind your UI code. It’s ridiculous to think that because you have an HTML/JavaScript/Embedded code page as a UI that it is superior to a Web Forms page, a Windows Form, or an Android phone UI.
You can build crappy Android apps that try to use data resources on main threads. You can build crappy Web Forms apps that use SqlDataSource and other Mort controls from Microsoft that professionals would never use that bind directly to data. And you can build MVC Models that fly to the moon. But by confusing code layers, you can totally debunk the idea that MVC has any structural code superiority at all. Building a solid application that follows good principles is up to you. Like anything else in life, it isn’t the tool, it’s how you use it. Try for the best foundation you can, both for your coding and your code structure. I won’t assume you have any prior knowledge of any of the aforementioned topics and just walk through it.
Node.js follows an MVVM pattern. That means you will need an HTML file to present as a UI. That HTML file is called a View. So let’s create a Views folder. You’ll be styling the View with cascading style sheets (CSS), so create a folder called CSS for that. And, as with any site, you’ll have images, so create a folder called Images for that. Now your project should be identical to the image on the previous page.
The supporting .js files you create with each View will live in the root folder. So you’re finally ready to start writing real code.
Writing the code
Create a file called app,js and add it to the root directory. Why that specific name?
Actually, you likely already specified that’s what it has to be. Check the project properties under the Web/Command Line arguments that you entered earlier during setup, and verify that’s the exact name of the file you provided for startup. Whether it is or it isn’t, you can call the file whatever name you want to. Just make sure the two names match: the one you give it and the one you call on startup.
In the file, build code by starting with a sanity check:
"use strict";
Using that as the first line of the file will save you some potentially buggy headaches from accidentally declaring variables (usually from typos) that don’t exist.
Next, write some real code that does something:
var express = require('express');
It should be clear what you’re doing here: adding the first npm package reference. The Express package takes the place of what you would have done with the core of Node.js, making life much easier for you for a lot of what you want to do.
Next, add these two lines:
var server = express();
server.listen(1234, function () {
console.log("ready on 1234");
});
These lines should also be self-explanatory. You have a server object you got back from your express call, and you’re turning it on by telling the server to listen for requests. Run the app, and you’ll see the message and see that it’s correct. Your server is running on your localhost (127.0.0.1) port 1234 (or whatever four-digit number suits you). The address http://127.0.0.1:1234 will get you there, although you won’t see anything yet. Note that you will not get a “404 page not found” error, so you’re in business. You’ve now built a server two slightly different ways using Node.js.
Your server will run as long as node.exe is running your server file. In this case, it’s running because you turned on Visual Studio. And you are popping up a console that tells you what’s happening. But in the real world, you most likely would have some sort of server background service that regularly checks to see that the node is running all the time.
Note that the following would be the same code if chained, and it should produce the same working server for you:
express().listen(1234, function () {
console.log("ready on 1234");
});
Just make sure you have the Express package referenced first. In this case, do it the first nonchained way, for reasons you will soon see.
We got this far before, albeit with different code. Now let’s take it into the real world.
Our overall dev plan is to have a Sports Survey site that offers some multiple choice questions containing player names as the answers. It’s always good to start with a picture of what you ultimately want. In my head, it would end up looking something like this:
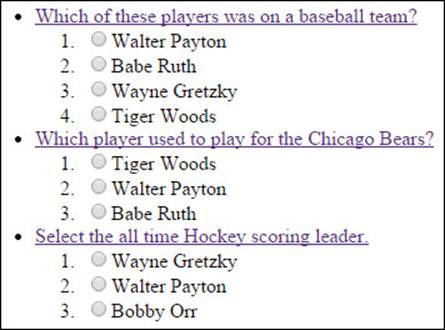
Obviously, it will need some styling, some images, and perhaps a login to access the page. However, my head doesn’t care much about all that to start with, so this is enough to go on for now.
First you need a View to hold the HTML you plan to display and then, as always, along with that will go an associated .js file of the same name. Just add the files in the usual way using Visual Studio.
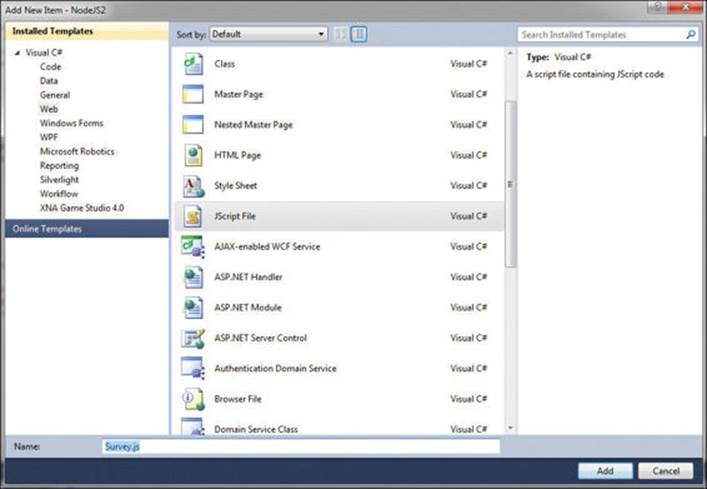
Let’s call them Survey.htm and Survey.js. Put Survey.htm in the Views folder, and leave Survey.js in the root directory.
At this point, you need to tell Node.js how to find your files. Locate the following lines in your app.js file:
var server = express();
server.listen(1234, function () {
console.log("ready on 1234");
});
After them, insert this line:
server.set('views', path.join(__dirname, 'views'));
There are two key ideas here. One idea is that Node.js has a configuration you can set at will, and the second idea is the __dirname value, a constant that Node.js uses to map to your local file system root directory. This is not only convenient; on another level, it’s good to know that Node.js appears to have some file I/O capability. (I’ll say more about this later.) For now, while you’re here, do the same for your images folder, like this:
server.set('images', path.join(__dirname, 'images'));
Now you’re already prepared for when you need them. (No, you can’t do the same for CSS. You have to get to those files differently because they are UI files.)
At this point, you can see why you didn’t chain your original server setup. You want to be able to access the object that is returned from the express function, and you’re not done doing so.
Associated with setting the path to your Views, you have to specify for Node.js that each of them exists as you build them, one at a time. In our specific case, to inform the processor of your first created view, you need to add this line after you set the Views path:
server.use(require('./survey'));
Make sure you note the use of the relative web file path in this line rather than the standard package reference. If the resource you want to use is not in the Node.js core, the processor expects a standard relative website path. In this case, you told it to look in the root for survey, which it assumes, like everything in Node.js, is a JavaScript file. Hence, there’s no need for the actual .js file suffix in the require reference.
Now you can turn your attention back to the newly created survey. To start with, it makes sense to be able to get the page. So let’s set up a route. A route is a pattern by which you identify an incoming web request so that you know which page to render to the browser.
To create a route to your survey page will take a few steps. First, add these two lines to survey.js:
var express = require('express');
var router = express.Router();
First you get access to the Express package and then get an object back from a call to the Router method. We’ve decided to call this object router, and the single most important aspect of this object is the get function you use to direct requests to the proper View.
The get function looks like this:
router.get('/classname', function (req, res) {});
This is very standard stuff in Node.js with an asynchronous signature. The callback function that takes a req object and a res object as arguments is where you do your rendering or whatever else you need to do in response to an incoming URL that matches the pattern.
In our specific case, the function looks like this:
router.get('/survey', function (req, res) {
res.send('this is the survey page');
});
For the moment, you just take advantage of the send method of the response object you got back to let you know that you got to the page. You’re almost all set. The final step is to add this line to the bottom of the file:
module.exports = router;
This line tells Node.js to make the router globally available through the exports property of the module object found in the bowels of Express.
If you now use a browser to go to http://127.0.0.1:1234/survey, you should see “this is your survey page” output.
And that’s all it takes to perform the basics of site navigation using Node.js. In this case, you sent only a simple message to render using the send function, but to render a complete and complex View, you use the render method of the same response object. I’ll cover render in a moment.
Before I do, there are a couple of things to note here. First of all, this code right here
get('/survey' ...)
and the pattern of the string specified within the GET is what actually tells Node.js how to route the request. Unlike in ASP.NET, the page ultimately served up has nothing at all to do with the file name in which this code lives. We chose to place this code in the survey.js file. When you call this page, you’ll need all the other objects that I talked about—Players and Questions—readily available to build the page elements. So you’ll place the code functions for all that in the same file.
Generally speaking, this style is my choice for so-called code encapsulation. All the route variations and all the JavaScript function objects that have anything to do with the survey page live in the same .js file, which is named after the intended View. And the same is true of the Home page, the About Us page, and all the rest of the pages that go into the site tree.
However, if you had chosen to place this code in the app.js file (or any other .js file that had the necessary npm package references and so on), it would run the same as it does here.
The other thing to remember is that JavaScript runs in order and so does the path-recognition tree. Just as in using .NET exceptions, you need to fall from the specific to the general and not vice versa. So you write this code as shown here:
var express = require('express');
var router = express.Router();
router.get('/', function (req, res) {
res.send('matches all pages');
});
router.get('/survey', function (req, res) {
res.send('this is the survey page');
});
module.exports = router;
Then use this URL from a browser as you did earlier:
http://127.0.0.1:1234/survey
The second path will never be reached and the code within it never executed. Thus, the page you intended to call will never show up.
Here’s one important thing to remember: return something from every single route you create using the response object. If you don’t use one of the following lines for every path you authorize, you’ll hang your application. Your main choices of interest when sending a response are these:
![]() send() As seen in the earlier code example, this is used to send a basic reply. Variations include the following:
send() As seen in the earlier code example, this is used to send a basic reply. Variations include the following:
• res.send(‘ok’);
• res.send(‘<b>really ok</b>’);
• res.send(new Buffer(‘buffered simple ok’));
• res.send({ really: ‘ok’ });
• res.status(404).send(‘Oops, page not found.’);
• res.status(500).send({ Oops: ‘something erred’ });
• sendJson()
Although you can use the send method to send Json code per the fourth example just shown, this specific method will also marshal things together as Json code that are not valid Json, such as nulls and the infamous JavaScript undefined.
![]() redirect() Navigates to the specified path.
redirect() Navigates to the specified path.
![]() end() Better than doing nothing.
end() Better than doing nothing.
![]() render() We’ll be covering this in detail in a few moments.
render() We’ll be covering this in detail in a few moments.
No matter how many paths you create, make sure you choose a response for each path. As you see from some of the examples, the response object has just about everything you need to respond to an incoming request. And the preceding list is not exhaustive; it represents only a subset of functionality. I’ll cover a few more useful aspects of the response object later—such as sendFile and cookie—that do more than just match an answer to an inbound request.
Now you’ve seen Node.js work to its capacity. You created a server, and it handles real URLs. You rendered a reply, albeit a simple one. Now all the building blocks are in place for you to add more paths, more objects to handle your user state, and some styling and external connections to handle looks and data content. You need some individual wiring, and then you’re off and running.
Because you’re ready to dive into those individual paths, let’s pause to take one last top-level view of your application and its configuration.
You already saw and employed server.listen, server.use, and server.set from Express in your code. The method server.set has a matching method server.get. The name server, as you might recall, is our own. It lives in a file called app.js, and that is because it is an Express Application object that is returned from the createServer call.
The Application object is a dictionary of name/value pairs. It contains about a dozen preconfigured meanings, such as the following ones:
![]() Case-sensitive routing on/off Path ‘/Survey’ is or is not the same as ‘/survey’
Case-sensitive routing on/off Path ‘/Survey’ is or is not the same as ‘/survey’
![]() Strict routing on/off Path ‘/Survey/’ is or is not the same as ‘/Survey’
Strict routing on/off Path ‘/Survey/’ is or is not the same as ‘/Survey’
![]() Trust proxy The X-Forwarded-* headers may be trusted for determining the connection and the IP address of the client (this has many caveats).
Trust proxy The X-Forwarded-* headers may be trusted for determining the connection and the IP address of the client (this has many caveats).
![]() views You set this value already for the file path to your View files.
views You set this value already for the file path to your View files.
![]() view engine You’ll be setting this as soon as you move to rendering with EJS, one of the npm packages you downloaded during project setup.
view engine You’ll be setting this as soon as you move to rendering with EJS, one of the npm packages you downloaded during project setup.
In addition to that, however, just like the ASP.NET Application object, the Express Application object can also store your own custom name/value pairs and allow you to retrieve them:
server.set('appName', 'NodeJSDemo');
alert(server.get('appName'));
Doing so gives you a global dictionary of configurable settings. Keep in mind that in JavaScript, global means “only as far as the page or file you’re in at the time.” These are not truly global application values. For that, you need the Memory-Cache package (or something similar), which I will cover later when I talk about state management.
Anyway, as for the Application object, if you need to know the enabled status of something within the collection the following line will tell you what you need to know:
server.disabled("trust proxy");
(Right now such a line in our application will output true if you try it.)
The number of settings within the Application object you have called server in your application are not very numerous, but they are potentially useful. Always remember that JavaScript runs in the order of the lines in the file. So, for your code to run the way you want it to, the requires statements and the configuration information typically forms the first entries in any .js file you will use as a “View Model” for your View. Then you get to the objects, routing, and rendering.
With all of those basic tools in our toolkit, let’s move on to add one or two more on top and render some commercial-quality Views.