Node.js for .NET Developers (2015)
Chapter 8. External authentication in Node.js
Login security is a vital aspect of most websites. In addition to having standard security access through whatever provider you choose, users now expect to be able to use a single sign-on to log in to Facebook, Gmail, and so on to integrate customized content. Fortunately, through the use of the Passport npm package, Node.js provides a solution for a vast array of authentication requirements.
To work with Passport, you just provide the request to authenticate. Passport, in return, provides standardized methods for you to then manage what happens if that authentication attempt succeeds or fails. To do this, it employs an extensible set of plug-ins known as strategies. Strategies can range from just verifying the username and password credentials, using delegated authentication, using OAuth (for example, via Facebook or Twitter), or using federated authentication using OpenID. I’ll provide working examples of several kinds of connections, but you will see a similar pattern repeated for each.
Let’s get you set up first by creating your login view and its supporting view model. By the way, I continue to put this in italics because I think the code file associated with the view should have a title, it just doesn’t in Node.js. The term middleware is thrown around everywhere in Node.js and seems to mean whatever people want it to mean at the time (so beware!). One of those meanings seems to be such a file. However, the same term found in documentation for a whole slew of npm packages also refers just to a function of any kind that hooks into the package. Also, as you will see in the brief appendix to this book, on common errors that you might encounter as you go, in the land of Node.js core errors, middleware is anything that has a global reference. It isn’t middleware without it. So I have intentionally avoided the term, although you will be unable to as you work in Node.js.
Anyway, moving on, the login view looks more or less like this:
<form action="/login" method="post">
<h3>
Enter login and password</h3>
Username:
<input id="txtUsername" name="txtUsername" type="text" /><br />
Password:
<input id="txtPassword" name="txtPassword" type="text" /><br />
<input type="submit" />
</form>
You can see what we are expecting the application to do, which is post that submitted info to /login. So let’s take care of that:
var express = require('express');
var router = express.Router();
var Connection = require('tedious').Connection;
var Request = require('tedious').Request;
// routes
router.get('/login', function (req, res) {
res.render('login');
});
router.post('/login', function (req, res) {
var sLogin = req.body.txtLogin;
var sPassword = req.body.txtPassword;
});
module.exports = router;
You’ve made sure you can get to the page in the first place by rendering the view you just created, and you provide the basics of the post operation. The references at the top expect you to use the database at some point, but I’ll let you add that code on your own.
Then make sure you can browse to the page by adding this to the app.js file:
server.use(require('./login'));
Now you’re ready to hook into Passport from your site code.
First, as usual, you need to add a reference to the proper npm package in your same app.js file:
var passport = require('passport');
Now head back into your login post function. Its exact signature will depend on the authentication mechanism you chose to employ. Because the typical login and password validation is the obvious place to start, the first example shown will be the Local strategy that accepts those arguments.
Before you begin, you need to install the passport-local npm package:
npm install passport-local
And inside of your login.js file, you need to add the following reference:
var LocalStrategy = require('passport-local').Strategy;
Now you have access to configuring the strategy. Authenticating requests is as simple as calling passport.authenticate and specifying which strategy to employ. You’ll add a local route to your login that specifies that mechanism to use:
router.post('/login/local', passport.authenticate('local', function (req, res) {
passport.use(new LocalStrategy(({
usernameField: 'username',
passwordField: 'password'
},
function (sLogin, sPassword, done) {
findByUsername(sLogin);
})
));
res.redirect('/survey');
}));
There are a few things to note here. You did not go into the body for the form post values. In this case, the strategy itself can be configured to pick up those input values by field name.
Also, all strategies in Passport require a validation function that accepts credentials (in this case, a username and password) and invokes a callback with a user object. Typically, of course, this function queries a database, or perhaps some internal access control list (ACL), but in this example you’ll go ahead and use a simple array of users and a findByUsername function to loop the array for a match.
var arrUsers = [
{ id: 1, username: 'walter', password: 'thirtyfour', email: 'emailaddress' }
, { id: 2, username: 'babe', password: 'homerun', email: 'emailaddress' }
];
findByUsername(username, function(err, user) {
var user;
// match the username / password in whatever way from the array and . . .
if (err) { return done(err); }
if (!user) { return done(null, false, { message: 'Unknown user ' + username }); }
if (user.password != password) { return done(null, false, { message: 'Invalid password' }); }
return done(null, user);
});
So this unfinished function you create yourself to match your own specifications for your own system expects you to “find” a user in your set of users that matches the username you passed into it. If you find one, you then look inside of that user object for the password for a match to that as well. Note how the code illustrates the granular control you have over what is passed to the done function to return whatever you need to return to provide information, system access, or both to the user. Always be sure to call done for every login path within every login route.
Now that you have a recipe for using Local authentication, let’s look at a few strategies for remote authentication such as Google and Facebook. Google has its own flavor of Passport you will want to install:
npm install passport-google
And then at the top of your login.js file, you will need to create the proper references as usual:
var GoogleStrategy = require('passport-google').Strategy;
The validation function in this case accepts an OpenID identifier and profile, and it invokes a callback with a user object. Before you can use it, you have to configure the strategy in the following way, with a URL specified for successfully logged-in Google users to come back into your app automatically:
passport.use(new GoogleStrategy({1234/auth/google/return',
realm: 'http://localhost:1234/'
},
function(identifier, profile, done) {
profile.identifier = identifier;
return done(null, profile);
}
));
Included in the preceding code you would create to find your own definition of a User is the validation callback for Google authentication, which accepts identifier, profile, and done arguments. If the login is successful, a profile is returned containing user profile information provided by Google. Passport marshals this information together for you into some easy-to-access properties of the profile object, including the ones listed in the following table:
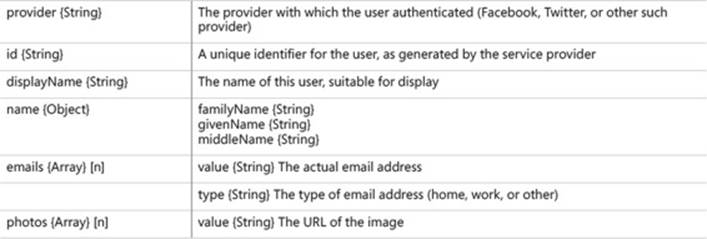
As you can see, the profile information can be extensive and includes child arrays of multiple items where needed. If you need to aggregate custom content, this is where you get it. The array of email addresses might give you something to match on in your own database and the rest of your site user information, thus allowing for single sign-on, which actually happens at the Google login.
Single sign-on happens there because, with all the setup done, the first step in Google authentication involves redirecting the user to google.com. Again, as before, to accomplish this functionality you just use passport.authenticate and set up the specific GoogleStrategy. After authenticating the user, Google will redirect that user back to your Node.js application using the return URL of login/google/return.
router.get('/login/google', passport.authenticate('google', { failureRedirect: '/login' }),
function (req, res) {
// never called
});
router.get('/login/google/callback ',
passport.authenticate('google', { failureRedirect: '/login' }),
function (req, res) {
res.redirect('/survey');
});
Notice that in the first get function the callback is empty because it will never be called, as a result of the redirection to Google.com. If authentication fails when using the preceding approach, the user will be redirected back to the login page. Otherwise, the route specified will be called, here redirecting your user to the survey page.
For Facebook, most of the approach is identical. However, before you begin in your Node.js application, to use Facebook authentication, you must first create an app at Facebook Developers.
When created, your individual app is assigned an App ID and App Secret. These are your connection credentials, as you will see shortly. As with Google authentication, your Node.js application must also implement a redirect URL to which the logged-in Facebook user will be sent upon success.
Within your application, as usual, first you have to make sure you have the correct npm package:
npm install passport-facebook
Then you need to have your strategy with its essential credentials to pass into the authenticate method:
var FacebookStrategy = require('passport-facebook').Strategy;
var FACEBOOK_APP_ID = "FaCEbO0kAp1DG0eZhere"
var FACEBOOK_APP_SECRET = "F@c3B00kS3cretKe7g0ezh3re"
And then you need to configure that strategy properly using the preceding values this way:
passport.use(new FacebookStrategy({
clientID: FACEBOOK_APP_ID,
clientSecret: FACEBOOK_APP_SECRET,
callbackURL: "http://localhost:1234/login/facebook/callback"
},
function(accessToken, refreshToken, profile, done) {
return done(null, profile);
}
));
As you see, in this case the validation function of FacebookStrategy accepts its credentials in the form of an accessToken, a refreshToken, and a Facebook profile. Also, it invokes the usual callback with a user object.
Here, again, you decided to return the user’s Facebook profile to represent the logged-in user. In a typical application, you will want to associate the Facebook account with a user record in your database or ACL and return that user information, as well as whatever Facebook profile information you choose to incorporate into your application. The Facebook profile information, once again, is available using the same profile information properties as were available from Google upon successful login.
As with Google, the first step in Facebook authentication involves redirecting the user to facebook.com. After authorization, Facebook redirects the user back to this application at /login/facebook/callback, or whatever argument you specified in the callbackURL property of the strategy during its configuration.
router.get('/login/facebook',
passport.authenticate('facebook'),
function(req, res){
});
router.get('/login/facebook/callback',
passport.authenticate('facebook', { failureRedirect: '/login' }),
function(req, res) {
res.redirect('/');
});
Again, you see that in the first get function the callback is empty because it will never be called, as a result of the redirection to facebook.com. If authentication fails in the process just shown, the user will be redirected back to the login page. Otherwise, the route specified will be called here, once again, redirecting your user to the survey page.
For our final example, we’ll look at using the OAuth 2.0 specification that has recently replaced OAuth. Dropbox, Reddit, PayPal, and many cloud-based resources that use this form of authentication each have its own specific npm package implementation. Here I’ll just cover the generic version. This form of authentication emphasizes tokens. For the vast majority of sites, this means specific bearer tokens, so those will be our focus.
Again, begin with the installation of the proper npm package:
npm install passport-http-bearer
Then reference the necessary module dependencies in login:
var BearerStrategy = require('passport-http-bearer').Strategy;
Next, just as with all the rest, you have to configure the OAuth 2.0 strategy:
passport.use(new BearerStrategy({},
function(token, done) {
User.findMeByToken({ token: token }, function (err, user) {
if (err) { return done(err); }
if (!user) { return done(null, false); }
return done(null, user, { scope: 'read' });
});
}
));
As you can see, the OAuth 2.0 strategy validation callback accepts the token as an argument. As usual, when you finish your internal “user matching” process (called User.findMeByToken in the preceding code sample), it should then call the done method while supplying a user. If no user is found, say so through the done call.
Optional info can be passed to done to convey the scope of the token for making your internal access-control checks. Here you pass scope: ‘read’ as a JSON array. This information is held by Passport in the req.authInfo property.
Now, to employ the strategy, just make sure you have the OAuth2 npm as well as http-bearer and then hook it into your page get as usual:
router.get('/login/oauth',
passport.authenticate('oauth2'));
router.get('/login/oauth/callback',
passport.authenticate('oauth2', { failureRedirect: '/login' }),
function(req, res) {
// Successful authentication, redirect
res.redirect('/survey');
});
Using one or more of the preceding authentication strategies should enable you to address the vast majority of sign-on situations you encounter inside your Node.js application.
At this point, we’ve covered all the essential aspects of constructing a commercial Node.js application. So let’s head for the finish line by putting all the pieces together into a working site that uses all the tools in your new toolkit.