Office 2016 For Dummies (2016)
Part II
Chapter 7
Designing Your Pages
In This Chapter
![]() Inserting pages
Inserting pages
![]() Organizing text in tables
Organizing text in tables
![]() Displaying text as WordArt
Displaying text as WordArt
![]() Dividing text into columns
Dividing text into columns
![]() Printing
Printing
The Insert, Design, and Layout tabs contain the most frequently used commands for designing the layout and appearance of your pages. You can add columns or headers and footers that display titles or page numbers, or add colors and pictures to your pages.
The Insert tab provides commands for inserting items into a document, such as new pages, tables, pictures, and headers and footers.
The Design tab provides commands for choosing spacing, colors, borders, and themes.
The Layout tab provides commands for defining how your pages look, such as creating columns; defining top, bottom, left, and right page margins; as well as defining how text wraps around pictures or other objects you place in the middle of a page.
Inserting New Pages
Word automatically adds new pages to your document as you write. However, Word also gives you the option of adding a new page anywhere in your document, such as in the middle or the beginning.
To insert a new, blank page into your document, follow these steps:
1. Click the Insert tab.
2. Move the cursor to where you want to insert the new page.
3. Click the Blank Page icon in the Pages group.
Word adds a blank page to your document where the cursor appears. So if you put the cursor between two sentences and insert a blank page, the first sentence will appear on one page, a blank page will appear next, and the second sentence will appear after the blank page.
 You don’t need to add a page to the end of a document if you’re still creating new text. Just move the cursor to the end of your document (Ctrl+End), start typing, and Word automatically adds new pages at the end of your document.
Adding (and Deleting) a Cover Page
Rather than add more pages on which to type text, you can just add a cover page that is the first page anyone can read in the document. A cover page typically displays a title and any additional information such as your company name and a date.
To create a cover page, follow these steps:
1. Click the Insert tab.
2. Click the Pages icon in the Pages group.
A pull-down menu appears.
3. Click the Cover Page icon.
Word displays a list of cover-page designs, as shown in Figure 7-1.
4. Click a cover-page design.
Word adds your chosen cover page as the first page of your document.
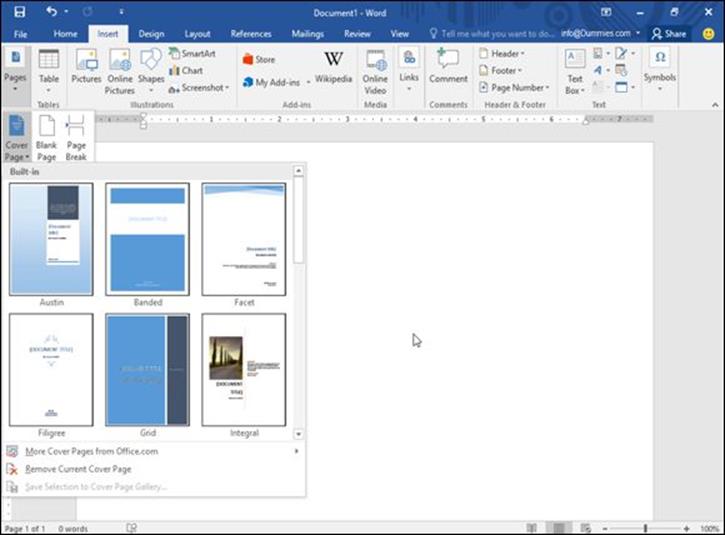
Figure 7-1: Word can insert a variety of preformatted cover pages into your document.
A document can have only one cover page at a time. If you choose another cover page, Word deletes your current cover page and replaces it with the new one you choose.
After you add a cover page, you may want to delete it later. To delete a cover page, follow these steps:
1. Click the Insert tab.
2. Click the Pages icon in the Pages group.
A pull-down menu appears.
3. Click Cover Page.
A pull-down menu appears (refer to Figure 7-1).
4. Choose Remove Current Cover Page.
Word deletes your cover page.
Inserting Page Breaks
Rather than insert a new page, you may want to break text on an existing page into two pages. To insert a page break into your document, follow these steps:
1. Move the cursor where you want to break your document into two pages.
2. Click the Layout tab.
3. Click the Breaks icon in the Page Setup group.
A menu appears, as shown in Figure 7-2.
4. Click Page under the Page Breaks heading. Word breaks your document into two pages.
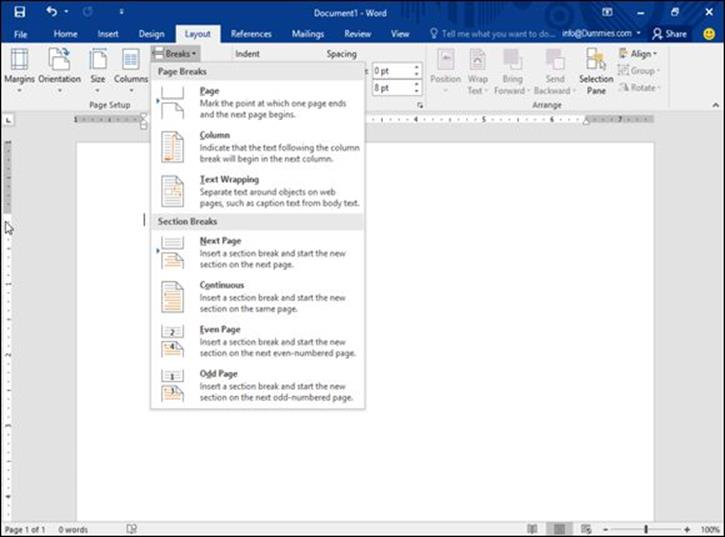
Figure 7-2: The Breaks menu lets you choose the type of page break to use.
To delete a page break, move the cursor to the top of the page directly following the page break you want to delete. Then press Backspace until Word deletes the page break.
 As an alternative to following Steps 2 and 3 in the preceding list, you can press Ctrl+Enter to create a page break at the cursor’s current location.
Inserting Headers and Footers
Headers and footers appear at the top (headers) and bottom (footers) on one or more pages of your document. Headers and footers can display information such as titles, chapter names, dates, and page numbers.
Creating a header (or footer)
To create a header or footer, follow these steps:
1. Click the Insert tab.
2. Click the Header or Footer icon in the Header & Footer group.
A pull-down menu appears.
3. Click Edit Header (or Edit Footer).
Word displays your header or footer.
You can click a predefined header (or footer) that’s already formatted to look pretty so you don’t have to spend time formatting it yourself.
 Headers and footers are visible only when you display a document in Print Layout view.
4. Type, edit, or delete any text you want to change.
5. (Optional) Click the Date & Time or Page Number icons of the Design contextual tools to insert the date and time or page numbers, respectively.
6. Click the Close Header and Footer icon.
Word dims your header and footer text.
Defining which pages display a header (or footer)
Usually when you define a header or footer, Word displays that header or footer on every page of your document. However, Word gives you the option of displaying a different header and footer for your first page only, or displaying different headers and footers for odd- and even-numbered pages.
Creating a unique header or footer for your first page
Often you want a header or footer to display page numbers and document or chapter titles — just not on the first page of your document. To create a unique header or footer that appears only on your first page, follow these steps:
1. Click the Insert tab, click the Header icon in the Header & Footer group, and choose Edit Header.
The Header & Footer Tools Design tab appears, as shown in Figure 7-3.
2. Select the Different First Page check box in the Options group.
Word displays a header or footer with the name First Page Header or First Page Footer.
3. Click the Close Header and Footer icon.
Word dims your header and footer text.
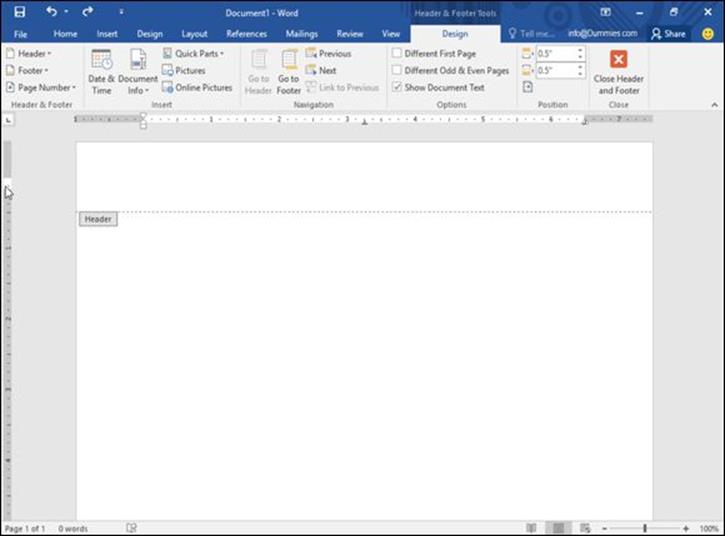
Figure 7-3: The Design tab provides additional commands for modifying your headers and footers.
Creating unique headers and footers for odd and even pages
Sometimes you may want different headers or footers to appear on even or odd pages. In most books, even page numbers (even headers) appear in the upper-left corner; odd page numbers (odd headers) appear in the upper-right corner. To create this effect in your own documents, you need to create different headers to appear on odd- and even-numbered pages.
To create a different header or footer for odd- and even-numbered pages, follow these steps:
1. Click the Insert tab, click the Header icon in the Header & Footer group, and choose Edit Header.
The Header & Footer Tools Design tab appears.
2. Select the Different Odd & Even Pages check box in the Options group.
Word displays a header or footer with the name Odd Page Header or Even Page Footer.
3. Click the Close Header and Footer icon.
4. Switch to another page.
5. Repeat Steps 2 through 4 to define the other odd or even header.
If an odd page number originally appears in Step 2, switch to an even page number (or vice versa) for Step 5.
Deleting a header (or footer)
In case you want to get rid of a header or footer, you can always delete it by following these steps:
1. Click the Insert tab.
2. Click the Header or Footer icon in the Header & Footer group.
A pull-down menu appears.
3. Click Remove Header (or Remove Footer).
Word removes your header or footer.
Organizing Text in Tables
Tables organize text into rows and columns, which can make the text easy to type, edit, and format while spacing it correctly in your document. Tables organize text into cells, where a cell is the intersection of a row and a column.
Word provides four ways to create a table:
· Click the Insert tab, click the Table icon, and then highlight the number of rows and columns for your table (up to a maximum of eight rows and ten columns).
· Use the Insert Table dialog box.
· Draw the size and position of the table with the mouse.
· Convert existing text (divided by a delimiter character such as a Tab or comma).
Creating a table by highlighting rows and columns
Creating a table by highlighting rows and columns can be fast, but it limits the size of your table to a maximum of eight rows and ten columns. To create a table by highlighting rows and columns, follow these steps:
1. Click the Insert tab.
2. Move the cursor where you want to insert a table in your document.
3. Click the Table icon.
A pull-down menu appears, as shown in Figure 7-4.
4. Move the mouse pointer to highlight the number of rows and columns you want to create for your table.
When you highlight rows and columns, Word displays your table directly in your document so you can see exactly what your table will look like.
5. Click the left mouse button when you’re happy with the size of your table.
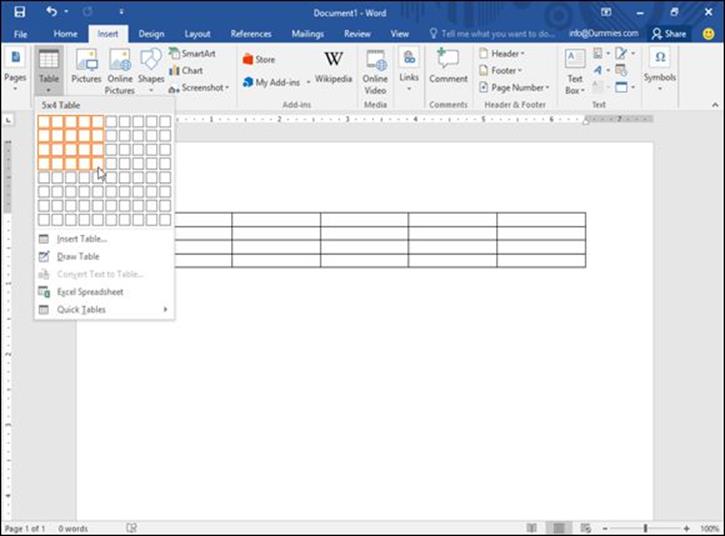
Figure 7-4: The Table pull-down menu displays squares that represent the number of rows and columns for your table.
Creating a table with the Insert Table dialog box
Creating a table by highlighting the number of rows and columns can be fast, but it limits the size of your table to a maximum of eight rows and ten columns. To create a table by defining a specific number of rows and columns (up to a maximum of 63 columns), follow these steps:
1. Click the Insert tab.
2. Move the cursor where you want to insert a table.
3. Click the Table icon.
A pull-down menu appears (refer to Figure 7-4).
4. Click Insert Table.
The Insert Table dialog box appears, as shown in Figure 7-5.
5. Click in the Number of Columns text box and type a number between 1 and 63, or click the up/down arrows to define the number of columns.
6. Click in the Number of Rows text box and type a number or click the up/down arrows to define the number of rows.
7. Select one of the following radio buttons in the AutoFit Behavior group:
· Fixed Column Width: Defines a fixed size for the column widths, such as 0.3 inches
· AutoFit to Contents: Defines the width of a column based on the width of the largest item stored in that column
· AutoFit to Window: Expands (or shrinks) the table to fit within the current size of the document window
8. Click OK.
Word draws the table in your document.
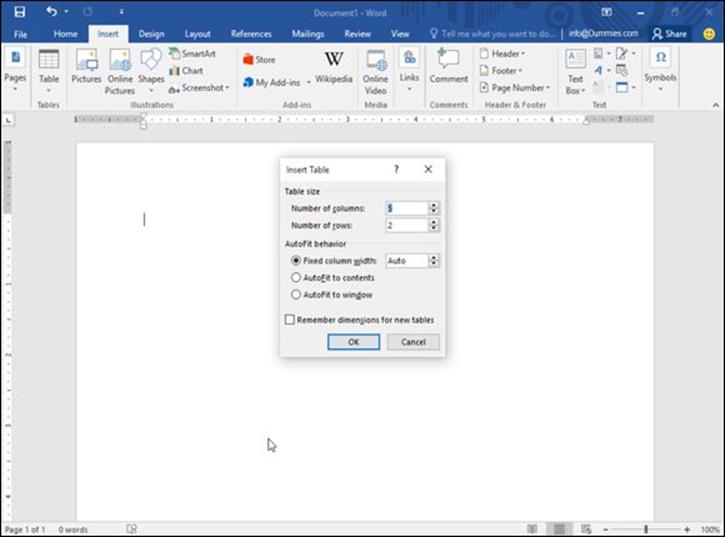
Figure 7-5: The Insert Table dialog box lets you specify an exact number of rows and columns.
Creating a table with the mouse
Drawing a table can be especially useful when you want to place a table in the middle of a page and create rows and columns of different sizes, as shown in Figure 7-6.
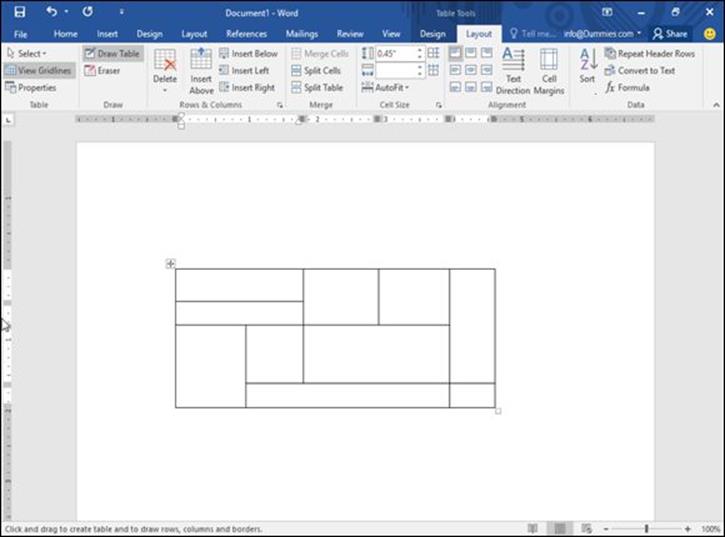
Figure 7-6: Drawing a table with the mouse lets you create odd-shaped cells within a table.
To draw a table in your document, follow these steps:
1. Click the Insert tab.
2. Click the Table icon.
A pull-down menu appears.
3. Click Draw Table.
The mouse pointer turns into a Pencil icon.
4. Move the mouse pointer where you want to draw your table, hold down the left mouse button, and drag (move) the mouse to draw your table.
Word draws a rectangular dotted box to show where your table will appear.
5. Release the left mouse button when you’re happy with the size and position of your table.
6. Move the mouse pointer to the top/bottom or left/right side of the table, hold down the left mouse button, and drag (move) the mouse up and down (or right and left) to draw the boundaries for your table’s rows and columns.
7. Press Esc or double-click to turn the mouse pointer from a Pencil icon back to an I-beam pointer.
If you need to draw new lines on a table later, click anywhere inside that table, and the Table Tools Layout tab appears. Then click the Draw Table icon to turn the mouse pointer into a Pencil icon. Now you can draw new lines in your table.
Creating a table from existing text
If you have existing text that you’d like to turn into a table, you need to first separate text into chunks so Word knows how to place the text into individual cells in a table. To separate text, you need to use a unique character such as
· Paragraphs: The invisible Return character separates text.
· Tabs: The invisible Tab character separates text.
· Commas: Commas separate text.
· Other: You can define other characters to separate text, such as the # or @ characters.
By using the same unique character to divide text, you can define how you want Word to define how much text to display in each individual cell of a table.
To convert existing text into a table, follow these steps:
1. Click the Insert tab.
2. Select the text that you want to convert into a table.
3. Click the Table icon.
A pull-down menu appears (refer to Figure 7-4).
4. Click the Convert Text to Table command.
The Convert Text to Table dialog box appears, as shown in Figure 7-7.
5. (Optional) Select a radio button in the Separate Text At group, such as Paragraphs, Tabs, or Commas.
You must choose the option that corresponds to the way you divided your text. So if you divided your text by tabs, you would select the Tabs radio button.
6. Click OK.
Word converts your text into a table.
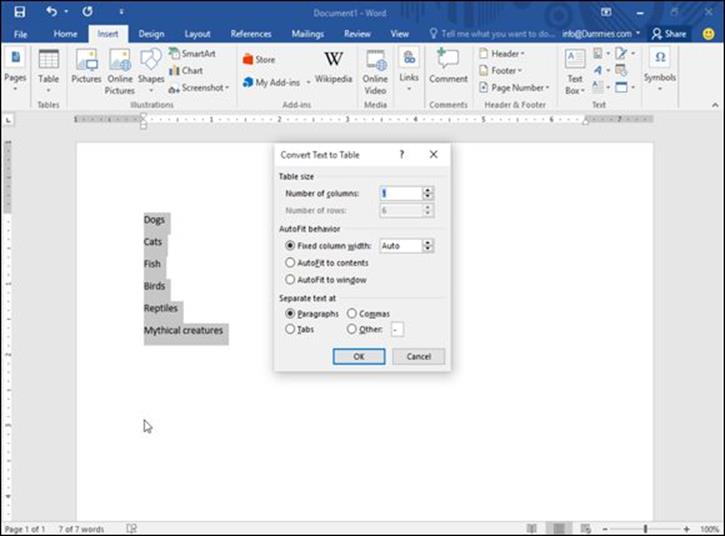
Figure 7-7: The Convert Text to Table dialog box defines how to convert your text into a table.
You can also convert a table into text. To convert a table into text, follow these steps:
1. Click anywhere inside the table you want to convert into text.
The Layout tab appears.
2. Click the Table Tools Layout tab.
3. Click Convert to Text.
The Convert Table to Text dialog box appears, as shown in Figure 7-8.
4. Select a radio button to define how you want to divide your table into text, such as by Commas, Tabs, Paragraph Marks, or other symbol.
5. Click OK.
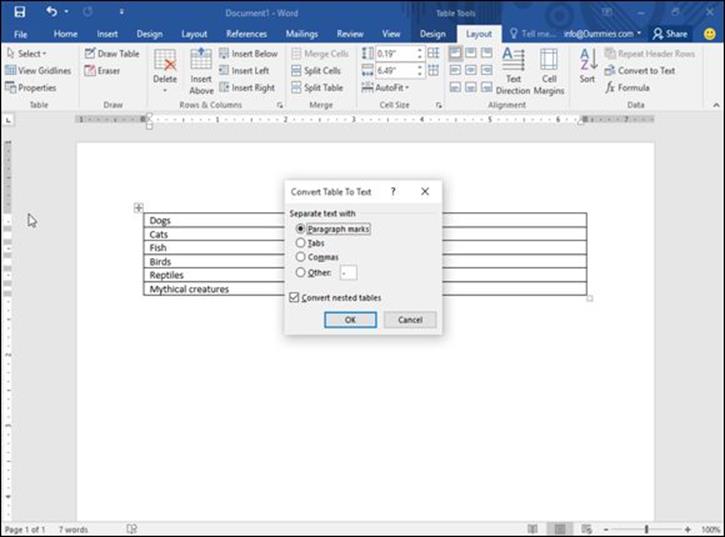
Figure 7-8: The Convert Table to Text dialog box lets you specify how to divide a table.
Formatting and Coloring a Table
After you create a table, you can format individual cells (spaces formed by the intersection of a row and a column) — or format entire rows and columns — by aligning text in cells, resizing columns and rows, and adding borders, shading, or colors. All these changes can make the text inside the cells easier to read.
Selecting all or part of a table
To format and color a table, you must first select the table, row, column, or cell that you want to modify. To select all or part of a table, follow these steps:
1. Click in the table, row, column, or cell you want to modify.
The Table Tools tab appears.
2. Click the Table Tools Layout tab.
3. Click Select in the Table group.
A pull-down menu appears, as shown in Figure 7-9.
4. Choose an option, such as Select Row or Select Column.
Word highlights your chosen item in the table. At this point, you can choose a command to modify the selected row or column (as when you choose a color or alignment).
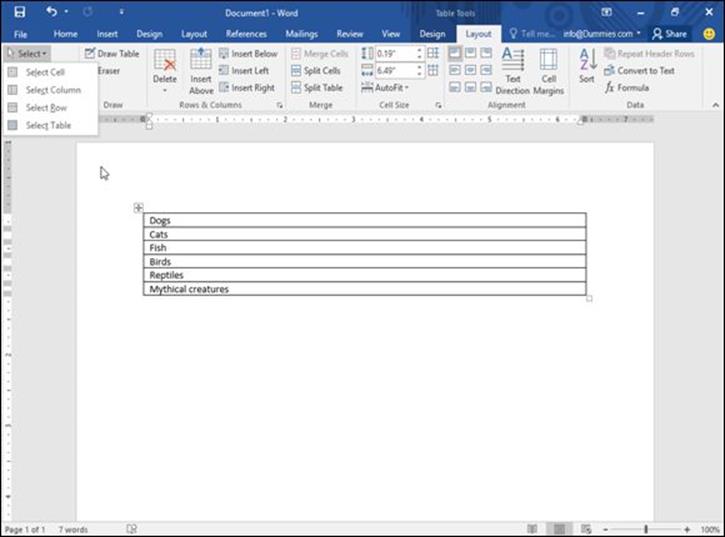
Figure 7-9: The Select icon displays a pull-down menu.
Aligning text in a table cell
You can align text in a table cell in nine different ways: Top Left (the default alignment), Top Center, Top Right, Center Left, Center, Center Right, Bottom Left, Bottom Center, and Bottom Right, as shown in Figure 7-10.
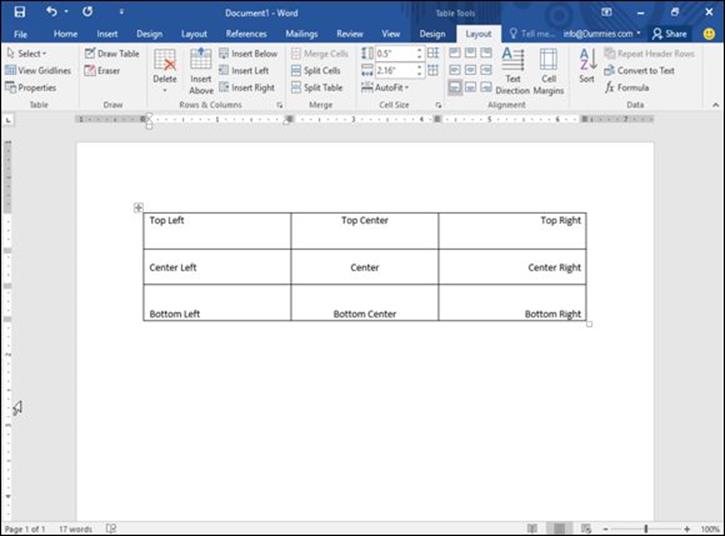
Figure 7-10: Tables can align text within cells in nine different ways.
To align one or more cells, follow these steps:
1. Click in the cell (or select multiple cells) that contains text you want to align.
The Table Tools tabs appear.
2. Click the Table Tools Layout tab.
3. Click an alignment icon in the Alignment group (refer to Figure 7-10) such as Top Right or Bottom Center.
Word aligns your text. If you change the alignment of blank cells, any new text you type in those blank cells will appear according to the alignment you choose.
Picking a table style
By coloring rows or columns and adding borders, you can customize the appearance of your tables. However, it can be much faster to use a predesigned table style instead, which can automatically format your text, color rows, and add borders to your tables.
To choose a table style, follow these steps:
1. Move the cursor inside the table you want to modify.
2. Click the Table Tools Design tab.
3. (Optional) Select or clear check boxes under the Table Style Options group, such as the Header Row or Last Column check box.
4. Click the More button on the Table Styles group.
A pull-down menu of all available styles appears, as shown in Figure 7-11. As you move the mouse pointer over a table style, Word displays a live preview of how your table will look.
5. Click a table style.
Word formats your table according to the style you chose.
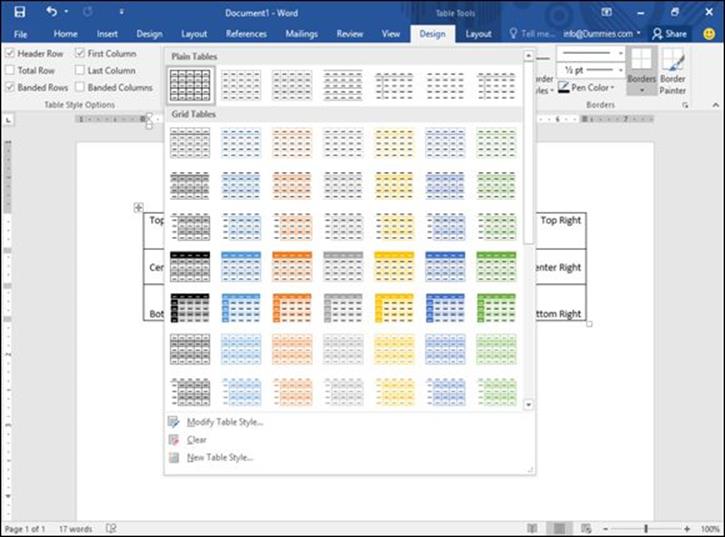
Figure 7-11: The Table Styles group displays different ways to format your table.
Resizing columns and rows
You may need to resize a column or row in your table to expand or shrink it so your text doesn’t appear crowded or surrounded by empty space. You can resize a column or row by using the mouse or by defining row heights and column widths.
To resize a row or column with the mouse, follow these steps:
1. Click anywhere inside the table you want to adjust, then move the mouse over the row or column border that you want to resize.
The mouse pointer turns into a two-way pointing arrow.
2. Hold the left mouse button down and drag (move) the mouse to resize the row or column.
3. Release the left mouse button when you’re happy with the size of the row or column.
Using the mouse to resize a row or column can be fast, but if you want to resize a row or column to a specific height or width, you can type in the specific dimensions by following these steps:
1. Select the row, column, or table that you want to modify. (If you select the entire table, you can adjust the width or height of rows and columns for your entire table.)
2. Click the Table Tools Layout tab.
3. Click the Width text box and type a value (or click the up/down arrows to choose a value).
4. Click the Height text box and type a value (or click the up/down arrows to choose a value).
5. (Optional) Click the AutoFit icon and choose one of the following, as shown in Figure 7-12:
· AutoFit Contents: Shrinks your columns or rows to largest cell.
· AutoFit Window: Expands the table to fit the width of the current document window.
· Fixed Column Width: Defines a fixed width for all columns.
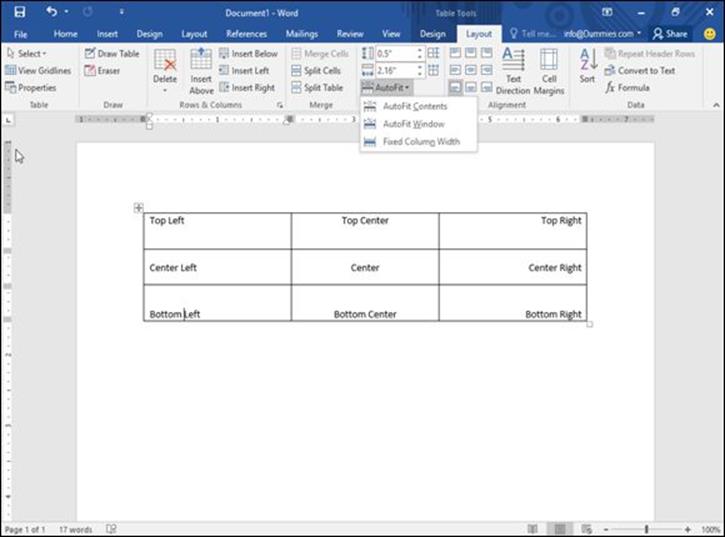
Figure 7-12: The AutoFit menu.
Sorting a Table
Tables not only can organize data, but they can also sort your data alphabetically. To sort a table, you need to specify a single column of data to sort. When Word sorts the data in this column, it automatically sorts every row in the table as well, as shown in Figure 7-13.
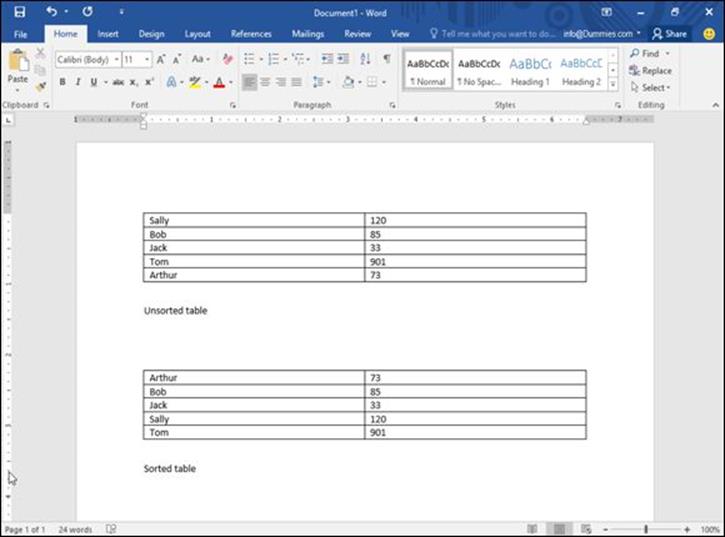
Figure 7-13: Sorting data in a column rearranges every row in a table.
To sort a table, follow these steps:
1. Select the column that contains the data you want to sort.
2. Click the Layout tab under the Table Tools tab.
3. Click the Sort icon in the Data group.
The Sort dialog box appears, as shown in Figure 7-14.
4. Click in the top Type list box and choose the type of data you want to sort: Text, Number, or Date.
5. Select either the Ascending or Descending radio button.
6. (Optional) Click the Header Row or No Header Row radio button.
 If you select the Header Row, Word won’t sort the top row of your table.
7. Click OK.
Word sorts your entire table based on the data in the column you selected.
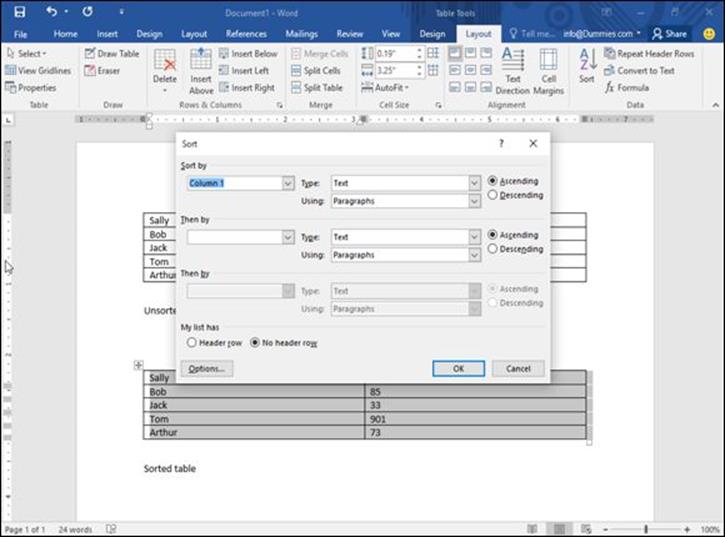
Figure 7-14: The Sort dialog box lets you specify whether to sort by ascending or descending order.
Deleting Tables
After you create a table, you can delete the entire table, delete one or more rows or columns, or delete individual cells along with their data.
Deleting an entire table
Sometimes you may need to delete an entire table along with all the data stored inside that table. To delete both your table and all the data stored in it at the same time, follow these steps:
1. Click the cursor anywhere in the table you want to wipe out.
2. Click the Layout tab under the Table Tools tab.
3. Click the Delete icon in the Rows & Columns group.
A pull-down menu appears, as shown in Figure 7-15.
4. Choose Delete Table.
Word wipes out your table and all the data stored in it.
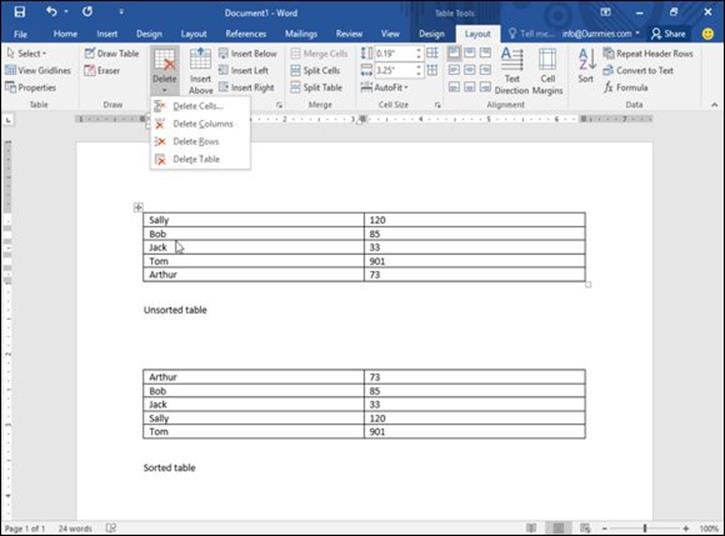
Figure 7-15: The Delete icon displays commands for deleting parts of a table.
 You can also select an entire table using the mouse, then press Backspace or Delete to delete the table.
Deleting rows and columns
Rather than delete an entire table, you can also delete rows and columns. When you delete a row or column, you wipe out any data stored inside that row or column.
To delete a row or column, follow these steps:
1. Move the cursor into the row or column you want to delete.
2. Click the Layout tab under the Table Tools tab.
3. Click the Delete icon.
A pull-down menu appears (refer to Figure 7-15).
4. Choose Delete Columns or Delete Rows.
Word deletes your chosen column or row.
Deleting cells
You can delete data in cells just by selecting the data and pressing the Delete key. If you want to delete data and the cell itself, you have two options:
· Delete a cell and shift adjacent rows or columns. This creates an odd-shaped table.
· Delete the data and cell borders. This keeps the table symmetrical but often merges cells.
To delete a cell and change the physical layout of a table, follow these steps:
1. Select the cell or cells you want to delete.
2. Click the Layout tab under the Table Tools tab.
3. Click the Delete icon in the Rows & Columns group.
A pull-down menu appears (refer to Figure 7-15).
4. Choose Delete Cells.
The Delete Cells dialog box appears, as shown in Figure 7-16.
5. Select the radio button for Shift Cells Left or Shift Cells Up.
6. Click OK.
Word deletes your chosen cells and shifts cells left or up, creating an odd-shaped table with missing cells, as shown in Figure 7-17.
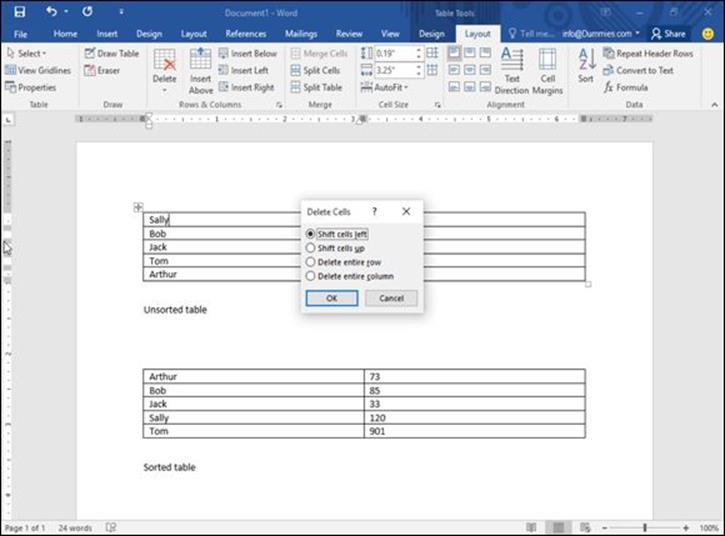
Figure 7-16: The Delete Cells dialog box.
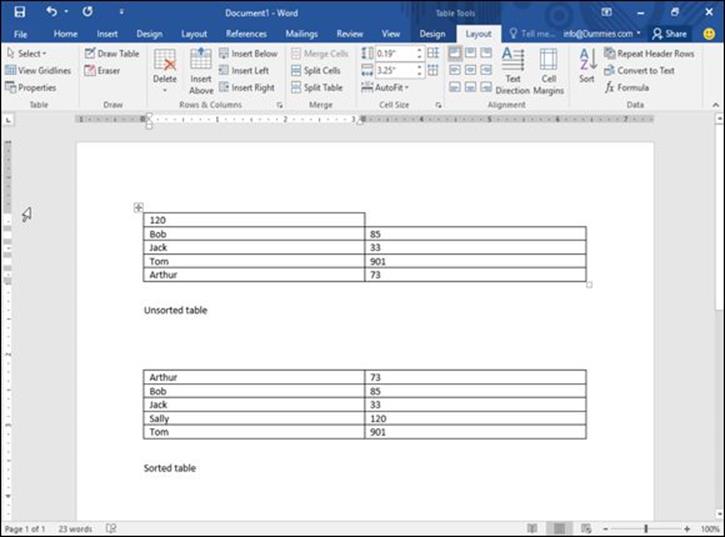
Figure 7-17: When you delete a cell, Word shifts any remaining cells left or up.
Deleting cell borders
Word also lets you delete individual cell lines by using the mouse. By using the mouse, you can delete borders and merge adjacent cells at the same time.
To use the mouse to delete cell lines, follow these steps:
1. Click the cursor anywhere in the table you want to modify.
2. Click the Layout tab under the Table Tools tab.
3. Click the Eraser icon in the Draw group.
The mouse pointer turns into an eraser icon.
4. Choose one of the following:
Click a cell border to delete it.
or
1. Move the mouse pointer near a cell line to delete, hold down the left mouse button, and drag (move) the mouse to highlight one or more cell lines.
Word highlights any cell lines you select.
2. Release the left mouse button.
Word deletes the selected cell lines and any data stored in adjacent cells.
5. Press Esc or double-click the mouse to turn off the Eraser and convert the mouse pointer back into an I-beam cursor.
Making Text Look Artistic
To spice up the appearance of individual paragraphs, Word lets you add drop caps, text boxes, or WordArt. Drop caps make the first letter of a paragraph appear huge. WordArt displays text as graphical images. Text boxes let you display chunks of text in separate boxes that you can arrange anywhere in your document.
Creating drop caps
To create a drop cap, follow these steps:
1. Click the Insert tab.
2. Move the cursor anywhere inside the paragraph for which you want to create a drop cap.
3. Click Drop Cap.
The Drop Cap menu appears, as shown in Figure 7-18.
4. Move the mouse pointer over the drop-cap style you want to use.
Word shows you what your drop cap will look like.
5. Click the drop cap style you want to use.
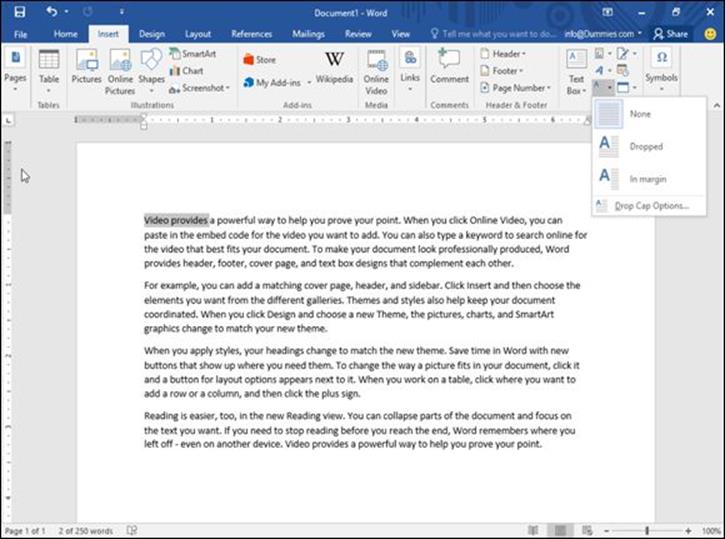
Figure 7-18: The Drop Cap menu lists different drop cap styles you can choose.
Creating WordArt
WordArt is Microsoft’s fancy term for displaying text in different graphical styles that you can stretch or resize on a page. You can create WordArt from scratch or from existing text.
To create WordArt, follow these steps:
1. (Optional) Select the text you want to convert into WordArt.
If you skip this step, you have to type in text later.
2. Click the Insert tab.
3. Click WordArt.
The WordArt menu appears, as shown in Figure 7-19.
4. Click a WordArt style.
A WordArt text box appears in your document, as shown in Figure 7-20.
5. (Optional) To resize your WordArt, move the mouse pointer over a WordArt handle (on the edge or the corner), hold down the left mouse button, and drag (move) the mouse.
6. Type or edit text, and then click outside of the WordArt text box.
Word displays your text as WordArt.
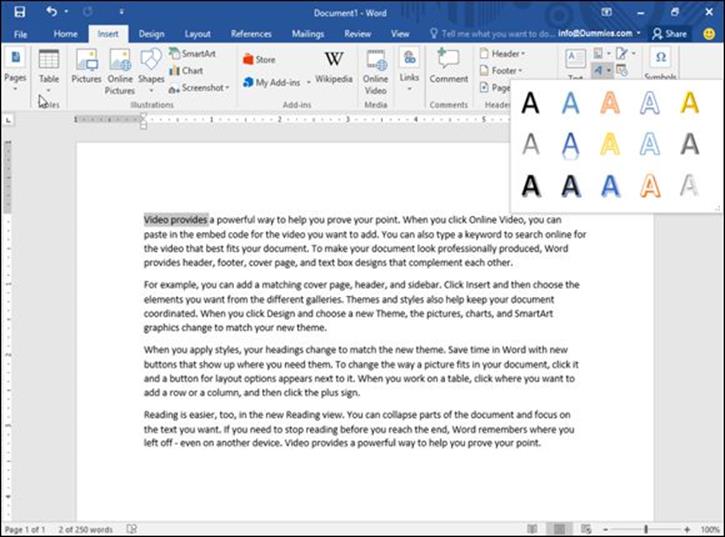
Figure 7-19: The WordArt menu displays different graphical styles to display your text.

Figure 7-20: The WordArt text box lets you type or edit text.
To edit your WordArt text, just click that text.
 You can delete WordArt by clicking its border and then pressing Delete.
Dividing Text into Columns
When you type, Word normally displays your text to fill the area defined by the left and right margins. However, you can also divide a page into two or three columns, which can be especially handy for printing newsletters.
To divide a document into columns, follow these steps:
1. Click the Layout tab.
2. Select the text that you want to divide into columns. (Press Ctrl+A to select your entire document.)
3. Click the Columns icon.
A pull-down menu appears that lists different column styles, as shown in Figure 7-21.
4. Click a column style (such as Two).
Word changes your document to display columns.
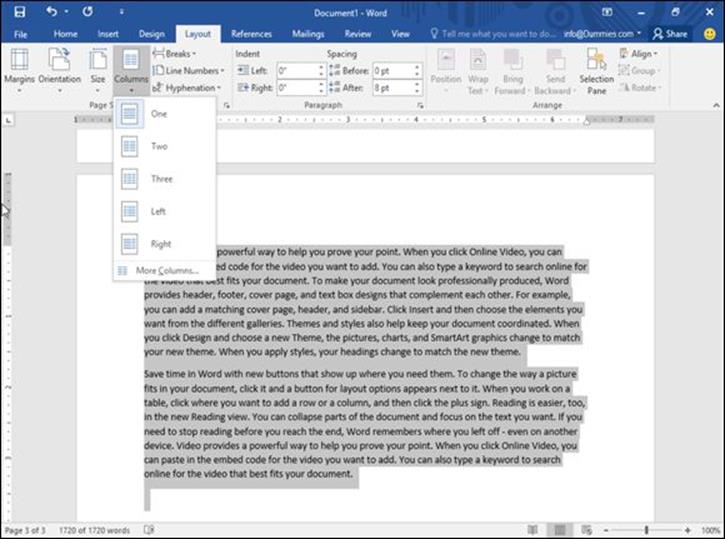
Figure 7-21: The Columns menu lists different types of columns you can use.
Editing columns
After you create two or three columns in your document, you may want to modify their widths, modify the spacing between columns, and choose whether to display a vertical line between columns. To edit columns, follow these steps:
1. Click the cursor in the text divided into columns that you want to modify.
2. Click the Layout tab.
3. Click the Columns icon.
A pull-down menu appears (refer to Figure 7-21).
4. Click More Columns.
The Columns dialog box appears, as shown in Figure 7-22.
5. (Optional) Click in the Number of Columns text box and click the up/down arrows to define how many columns you want (from 1 to 9).
6. (Optional) Click in the Width text box and type a value or click the up/down arrows to define a width for column 1.
7. (Optional) Click in the Spacing text box and type a value or click the up/down arrows to define the spacing width to the right of column 1.
8. (Optional) Repeat Steps 6 and 7 for each additional column you want to modify.
9. (Optional) Select the Line between check box to display a vertical line between your columns.
10. (Optional) Click the Apply To list box and choose Whole Document or This Point Forward (to define how columns appear from the current cursor position to the end of the document).
11. Click OK.
Word displays the changes for your columns.

Figure 7-22: The Columns dialog box lets you customize the appearance of your columns.
Removing columns
If you decide you don’t want to display text in columns anymore, you can remove columns — throughout your entire document or just from the current cursor position to the end of the document.
To remove columns, follow these steps:
1. Move the cursor to the page from which you want to remove columns to the end of a document.
2. Click the Layout tab.
3. Click the Columns icon.
A pull-down menu appears (refer to Figure 7-21).
4. Click One.
Word removes columns from the current cursor position to the end of the document.
Previewing a Document before Printing
Before you print your document, you may want to preview how it will look so you don’t waste paper printing something you can’t use anyway. After you see that your pages will look perfect, then you can finally print out your document for everyone to read.
Defining page size and orientation
If you need to print your document on different sizes of paper, you may need to define the page size and paper orientation. By doing this, Word can accurately show you what your text may look like when printed on an 8.5" x 11" page compared with an 8.27" x 11.69" page.
To define the Page Size, follow these steps:
1. Click the Layout tab.
2. Click the Size icon in the Page Setup group.
A pull-down menu appears, as shown in Figure 7-23.
3. Click the page size you want.
Word displays your document based on the new page size.
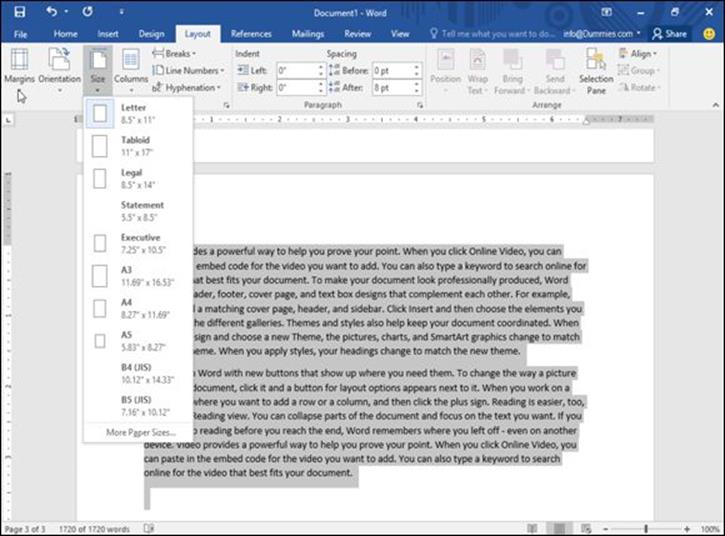
Figure 7-23: The Size menu lists different page sizes you can use.
Normally Word assumes that you want to print in portrait orientation, where the height of the paper is greater than its width. However, you may want to print in landscape orientation, where the height of the paper is less than its width.
To define the orientation, follow these steps:
1. Click the Layout tab.
2. Click the Orientation icon in the Page Setup group.
A pull-down menu appears, as shown in Figure 7-24.
3. Click either Portrait or Landscape orientation.
Word displays your document based on the new paper orientation.
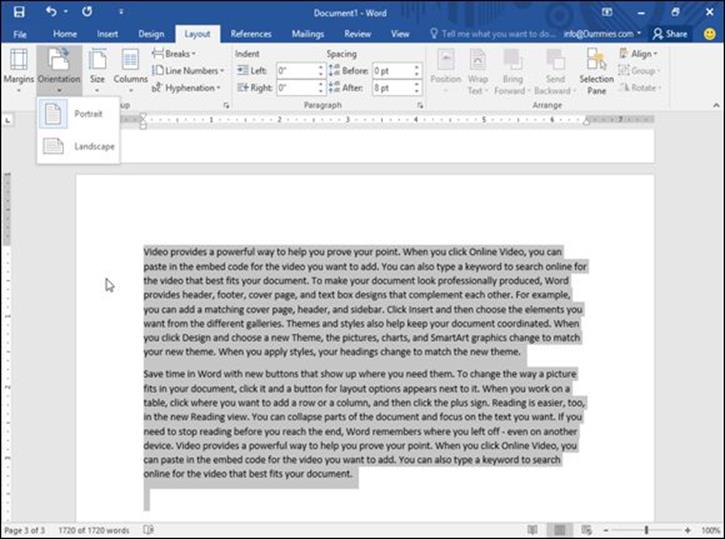
Figure 7-24: Choose a page orientation.
Using Print Preview
Print Preview lets you browse through your document so you can see how every page will look, including any headers and footers, cover pages, and pictures you may have added. To use Print Preview, follow these steps:
1. Click the File tab.
2. Click Print.
Word displays various print settings in the middle pane and a preview of your document in the right pane, as shown in Figure 7-25.
3. (Optional) Click the various options in the middle pane, such as choosing a printer to use or how many copies to print.
4. (Optional) Click Next Page/Previous Page or use the vertical scroll bar to browse through all the pages of your document.
If you drag the Magnifier slider in the bottom-right corner, you can zoom in or zoom out so you can examine the details of your document.
5. Press Esc to return to your document, or click Print to start printing.
You can also start printing by just pressing Ctrl+P.
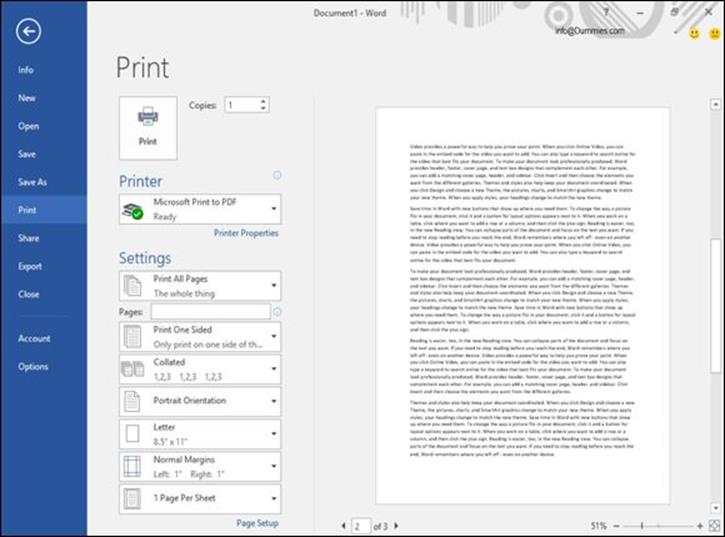
Figure 7-25: The Print option displays a Print Preview of your document.