PowerPoint 2016 For Dummies (2016)
Part II
Creating Great-Looking Slides
 See how to add recurring text or other elements to each of your PowerPoint slides at www.dummies.com/extras/powerpoint2016.
In this part …
![]() Find out how to stun your audience and receive ooohs and aaahs from the crowd by formatting text and giving your slides a spectacular appearance.
Find out how to stun your audience and receive ooohs and aaahs from the crowd by formatting text and giving your slides a spectacular appearance.
![]() Get familiar with PowerPoint themes that allow you to create good-looking slides in minutes.
Get familiar with PowerPoint themes that allow you to create good-looking slides in minutes.
![]() Explore how to use slide transitions and animations to make even the dullest content look amazing.
Explore how to use slide transitions and animations to make even the dullest content look amazing.
![]() Discover how to utilize Masters, the surefire way to add something to every slide.
Discover how to utilize Masters, the surefire way to add something to every slide.
Chapter 10
Masters of the Universe Meet the Templates of Doom
In This Chapter
![]() Discovering stuff about Masters you have to know
Discovering stuff about Masters you have to know
![]() Using and changing Masters
Using and changing Masters
![]() Working with headers and footers
Working with headers and footers
![]() Finding lost placeholders
Finding lost placeholders
![]() Creating templates
Creating templates
Want to add a bit of text to every slide in your presentation? Or maybe add your name and phone number at the bottom of your audience handouts? Or place a picture of Rush Limbaugh at the extreme right side of each page of your speaker notes?
Masters are the surefire way to add something to every slide. No need to toil separately at each slide. Add something to the Master, and it shows up automatically on every slide. Remove it from the Master, and — poof! — it disappears from every slide. Very convenient.
Masters govern all aspects of a slide’s appearance: background color, objects that appear on every slide, text that appears on all slides, and more.

Working with Masters
In PowerPoint, a Master governs the appearance of all the slides or pages in a presentation. Each presentation has at least three Masters:
· Slide Master: Dictates the format of your slides
You work with this Master most often when you tweak your slides to cosmetic perfection.
· Handout Master: Controls the look of printed handouts
· Notes Master: Determines the characteristics of printed speaker notes
Each Master specifies the appearance of text (font, size, and color, for example), slide background color, animation effects, and any additional text or other objects that you want to appear on each slide or page.
In addition, each Master can contain one or more layouts that provide different arrangements of text and other elements on the slide. For example, a typical Slide Master might contain a Title layout and several Text layouts for various types of body text slides.
One interesting — and often useful — aspect of Slide Masters is that any elements you add to the Master itself are also included in each layout that’s associated with the Master. For example, if you set the background color for the Slide Master, that color is used for each layout. Likewise, if you add a big blue rectangle in the top-left corner of the Slide Master, that rectangle is visible in the top-left corner of each layout.
However, you can also add elements to an individual layout. Then, the element is present only for that layout. For example, you may want to add more graphical elements to the Title layout. Then, those elements appear only on slides that use the Title layout.
Here are a few other points to ponder while you lie awake at night thinking about Slide Masters:
· Masters aren’t optional. Every presentation has them. You can, however, override the formatting of objects contained in the Master for a particular slide. This capability enables you to vary the appearance of slides when necessary.
· PowerPoint allows you to create more than one Slide Master in a single presentation, so you can mix two or more slide designs in your presentations. That’s why I say a presentation has at least three Masters. If you have more than one Slide Master, a presentation will have more than three Masters altogether. Note, however, that you can still have only one Handout or Notes Master in each presentation. For more information about using more than one Slide Master, see the section, “Yes, You Can Serve Two Masters,” later in this chapter.
· If you’ve used previous versions of PowerPoint, you might be wondering what happened to the Title Master. In the old days, there was actually a separate Master for title slides. However, in PowerPoint 2016, title slides don’t have their own Masters. Instead, the format of title slides is controlled by a Title Slide layout that belongs to a particular Slide Master.
Modifying the Slide Master
If you don’t like the layout of your slides, call up the Slide Master and do something about it, as shown in these steps:
1. Open Slide Master View by opening the View tab on the Ribbon and then clicking the Slide Master button, found in the Presentation Views group.
Alternatively, you can hold down the Shift key and then click the Normal View button near the bottom right of the screen.
2. Behold the Slide Master in all its splendor.
Figure 10-1 shows a typical Slide Master. You can see the placeholders for the slide title and body text. Although none are visible in this example, the Master can also contain background colors and other elements that are present on each slide.
The Slide Master includes placeholders for three objects that appear at the bottom of each slide: the Date area, Footer area, and Number area. These special areas are described later in this chapter under the heading, “Using Headers and Footers.”
A thumbnail of each Slide Master as well as the layouts for each Master are shown on the left side of the screen.
3. Make any formatting changes that you want.
Select the text you want to apply a new style to and make your formatting changes. If you want all the slide titles to be in italics, for example, select the title text and then press Ctrl+I or click the Italic button on the Formatting toolbar.
 Make sure the Slide Master itself is selected — not one of its layouts. That way, any changes you make apply to all the layouts associated with the Slide Master.
4. (Optional) To add elements that are specific to one of the layouts, select the layout and then add your changes.
For example, you may want to add more graphical elements or select different fonts for your title slides. To do that, select the Title Slide layout and make your changes.
5. Click the Normal View button near the bottom right of the window to return to Normal View.
You’re done!
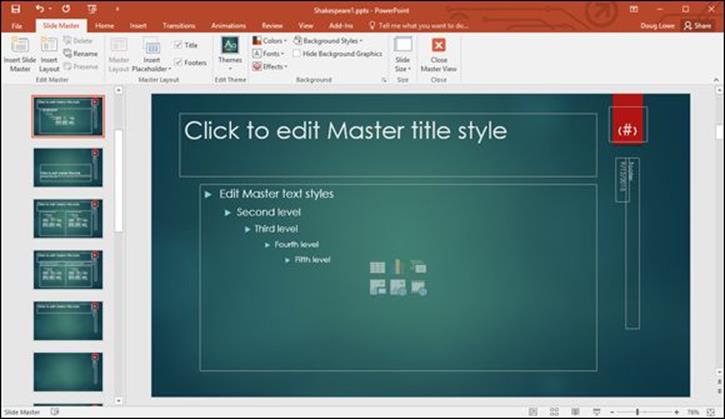
Figure 10-1: Slide Master View.
Notice that the body object contains paragraphs for five outline levels formatted with different point sizes, indentations, and bullet styles. If you want to change the way an outline level is formatted, this is the place to do so.
You can type all you want in the title or object area placeholders, but the text that you type doesn’t appear on the slides. The text that appears in these placeholders is provided only so that you can see the effect of the formatting changes you apply. (To insert text that appears on each slide, see the upcoming section, “Adding recurring text or other elements.”)
You can edit any other object on the Master by clicking it. Unlike the title and object area placeholders, any text that you type in other Slide Master objects appears exactly as you type it on each slide.
Working with the Slide Master and Edit Master tabs
When you switch to Slide Master View, an entirely new tab appears on the Ribbon. This new tab — appropriately called Slide Master — is shown in Figure 10-2.

Figure 10-2: The Slide Master tab.
Throughout this chapter, I show you how to use many of the controls on this tab. For now, here’s a quick overview of each group on this tab and the controls found in them:
· Edit Master: The controls in this group let you edit the Slide Master. You can use the Insert Slide Master button to create a new Slide Master, or you can use the Insert Layout button to add a new layout to an existing Master. You can also use the Delete and Rename buttons to delete or rename Masters or layouts. For information about the Preserve button, see the section “Preserving your masters,” later in this chapter.
· Master Layout: The controls in this group let you edit a layout by adding or removing placeholders, the title, and footer elements.
· Edit Theme: The controls in this group let you apply a theme to a Master or a layout. For more information about themes, flip to Chapter 8.
· Background: The controls in this group let you set the background for a Master or a layout. Refer to Chapter 8 for more information.
· Size: The control in this group lets you select Standard, Widescreen, or a custom slide size.
· Close: This group contains a Close Master View button that returns you to Normal View.
Adding recurring text or other elements
To add recurring text to each slide, follow this procedure:
1. Call up the Slide Master (by clicking Slide Master in the Presentation Views group of the Views tab) if it’s not displayed already.
2. Add a text box to the Slide Master by selecting the Insert tab on the Ribbon and then clicking the Text Box button (found in the Text group).
Click where you want to add the text.
3. Type the text that you want to appear on each slide.
For example, Call 1-800-555-NERD today! Don’t delay! Operators are standing by!
4. Format the text however you want.
For example, if you want bold, press Ctrl+B or click the Bold button on the Formatting toolbar. (See Chapter 7 for more on text formatting.)
5. Click the Normal View button to return to your presentation.
Now’s the time to gloat over your work. Lasso some co-workers and show ’em how proud you are that you added some text that appears on each slide in your presentation.
You can add other types of objects to the Slide Master, too. You can add clip art, pictures, or even a video or sound clip. Anything that you can add to an individual slide can be added to the Slide Master.
After you place an object on the Slide Master, you can grab it with the mouse and move it or resize it in any way you want. The object appears in the same location and size on each slide.
To delete an object from the Slide Master, click it and press Delete. To delete a text object, you must first click the object and then click again on the object frame. Then press Delete.
Applying themes to your Masters
You can use the Edit Theme group in the Slide Master tab on the Ribbon to change the theme applied to a Slide Master. Note: All the layouts that belong to a given Master use the same theme. So, it doesn’t matter whether the Slide Master itself or one of its layouts is selected when you change the theme; either way, the entire Slide Master is changed.
To change the theme for a Slide Master, follow these steps:
1. Choose View ⇒ Presentation Views ⇒ Slide Master or Shift+click the Normal View button at the bottom right of the PowerPoint window to summon the Slide Master.
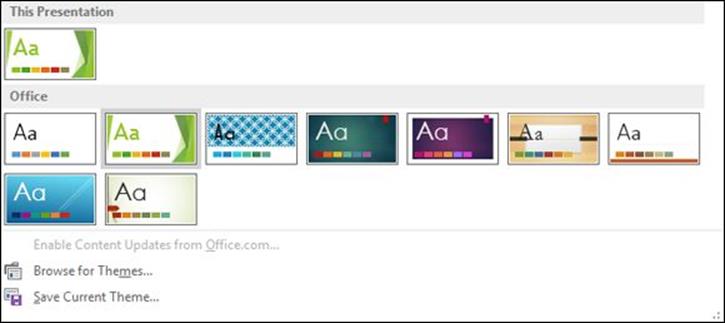
2. Use the Themes drop-down list on the Slide Master tab to select the theme you want to apply to the Slide Master.
3. (Optional) Use the Colors, Fonts, and Effects controls to modify the color scheme, fonts, and effects used for the theme.
Treat yourself to a bag of Cheetos if it works the first time. If it doesn’t work, have a bag of Cheetos anyway. Then rub all that orange gunk that sticks to your fingers on the computer screen. That will apply the Cheetos Orange color scheme to your Slide Master — at least temporarily.
PowerPoint themes are hefty enough that I’ve devoted an entire chapter to them. Go to Chapter 8 if you need to know how they work.
If you want to adjust the slide background, use the Background Styles control. Chapter 8 walks you through this feature.
Adding new layouts
If you don’t like the standard layouts that come with PowerPoint’s built-in Slide Master, you can add a layout and customize it any way you want. To add your own layout, just follow these steps:
1. Switch to Slide Master View by choosing View ⇒ Presentation Views ⇒ Slide Master or Shift+click the Normal View button near the bottom right of the window.
2. On the Slide Master tab on the Ribbon, click Insert Layout in the Edit Master group.
A new, blank layout is inserted in the current Slide Master.
3. Use the Insert Placeholder drop-down list in the Master Layout group on the Slide Master tab on the Ribbon to insert whatever placeholders you want to add to the new layout.
This control reveals a list of placeholder types you can insert. The options are Content, Text, Picture, Chart, Table, Diagram, Media, and Clip Art.
4. Play with the layout until you get it just right.
You can move and resize the placeholders to your heart’s content, and you can apply any formatting or other options you want for the layout.
5. When you’re happy, click the Close Master View button to switch back to Normal View.
Adjusting the Handout and Notes Masters
Like the Slide Master, the Handout and Notes Masters contain formatting information that’s applied automatically to your presentation. This section tells you how you can modify these Masters.
Changing the Handout Master
Follow these simple steps to change the Handout Master:
1. Choose View ⇒ Presentation Views ⇒ Handout Master or hold down the Shift key while clicking the Slide Sorter View button.
The Handout Master rears its ugly head, as shown in Figure 10-3. Notice that it includes a special Handout Master tab on the Ribbon.
2. Mess around with it.
The Handout Master shows the arrangement of handouts for slides printed two, three, four, six, or nine per page, plus the arrangement for printing outlines. You can switch among these different handout layouts by using the Slides-Per-Page control in the Page Setup group on the Handout Master tab.
Unfortunately, you can’t move, resize, or delete the slide and outline placeholders that appear in the Handout Master. You can, however, add or change elements that you want to appear on each handout page, such as your name and phone number, a page number, and maybe a good lawyer joke.
3. Click the Close Master View button on the Handout Master tab on the Ribbon.
PowerPoint returns to Normal View.
4. Print a handout to see whether your changes worked.
Handout Master elements are invisible until you print them, so you should print at least one handout page to check your work.

Figure 10-3: The Handout Master.
When you print handout pages, the slides are formatted according to the Slide Master. You can’t change the appearance of the slides from the Handout Master.
Changing the Notes Master
Notes pages consist of a reduced image of the slide, plus any notes that you type to go along with the slide. For more information about creating and using Notes Pages, see Chapter 5.
When printed, notes pages are formatted according to the Notes Master. To change the Notes Master, follow these steps:
1. Choose View ⇒ Presentation Views ⇒ Notes Master.
The Notes Master comes to life, as shown in Figure 10-4.
2. Indulge yourself.
The Notes Master contains two main placeholders — one for your notes and the other for the slide. You can move or change the size of either of these objects, and you can change the format of the text in the notes placeholder. You also can add or change elements that you want to appear on each handout page. Also notice the convenient placement of the header, footer, date, and page number blocks.
3. Click the Close Master View button.
PowerPoint returns to Normal View.
4. Print your notes to see whether your changes worked.
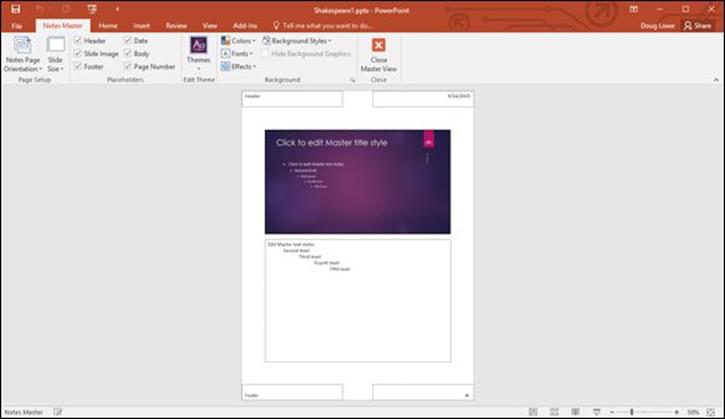
Figure 10-4: The Notes Master.
At the very least, add page numbers to your speaker notes. That way, if you drop a stack of notes pages, you can use the page numbers to quickly sort them back into order.
If public speaking gives you severe stomach cramps, add the text “Just picture them naked” to the Notes Master. It works every time for me.
Using Masters
You don’t have to do anything special to apply the formats from a Master to your slide; all slides automatically pick up the Master format unless you specify otherwise. So this section really should be titled “Not Using Masters” because it talks about how to not use the formats provided by Masters.
Overriding the Master text style
To override the text style specified by a Slide Master, simply format the text however you want while you’re working in Normal View. The formatting changes you make apply only to the selected text. The Slide Masters aren’t affected.
 The only way to change one of the Masters is to do it directly by switching to the appropriate Master View. Therefore, any formatting changes you make while in Slide View affect only that slide.
If you change the layout or formatting of text elements on a slide (for example, if you move the title placeholder or change the title font) and then decide that you liked it better the way it was, you can quickly reapply the text style from the Slide Master. Right-click the slide in the Slide Preview pane (on the left side of the screen) and then choose Reset Slide from the menu that appears.
Hiding background objects
Slide Masters enable you to add background objects that appear on every slide in your presentation. You can, however, hide the background objects for selected slides. You can also change the background color or effect used for an individual slide. These steps show you how:
1. Display the slide that you want to show with a plain background.
2. Click the Design tab on the Ribbon and then select the Hide Background Graphics check box found in the Background group.
Hiding background objects or changing the background color or effect applies only to the current slide. Other slides are unaffected.
If you want to remove some but not all the background objects from a single slide, try this trick:
1. Hide the background graphics from the slide.
To hide a background object, choose Design ⇒ Background ⇒ Hide Background Objects.
2. Call up the Slide Master by choosing View ⇒ Presentation Views ⇒ Slide Master.
3. Hold down the Shift key and then click each of the background objects that you want to appear.
4. Press Ctrl+C to copy these objects to the Clipboard.
5. Return to Normal View by clicking the Normal button at the bottom of the screen.
6. Press Ctrl+V to paste the objects from the Clipboard.
7. Click the Design tab on the Ribbon and then click the Send to Back button (in the Arrange group) if the background objects obscure other slide objects or text.
Note that if you paste objects in this way, those objects are no longer tied to the Slide Master. Thus, if you later change the objects on the Slide Master, the change won’t be reflected on the slides with the pasted copies of the objects.
Using Headers and Footers
Headers and footers provide a convenient way to place repeating text at the top or bottom of each slide, handout, or notes page. You can add the time and date, slide number or page number, or any other information that you want to appear on each slide or page, such as your name or the title of your presentation.
The PowerPoint Slide Masters include three placeholders for such information:
· The Date area can be used to display a date and time.
· The Number area can be used to display the slide number.
· The Footer area can be used to display any text that you want to see on each slide.
In addition, Handout and Notes Masters include a fourth placeholder, the Header area, which provides an additional area for text that you want to see on each page.
Although the Date, Number, and Footer areas normally appear at the bottom of the slide in the Slide Masters, you can move them to the top by switching to Slide View or Slide Master View and then dragging the placeholders to the top of the slide.
Adding a date, number, or footer to slides
To add a date, slide number, or footer to your slides, follow these steps:
1.  Click the Insert tab on the Ribbon and then click the Header and Footer button (found in the Text group).
The Header and Footer dialog box appears, as shown in Figure 10-5. (If necessary, click the Slide tab so that you see the slide footer options as shown in the figure.)
2. To display the date, select the Date and Time check box. Then select the date format that you want in the list box beneath the Update Automatically radio button.
Alternatively, you can select the Fixed radio button and then type any text that you want in the Fixed text box. The text that you type appears in the Date area of the Slide Master.
3. To display slide numbers, select the Slide Number check box.
4. To display a footer on each slide, select the Footer check box and then type the text that you want to appear on each slide in the Footer text box.
For example, you may type your name, your company name, a subliminal message, or the name of your presentation.
5. If you want the date, number, and footer to appear on every slide except for the title slide, select the Don’t Show on Title Slide check box.
6. Click Apply to All.
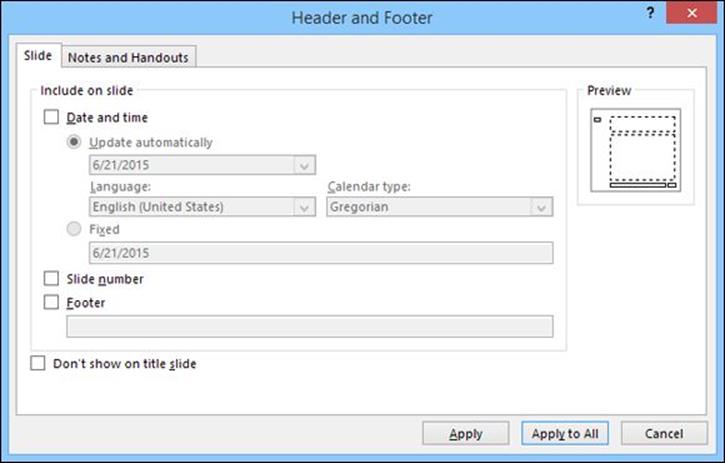
Figure 10-5: The Header and Footer dialog box.
If you’re going to give a presentation on a certain date in the future (for example, at a sales conference or a trade show), type the date that you’ll be giving the presentation directly into the Fixed text box. You can use the same technique to postdate presentations that you never really gave but need to supply to your legal counsel to back up your alibi. (You can also type any other type of text you want to appear here.)
If you want to change the Footer areas for just one slide, click Apply instead of Apply to All. This option comes in handy for those occasional slides that contain a graphic or a block of text that crowds up against the footer areas. You can easily suppress the footer information for that slide to make room for the large graphic or text.
Adding a header or footer to notes or handouts pages
To add header and footer information to notes or handouts pages, follow the steps described in the preceding section, “Adding a date, number, or footer to slides,” except click the Notes and Handouts tab after the Header and Footer dialog box appears. Clicking this tab displays a dialog box that’s similar to the Header and Footer dialog box for Slide, except that it gives you an additional option to add a header that appears at the top of each page. After you indicate how you want to print the Date, Header, Number, and Footer areas, click the Apply to All button.
Editing the header and footer placeholders directly
If you want, you can edit the text that appears in the header and footer placeholders directly. First, display the appropriate Master — Slide, Handout, or Notes. Then click the date, number, footer, or header placeholder and start typing.
You may notice that the placeholders include special codes for the options that you indicated in the Header and Footer dialog box. For example, the date placeholder may contain the text <date,time> if you indicated that the date should be displayed. You can type text before or after these codes, but you should leave the codes themselves alone.
Yes, You Can Serve Two Masters
In spite of the Biblical edict, Microsoft has endowed PowerPoint with the capability to have more than one Slide Master. This feature lets you set up two or more Slide Masters and then choose which Master you want to use for each slide in your presentation.
The following sections explain how to use the multiple Masters feature.
Creating a new Slide Master
To add a new Master to a presentation, follow these steps:
1. Switch to Slide Master View.
From the View tab on the Ribbon, click the Slide Master button (found in the Presentation Views group). Or if you prefer, hold down the Shift key and click the Normal View button near the lower-right corner of the screen.
2. In the Slide Master tab on the Ribbon, click the Insert Slide Master button in the Edit Master group.
A new Slide Master appears, as shown in Figure 10-6. Notice that a thumbnail for the new Slide Master is added to the list of thumbnails on the left side of the screen, and that the new Slide Master uses PowerPoint’s default settings (white background, black text, and so forth).
3. Modify the new Slide Master to your liking.
You can make any formatting changes you want: Change the background color and text styles, add background objects, and so on.
4. Click the Close Master View button on the Slide Master tab on the Ribbon to return to Normal View.
You can now begin using the new Master that you created. (See the next section, “Applying Masters,” for more information.)

Figure 10-6: Creating a new Slide Master.
Another way to create a new Slide Master is to duplicate one of your presentation’s existing Slide Masters. When you do that, the new Slide Master inherits the formatting of the original one. This inheritance can save you a lot of work, especially if you want to create a new Slide Master that varies from an existing one in only a minor way, such as having a different background color.
To duplicate a Slide Master, click the Master that you want to duplicate in the thumbnails on the left of the screen and then press Ctrl+D or right-click the thumbnail and choose Duplicate Layout.
To delete a Slide Master, click the Master that you want to delete. Then click the Delete Master button in the Slide Master tab on the Ribbon (located in the Edit Master group). Or, just press Delete.
Applying Masters
If you have created multiple Masters for a presentation, you can select which Master to use for each slide in your presentation. To apply a Master to one or more slides, follow these steps:
1. Select the slide or slides to which you want to apply the alternate Slide Master.
The easiest way to do this is to click the slide that you want in the thumbnails area on the left of the screen. To select more than one slide, hold down the Ctrl key and click each slide that you want to select.
2. Click the Home tab on the Ribbon and then click the Layout button (in the Slides group).
This action summons the gallery, shown in Figure 10-7. Here, you can see all the layouts for all the Slide Masters contained in the presentation.
3. Select the Slide Master layout you want to apply to the slides you selected.
The Slide Master is applied to the selected slides.
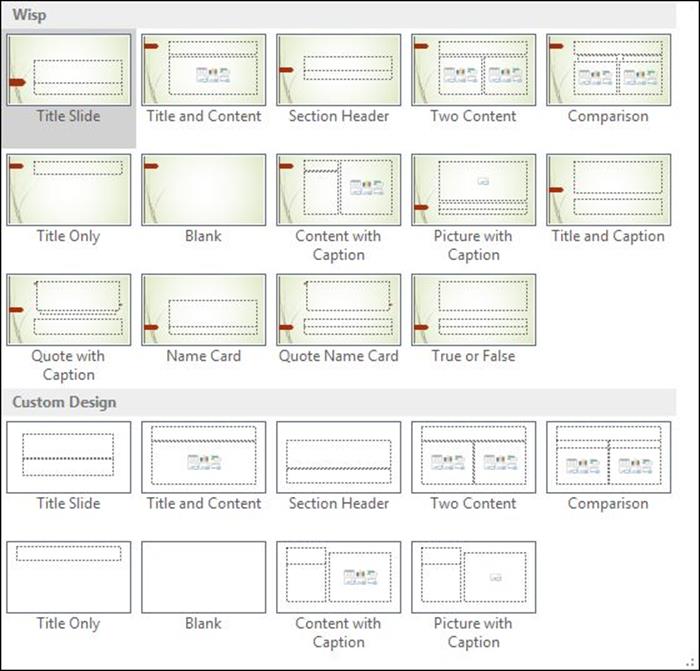
Figure 10-7: Choosing a layout.
Preserving your masters
PowerPoint has a bad habit of deleting Slide Masters when they’re no longer used in your presentation. For example, if you create a new Slide Master and then apply it to all the slides in your presentation, PowerPoint assumes that you no longer need the original Slide Master. So, the original is deleted. Poof! Your presentation is now one pickle short of a full jar.
You can prevent this from happening with the Preserve Master option for your Slide Masters. Any new Slide Masters that you create automatically get the Preserve Master option, so they won’t be deleted. However, the Slide Masters that your presentations start off with don’t have the Preserve Master option, so you may want to set it yourself.
To preserve a Master, switch to Slide Master View, click the thumbnail for the Master that you want to preserve, and then click the Preserve button on the Slide Master tab on the Ribbon (found in the Edit Master group). A little pushpin icon appears next to the Master’s thumbnail to show that the Master will be preserved.
 Don’t click the Preserve button indiscriminately! If you click it for a Master that already has the Preserve Master setting, Preserve Master is removed for that Master. Then the Master is subject to premature deletion.
Restoring Lost Placeholders
If you’ve played around with your Masters too much, you may inadvertently delete a layout placeholder that you wish you could get back. For example, suppose that you delete the footer placeholder from a Master and now you want it back. No problem! Just follow these steps:
1. Switch to Slide Master View.
2. Call up the Master with the missing placeholder.
3. In the Slide Master tab on the Ribbon, click the Master Layout button (in the Master Layout group).
This step calls up the Master Layout dialog box, as shown in Figure 10-8.
The Master Layout dialog box is one of the strangest dialog boxes you encounter. If you summon it for a Master that still has all its placeholders, all the check boxes on the Master Layout dialog box are grayed out. So, all you can do is look at the controls, grunt, scratch your head, and then click OK to dismiss the seemingly useless dialog box. However, if you have deleted one or more placeholders, the check boxes for the missing placeholders are available.
4. Select the check boxes for the placeholders that you want to restore.
5. Click OK.
The missing placeholders reappear.
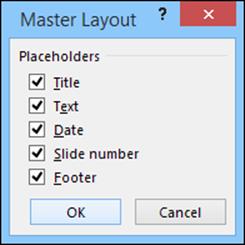
Figure 10-8: The Master Layout dialog box.
Note that the preceding procedure works only for actual masters, not for individual layouts. If you delete a placeholder from a layout, you must re-create it by using the Insert Placeholder command as described in the section “Adding new layouts,” earlier in this chapter.
Working with Templates
If you had to create every presentation from scratch, starting with a blank slide, you would probably put PowerPoint back in its box and use it as a bookend. Creating a presentation is easy, but creating one that looks good is a different story. Making a good-looking presentation is tough even for the artistically inclined. For left-brained, nonartistic types, it’s next to impossible.
Thank heavens for themes and templates. A theme is simply a PowerPoint presentation with predefined Slide Masters. A template is similar to a theme, but also includes boilerplate text. Because they are so similar, I refer to both themes and templates simply as templatesthroughout the rest of this section.
Templates jump-start the process of creating good-looking presentations. You can create your own templates, but fortunately PowerPoint comes with a ton of them designed by professional artists who understand color combinations, balance, and all that other artsy stuff. Have a croissant and celebrate.
Templates use the special file extension .potx, but you can also use ordinary PowerPoint presentation files (PPT) as themes or templates. You can, therefore, use any of your own presentations as a template. If you make extensive changes to a presentation’s Masters, you can use that presentation as a template for other presentations that you create. Or, you can save the presentation as a template by using the .potx file extension.
Because a template is a presentation, you can open it and change it if you want.
Creating a new template
If none of the templates that come with PowerPoint appeals to you, you can easily create your own. All you have to do is create a presentation with the Masters, and the color scheme set up just the way you want, and then save it as a template. Here are a few points to remember about templates:
· If you want to make minor modifications to one of the supplied templates, open the template by using the Open command. Then, make your changes and use the Save As command to save the template under a new name.
· You can also create your own presentation templates. Just create the template as a normal presentation and add however many slides that you want to include.
· Choose a location to store all your templates. You need to know the path to this location to create new presentations based on your templates.
Creating a presentation based on a template
To create a new presentation based on a template you have created yourself, you must first configure PowerPoint to look for personal templates. To do so, choose File ⇒ Options, click Save, enter the path to your templates folder in the Default Personal Templates Location box, and click OK.
Once you have configured the template location, you can create a new presentation based on one of your templates by choosing File ⇒ New, then clicking on Personal to display a list of your personal templates. See Figure 10-9.
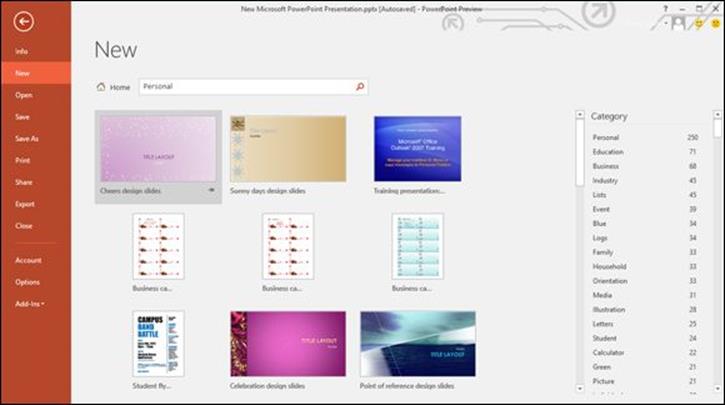
Figure 10-9: Creating a new presentation.
Working with Presentation Sections
Sections let you divide a presentation into two or more groups of slides called sections. Sections are designed to be used with large presentations that contain a large number of slides that can easily be grouped into logical groupings.
Using sections couldn’t be easier. To create a new section in your presentation, just select the first slide that you want in the new section, switch to the Home tab, click the Section button (found in the Slides group), and then choose Add Section. The new section appears in the Slide thumbnail area with the name Untitled Section, as shown in Figure 10-10.
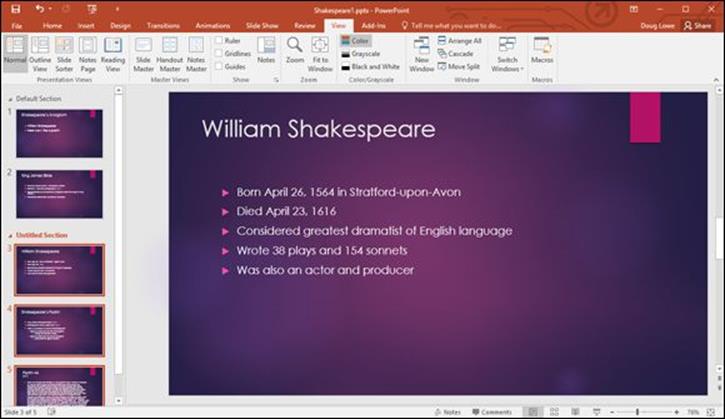
Figure 10-10: Creating a new section.
After you’ve created one or more sections in your presentation, you can do several interesting things with the sections:
· You can select all the slides in a section by clicking the section header in the Slide Thumbnail pane.
· You can collapse or expand the sections in the Slide Thumbnail pane by clicking the arrow at the left of the section header.
· You can rename a section by right-clicking the section header and choosing Rename Section.
· You can move all the slides in a section by dragging the section header to a new location in the Slide Thumbnail pane.
· You can delete the slides in a section, as well as the section itself, by clicking the section header to select the section and then pressing the Delete key.
· You can remove a section without deleting its slides by right-clicking the section header and choosing Remove Section.
· During a slide show, you can go to the first slide in any section by clicking the Menu icon in the bottom-left corner of the slide, then choosing Go To Section and selecting the section you