MCSA: Windows Server 2012 R2 Installation and Configuration (2015)
Chapter 3
Plan and Install Active Directory
THE FOLLOWING 70-410 EXAM OBJECTIVES ARE COVERED IN THIS CHAPTER:
1. ![]() Install domain controllers
Install domain controllers
§ Add or remove a domain controller from a domain
§ Upgrade a domain controller
§ Install Active Directory Domain Services (AD DS) on a Server Core installation
§ Install a domain controller from Install from Media (IFM)
§ Resolve DNS SRV record registration issues
§ Configure a global catalog server
§ Deploy Active Directory iaas in Windows Azure
Now that you are familiar with Domain Name System (DNS), you need to verify that the computer you upgrade to a domain controller (DC) meets the basic file system and network connectivity requirements so that Active Directory runs smoothly and efficiently in your organization.
Next, you’ll explore the concept of domain functional levels, which essentially determine what sorts of domain controllers you can use in your environment. For instance, in the Windows Server 2003 domain functional level, you can include Server 2012/2012 R2, Server 2008 R2, Server 2008, and Server 2003 domain controllers, but the functionality of the domain is severely limited.
Once you understand how to plan properly for your domain environment, you will learn how to install Active Directory, which you will accomplish by promoting a Windows Server 2012 R2 computer to a domain controller. I will also discuss a feature in Windows Server 2012 R2 called a read-only domain controller (RODC).
After you become familiar with the initial Active Directory installation, you will learn how to install and configure Application Directory partitions. These partitions provide replicable data repositories using the Active Directory paradigm, but they don’t actually store any security principals, such as users or groups. As the name implies, you use Application Directory partitions primarily to store data generated by applications that need to be replicated throughout your network environments independent of the rest of Active Directory.
The final section of this chapter deals with integrating DNS with Active Directory. You learned about DNS in Chapter 2, “Configure Network Services,” but in this chapter I will review how DNS implements with Active Directory.
 For these exercises, I assume you are creating a Windows Server 2012 R2 machine in a test environment and not on a live network. If this Windows Server 2012 R2 machine is being added into a Windows Server 2012 or 2008 R2 domain, you will need to prep the domain (explained in the section “Adprep” later in this chapter).
Verifying the File system
When you’re planning your Active Directory deployment, the file system that the operating system uses is an important concern for two reasons. First, the file system can provide the ultimate level of security for all the information stored on the server itself. Second, it is responsible for managing and tracking all of this data. The Windows Server 2012 R2 platform supports two file systems:
§ Windows NT File System (NTFS)
§ Resilient File System (ReFS)
Although ReFS was new to Windows Server 2012, NTFS has been around for many years, and NTFS in Windows Server 2012 R2 has been improved for better performance.
If you have been working with servers for many years, you may have noticed a few changes to the server file system choices. For example, in Windows Server 2003, you could choose between FAT, FAT32, and NTFS. In Windows Server 2008 R2, you could choose between FAT32 and NTFS. In Windows Server 2012 R2, you will notice that all versions of FAT have been removed (see Figure 3.1).
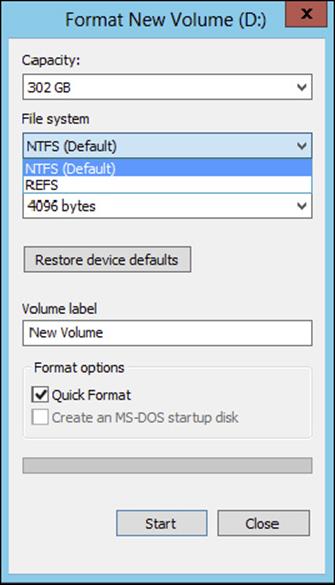
FIGURE 3.1 Format options on Windows Server 2012 R2
Resilient File System (ReFS)
Windows Server 2012 R2 now includes a new file system called Resilient File System (ReFS). ReFS was created to help Windows Server 2012 R2 maximize the availability of data and online operation. ReFS allows the Windows Server 2012 R2 system to continue to function despite some errors that would normally cause data to be lost or the system to go down. ReFS uses data integrity to protect your data from errors and also to make sure that all of your important data is online when that data is needed.
One of the issues that IT members have had to face over the years is the problem of rapidly growing data sizes. As we continue to rely more and more on computers, our data continues to get larger and larger. This is where ReFS can help an IT department. ReFS was designed specifically with the issues of scalability and performance in mind, which resulted in some of the following ReFS features:
Availability If your hard disk becomes corrupt, ReFS has the ability to implement a salvage strategy that removes the data that has been corrupted. This feature allows the healthy data to continue to be available while the unhealthy data is removed. All of this can be done without taking the hard disk offline.
Scalability One of the main advantages of ReFS is the ability to support volume sizes up to 2^78 bytes using 16KB cluster sizes, while Windows stack addressing allows 2^64 bytes. ReFS also supports file sizes of 2^64-1 bytes, 2^64 files in a directory, and the same number of directories in a volume.
Robust Disk Updating ReFS uses a disk updating system referred to as an allocate-on-write transactional model (also known as copy on write). This model helps to avoid many hard disk issues while data is written to the disk because ReFS updates data using disk writes to multiple locations in an atomic manner instead of updating data in place.
Data Integrity ReFS uses a check-summed system to verify that all data that is being written and stored is accurate and reliable. ReFS always uses allocate-on-write for updates to the data, and it uses checksums to detect disk corruption.
Application Compatibility ReFS allows for most NTFS features and also supports the Win32 API. Because of this, ReFS is compatible with most Windows applications.
NTFS
Let’s start with some of the features of NTFS. There are many benefits to using NTFS, including support for the following:
Disk Quotas To restrict the amount of disk space used by users on the network, system administrators can establish disk quotas. By default, Windows Server 2012 R2 supports disk quota restrictions at the volume level. That is, you can restrict the amount of storage space that a specific user uses on a single disk volume. Third-party solutions that allow more granular quota settings are also available.
File System Encryption One of the fundamental problems with network operating systems (NOSs) is that system administrators are often given full permission to view all files and data stored on hard disks, which can be a security and privacy concern. In some cases, this is necessary. For example, to perform backup, recovery, and disk management functions, at least one user must have all permissions. Windows Server 2012 R2 and NTFS address these issues by allowing for file system encryption. Encryption essentially scrambles all of the data stored within files before they are written to the disk. When an authorized user requests the files, they are transparently decrypted and provided. By using encryption, you can prevent the data from being used in case it is stolen or intercepted by an unauthorized user—even a system administrator.
Dynamic Volumes Protecting against disk failures is an important concern for production servers. Although earlier versions of Windows NT supported various levels of Redundant Array of Independent Disks (RAID) technology, software-based solutions had some shortcomings. Perhaps the most significant was that administrators needed to perform server reboots to change RAID configurations. Also, you could not make some configuration changes without completely reinstalling the operating system. With Windows Server 2012 R2 support for dynamic volumes, system administrators can change RAID and other disk configuration settings without needing to reboot or reinstall the server. The result is greater data protection, increased scalability, and increased uptime. Dynamic volumes are also included with ReFS.
Mounted Drives By using mounted drives, system administrators can map a local disk drive to an NTFS directory name. This helps them organize disk space on servers and increase manageability. By using mounted drives, you can mount the C:\Users directory to an actual physical disk. If that disk becomes full, you can copy all of the files to another, larger drive without changing the directory path name or reconfiguring applications.
Remote Storage System administrators often notice that as soon as they add more space, they must plan the next upgrade. One way to recover disk space is to move infrequently used files to external hard drives. However, backing up and restoring these files can be quite difficult and time-consuming. System administrators can use the remote storage features supported by NTFS to off-load seldom-used data automatically to a backup system or other devices. The files, however, remain available to users. If a user requests an archived file, Windows Server 2012 R2 can automatically restore the file from a remote storage device and make it available. Using remote storage like this frees up system administrators’ time and allows them to focus on tasks other than micromanaging disk space.
Self-healing NTFS In previous versions of the Windows Server operating system, if you had to fix a corrupted NTFS volume, you used a tool called Chkdsk.exe. The disadvantage of this tool is that the Windows Server’s availability was disrupted. If this server was your domain controller, that could stop domain logon authentication.
To help protect the Windows Server 2012 R2 NTFS file system, Microsoft now uses a feature called self-healing NTFS. Self-healing NTFS attempts to fix corrupted NTFS file systems without taking them offline. Self-healing NTFS allows an NTFS file system to be corrected without running the Chkdsk.exe utility. New features added to the NTFS kernel code allow disk inconsistencies to be corrected without system downtime.
Security NTFS allows you to configure not only folder-level security but also file-level security. NTFS security is one of the biggest reasons most companies use NTFS. ReFS also allows folder- and file-level security.
Setting Up the NTFS Partition
Although the features mentioned in the previous section likely compel most system administrators to use NTFS, additional reasons make using it mandatory. The most important reason is that the Active Directory data store must reside on an NTFS partition. Therefore, before you begin installing Active Directory, make sure you have at least one NTFS partition available. Also, be sure you have a reasonable amount of disk space available (at least 4GB). Because the size of the Active Directory data store will grow as you add objects to it, also be sure that you have adequate space for the future.
Exercise 3.1 shows you how to use the administrative tools to view and modify disk configuration.
 Before you make any disk configuration changes, be sure you completely understand their potential effects; then perform the test in a lab environment and make sure you have good, verifiable backups handy. Changing partition sizes and adding and removing partitions can result in a total loss of all information on one or more partitions.
If you want to convert an existing partition from FAT or FAT32 to NTFS, you need to use the CONVERT command-line utility. For example, the following command converts the C: partition from FAT to NTFS:
CONVERT c: /fs:ntfs
EXERCISE 3.1: Viewing Disk Configuration
1. Press the Windows key on the keyboard (left side between the Ctrl and Alt keys) and then choose Administrative Tools.
2. Double-click Computer Management.
3. Under Storage, click Disk Management.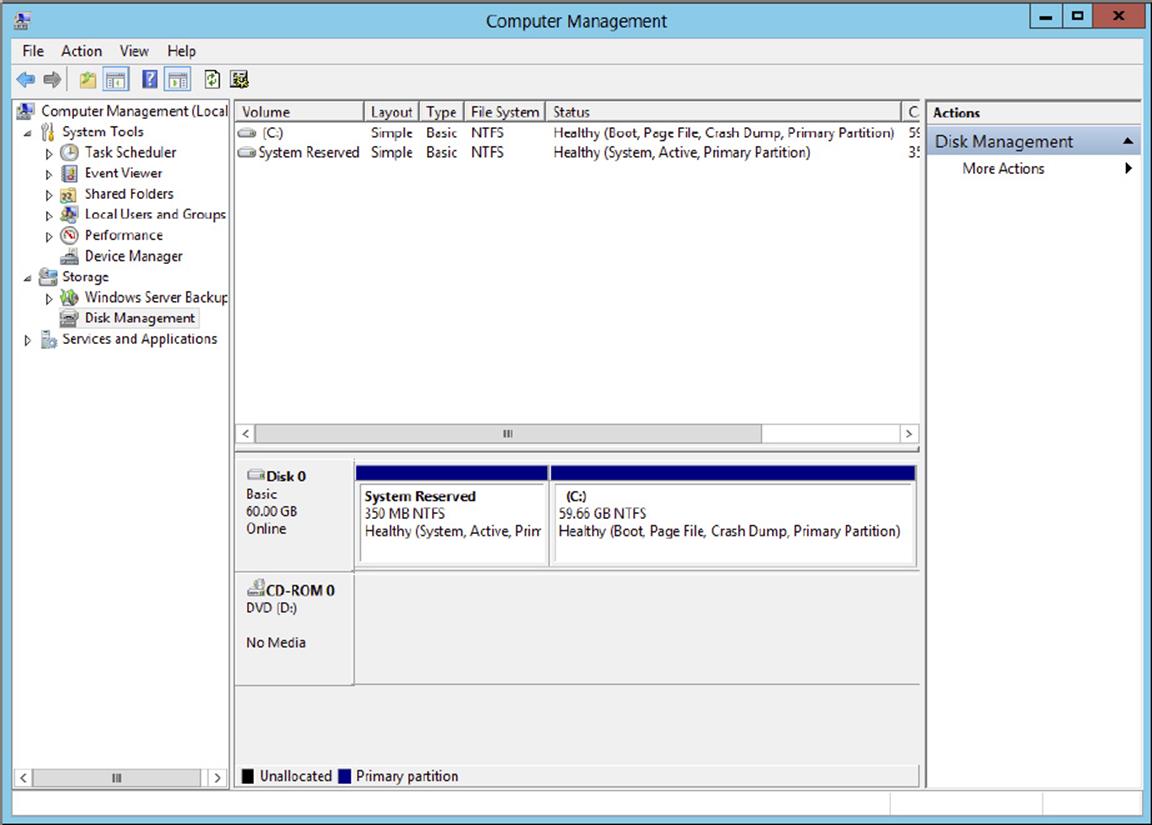
The Disk Management program shows you the logical and physical disks that are currently configured on your system. Note that information about the size of each partition is also displayed (in the Capacity column).
4. Use the View menu to choose various depictions of the physical and logical drives in your system.
5. To see the available options for modifying partition settings, right-click any of the disks or partitions. This step is optional.
6. Close Computer Management.
Verifying Network Connectivity
Although a Windows Server 2012 R2 computer can be used by itself without connecting to a network, you will not harness much of the potential of the operating system without network connectivity. Because the fundamental purpose of a network operating system is to provide resources to users, you must verify network connectivity.
Basic Connectivity Tests
Before you begin to install Active Directory, you should perform several checks of your current configuration to ensure that the server is configured properly on the network. You should test the following:
Network Adapter At least one network adapter should be installed and properly configured on your server. A quick way to verify that a network adapter is properly installed is to use the Computer Management administrative tool. Under Device Manager, Network Adapters branch, you should have at least one network adapter listed. If you do not, use the Add Hardware icon in Control Panel to configure hardware.
TCP/IP Make sure that TCP/IP is installed, configured, and enabled on any necessary network adapters. The server should also be given a valid IP address and subnet mask. Optionally, you may need to configure a default gateway, DNS servers, WINS servers, and other network settings. If you are using DHCP, be sure that the assigned information is correct. It is always a good idea to use a static IP address for servers because IP address changes can cause network connectivity problems if they are not handled properly.
You must understand TCP/IP to use Windows Server 2012 R2 and Active Directory. TCP/IP will be covered in greater detail in Chapter 8, “Configure TCP/IP.”
Internet Access If the server should have access to the Internet, verify that it is able to connect to external web servers and other machines outside of the local area network (LAN). If the server is unable to connect, you might have a problem with the TCP/IP configuration.
LAN Access The server should be able to view other servers and workstations on the network. If other machines are not visible, make sure that the network and TCP/IP configurations are correct for your environment.
Client Access Network client computers should be able to connect to your server and view any shared resources. A simple way to test connectivity is to create a share and test whether other machines are able to see files and folders within it. If clients cannot access the machine, make sure that both the client and the server are configured properly.
Wide Area Network Access If you’re working in a distributed environment, you should ensure that you have access to any remote sites or users who will need to connect to this machine. Usually, this is a simple test that can be performed by a network administrator.
Tools and Techniques for Testing Network Configuration
In some cases, verifying network access can be quite simple. You might have some internal and external network resources with which to test. In other cases, it might be more complicated. You can use several tools and techniques to verify that your network configuration is correct.
Using the Ipconfig Utility By typing ipconfig/all at the command prompt, you can view information about the TCP/IP settings of a computer. Figure 3.2 shows the types of information you’ll receive.

FIGURE 3.2 Viewing TCP/IP information with the ipconfig utility
Using the Ping Command The ping command was designed to test connectivity to other computers. You can use the command simply by typing ping and then an IP address or hostname at the command line. The following are some steps for testing connectivity using the ping command.
1. Ping Other Computers on the Same Subnet You should start by pinging a known active IP address on the network to check for a response. If you receive one, then you have connectivity to the network.
2. Next check to see whether you can ping another machine using its hostname. If this works, then local name resolution works properly.
3. Ping Computers on Different Subnets To ensure that routing is set up properly, you should attempt to ping computers that are on other subnets (if any exist) on your network. If this test fails, try pinging the default gateway. Any errors may indicate a problem in the network configuration or a problem with a router.
When You Don’t Receive a Response
Some firewalls, routers, or servers on your network or on the Internet might prevent you from receiving a successful response from a ping command. This is usually for security reasons (malicious users might attempt to disrupt network traffic using excessive pings as well as redirects and smurf attacks). If you do not receive a response, do not assume that the service is not available. Instead, try to verify connectivity in other ways. For example, you can use the TRACERT command to demonstrate connectivity beyond your subnet, even if other routers ignore Internet Control Message Protocol (ICMP) responses. Because the display of a second router implies connectivity, the path to an ultimate destination shows success even if it does not display the actual names and addresses.
Browsing the Network To ensure that you have access to other computers on the network, be sure that they can be viewed by clicking Network. This verifies that your name resolution parameters are set up correctly and that other computers are accessible. Also, try connecting to resources (such as file shares or printers) on other machines.
By default, Network Discovery is turned off. To browse the network, you must first enable Network Discovery from the Control Panel in the Network and Sharing Center ![]() Advanced Sharing settings.
Advanced Sharing settings.
Browsing the Internet You can quickly verify whether your server has access to the Internet by visiting a known website, such as www.microsoft.com. Success ensures that you have access outside of your network. If you do not have access to the Web, you might need to verify your proxy server settings (if applicable) and your DNS server settings.
By performing these simple tests, you can ensure that you have a properly configured network connection and that other network resources are available.
Understanding Domain and Forest Functionality
Windows Server 2012 R2 Active Directory uses a concept called domain and forest functionality. The functional level that you choose during the Active Directory installation determines which features your domain can use.
Windows Server 2008, Windows Server 2008 R2, Windows Server 2012, and Windows Server 2012 R2 include additional forest functionality compared to Windows Server 2003. Forest functionality applies to all of the domains within a forest.
About the Domain Functional Level
Windows Server 2012 R2 will support the following domain functional levels:
§ Windows Server 2003
§ Windows Server 2008
§ Windows Server 2008 R2
§ Windows Server 2012
§ Windows Server 2012 R2
Which function level you use depends on the domain controllers you have installed on your network. This is an important fact to remember. You can use Windows Server 2003, Windows Server 2008/2008 R2, and Windows 2012 member servers in the WindowsServer 2012 R2 function level as long as all domain controllers are running Windows Server 2012 R2.
When you are deciding which function level you will use in your organization, you must choose the function level of your lowest domain controller. For example, if you have a Windows Server 2003 domain controller, your function levels should be Windows Server 2003. If you choose a higher level, the Windows Server 2003 domain controller will not function. Be careful—once a forest function level is upgraded, it cannot be downgraded lower than Windows Server 2008.
Table 3.1 shows the features available in Windows Server 2003, Windows Server 2008, Windows Server 2008 R2, Windows Server 2012, and Windows Server 2012 R2 domain function levels.
TABLE 3.1 Comparing domain functional levels
|
Domain functional feature |
Windows Server 2003 |
Windows Server 2008 |
Windows Server 2008 R2 |
Windows Server 2012 |
Windows Server 2012 R2 |
|
Authentication assurance |
Disabled |
Disabled |
Enabled |
Enabled |
Enabled |
|
Fine-grained password policies |
Disabled |
Enabled |
Enabled |
Enabled |
Enabled |
|
Last interactive logon information |
Disabled |
Enabled |
Enabled |
Enabled |
Enabled |
|
Advanced Encryption Services (AES 128 and 256) support for the Kerberos protocol |
Disabled |
Enabled |
Enabled |
Enabled |
Enabled |
|
Distributed File System replication support for Sysvol |
Disabled |
Enabled |
Enabled |
Enabled |
Enabled |
|
Read-only domain controller (RODC) |
Enabled |
Enabled |
Enabled |
Enabled |
Enabled |
|
Ability to redirect the Users and Computers containers |
Enabled |
Enabled |
Enabled |
Enabled |
Enabled |
|
Ability to rename domain controllers |
Enabled |
Enabled |
Enabled |
Enabled |
Enabled |
|
Logon time stamp updates |
Enabled |
Enabled |
Enabled |
Enabled |
Enabled |
|
Kerberos KDC key version numbers |
Enabled |
Enabled |
Enabled |
Enabled |
Enabled |
|
Passwords for InetOrgPerson objects |
Enabled |
Enabled |
Enabled |
Enabled |
Enabled |
|
Converts NT groups to domain local and global groups |
Enabled |
Enabled |
Enabled |
Enabled |
Enabled |
|
SID history |
Enabled |
Enabled |
Enabled |
Enabled |
Enabled |
|
Group nesting |
Enabled |
Enabled |
Enabled |
Enabled |
Enabled |
|
Universal groups |
Enabled |
Enabled |
Enabled |
Enabled |
Enabled |
About Forest Functionality
Windows Server 2012 R2 forest functionality applies to all of the domains in a forest. All domains have to be upgraded to Windows Server 2012 R2 before the forest can be upgraded to Windows Server 2012 R2.
There are five levels of forest functionality:
§ Windows Server 2003
§ Windows Server 2008
§ Windows Server 2008 R2
§ Windows Server 2012
§ Windows Server 2012 R2
Windows Server 2003, Windows Server 2008, Windows Server 2008 R2, Windows Server 2012, and Windows Server 2012 R2 have many of the same forest features. Some of these features are described in the following list:
Global Catalog Replication Enhancements When an administrator adds a new attribute to the global catalog, only those changes are replicated to other global catalogs in the forest. This can significantly reduce the amount of network traffic generated by replication.
Defunct Schema Classes and Attributes You can never permanently remove classes and attributes from the Active Directory schema. However, you can mark them as defunct so that they cannot be used. With Windows Server 2003, Windows Server 2008, Windows Server 2008 R2, Windows Server 2012, and Windows Server 2012 R2 forest functionality, you can redefine the defunct schema attribute so that it occupies a new role in the schema.
Forest Trusts Previously, system administrators had no easy way of granting permission on resources in different forests. Windows Server 2003, Windows Server 2008, Windows Server 2008 R2, Windows Server 2012, and Windows Server 2012 R2 resolve some of these difficulties by allowing trust relationships between separate Active Directory forests. Forest trusts act much like domain trusts, except that they extend to every domain in two forests. Note that all forest trusts are intransitive.
Linked Value Replication Windows Server 2003, Windows Server 2008, Windows Server 2008 R2, Windows Server 2012, and Windows Server 2012 R2 use a concept called linked value replication. With linked value replication, only the user record that has been changed is replicated (not the entire group). This can significantly reduce network traffic associated with replication.
Renaming Domains Although the Active Directory domain structure was originally designed to be flexible, there were several limitations. Because of mergers, acquisitions, corporate reorganizations, and other business changes, you may need to rename domains. In Windows Server 2003, Windows Server 2008, Windows Server 2008 R2, Windows Server 2012, and Windows Server 2012 R2 you can change the DNS and NetBIOS names for any domain. Note that this operation is not as simple as just issuing a renamecommand. Instead, there’s a specific process that you must follow to make sure the operation is successful. Fortunately, when you properly follow the procedure, Microsoft supports domain renaming even though not all applications support it.
Other Features Windows Server 2008, Windows Server 2008 R2, Windows Server 2012, and Windows Server 2012 R2 also support the following features:
§ Improved replication algorithms and dynamic auxiliary classes are designed to increase performance, scalability, and reliability.
§ Active Directory Federation Services (AD FS), also known as Trustbridge, handles federated identity management. Federated identity management is a standards-based information technology process that enables distributed identification, authentication, and authorization across organizational and platform boundaries. The ADFS solution in Windows Server 2003 R2, Windows Server 2008, Windows Server 2008 R2, Windows Server 2012, and Windows Server 2012 R2 helps administrators address these challenges by enabling organizations to share a user’s identity information securely.
§ Active Directory Lightweight Directory Services (AD LDS) was developed for organizations that require flexible support for directory-enabled applications. AD LDS, which uses the Lightweight Directory Access Protocol (LDAP), is a directory service that adds flexibility and helps organizations avoid increased infrastructure costs.
§ Active Directory Recycle Bin (Windows Server 2008 R2 Forest level or higher) provides administrators with the ability to restore deleted objects in their entirety while AD DS is running. Before this, if you deleted an Active Directory object, you needed to recover it from a backup. Now you can recover the object from the AD recycle bin.
Many of the concepts related to domain and forest functional features are covered in greater detail later in this book.
Planning the Domain Structure
Once you have verified the technical configuration of your server for Active Directory, it’s time to verify the Active Directory configuration for your organization. Since the content of this chapter focuses on installing the first domain in your environment, you really need to know only the following information prior to beginning setup:
§ The DNS name of the domain
§ The computer name or the NetBIOS name of the server (which will be used by previous versions of Windows to access server resources)
§ In which domain function level the domain will operate
§ Whether other DNS servers are available on the network
§ What type of and how many DNS servers are available on the network
However, if you will be installing additional domain controllers in your environment or will be attaching to an existing Active Directory structure, you should also have the following information:
§ If this domain controller will join an existing domain, you should know the name of that domain. You will also either require a password for a member of the Enterprise Administrators group for that domain or have someone with those permissions create a domain account before promotion.
§ You should know whether the new domain will join an existing tree and, if so, the name of the tree it will join.
§ You should know the name of a forest to which this domain will connect (if applicable).
Installing Active Directory
Installing Active Directory is an easy and straightforward process as long as you plan adequately and make the necessary decisions beforehand. There are many ways that you can install Active Directory. You can install Active Directory by using the Windows Server 2012 R2 installation disk (Install from Media (IFM)), using Server Manager, or using Windows PowerShell. But before you can do the actual installation, you must first make sure that your network is ready for the install.
In the following sections, you’ll look at the required steps to install the first domain controller in a given environment.
Adprep
When you are adding a new user to Active Directory, you fill in fields such as First Name, Last Name, and so on. These fields are called attributes. The problem is that when you go to install Windows Server 2012 R2, its version of Active Directory has newer attributes than the previous versions of Active Directory. Thus, you need to set up your current version of Active Directory so that it can accept the installation of Windows Server 2012 R2 Active Directory. This is why you use Adprep. Adprep is required to run in order to add the first Windows Server 2012 R2 domain controller to an existing domain or forest.
You would need to run Adprep /forestprep to add the first Windows Server 2012 R2 domain controller to an existing forest. Adprep /forestprep must be run by an administrator who is a member of the Enterprise Admins group, the Schema Admins group, and the Domain Admins group of the domain that hosts the schema master.
You would need to run Adprep /domainprep to add the first Windows Server 2012 R2 domain controller to an existing domain. Again, to achieve this command, you must be a member of the Domain Admins group of the domain where you are installing the Windows Server 2012 R2 domain controller.
Adprep /rodcprep must be run to add the first Windows Server 2012 R2 RODC to an existing forest. The administrator who runs this command must be a member of the Enterprise Admins group.
One feature that is new to the Windows Server 2012 R2 Active Directory installation process is that, if needed, Adprep will automatically be executed during the normal Active Directory Domain Services installation.
Active Directory Prerequisites
Before you install Active Directory into your network, you must first make sure that your network and the server meet some minimum requirements. Table 3.2 will show you the requirements needed for Active Directory.
TABLE 3.2 Active Directory requirements
|
Requirement |
Description |
|
Adprep |
When adding the first Windows Server 20012 R2 domain controller to an existing Active Directory domain, Adprep commands run automatically as needed. |
|
Credentials |
When installing a new AD DS forest, the administrator must be set to local Administrator on the first server. To install an additional domain controller in an existing domain, you need to be a member of the Domain Admins group. |
|
DNS |
Domain Name System needs to be installed for Active Directory to function properly. You can install DNS during the Active Directory installation. |
|
NTFS |
The Windows Server 2012 R2 drives that store the database, log files, and SYSVOL folder must be placed on a volume that is formatted with the NTFS file system. |
|
RODCs |
Read Only Domain Controllers can be installed as long as another domain controller (Windows Server 2008 or newer) already exists on the domain. Also the Forest functional level must be at least Windows Server 2003. |
|
TCP/IP |
You must configure the appropriate TCP/IP settings on your domain, and you must configure the DNS server addresses. |
The Installation Process
Windows Server 2012 R2 computers are configured as either member servers (if they are joined to a domain) or stand-alone servers (if they are part of a workgroup). The process of converting a server to a domain controller is known as promotion. Through the use of a simple and intuitive wizard in Server Manager, system administrators can quickly configure servers to be domain controllers after installation. Administrators also have the ability to promote domain controllers using Windows PowerShell.
The first step in installing Active Directory is promoting a Windows Server 2012 R2 computer to a domain controller. The first domain controller in an environment serves as the starting point for the forest, trees, domains, and the operations master roles.
Exercise 3.2 shows the steps you need to follow to promote an existing Windows Server 2012 R2 computer to a domain controller. To complete the steps in this exercise, you must have already installed and configured a Windows Server 2012 R2 computer. You also need a DNS server that supports SRV records. If you do not have a DNS server available, the Active Directory Installation Wizard automatically configures one for you.
![]() EXERCISE 3.2: Promoting a Domain Controller
EXERCISE 3.2: Promoting a Domain Controller
1. Install the Active Directory Domain Services by clicking the Add Roles And Features link in Server Manager’s Dashboard view.
2. At the Before You Begin screen, click Next.
3. The Select installation Type screen will be next. Make sure that the Role-Based radio button is selected and click Next.
4. At the Select Destination Server screen, choose the local machine. Click Next.
5. At the Select Server Roles screen, click the check box for Active Directory Domain Services.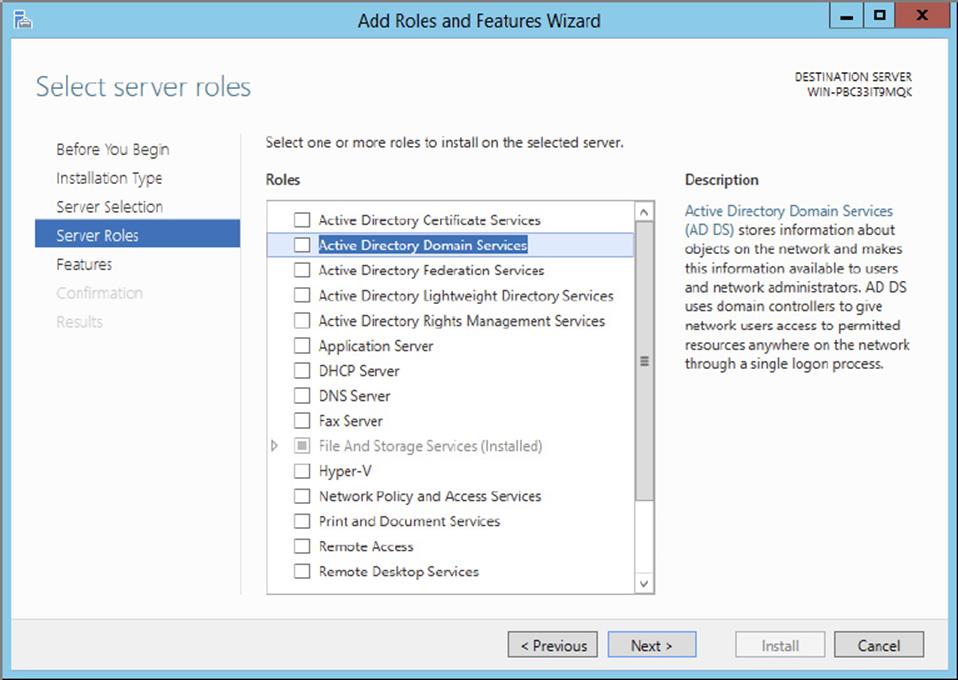
6. After you check the Active Directory Domain Services box, a pop-up menu will appear asking you to install additional features. Click the Add Features button.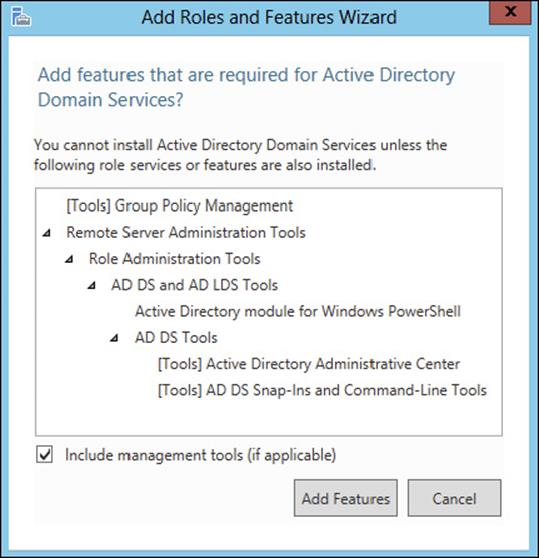
7. Click Next.
8. At the Select Features screen, accept the defaults and click Next.
9. Click Next at the information screen.
10.Click the Install button at the Confirmation Installation screen.
11.The Installation Progress screen will show you how the installation is progressing.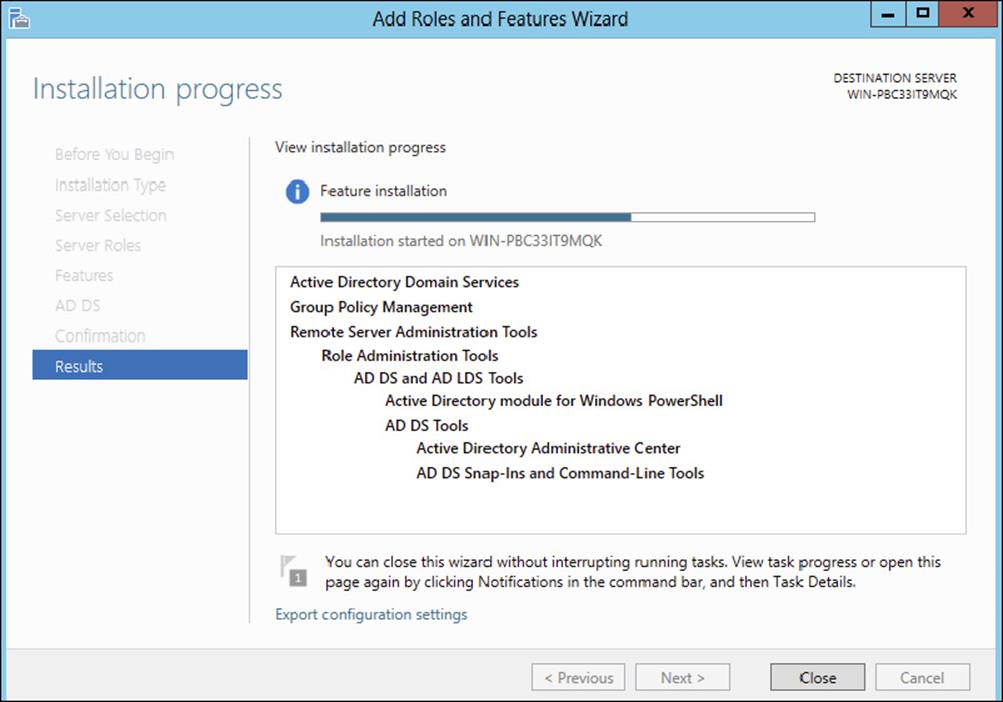
12.After the installation is complete, click the Close button.
13.On the left side window, click the AD DS link.
14.Click the More link next to Configuration Required for Active Directory Domain Services.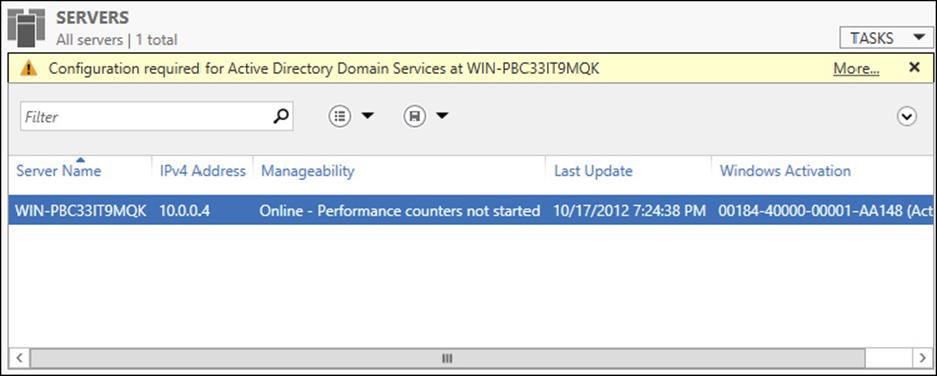
15.Under the Post-Deployment Configuration section, click the Promote This Server To A Domain Controller link.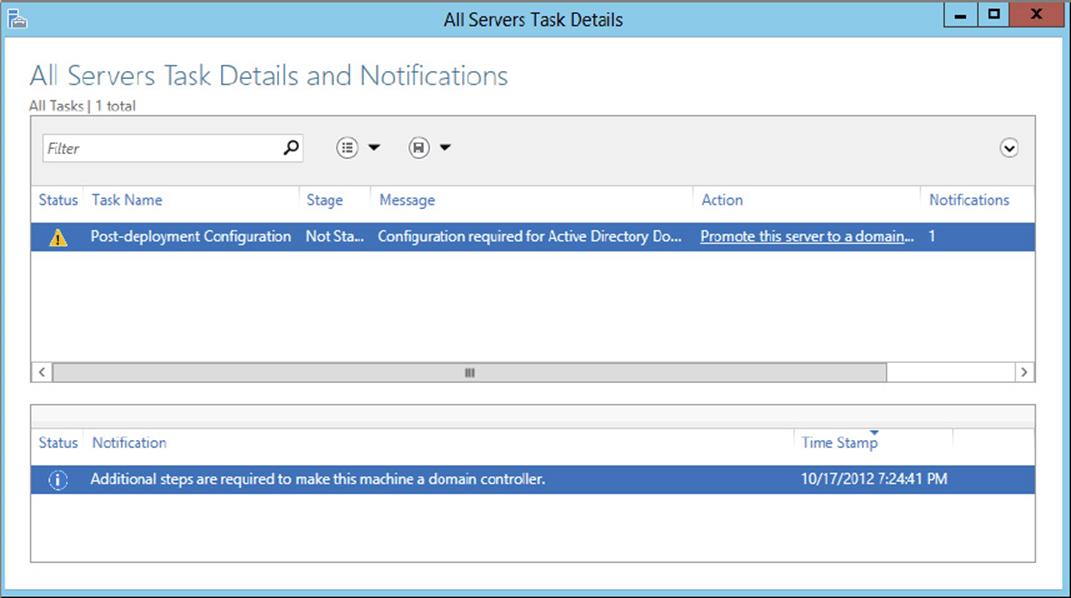
16.At this point, you will configure this domain controller. You are going to install a new domain controller in a new domain in a new forest. At the Deployment Configuration screen, choose the Add A New Forest radio button. You then need to add a root domain name. In this exercise, I will use Sybex.com. Click Next.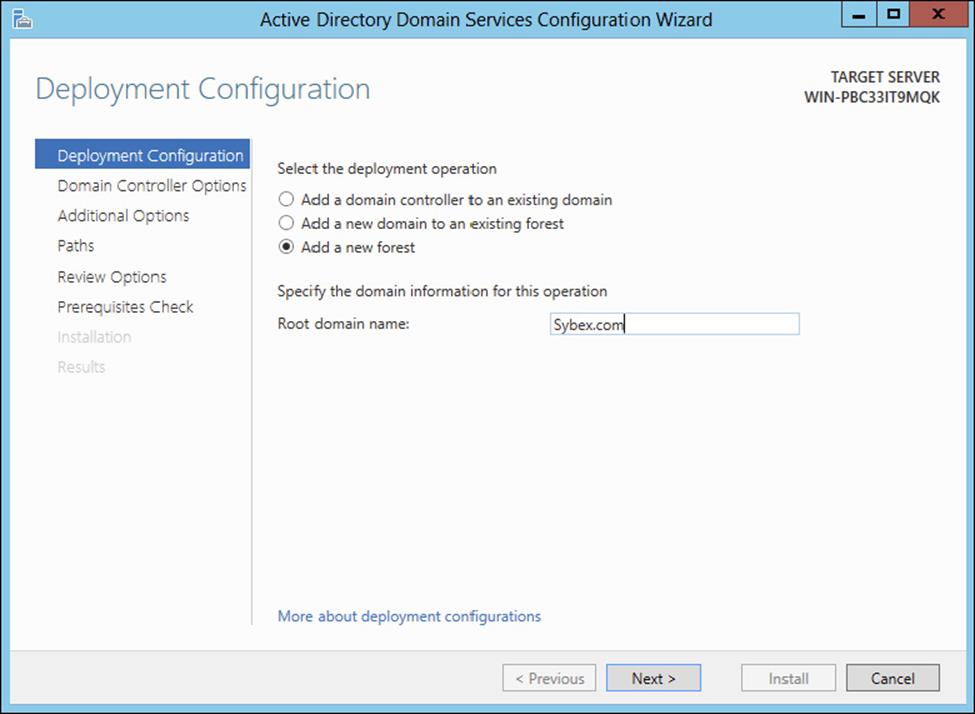
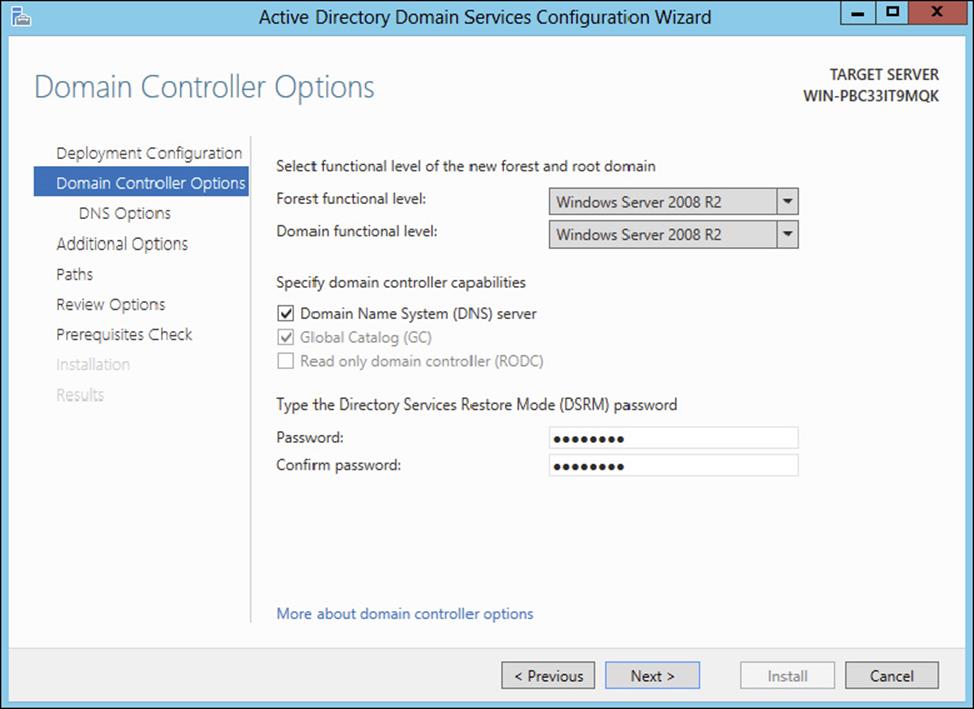
17.At the Domain Controller Options screen, set the following options:
§ Function levels: Windows Server 2008 R2 (for both)
§ Verify that the DNS and Global Catalog check boxes are checked
§ Password: P@ssw0rd
Then click Next.
18.At the DNS screen, click Next.
19.At the additional options screen, accept the default NetBIOS domain name and click Next.
20.At the Paths screen, accept the default file locations and click Next.
21.At the Review Options screen, verify your settings and click Next.
22.At the Prerequisites Check screen, click the Install button (as long as there are no errors).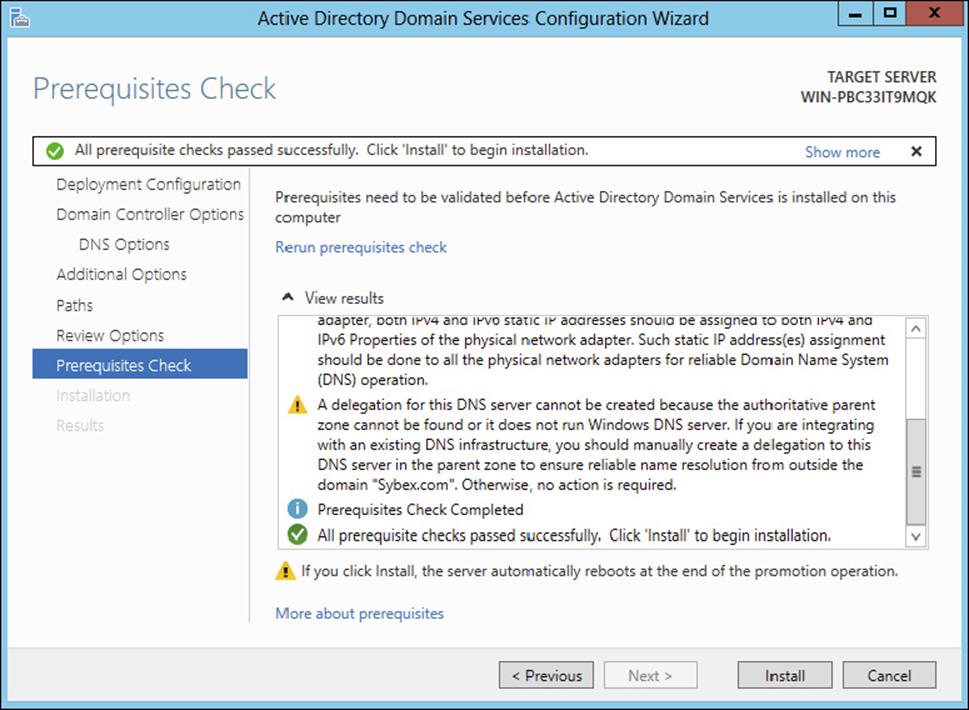
23.After the installation completes, the machine will automatically reboot. Log in as the administrator.
24.Close Server Manager.
25.Click the Start button on the keyboard and choose Administrative Tools.
26.You should see new MMC snap-ins for Active Directory.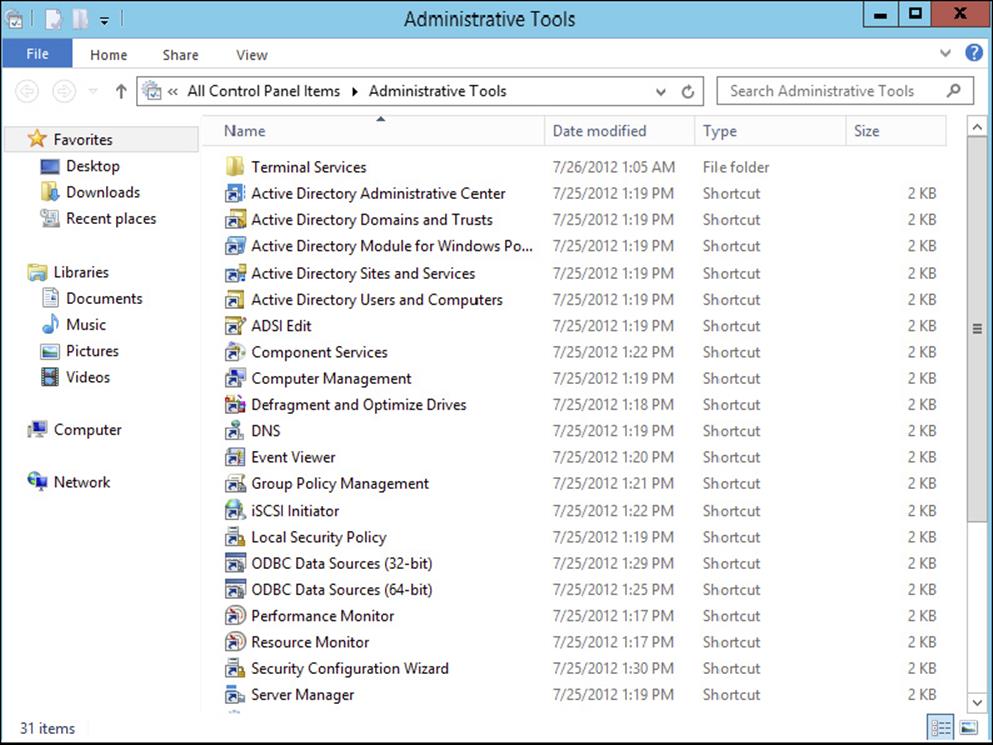
27.Close the Administrative Tools window.
In Exercise 3.3, you will learn how to install Active Directory on a Server Core installation. You will use Windows Server 2012 R2 Datacenter Server Core. Before actually installing AD DS, you will learn how to configure the computer name, the time, the administrator password, and a static TCP/IP address, and then you will install DNS.
![]() EXERCISE 3.3: Installing AD DS on Server Core
EXERCISE 3.3: Installing AD DS on Server Core
1. At the Server Core command prompt, type cd\windows\system32 and press Enter.
2. Type timedate.cpl and set your date, local time zone, and time. Click OK.
3. Type Netsh and press Enter.
4. Type Interface, and press Enter.
5. Type IPv4, and press Enter.
6. Type Show IP and press Enter. This will show you the current TCP/IP address and the interface with which the TCP/IP address is associated.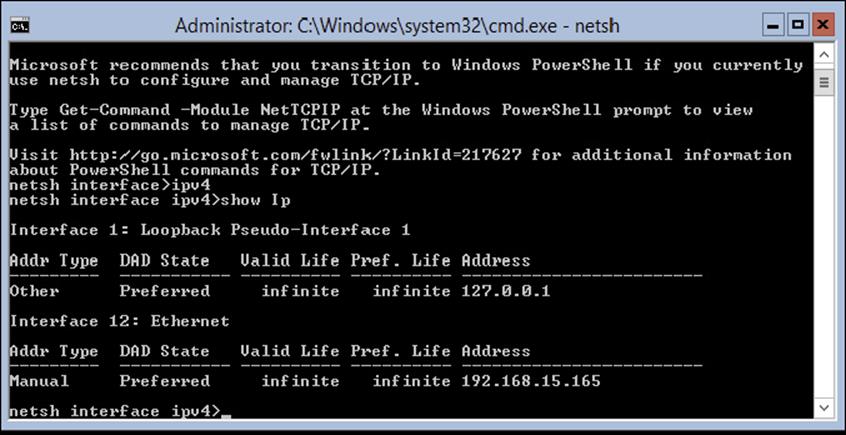
7. As you can see, interface 12 is my Ethernet interface. To change this interface, type the following command and press Enter:
Set address name="12" source=static address=192.168.15.165 mask=255.255.255.0 gateway=192.168.15.1
I used 192.168.15.x for my address. You can replace the address, mask, and gateway based on your local settings.
8. Type Show IP and press Enter. You should see that the new address is now manual and set to the IP address you set.
9. Type Exit and press Enter.
10.Type Net User Administrator ∗ and press Enter.
11.Type in your password and then confirm the password. I used P@ssw0rd for my password.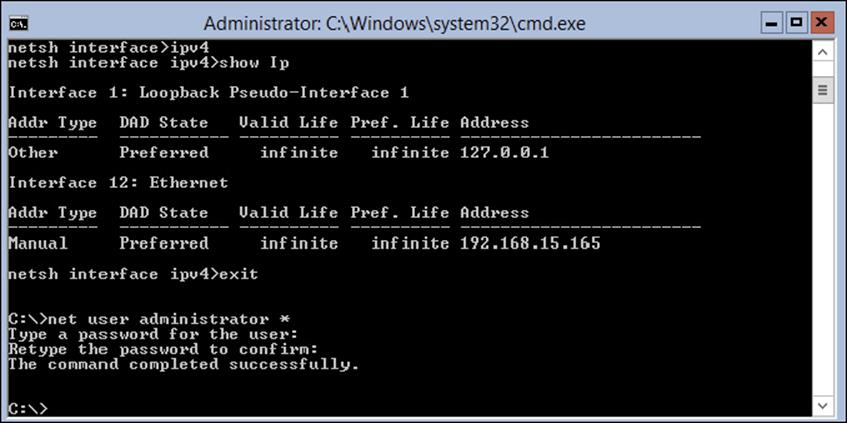
12.Type the following command and press Enter:
Netdom renamecomputer %computername% /newname:ServerA
13.Type Y and press Enter.
14.Type Shutdown /R /T 0 and press Enter. This will reboot the machine. After the reboot, log back into the system.
15.Type PowerShell and press Enter.
16.At the PowerShell prompt, type Add-WindowsFeature DNS and press Enter. This will add DNS to the server.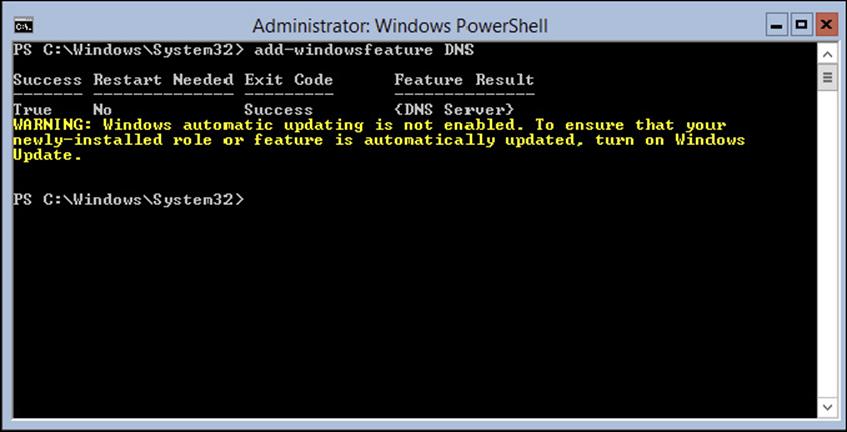
17.At the PowerShell prompt, type Add-WindowsFeature AD-Domain-Services and press Enter.
18.At the PowerShell prompt, type Import-Module ADDSDeployment.
19.At the PowerShell prompt, type Install-ADDSForest.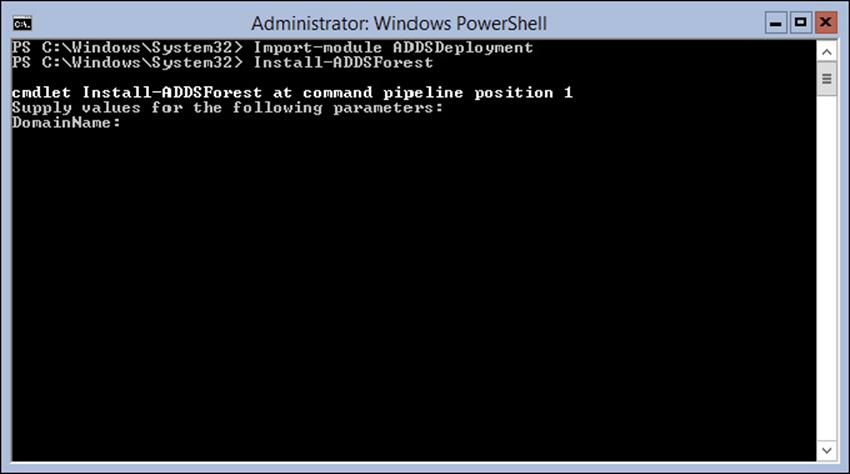
20.Type in your domain name and press Enter. I used Sybex.com.
21.Next you will be asked for your Safe mode administrator password. Type in P@ssw0rd and then confirm it.
22.Type Y and press Enter.
Active Directory will install, and the machine will automatically reboot.
Deploying Active Directory IaaS in Windows Azure
Well before I jump into this topic, I must first explain what I am talking about. Windows Azure is a Microsoft cloud platform that allows you to put your server data into the cloud. Deploying Active Directory with IaaS means you are using virtualization for the deployment.
So, to put this in a nutshell, when doing this type of install, it’s actually not too far off from the install you already did. You create a virtual server and then install Active Directory. Then you upload that virtual server to the cloud.
I understand that I have not explained virtualization, but Hyper-V and virtualization will be covered in detail in Chapter 9, “Use Virtualization in Windows Server 2012 R2.”
Now that you understand what this section is about, let’s talk about some of the tasks that are different from the normal way you install Active Directory virtually. There are three main differences when installing Active Directory IaaS on Windows Azure.
Windows Azure virtual machines may need to have connectivity to the corporate network. Microsoft states that you don’t have to have connectivity to your on-site corporate network, but you will lose functionality. Thus, Microsoft recommends that you set up connectivity, and to do that, you must use Windows Azure Virtual Network. Windows Azure Virtual Network includes a site-to-site or site-to-point virtual private network (VPN) component capable of seamlessly connecting Windows Azure virtual machines and on-site machines.
Static IP addresses are not supported on Windows Azure virtual machines. Normally, when setting up a server, we all use static IP addresses. This is actually required on a DHCP server, DNS server, and so on. But when you deploy Active Directory IaaS in Windows Azure, you must use Dynamic TCP/IP addressing, and this requires that you set up Windows Azure Virtual Network.
IP addresses for Windows Azure virtual machines are attached to Windows Azure Virtual Network, and that TCP/IP address persists for the lifetime of the virtual machine. Because of this, the Windows Server Active Directory requirements for IP addressing are met, and the requirements for DNS are also met if you want the server to have both roles.
Windows Azure allows for two distinct disk types for virtual machines. As you will learn in Chapter 9, the selection of the virtual machine disk type is important when deploying domain controllers. Windows Azure allows both “operating system disks” and “data disks.” Most of the time you will use data disks when installing Active Directory on the virtual machine. Data disks use write-through caching, guaranteeing durability of writes, and this is important to the integrity of any Windows Server active machine. There are some other factors of which you should be aware when choosing your disk type. Please check Microsoft’s website for more details when choosing a disk type.
Verifying Active Directory Installation
Once you have installed and configured Active Directory, you’ll want to verify that you have done so properly. In the following sections, you’ll look at methods for doing this.
Using Event Viewer
The first (and perhaps most informative) way to verify the operations of Active Directory is to query information stored in the Windows Server 2012 R2 event log. You can do this using the Windows Server 2012 R2 Event Viewer. Exercise 3.4 walks you through this procedure. Entries seen with the Event Viewer include errors, warnings, and informational messages.
To complete the steps in Exercise 3.4, you must have configured the local machine as a domain controller.
EXERCISE 3.4: Viewing the Active Directory Event Log
1. Open Administrative tools by pressing the Windows key and choosing Administrative Tools.
2. Open the Event Viewer snap-in from the Administrative Tools program group.
3. In the left pane, under Applications And Services Logs, select Directory Service.
4. In the right pane, you can sort information by clicking column headings. For example, you can click the Source column to sort by the service or process that reported the event.
5. Double-click an event in the list to see the details for that item. Note that you can click the Copy button to copy the event information to the Clipboard. You can then paste the data into a document for later reference. Also, you can move between items using the up and down arrows. Click OK when you have finished viewing an event.
6. Filter an event list by right-clicking the Directory Service item in the left pane and selecting Filter Current Log. Note that filtering does not remove entries from the event logs—it only restricts their display.
7. To verify Active Directory installation, look for events related to the proper startup of Active Directory, such as Event ID 1000 (Active Directory Startup Complete) and 1394 (Attempts To Update The Active Directory Database Are Succeeding). Also, be sure to examine any error or warning messages because they could indicate problems with DNS or other necessary services.
8. When you’ve finished viewing information in the Event Viewer, close the application.
Gaining Insight Through Event Viewer
Despite its simple user interface and somewhat limited GUI functionality, the Event Viewer tool can be your best ally in isolating and troubleshooting problems with Windows Server 2012 R2. The Event Viewer allows you to view information that is stored in various log files that are maintained by the operating system. This includes information from the following logs:
Application Stores messages generated by programs running on your system. For example, SQL Server 2012 might report the completion of a database backup job within the Application log.
Security Contains security-related information as defined by your auditing settings. For example, you could see when users have logged onto the system or when particularly sensitive files have been accessed.
System Contains operating system-related information and messages. Common messages might include a service startup failure or information about when the operating system was last rebooted.
Directory Service Stores messages and events related to how Active Directory functions. For example, you might find details related to replication here.
DNS Server Contains details about the operations of the DNS service. This log is useful for troubleshooting replication or name-resolution problems.
Other Log Files Contain various features of Windows Server 2012 R2 and the applications that may run on this operating system, which can create additional types of logs. These files allow you to view more information about other applications or services through the familiar Event Viewer tool.
Additionally, developers can easily send custom information from their programs to the Application log. Having all of this information in one place really makes it easy to analyze operating system and application messages. Also, many third-party tools and utilities are available for analyzing log files.
Although the Event Viewer GUI does a reasonably good job of letting you find the information you need, you might want to extract information to analyze other systems or applications. One especially useful feature of the Event Viewer is its ability to save a log file in various formats. You can access this feature by clicking Action ![]() Save As. You’ll be given the option of saving in various formats, including tab- and comma-delimited text files. You can then open these files in other applications (such as Microsoft Excel) for additional data analysis.
Save As. You’ll be given the option of saving in various formats, including tab- and comma-delimited text files. You can then open these files in other applications (such as Microsoft Excel) for additional data analysis.
Overall, in the real world, the Event Viewer can be an excellent resource for monitoring and troubleshooting your important servers and workstations.
In addition to providing information about the status of events related to Active Directory, the Event Viewer shows you useful information about other system services and applications. You should routinely use this tool.
Using Active Directory Administrative Tools
After a server has been promoted to a domain controller, you will see that various tools are added to the Administrative Tools program group, including the following:
Active Directory Administrative Center This is a Microsoft Management Console (MMC) snap-in that allows you to accomplish many Active Directory tasks from one central location. This MMC snap-in allows you to manage your directory services objects, including doing the following tasks:
§ Reset user passwords
§ Create or manage user accounts
§ Create or manage groups
§ Create or manage computer accounts
§ Create or manage organizational units (OUs) and containers
§ Connect to one or several domains or domain controllers in the same instance of Active Directory Administrative Center
§ Filter Active Directory data
Active Directory Domains and Trusts Use this tool to view and change information related to the various domains in an Active Directory environment. This MMC snap-in also allows you to set up shortcut trusts.
Active Directory Sites and Services Use this tool to create and manage Active Directory sites and services to map to an organization’s physical network infrastructure. Sites and services are covered in detail in Chapter 5, “Administer Active Directory.”
Active Directory Users and Computers User and computer management is fundamental for an Active Directory environment. The Active Directory Users and Computers tool allows you to set machine- and user-specific settings across the domain. This tool is discussed throughout this book.
Active Directory Module for Windows PowerShell Windows PowerShell is a command-line shell and scripting language. The Active Directory Module for Windows PowerShell is a group of cmdlets used to manage your Active Directory domains, Active Directory Lightweight Directory Services (AD LDS) configuration sets, and Active Directory Database Mounting Tool instances in a single, self-contained package.
A good way to make sure that Active Directory is accessible and functioning properly is to run the Active Directory Users and Computers tool. When you open the tool, you should see a configuration similar to that shown in Figure 3.3. Specifically, you should make sure the name of the domain you created appears in the list. You should also click the Domain Controllers folder and make sure that the name of your local server appears in the right pane. If your configuration passes these two checks, Active Directory is present and configured.
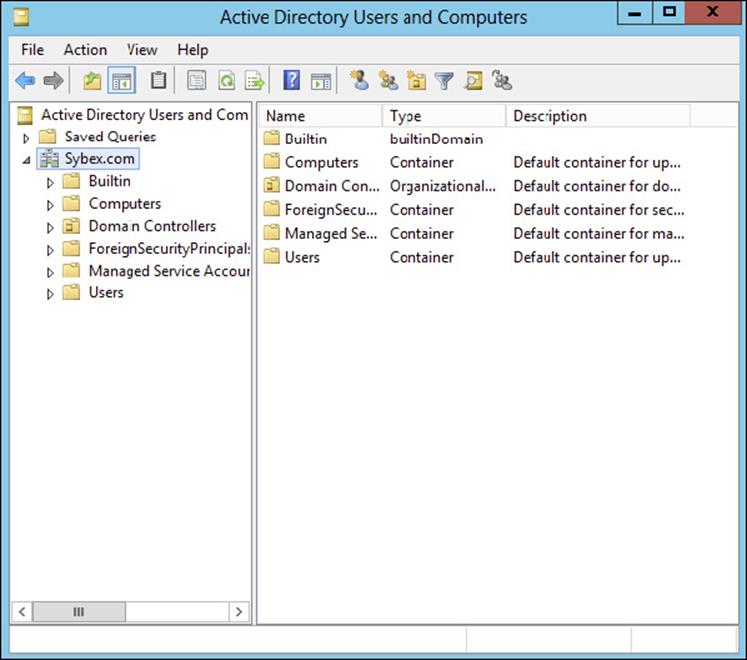
FIGURE 3.3 Viewing Active Directory information using the Active Directory Users and Computers tool
Testing from Clients
The best test of any solution is simply to verify that it works the way you had intended in your environment. When it comes to using Active Directory, a good test is to ensure that clients can view and access the various resources presented by Windows Server 2012 R2 domain controllers. In the following sections, you’ll look at several ways to verify that Active Directory is functioning properly.
Verifying Client Connectivity
If you are unable to see the recently promoted server on the network, there is likely a network configuration error. If only one or a few clients are unable to see the machine, the problem is probably related to client-side configuration. To fix this, make sure that the client computers have the appropriate TCP/IP configuration (including DNS server settings) and that they can see other computers on the network.
If the new domain controller is unavailable from any of the other client computers, you should verify the proper startup of Active Directory using the methods mentioned earlier in this chapter. If Active Directory has been started, ensure that the DNS settings are correct. Finally, test network connectivity between the server and the clients by accessing the network or by using the ping command.
Joining a Domain
If Active Directory has been properly configured, clients and other servers should be able to join the domain. Exercise 3.5 outlines the steps you need to take to join a Windows 7 or Windows 8 computer to the domain.
To complete this exercise, you must have already installed and properly configured at least one Active Directory domain controller and a DNS server that supports SRV records in your environment. In addition to the domain controller, you need at least one other computer, not configured as a domain controller, running one of the following operating systems: Windows 2000, Windows XP Professional (Windows XP Home Edition cannot join a domain), Windows Vista, Windows 7, Windows 8, Windows Server 2003, Windows Server 2008, Windows Server 2008 R2, Windows Server 2012, or Windows Server 2012 R2.
Once clients are able to join the domain successfully, they should be able to view Active Directory resources using the Network icon. This test validates the proper functioning of Active Directory and ensures that you have connectivity with client computers.
 Exercise 3.5 is being done from a Windows 7 Enterprise computer.
EXERCISE 3.5: Joining a Computer to an Active Directory Domain
1. Right-click the Computer icon on the Start menu, and click Properties.
2. Go to the section called Computer Name. On the right side, click the Change Settings link.
3. Next to the section To Rename This Computer Or Change Its Domain Or Workgroup, click the Change button.
4. In the Member Of section, choose the Domain option. Type the name of the Active Directory domain that this computer should join. Click OK.
5. When prompted for the username and password of an account that has permission to join computers to the domain, enter the information for an administrator of the domain. Click OK to commit the changes. If you successfully joined the domain, you will see a dialog box welcoming you to the new domain.
6. You will be notified that you must reboot the computer before the changes take place. Select Yes when prompted to reboot.
Creating and Configuring Application Data Partitions
Organizations store many different kinds of information in various places. For the IT departments that support this information, it can be difficult to ensure that the right information is available when and where it is needed. Windows Server 2012 R2 uses a feature called application data partitions, which allows system administrators and application developers to store custom information within Active Directory. The idea behind application data partitions is that since you already have a directory service that can replicate all kinds of information, you might as well use it to keep track of your own information.
Developing distributed applications that can, for example, synchronize information across an enterprise is not a trivial task. You have to come up with a way to transfer data between remote sites (some of which are located across the world), and you have to ensure that the data is properly replicated. By storing application information in Active Directory, you can take advantage of its storage mechanism and replication topology. Application-related information stored on domain controllers benefits from having fault-tolerance features and availability.
Consider the following simple example to understand how this can work. Suppose your organization has developed a customer Sales Tracking and Inventory application. The company needs to make the information that is stored by this application available to all of its branch offices and users located throughout the world. However, the goal is to do this with the least amount of IT administrative effort. Assuming that Active Directory has already been deployed throughout the organization, developers can build support into the application for storing data within Active Directory. They can then rely on Active Directory to store and synchronize the information among various sites. When users request updated data from the application, the application can obtain this information from the nearest domain controller that hosts a replica of the Sales Tracking and Inventory data.
Other types of applications can also benefit greatly from the use of application data partitions. Now that you have a good understanding of the nature of application data partitions, let’s take a look at how you can create and manage them using Windows Server 2012 R2 and Active Directory.
Creating Application Data Partitions
By default, after you create an Active Directory environment, you will not have any customer application data partitions. Therefore, the first step in making this functionality available is to create a new application data partition. You can use several tools to do this:
Third-Party Applications or Application-Specific Tools Generally, if you are planning to install an application that can store information in the Active Directory database, you’ll receive some method of administering and configuring that data along with the application. For example, the setup process for the application might assist you in the steps you need to take to set up a new application data partition and to create the necessary structures for storing data.
Creating and managing application data partitions are advanced Active Directory–related functions. Be sure that you have a solid understanding of the Active Directory schema, Active Directory replication, LDAP, and your applications’ needs before you attempt to create new application data partitions in a live environment.
Active Directory Service Interfaces ADSI is a set of programmable objects that can be accessed through languages such as Visual Basic Scripting Edition (VBScript), Visual C#, Visual Basic .NET, and many other language technologies that support the Component Object Model (COM) standard. Through the use of ADSI, developers can create, access, and update data stored in Active Directory and in any application data partitions.
The LDP Tool You can view and modify the contents of the Active Directory schema using LDAP-based queries. The LDP tool allows you to view information about application data partitions.
Ldp.exe is a graphical user interface (GUI) tool that allows an administrator to configure Lightweight Directory Access Protocol (LDAP) directory service. Administrators have the ability to use the LDP tool to administer an Active Directory Lightweight Directory Services (AD LDS) instance. To use the LDP tool, you must be an administrator or equivalent.
Figure 3.4 shows an example of connecting to a domain controller and browsing Active Directory information.

FIGURE 3.4 Using the LDP tool to view Active Directory schema information
Ntdsutil The ntdsutil utility is the main method by which system administrators create and manage application data partitions on their Windows Server 2012 R2 domain controllers. This utility’s specific commands are covered later in this chapter.
Creating and managing application data partitions can be fairly complex. Such a project’s success depends on the quality of the architecture design. This is a good example of where IT staff and application developers must cooperate to ensure that data is stored effectively and that it is replicated efficiently.
You can create an application data partition in one of three different locations within an Active Directory forest:
§ As a new tree in an Active Directory forest
§ As a child of an Active Directory domain partition
For example, you can create an Accounting application data partition within the Finance.MyCompany.com domain.
§ As a child of another application data partition
This method allows you to create a hierarchy of application data partitions.
As you might expect, you must be a member of the Enterprise Admins or Domain Admins group to be able to create application data partitions. Alternatively, you can be delegated the appropriate permissions to create new partitions.
Now that you have a good idea of the basic ways in which you can create application data partitions, let’s look at how replicas (copies of application data partition information) are handled.
Managing Replicas
A replica is a copy of any data stored within Active Directory. Unlike the basic information that is stored in Active Directory, application partitions cannot contain security principals. Also, not all domain controllers automatically contain copies of the data stored in an application data partition. System administrators can define which domain controllers host copies of the application data. This is an important feature because, if replicas are used effectively, administrators can find a good balance between replication traffic and data consistency. For example, suppose that three of your organization’s 30 locations require up-to-date accounting-related information. You might choose to replicate the data only to domain controllers located in the places that require the data. Limiting replication of this data reduces network traffic.
Replication is the process by which replicas are kept up-to-date. Application data can be stored and updated on designated servers in the same way basic Active Directory information (such as users and groups) is synchronized between domain controllers. Application data partition replicas are managed using the Knowledge Consistency Checker (KCC), which ensures that the designated domain controllers receive updated replica information. Additionally, the KCC uses all Active Directory sites and connection objects (covered in Chapter 5) that you create to determine the best method to handle replication.
Removing Replicas
When you perform a demotion on a domain controller, that server can no longer host an application data partition. If a domain controller contains a replica of application data partition information, you must remove the replica from the domain controller before you demote it. If a domain controller is the machine that hosts a replica of the application data partition, then the entire application data partition is removed and will be permanently lost. Generally, you want to do this only after you’re absolutely sure that your organization no longer needs access to the data stored in the application data partition.
Using ntdsutil to Manage Application Data Partitions
The primary method by which system administrators create and manage application data partitions is through the ntdsutil command-line tool. You can launch this tool simply by entering ntdsutil at a command prompt. The ntdsutil command is both interactive and context sensitive. That is, once you launch the utility, you’ll see an ntdsutil command prompt. At this prompt, you can enter various commands that set your context within the application. For example, if you enter the domain management command, you’ll be able to use domain-related commands. Several operations also require you to connect to a domain, a domain controller, or an Active Directory object before you perform a command.
For complete details on using ntdsutil, see the Windows Server 2012 R2 Help and Support Center.
Table 3.3 describes the domain management commands supported by the ntdsutil tool. You can access this information by typing in the following sequence of commands at a command prompt:
ntdsutil
domain management
Help
TABLE 3.3 ntdsutil domain management commands
|
ntdsutil domain management command |
Purpose |
|
Help or ? |
Displays information about the commands that are available within the Domain Management menu of the ntdsutil command. |
|
Connection or Connections |
Allows you to connect to a specific domain controller. This will set the context for further operations that are performed on specific domain controllers. |
|
Create NC PartitionDistinguishedName DNSName |
Creates a new application directory partition. |
|
Delete NC PartitionDistinguishedName |
Removes an application data partition. |
|
List NC Information Partition DistinguishedName |
Shows information about the specified application data partition. |
|
List NC Replicas PartitionDistinguishedName |
Returns information about all replicas for the specific application data partition. |
|
Precreate PartitionDistinguished NameServerDNSName |
Pre-creates cross-reference application data partition objects. This allows the specified DNS server to host a copy of the application data partition. |
|
Remove NC Replica PartitionDistinguishedName DCDNSName |
Removes a replica from the specified domain controller. |
|
Select Operation Target |
Selects the naming context that will be used for other operations. |
|
Set NC Reference Domain PartitionDistinguishedName DomainDistinguishedName |
Specifies the reference domain for an application data partition. |
|
Set NC Replicate NotificationDelay PartitionDistinguishedName FirstDCNotificationDelay OtherDCNotificationDelay |
Defines settings for how often replication will occur for the specified application data partition. |
The ntdsutil commands are all case insensitive. Mixed case was used in the table to make them easier to read. NC in commands stands for “naming context,” referring to the fact that this is a partition of the Active Directory schema.
Figure 3.5 provides an example of working with ntdsutil. The following commands were entered to set the context for further operations:
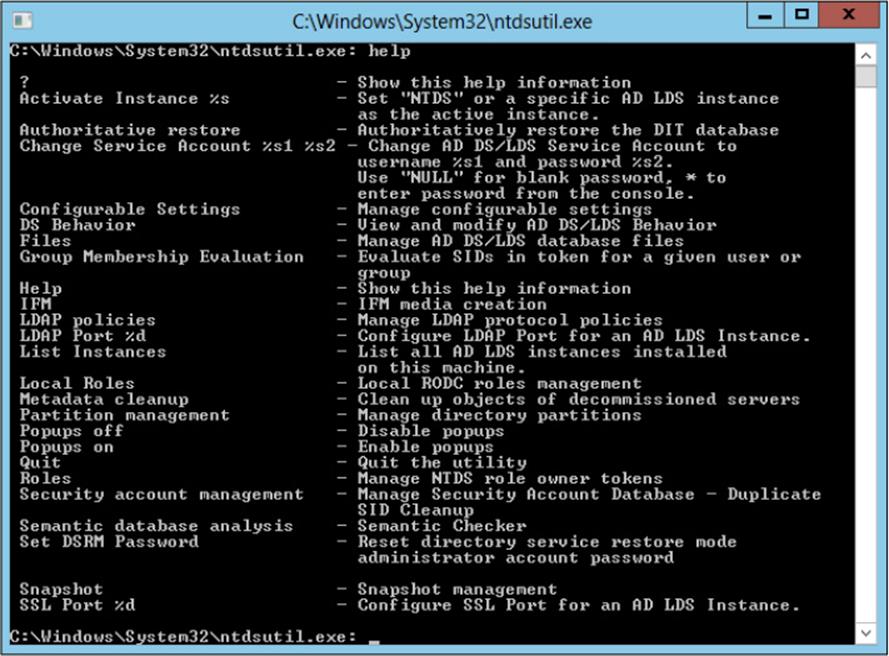
FIGURE 3.5 Viewing naming contexts on the local domain controller
ntdsutil
domain management
connections
connect to server localhost
connect to domain ADTest
quit
list
Configuring DNS Integration with Active Directory
There are many benefits to integrating Active Directory and DNS services:
§ You can configure and manage replication along with other Active Directory components.
§ You can automate much of the maintenance of DNS resource records through the use of dynamic updates.
§ You will be able to set specific security options on the various properties of the DNS service.
Exercise 3.6 shows the steps that you must take to ensure that these integration features are enabled. You’ll look at the various DNS functions that are specific to interoperability with Active Directory.
Before you begin this exercise, make sure that the local machine is configured as an Active Directory domain controller and that DNS services have been properly configured. If you instructed the Active Directory Installation Wizard to configure DNS automatically, many of the settings mentioned in this section may already be enabled. However, you should verify the configuration and be familiar with how the options can be set manually.
![]() EXERCISE 3.6:Configuring DNS Integration with Active Directory
EXERCISE 3.6:Configuring DNS Integration with Active Directory
1. Open Administrative tools by pressing the Windows key and choosing Administrative Tools.
2. Open the DNS snap-in from the Administrative Tools program group.
3. Right-click the icon for the local DNS server and select Properties. Click the Security tab. Notice that you can now specify which users and groups have access to modify the configuration of the DNS server. Make any necessary changes and click OK.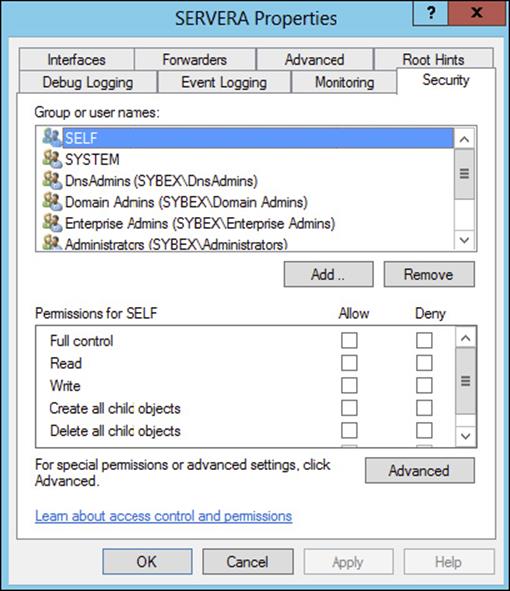
4. Expand the local server branch and the Forward Lookup Zones folder.
5. Right-click the name of the Active Directory domain you created and select Properties.
6. On the General tab, verify that the type is Active Directory–Integrated and that the Data Is Stored In Active Directory message is displayed. If this option is not currently selected, you can change it by clicking the Change button next to Type and choosing the Store The Zone In Active Directory check box on the bottom.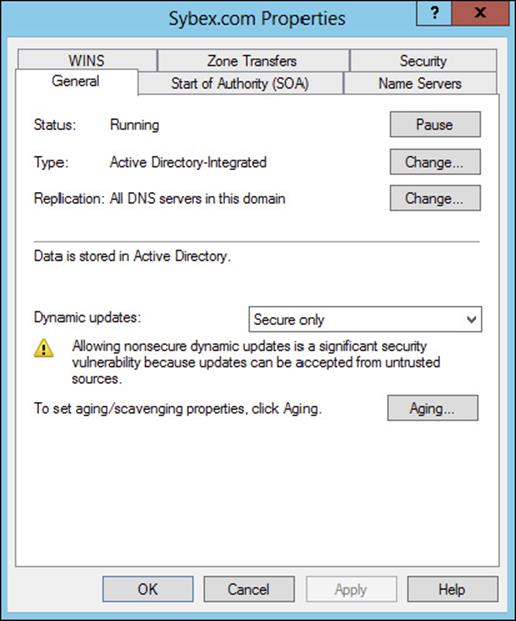
7. Verify that the Dynamic Updates option is set to Secure Only. This ensures that all updates to the DNS resource records database are made through authenticated Active Directory accounts and processes.
The other options are Nonsecure And Secure (accepts all updates) and None (to disallow dynamic updates).
8. Finally, notice that you can define the security permissions at the zone level by clicking the Security tab. Make any necessary changes and click OK.
Summary
This chapter covered the basics of implementing an Active Directory forest and domain structure, creating and configuring application data partitions, and setting the functional level of your domain and forest.
You are now familiar with how you can implement Active Directory. We carefully examined all of the necessary steps and conditions that you need to follow to install Active Directory on your network. First you need to prepare for the Domain Name System because Active Directory cannot be installed without the support of a DNS server.
You also need to verify that the computer you upgrade to a domain controller meets some basic file system and network connectivity requirements so that Active Directory can run smoothly and efficiently in your organization. These are some of the most common things you will have to do when you deploy Active Directory.
The chapter also covered the concept of domain functional levels, which essentially determine the kinds of domain controllers you can use in your environment. For instance, in the Windows 2003 functional level, you can include Windows Server 2012 R2, Windows Server 2012, Windows Server 2008 R2, Windows Server 2008, and Windows Server 2003 domain controllers, but the functionality of the domain is severely limited.
In this chapter, you also learned how to install Active Directory, which you accomplish by promoting a Windows Server 2012 computer to a domain controller using Server Manager. You also learned how to verify the installation by testing Active Directory from a client computer.
This chapter was limited in scope to examining the issues related to installing and configuring the first domain in an Active Directory environment. In later chapters, you’ll see how to create and manage more complex configurations.
Exam Essentials
Know the prerequisites for promoting a server to a domain controller. You should understand the tasks that you must complete before you attempt to upgrade a server to a domain controller. Also, you should have a good idea of the information you need in order to complete the domain controller promotion process.
Understand the steps of the Active Directory Installation Wizard. When you run the Active Directory Installation Wizard, you’ll be presented with many different choices. You should understand the effects of the various options provided in each step of the wizard.
Be familiar with the tools that you will use to administer Active Directory. Three main administrative tools are installed when you promote a Windows Server 2012 R2 to a domain controller. Be sure that you know which tools to use for which types of tasks.
Understand the purpose of application data partitions. The idea behind application data partitions is that since you already have a directory service that can replicate all kinds of security information, you can also use it to keep track of application data. The main benefit of storing application information in Active Directory is that you can take advantage of its storage mechanism and replication topology. Application-related information stored on domain controllers benefits from having fault-tolerance features and availability.
Review Questions
1. You are the system administrator of a large organization that has recently implemented Windows Server 2012 R2. You have a few remote sites that do not have very tight security. You have decided to implement read-only domain controllers (RODCs). What forest and function levels does the network need for you to do the install? (Choose all that apply.)
A. Windows 2000 Mixed
B. Windows 2008 R2
C. Windows 2003
D. Windows 2008
2. What is the maximum number of domains that a Windows Server 2012 R2 computer configured as a domain controller may participate in at one time?
A. Zero
B. One
C. Two
D. Any number of domains
3. A system administrator is trying to determine which file system to use for a server that will become a Windows Server 2012 R2 file server and domain controller. The company has the following requirements:
§ The file system must allow for file-level security from within Windows 2012 R2 Server.
§ The file system must make efficient use of space on large partitions.
§ The domain controller Sysvol must be stored on the partition.
Which of the following file systems meets these requirements?
D. FAT
E. FAT32
F. HPFS
G. NTFS
4. For security reasons, you have decided that you must convert the system partition on your removable drive from the FAT32 file system to NTFS. Which of the following steps must you take in order to convert the file system? (Choose two.)
. Run the command CONVERT /FS:NTFS from the command prompt.
A. Rerun Windows Server 2008 R2 Setup and choose to convert the partition to NTFS during the reinstallation.
B. Boot Windows Server 2008 R2 Setup from the installation CD-ROM and choose Rebuild File System.
C. Reboot the computer.
5. Windows Server 2012 R2 requires the use of which of the following protocols or services in order to support Active Directory? (Choose two.)
. DHCP
A. TCP/IP
B. NetBEUI
C. IPX/SPX
D. DNS
6. You are promoting a Windows Server 2012 R2 computer to an Active Directory domain controller for test purposes. The new domain controller will be added to an existing domain. While you are using the Active Directory Installation Wizard, you receive an error message that prevents the server from being promoted. Which of the following might be the cause of the problem? (Choose all that apply.)
. The system does not contain an NTFS partition on which the Sysvol directory can be created.
A. You do not have a Windows Server 2012 R2 DNS server on the network.
B. The TCP/IP configuration on the new server is incorrect.
C. The domain has reached its maximum number of domain controllers.
7. Your network contains a single Active Directory domain. The domain contains five Windows Server 2008 R2 domain controllers. You plan to install a new Windows Server 2012 R2 domain controller. Which two actions would you need to perform? (Each correct answer presents part of the solution. Choose two.)
. Run adprep.exe /rodcprep at the command line.
A. Run adprep.exe /forestprep at the command line.
B. Run adprep.exe /domainprep at the command line.
C. From Active Directory Domains and Trusts, raise the functional level of the domain.
D. From Active Directory Users and Computers, prestage the RODC computer account.
8. You are the network administrator for a large company that creates widgets. Management asks you to implement a new Windows Server 2012 R2 system. You need to implement federated identity management. Which of the following will help you do this?
. Active Directory Federation Services
A. Active Directory DNS Services
B. Active Directory IIS Services
C. Active Directory IAS Services
9. You are the system administrator responsible for your company’s infrastructure. You think you have an issue with name resolution, and you need to verify that you are using the correct hostname. You want to test DNS on the local system and need to see whether the hostname server-1 resolves to the IP address 10.1.1.1. Which of the following actions provides a solution to the problem?
. Add a DNS server to your local subnet.
A. Add the mapping for the hostname server-1 to the IP address 10.1.1.1 in the local system’s HOSTS file.
B. Add an A record to your local WINS server.
C. Add an MX record to your local DNS server.
10. You have one Active Directory forest in your organization that contains one domain named Stellacon.com. You have two domain controllers configured with the DNS role installed. There are two Active Directory Integrated zones named Stellacon.com andStellatest.com. One of your IT members (who is not an administrator) needs to be able to modify the Stellacon.com DNS server, but you need to prevent this user from modifying the Stellatest.com SOA record. How do you accomplish this?
. Modify the permissions of the Stellacon.com zone from the DNS Manager snap-in.
A. Modify the permissions of the Stellatest.com zone from the DNS Manager snap-in.
B. Run the Delegation Of Control Wizard in Active Directory.
C. Run the Delegation Of Control Wizard in the DNS snap-in.
All materials on the site are licensed Creative Commons Attribution-Sharealike 3.0 Unported CC BY-SA 3.0 & GNU Free Documentation License (GFDL)
If you are the copyright holder of any material contained on our site and intend to remove it, please contact our site administrator for approval.
© 2016-2026 All site design rights belong to S.Y.A.