Essential SharePoint 2013: Practical Guidance for Meaningful Business Results (2014)
Part II. Optimizing
Chapter 13. Managing Enterprise Content
Enterprise content management (ECM) is a widely recognized IT industry term for software technology that enables organizations to create, capture, present, access, view, print, store, secure, manage, publish, personalize, distribute, search, retain, and destroy digital content related to organizational processes. Whew—that’s a mouthful. So what does this mean? In short, it means storing document content electronically and then making sure it is managed appropriately. Whether it’s the simple creation of content, sharing the content with others, or a full document life cycle that represents your organization’s processes (see Figure 13-1 for an example life cycle), understanding how SharePoint can help is critical to the successful management of content.

Figure 13-1 For individuals, simply creating a document is sufficient; however, when sharing with teams or organizing content for the enterprise, a more complete definition of the document life cycle is needed—you should take a step back and determine yours
With the 2010 release, SharePoint finally could be considered a document management system, rather than just a document collaboration environment. Prior to SharePoint’s emergence in this manner, many organizations used SharePoint for document sharing, only to purchase a more expensive system (such as EMC Documentum or IBM FileNet) to provide actual document management features for a central collection of artifacts. While this model eases some of the traditional bottlenecks associated with a central team managing all content, it poses several new challenges. First, consistency is hard to enforce. Different users will likely apply different metadata or inconsistent security around content (this includes pages as well as documents and other types of content). In addition, with many owners come varied processes for managing how content gets published and ultimately removed. Finally, with this inconsistency around process and control comes a potential conflict with corporate compliance mandates.
SharePoint 2013 changes the way documents and other data are managed by easing the burden associated with effective content management of corporate data. Because ECM is now embedded in the main SharePoint feature set—even in SharePoint Online—users can take advantage of traditional ECM processes like document management and records management, all within a familiar user interface. This allows users to participate in the management of documents and records without changing the way they work—at least to some degree—within their SharePoint environment. Because SharePoint supports a wide variety of document and records management strategies that can be used in combination to accommodate various levels of document processing, integrity, and disposition, it is important to plan carefully to achieve your business goals.
Getting Started with ECM
Before we dive into some of the functionality associated with ECM, let’s look at key terms we’ll use throughout this chapter:
![]() Enterprise content management (ECM). ECM refers to activities related to document management (DM), forms management, Web content management (WCM), and records management (RM).
Enterprise content management (ECM). ECM refers to activities related to document management (DM), forms management, Web content management (WCM), and records management (RM).
![]() Document management (DM). Document management refers to the active use of “living” documents, along with a set of capabilities, such as check-in, checkout, and version control, designed to put structure around those documents. These are documents authored by individuals and teams that exist in a state in which they may be changed or moved at any time.
Document management (DM). Document management refers to the active use of “living” documents, along with a set of capabilities, such as check-in, checkout, and version control, designed to put structure around those documents. These are documents authored by individuals and teams that exist in a state in which they may be changed or moved at any time.
![]() Digital Asset Management (DAM). Digital asset management typically refers to the storage and organization of media content, such as videos, images, and audio files. While we don’t specifically cover digital asset management in this chapter, the principles of ECM that we do cover can apply to this type of content.
Digital Asset Management (DAM). Digital asset management typically refers to the storage and organization of media content, such as videos, images, and audio files. While we don’t specifically cover digital asset management in this chapter, the principles of ECM that we do cover can apply to this type of content.
![]() Records management (RM). Records management refers to documents and other content (Web pages, physical assets, etc.) that exist in an official, stable state. These are documents that the organization has effectively authored and should not be changed. A document may move from a normal state and later become a record. Records are often archived, tracked, and audited. The most common scenario for records management is legal/regulatory compliance—ensuring that a document is retained/unchanged/purged according to a predictable, known schedule.
Records management (RM). Records management refers to documents and other content (Web pages, physical assets, etc.) that exist in an official, stable state. These are documents that the organization has effectively authored and should not be changed. A document may move from a normal state and later become a record. Records are often archived, tracked, and audited. The most common scenario for records management is legal/regulatory compliance—ensuring that a document is retained/unchanged/purged according to a predictable, known schedule.
![]() E-discovery. Electronic discovery is the process of identifying and delivering electronic information that can be used as evidence. SharePoint Server 2013 introduces a new feature called the eDiscovery Center, which is a new type of site collection that is used as a portal for managing e-discovery cases. From this central location you can discover content in the same SharePoint farm or other SharePoint farms, content in Exchange Server 2013, and content on file shares.
E-discovery. Electronic discovery is the process of identifying and delivering electronic information that can be used as evidence. SharePoint Server 2013 introduces a new feature called the eDiscovery Center, which is a new type of site collection that is used as a portal for managing e-discovery cases. From this central location you can discover content in the same SharePoint farm or other SharePoint farms, content in Exchange Server 2013, and content on file shares.
![]() Legal holds. During an e-discovery process, you can apply a legal hold to SharePoint and Exchange content that you discover. The hold ensures that a copy of the content is preserved while still allowing users to work with (and even change) the content. When you have identified the specific items that you will have to deliver, SharePoint provides a way to export them in an industry-standard format.
Legal holds. During an e-discovery process, you can apply a legal hold to SharePoint and Exchange content that you discover. The hold ensures that a copy of the content is preserved while still allowing users to work with (and even change) the content. When you have identified the specific items that you will have to deliver, SharePoint provides a way to export them in an industry-standard format.
With these terms defined, let’s dig into the main pieces of ECM within SharePoint 2013. For this discussion, we’ll focus our ECM topics on three main components: document management, records management, and e-discovery. Web content management (WCM) has its own chapter (Chapter 14, “Managing Web Content”).
What’s New in SharePoint 2013?
Let’s take a high-level view of what’s new in SharePoint 2013. In general, the document and records management features haven’t changed drastically. The following sections describe the new or enhanced features in SharePoint 2013 that will impact how you manage and organize content.
Site Retention Policy
New in SharePoint 2013 is the ability to manage the open/close status of a site, complete with retention policies (see Figure 13-2). When a site is closed, it is trimmed from places that aggregate open sites to site members such as Outlook, OWA, and Project Server. In addition, a site can automatically be deleted after it is closed. Before you apply a policy to a specific site, you’ll need to create site policies that define specific rules for exactly how a site is closed and deleted, when the deletion should occur, and whether a site should be marked as read-only upon closure. If you have any kind of retention policy for compliance reasons, or you simply wish to clean up sites after they’re no longer in use, this feature can be very useful. From an overall content management perspective, site retention can work hand in hand with item retention to complete an overall content retention policy within your organization. Even if you haven’t considered it before, we recommend taking the time to determine whether cleaning up content—regardless of the legal requirement to do so—could be of benefit.
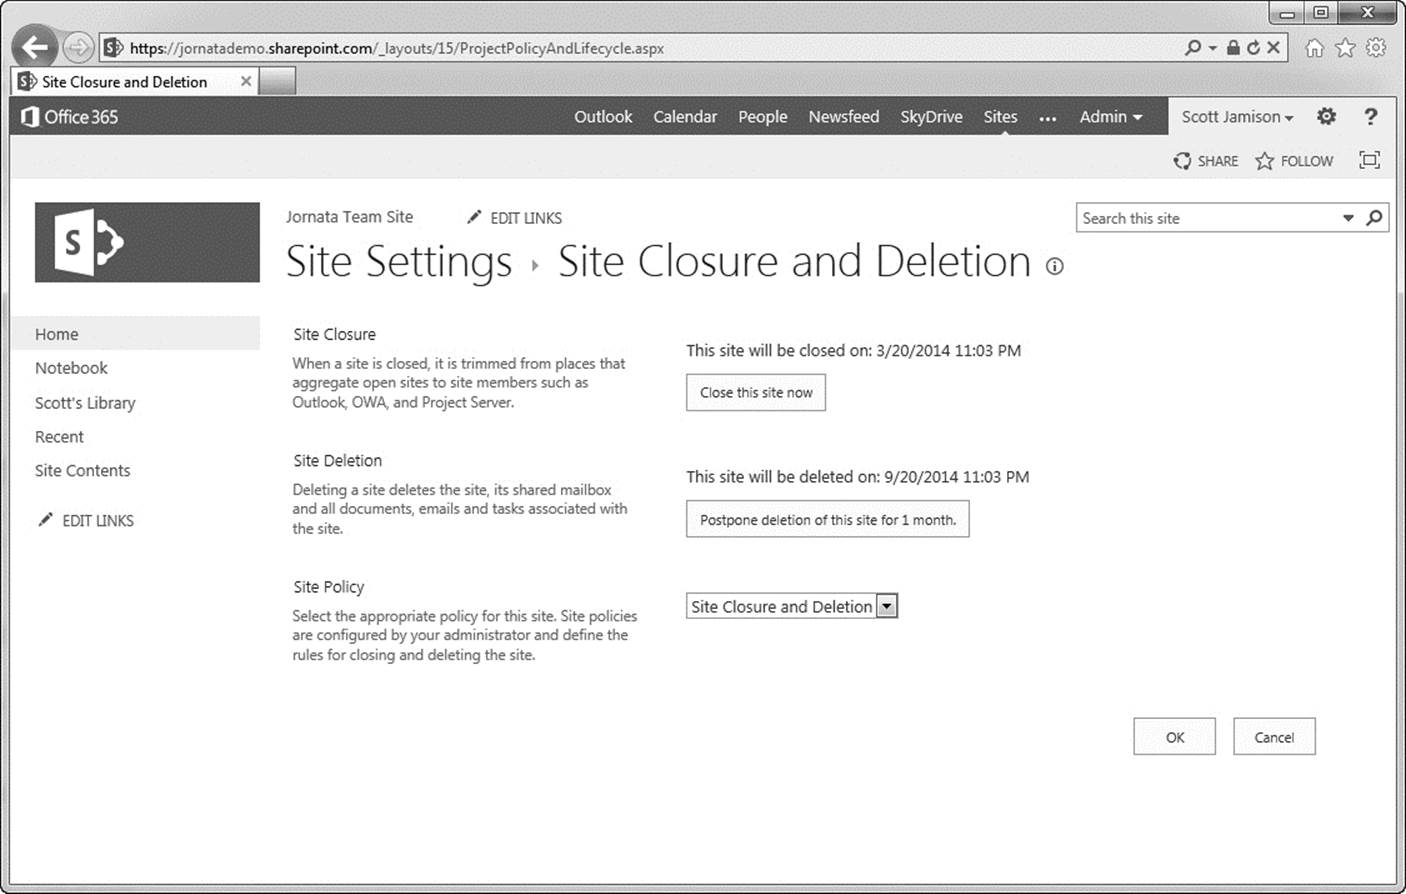
Figure 13-2 Site retention policies enable you to set when a site gets closed, whether sites are deleted automatically, and whether closed sites should be read-only
Site Mailbox
Site Mailboxes enable you to manage e-mail and documents together by connecting a SharePoint site to an Exchange mailbox especially created for the site. Users can then view the project or team-related e-mail from SharePoint and view site documents in Outlook. You can add a site mailbox to any site by adding the Site Mailbox app and then clicking into the app to complete the configuration (see Figure 13-3). Once you configure the site mailbox, a link to the mailbox will show up in the Site Contents page, just as for lists and libraries. When users click the Mailbox link, they are redirected to a page that displays an Outlook Web Access–based view of the mailbox content, complete with a breadcrumb back to the SharePoint site. Note that the Site Mailbox capability is included with Office 365 but not SharePoint Online by itself. In addition, for the Site Mailbox functionality to work on-premises, you’ll need both SharePoint 2013 and Exchange 2013 installed.
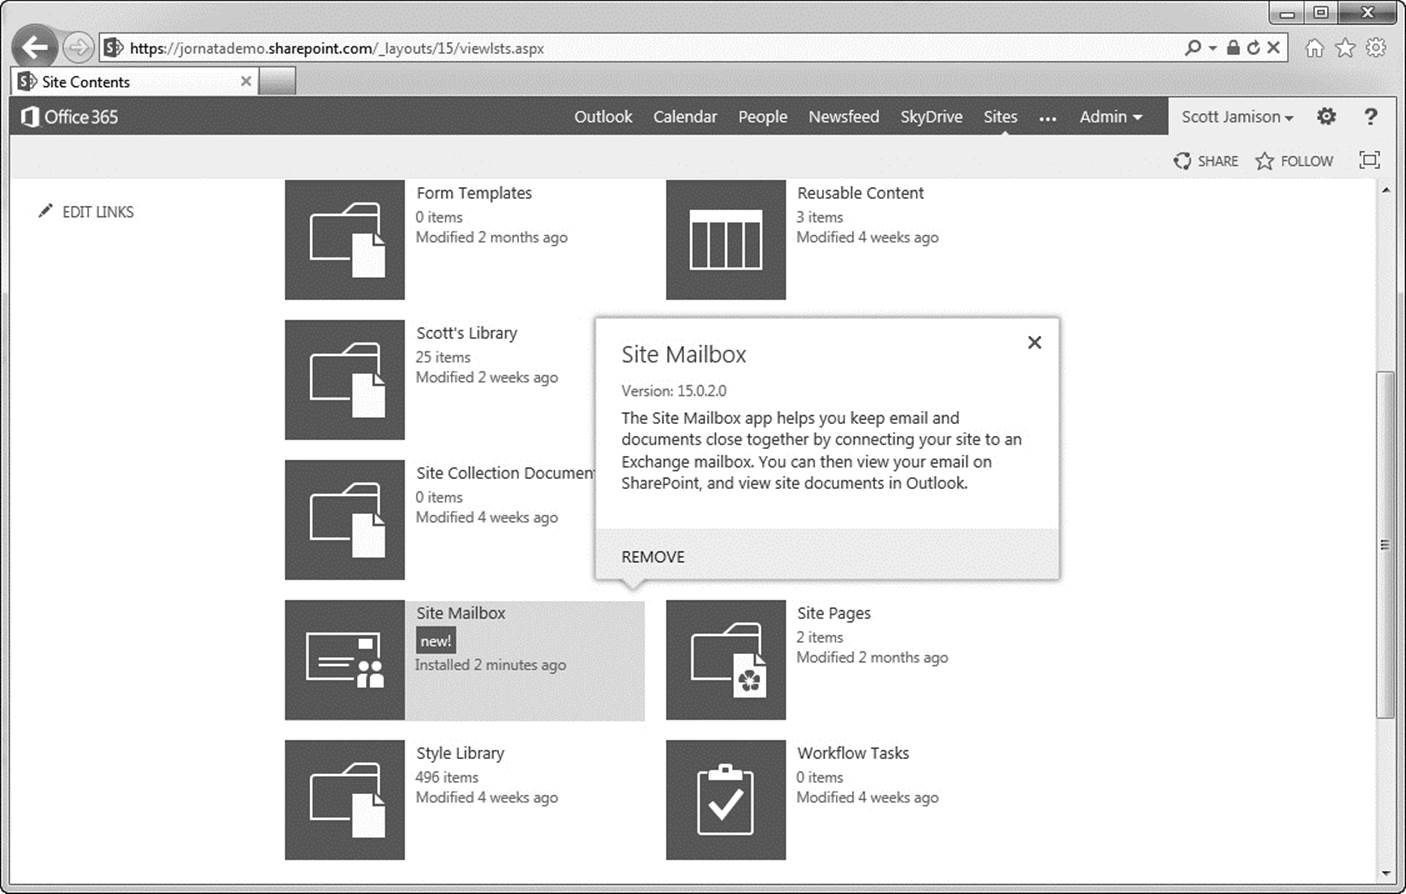
Figure 13-3 Site Mailboxes provide an Exchange-based mailbox to jointly manage documents and e-mail
We recommend considering this feature if you
![]() Need to have a consistent retention policy between project-related e-mail and SharePoint document content
Need to have a consistent retention policy between project-related e-mail and SharePoint document content
![]() Manage teams and projects for which overall content needs to be managed together
Manage teams and projects for which overall content needs to be managed together
![]() Want to provide the ability for team members to view and contribute documents stored in SharePoint document libraries directly from Outlook 2013
Want to provide the ability for team members to view and contribute documents stored in SharePoint document libraries directly from Outlook 2013
Document Drag and Drop
Users can drag and drop documents from their desktop into a SharePoint library directly—without the need for a special Explorer window (see Figure 13-4). This can be very powerful, since the ease of use provided by drag and drop will encourage SharePoint document library use. There are two caveats to this feature:
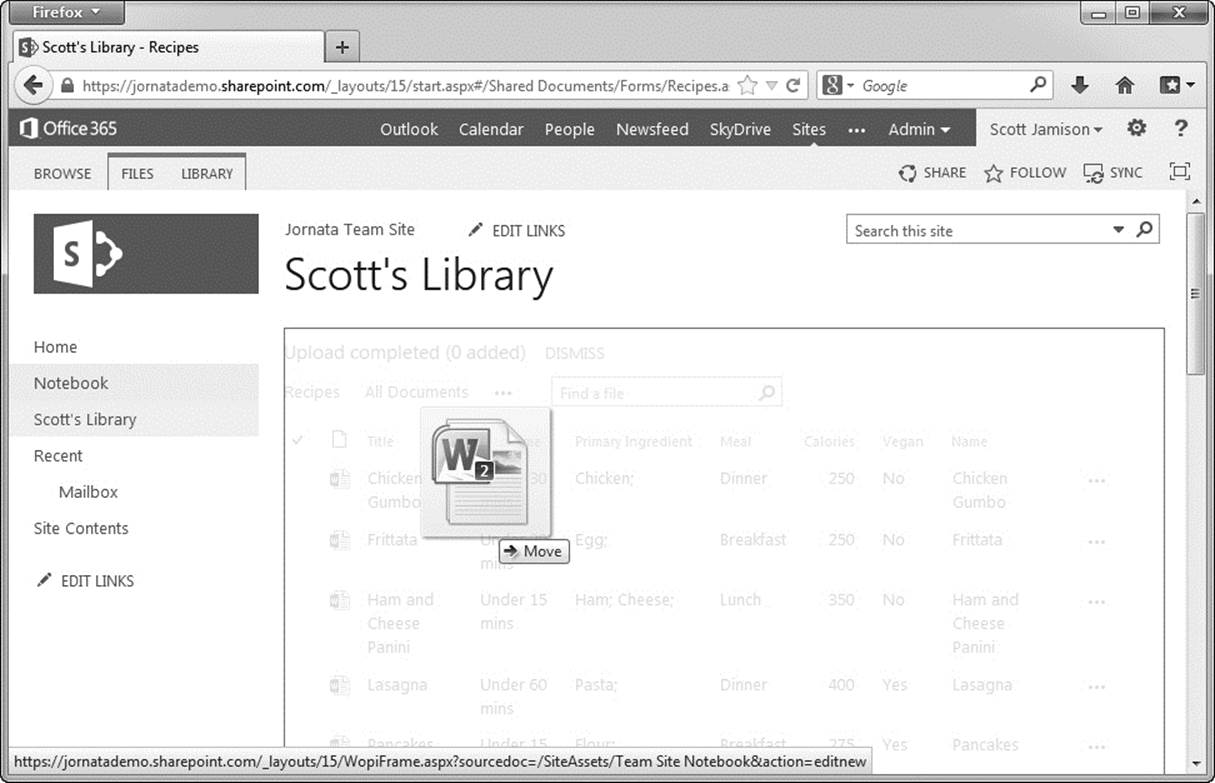
Figure 13-4 SharePoint 2013 supports browser-based drag and drop in almost any browser, providing a much improved user experience for document contributors
1. Since drag and drop doesn’t prompt the user for metadata, you should consider location-based default metadata values to encourage the implicit use of tags for your content, which will help with searching later.
2. Internet Explorer 9 doesn’t support drag and drop, so you’ll need to use IE10, Chrome, or Firefox to use this feature—these browsers are all supported.
Shredded Storage
Document versions are no longer stored as separate, complete copies of the full document. This can have a major impact on storage needs and can save costs if you rely on a large number of document versions. In SharePoint 2010 (when combined with Office 2010), Microsoft introduced the concept of transmitting only the changes made to Office documents when updating them in SharePoint; SharePoint 2013 takes this a step further and saves differences to the databases as well, saving both network bandwidth and database storage space.
eDiscovery Center
SharePoint Server 2013 introduces a new feature called the eDiscovery Center, which is a new type of site collection that is used as a portal for managing e-discovery cases. From this central location, you can discover content in the same SharePoint farm or other SharePoint farms, content in Exchange Server 2013, and content on file shares.
When an organization receives a request for e-discovery, perhaps from legal or as an outside request, you create an eDiscovery case in the eDiscovery Center. An eDiscovery case is a collaboration site that you can use to organize information (located via search) related to that particular e-discovery request. From within an eDiscovery case, you can search for content, apply a hold to content, export content, and view the status of holds and exports that are associated with the case.
SharePoint Online Feature Parity
In the 2010 time frame, document management in SharePoint was reasonably feature-rich. However, the SharePoint Online offering did not reflect many of those capabilities. The SharePoint 2013 release, and the corresponding SharePoint Online offering based on SharePoint 2013, provides the same set of features that you’d find on-premises. This makes the cloud offering much more viable in this release.
Now that you have an idea of what was added in SharePoint 2013, let’s review how to get the most out of the document management and records management features.
Back to Basics: Document Management in SharePoint 2013
Technically, document management has been a core piece of SharePoint since its inception, with features such as document libraries and custom Columns (metadata). Some might argue that versions of SharePoint prior to 2010 offered “document collaboration” or perhaps document management “lite.” The new document management features that have been added in SharePoint 2010 and 2013 bring SharePoint’s document management capabilities up to par with—or at least close to—industry expectations. This section discusses each of the key document management features as well as how and when you’d use them, and then provides a step-by-step walkthrough of a typical configuration for document and records management within SharePoint. In this section, we intentionally focus on some key features that might have existed prior to SharePoint 2013—such as location-based default metadata values—since many of these valuable features are still underused in most organizations, and because the features that have been introduced in SharePoint 2013, while useful, are marginally evolutionary and not revolutionary.
Document Libraries
A document library is simply a SharePoint list that is designed to accommodate documents. In SharePoint, libraries are designed to hold large items such as documents, images, videos, and reports, whereas lists typically hold structured data. In most cases, a document library is the best place to store and manage document content, with features such as versions, check-in/checkout, and tagging.
Note
Document libraries are also used to hold Web pages. For example, every team site in SharePoint 2013 has a library called Site Pages. This library holds the pages that display the user interface to the user, including Home.aspx, which is the start page for the site.
Versioning Settings
Version management is a core component of any document management system. It involves tracking the change history associated with a particular item. SharePoint 2013 offers several options: don’t track prior versions, track major versions only, or track major and minor version numbers.
![]() No versioning indicates that only the most recent version of the document will be retained.
No versioning indicates that only the most recent version of the document will be retained.
![]() A major version is a published version (1.0, 2.0) that indicates that the document is published and available to all readers. Previous versions are stored in the version history.
A major version is a published version (1.0, 2.0) that indicates that the document is published and available to all readers. Previous versions are stored in the version history.
![]() A minor version (1.1, 1.2) indicates that the document is in progress. It will eventually be published but has not yet been. Minor versions can be made visible to contributors only or to all readers. Previous versions are stored in the version history.
A minor version (1.1, 1.2) indicates that the document is in progress. It will eventually be published but has not yet been. Minor versions can be made visible to contributors only or to all readers. Previous versions are stored in the version history.
![]() SharePoint also retains document metadata/Column information within the version history.
SharePoint also retains document metadata/Column information within the version history.
Version options are set directly within the document library and apply to the library as a whole.
The document library Versioning Settings page allows you to specify if items should require content approval prior to publication, configure version setting details, set draft item security, and indicate checkout requirement options for a document library (see Figure 13-5).
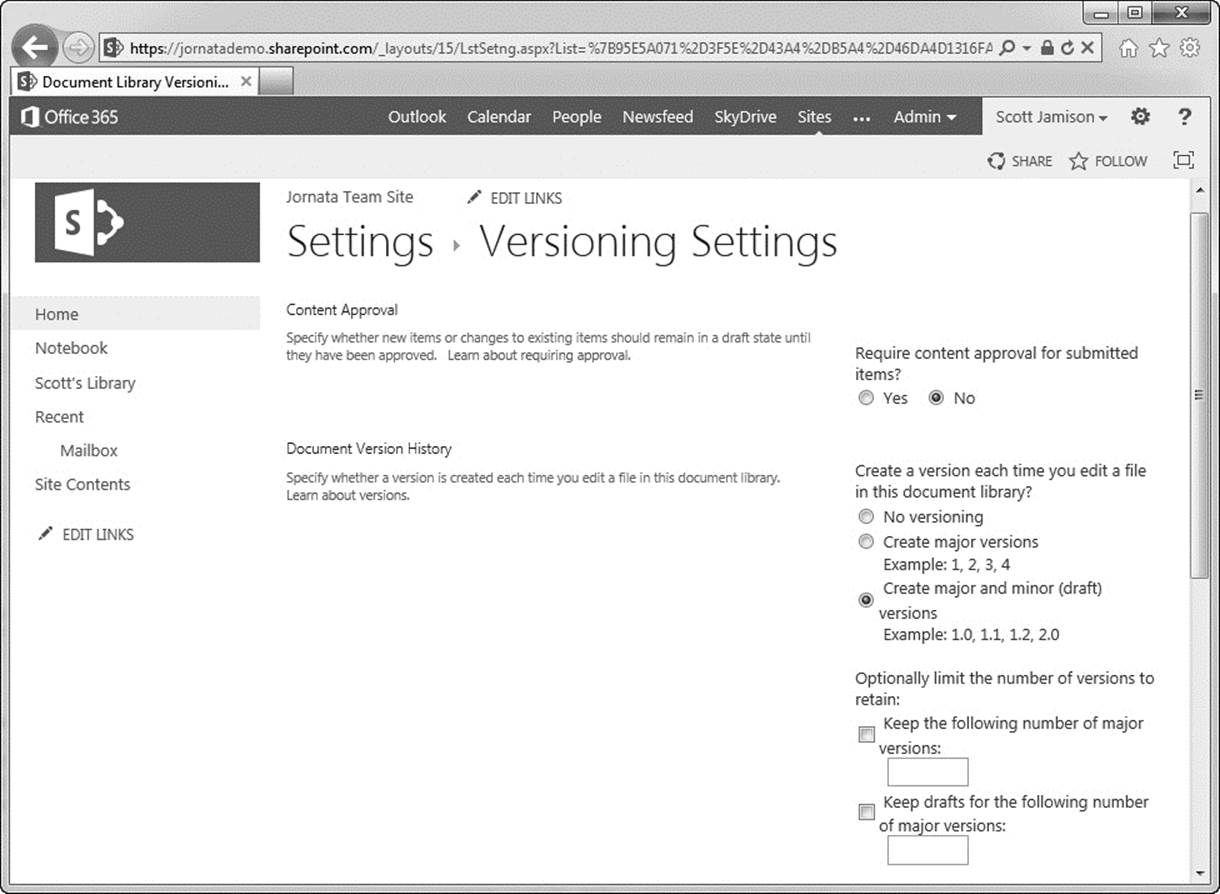
Figure 13-5 The Document Library Versioning Settings provide content approval, version history, draft item security, and checkout requirement options for a document library
Content Approval
You can think of content approval (see Figure 13-5) as a one-stage approval process. When this setting is enabled, all major-versioned documents need approval from an Approver user role. New and changed items remain in a pending state until approved or rejected by someone who has permission to approve them.
![]() If the item or file is approved, it is assigned an Approved status in the list or library, and it is displayed to anyone with permission to view the list or library.
If the item or file is approved, it is assigned an Approved status in the list or library, and it is displayed to anyone with permission to view the list or library.
![]() If the item or file is rejected, it remains in a pending state and is visible only to the people with permission to view drafts. Minor versions (drafts) don’t require approval.
If the item or file is rejected, it remains in a pending state and is visible only to the people with permission to view drafts. Minor versions (drafts) don’t require approval.
Content approval settings apply to what is returned in search results as well.
Document Version History
Depending on the options selected in this section, SharePoint tracks revisions to both the document content and its metadata properties. Libraries can track both major and minor versions, and you can limit the number of versions that people can store (see Figure 13-6).
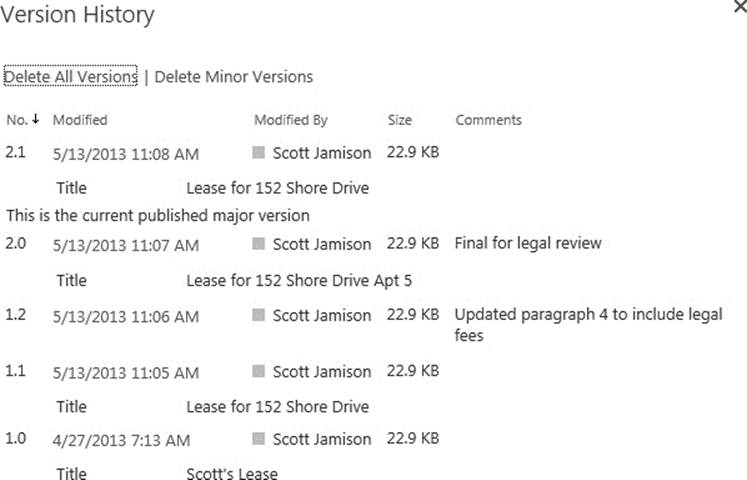
Figure 13-6 Versioning enables you to save the various changes to an item over the course of its editing history
Tracking both major and minor versions provides a more detailed way to track the version history of an item. Major versions are more likely to represent a milestone, such as when a file is ready to be viewed by a wide audience. Minor versions are typically used as a routine increment, such as a version that a user saves or checks in while he or she is still writing the content. When you want to view the version history of a file, major and minor versions make it easy to identify the stages of the file’s development. Note that users can add a version comment for minor versions only if they check out and check the document back in; this means that if you want to require comments on every version (including minor versions), you need to require checkout.
When you save and close a file, the version is tracked as a minor version by default. If you check out the file before working on it, you can designate the type of version you are checking in. You must publish a major version of the file for it to become visible to all readers. You do not need to publish a file as a separate step if you designate it as a major version when you check it in.
Versions are numbered when they are created. When major and minor versions are tracked, the major versions are whole numbers, and the minor versions are decimals. For example, 0.1 is the first minor version of a file, 1.2 is the second minor version of a file that was published once, and 2.0 is the second major version of a published file.
Let’s walk through an example to illustrate how the version numbering might work. Assume that a user creates a new file in a document library; the document is labeled 0.1. When the user publishes the document, it is labeled as version 1.0. After being checked out, edited, and checked in an additional time, version 1.1 is visible to team members but not seen by the organization. (Note that the specific visibility of draft items depends on the Draft Item Security setting, described in the next section.) The rest of the organization continues to see only version 1.0. It’s the same with a second draft, tagged as version 1.2. Finally, when the document is published, version 2.0 is created, and it supplants version 1.0 from a visibility perspective so that everyone sees version 2.0.
Again, let’s recap:
![]() Version 0.1 (created at check-in; visible to author and/or approval team only)
Version 0.1 (created at check-in; visible to author and/or approval team only)
![]() Version 1.0 (created when published; visible to all after approval takes place)
Version 1.0 (created when published; visible to all after approval takes place)
![]() Version 1.1 (created at check-in; visible to author and/or approval team only)
Version 1.1 (created at check-in; visible to author and/or approval team only)
![]() Version 1.2 (created at check-in; visible to author and/or approval team only)
Version 1.2 (created at check-in; visible to author and/or approval team only)
![]() Version 2.0 (visible to all)
Version 2.0 (visible to all)
The power of the major/minor version functionality is the ability to manage the document revision process within the portal (versus on a local drive) while at the same time ensuring that a document is not made available until it is complete and approved.
Note
If you delete a document and subsequently restore the document, all stored versions will be restored in the source document library.
If you choose to limit the number of versions that SharePoint stores, the oldest versions are permanently deleted when the limit is reached and not sent to the Recycle Bin.
A major change in SharePoint 2013 with respect to version history is that a full copy of every version is no longer stored in the database. In prior versions of SharePoint, regardless of the versioning control method that you chose, a complete copy of each version of the document would be stored in SQL Server. This made some organizations stop and think about whether to enable versioning due to the sheer cost of storage. With a new feature in SharePoint 2013 called “shredded storage,” only the differences between the document versions are stored. This could make you reconsider your stance on enabling versioning since the overall storage savings could be significant.
Draft Item Security
The Draft Item Security setting allows you to control which groups of people can read drafts. As discussed in the last section, drafts are the minor versions of a file and are created in one of two ways: either when a minor version of a file is created or updated in a library that tracks major and minor versions, or when a list item or file is created or updated but not yet approved in a list or library in which content approval is required.
You can specify which groups of people can view drafts—either by enabling all users with Read access to view them, or by restricting viewing only to users who can edit items. This allows you to restrict readers to access only the major versions of documents or the documents that are approved.
![]() If content approval is required, you can specify whether files that are pending approval can be viewed by people with permission to read, people with permission to edit, or only the author and people with permission to approve items.
If content approval is required, you can specify whether files that are pending approval can be viewed by people with permission to read, people with permission to edit, or only the author and people with permission to approve items.
![]() If both major and minor versions are being tracked, the author must publish a major version before the file can be submitted for approval. When content approval is required, people who have permission to read content but do not have permission to see draft items will see the last approved major version of the file.
If both major and minor versions are being tracked, the author must publish a major version before the file can be submitted for approval. When content approval is required, people who have permission to read content but do not have permission to see draft items will see the last approved major version of the file.
If you plan to use minor versions and content approval, we recommend configuring Draft Item Security so that only editors and/or approvers see draft items. This ensures that general site users don’t see unapproved versions of documents.
Require Checkout
You can also configure the document library to require checkout before items can be edited (see Figure 13-7). Requiring checkout prevents multiple people from making changes at the same time. When this setting is enabled, new files are initially set as checked out. The person who creates or adds the file must check it in before other people can see it. Checkout is also required to update metadata properties on the file.
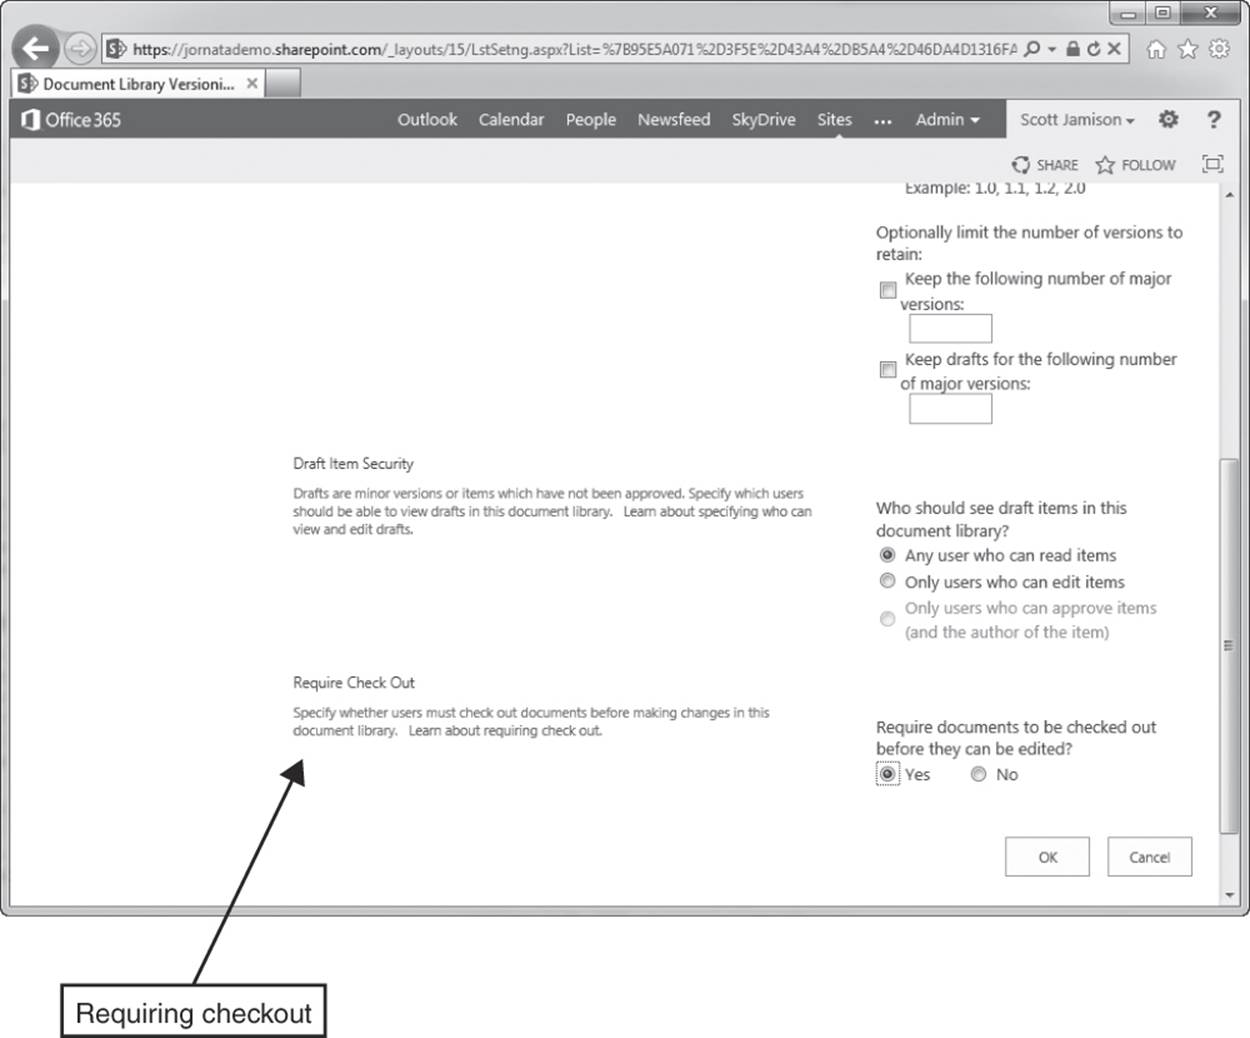
Figure 13-7 The Require Check Out setting enables you to require that users check out items before they can be edited
When checkout is required, a file is checked out automatically when someone opens it for editing. When a file is checked out, no one can edit it except the person who checked it out. Changes that someone makes to a file while it is checked out are not visible to others until the file is checked back in. This is true regardless of whether the person is working on the file locally or on the server.
Note
In general, if users are planning to edit documents in place, they are typically better off not requiring checkout and instead using the simultaneous editing feature of SharePoint and Office. In this scenario, you should instruct site designers and users to use check-in/checkout only if they’re going to take documents offline and edit them, or if you require very strict controls. Just note that no conflict resolution process will be available; multiple users will simply edit the same document at the same time. In Word and PowerPoint, they’ll see each other’s changes as they save the document. In Excel, changes are saved as soon as the user tabs out of a cell.
When users check in a file, they are prompted to enter comments about the changes that were made. If a library tracks versions, the comments become part of the version history. If both major versions and minor versions are tracked, users are prompted to choose which type of version they are checking in (major or minor).
Item-Level Security
SharePoint enables library owners to configure permissions at the item level; this means a single document library can hold a collection of similar (by content) documents that have different security definition(s). Item-level security can also be applied at the folder level (all documents in a folder share the security settings of the folder) or at the document level (unique permissions for the item).
Users looking at the list may see different documents based on their security privileges. In addition, security can be applied not just for viewing but for editing as well. In this case, specific users can edit only certain documents in the list. Again, one document library is managing a collection of similar content but the visibility or accessibility is being managed at the item level.
Consolidated libraries with item-level security can be far more efficient to present, navigate, and manage, but it is important to carefully consider the design and application of item-level security. By definition, permissions are broken from the parent, so if users or groups are added, modified, or deleted at the parent level, they will not automatically be updated in the folder or document. Furthermore, neither folders nor documents show an item-level security indicator. This can make document management challenging. Consider adding a metadata field to indicate if item security is applied. This can be a simple yes/no or a text field to capture who has access.
The recommendation here is to use item-level security as sparingly possible, mainly due to the burden that it can put on site administrators. When you enable item-level security, you break the security inheritance model. Therefore, if you change the security on either the library itself or the site as a whole, your documents will not inherit the new permissions and you will have to find each document that is uniquely provisioned and adjust the permissions manually. This can be a huge problem if you have a large number of items with item-level security in a library.
Managed Metadata
Managed metadata services play a large role in effectively tagging content. SharePoint 2013’s Managed Metadata Service (or term store) provides a simple means of centrally managing a keyword taxonomy and providing an easy-to-use interface for updating and leveraging the keyword hierarchy. In addition to a central store of terms, this service provides many useful items: “type-ahead” on keyword selection (which works as an auto-complete function), easy management of the keyword associations, synonym management, and security trimming that allows for the decentralization of metadata ownership.
With managed metadata, SharePoint 2013 allows you to create centrally managed taxonomies and use them across lists and document libraries. In addition, users are able to navigate by using the metadata items. As an example, you might want to tag company documents with a custom property that identifies the client to which the document is aligned, which would then contain a well-managed list of client names. This ensures that metadata values are consistent, making searches more accurate. To add a Column in this manner, you can create a new Column in SharePoint called Offering and select Managed Metadata as the Column’s type. This enables you to point the new Column at a managed term set in the term store. When users enter information into this property, they are able to select from a hierarchical view of preset value choices (see Figure 13-8).
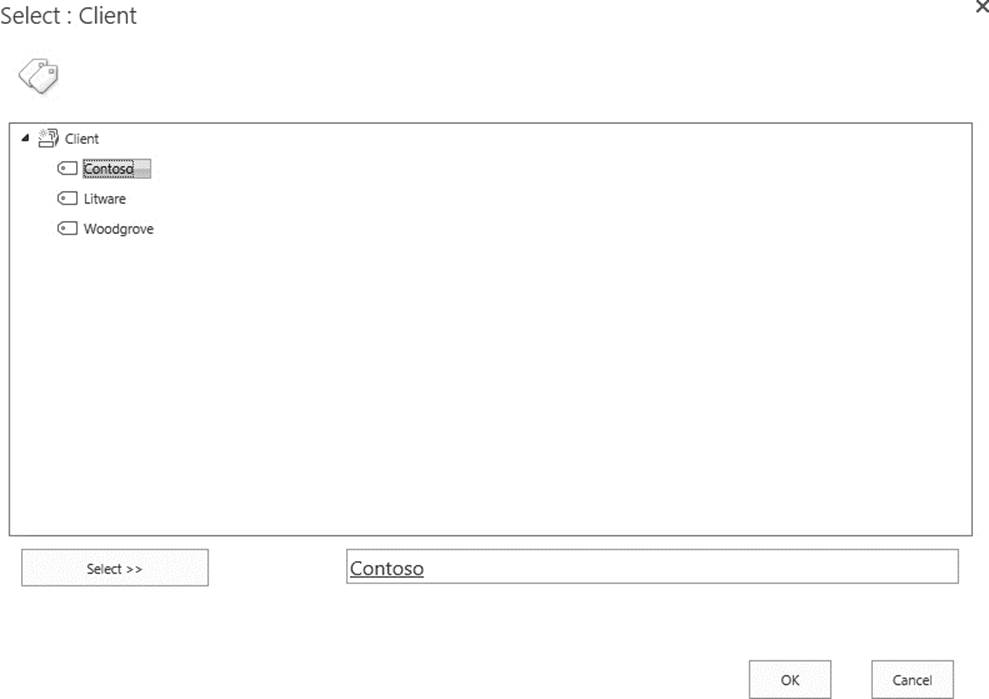
Figure 13-8 The Managed Metadata Column type enables users to select from a set of predefined, centrally managed terms
You can also use the Managed Metadata type to provide hierarchical navigation for users. For example, users can view a navigation tree (Figure 13-9). If a user selects the company Contoso under Client, SharePoint will apply a filter to the current view, showing only items that are tagged with a service offering type. In addition, users can use the Key Filters text box to type in the value of an offering, thereby applying the filter.
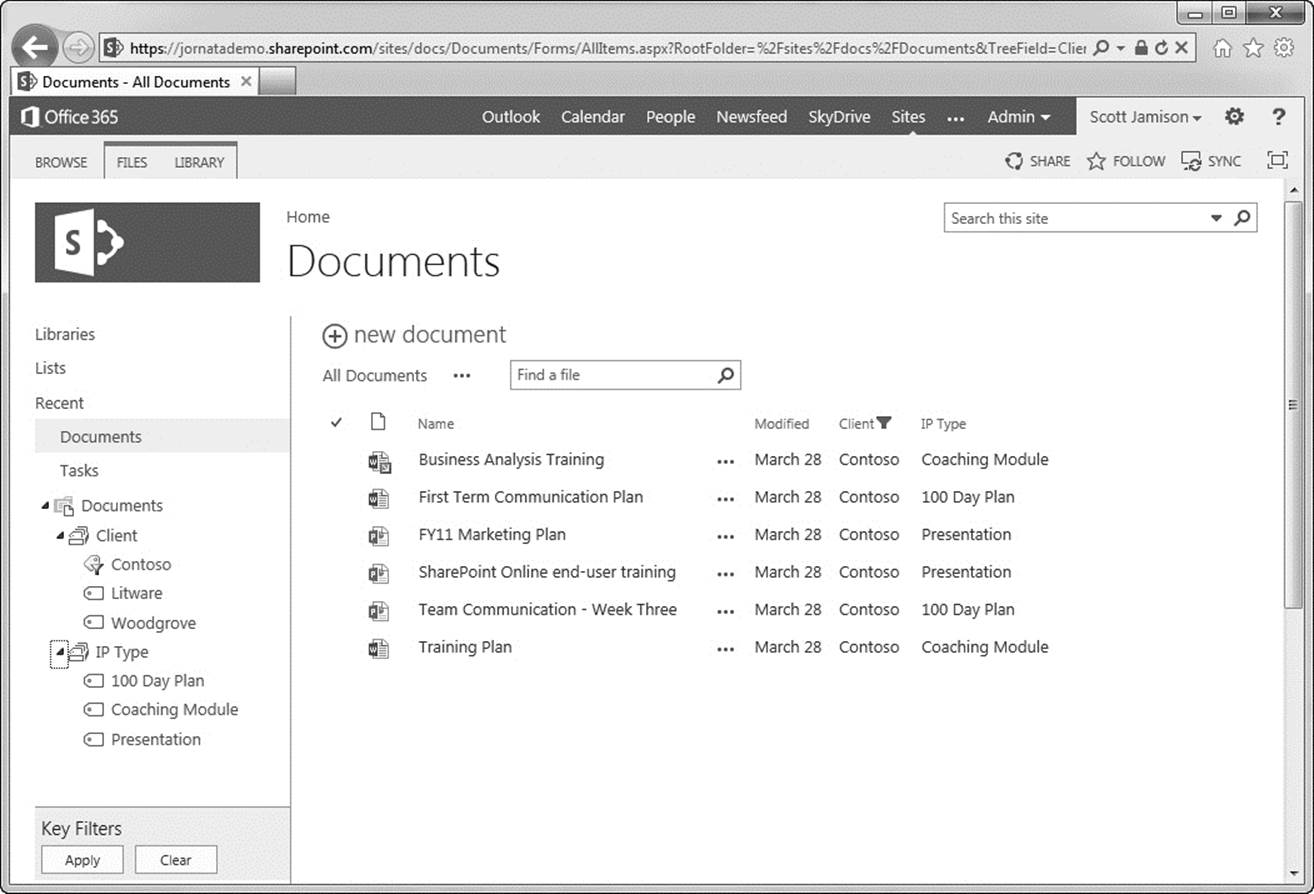
Figure 13-9 Metadata-based navigation provides a way for users to navigate lists and document libraries by using managed metadata values or folders
To configure metadata navigation, click the Configure Metadata Navigation link within the settings for the document library. Here, you can configure three items (see Figure 13-10):

Figure 13-10 Metadata Navigation Settings enable you to configure document filtering based on metadata Columns, providing automatic filtering based on filters
![]() Configure Navigation Hierarchies. You can set navigation fields based on the following types: Content Type, choice, managed metadata. The properties of all Columns that satisfy one of those three types are enumerated here. You can choose any/all fields that you want users to navigate by using the tree view.
Configure Navigation Hierarchies. You can set navigation fields based on the following types: Content Type, choice, managed metadata. The properties of all Columns that satisfy one of those three types are enumerated here. You can choose any/all fields that you want users to navigate by using the tree view.
![]() Configure Key Filters. In addition to the tree view, you may want users to type in filter information for fast filtering. You can indicate which fields you want SharePoint to maintain an index on for filtering.
Configure Key Filters. In addition to the tree view, you may want users to type in filter information for fast filtering. You can indicate which fields you want SharePoint to maintain an index on for filtering.
![]() Configure automatic column indexing for this list: Typically, you’ll want SharePoint to manage Column indices on the list.
Configure automatic column indexing for this list: Typically, you’ll want SharePoint to manage Column indices on the list.
Location-Based Metadata
A very powerful feature that was introduced in SharePoint 2010 is the concept of default metadata values. The library administrator can set default Column values by location (see Figure 13-11); for example, all documents dropped into a specified library can have metadata values set automatically. This feature becomes even more powerful when combined with folders, since content contributors can use SharePoint 2013’s new drag-and-drop capability to move dozens of documents at once into SharePoint, select the proper folder, and apply correct metadata values on all documents automatically.
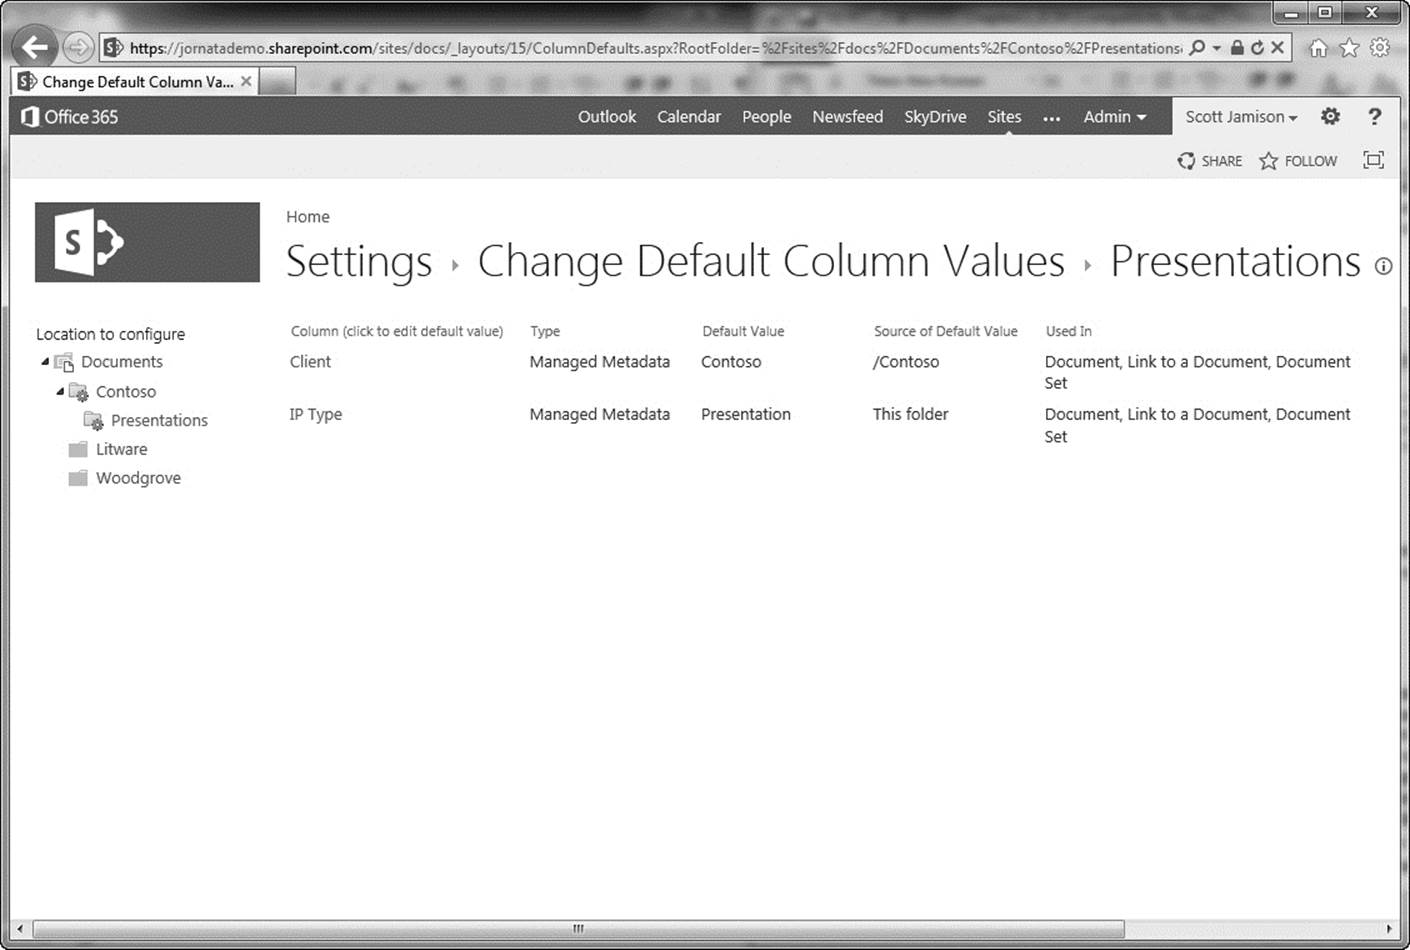
Figure 13-11 Configuring Column default value settings provides a way to specify default Column values; combined with folders, this feature enables contributors to simply choose a location and get metadata tagging for free
Document Sets
In many document management scenarios, users may produce several documents to accomplish one task or produce one deliverable. It can improve efficiency and consistency to manage the group of documents as one document set. Before you can create and manage SharePoint document sets, you must activate the site collection Document Set feature. Activating this feature creates a new Content Type that allows you to organize multiple documents into a collection of related documents that can be managed as one. In effect, document sets are folders where you can
![]() Share metadata across documents
Share metadata across documents
![]() Version the document set itself (instead of the individual documents)
Version the document set itself (instead of the individual documents)
![]() Initiate workflows for the whole document set
Initiate workflows for the whole document set
![]() Set permissions on the document set
Set permissions on the document set
![]() Download the documents within a document set to a .zip file
Download the documents within a document set to a .zip file
![]() Create a welcome page for the document set
Create a welcome page for the document set
The big advantage is that the entire collection of documents is effectively treated as one when used as part of a business process.
Document sets are implemented as a Content Type. To activate document sets, follow these steps:
1. Select Site Actions → Site Settings.
2. Under Site Collection Administration, click Manage Site Collection Features.
3. Click the Active button next the Document Sets feature (see Figure 13-12).
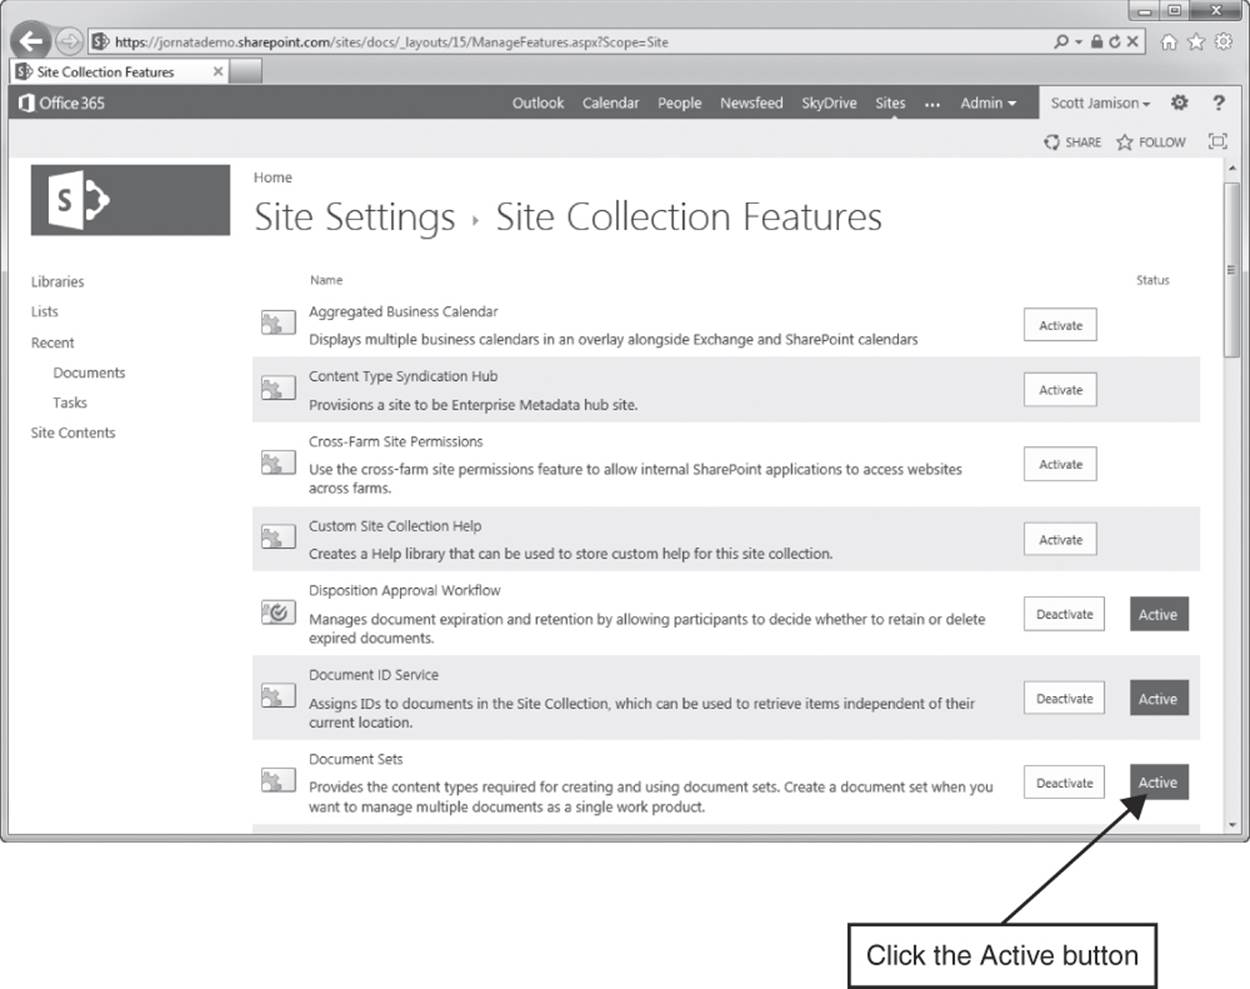
Figure 13-12 The Document Sets site feature and the Document ID Service feature are enabled at the site collection
4. Return to the document library Advanced Settings page and enable management of Content Types.
5. Add the Document Set Content Type to the library by clicking “Add from existing site content types” (Figure 13-13) and selecting Document Set.
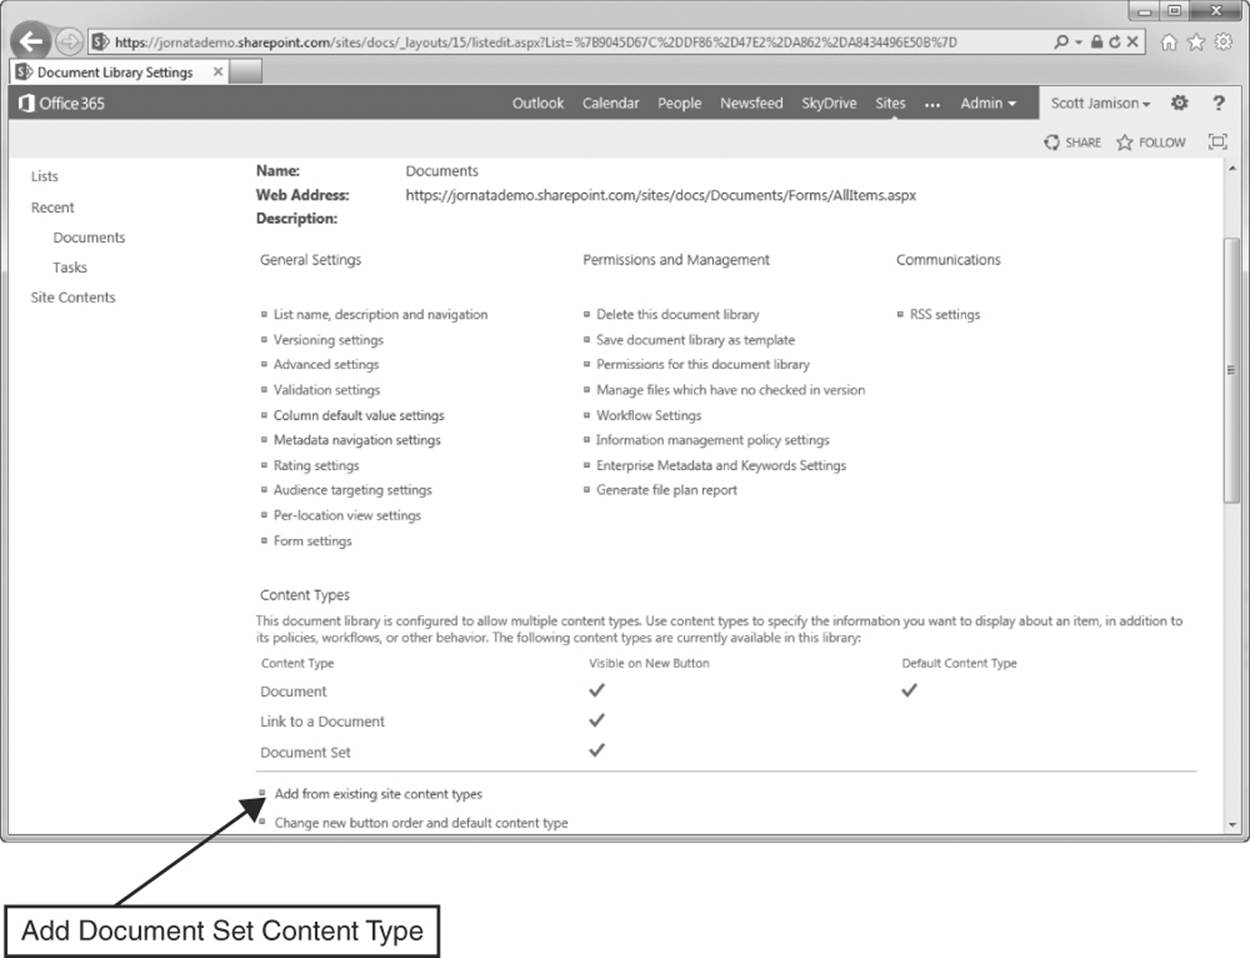
Figure 13-13 Unless you use the Document Center site template, the Document Set Content Type must be added manually to the document library before you can create one
So when do you use document sets? Primarily when you want to treat a number of documents as a single item that has common metadata, permissions, and workflow. For example, you might be creating a proposal for a customer. While the proposal itself might be a single Word document,you’ll also deliver a PowerPoint presentation, a video presentation, and an Excel spreadsheet for financial analysis. In this scenario, you’ll probably want all of the items to share the same metadata (customer name, opportunity ID, and so on).
When users navigate to a document set, they will see information about the document set and can view and upload documents associated with the set. In addition, there is a special tab in the ribbon that appears when a user enters a document set. This ribbon button enables the user to create a version of the set, to start a workflow on the set, and to manage permissions on the set as a whole.
Content Organizer
The Content Organizer, introduced in SharePoint 2010, can automatically process content based on rules. This allows you to set up rules, such as specifying a drop-off library where users can centrally upload documents, having the system automatically create subfolders to partition items so that no folder has too many items, and sending documents to another location based on document attributes.
Document IDs
The Document ID service, also introduced in SharePoint 2010, enables you to assign unique IDs to documents within a site collection. Once this feature is activated, SharePoint assigns each document in the site collection its own unique identifier (permalink). This identifier can then be used to identify documents through either a direct link, page navigation, or a search. Users can then search for and retrieve documents based on ID independent of location.
Prior to SharePoint 2010, if a document moved within SharePoint, all references to it would break. With a document ID, that document now has a permanent path, independent of how many times it is moved. This provides a dependable method for retrieving the document and is a very powerful feature for those who point users directly to specific documents on their site. Since this feature is managed at the site collection level, there are additional settings that should be configured to ensure that document IDs are unique across all site collections. This is described in further detail later in this chapter.
To use this feature, activate it on the Site Settings page in the Site Collection Administration section. Then, click the Document ID settings page within Site Collection Administration.
There are two options within the Document ID settings page. The first setting is vitally important—it enables you to configure a prefix that will be applied to all documents within the site collection. Why is this setting so important? Provided you use unique prefixes across your site collections, it will ensure that your document IDs will be unique. The second option enables you to specify a search scope that is used for looking up documents using the ID field. An important note: Even though your document ID will be unique, if you move a document from one site collection to another, a new document ID will be created for it, since SharePoint considers it a copy.
As a best practice, make sure that each site collection has a unique document ID prefix properly configured. Don’t just make something up; instead, use consistent prefixes according to your document management policies. Your governance committee should approve all document IDprefixes used in your enterprise; this will ensure that all document IDs assigned by SharePoint are globally unique. As a best practice, we recommend maintaining a master list to store the site collection names, the document ID prefix assigned to the site collection, the principal contact and backup contact for the site collection, and a description of the intent or focus of the site collection. Keep this with other governance plan documents for your environment.
Workflow
Workflow is a framework for defining rules and associated actions on a list entity (like a document). Workflow rules can be based on metadata (i.e., Create Date < 1/1/2014 or Status=“Approved by Manager”) and can trigger actions like document approval, removal, or movement. The workflow components of SharePoint 2010 proved popular for automating processes such as approvals and dispositions; SharePoint 2013 continues to add and enhance workflow capabilities by adding the new Workflow Manager role (for more information on workflows, refer to Chapter 17, “Planning Business Solutions”).
The biggest advantages of workflow implementation are the consistency and structure it offers. Workflow rules are defined, and then SharePoint triggers the workflow actions when the specified criteria are met. From a document management perspective, workflow is interesting in that it enables content administrators to define rules for humans to interact with documents within SharePoint.
SharePoint 2013 contains a few out-of-the-box workflows that represent standard scenarios. One is an approval process. In this scenario, one or more approvers must confirm the validity of document content and acknowledge their acceptance through a formal process. The SharePoint workflow manages the process of notifying each approver of the requested action, captures the response, and notifies the next approver on the list of the request.
As stated earlier, workflow enables a framework for introducing a set of well-defined actions, with or without intervention, as they apply to documents stored in SharePoint libraries. In addition, actions can be defined so that appropriate activities can occur and be logged as documents are altered.
Document Information Panel
One of the toughest challenges in building a document repository is ensuring that each document is tagged with well-defined metadata so that it is easily discovered by an organization’s members. Given the breadth of content that is often created in a corporate environment, this can be an overwhelming task (ask anyone who has tried to manage a document management system!). Content contributors are much more focused on the details within a document than on thinking about how best to tag it. Content discovery, after an item has been submitted, is an afterthought. Why is this bad? Search engines, even the best ones, cannot deliver optimal results if little is known about the content. In addition, it is hard to group similar content if the linking attribute is not consistently managed. This leaves many organizations in a stuck state. They have a SharePoint environment that contains the majority of business-critical documents but no easy way to find or associate key content.
Why is document tagging so difficult? Mainly it is because the tagging process happens too late in the document submission process. Just after a user uploads a document, he or she is asked for a bunch of metadata. Often, as a timesaver, little or no data is provided. Once a document is in the repository, it is very unlikely that it will ever be tagged again. The Document Information Panel (DIP), also available in previous versions of SharePoint and Office, is an interface within the Office 2013 products (such as Word or Excel or PowerPoint) that shows the metadata requirements for that document within the Office interface. A content contributor can update metadata as he or she is creating the document. Think about the power in that. SharePoint 2013 has moved the metadata entry process earlier in the document life cycle, where it should be, when the information is most readily available and makes more sense.
By providing an easier means of entering/updating document metadata (directly in the open document), the Document Information Panel can improve the probability that quality metadata will be entered for the document. This improved metadata has far-reaching impact as it offers a better user experience in terms of content discovery (i.e., search or filtering). In addition, it provides the data required to implement stronger audit policies around specific types of content.
Document Center
One of the final items to note regarding document management is the Document Center, which is a site template that enables you to centrally manage documents in your organization. Whereas most sites contain document libraries that are geared toward supporting that particular site only, the Document Center is for centrally managing documents.
What does the Document Center template provide? It’s essentially a template with two key lists: a document library and a task list. The Document Center site template also configures the default settings in the document library to support strong content control. In contrast to generic site templates and libraries, default checkout is required before editing, major and minor versions are enabled, support for multiple Content Types is enabled, document sets are enabled, metadata navigation is enabled, and auditing is enabled to track content changes over time. The site template also provides a custom welcome page to facilitate easy upload and search (based on document IDs) (see Figure 13-14).
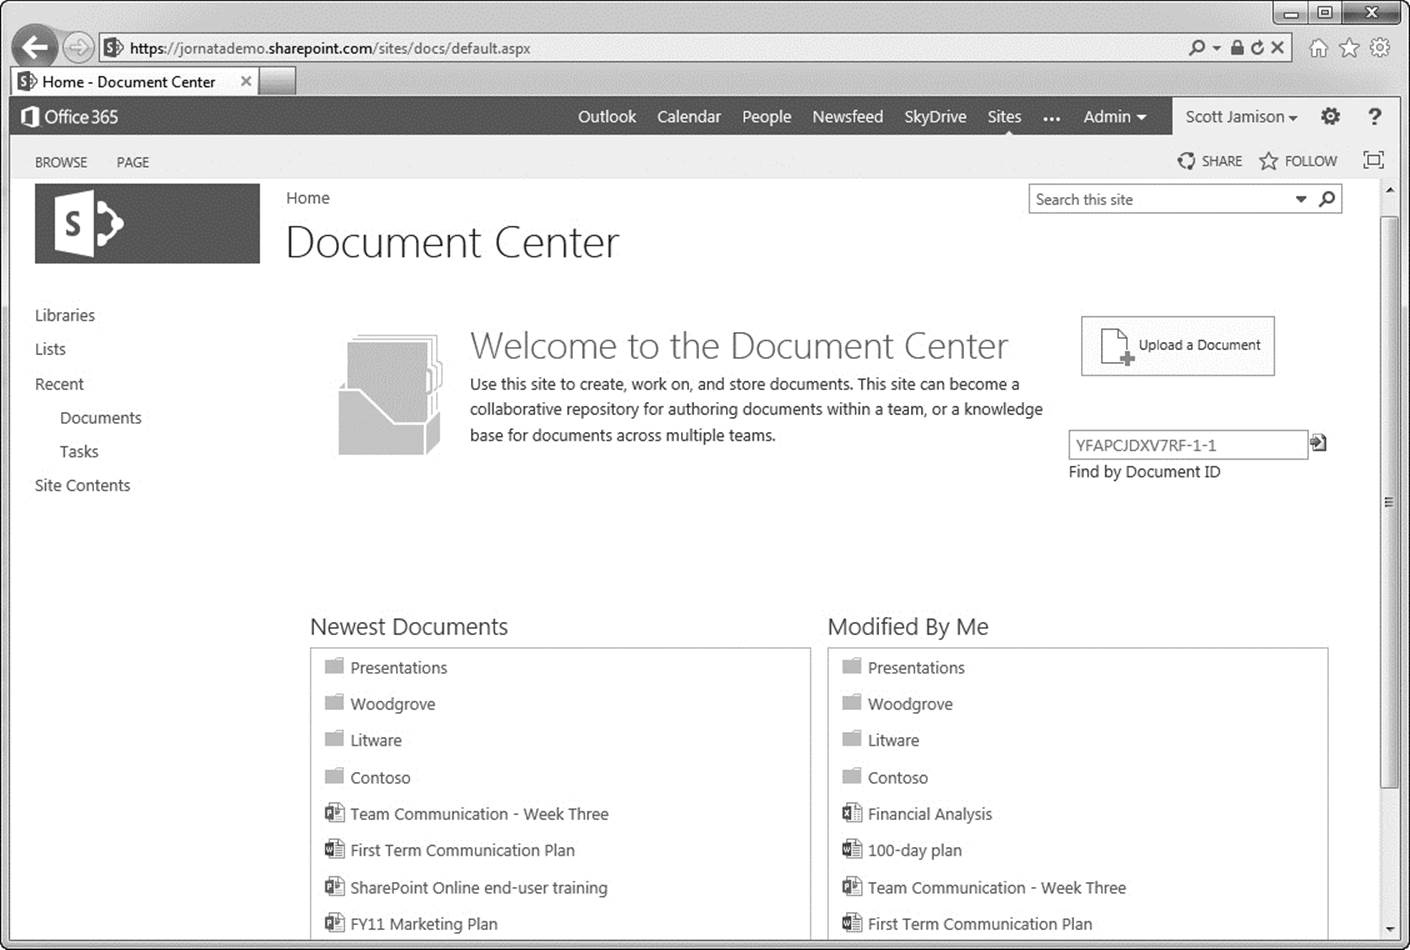
Figure 13-14 The Document Center template enables you to create a site specifically geared toward enterprise document management
Our recommendation is to use the Document Center site for documents that need centralized management. Use a Team Site template with document libraries to store documents that require active collaboration.
Records Management
Records management in SharePoint 2013 enables you to manage business documents that are necessary for regulatory compliance, business continuity, or historical interest. Records management is not new to SharePoint 2013, but it has been enhanced to enable retention policies on entire sites (in addition to retention policies on documents and other library items, which were available previously). In a nutshell, records management involves declaring the document(s) as a record and then applying records management policies and auditing to those records. Records management policies are an effective way to ensure that historical content is maintained by either marking the document in place or moving the document to a special repository with its own rules and security. Documents are effectively removed from the mainstream content so that they do not burden search engines and content navigation with excess clutter. If desired, a separate search page or navigational structure could be used for archived content.
Record Declaration
To start off, which do you use: in-place records declaration or the records archive? You’ll likely use both and will need to decide which and when. There are certain issues you will need to consider:
![]() Records retention rules
Records retention rules
![]() Which users can view records
Which users can view records
![]() Ease of locating records (collaborative users versus the records manager)
Ease of locating records (collaborative users versus the records manager)
![]() Maintaining each version as a record—do you need this?
Maintaining each version as a record—do you need this?
![]() Records auditing—how often will you audit records?
Records auditing—how often will you audit records?
![]() Site organization (and number of sites used)—what does your information architecture look like?
Site organization (and number of sites used)—what does your information architecture look like?
![]() E-discovery
E-discovery
![]() Security
Security
If you plan to use a records archive, you will need a Records Manager role to ensure that records are well managed and that rules are followed. This person will likely set up a records archive using the Records Center template.
In-Place Records Management
You can also declare records in place. This requires you to do two things first: (1) activate the In Place Records Management site collection feature; (2) then enable manual declaration of records either at the site collection level or at the document library level (under “Record declaration settings”). You can also automatically declare items as records when they are added to specified libraries.
Note
Lists can also be configured to store records.
Once you enable manual declaration of records, users will see a new action in the ribbon that allows them to declare an item as a record (see Figure 13-15).
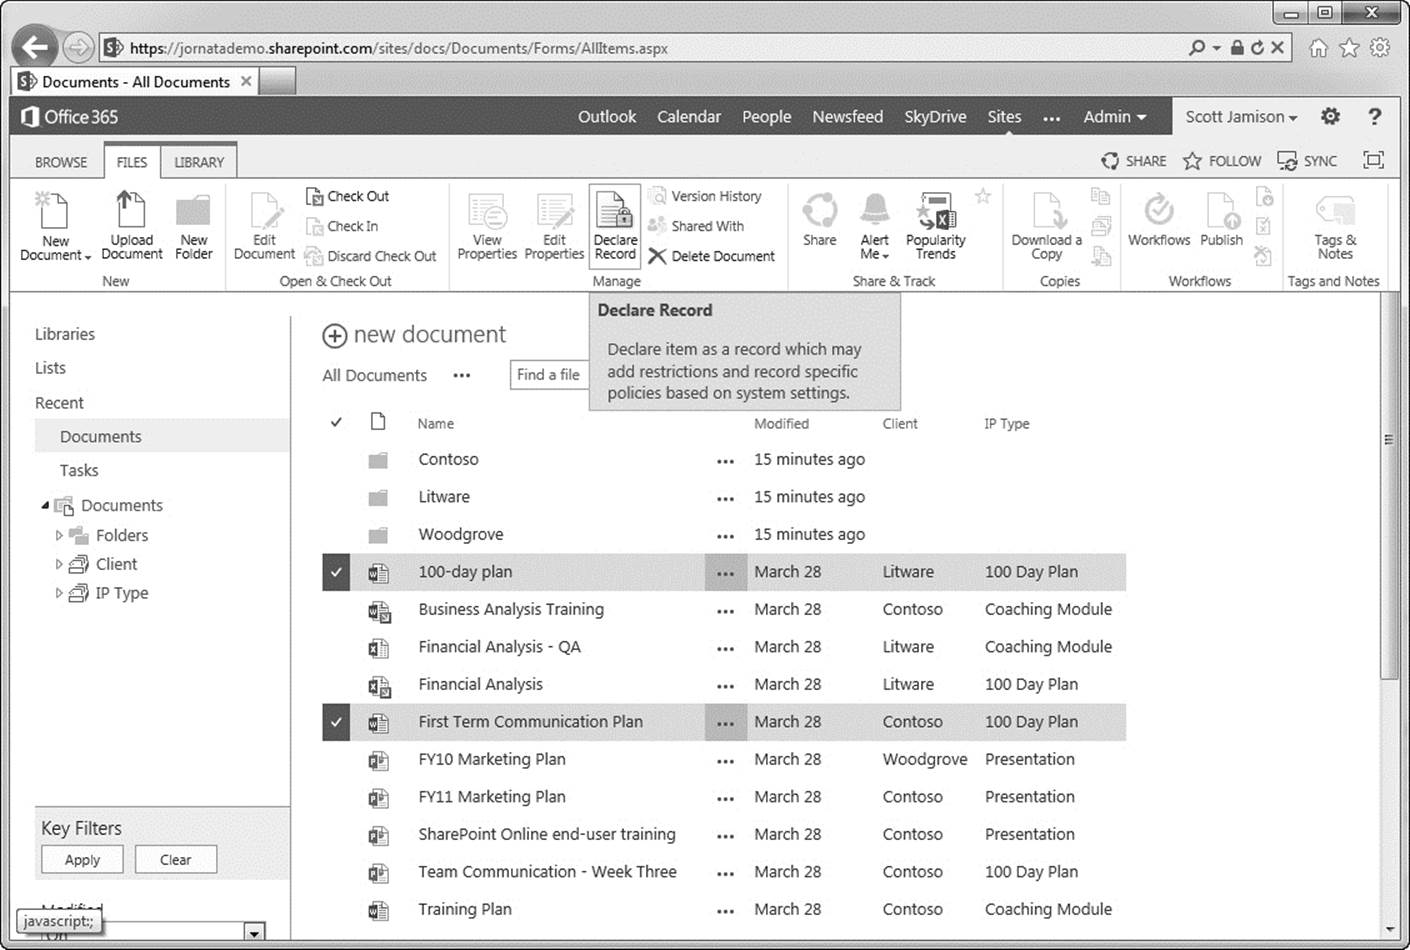
Figure 13-15 Once the ability to manually declare a record is enabled, users can declare records in place
Records management involves “locking down” a version of a document to provide an immutable snapshot of that document at a point in time. This means that SharePoint 2013 can manage items as auditable sources of corporate content. With SharePoint 2007, this meant having to move the document to another location and/or tightening the security around it. With SharePoint 2013, documents can be treated as records either in a central location or in place. Thus, you have the choice of sending a document to a Records site, or marking the document as a record within the context of its original document library. In-place records management gives contributors more flexibility in managing documents and locking them down when each reaches a final state. Doing this will provide a proper audit trail and eliminate some current business processes associated with physically moving documents to new locations for archiving.
Because most users are not familiar with records management practices (and likely don’t need that level of detail), the ability to implement consistent handling to ensure compliance/retention/disposition is a real value-add for many organizations. However, that does not obviate the need to make sure individuals who have overall responsibility for managing record content are actively engaged and well trained in defining and/or implementing policies and settings. You should make sure that anyone responsible for content management of any kind understands the expectations for how content is to be managed.
Auditing
For many organizations, especially those in industries that require a high level of regulatory compliance, storing documents in a repository is not enough. It is just as important to manage the activity around those documents. Activity management is all about auditing or recording the details around what happened to a particular document throughout its life cycle. Examples of audit information include who added particular sections and when, when a document was approved and by whom, what a document looked like on a certain date, and what the rules around document retention are.
Even more granular is the ability to record viewing statistics associated with a particular document. Let’s say you have a new corporate policy that requires executive approval prior to publishing. The information in the document is so sensitive that you may want to know who viewed the document prior to its approved state. As you can see, auditing spills over into accountability. Because of this, it is important to have a robust records management solution in place to properly track and record all details associated with portal content.
SharePoint 2013 delivers on the goal of effective records management by providing a system that allows auditing on documents or any list item. SharePoint 2013 provides auditing capabilities for tracking specific events like when a document was opened or viewed, when a document was edited, when a document was checked out, and even when a document was moved to a new location. All of this is built right into the SharePoint 2013 system interface and is easily configured as part of a list library definition.
In addition to item-level auditing, SharePoint 2013 also provides auditing at a specific site level. This is an especially interesting feature as it allows site managers to track when security changes were made within the site and when metadata associated with a particular document was altered. Think about the impact of such a feature! Administrators can be assured that policies about site security and/or document definition can be effectively monitored and enforced. This is how the term compliance gets introduced in the SharePoint 2013 feature set.
Who can see details on audit data? Only administrators. Content contributors, whose activities are tracked, do not have access to audit reports. In addition, no one is allowed to edit or alter audit data. This lockdown ensures that audit trails are always complete and accurate. In addition, audit policies themselves can be audited so administrators can assess how well certain policies are being followed. This rules-based approach is yet another way SharePoint supports the effective management of sensitive information. Everything is monitored; policies are always tracked.
Information Management Policies
We’ve briefly talked about applying audit policies to specific documents or list items in SharePoint 2013. One of the obvious questions is how you ensure that these policies are in place, in all the right places. SharePoint provides the ability to set information management policies. These policies provide a structured way for administrators (or records managers) to define the proper audit policies and apply them consistently to all relevant locations. That way, no one has to worry about making sure that these policies extend into new sites or documents—they’ll be applied automatically, ensuring that future content adheres to organizational rules.
As with most SharePoint 2013 functionality, information management policy management is built right into the interface. This allows administrators or records managers to define policies directly in the site settings of a particular document or site. In the Permissions and Policies section there is a link for “Information management policy settings.” This is where policy is defined and applied.
Setting information management policies is intended to be simple and intuitive. No special skills are required to define policies. Administration is intended to be simple. For users, the experience is just as simple. When a policy is in place around a particular document, the user is made aware by a notification bar at the top of the document. All other functionality is normal.
There are several information management policy use cases, but let’s look at a specific example associated with an expiration policy. Very much like metadata capture, document expiration is critical to the overall effectiveness of portal document delivery. Few documents should live forever (at least in the context of the corporate portal). Over time, a document becomes less relevant and therefore should be moved out of the mainstream. Without rules and policies in place, this becomes an overwhelming burden for document administrators. Who can be responsible for investigating all documents for usefulness?
SharePoint 2013 introduces the ability to have multistage expiration policies, which is a set of rules for executing activity on a particular document or group of documents. This is a two-step process.
The first step is to define when a document will encounter an expiration trigger. This is most easily done with logic against known metadata (another reason to properly tag content!). While most rules will be date driven (i.e., expire after 180 days), any metadata can be used to drive expiration.
The second step in the policy definition is to define what happens to the document when the criterion is met. This can take many forms; you can delete the document from the repository, or perhaps launch a SharePoint-based workflow that can move that document to an archive location. By setting expiration rules, administrators and records managers can ensure that the portal always contains relevant and timely data. See Figure 13-16 for the compliance details on a particular item—this one has yet to have a retention policy defined.
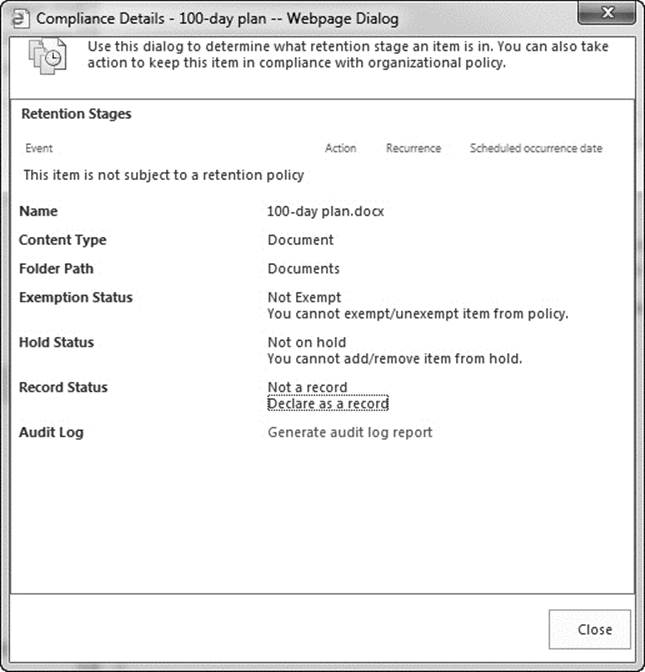
Figure 13-16 You can view the compliance details on any document, where you can see the document’s scheduled retention policy, record and hold status, and audit information
As we have seen in this section, the document management and records management features in SharePoint 2013 enable you to create a repository to retain business documents that are necessary for regulatory compliance, business continuity, or historical interest. The ECM features of SharePoint 2013 enable you to set polices and auditing around documents. It’s an effective way to ensure that historical content is maintained, not deleted, and does not burden search engines and content navigation.
Key Points
This chapter provided recommendations for using the enterprise content management (ECM) features of SharePoint 2013. In general, our recommendations are:
![]() Define Site Columns to capture metadata. Consider using folders for contributors, which enables you to define location-based default values for Columns. This provides a way for editors to provide metadata in bulk, or when using drag and drop.
Define Site Columns to capture metadata. Consider using folders for contributors, which enables you to define location-based default values for Columns. This provides a way for editors to provide metadata in bulk, or when using drag and drop.
![]() Use folders to apply security, define location-based default metadata, or partition large libraries. Train users to use Columns instead of folders to organize or display content.
Use folders to apply security, define location-based default metadata, or partition large libraries. Train users to use Columns instead of folders to organize or display content.
![]() Set the default reader view(s) in a library to ignore folders. Then, provide a secondary view, called either Contributor or Folder View, for those users who want to navigate via a folder view.
Set the default reader view(s) in a library to ignore folders. Then, provide a secondary view, called either Contributor or Folder View, for those users who want to navigate via a folder view.
![]() Define Content Types to standardize metadata across the organization, using Content Type syndication to keep document types consistent across site collections.
Define Content Types to standardize metadata across the organization, using Content Type syndication to keep document types consistent across site collections.
![]() Use a Team Site template with document libraries to store documents that will be actively collaborated on. Use the Document Center site template for documents that need to be managed in a centralized way.
Use a Team Site template with document libraries to store documents that will be actively collaborated on. Use the Document Center site template for documents that need to be managed in a centralized way.
![]() Make sure that each site collection has a unique document ID prefix configured. Your governance committee should approve all document ID prefixes used in your enterprise; this will ensure that all document IDs assigned by SharePoint are globally unique.
Make sure that each site collection has a unique document ID prefix configured. Your governance committee should approve all document ID prefixes used in your enterprise; this will ensure that all document IDs assigned by SharePoint are globally unique.
![]() If you have a records manager, use the Records Center site template to store and manage records. If you don’t have a formal, centralized records manager, in-place record declaration will be easier for users to manage.
If you have a records manager, use the Records Center site template to store and manage records. If you don’t have a formal, centralized records manager, in-place record declaration will be easier for users to manage.