WINDOWS 10 TIPS AND TRICKS (2016)
3. Connecting to Networks and the Internet
In This Chapter
![]() Connecting to wired networks and wireless networks
Connecting to wired networks and wireless networks
![]() Managing your network connections, using VPNs, and mapping network drives
Managing your network connections, using VPNs, and mapping network drives
![]() Diagnosing and repairing connection problems
Diagnosing and repairing connection problems
To get the most out of your computer, you’ll want to connect it to the Internet. Normally, the easiest way to do this is to connect it to a local area network that is connected to the Internet. For example, a typical home broadband connection includes a switch or router to which you can connect your computers and other devices (such as smartphones or tablets) so that they can access the Internet and also share files, printers, and other devices with each other locally. Similarly, your workplace likely has a network that enables the computers and devices to connect to servers, printers, and other shared resources, and to access the Internet.
This chapter shows you how to connect your computer to a wired network or to a wireless network, how to connect to network folders, and how to deal with network problems. You also learn how to connect your computer to a virtual private network, or VPN, in order to establish a secure connection to a server across the Internet, and how to share your computer’s Internet connection with others.
Connecting to a Wired Network
To connect to a wired network, plug one end of an Ethernet cable into the Ethernet port on your computer and the other end into an Ethernet port on a switch, router, or hub.
For many networks, making the physical connection is all you need to do, because Windows tries to configure the connection automatically when it detects the cable. If the network uses DHCP (see the nearby sidebar), Windows can apply suitable settings, and your computer can start using the network.
Windows doesn’t display any fly-out or dialog box when it connects successfully to a network, so you’ll probably want to check that the connection is working. Usually, the easiest way is to open a web browser, such as Microsoft Edge; if it displays your home page, all is well; but if it displays an error, you will need to configure the connection.
See the section “Configuring IP Settings Manually,” later in this chapter, for instructions on configuring a wired connection manually.
Why Do You Sometimes Need to Configure Network Settings?
To connect to a network, your computer must have suitable Internet Protocol (IP) settings: the IP address, the gateway address, the network prefix length, and the addresses of the domain name system (DNS) server it should use. Typically, the computer receives these settings automatically from the network, but you can also set them manually if necessary.
Most wired and Wi-Fi networks use Dynamic Host Configuration Protocol (DHCP), a protocol in which a DHCP server or DHCP allocator automatically provides IP addresses and network configuration information to computers that connect. DHCP is an efficient way of sharing available IP addresses among computers, so it’s widely used. But some networks use static IP addresses instead, assigning a particular address to each computer. For such networks, you must configure your computer’s IP settings manually.
![]() Note
Note
The quick and easy way to disconnect from a wired network is to unplug the Ethernet cable from your computer. Alternatively, you can leave the cable connected but disable the Ethernet adapter. To do this, right-click or long-press the Network icon in the notification area and click Open Network and Sharing Center. Next, click Change Adapter Settings, and then right-click or long-press Ethernet and click Disable on the shortcut menu.
Connecting to a Wireless Network
Wired networks can be great for high speeds and reliability, but if your computer is a laptop or a tablet, you will likely find wireless networks more convenient. Windows enables you to connect to wireless networks easily and quickly.
To connect to a wireless network, you need to know its name (so that you can identify the network) and its security mechanism, such as a password.
Understanding SSIDs and Hidden Networks
Each Wi-Fi network has a network name to identify it. The administrator assigns the name when setting up the network. The name contains alphanumeric characters—letters and numbers—and has a maximum length of 32 characters. The technical term for a wireless network’s name is service set identifier, which is abbreviated to SSID.
When setting up a Wi-Fi network, the administrator can decide whether to have the router broadcast the network’s name—as networks normally do—or whether to create a hidden network, one that doesn’t broadcast its name. A hidden network is also called a closed network.
Creating a hidden network is one of the security measures an administrator can take for a wireless network. It is only moderately effective: Casual intruders may miss the network, but anyone with a Wi-Fi scanner will still be able to detect the network. For technical reasons, network professionals recommend not creating hidden networks, but many people use them nonetheless.
Connecting to a Wireless Network That Broadcasts Its Name
Follow these steps to connect to a wireless network that broadcasts its name:
1. Click the Network icon in the notification area to display the Network fly-out.
2. If Wi-Fi is turned off (the Wi-Fi button is gray, and no networks appear), click Wi-Fi to turn Wi-Fi on. The list of available networks appears (see Figure 3.1).
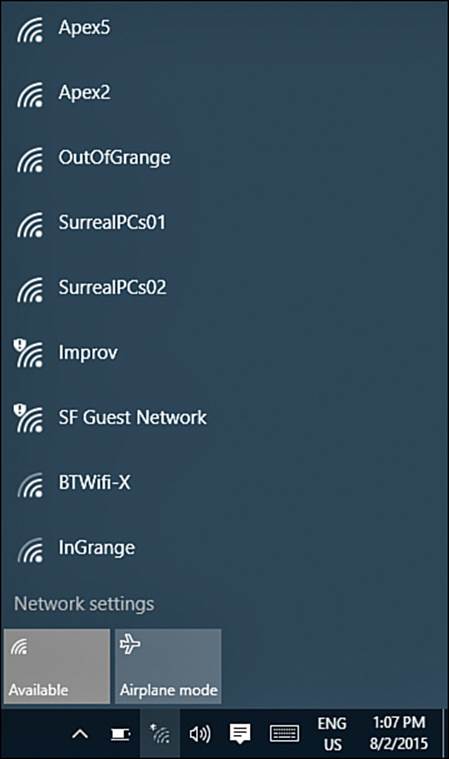
FIGURE 3.1 To start connecting to a wireless network, click the Network icon in the notification area, and then click the network name.
![]() Note
Note
An exclamation point in the upper-left corner of a wireless network’s icon in the Network fly-out indicates that the wireless network is not secured.
3. Click the network to which you want to connect your computer. If the list of networks is long, you may need to scroll down to find the network. The connection controls appear (see Figure 3.2).
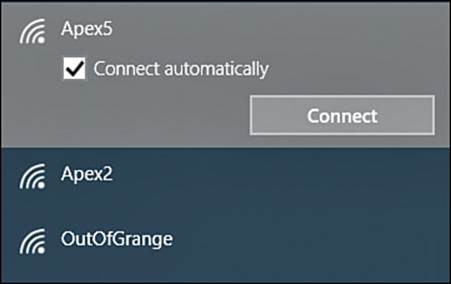
FIGURE 3.2 With the connection controls displayed in the Network fly-out, check the Connect Automatically check box if necessary and then click the Connect button.
4. Check the Connect Automatically check box if you want your computer to connect automatically to this network in the future when the network is available. You’d want to do this for your main wireless networks at home, work, and other regular locations.
5. Click Connect. Windows prompts you to enter the network security key (see Figure 3.3).

FIGURE 3.3 Type the password in the Enter the Network Security Key box and click Next.
![]() Note
Note
Windows doesn’t prompt you for the password if you have connected to this network before and Windows has saved the password. Similarly, if the wireless network doesn’t use security, there’s no password to enter.
6. Type the password.
![]() Tip
Tip
The password characters appear as dots for security. You can click the symbol at the right end of the Enter the Network Security Key box to reveal the characters momentarily to check that you have the password right.
7. Check the Share Network with My Contacts check box if you want Windows to share the network with your contacts via Wi-Fi Sense.
8. Click Next. Windows prompts you to decide whether to find PCs, devices, and content on the network and to connect automatically to devices like printers and TVs.
![]() Note
Note
Allowing Windows to find PCs, devices, and content on the network, and to connect automatically to devices, configures sharing settings for the network. See the section “Configuring Sharing” in Chapter 7 for instructions on configuring sharing manually.
9. Click Yes or No, as appropriate. Normally, you’d want to click Yes if this is your home network or a work network that you use regularly, and click No if this is a public network or a network you don’t use regularly.
When Windows connects successfully to the network, it automatically determines and applies the IP settings needed for your computer to communicate through the network. The network appears at the top of the Network fly-out and Connected appears underneath it.
When your computer is connected to the network, check that the connection is working. If the network has an Internet connection, you can check easily by opening Microsoft Edge or another web browser and making sure that it can load web pages.
If the connection isn’t working, you will need to configure it manually. See the section “Configuring IP Settings Manually,” later in this chapter, for instructions.
Connecting to a Network Using WPS
Some Wi-Fi routers include a feature called Wi-Fi Protected Setup (WPS) to help you set up networks securely. WPS is mostly used by Wi-Fi routers designed for the home market. It is a moderately secure way of establishing a connection to a Wi-Fi network.
When Windows detects that the Wi-Fi router offers WPS, it prompts you to press the WPS button on the router as an alternative to entering the network security. When you press the button, Windows communicates with the router to get the security settings needed for the network.
To use WPS, you need physical access to the router. If you don’t have this, enter the network security key as usual to connect to the network.
Connecting to a Hidden Wireless Network
A hidden wireless network doesn’t broadcast its name, so you need to tell Windows the network name as well as the network security key. Windows enables you to connect to a hidden wireless network by using either the Network fly-out or the Manually Connect to a Wireless Network Wizard. The Manually Connect to a Wireless Network Wizard offers an extra setting, so it’s worth knowing both techniques.
After you specify the details of the hidden wireless network, you can connect to it from the Network fly-out in the same way you connect to other wireless networks.
Adding a Hidden Wireless Network via the Network Fly-Out
To connect to a hidden wireless network via the Network fly-out, follow these steps:
1. Click the Network icon in the notification area to display the Network fly-out.
2. Click the Hidden Network item at the bottom of the fly-out.
3. Check the Connect Automatically check box if you want your computer to connect to this network automatically.
4. Click Connect. Windows prompts you to enter the name (the SSID) for the network.
5. Click Next. Windows prompts you to enter the network security key.
6. Type the network security key.
7. Check the Share Network with My Contacts check box if you want Windows to share the network with your contacts via Wi-Fi Sense.
8. Click Next. Windows prompts you to decide whether to find PCs, devices, and content on the network and to connect automatically to devices like printers and TVs.
9. Click Yes or No, as appropriate.
Adding a Hidden Wireless Network via the Manually Connect to a Wireless Network Wizard
Follow these steps to add a hidden wireless network using the Wireless Network Wizard:
1. Right-click or long-press the Network icon in the notification area to open the shortcut menu.
2. Click Open Network and Sharing Center to open the Network and Sharing Center window.
3. In the Change Your Networking Settings list, click Set Up a New Connection or Network to launch the Set Up a New Connection or Network Wizard. The Choose a Connection Option screen appears.
4. Click Manually Connect to a Wireless Network.
5. Click Next. The Manually Connect to a Wireless Network Wizard starts and displays the Enter Information for the Wireless Network You Want to Add screen (see Figure 3.4).
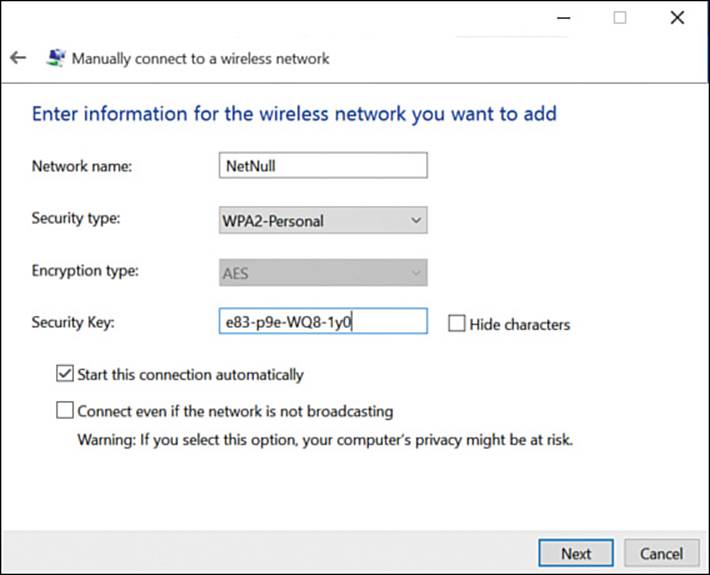
FIGURE 3.4 To connect to a hidden wireless network, enter its name and connection information in the Manually Connect to a Wireless Network Wizard.
6. Type the network’s SSID in the Network Name box.
![]() Note
Note
SSIDs are case sensitive, so use the exact case.
7. Open the Security Type drop-down menu and choose the security type, such as WPA2-Personal.
8. If the Encryption Type drop-down menu is available, open it and choose the appropriate encryption type.
9. Check the Hide Characters check box if you need to hide the password from shoulder-surfers.
10. Type the password in the Security Key box.
11. Check the Start This Connection Automatically check box if you want Windows to connect automatically to this network. You may want to do this if this is a network you use regularly.
![]() Caution
Caution
Selecting the Start This Connection Automatically check box causes Windows to try to connect to the network even when it’s not there—for example, when you’re using your tablet somewhere else. Anybody running a network scanner can see that your computer is looking for a hidden network.
12. Check the Connect Even If the Network Is Not Broadcasting check box only if it’s essential to connect your computer to this network. See the nearby Caution.
![]() Caution
Caution
Selecting the Connect Even If the Network Is Not Broadcasting check box makes Windows keep trying to connect to the network. Someone using a network scanner can read the probe packets that Windows sends and from them learn the network’s name and the settings required. With this information, that person can set up a dummy access point, and your computer will connect to it as if it were the real one. This is why Windows says that your computer’s privacy may be at risk if you use this option. Another downside to enabling this option and the previous option is that they use more battery power on a laptop or tablet.
13. Click the Next button. The Manually Connect to a Wireless Network Wizard displays the Successfully Added screen, letting you know that it has added the network.
14. Click Close to close the Wizard.
Connecting to the Hidden Network You Added
After you’ve added the hidden network, it appears in the list of networks in the Network fly-out when your computer is within range of it. To connect to the hidden network, click the Network icon in the notification area, and then click the network’s name on the Network fly-out, as for a non-hidden wireless network.
Disconnecting from and Reconnecting to Wireless Networks
When you’re ready to stop using a wireless network, disconnect from it. Click the Network icon in the notification area to display the Network fly-out, click the network’s name, and then click Disconnect.
![]() Tip
Tip
If you need to connect to a different wireless network than the one your computer is currently using, you can simply connect to that network. When you do so, Windows disconnects automatically from the previous network.
To reconnect to a network you’ve used before, click the Network icon in the notification area to open the network fly-out, click the network’s name, and then click Connect.
![]() Tip
Tip
If you try to reconnect to a wireless network whose password you’ve previously entered and saved but you get the message “Can’t connect to this network,” chances are that the network’s password has changed. To connect to the network, tell Windows to forget it (see the section “Forgetting a Wireless Network,” later in this chapter), and then connect to the network as if it were a new network.
Whitelisting Your Device on a Wi-Fi Network
Some Wi-Fi networks use whitelists to determine which devices are allowed to connect to them. A whitelist is a list of approved MAC addresses on devices.
![]() Note
Note
MAC is the abbreviation for Media Access Control. A MAC address is a unique hexadecimal identifier (such as f8:a9:d0:73;c4:dd) burned into the network hardware of a device.
Here’s how to find your computer’s MAC address:
1. Choose Start, Settings to open the Settings window.
2. Choose Network & Internet to display the Network & Internet screen.
3. Click Wi-Fi in the left column if it’s not already selected.
4. Click Advanced Options below the list of Wi-Fi networks. (You may need to scroll down.)
5. Look at the Physical Address readout on the Wi-Fi screen.
6. If necessary, click Copy to copy all the information shown.
![]() Caution
Caution
If you’re administering a wireless network, a whitelist of MAC addresses is a useful security measure for preventing unauthorized devices from connecting. But it’s not foolproof, because software can spoof (fake) an authorized MAC address that an attacker has grabbed using a network sniffer tool.
You can then give the address to your network’s administrator to add to the MAC whitelist—or, if the network is your own, add the address yourself.
Managing Your Network Connections
If your computer is a laptop or a tablet, chances are that you’ll use multiple network connections rather than just one. This section shows you how to use Airplane mode to turn off communications, how to configure network settings manually when necessary, and how to connect through a proxy server. You also learn how to prioritize network connections, how to bridge multiple connections, how to improve wireless speed and reliability, and how to forget a wireless network you no longer want to use.
Using Airplane Mode and Turning Off Wireless Devices
When you need to shut down communications, you can switch on Airplane mode. As its name suggests, Airplane mode is mainly designed for air travel, but you can use it any other time you need it.
![]() Note
Note
Switching on Airplane mode turns off all your computer’s wireless communications hardware: Wi-Fi, Bluetooth, and cellular connectivity (if your computer has it). After turning on Airplane mode, you can turn individual items back on as needed. For example, you can turn Wi-Fi back on.
The quick way to turn Airplane mode on or off is to click the Network icon in the notification area and then click Airplane Mode on the Network fly-out.
Alternatively, choose Start, Settings, choose Network & Internet, click Airplane Mode in the left column, and then set the Airplane Mode switch to On or Off, as needed.
![]() Note
Note
After turning on Airplane mode, you can open the Network fly-out and click Wi-Fi to turn Wi-Fi on or off. Similarly, on the Airplane Mode screen, you can set the Wi-Fi switch and the Bluetooth switch in the Wireless Devices area to On or Off, as needed.
Configuring IP Settings Manually
As discussed earlier in this chapter, Windows tries to automatically detect and apply suitable network settings when you connect to a wired network or wireless network. But if the network doesn’t use DHCP, or if your computer needs a static IP address for other reasons, you can configure IP settings manually.
Normally, you’ll just need to configure the essential settings, which we cover in the first subsection. But there are also more advanced settings you may need sometimes; we cover those in the second subsection.
Configuring the IP Address, Gateway, and DNS Servers
Follow these steps to configure IP settings:
1. Click the Network icon in the notification area to open the Network fly-out.
2. Click the Network Settings link to display the appropriate pane on the Network & Internet screen in the Settings app. For a wireless network, the Wi-Fi pane appears; for a wired network, the Ethernet pane appears.
3. Click Change Adapter Options to display the Network Connections window.
![]() Tip
Tip
You can also open the Network Connections window by right-clicking the Network icon in the notification area, clicking Open Network and Sharing Center, and then clicking Change Adapter Settings in the left column.
4. Right-click the entry for the adapter you want to configure, and then click Properties on the shortcut menu. For example, right-click Ethernet and click Properties to open the Ethernet Properties dialog box (see Figure 3.5).
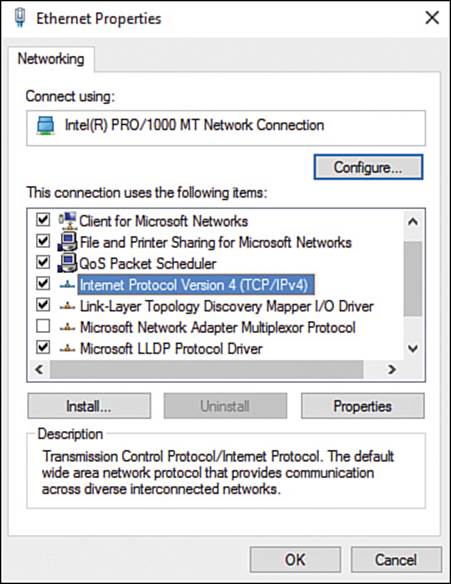
FIGURE 3.5 In the Properties dialog box for the connection, click the appropriate Internet Protocol item, and then click Properties.
5. Click the appropriate Internet Protocol item. For most networks, you’d click Internet Protocol Version 4 (TCP/IPv4).
6. Click Properties to display the Properties dialog box—for example, the Internet Protocol Version 4 (TCP/IPv4) Properties dialog box (see Figure 3.6).
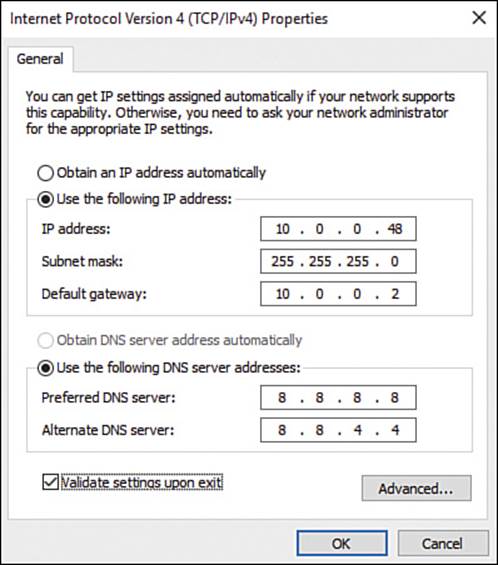
FIGURE 3.6 In the Properties dialog box for the protocol, such as the Internet Protocol Version 4 (TCP/IPv4) Properties dialog box, specify the IP settings the connection needs.
7. Check the Use the Following IP Address option button. When you do this, Windows automatically selects the Use the Following DNS Server Addresses option button in the lower part of the dialog box.
8. Type the static IP address in the IP Address box.
![]() Note
Note
Normally, you’ll be using an IPv4 address, which consists of four groups of numbers in the 0–255 range, separated by periods—for example, 192.168.1.44 or 10.0.0.250. If you’re connecting to an IPv6 network, the address consists of six hexadecimal groups separated by colons—for example, fe80:0000:faa9:d0fe:fe72:c4dd. If a group consists of zeroes, you can collapse it to nothing, simply putting a pair of colons to indicate where it would be. For example, the previous address can also be written fe80::faa9:d0fe:fe72:c4dd, with the group of zeroes removed.
9. Type the subnet mask in the Subnet Mask box.
![]() Tip
Tip
Many home networks use the subnet mask 255.255.255.0.
![]() Note
Note
When configuring an IPv6 connection, you specify the subnet prefix length instead of the subnet mask. The subnet prefix length is a number such as 64.
10. Type the IP address of the network router or gateway in the Default Gateway box. If you administer your network, this is the address of your router; if you’re on someone else’s network, ask the network’s administrator for this information and for the DNS server addresses.
11. Type the IP address of the first DNS server your administrator or ISP has given you in the Preferred DNS Server box.
![]() Tip
Tip
Some administrators refer to the DNS servers as “primary” and “secondary” rather than “preferred” and “alternate.” If you’re short of a DNS server address, you can use Google’s DNS servers, 8.8.8.8 (primary) and 8.8.4.4 (secondary). For IPv6, use 2001:4860:4860::8888(primary) and 2001:4860:4860::8844 (secondary).
12. Type the IP address of the second DNS server in the Alternate DNS Server box.
13. Check the Validate Settings upon Exit check box if you want Windows to check the configuration when you close the Internet Protocol Version 4 (TCP/IPv4) Properties dialog box. This is normally a good idea.
14. Click OK.
If you selected the Validate Settings upon Exit check box, Windows checks for obvious problems with the connection. If the settings seem valid, Windows closes the dialog box without comment. But if there’s a problem, Windows displays a Microsoft TCP/IP dialog box such as that shown in Figure 3.7 to warn you of the problem. Normally, you’ll want to click No, which returns you to the Internet Protocol Version 4 (TCP/IPv4) Properties dialog box so that you can fix the problem.
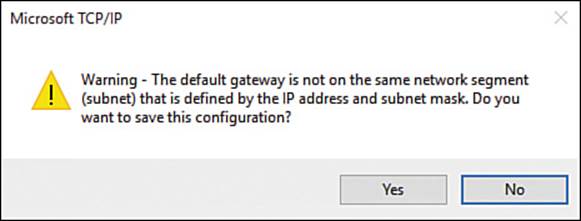
FIGURE 3.7 The Microsoft TCP/IP dialog box opens if Windows detects a problem with the IP settings you have chosen. Click No to go back and make changes to fix the problem.
When the settings are okay, you can close the Properties dialog box for the connection, the Network Connections window, and the Settings window.
Configuring Advanced Settings
For some networks, you may need to configure advanced settings in order to give your computer the connectivity it needs. For example, you may need to assign further IP addresses, configure default gateways, or specify DNS suffixes.
Click the Advanced button in the Internet Protocol Version 4 (TCP/IPv4) Properties dialog box or the Internet Protocol Version 6 (TCP/IPv6) dialog box to display the Advanced TCP/IP Settings dialog box. For IPv4, this dialog box has three tabs: the IP Settings tab, the DNS tab, and the WINS tab. For IPv6, this dialog box has only the IP Settings tab and the DNS tab.
![]() Note
Note
WINS is the acronym for Windows Internet Naming System, an older method for locating computers on a network. If necessary, you can configure WINS settings for an adapter by working on the WINS tab of the Advanced TCP/IP Settings dialog box. Normally, however, you don’t need to use WINS these days.
On the IP Settings tab of the Advanced TCP/IP Settings dialog box (see Figure 3.8), you can take the following actions:

FIGURE 3.8 On the IP Settings tab of the Advanced TCP/IP Settings dialog box, you can add, edit, and remove IP addresses and default gateways.
![]() Add, edit, and remove IP addresses. Use the Add, Edit, and Remove buttons below the IP Addresses box to add new IP addresses or to edit or remove existing ones. The adapter must have at least one IP address.
Add, edit, and remove IP addresses. Use the Add, Edit, and Remove buttons below the IP Addresses box to add new IP addresses or to edit or remove existing ones. The adapter must have at least one IP address.
![]() Add, edit, and remove default gateways. Use the Add, Edit, and Remove buttons below the Default Gateways box to add new default gateways or to edit or remove existing ones. For each default gateway, you can either assign a specific interface metric or allow Windows to assign the metric automatically. The adapter must have at least one default gateway.
Add, edit, and remove default gateways. Use the Add, Edit, and Remove buttons below the Default Gateways box to add new default gateways or to edit or remove existing ones. For each default gateway, you can either assign a specific interface metric or allow Windows to assign the metric automatically. The adapter must have at least one default gateway.
![]() Choose between automatic metric and a specific interface metric for this network adapter. Check the Automatic Metric check box at the bottom of the IP Settings tab to let Windows choose which adapter to use when multiple adapters have connections. Clear this check box and enter a value (an integer in the range 1–9999) if you want to weight this adapter against other adapters manually.
Choose between automatic metric and a specific interface metric for this network adapter. Check the Automatic Metric check box at the bottom of the IP Settings tab to let Windows choose which adapter to use when multiple adapters have connections. Clear this check box and enter a value (an integer in the range 1–9999) if you want to weight this adapter against other adapters manually.
![]() Note
Note
The metric is an integer value in the range 1–9999 that represents the cost assigned to a specific route. Windows uses the default gateway with the lower metric. Generally, it is best to check the Automatic Metric check box and let Windows choose which default gateway to use unless you need to force Windows to favor one default gateway over another.
On the DNS tab of the Advanced TCP/IP Settings dialog box (see Figure 3.9), you can take the following actions:
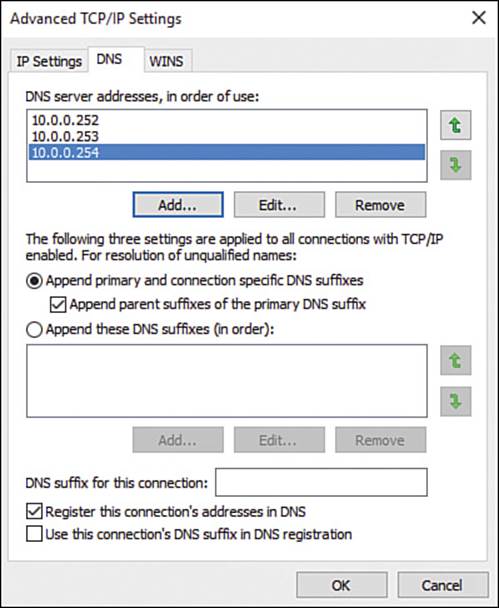
FIGURE 3.9 You can configure additional DNS settings on the DNS tab of the Advanced TCP/IP Settings dialog box.
![]() Add, edit, and remove DNS servers. Use the Add, Edit, and Remove buttons below the DNS Server Addresses, in Order of Use box to add new DNS servers or to edit or remove existing ones.
Add, edit, and remove DNS servers. Use the Add, Edit, and Remove buttons below the DNS Server Addresses, in Order of Use box to add new DNS servers or to edit or remove existing ones.
![]() Change the order in which to use DNS servers. Use the Move Up button and Move Down button on the right side to shuffle the DNS servers into the order in which you want Windows to use them.
Change the order in which to use DNS servers. Use the Move Up button and Move Down button on the right side to shuffle the DNS servers into the order in which you want Windows to use them.
![]() Specify how to resolve unqualified DNS names. For unqualified DNS names (see the nearby note), you normally want to select the Append Primary and Connection Specific DNS Suffixes option button. You then can check the Append Parent Suffixes of the Primary DNS Suffix check box to append parent suffixes as well. (For example, with the primary DNS suffix of test.surrealpcs.com, Windows appends .surrealpcs.com and .com to queries.) Alternatively, you can check the Append These DNS Suffixes (in Order) check box and then build the list of suffixes in the list box.
Specify how to resolve unqualified DNS names. For unqualified DNS names (see the nearby note), you normally want to select the Append Primary and Connection Specific DNS Suffixes option button. You then can check the Append Parent Suffixes of the Primary DNS Suffix check box to append parent suffixes as well. (For example, with the primary DNS suffix of test.surrealpcs.com, Windows appends .surrealpcs.com and .com to queries.) Alternatively, you can check the Append These DNS Suffixes (in Order) check box and then build the list of suffixes in the list box.
![]() Note
Note
An unqualified DNS name is one that does not have a full address—for example, que instead of que.com. To qualify the domain fully, Windows can automatically apply DNS suffixes either from its built-in list or from a list of DNS suffixes that you supply, and in the order you specify.
![]() Specify the DNS suffix for this connection. Type the appropriate suffix in the DNS Suffix for This Connection box.
Specify the DNS suffix for this connection. Type the appropriate suffix in the DNS Suffix for This Connection box.
![]() Register this connection’s addresses in DNS. Check the Register This Connection’s Addresses in DNS check box if you want your computer to try to dynamically create DNS records in this DNS zone. Creating the records may help other computers to locate this computer.
Register this connection’s addresses in DNS. Check the Register This Connection’s Addresses in DNS check box if you want your computer to try to dynamically create DNS records in this DNS zone. Creating the records may help other computers to locate this computer.
![]() Use this connection’s DNS suffix in DNS registration. If you check the Register This Connection’s Addresses in DNS check box, you can check the Use This Connection’s DNS Suffix in DNS Registration check box to make your computer try to register its DNS suffix in this DNS zone. You don’t usually need to do this, because Windows automatically registers the full computer name in the DNS zone.
Use this connection’s DNS suffix in DNS registration. If you check the Register This Connection’s Addresses in DNS check box, you can check the Use This Connection’s DNS Suffix in DNS Registration check box to make your computer try to register its DNS suffix in this DNS zone. You don’t usually need to do this, because Windows automatically registers the full computer name in the DNS zone.
Connecting Through a Proxy Server
Instead of connecting to websites directly, your computer can connect through a proxy server. This is a server that fulfills network requests for your computer, either by providing data that the server has previously cached or by relaying the requests to a suitable server. For example, instead of requesting a web page directly from the web server, your computer requests it from the proxy server. The proxy server either delivers the web page from its cache, providing the data more quickly and reducing Internet use, or requests the web page from the web server and passes it along to your computer.
![]() Tip
Tip
Normally, you’d connect through a proxy server in a corporate or organizational setting, where the proxy server not only caches data but also prevents access to blocked sites. You can also connect through a proxy server with the aim of disguising the location where the network requests are coming from.
Windows can use a proxy server in three ways:
![]() Automatically. Depending on the network setup, Windows may be able to detect the proxy server and automatically select settings to use the server. You can control whether Windows does this by setting the Automatically Detect Settings switch to On or Off, as needed.
Automatically. Depending on the network setup, Windows may be able to detect the proxy server and automatically select settings to use the server. You can control whether Windows does this by setting the Automatically Detect Settings switch to On or Off, as needed.
![]() Using a configuration script. Windows can use the configuration script you specify to select settings for using the proxy server. You can control this feature by setting the Use Setup Script switch to On or Off, as needed.
Using a configuration script. Windows can use the configuration script you specify to select settings for using the proxy server. You can control this feature by setting the Use Setup Script switch to On or Off, as needed.
![]() Manually. You set the details of the proxy server.
Manually. You set the details of the proxy server.
To set up a network connection to use a proxy server, follow these steps:
1. Choose Start, Settings to open the Settings window.
2. Choose Network & Internet to display the Network & Internet screen.
3. Choose Proxy in the left pane to display the Proxy pane. Figure 3.10 shows the top part of the Proxy pane.
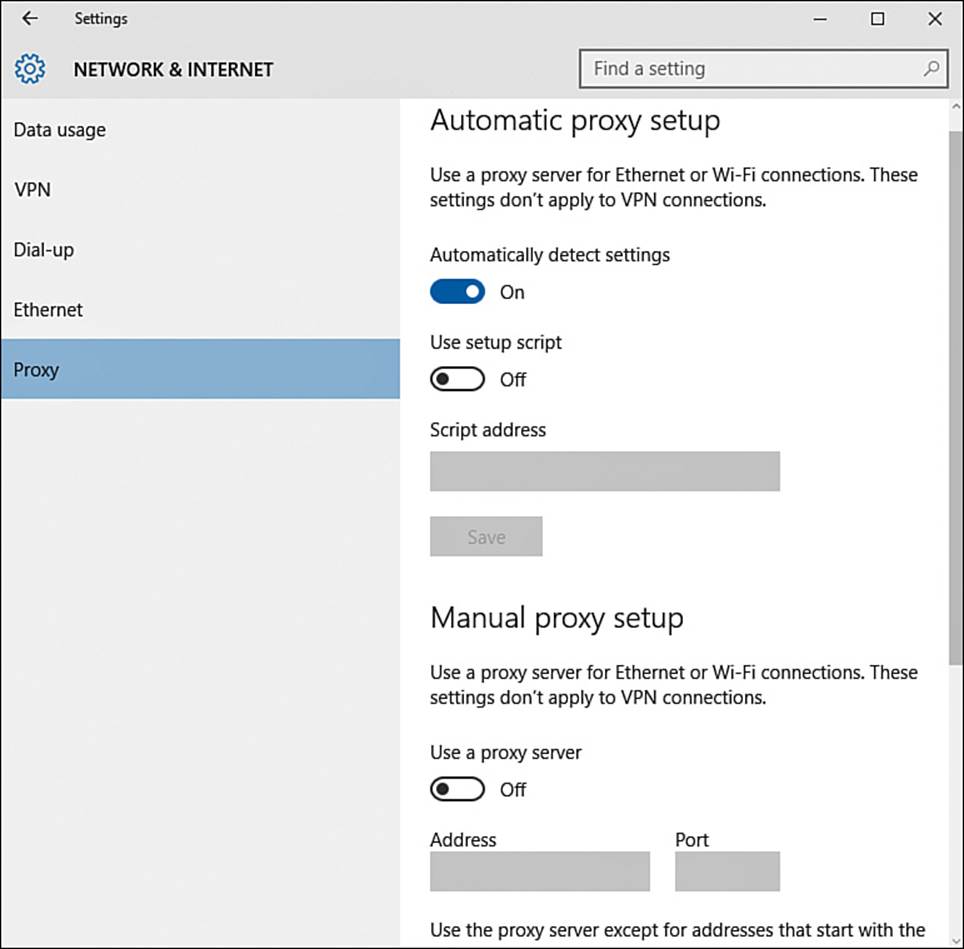
FIGURE 3.10 At the top of the Proxy pane, choose whether to use the Automatically Detect Settings feature or the Use Setup Script feature.
4. Set the Automatically Detect Settings switch to On if you want Windows to detect the proxy server automatically. Otherwise, set this switch to Off.
5. Set the Use Setup Script switch to On if you need to use a script, and then enter the script’s location in the Script Address box and click Save. Otherwise, set the Use Setup Script switch to Off.
6. Assuming you haven’t chosen either of the automatic options, go to the Manual Proxy Setup section and set the Use a Proxy Server switch to On.
7. Type the proxy server’s address in the Address box (see Figure 3.11). This can be either a hostname, such as proxy.surrealpcs.com, or an IP address, such as 10.0.0.254.
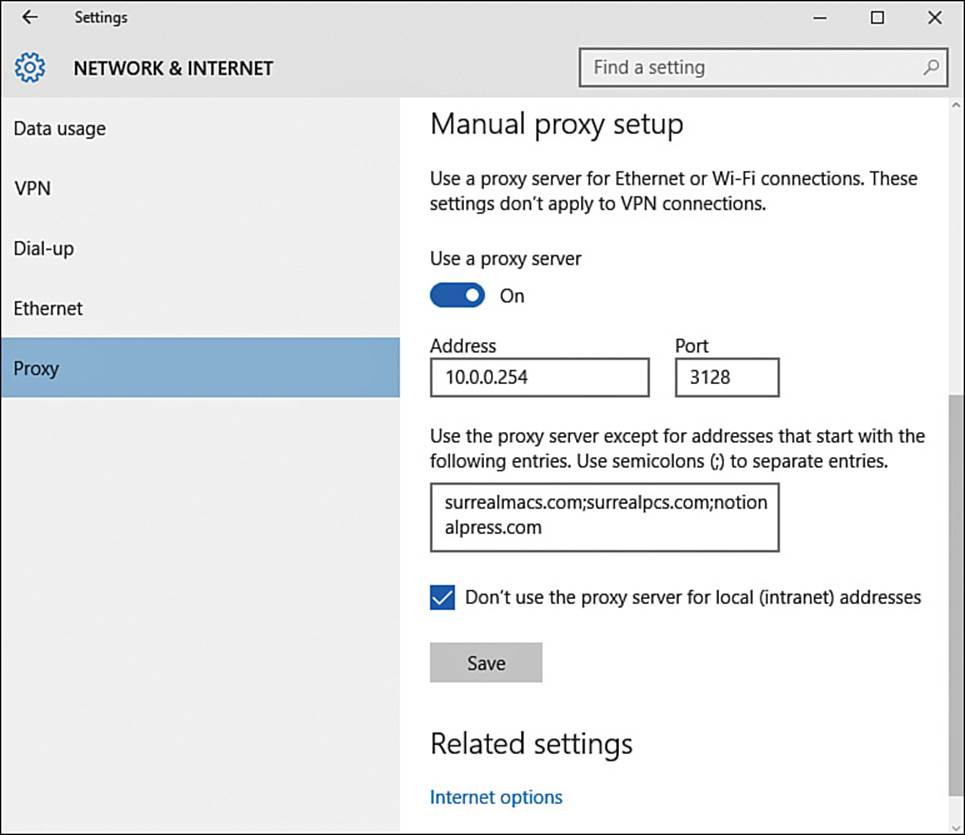
FIGURE 3.11 In the lower part of the Proxy pane, set the Use a Proxy Server switch to On, enter the address and port, and specify any exceptions.
8. Type the port number in the Port box. The port depends on how the server is configured, but ports 3128 and 8080 are widely used.
9. Enter any proxy exceptions in the Use the Proxy Server Except for Addresses That Start with the Following Entries box, separating them with semicolons. A proxy exception is an address for which you don’t want Windows to use the proxy server. You enter the first part of the address. For example, to create a proxy exception for the surrealpcs.com site, you would enter surrealpcs.com; to create an exception just for FTP traffic on surrealpcs.com, you would enter ftp://surrealpcs.com.
10. Check the Don’t Use the Proxy Server for Local (Intranet) Addresses check box if you want to create an exception for all local addresses.
11. Click Save. Windows saves the proxy configuration.
Using a Proxy Server for Just Some Apps
When you set up a proxy server as explained in the main text of this section, Windows uses the proxy server for all apps and all traffic, except for any traffic that matches proxy exceptions you have configured. Instead, you can configure some apps individually to use a proxy server. Most web browsers and some games enable you to do this.
For example, to set the widely used Firefox browser to use a proxy server, click the Menu button to open the menu, and then click Options to open the Options dialog box. Click the Advanced button on the toolbar to display the Advanced tab, and then click Network to display the Network pane. In the Connection area, click Settings to open the Connection Settings dialog box. Select the Manual Proxy Configuration option button, enter the details in the HTTP Proxy box and the Port box, and then click OK. Click OK to close the Options dialog box as well.
Prioritizing One Network Connection over Another
If your computer has two or more network connections at any given time, you should tell Windows which connection to use first. Otherwise, you may be stuck using a slow wireless connection when a fast wired connection is available.
To set the priority for connections, follow these steps:
1. Right-click or long-press the Network icon in the notification area to open the shortcut menu.
2. Click Open Network and Sharing Center to open a Network and Sharing Center window.
3. Click Change Adapter Settings in the left column to open a Network Connections window.
4. Press Alt to display the menu bar.
5. Click the Advanced menu and then click Advanced Settings to display the Advanced Settings dialog box. The Adapters and Bindings tab appears at the front (see Figure 3.12).
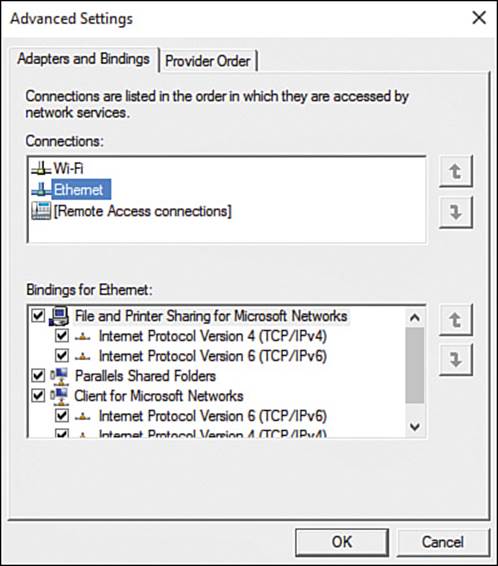
FIGURE 3.12 Set the priority for your computer’s network connections by working in the Connections box on the Adapters and Bindings tab of the Advanced Settings dialog box.
6. In the Connections box, click a connection, and then click Move Up or Move Down, as appropriate.
7. When you finish, click OK to close the Advanced Settings dialog box.
Bridging Two or More Network Connections
If your computer connects to two separate networks, you can create a network bridge to enable the computers and devices on each of those networks to communicate with computers and devices on the other network.
![]() Note
Note
Bridging network connections is a relatively specialized move. Don’t create a bridge unless you’re certain you need to do so.
Follow these steps to bridge network connections:
1. Right-click or long-press the Network icon in the notification area to open the shortcut menu.
2. Click Open Network and Sharing Center to open a Network and Sharing Center window.
3. Click Change Adapter Settings in the left column to open a Network Connections window.
4. Click the first connection you want to bridge, and then Ctrl+click each of the other connections.
5. Right-click or long-press one of the selected connections, and then click Bridge Connections on the shortcut menu.
The Network Bridge dialog box appears while Windows sets up the bridge, and then disappears automatically when the Network Bridge item appears in the Network Connections window. You’ve now connected the two networks, and the computers and devices can communicate across the bridge.
![]() Tip
Tip
You can create only one network bridge at a time, but you can add as many connections as necessary to that bridge.
![]() Caution
Caution
Use bridging only for network connections, not for a network connection and an Internet connection. Bridging an Internet connection can make your network accessible to any computer on the Internet, which exposes computers on your network to attack.
After creating a bridge, you can manipulate it as follows:
![]() Add a connection to the bridge. Right-click or long-press the connection in the Network Connections window, and then click Add to Bridge on the shortcut menu.
Add a connection to the bridge. Right-click or long-press the connection in the Network Connections window, and then click Add to Bridge on the shortcut menu.
![]() Remove a connection from the bridge. Right-click or long-press the connection in the Network Connections window, and then click Remove from Bridge on the shortcut menu.
Remove a connection from the bridge. Right-click or long-press the connection in the Network Connections window, and then click Remove from Bridge on the shortcut menu.
![]() Remove the bridge. Remove each connection from the bridge. After you remove the last connection, Windows removes the bridge automatically.
Remove the bridge. Remove each connection from the bridge. After you remove the last connection, Windows removes the bridge automatically.
![]() Tip
Tip
After you remove a network bridge, you may find that one or more of the connections that formed the bridge fails to regain its previous network settings. If this happens, right-click or long-press the connection in the Network Connections window and click Disable on the shortcut menu to disable it for a moment. Right-click or long-press the connection again and click Enable on the shortcut menu to enable it again. Normally, disabling and reenabling the connection makes it reestablish its settings.
Improving Wireless Speed and Reliability
Wi-Fi connections can be great for convenience and flexibility but can suffer from dropped connections and slowdowns. In this section, we look briefly at what you can do to improve the speed and reliability of your wireless connections.
First, if your computer keeps dropping the connection and then having to reestablish it, try turning Wi-Fi off and back on again. The easiest way to do this is to click the Network icon in the notification area and then click the Wi-Fi button at the bottom of the Network fly-out to turn off Wi-Fi temporarily. Repeat the move to turn Wi-Fi back on. If the connection is still problematic, and it’s a network that you administer, restart the wireless router.
![]() Tip
Tip
If turning Wi-Fi off and back on doesn’t stop your computer from dropping the connection, restart Windows. Restarting is tedious if you’re in a hurry, but it can clear up many lingering configuration problems.
Second, look at the connection’s status to see whether there’s anything obviously wrong. The Network icon in the notification area gives you a rough indication of signal strength—the more white bars, the better—but to see the details, you need to look in the Wi-Fi Status dialog box.
Follow these steps to open the Wi-Fi Status dialog box:
1. Right-click or long-press the Network icon in the notification area to open the shortcut menu.
2. Click Open Network and Sharing Center to open a Network and Sharing Center window.
3. In the Access Type section of the View Your Active Networks box, click the link for the Wi-Fi connection to display the Wi-Fi Status dialog box (see Figure 3.13).
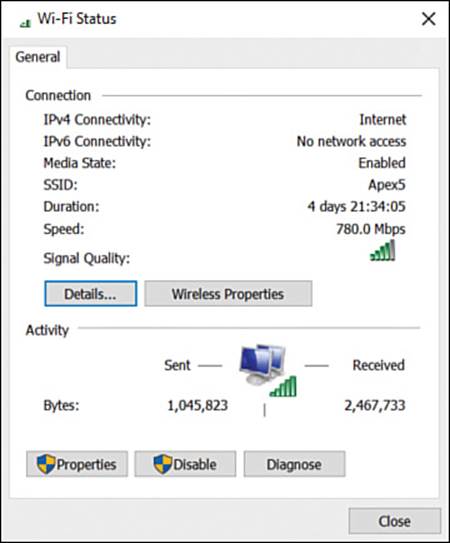
FIGURE 3.13 Look at the Speed readout and Signal Quality readout in the Wi-Fi Status dialog box to try to identify problems with the connection.
These are the main things you can do from the Wi-Fi Status dialog box:
![]() Check that the connection has Internet access. Look at the IPv4 Connectivity readout and the IPv6 Connectivity readout. Make sure that at least one of these says Internet rather than No Internet Access.
Check that the connection has Internet access. Look at the IPv4 Connectivity readout and the IPv6 Connectivity readout. Make sure that at least one of these says Internet rather than No Internet Access.
![]() Check the connection speed. Look at the speed readout to see whether it’s reasonable. (See the nearby sidebar about wireless speeds.) If it’s not, you may be able to get a higher speed by disconnecting from the network and then connecting to it again.
Check the connection speed. Look at the speed readout to see whether it’s reasonable. (See the nearby sidebar about wireless speeds.) If it’s not, you may be able to get a higher speed by disconnecting from the network and then connecting to it again.
![]() Check the signal quality. Look at the Signal Quality readout, which shows from one to five green bars—as usual, the more the merrier.
Check the signal quality. Look at the Signal Quality readout, which shows from one to five green bars—as usual, the more the merrier.
![]() View more details about the wireless connection. Click Details to display the Network Connection Details dialog box. This includes a wealth of detail, of which the following items are usually most useful: the hardware (MAC) address; whether the connection uses DHCP; the IP address and the subnet mask; and the addresses of the default gateway, the DHCP server, and the DNS server.
View more details about the wireless connection. Click Details to display the Network Connection Details dialog box. This includes a wealth of detail, of which the following items are usually most useful: the hardware (MAC) address; whether the connection uses DHCP; the IP address and the subnet mask; and the addresses of the default gateway, the DHCP server, and the DNS server.
![]() Change the wireless network’s properties. If you need to control whether Windows connects automatically to this network, click Wireless Properties to display the Wireless Network Properties dialog box. On the Connection tab, you can check or clear the Connect Automatically When This Network Is in Range check box, as needed.
Change the wireless network’s properties. If you need to control whether Windows connects automatically to this network, click Wireless Properties to display the Wireless Network Properties dialog box. On the Connection tab, you can check or clear the Connect Automatically When This Network Is in Range check box, as needed.
![]() Note
Note
In the Wireless Network Properties dialog box, you can also check the Look for Other Wireless Networks While Connected to This Network check box if you want Windows to look for other networks. You can check the Connect Even If the Network Is Not Broadcasting Its Name (SSID) check box if you need to try to force a connection to the network. As mentioned earlier in this chapter, this option may expose your computer to attack via a dummy access point, so use it only if you must.
![]() Diagnose problems with the connection. If the connection isn’t working correctly, click Diagnose to launch the Windows Network Diagnostics Wizard.
Diagnose problems with the connection. If the connection isn’t working correctly, click Diagnose to launch the Windows Network Diagnostics Wizard.
What Wireless Speeds Should You Be Getting?
What wireless speeds your computer gets depends on several things, including the capabilities both of your computer’s wireless network adapter and of the wireless router, the distance between your computer and the wireless router, and how much wireless activity is taking place in the area.
Wireless networks use a plethora of confusingly numbered standards, most of which people refer to simply as “Wi-Fi.” At this writing, the fastest standard is 802.11ac, which gives speeds up to 1,300 megabits per second (Mbps)—in other words, 1.3 gigabits per second (Gbps), or faster than a Gigabit Ethernet connection, which is the fastest widely used standard for wired connections. Next in speed is 802.11n with 600Mbps, followed by 802.11g and 802.11a with 54Mbps each, and last 802.11b with 11Mbps.
Each of these is the maximum theoretical speed, and in practice, the speeds your computer achieves are likely to be much lower than the maximum, especially when many computers and devices are using the same wireless router.
Many wireless devices support multiple standards, enabling you to connect to a wide variety of devices.
![]() Note
Note
Windows usually connects at the highest link speed possible. But if you establish the connection when your computer is relatively far from the wireless access point and the signal is correspondingly weak, you may get a low link speed that persists even when you move your computer closer to the wireless access point. If this happens, drop the connection and reconnect to try to get a higher link speed.
Third, you may need to change channels to get a decent connection. A wireless network can use any of a variety of channels, which the administrator can choose using whatever configuration utility the wireless access point provides. If many of the wireless networks in your immediate vicinity use the same channels, you may get lower throughput.
To see which network is using which channels, you can install a Wi-Fi analyzer app or Wi-Fi stumbler app such as InSSIDer or Kismet. Many are available with different features, but most show you the available networks, their relative signal strength, and the channels they are using. Armed with this information, you can set your wireless network to avoid the channels your neighbors are using.
![]() Tip
Tip
A Wi-Fi analyzer app or Wi-Fi stumbler app is also useful for locating available wireless networks when you need to get online.
Forgetting a Wireless Network
When you no longer want to use a particular wireless network, tell your computer to forget it. Follow these steps:
1. Click the Network icon in the notification area to open the Network fly-out.
2. Click Network Settings to display the Network & Internet screen in Settings.
3. Click Manage Wi-Fi Settings (below the list of Wi-Fi networks) to display the Manage Wi-Fi Settings screen.
4. Click the appropriate network in the Manage Known Networks list. The Forget button appears.
5. Click Forget. Windows removes the network from the list and deletes the saved password and settings for it.
Understanding Wi-Fi Sense
Wi-Fi Sense is a feature that helps you connect your computer to Wi-Fi hotspots. Microsoft introduced Wi-Fi Sense on Windows Phone but now has made the feature available on desktops, laptops, and tablets as well. Wi-Fi Sense tends to be more useful on mobile devices than on desktop computers.
Wi-Fi Sense maintains a database of crowd-sourced open Wi-Fi networks and detects known networks that are nearby. Wi-Fi Sense can accept a network’s terms of use for you, enabling your computer to connect to the network more easily. To do this, Wi-Fi Sense needs to use your computer’s location services.
You can turn Wi-Fi Sense on or off by setting the Connect to Suggested Open Hotspots switch and the Connect to Networks Shared by My Contacts switch on the Manage Wi-Fi Settings screen to On or Off.
Connecting Through a VPN
Virtual private networking (abbreviated to VPN) enables you to create a secure connection to a server across an insecure network. You’d typically use a virtual private network (also abbreviated to VPN) for connecting across the Internet to a work network.
![]() Tip
Tip
Here are two more uses for VPN. First, when you connect to a Wi-Fi hotspot, you can use a VPN to secure your Internet traffic against snooping. Second, you can use a VPN when you need to make your computer appear to be in a different location than it actually is. For example, if you subscribe to a U.S.-based media service, you may not be able to access it when you travel abroad. But by connecting to a VPN server within the U.S., you can make your computer appear to be in the country, enabling you to use the service. Leading VPN services include IPVanish (www.ipvanish.com), StrongVPN (www.strongvpn.com), and CyberGhost VPN (www.cyberghostvpn.com).
Setting Up a VPN Connection
To set up a VPN connection on your computer, you’ll need to know the following:
![]() VPN type. This can be PPTP, L2TP/IPSec, SSTP, or IKEv2.
VPN type. This can be PPTP, L2TP/IPSec, SSTP, or IKEv2.
![]() Server address. This can be a server name (such as vpnserv.surrealpcs.com) or an IP address (such as 209.14.241.1).
Server address. This can be a server name (such as vpnserv.surrealpcs.com) or an IP address (such as 209.14.241.1).
![]() L2TP secret. This is a text string used for securing some L2TP connections.
L2TP secret. This is a text string used for securing some L2TP connections.
![]() IPSec identifier. This is a text string used for some IPSec connections.
IPSec identifier. This is a text string used for some IPSec connections.
![]() IPSec preshared key. This is a text string used for some IPSec connections.
IPSec preshared key. This is a text string used for some IPSec connections.
Ask the VPN’s administrator for this information. Ask also for your user name and password for the VPN connection. You don’t need these for setting up the connection, but you’ll need them when you connect.
When you’ve gathered this information, follow these steps to set up the VPN on your computer:
1. Choose Start, Settings to open a Settings window.
2. Choose Network & Internet to display the Network & Internet screen.
3. Choose VPN in the left pane to display the VPN pane.
4. Choose Add a VPN Connection to display the Add a VPN Connection pane (shown in Figure 3.14 with settings chosen).
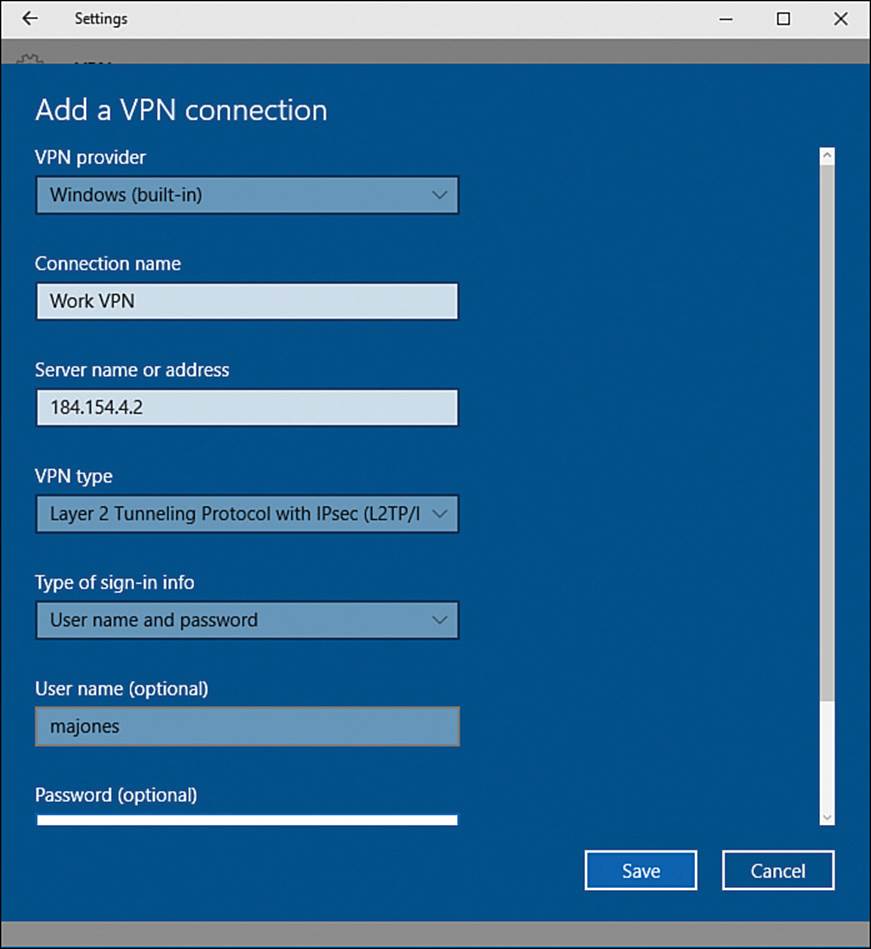
FIGURE 3.14 In the Add a VPN Connection pane, enter the details for the VPN connection and click Save.
5. Open the VPN Provider drop-down menu and choose the provider. If you’re not sure what the provider is, choose Windows (Built-In).
6. Type a descriptive name for the connection in the Connection Name box. This name is to help you identify the VPN—for example, Work VPN.
7. Type the server’s hostname (such as vpn1.surrealpcs.com) or IP address (such as 205.14.152.18) in the Server Name or Address box.
8. Open the VPN Type drop-down menu and choose the VPN type, such as Layer 2 Tunneling Protocol with IPsec (L2TP/IPsec).
9. Open the Type of Sign-In Info drop-down menu and then choose User Name and Password, Smart Card, or One-Time Password, as appropriate.
10. For a VPN that uses a user name for signing in, type the user name in the User Name box.
![]() Note
Note
The User Name box and Password box are marked “optional” because, instead of entering them while setting up the connection, you can enter them each time you use the connection. Entering your credentials each time is more secure but takes more time and effort.
11. For a VPN that uses a password for signing in, type the password in the Password box.
12. Check the Remember My Sign-In Info check box if you want Windows to store your sign-in information.
13. Click Save.
Connecting via the VPN
After you’ve set up a VPN connection, you can connect via the VPN like this:
1. Choose Start, Settings to open a Settings window.
2. Choose Network & Internet to display the Network & Internet screen.
3. Choose VPN in the left pane to display the VPN pane.
4. Click the VPN in the VPN list to display control buttons for it (see Figure 3.15).
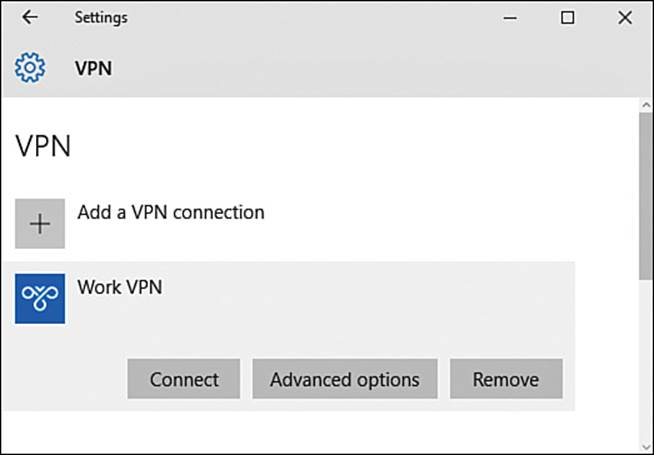
FIGURE 3.15 In the VPN pane in the Settings app, click the VPN to display its control buttons, and then click Connect.
5. Click Connect. Windows establishes the connection, and then displays the Connected readout and the Disconnect button.
After connecting, you can work across the VPN connection in much the same way as a local network connection. Normally, the speeds will be much slower across the VPN, so you may need to be patient while transferring data.
When you’re ready to stop using the VPN, click the Disconnect button in the VPN pane. If you’ve left the VPN pane open, you can go straight there; if you’ve closed it, click the Network icon in the notification area, click the VPN’s name at the top of the network fly-out, click the VPN’s name in the VPN pane, and then click Disconnect.
Mapping a Drive to a Network Folder
When you work with other people, it’s often useful to share files on a network. If you need to connect to the same network folder regularly, you can map a drive to it. When you do this, Windows displays a drive, marked with your chosen letter, that you can use to connect to the network folder quickly and easily.
Follow these steps to map a drive to a network folder:
1. Open a File Explorer window. For example, click File Explorer on the Taskbar.
2. Choose Home, New, Easy Access, Map as Drive to display the Map Network Drive dialog box (see Figure 3.16).
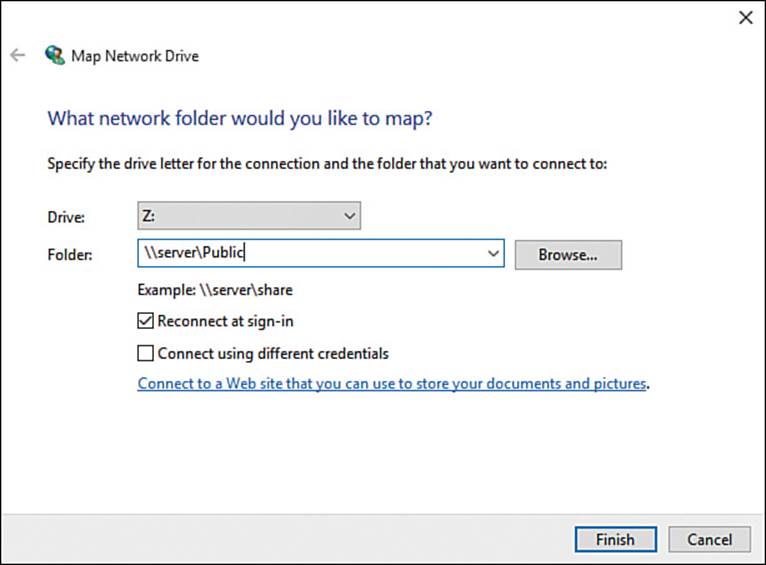
FIGURE 3.16 In the Map Network Drive dialog box, specify the drive, choose the folder, and choose options for reconnection and credentials.
3. Click the Drive drop-down menu and choose the drive letter you want to assign. Windows starts with Z: (if it is as yet unassigned) and walks backward from there, but you can choose any available drive letter.
Why Does Windows Suggest Z: For the First Network Drive?
Windows drive-naming conventions derive from DOS (disk operating system), a predecessor of Windows.
Drive A: was the first floppy disk drive, and drive B: the second floppy disk drive. Drive C: was, and remains, the first hard drive, with any subsequent hard drives receiving the next letters (drive D:, drive E:), and any optical drives picking up the next available letter (drive D:, drive E:, drive F:).
Network drives originally used to pick up the next unused letter, but more recently they’ve walked backward from Z: to make a distinction between local drives and network drives.
4. In the Folder box, enter the address of the folder to which you want to map the drive. You can type in the address if you know it verbatim, or paste it in if you have somewhere from which you can copy it, but usually it’s easiest to click Browse, locate and select the folder in the Browse for Folder dialog box, and then click OK.
![]() Tip
Tip
Enter the folder address in the format \\server_name\folder. For example, you would enter \\server1\Public to connect to the folder named Public on the server named server1. The server name can also be an IP address, giving an address such as \\10.0.0.100\Files.
5. Check the Reconnect at Sign-In check box if you want Windows to connect automatically to this folder each time you sign in. You’d do this for a folder you connect to every day with your desktop computer at work, but normally you will be better off connecting manually on a laptop or a tablet that you use in multiple locations.
![]() Tip
Tip
Another way to start mapping a network drive is to use File Explorer. Browse to the computer and drive in the Network section, and then right-click or long-press the appropriate folder and click Map Network Drive. Windows displays the Map Network Drive dialog box with the server name and folder path already entered in the Folder box.
6. Check the Connect Using Different Credentials check box if you need to provide different credentials for the folder than the credentials you’re using for Windows.
7. Click Finish. If you checked the Connect Using Different Credentials check box, Windows displays the Windows Security dialog box (see Figure 3.17); continue with the next steps. If not, Windows connects to the folder; skip the rest of the steps in this list.

FIGURE 3.17 In the Windows Security dialog box, type your user name and password for the server, check the Remember My Credentials check box if necessary, and then click OK.
8. Type your user name for the server.
9. Type your password for the server.
10. Check the Remember My Credentials check box if you don’t want to have to enter them next time.
11. Click OK. The Windows Security dialog box closes, and Windows connects to the folder.
Sharing Your Computer’s Internet Connection
Windows includes a feature called Internet Connection Sharing that enables you to share your computer’s Internet connection with other computers and devices.
Internet Connection Sharing can work pretty well, but normally you’d want to use it only in these circumstances:
![]() You have a wired connection that’s available only to your computer. For example, your broadband router is connected directly to your computer via USB and doesn’t have an Ethernet port or wireless capabilities.
You have a wired connection that’s available only to your computer. For example, your broadband router is connected directly to your computer via USB and doesn’t have an Ethernet port or wireless capabilities.
![]() Your computer has a cellular connection that you want to share temporarily.
Your computer has a cellular connection that you want to share temporarily.
![]() Caution
Caution
Avoid using Internet Connection Sharing if you have a better alternative available, such as sharing the connection via your broadband router either using cables or wirelessly.
Follow these steps to set up Internet Connection Sharing:
1. Right-click or long-press the Network icon in the notification area to open the shortcut menu.
2. Click Open Network and Sharing Center to open a Network and Sharing Center window.
3. Click Change Adapter Settings in the left column to open a Network Connections window.
4. Right-click or long-press the Internet connection, and then click Properties on the shortcut menu to open the Properties dialog box for the connection.
5. Click the Sharing tab to display its contents (see Figure 3.18).
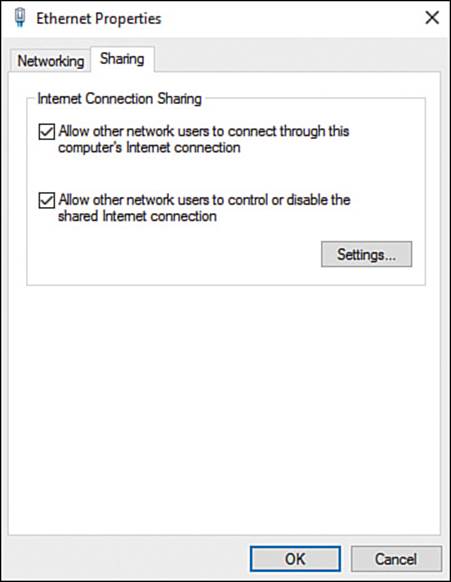
FIGURE 3.18 You can control Internet Connection Sharing on the Sharing tab of the Properties dialog box for the connection.
6. Check the Allow Other Network Users to Connect Through This Computer’s Internet Connection check box.
7. Check the Allow Other Network Users to Control or Disable the Shared Internet Connection check box only if you want others to be able to manipulate the Internet connection. You may prefer to keep control of it yourself.
8. Click OK. Windows shares the connection.
![]() Note
Note
When you want to stop sharing your computer’s Internet connection, open the Properties dialog box, uncheck the Allow Other Network Users to Connect Through This Computer’s Internet Connection check box, and click OK.
Diagnosing and Repairing Network Problems
Networks are great when they work, but they can be a source of painful headaches when they don’t. To help you avoid reaching for the acetaminophen, Windows includes tools for diagnosing and repairing network problems.
Determining Whether a Problem Has Occurred
When your computer loses its network connection, chances are that you’ll notice soon enough—or immediately if you’re using the Internet.
When you detect the problem, look first at the Network icon in the notification area. If it shows an exclamation point, as in Figure 3.19, you’ll know there’s a problem. If you’re using a mouse, you can hold the pointer over it to display a ScreenTip showing details, such as “Unidentified network: No Internet access.” On any computer, you can open the Network fly-out to see the network status readout at the top, which shows a similar message.
![]()
FIGURE 3.19 The Network icon in the notification area shows an exclamation point to alert you to problems.
From the Network fly-out, click the Network Settings link to open the Network & Internet screen in the Settings app. Here, you have various options, but the best approach is usually to click Network and Sharing Center to open a Network and Sharing Center window (see Figure 3.20).
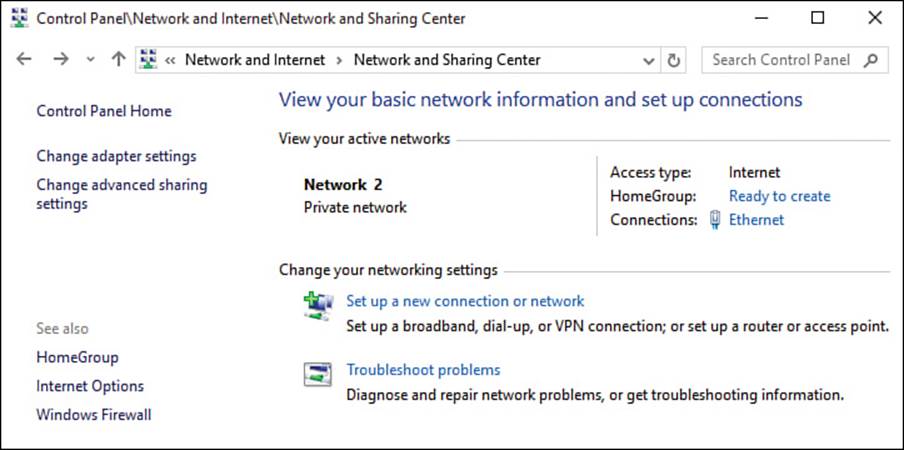
FIGURE 3.20 In the Network and Sharing Center window, click Troubleshoot Problems.
Using the Troubleshoot Problems Feature
Sometimes you may be able to diagnose the cause of the problem immediately. For example, if you can see that your Ethernet cable has come unplugged (or that your pet has bitten through the cable) or that your wireless router has lost power, you’ll probably want to start by fixing physical problems such as these.
If the cause of the problem isn’t immediately apparent, try using the Troubleshoot Problems feature to identify what’s wrong.
From the Network and Sharing Center, click Troubleshoot Problems to display the Troubleshoot Problems screen (see Figure 3.21), and then click the item that seems to be the source of the problem. For example, if your Internet connection isn’t working, click Internet Connections.
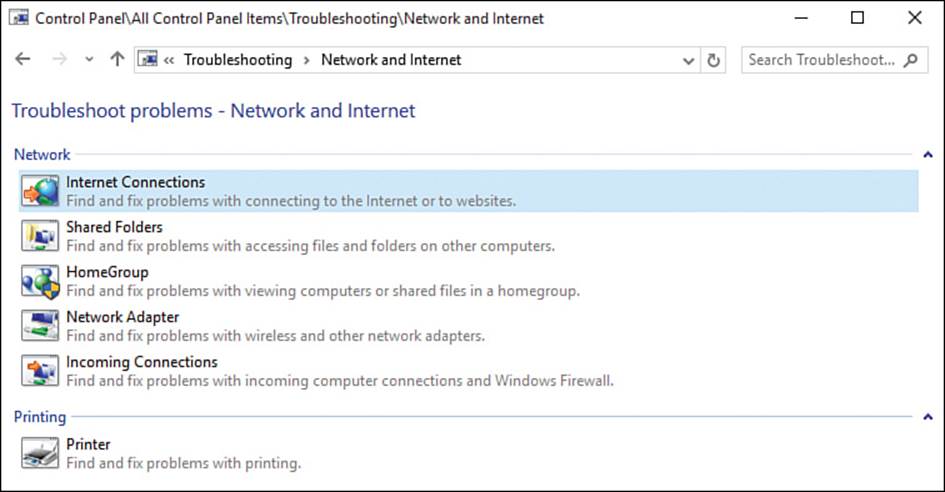
FIGURE 3.21 On the Troubleshoot Problems screen, click Internet Connections to start troubleshooting your network connection.
The Troubleshoot Problems feature displays the first screen of the troubleshooter you chose, such as the Internet Connections screen shown in Figure 3.22, and you can follow its steps. The steps vary depending on the troubleshooter and what it discovers is wrong with your computer.
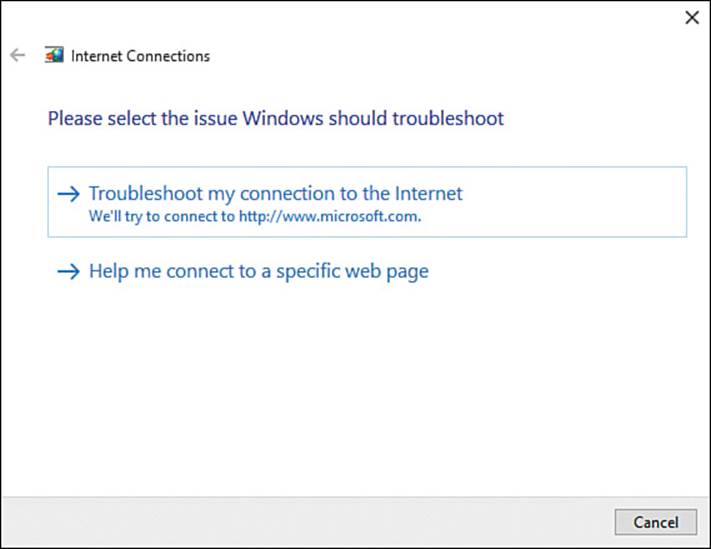
FIGURE 3.22 Follow through the screens of a troubleshooter such as Internet Connections to fix problems with your computer’s configuration.
![]() Tip
Tip
By default, the Troubleshoot Problems feature applies repairs automatically when it can determine what is wrong. You can turn off automatic repairs by clicking Advanced on the opening screen of the troubleshooter and then deselecting the Apply Repairs Automatically check box.