CCNP Security SISAS 300-208 Official Cert Guide (2015)
Part III: Cisco Identity Services Engine
Chapter 8. A Guided Tour of the Cisco ISE Graphical User Interface
This chapter covers the following exam topics:
![]() Logging into ISE
Logging into ISE
![]() Organization of the ISE GUI
Organization of the ISE GUI
![]() Types of Policies in ISE
Types of Policies in ISE
In Chapter 7, “Cisco Identity Services Engine Architecture,” we discussed the roles of each ISE persona and how ISE is deployed within the network. After you have decided the deployment model you plan to use on your network, you then need to begin the configuration of the ISE security policy. However, you must first become familiar with the ISE administration portal.
As you saw briefly in the deployment section of Chapter 7, ISE’s administrative portal is a Flash-based, web interface—meaning the administration of ISE is done using a supported web browser that has Adobe Flash installed. The supported web browsers, Adobe Flash, and screen resolution requirements for ISE 1.2 are provided in Table 8-1.

Table 8-1 Supported Web Browsers, Adobe Flash, and Screen Resolution Requirements
Note
The Cisco ISE user interface does not support using the Microsoft IE8 browser in IE7 compatibility mode. The Microsoft IE8 is supported in its IE8-only mode.
During this chapter, we will log in to ISE, provide a quick overview of the organization of the ISE GUI, and briefly discuss the various policies that are available within Cisco ISE.
“Do I Know This Already?” Quiz
The “Do I Know This Already?” quiz allows you to assess whether you should read this entire chapter thoroughly or jump to the “Exam Preparation Tasks” section. If you are in doubt about your answers to these questions or your own assessment of your knowledge of the topics, read the entire chapter. Table 8-2 lists the major headings in this chapter and their corresponding “Do I Know This Already?” quiz questions. You can find the answers in Appendix A, “Answers to the ‘Do I Know This Already?’ Quizzes.”
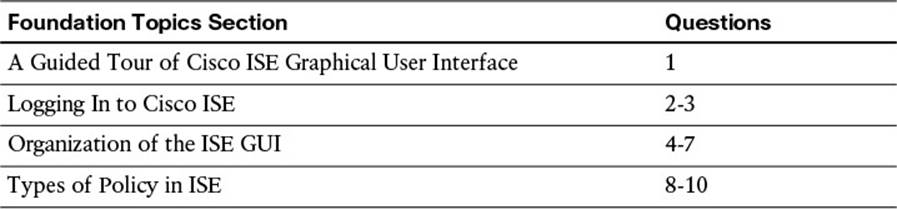
Table 8-2 “Do I Know This Already?” Section-to-Question Mapping
Caution
The goal of self-assessment is to gauge your mastery of the topics in this chapter. If you do not know the answer to a question or are only partially sure of the answer, you should mark that question as wrong for purposes of the self-assessment. Giving yourself credit for an answer you correctly guess skews your self-assessment results and might provide you with a false sense of security.
1. Which is true of the Cisco ISE GUI?
a. Requires a separate application to access it
b. Uses a “standard,” Adobe Flash-capable web-browser
c. Does not exist—ISE is only configurable via command-line interface (CLI)
d. Requires Cisco Network Assistant
2. To ensure the highest level of security, the ISE administrative GUI uses which of the following?
a. SSH
b. SCP
c. HTTP
d. HTTPS
3. The initial certificate presented by the ISE administrative GUI is typically which of the following?
a. Signed by a trusted, public certificate authority
b. A self-signed certificate automatically generated by ISE
c. Delivered in a separate envelope from the ISE appliance
d. Put in a frame and hung over your desk at work
4. Components within the Operations section of ISE allow an administrator to do which of the following?
a. Actively monitor, report, and troubleshoot active authentication and authorization sessions
b. Configure how ISE will operate on the network
c. Create the web portals for client provisioning
d. Modify the security policy of ISE
5. The Policy tab of the Cisco ISE GUI allows an administrator to configure all of the following EXCEPT which?
a. Authorization
b. Client provisioning
c. Web portals
d. Security group access
6. You can configure which of the following item(s) under the Administration tab of Cisco ISE?
a. Policy elements
b. Certificates
c. Dictionaries
d. Network devices
e. A, B, and C
f. B, C, and D
g. B and D
7. When adding a network access device to Cisco ISE, which of the following details can be configured under the network device? (Select three.)
a. MAC address
b. IP address
c. Device name
d. RADIUS server IP address
e. RADIUS shared secret key
f. Mobile device manager
g. SGA AAA Servers
8. An authentication policy within ISE is used to do which of the following?
a. Determine what the endpoint will be given access to
b. Identify the endpoint or the user of the endpoint as it connects to the network
c. Determine the type of security software that is running on the endpoint
d. Quarantine a user if the endpoint is on the Blacklist
9. Profiling policies within ISE can leverage all of the following protocols to determine the type of endpoint that is accessing the network EXCEPT which? (Select two.)
a. DHCP
b. RADIUS (by proxy)
c. SSH
d. HTTP(S)
e. FTP
10. Client provisioning is a process whereby all necessary _______ and _______ are deployed to the endpoint, allowing the endpoint to more easily, maybe even automatically, join the network in the future.
a. credentials, configurations
b. regulations, policies
c. IP addresses, ACLs
d. protocols, processes
Foundation Topics
Logging In to ISE
Like many modern products, Cisco ISE uses a web-based interface for the GUI. As we discussed in the previous chapter summary, the Cisco ISE administrative portal is an Adobe Flash-based web interface.
Initial Login
To log in to Cisco ISE, you need to open a supported web browser running a supported version of Adobe Flash (refer to Table 8-1). If your web browser does not meet these requirements, your ability to access or configure the various components of Cisco ISE can be drastically affected.
After you have opened your supported, preferred web browser, you must access Cisco ISE. To maintain the highest level of security, the Cisco ISE GUI leverages HTTPS for administrative access. Therefore, the resulting URL to access your Cisco ISE is https://<ISE_FQDN>. If you have not added your ISE into your DNS server, either by hostname or FQDN, you might need to type the ISE’s IP address explicitly, in place of ISE_FQDN, to access the administrative GUI.

As you first access Cisco ISE, you might receive a security alert from your browser. The default-generated X.509 certificate used to identify the HTTPS ISE administrative portal is a self-signed certificate. After this initial login, you can choose to permanently accept the certificate into your web browser or load a new X.509 certificate that is “pre-trusted” by your web browser. The process by which this certificate is permanently accepted by the web browser is browser-specific and, therefore, beyond the scope of this chapter. The use of X.509 certificates within ISE are discussed further in Chapter 9, “Initial Configuration of Cisco ISE.”
As you first browse to the provided URL, a login screen appears. This login screen will help to authenticate you as a valid administrative user. The username (and password) given here define the level of access you will be given as you access this administrative GUI. The initial administrative user (configured during the initial bootstrapping of Cisco ISE) is given complete access to all components of the administrative portal (the “Super Admin” role; refer to Table 8-3). In Figure 8-1, you will see that our configured initial administrative username is “admin”.

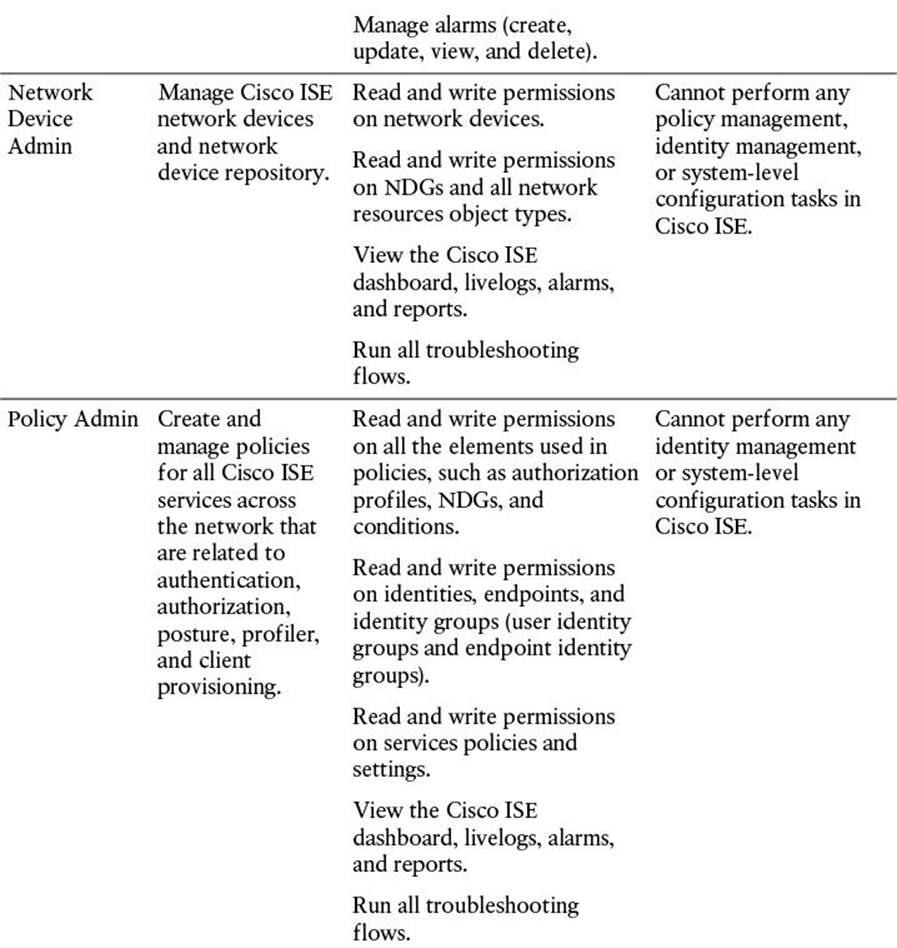
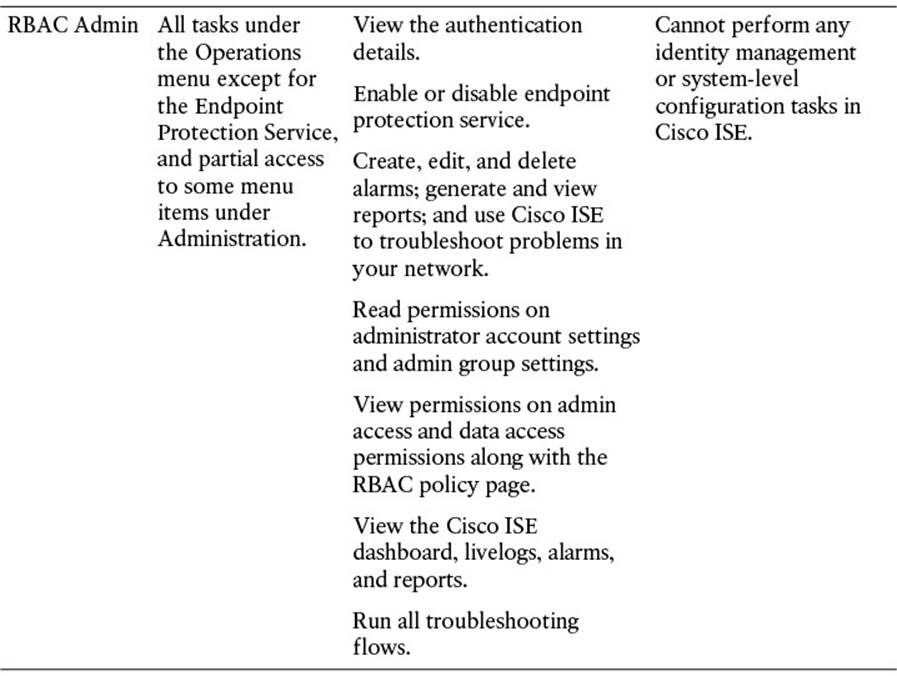
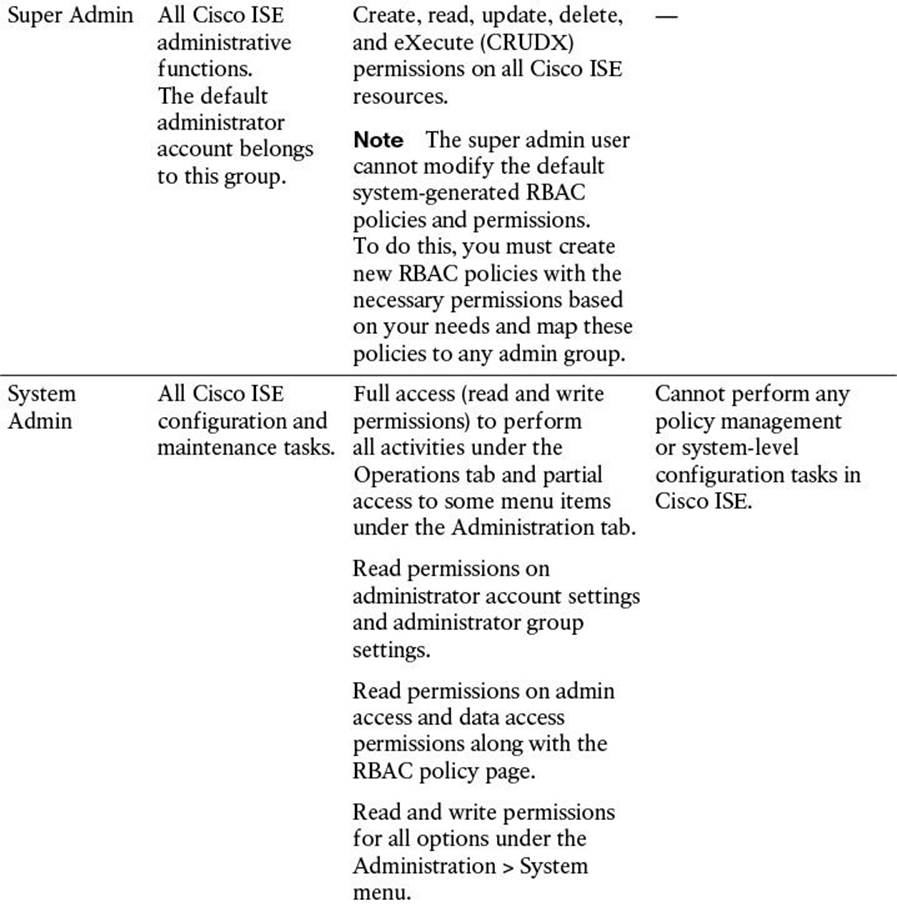
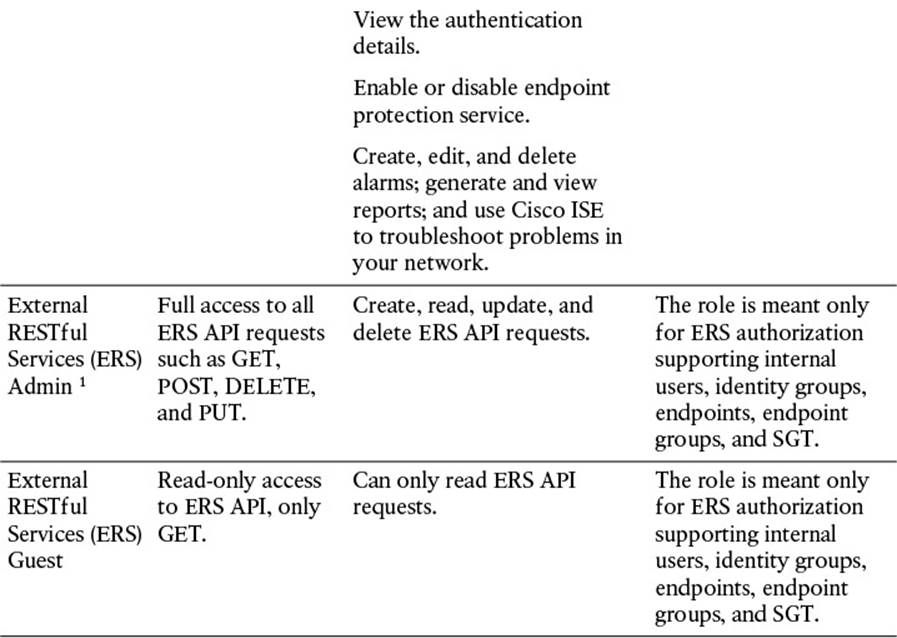
Table 8-3 Cisco ISE Admin Groups, Access Levels, Permissions, and Restrictions
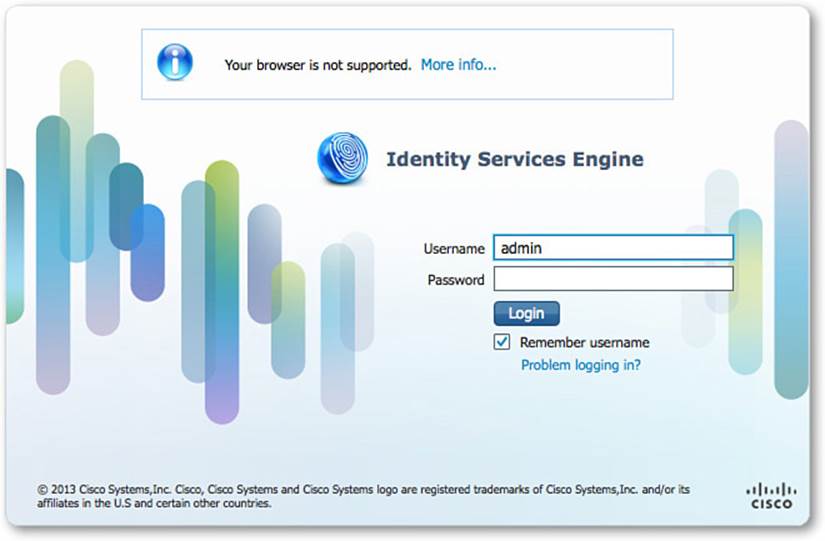
Figure 8-1 Initial ISE administrative GUI login.
Additional administrative users can be created after the initial login. Each additional administrative user can be assigned a specific administrative role. As mentioned previously, depending on the username/password, and, therefore, the resulting administrative role, that is provided upon login, you will have access to those relevant functions within the administrative portal. These additional administrative roles are defined in Table 8-3.
To access these administrative roles within Cisco ISE, you must browse to Administration > System > Admin Access > Administrators > Admin Groups (see Figure 8-2). To add an administrative user with the given role, go to Administration > System > Admin Access > Administrators > Admin Users (see Figure 8-3).
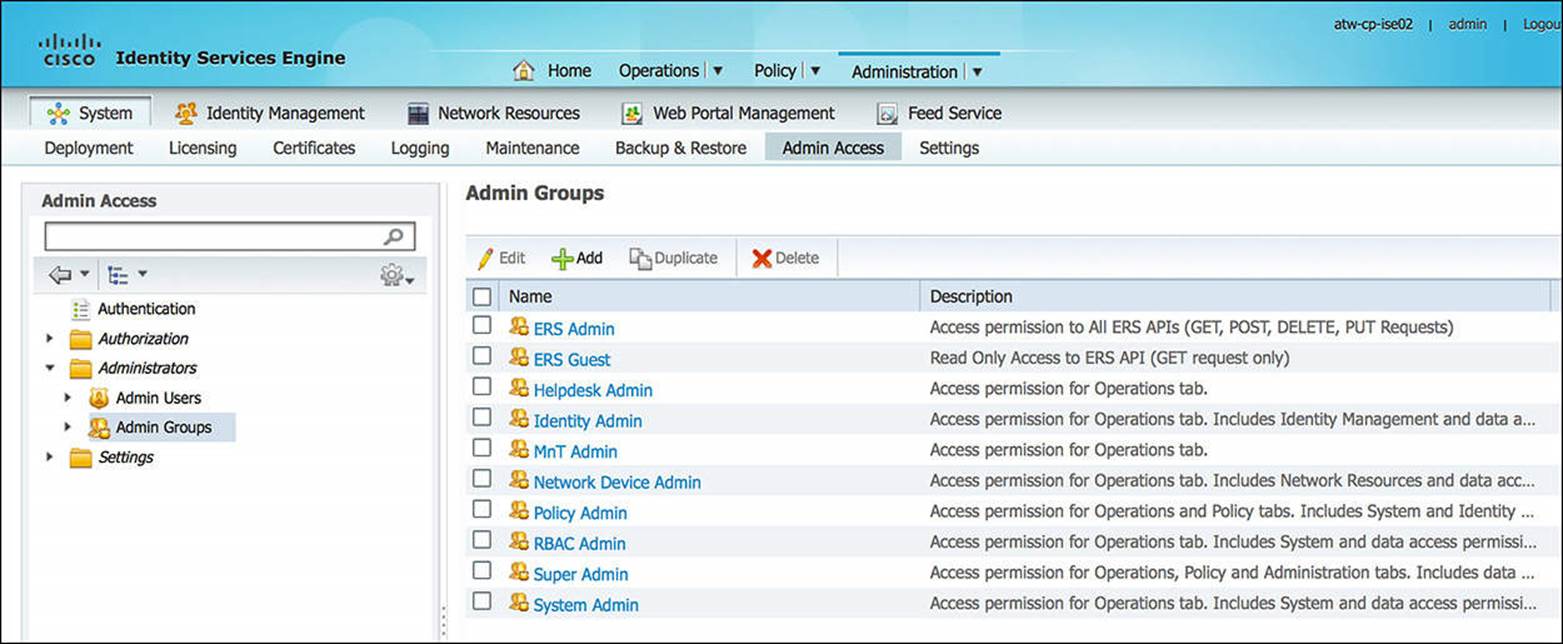
Figure 8-2 Additional administrative roles.
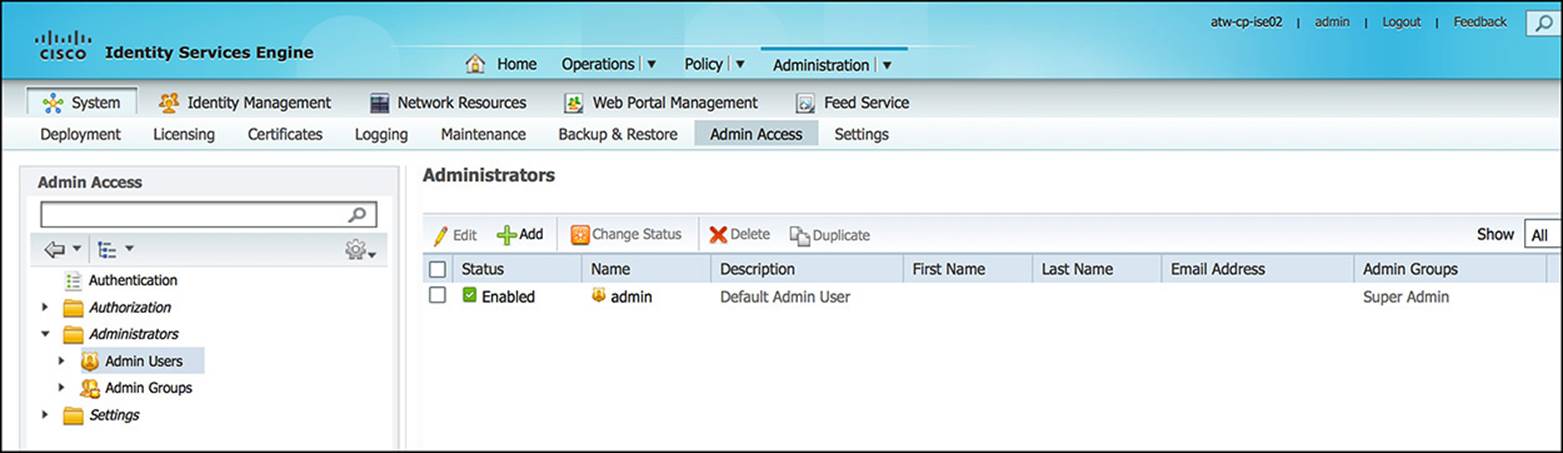
Figure 8-3 Adding administrative users.
Administration Dashboard
The first screen an administrative user sees is the Administration Dashboard (see Figure 8-4 and Table 8-4). This dashboard is analogous to the dashboard of your car because it provides a condensed overview of the status of ISE. As an administrator, this dashboard can be your first stop when checking the status of the entire ISE deployment.
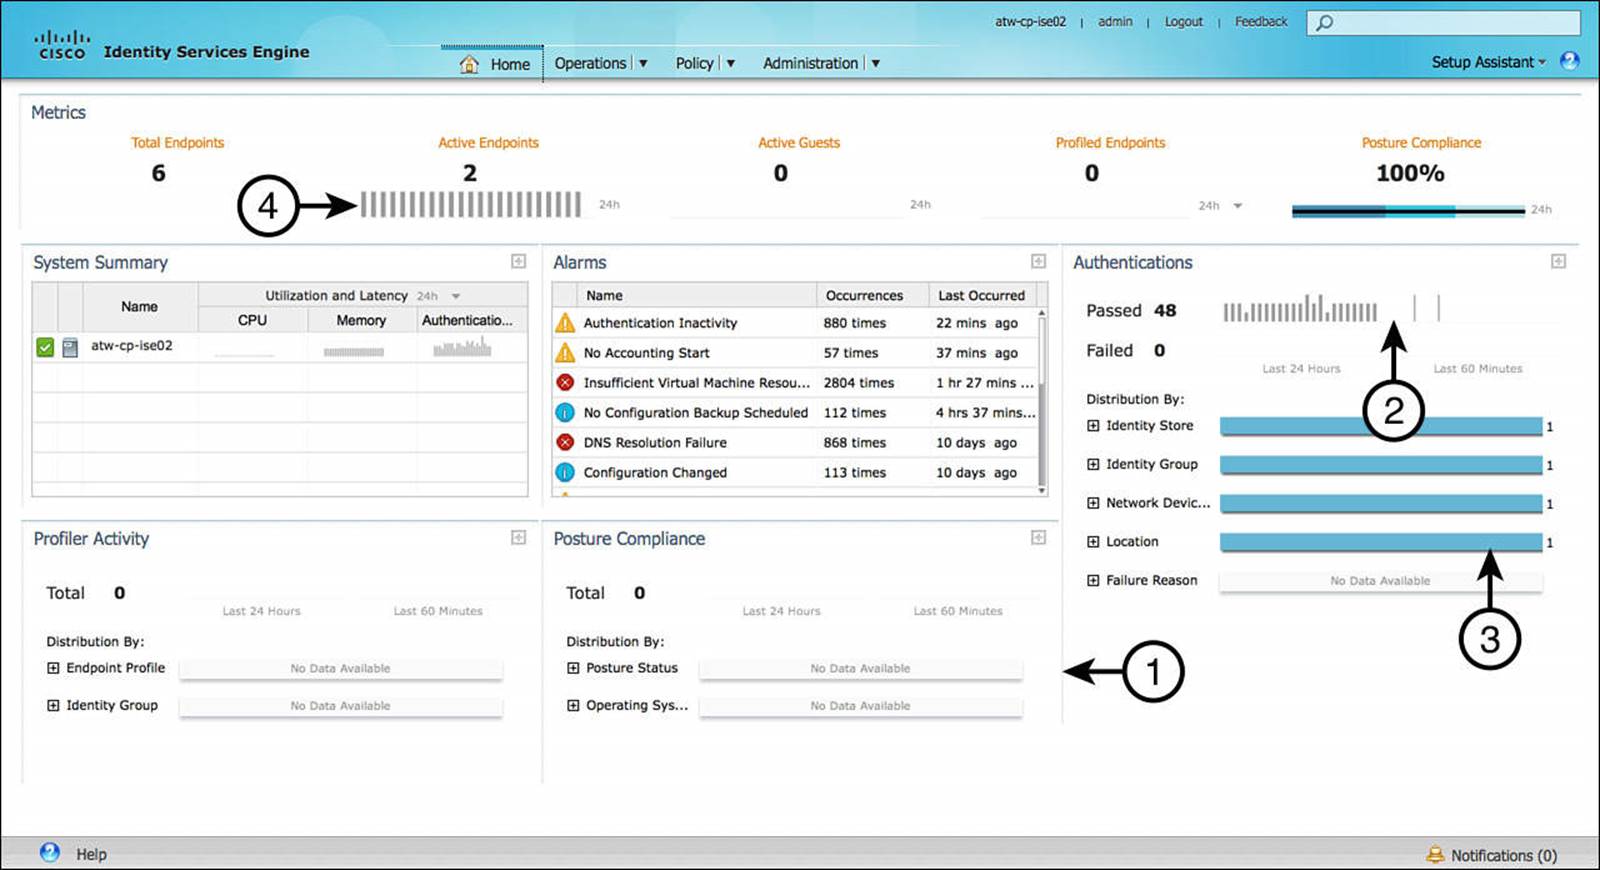
Figure 8-4 Administration dashboard.
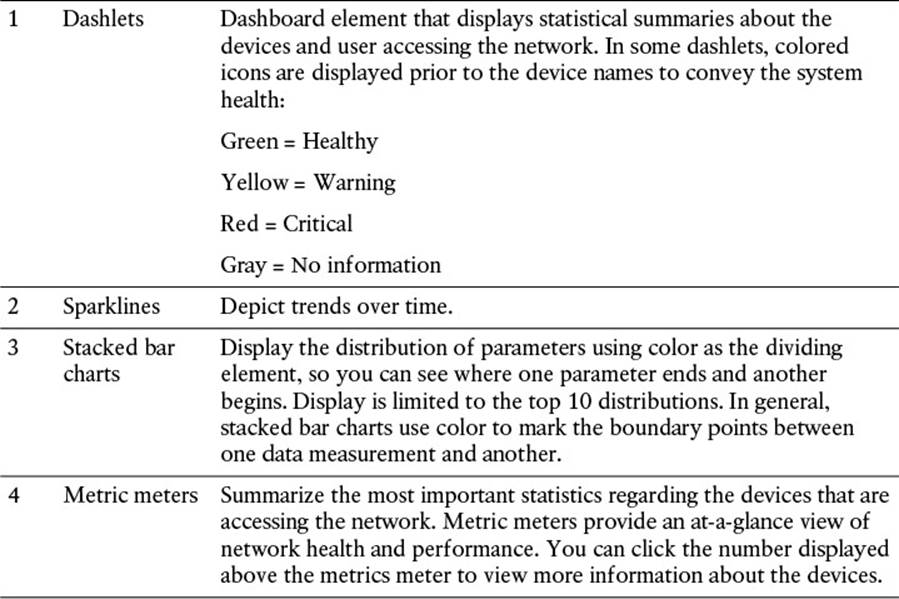
Table 8-4 Administration Dashboard Components (refer to Figure 8-4)
The administration dashboard provides the following dashlets:
![]() Metrics—Shows a high-level summary of how many endpoints are active, how many active guests exist, the profiled endpoints, as well as posture compliance.
Metrics—Shows a high-level summary of how many endpoints are active, how many active guests exist, the profiled endpoints, as well as posture compliance.
![]() System Summary—Provides a quick overview of all ISE appliances within the deployment. This summary includes the health status, CPU level, memory usage, and authentication latency for each ISE appliance.
System Summary—Provides a quick overview of all ISE appliances within the deployment. This summary includes the health status, CPU level, memory usage, and authentication latency for each ISE appliance.
![]() Alarms—Provides any alarms or anomalous behaviors that have been seen by ISE. A few examples of alarms may be authentication inactivity, NTP sync issues, or insufficient virtual machine resources, just to name a few.
Alarms—Provides any alarms or anomalous behaviors that have been seen by ISE. A few examples of alarms may be authentication inactivity, NTP sync issues, or insufficient virtual machine resources, just to name a few.
![]() Authentications—Provides a 24-hour and 60-minute summary of the ISE passed and failed authentications, providing a distribution between identity store, identity group, network device, location, and failure reason (if applicable).
Authentications—Provides a 24-hour and 60-minute summary of the ISE passed and failed authentications, providing a distribution between identity store, identity group, network device, location, and failure reason (if applicable).
![]() Profiler Activity—If profiling is enabled, this dashlet provides a 24-hour and 60-minute overview of which endpoint profile or identity group the endpoints were profiled.
Profiler Activity—If profiling is enabled, this dashlet provides a 24-hour and 60-minute overview of which endpoint profile or identity group the endpoints were profiled.
![]() Posture Compliance—This pane provides the posture status of endpoints, highlighting the distribution based on profile status as well as operating system.
Posture Compliance—This pane provides the posture status of endpoints, highlighting the distribution based on profile status as well as operating system.
Based on the status of the various dashlets, further research, troubleshooting, and reporting might be required.
Administration Home Page
Besides the administration dashboard, other important information is available on the Home page.
Server Information
In the upper-right corner of the administration Home page, you will see the hostname of the ISE appliance that is currently being viewed. By hovering over this hostname, you will see some additional information about the ISE appliance. The information given in this Server Information pop-up is shown in the following list and Figure 8-5:
![]() Personas—The active personas on the current ISE appliance
Personas—The active personas on the current ISE appliance
![]() Role—Whether this ISE is currently in a standalone, primary, or secondary role
Role—Whether this ISE is currently in a standalone, primary, or secondary role
![]() System Time—The current time as seen by the current ISE appliance
System Time—The current time as seen by the current ISE appliance
![]() FIPS Mode—If the current ISE node is running in FIPS compliant mode, it is indicated here
FIPS Mode—If the current ISE node is running in FIPS compliant mode, it is indicated here
![]() Version—The current version of ISE that is running
Version—The current version of ISE that is running
![]() Patch Information—If there is a system patch that has been installed, it is indicated here
Patch Information—If there is a system patch that has been installed, it is indicated here

Figure 8-5 Server information pop-up.
Setup Assistant
The Setup Assistant link on the Administration Home page, located in the upper-right corner of the page, can be used to do an initial configuration of the Cisco ISE after the initial CLI bootstrapping of ISE. The Setup Assistant guides you through a series of questions to configure the basic functionality of Cisco ISE. Following the Setup Assistant Wizard, the input you provided is used to configure Cisco ISE directly. Some of the areas that are affected by the Setup Assistant include authentication, authorization, profiling, posture, client provisioning, guest services, and support for personal devices. Figure 8-6 shows you how to run the Setup Assistant.
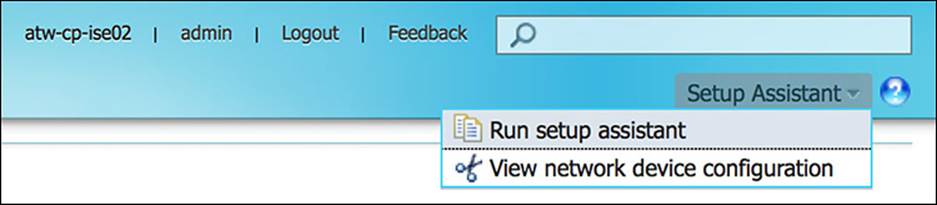
Figure 8-6 Setup Assistant drop-down.
Help
In the bottom-left corner of the Administration Home page, the Help link provides a number of useful resources to help you manage your Cisco ISE.
The first resource provided via the Help link is the Task Navigator. The Task Navigator is a set of wizards that will walk you through a number of common configuration tasks. These walkthroughs are given as a linear set of tasks—whereby the order of the tasks is the order in which the tasks must be configured. The links provided as part of this workflow take you directly to the relevant configuration page within ISE.
The second resource provided via the Help link is the Online Help repository (see Figure 8-7). This link provides the online documentation for Cisco ISE. When you select Online Help, an indexed and searchable guide appears, often in a new tab within your browser (you must allow for pop-ups from the ISE node). This is a local copy of the Cisco ISE User Guide for the version of ISE that is currently running. Also within this Online Help, you can add your favorite links for those tasks that you refer to often.
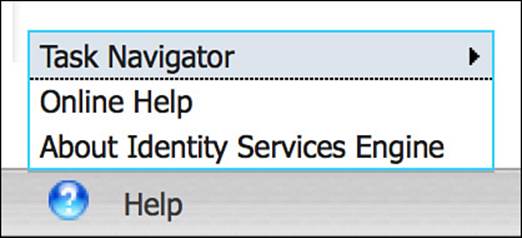
Figure 8-7 Help link.
The third resource provided via the Help link is About Cisco Identity Services Engine (see Figure 8-8). This resource provides the ISE and ADE software versions that are running on the current node. The product ID, version ID, and serial number are also provided via the About link; these can prove quite useful when requesting customer support from Cisco TAC, RMAs (in case of a defective ISE), and to place additional orders for similarly configured equipment. This information is also important for licensing purposes.
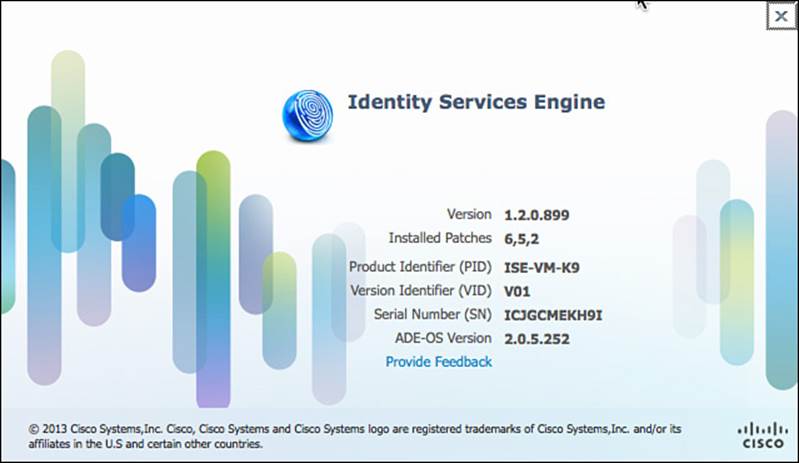
Figure 8-8 About Cisco Identity Services Engine.
Organization of the ISE GUI
Besides the Administrative Home screen, the Cisco ISE GUI is divided into three functional components—Operations, Policy, and Administration.
Operations are those components of ISE that enable the administrator to actively monitor, report, and troubleshoot ongoing authentication and authorization sessions. It is also a place where the administrator can monitor, report, and troubleshoot those network devices and policies that are already configured on ISE.
The Policy functions are those components of ISE that allow the administrator to configure the security policy. These policy functions include authentication, authorization, profiling, posture, client provisioning, and security group access policy—as well as the supplementary building blocks that are used within these policies. As a network device authenticates and authorizes to ISE, ISE processes the credentials provided by the NAD through this policy, providing the resulting authorization security policy back to the NAD.
The third major component of the Cisco ISE GUI is Administration. Administration focuses on the configuration of the ISE component itself—what, who, and how users and devices can access ISE. This configuration section of ISE enables the administrator to define how the ISE deployment behaves, which external identity resources are going to be used, which devices are allowed to use the ISE security policy, which services ISE will provide to the user base, and how often ISE will update its device databases.
We’ll now dive a little deeper into each of these major functional components, describing how each, smaller part contributes to the complete ISE ecosystem.
Operations
As you look at the Operations tab, you will see four subcomponents—Authentications, Reports, Endpoint Protection Service, and Troubleshoot.
Authentications
The authentication subcomponent of Operations takes on a very similar feel as the administration dashboard discussed earlier in this chapter. This authentication screen can be configured to update in a periodic fashion, providing a live view of the authentications that are occurring and the resulting security policies that are actively being issued to the endpoints. By monitoring this screen, an administrator can quickly discern whether users are successfully authenticating/authorizing or whether there is currently a problem with authentications or authorizations.
Within the Live Authentications Log, we can see those users (Identity), devices (Endpoints), or NADs (Network Device) as they attempt to authenticate to ISE. If the policy is successful, the resulting security policy (Authorization Profile) is sent to the NAD. Each authentication event is logged on this Live Authentications Log, as shown in Figure 8-9.
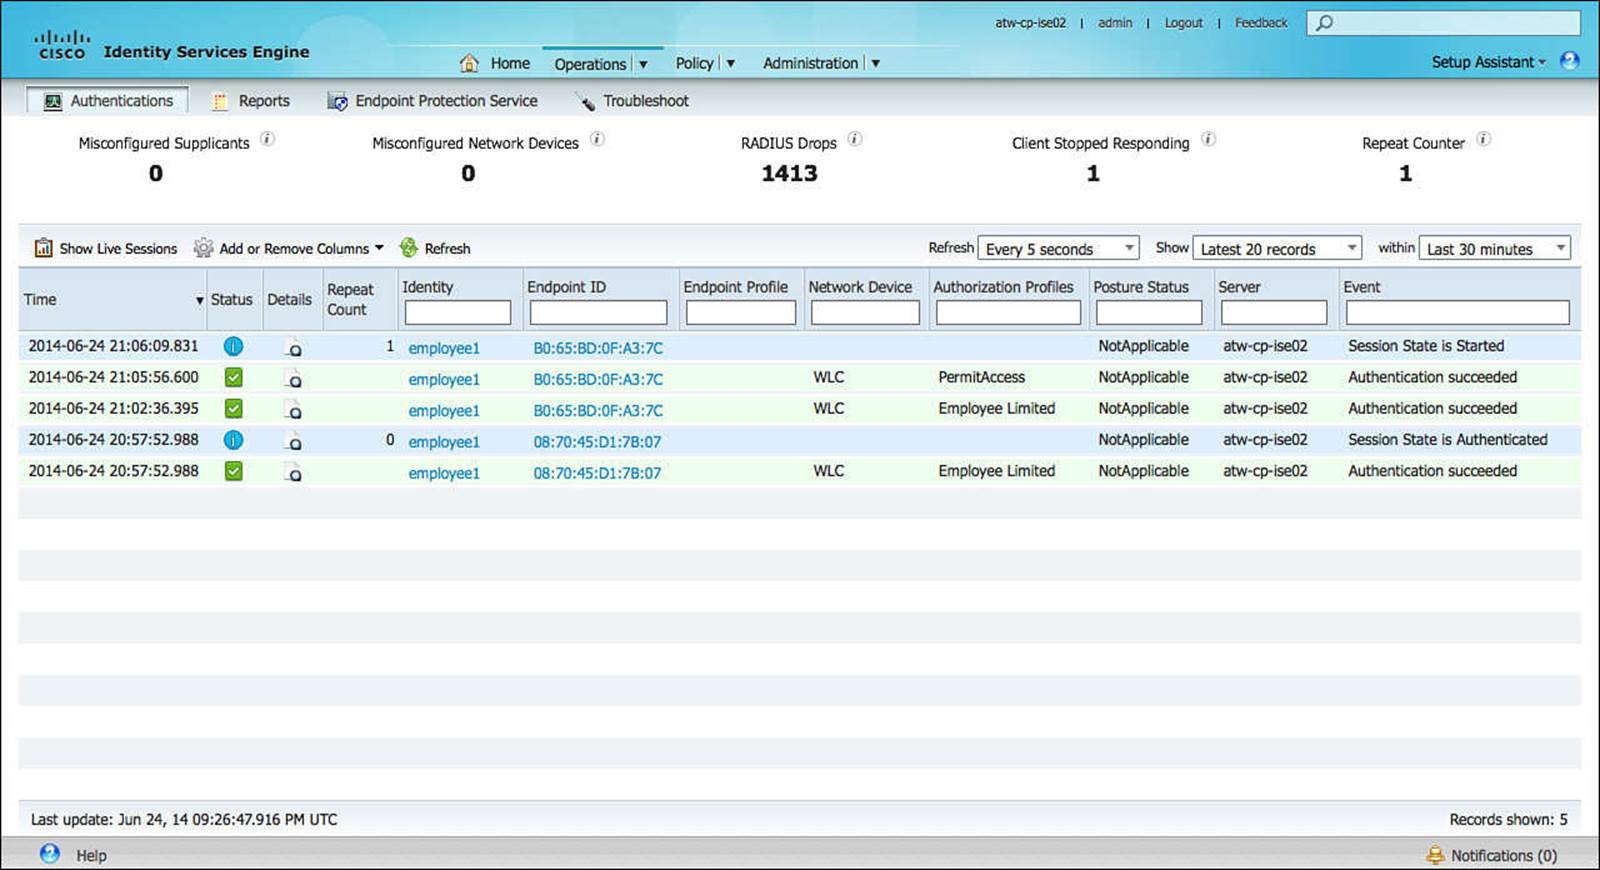
Figure 8-9 Live Authentication Log.
The Live Authentications Log provides only a summary of the authentication but not all of the details. However, the details of the authentication session are sometimes as important—or more important—than the final result. For instance, if an authentication fails directly or fails indirectly (because it hit the wrong policy), those authentication details will help an administrator determine the nature of the problem. To see the details of the authentication session, click the magnifying glass (in the Details column) for the relevant authentication event.
As you click the Live Log Details link (see Figure 8-10), you will see a large amount of information about the Authentication session—the details of the RADIUS exchange that resulted in the authentication event, the endpoint, the NAD, and the identity store—to name just a few. By reviewing portions of the Live Log Details and knowing the expected policy outcome, you should be able to determine the reason a particular authentication, authorization, posturing, or profiling policy was chosen, correctly or incorrectly, as the result of the authentication session.
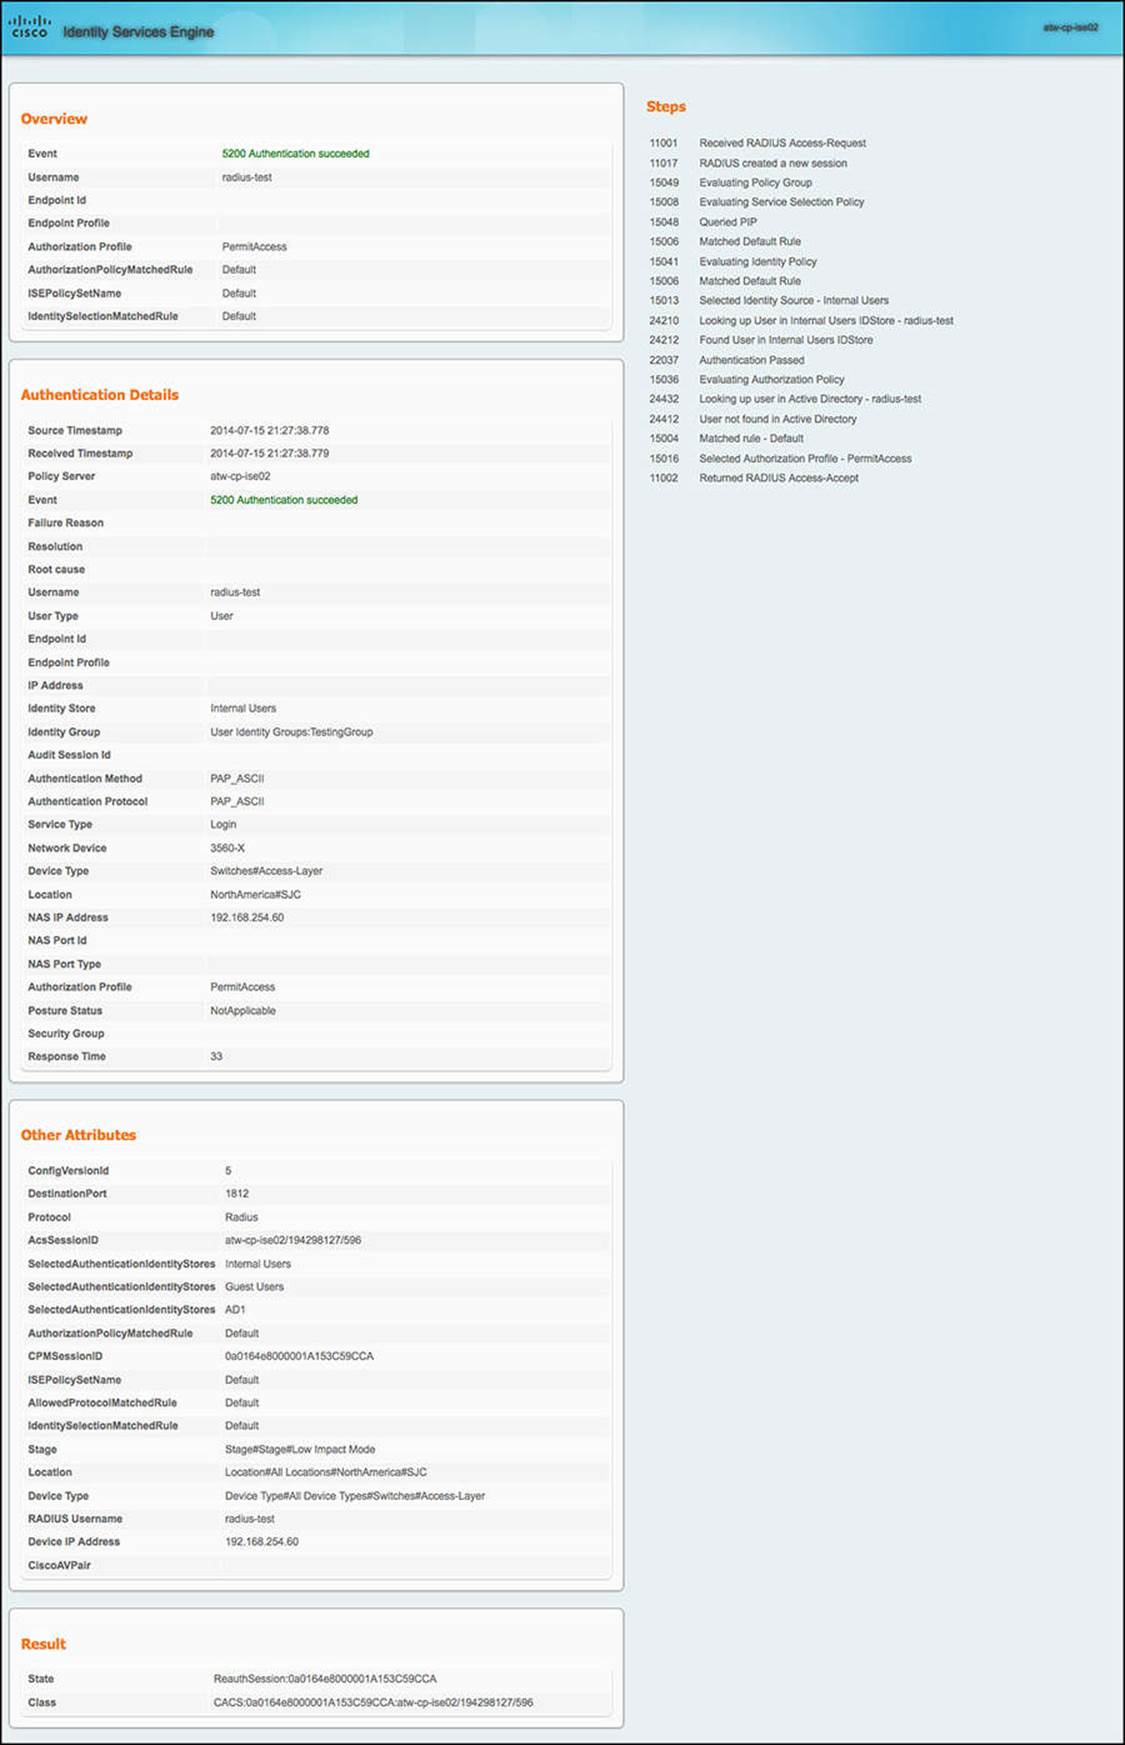
Figure 8-10 Live Authentication Log details.
The alternative view of the Live logs—Live Sessions—can be seen by clicking the Show Live Sessions icon shown in Figure 8-11. Whereas the Live Authentications Log showed real-time authentications to ISE, the Live Sessions Log shows the status of those active sessions with ISE. This can be a session that has just started or a session that is ongoing.
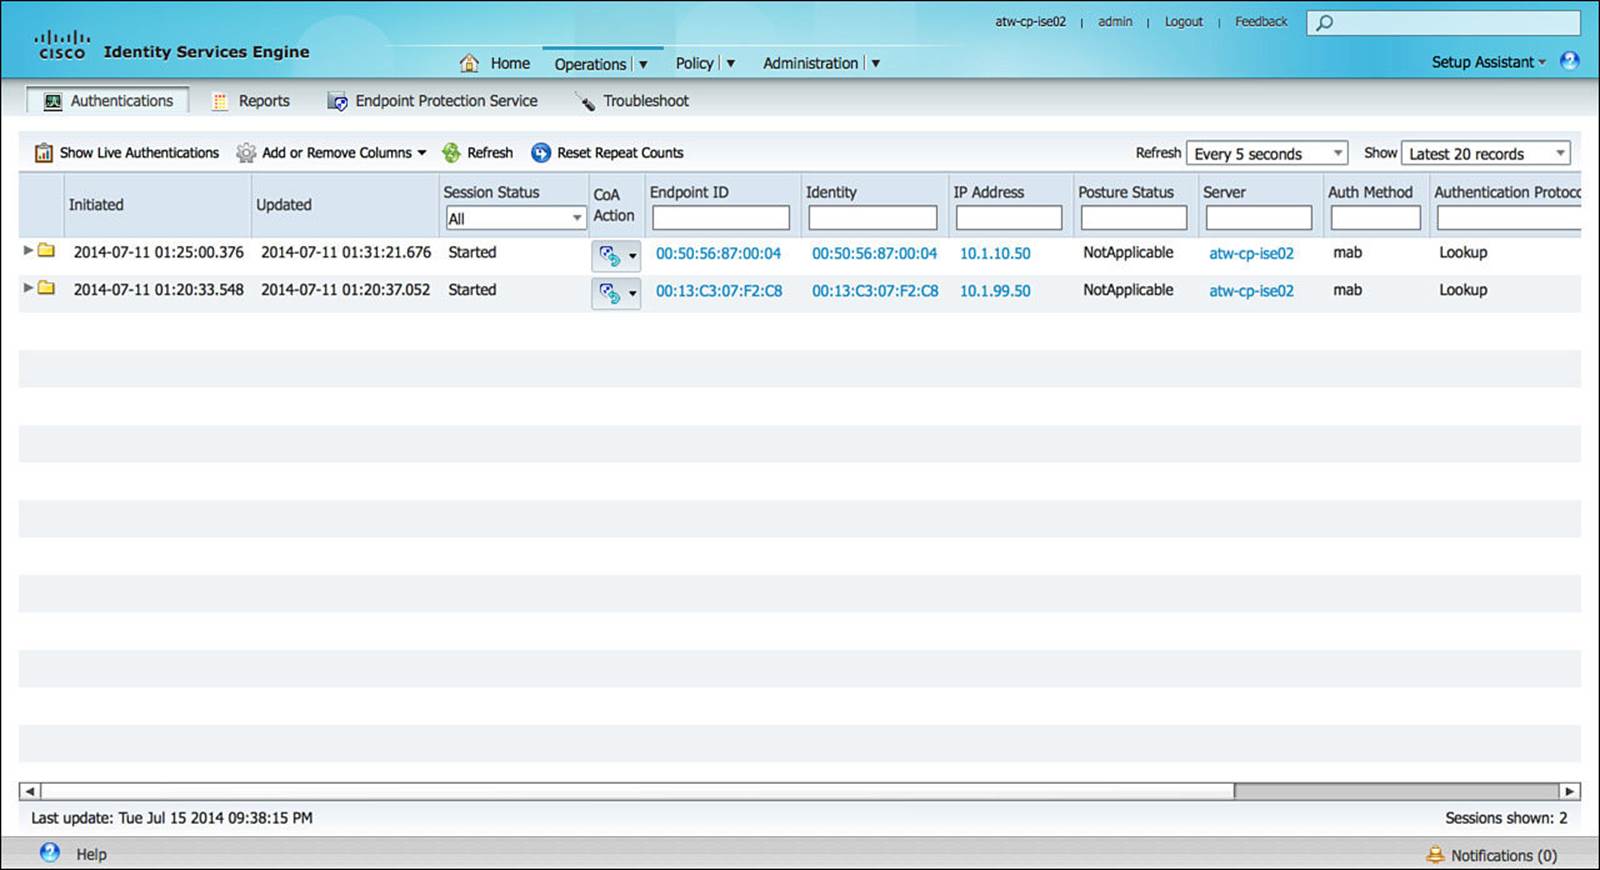
Figure 8-11 Live Sessions Log.
By expanding a session or filtering for the relevant session that you are interested in, you can see the play-by-play of the authentication session (see Figure 8-12). If a session is having issues, this view should provide a sufficient timeline as to when each step of the authentication took place as well as which ones succeeded or failed.

Figure 8-12 Live Sessions play-by-play.
A further function of this Live Sessions Log view is the capability to force the termination of the session or to force the session to reauthenticate. This is accomplished by selecting the CoA Action icon for the relevant session, as shown in Figure 8-13.
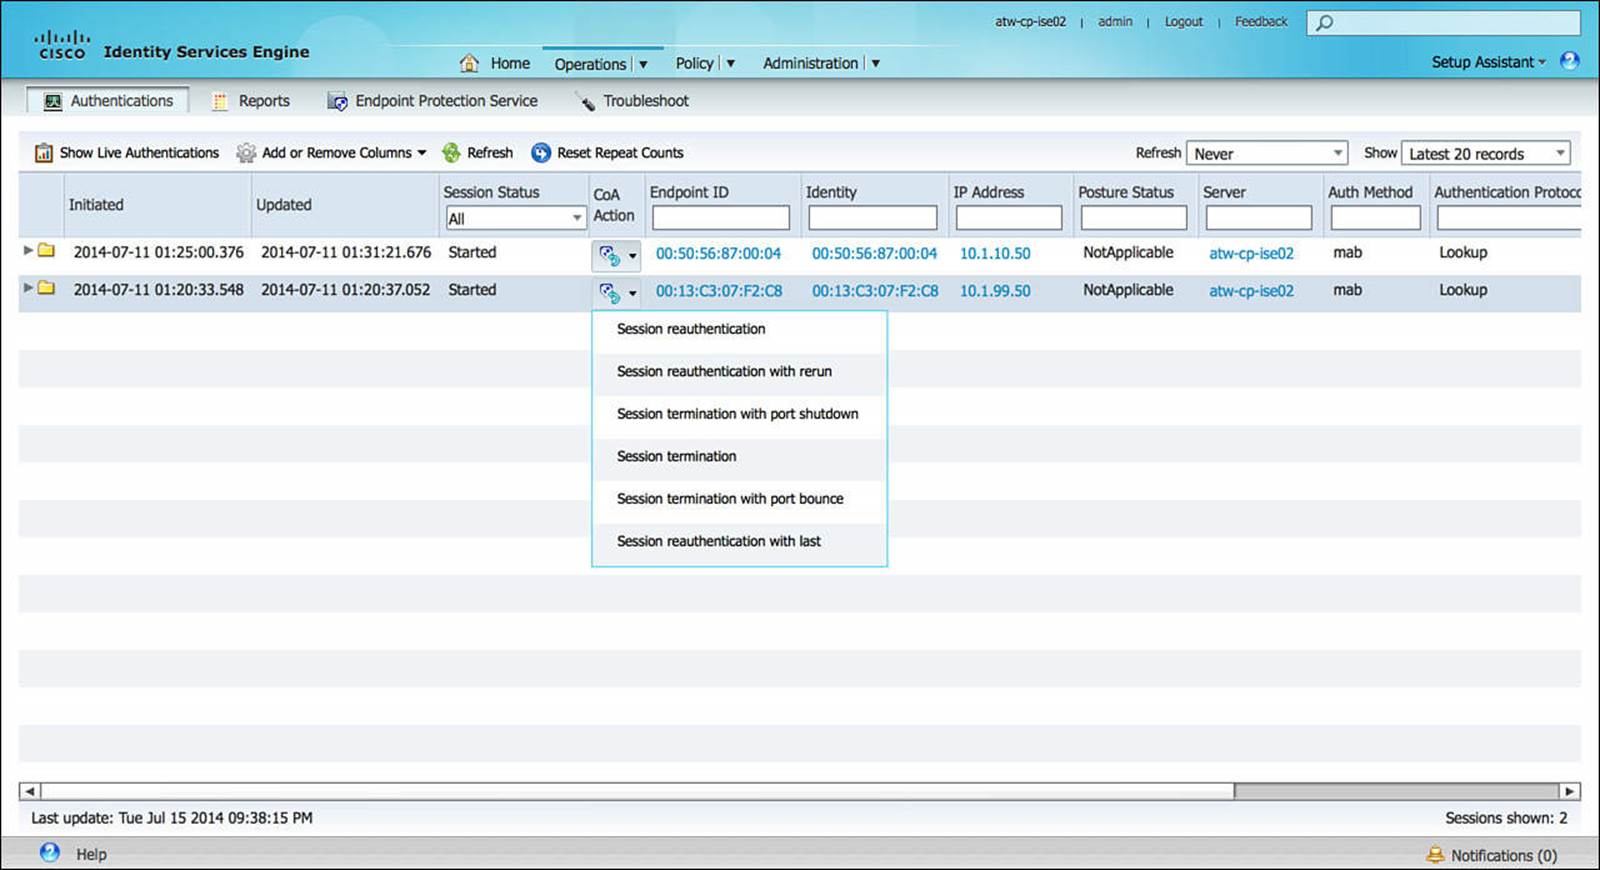
Figure 8-13 Live Sessions additional actions.
Reports
The reports subcomponent of Operations is exactly as it sounds—a place to generate reports for ISE functions and sessions. The reports are broken down into the following categories and also shown in Figure 8-14:
![]() Auth Services Status—Access reports about authentications, authorization, and accounting (also known as AAA services). These reports focus on tracking the transactions between users and Cisco ISE.
Auth Services Status—Access reports about authentications, authorization, and accounting (also known as AAA services). These reports focus on tracking the transactions between users and Cisco ISE.
![]() Deployment Status—Access reports about the health of the Cisco ISE deployment. These reports focus on the Cisco ISE infrastructure and administration.
Deployment Status—Access reports about the health of the Cisco ISE deployment. These reports focus on the Cisco ISE infrastructure and administration.
![]() Endpoints and Users—Access reports about user provisioning, endpoint profiling, and user management. These reports focus on Cisco ISE end users and endpoints.
Endpoints and Users—Access reports about user provisioning, endpoint profiling, and user management. These reports focus on Cisco ISE end users and endpoints.
![]() Security Group Access—Access reports for the Security Group Access (SGA) feature, which is available with the Cisco Advanced ISE license. These reports provide details about the integration between Cisco ISE and the network devices that support the SGA feature.
Security Group Access—Access reports for the Security Group Access (SGA) feature, which is available with the Cisco Advanced ISE license. These reports provide details about the integration between Cisco ISE and the network devices that support the SGA feature.
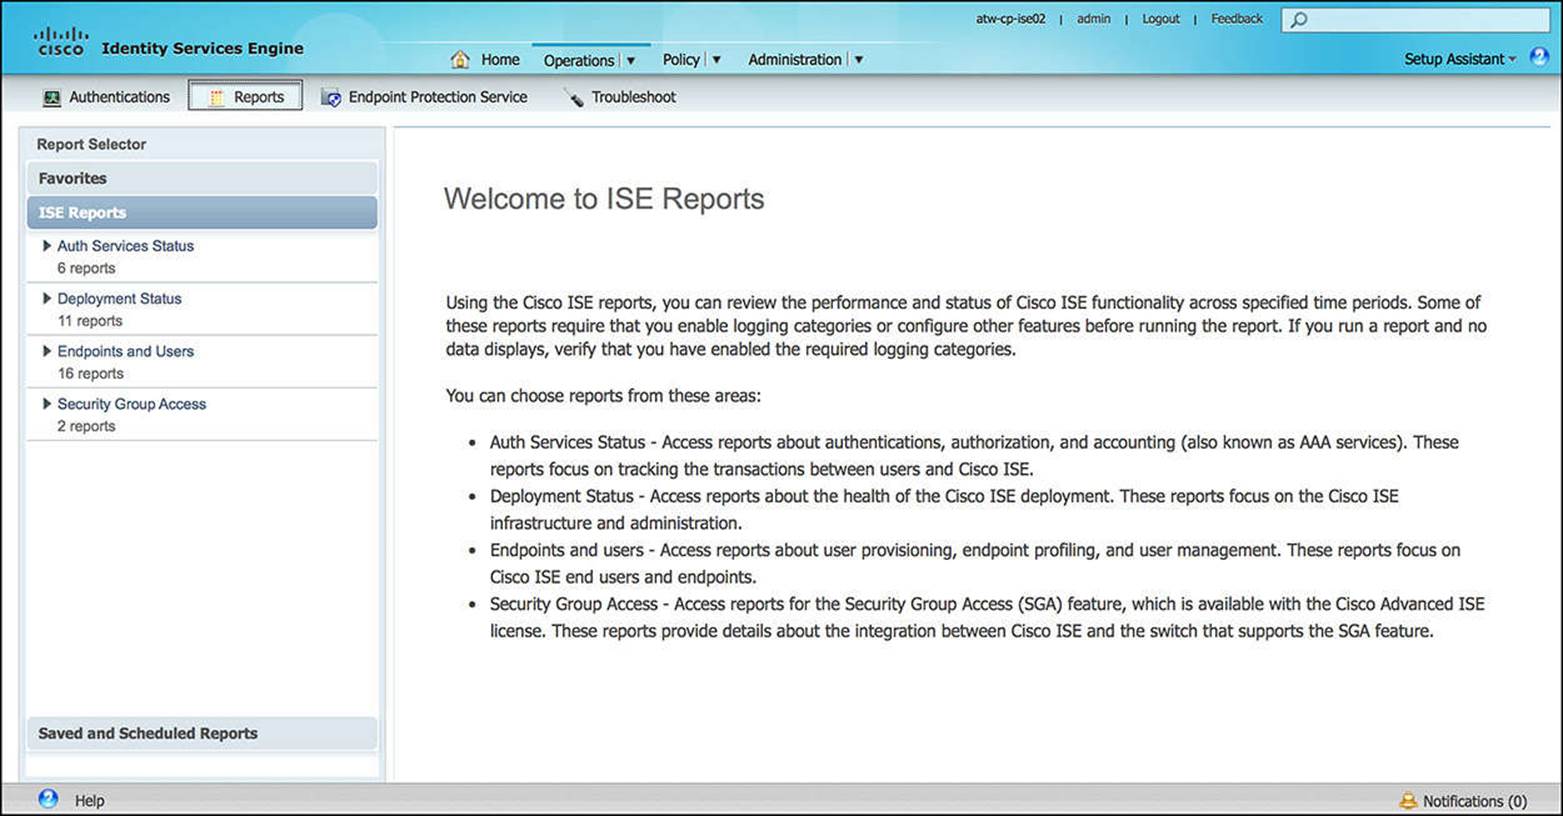
Figure 8-14 Available reports.
Endpoint Protection Service
The Endpoint Protection Service is a useful tool available to network administrators (see Figure 8-15). This function of ISE enables an administrator to manually refuse network access to an endpoint. Depending on the security policy that is configured, a network administrator can quarantine an endpoint using the endpoint’s MAC address (most effective) or IP address.
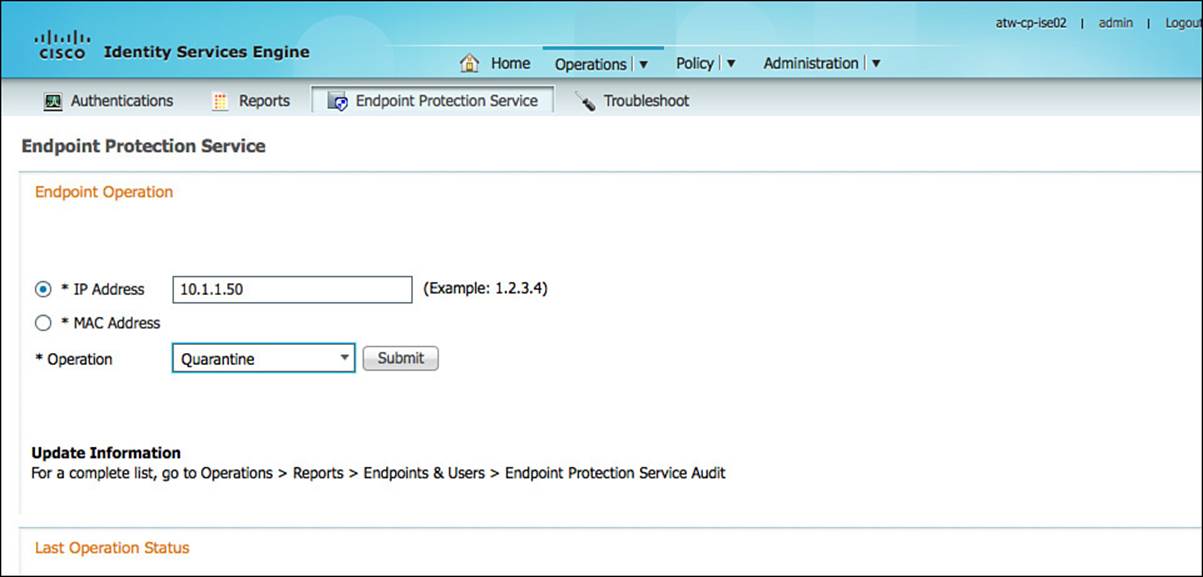
Figure 8-15 Endpoint Protection Services.
If an endpoint is quarantined—with the appropriate security policy configured—all requests for authentication are refused, resulting in the endpoint being restricted to the Layer-2 network between the endpoint and the NAD. In the case of a wired endpoint, this is usually the physical connectivity to the switch and, with wireless, the connection between the endpoint and the Wireless LAN Controller (WLC) from where the RADIUS calls are originated.
This is a very strong-handed approach to keep a device off of the network and is often used to address the most egregious security offenses on the network. In this case, the user or endpoint is simply refused network access without being given any concrete feedback as to why (such as a redirect to a webpage with detailed feedback). A few scenarios where this can be appropriate are a device that is infected that is accessing the network, a rogue device, or a device that is otherwise DoSing the network.
Troubleshoot
The Troubleshoot subcomponent of Operations provides a number of tools for the network administrator to use in case of issues with ISE. These tools provide a number of useful functions including a configuration validation tool (Evaluate Configuration Validator), a RADIUS Authentication Troubleshooting tool, a packet capture utility (TCP Dump), and others, as shown in Figure 8-16.
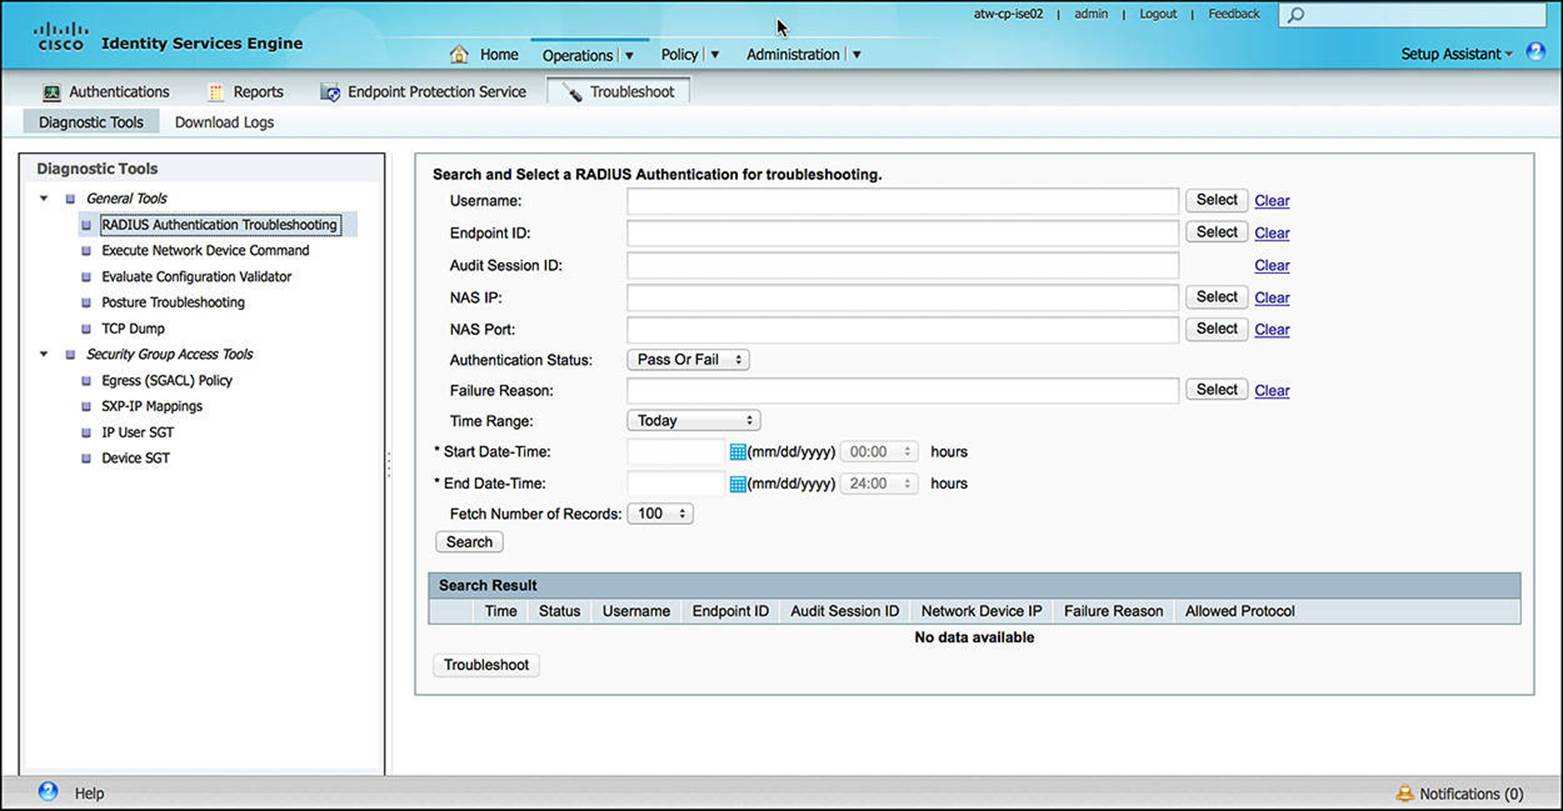
Figure 8-16 Troubleshooting tools.
In those cases where you cannot resolve an issue by monitoring the Live Logs or troubleshooting on your own, you might need to open a support case with Cisco TAC. To provide the customer support engineer with the information she needs, you might be asked to gather the logs from ISE at the time of the issue. These logs are available as a Support Bundle or as individual debug logs, both of which are under the Troubleshoot subcomponent, as shown in Figures 8-17 and 8-18.
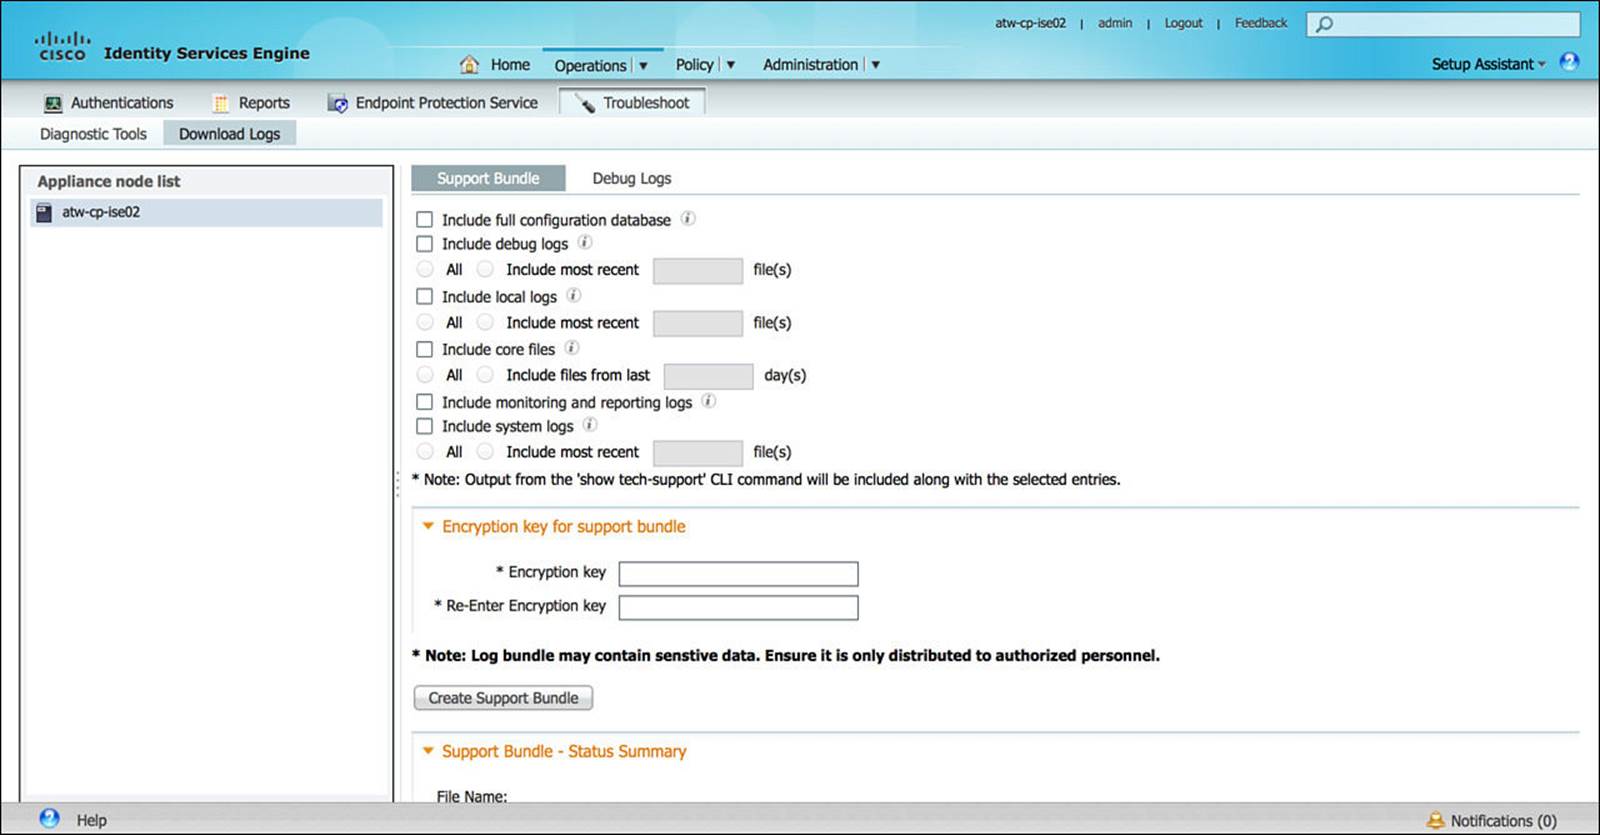
Figure 8-17 Support bundle.
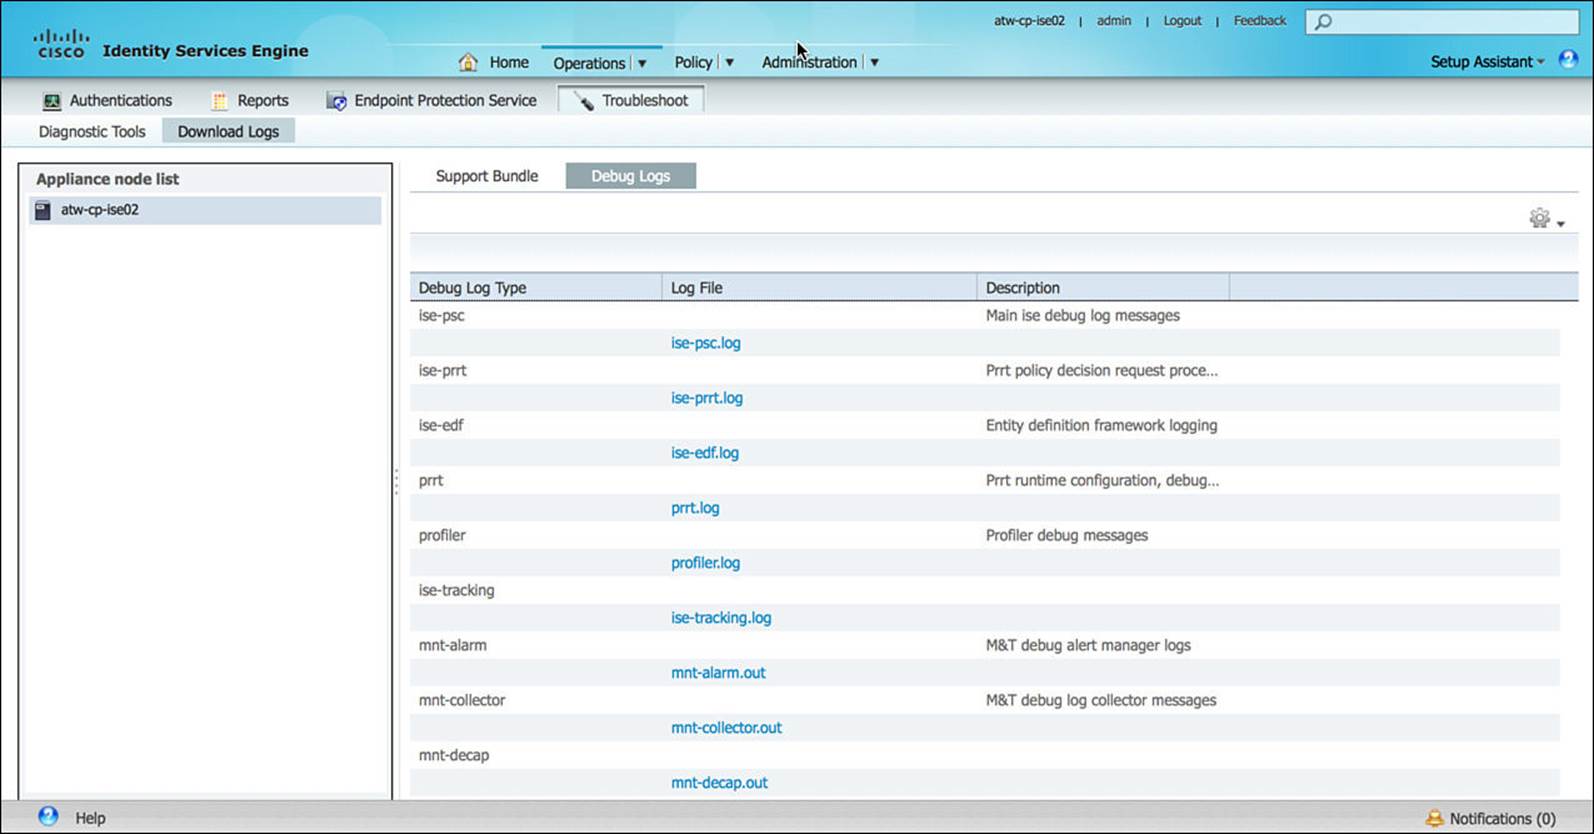
Figure 8-18 Debug logs.
Policy
The next major tab we’ll discuss in the ISE GUI is the Policy tab. This component of ISE contains configuration for authentication, authorization, profiling, posturing, client provisioning, security group access, and policy elements.
Authentication
The authentication subcomponent of Policy provides the interface to configure authentication policies on ISE. Authentication, as you learned in Chapter 2, “Fundamentals of AAA,” is the process by which the identity of the user or device is determined. The authentication policy defines the rules by which ISE identifies the user—leveraging the various RADIUS Attribute-Value pairs sent by the NAD to ISE, specific information about the NAD itself, and other unique criteria from the authentication session. Figure 8-19 shows a sample authentication policy.
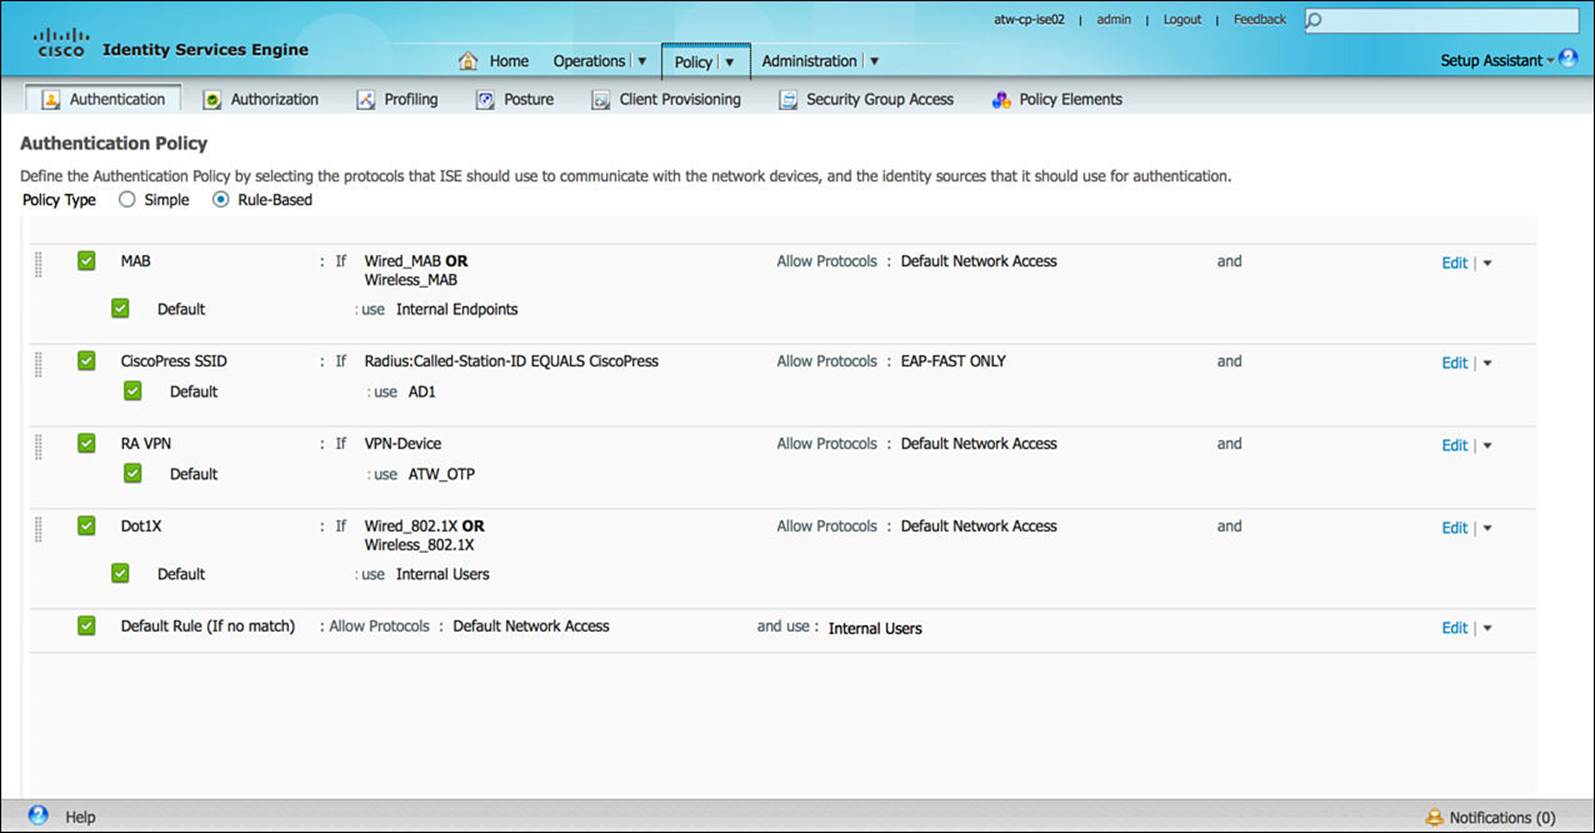
Figure 8-19 Authentication policy.
Authorization
Authorization is the process of determining what an endpoint device will have access to on the network after it has been authenticated. The authorization policy, much like the authentication policy, leverages the RADIUS Attribute-Value pairs that are sent from the NAD, specific information about the NAD itself, and other unique criteria. Each policy has a name, conditions the endpoint must match, and the resulting permission. Figure 8-20 shows a sample set of authorization policies.
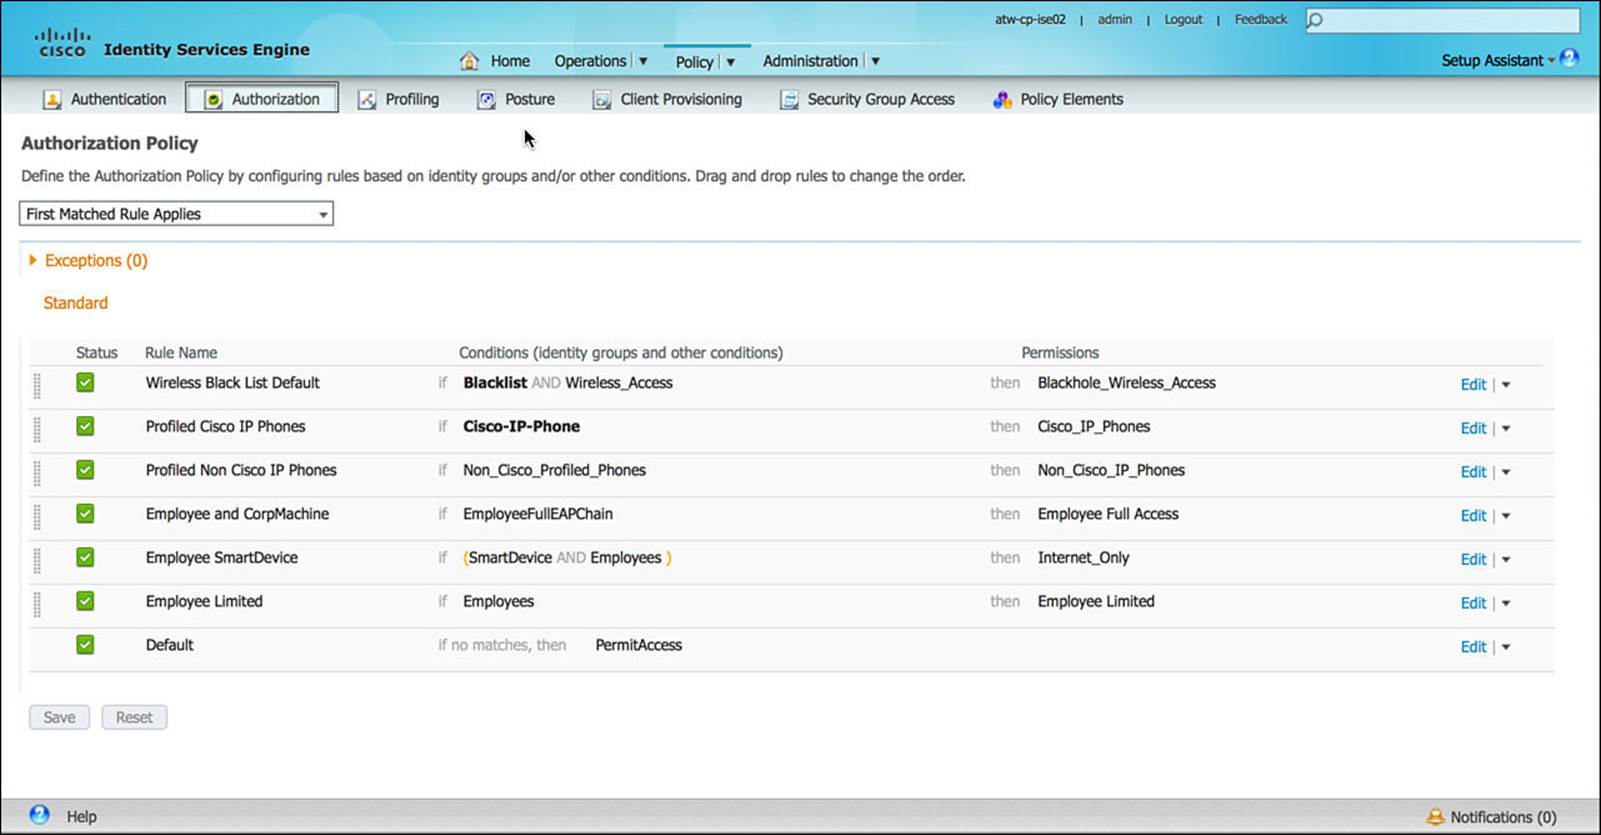
Figure 8-20 Authorization policy.
Profiling
ISE has the ability to determine, or make a very educated guess, about which type of endpoint is attempting to access the network. This process, called profiling, is accomplished by ISE’s monitoring of those protocols sent by the endpoint onto the network—namely, DHCP, HTTP, and (by proxy) RADIUS, amongst a few others. The profiling done by ISE can sometimes be general in nature, identifying just the vendor or just the device type, or very specific, identifying the endpoint’s vendor, device model, and function on the network (such as a printer, phone, and so on). A large number of profiling policies are included by default, a sample of which can be seen in Figure 8-21.
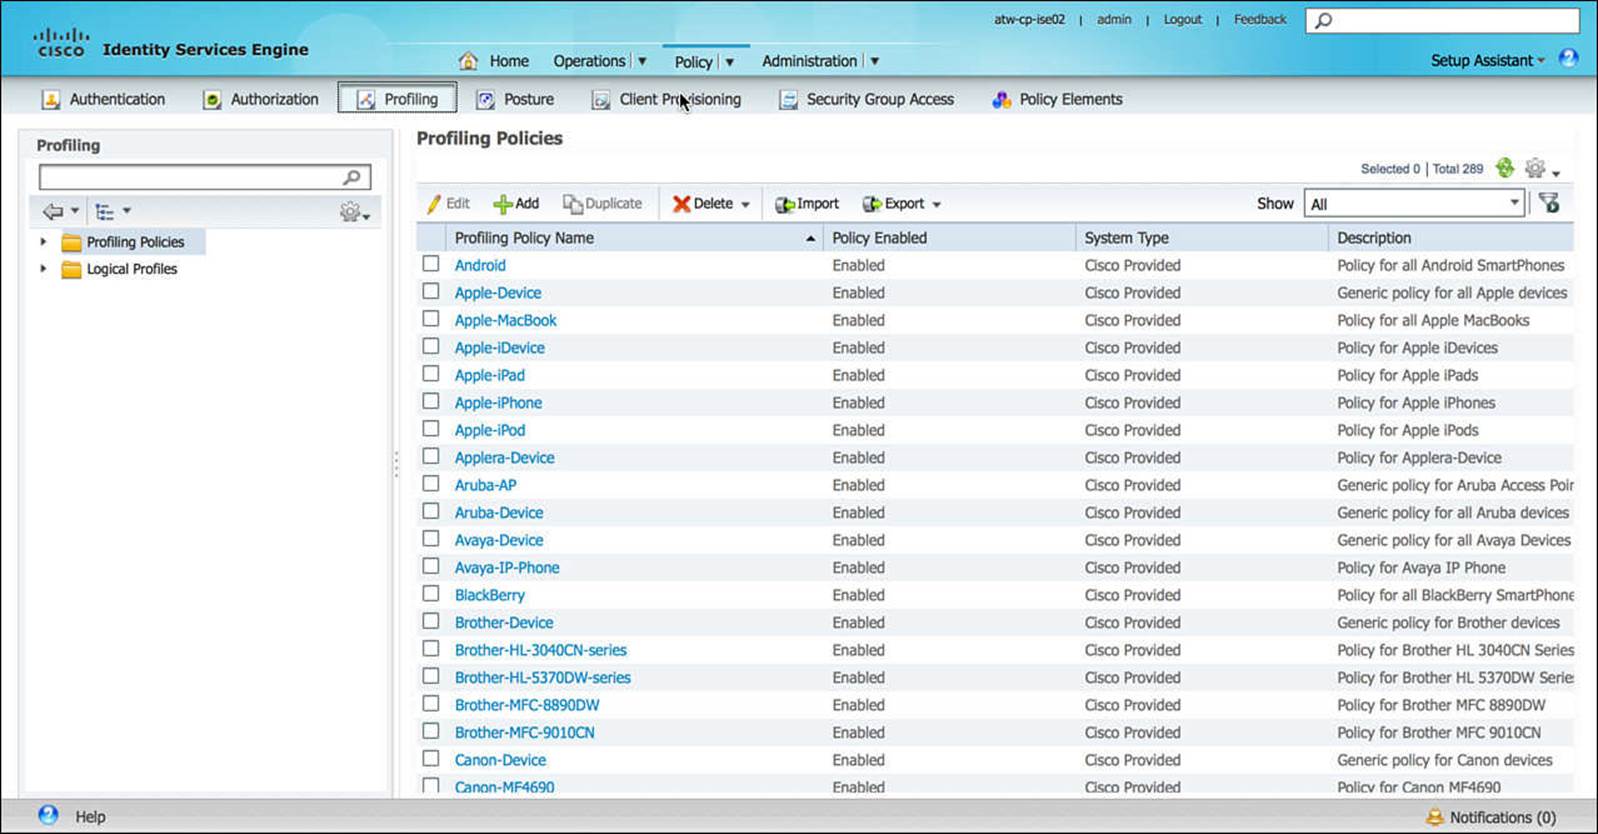
Figure 8-21 Profiling policy.
The profiling policy on ISE enables an administrator to leverage the Cisco preconfigured profiling policy to identify endpoints and/or create their own policy, defining the rules or criteria by which the type of endpoint that is accessing the network is determined.
Posture
Posturing is a mechanism by which a software supplicant or agent on the endpoint provides ISE detailed information about the endpoint’s software and hardware configuration. The information provided by the endpoint can include information about the operating system, antivirus/antispyware/antimalware software, as well as current OS patch levels. Depending on the operating system, other important information can be gathered from the endpoint as part of the posturing process.
Based on the final assessment of the endpoint’s posture, comparing it to the configured posture policy on ISE, ISE might quarantine the endpoint with a noncompliant or unknown posture—possibly providing the endpoint reduced network access to remediate its posture. After taking all remediation steps needed to become compliant, the endpoint then can be allowed appropriate network access. The posture policy screen is shown in Figure 8-22.
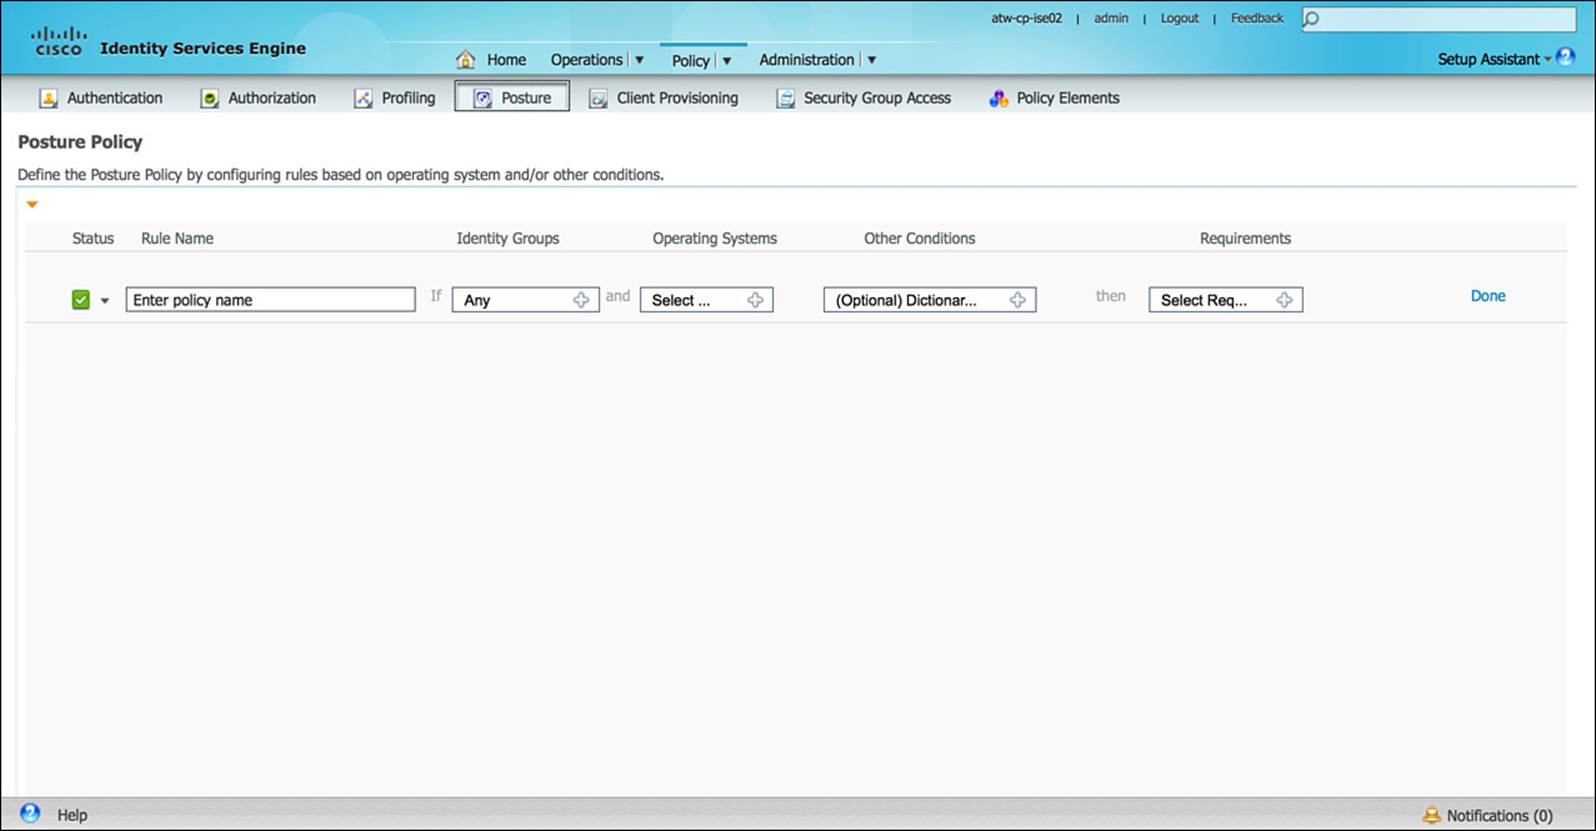
Figure 8-22 Posture policy.
Client Provisioning
In the Client Provisioning section of the Policy component, you can configure how each endpoint type will be provisioned to join the network. This can sometimes be referred to as onboarding the endpoint. As an endpoint attempts to onboard onto the network, the appropriate security credentials (including X.509 certificates and wireless profiles) must be downloaded onto the endpoint. After being onboarded, the user of the endpoint then can join the network in the future with minimal, if any, manual interaction.
To accomplish this client provisioning, ISE must provide the appropriate information in a manner understood by the endpoint. Via the Client Provisioning policy (see Figure 8-23), based on the OS and other criteria provided by the endpoint and the NAD, ISE will present the required credentials (again, X.509 certificates and wireless profiles) to the endpoint to store for future use. This sometimes might require a supplicant built in to the OS or one that is automatically downloaded from ISE (often a Java- or ActiveX-based supplicant).
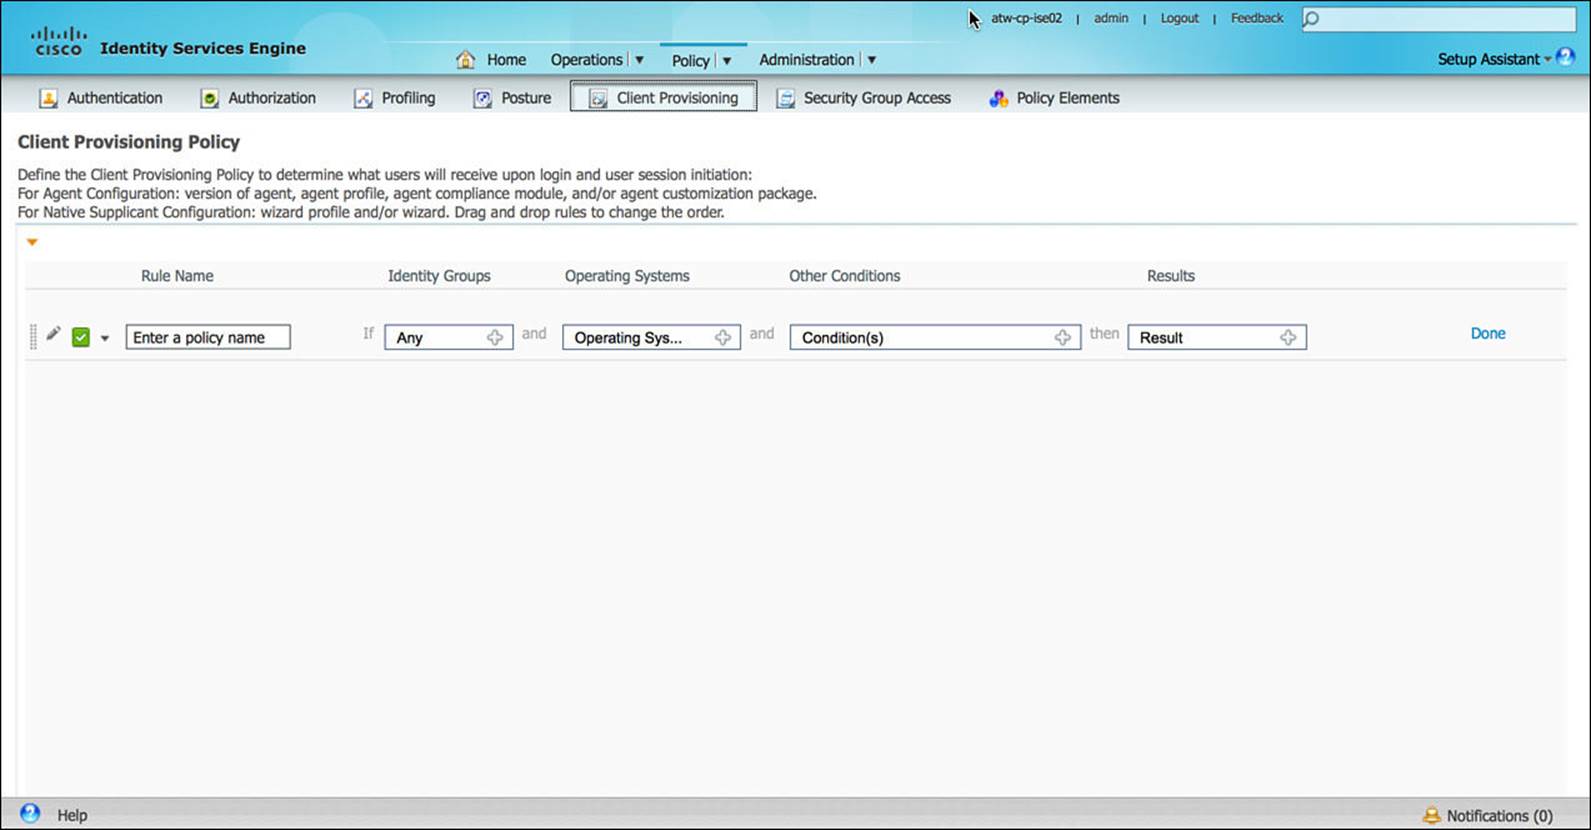
Figure 8-23 Client provisioning policy.
In a similar fashion, the client provisioning process can be used to deploy a Cisco NAC Agent onto the endpoint if posturing is being used.
Security Group Access
The Security Group Access (SGA) section of the Policy component is where ISE’s TrustSec access policy is defined. After identifying a NAD as a TrustSec-enabled or -capable device (via the Administration > Network Resources > Network Devices > Network Devices, which will be discussed shortly), an administrator must configure the appropriate SGA policy. Specifically, he must configure what each Security Group Tag source or destination will be allowed to access. SGA policy configuration is discussed in more detail in Chapter 11, “Authorization Policies,” and Chapter 18, “TrustSec and MACSec.” Figure 8-24 shows a sample SGT policy matrix.
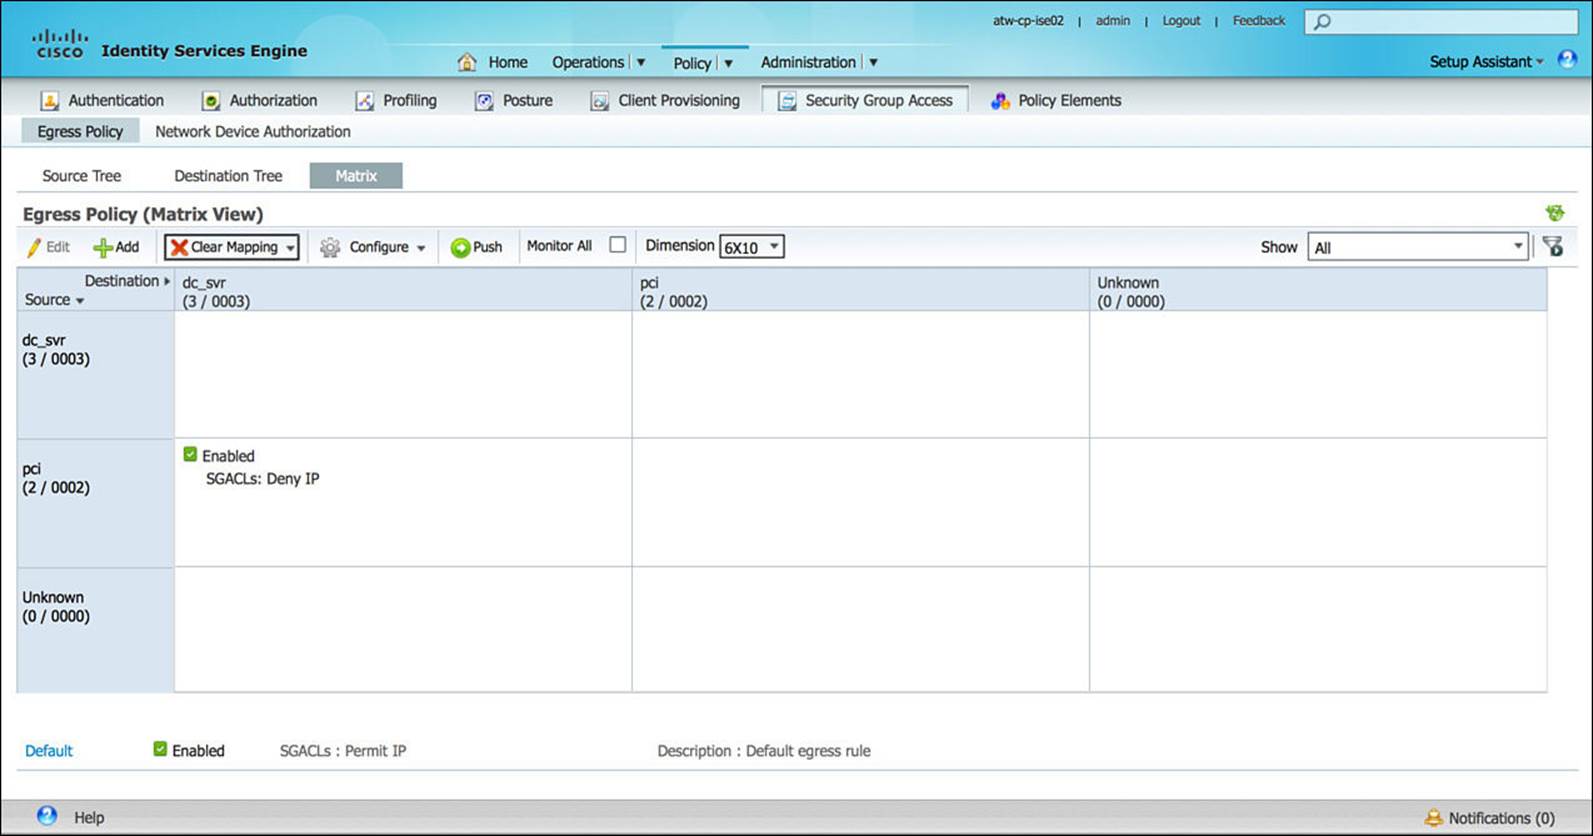
Figure 8-24 Security Group Access policy.
Policy Elements
Policies are often comprised of numerous building blocks, or elements. These building blocks help simplify the overall configuration of ISE policy either by facilitating reuse across multiple policies or by providing elements that are more human readable. The Policy Elements section of the Policy component is the place within ISE where you can add and modify these reusable building blocks.
Within Policy Elements, there are subsections defined for Dictionaries, Conditions, and Results:
![]() Dictionaries—A list of system and user-defined elements and their available attributes. The individual dictionary elements leverage an Attribute-Value pair approach, similar to RADIUS, whereby each chosen attribute is assigned a value by the endpoint, the NAD, or ISE. These attributes and their assigned values can be used as the smallest building blocks within the ISE policy.
Dictionaries—A list of system and user-defined elements and their available attributes. The individual dictionary elements leverage an Attribute-Value pair approach, similar to RADIUS, whereby each chosen attribute is assigned a value by the endpoint, the NAD, or ISE. These attributes and their assigned values can be used as the smallest building blocks within the ISE policy.
![]() Conditions—Many of the policy constructs within ISE leverage an IF-THEN programmatic approach. With IF-THEN clauses, the IF portion of the clause is a conditional statement—a “test” statement that can take on the ultimate value of TRUE or FALSE. If the totality of this conditional statement is TRUE, everything following the THEN portion of the clause is executed. The Conditions subsection of Policy Elements is the location within ISE where the IF portions of ISE policy are defined.
Conditions—Many of the policy constructs within ISE leverage an IF-THEN programmatic approach. With IF-THEN clauses, the IF portion of the clause is a conditional statement—a “test” statement that can take on the ultimate value of TRUE or FALSE. If the totality of this conditional statement is TRUE, everything following the THEN portion of the clause is executed. The Conditions subsection of Policy Elements is the location within ISE where the IF portions of ISE policy are defined.
![]() Results—As noted in the Conditions definition, many of the policy constructs within ISE leverage an IF-THEN programmatic approach. The Results subsection of Policy Elements is the location within ISE where the THEN portions of ISE policy are defined. Therefore, if the IF statement (the conditions) result in a TRUE outcome, everything following the THEN (the results) will be executed.
Results—As noted in the Conditions definition, many of the policy constructs within ISE leverage an IF-THEN programmatic approach. The Results subsection of Policy Elements is the location within ISE where the THEN portions of ISE policy are defined. Therefore, if the IF statement (the conditions) result in a TRUE outcome, everything following the THEN (the results) will be executed.
Administration
The final tab we’ll discuss in the ISE GUI is the Administration tab. The Administration component is comprised of all setup-type functions of ISE. These functions are those that are often set up one time and rarely modified thereafter. These include System, Identity Management, Network Resources, Web Portal Management, and the Feed Service.
System
The System section of the Administration configuration component enables the administrator to configure those elements that affects ISE’s behavior directly, including
![]() Deployment—Under the Deployment subsection, you can configure all the ISE nodes. Each node must be defined and registered within the Deployment configuration on the Admin node. As discussed in Chapter 7, each node is assigned at least one persona, role (primary, secondary, or standalone), as well as an IP address or a DNS-resolvable hostname.
Deployment—Under the Deployment subsection, you can configure all the ISE nodes. Each node must be defined and registered within the Deployment configuration on the Admin node. As discussed in Chapter 7, each node is assigned at least one persona, role (primary, secondary, or standalone), as well as an IP address or a DNS-resolvable hostname.
The Deployment subsection, shown in Figure 8-25, is also the place within ISE where you enable the profiling function on a per-node basis—that is, which nodes will actively participate in endpoint profiling.
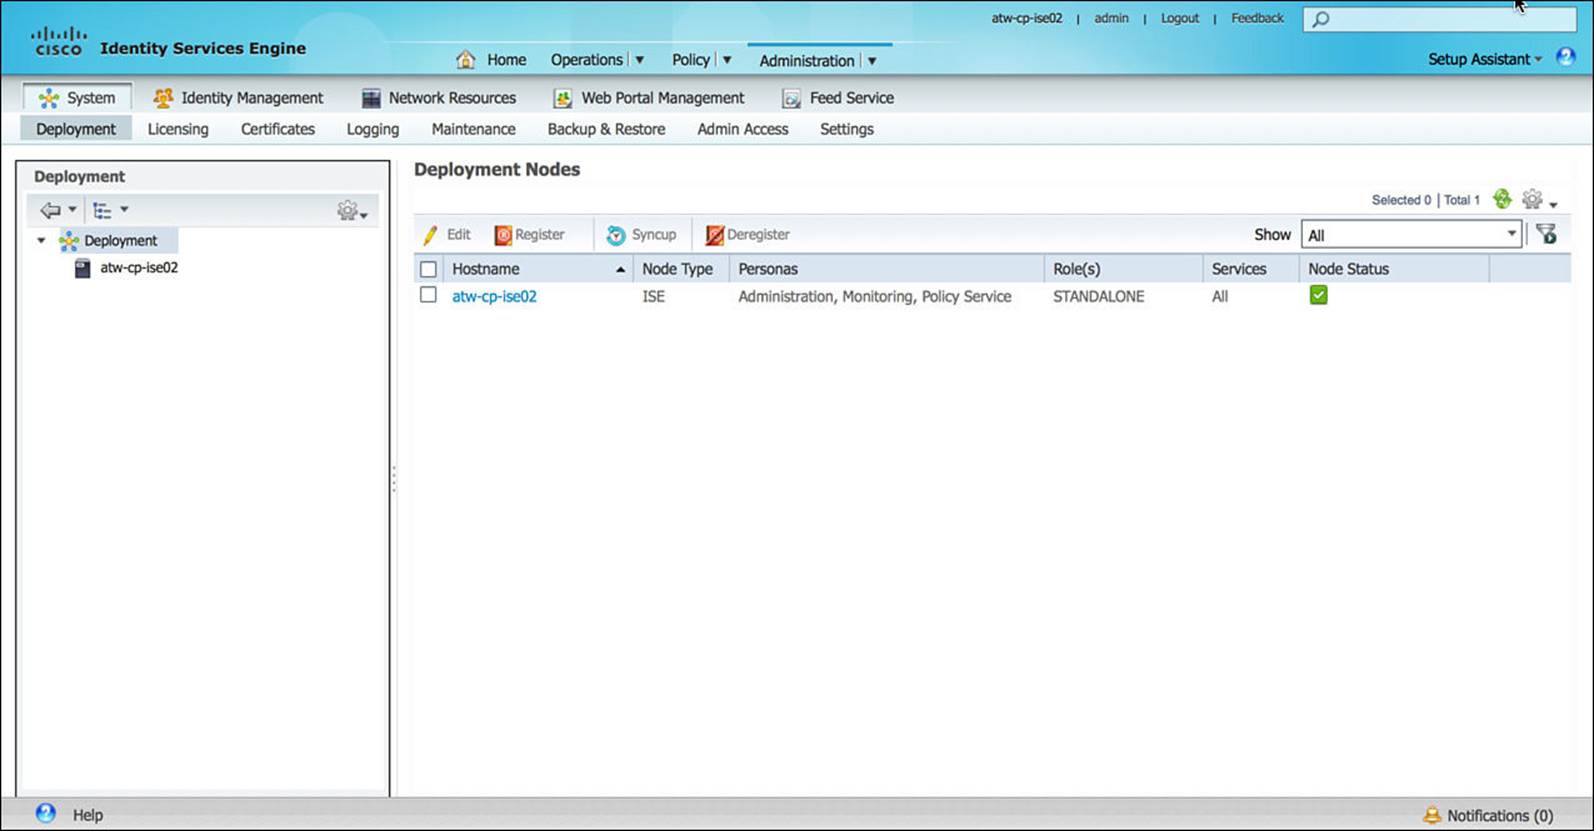
Figure 8-25 ISE deployment nodes.
![]() Licensing—Every feature within ISE requires a license, whether that feature is a basic feature or a more advanced feature. Many of the common features that do not require external resources are grouped under the Base license. Those features that require periodic updates from Cisco require an Advanced license. By default, ISE comes with a 90-day Evaluation license. A breakdown of what features are covered with each license is provided in Table 8-5, and Figure 8-26 shows the licensing screen.
Licensing—Every feature within ISE requires a license, whether that feature is a basic feature or a more advanced feature. Many of the common features that do not require external resources are grouped under the Base license. Those features that require periodic updates from Cisco require an Advanced license. By default, ISE comes with a 90-day Evaluation license. A breakdown of what features are covered with each license is provided in Table 8-5, and Figure 8-26 shows the licensing screen.
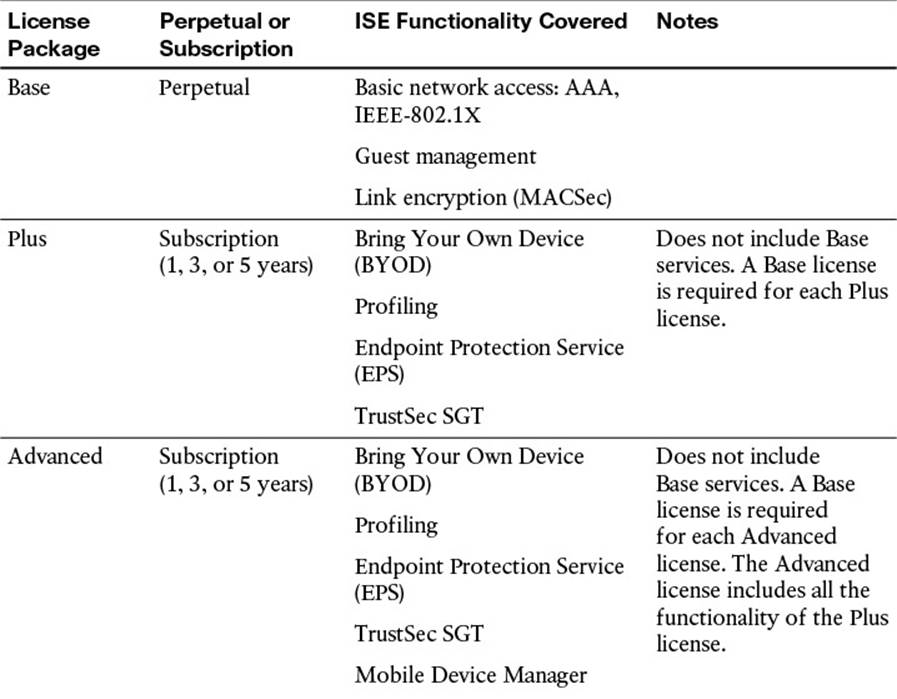
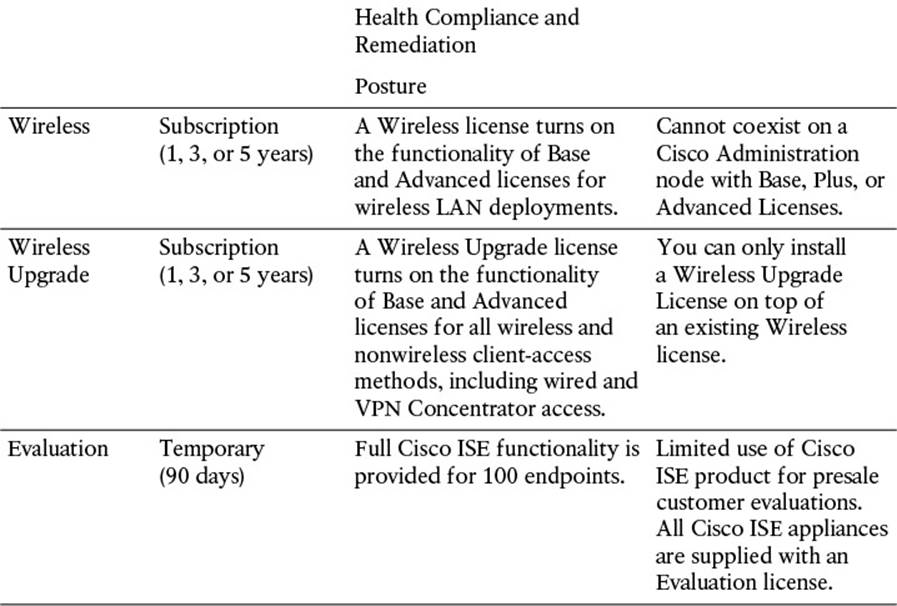
Table 8-5 Cisco ISE License Packages

Figure 8-26 ISE licensing.
![]() Certificates—X.509 certificates (often referred to as simply certificates) are the key components to a Public Key Infrastructure (PKI), providing a scalable deployment option that marries each endpoint to the user as well as nonrepudiation. To ensure that ISE can properly authenticate endpoints and the endpoints can properly authenticate ISE, we must leverage the X.509 certificates (see Figure 8-27) for both server authentication as well as client authentication.
Certificates—X.509 certificates (often referred to as simply certificates) are the key components to a Public Key Infrastructure (PKI), providing a scalable deployment option that marries each endpoint to the user as well as nonrepudiation. To ensure that ISE can properly authenticate endpoints and the endpoints can properly authenticate ISE, we must leverage the X.509 certificates (see Figure 8-27) for both server authentication as well as client authentication.

Figure 8-27 X.509 certificates.
The Certificates subsection enables an administrator to configure the certificates that will be used for the administration portal as well as any portal that is served to the client as part of the onboarding or remediation process. The requisite certificate authorities to authenticate the endpoints or infrastructure devices (such as mobile device managers) must also be loaded here. Certificates are discussed in greater detail in Chapter 9.
![]() Logging—The Logging subsection, shown in Figure 8-28, is where the administrator configures the specifics of how ISE creates and stores syslogs. In the logging configuration, the administrator can define how long logs will be kept, how detailed the logs will be, and where to send the logs. These logs might be required as part of a compliance program (such as PCI-DSS or HIPAA), a security policy, or to simply monitor how ISE is performing. If the logging level that is chosen is too low, the amount of detail provided in these logs might not be sufficient to address any issues as they occur. If the logging level that is chosen is too high, then the amount of logs generated can adversely affect storage space on the ISE appliance and affect the overall performance of the appliance.
Logging—The Logging subsection, shown in Figure 8-28, is where the administrator configures the specifics of how ISE creates and stores syslogs. In the logging configuration, the administrator can define how long logs will be kept, how detailed the logs will be, and where to send the logs. These logs might be required as part of a compliance program (such as PCI-DSS or HIPAA), a security policy, or to simply monitor how ISE is performing. If the logging level that is chosen is too low, the amount of detail provided in these logs might not be sufficient to address any issues as they occur. If the logging level that is chosen is too high, then the amount of logs generated can adversely affect storage space on the ISE appliance and affect the overall performance of the appliance.
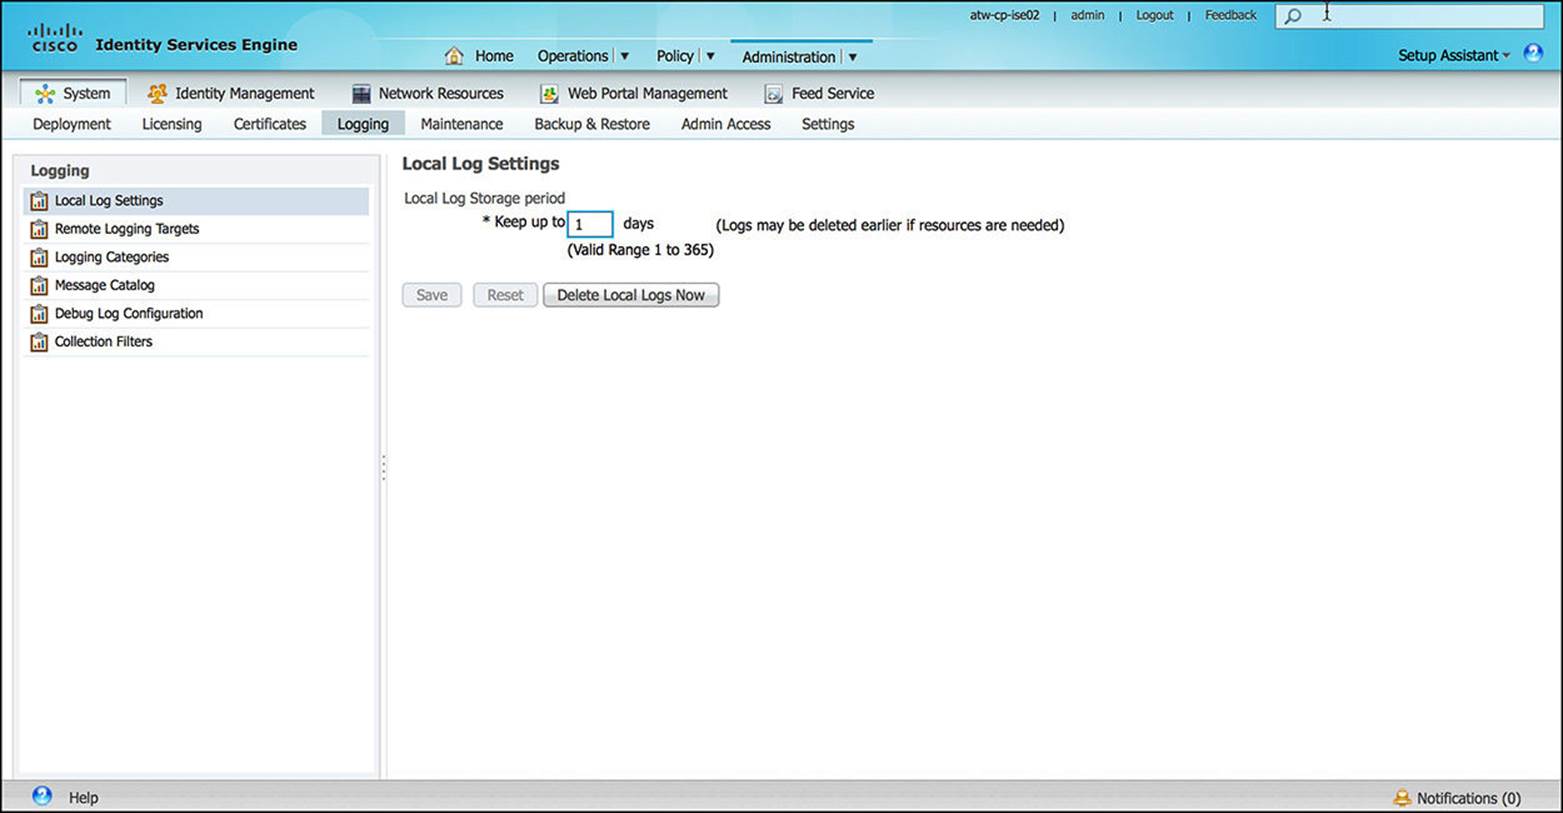
Figure 8-28 Logging configuration.
The level of logging enabled should be carefully chosen and well-balanced to facilitate ongoing operations while providing enough detail to identify any issues as they arise. In case of any issues, Cisco TAC might request detailed logs at the time of the issue. If debug-level logs are requested, it is best to enable the debug level logs temporarily to gather the requested level of detail. As soon as the requested information is gathered with the debug-level logs, you should return the logging level to a more neutral logging level. Figure 8-28 shows the logging configuration screen.
![]() Maintenance—As with software systems from other vendors, Cisco periodically releases software updates to add features to ISE or to resolve any defects. On a periodic basis, Cisco compiles a patch to address a number of defects that have been found within previous ISE releases. To load these patches, manage download locations for software maintenance, or manage how often operations data is purged to maintain optimal system performance, you must access the Maintenance subsection of the System configuration.
Maintenance—As with software systems from other vendors, Cisco periodically releases software updates to add features to ISE or to resolve any defects. On a periodic basis, Cisco compiles a patch to address a number of defects that have been found within previous ISE releases. To load these patches, manage download locations for software maintenance, or manage how often operations data is purged to maintain optimal system performance, you must access the Maintenance subsection of the System configuration.
![]() Backup & Restore—As part of any disaster recovery process, it is important that an administrator periodically perform a backup of all network configurations. ISE’s configuration is no different. The Backup & Restore subsection enables an administrator to back up both the ISE configuration and ISE operational data, either automatically on a preconfigured schedule or manually, sending the data to a chosen repository. If disaster does strike, the configuration can be restored accordingly.
Backup & Restore—As part of any disaster recovery process, it is important that an administrator periodically perform a backup of all network configurations. ISE’s configuration is no different. The Backup & Restore subsection enables an administrator to back up both the ISE configuration and ISE operational data, either automatically on a preconfigured schedule or manually, sending the data to a chosen repository. If disaster does strike, the configuration can be restored accordingly.
![]() Admin Access—The Admin Access subsection (see Figure 8-29) does exactly as the name implies—it defines how an administrator can access ISE. Some of the options available from the Admin Access section include usernames and passwords for administrative users, the administrative groups that are defined, the requisite password policy for administrative users, and from where and for how long administrators are allowed to access the administrative portal of ISE. Additional options are also available on the Admin Access section.
Admin Access—The Admin Access subsection (see Figure 8-29) does exactly as the name implies—it defines how an administrator can access ISE. Some of the options available from the Admin Access section include usernames and passwords for administrative users, the administrative groups that are defined, the requisite password policy for administrative users, and from where and for how long administrators are allowed to access the administrative portal of ISE. Additional options are also available on the Admin Access section.
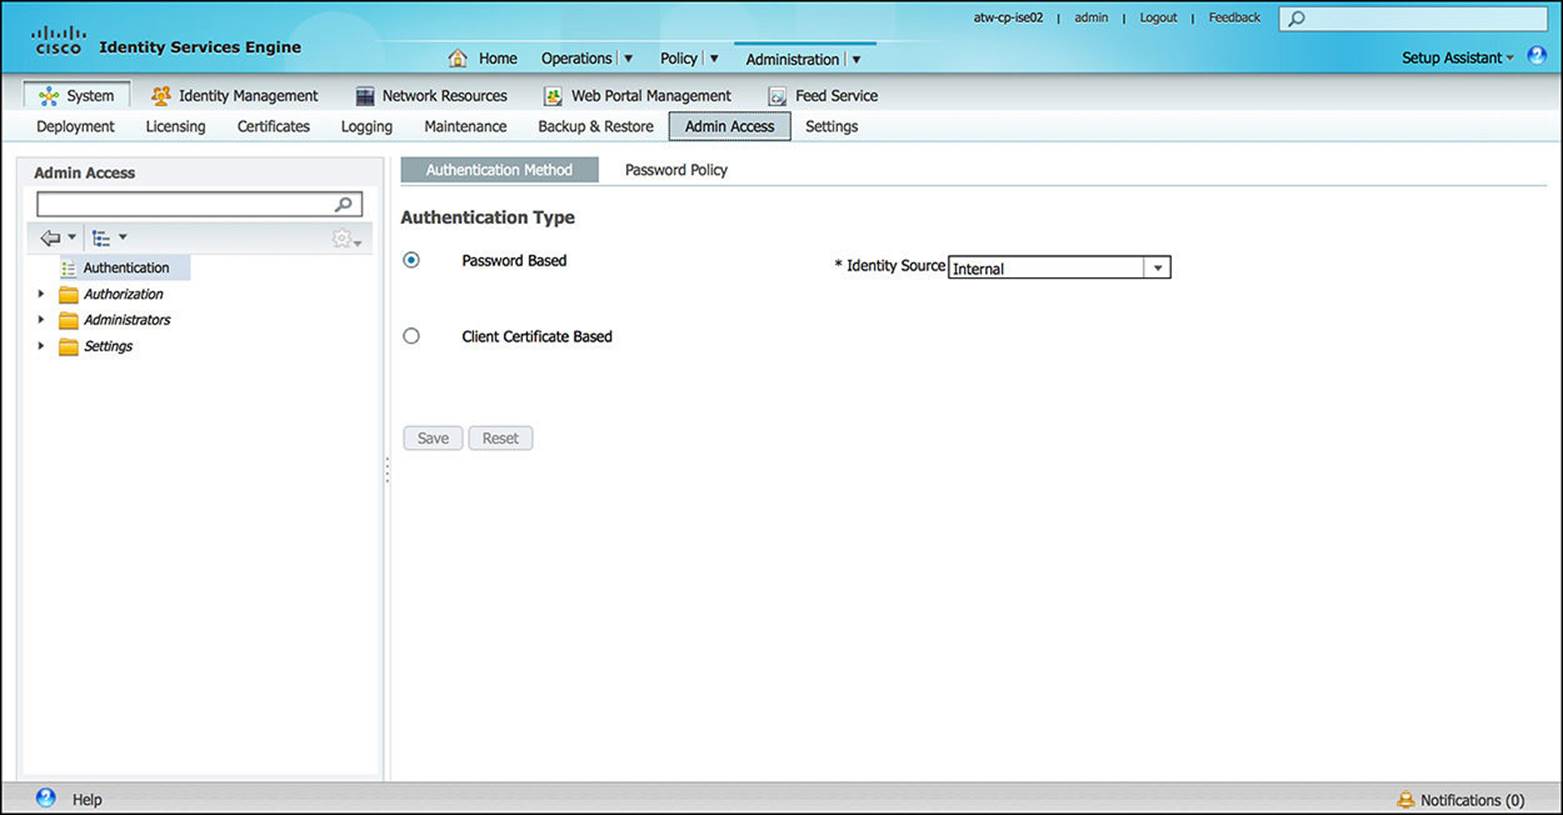
Figure 8-29 Admin access configuration.
![]() Settings—The Settings subsection (see Figure 8-30) of the System configuration enables an administrator to define how the system will behave. Some features configured via the Settings subsection include client provisioning support, Endpoint Protection Services, FIPS Mode, posture timers, and profiling CoA behavior. Proxy, SMTP, and NTP servers can also be defined here.
Settings—The Settings subsection (see Figure 8-30) of the System configuration enables an administrator to define how the system will behave. Some features configured via the Settings subsection include client provisioning support, Endpoint Protection Services, FIPS Mode, posture timers, and profiling CoA behavior. Proxy, SMTP, and NTP servers can also be defined here.
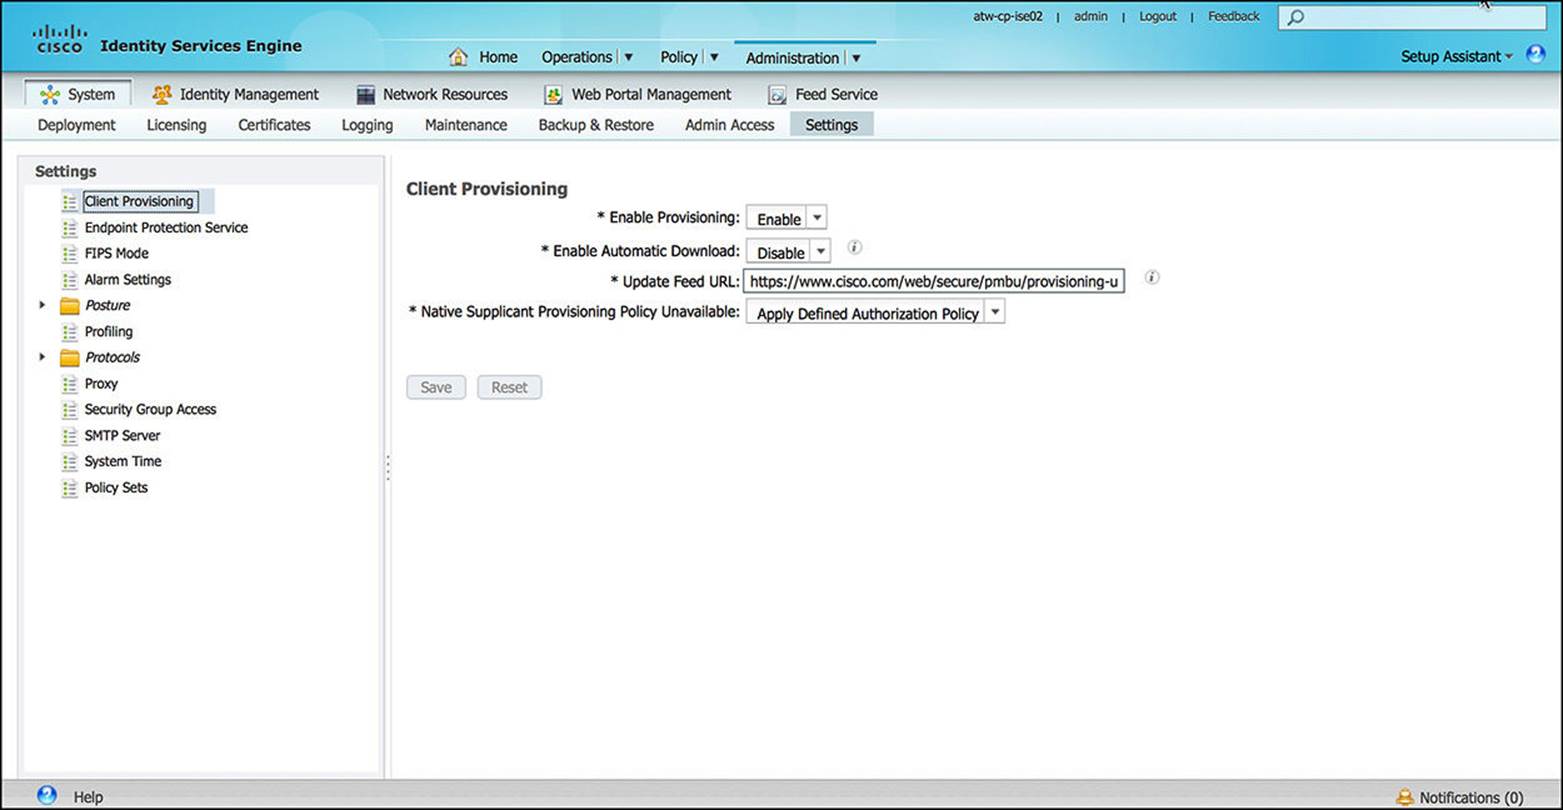
Figure 8-30 Admin settings configuration.
Identity Management
Identity management is a key construct within ISE. Nearly every step within the ISE authentication and authorization processes requires at least one identity as the subject of the operation. The Identity Management subsection of Administration enables an administrator to manage all ISE configurations that pertain to identities:
![]() Identities—The Identities subsection (see Figure 8-31) is used to manage both users and endpoints. Whenever a user or an endpoint first authenticates or authorizes to ISE—as well as any subsequent reauthentications—information about the entity is updated here. If a user or an endpoint needs to be removed from ISE, the administrator will remove the user/endpoint from this Identities database.
Identities—The Identities subsection (see Figure 8-31) is used to manage both users and endpoints. Whenever a user or an endpoint first authenticates or authorizes to ISE—as well as any subsequent reauthentications—information about the entity is updated here. If a user or an endpoint needs to be removed from ISE, the administrator will remove the user/endpoint from this Identities database.
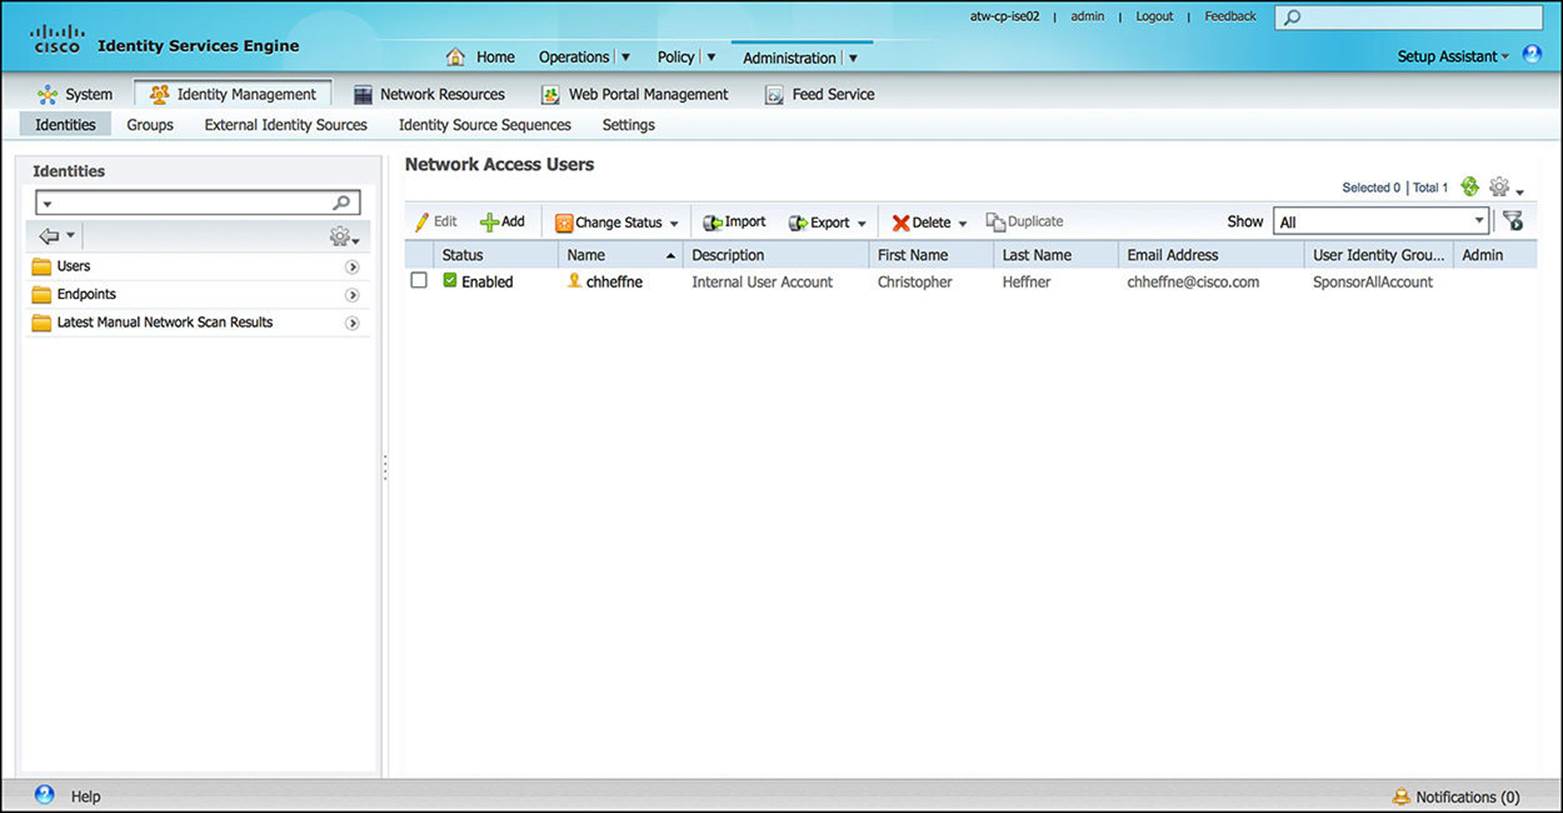
Figure 8-31 Identities configuration.
![]() Groups—Identity groups, shown in Figure 8-32, enable administrators to subdivide and manage users or endpoints based on common criteria. By grouping users or endpoints, the administrator can more easily enforce any associated policy based on which group a particular user or endpoint is part of. For instance, all smartphones could have one security policy while all laptop computers could have a slightly different security policy.
Groups—Identity groups, shown in Figure 8-32, enable administrators to subdivide and manage users or endpoints based on common criteria. By grouping users or endpoints, the administrator can more easily enforce any associated policy based on which group a particular user or endpoint is part of. For instance, all smartphones could have one security policy while all laptop computers could have a slightly different security policy.
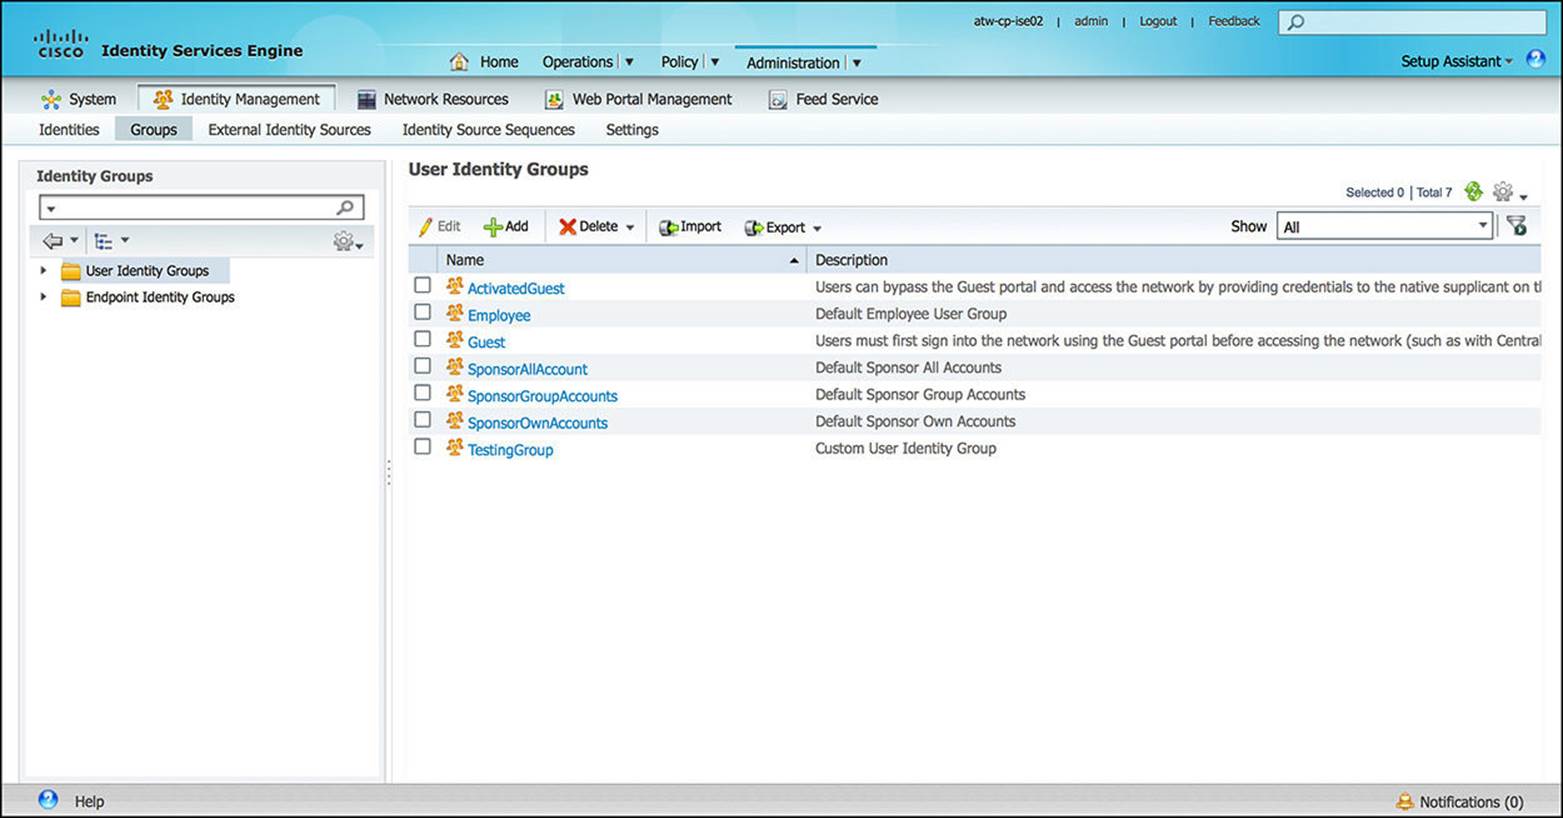
Figure 8-32 Identity group configuration.
![]() External Identity Sources—In many ISE deployment scenarios, ISE is being deployed into a network that has been running for a while. Often, the user identities and management are stored outside of ISE. Instead of importing each identity into ISE and, therefore, managing the user in two different places, ISE allows for external identity sources.
External Identity Sources—In many ISE deployment scenarios, ISE is being deployed into a network that has been running for a while. Often, the user identities and management are stored outside of ISE. Instead of importing each identity into ISE and, therefore, managing the user in two different places, ISE allows for external identity sources.
These external identity sources can include Active Directory (as illustrated in Figure 8-33), LDAP, or RSA SecurID (token-based, two-factor authentication). Depending on the authentication policy as configured on ISE, a user’s or an endpoint’s credentials may be authenticated to any one of these external identity sources. We discuss authentication more in Chapter 9, “Initial Configuration of Cisco ISE,” and Chapter 10, “Authentication Policies.”
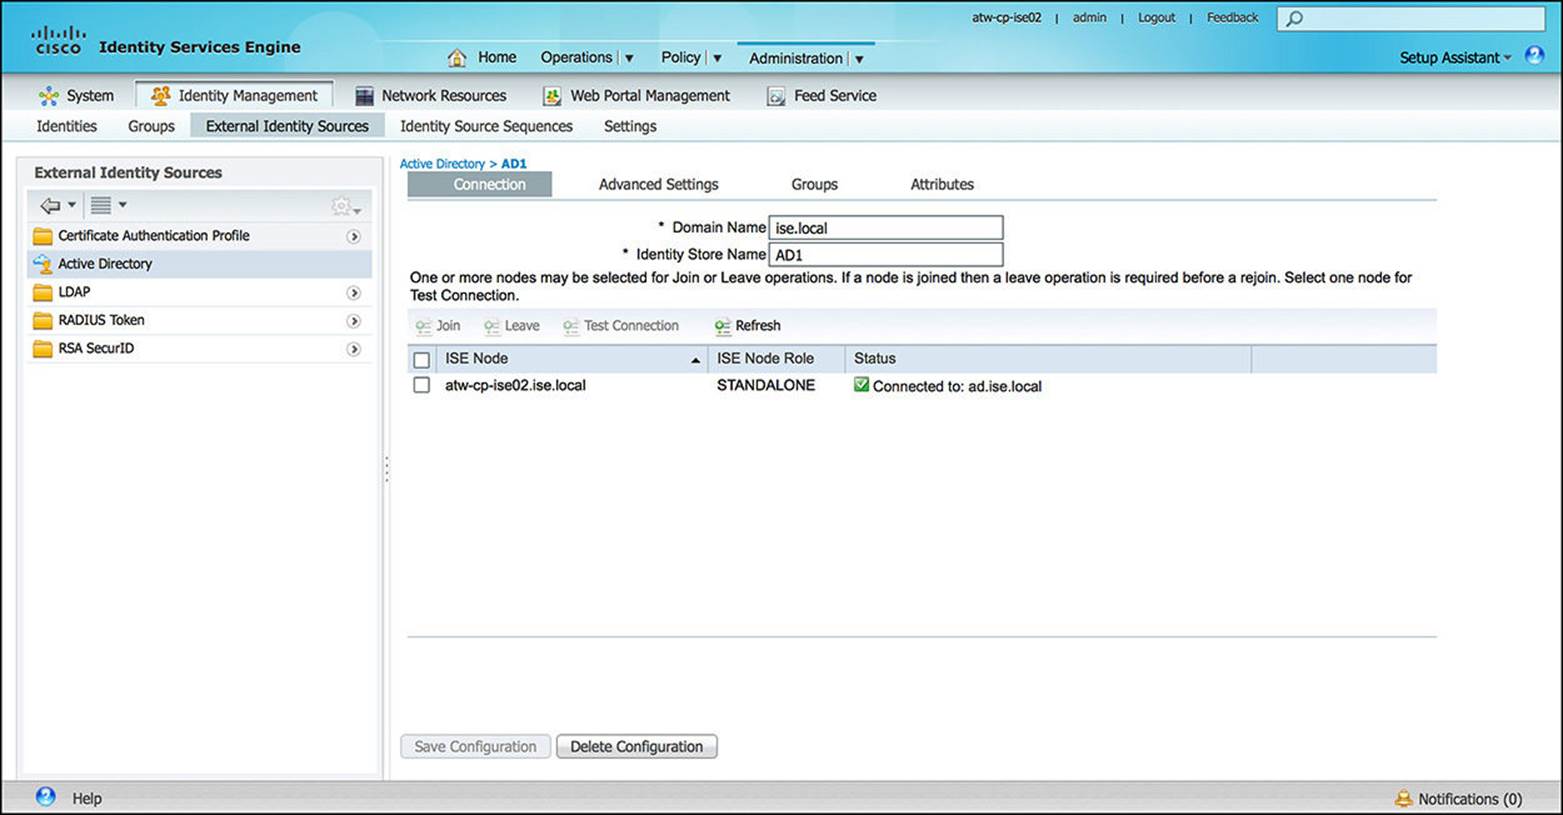
Figure 8-33 External identity sources configuration.
![]() Identity Source Sequences—Used in conjunction with the Local and External Identity Sources as mentioned previously, Identity Source Sequences as shown in Figure 8-34 allow a policy to sequentially check a number of Identity Sources for a successful authentication. This sequential search can be useful if users or endpoints can exist in multiple identity databases. A policy can then be configured to “check all identity stores sequentially” as a single rule versus searching each identity store separately. This approach can greatly simplify authentication policy. The authentication process ends upon the first successful authentication as based on the chosen Authentication policy. Again, we’ll discuss authentication more in Chapter 9 and Chapter 10.
Identity Source Sequences—Used in conjunction with the Local and External Identity Sources as mentioned previously, Identity Source Sequences as shown in Figure 8-34 allow a policy to sequentially check a number of Identity Sources for a successful authentication. This sequential search can be useful if users or endpoints can exist in multiple identity databases. A policy can then be configured to “check all identity stores sequentially” as a single rule versus searching each identity store separately. This approach can greatly simplify authentication policy. The authentication process ends upon the first successful authentication as based on the chosen Authentication policy. Again, we’ll discuss authentication more in Chapter 9 and Chapter 10.

Figure 8-34 Identity source sequences configuration.
![]() Settings—The Identity Management Settings subsection, shown in Figure 8-35, can be used to define custom attributes that can be associated to each user, such as the user password policy.
Settings—The Identity Management Settings subsection, shown in Figure 8-35, can be used to define custom attributes that can be associated to each user, such as the user password policy.
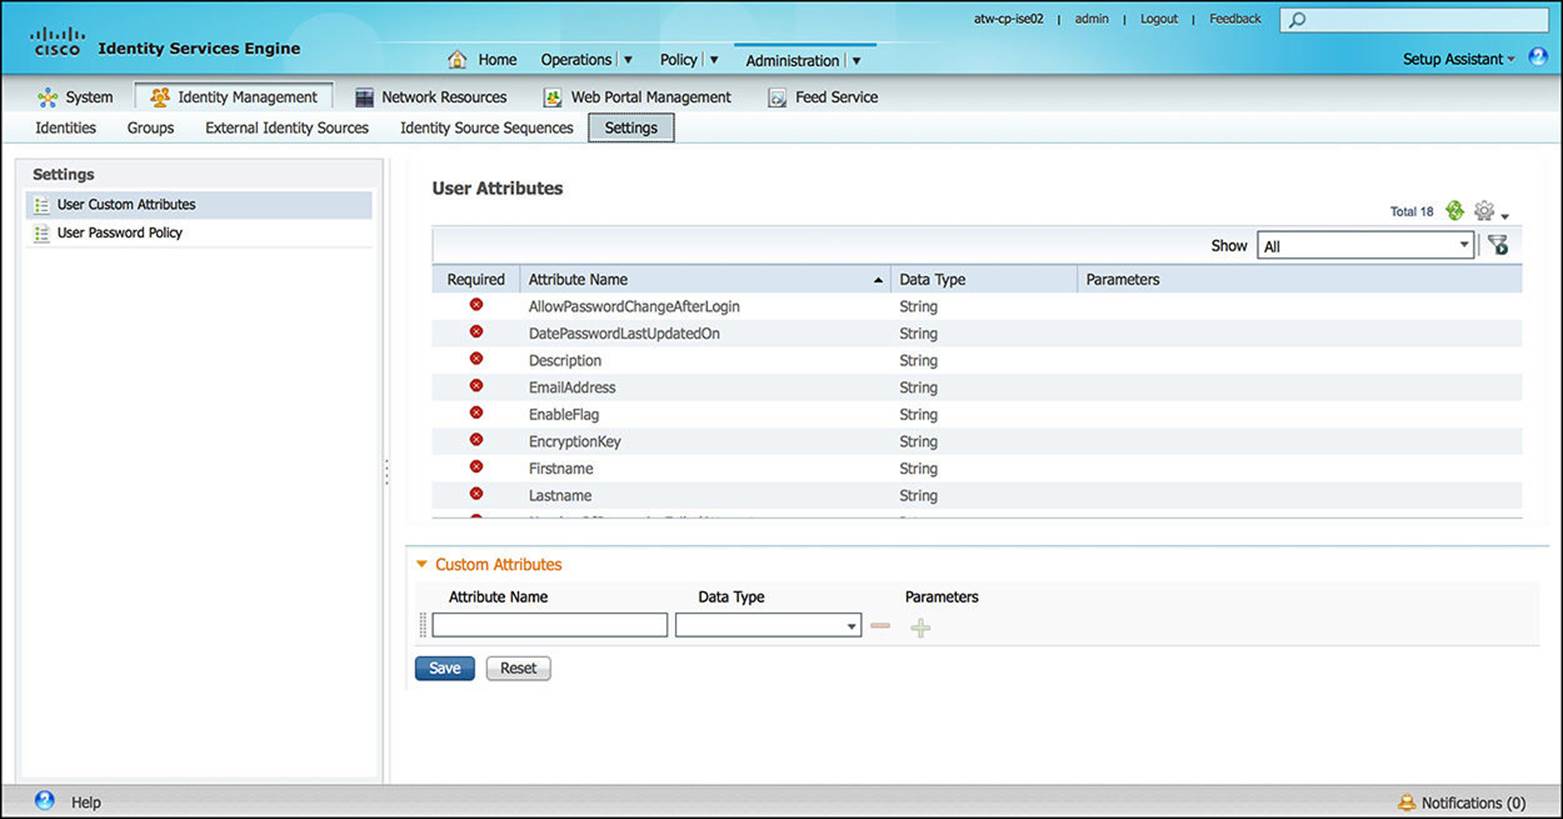
Figure 8-35 Identity management settings configuration.
Network Resources
The Network Resources section of the Administration component is where all external, supplementary resources are configured. These resources include all the NADs, external RADIUS servers, NAC managers, and MDMs:
![]() Network Devices—Whenever a new NAD, such as a switch, router, firewall, or Wireless LAN Controller (WLC), is added to the network, you might need to add this device’s credentials to ISE. This will enable the NAD to authenticate endpoints to ISE. Without being added to the Network Devices, this NAD will not be able to use any of the AAA resources provided by ISE.
Network Devices—Whenever a new NAD, such as a switch, router, firewall, or Wireless LAN Controller (WLC), is added to the network, you might need to add this device’s credentials to ISE. This will enable the NAD to authenticate endpoints to ISE. Without being added to the Network Devices, this NAD will not be able to use any of the AAA resources provided by ISE.
For each NAD that is added to this Network Devices database (see Figure 8-36), additional information can be provided about the NAD, including the IP address(es), model name, software version, device location, and device type. Additionally, the appropriate network services can be configured, including RADIUS, SNMP, and TrustSec. Without the requisite protocol being selected and appropriately configured, the NAD in question will not be able to access that service on ISE.
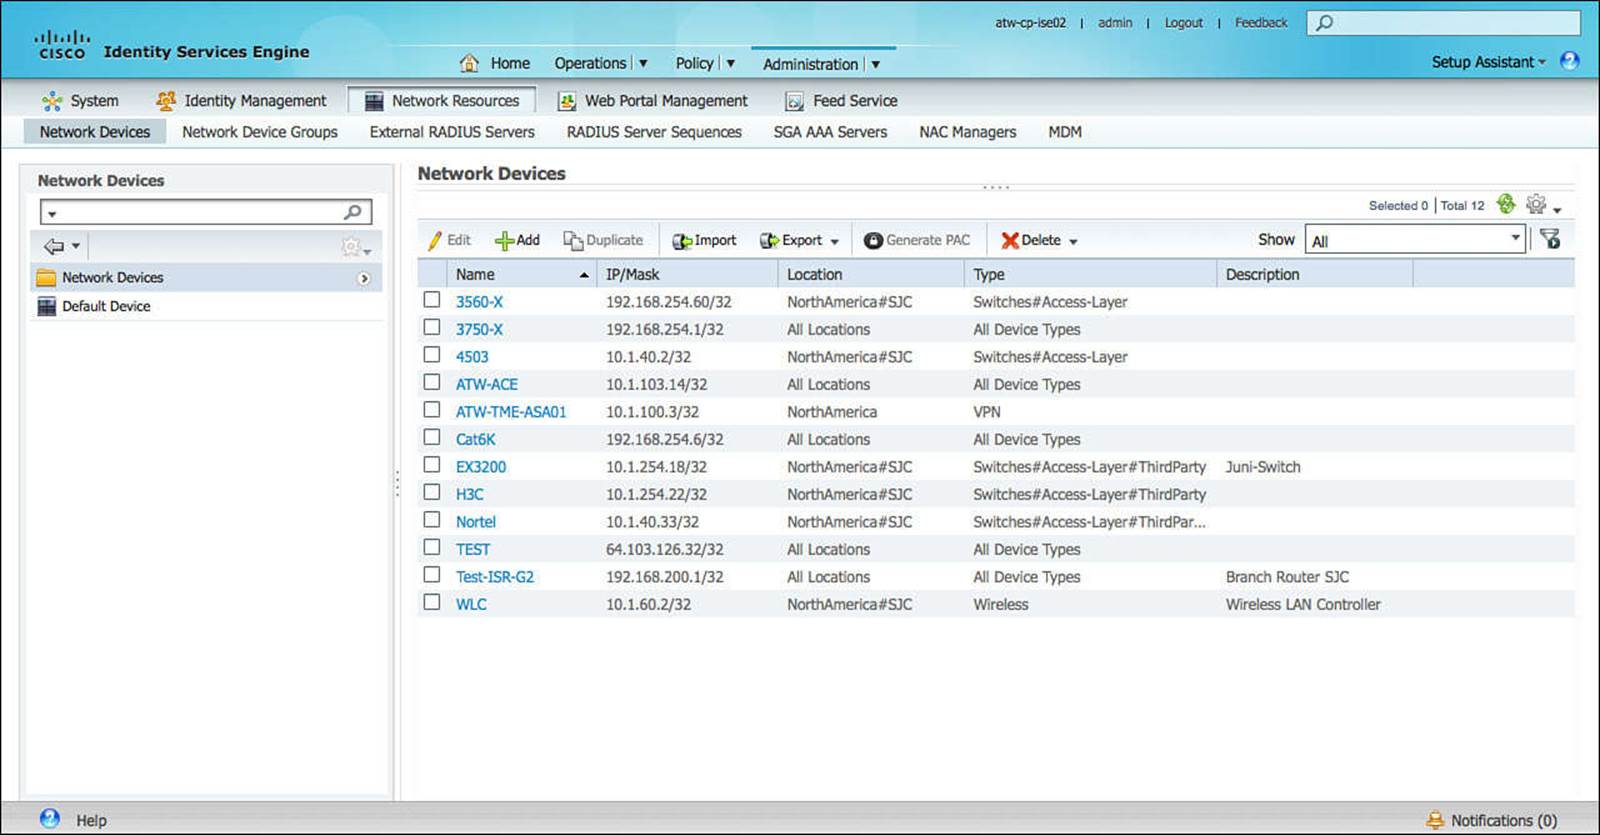
Figure 8-36 Network devices configuration.
![]() Network Device Groups—As the number of NADs on the network increases, the ability to manage these network devices can become incrementally more difficult. Furthermore, as the ISE security policy is configured, you can greatly simplify the policy rules by grouping the NADs according to certain criteria.
Network Device Groups—As the number of NADs on the network increases, the ability to manage these network devices can become incrementally more difficult. Furthermore, as the ISE security policy is configured, you can greatly simplify the policy rules by grouping the NADs according to certain criteria.
By default, ISE enables each device to have a device type and device location component, though additional criteria can be defined. The device type can refer to the functional role of the device on the network—such as a router, switch, firewall, or WLC. The device location might refer to the geographical location of the device, such as in Ohio or in North Carolina, or the location within the network topology, such as at a branch location or on the campus. In either case, the device type and device location can be very general or as granular as you want.
These device groups can be used within the security policy to provide a differentiated level of access to the endpoints, allowing for a different level of access (more secure or less secure) if the endpoint is authenticating to a NAD at a branch location versus at the campus location. It will also allow the network administrator a level of flexibility in the policy that is pushed to the NAD. If certain NADs support a more feature-rich set of features (such as TrustSec-capable devices) or if certain device types require specific RADIUS Attribute-Value pairs (such as wireless access-lists), you might choose to separate those devices into their own device group (either leveraging the default device type group or adding your own custom device group). For an example of a custom device group, consider the “Stage” group inFigure 8-37—used to facilitate a tiered, rollout approach for ISE.
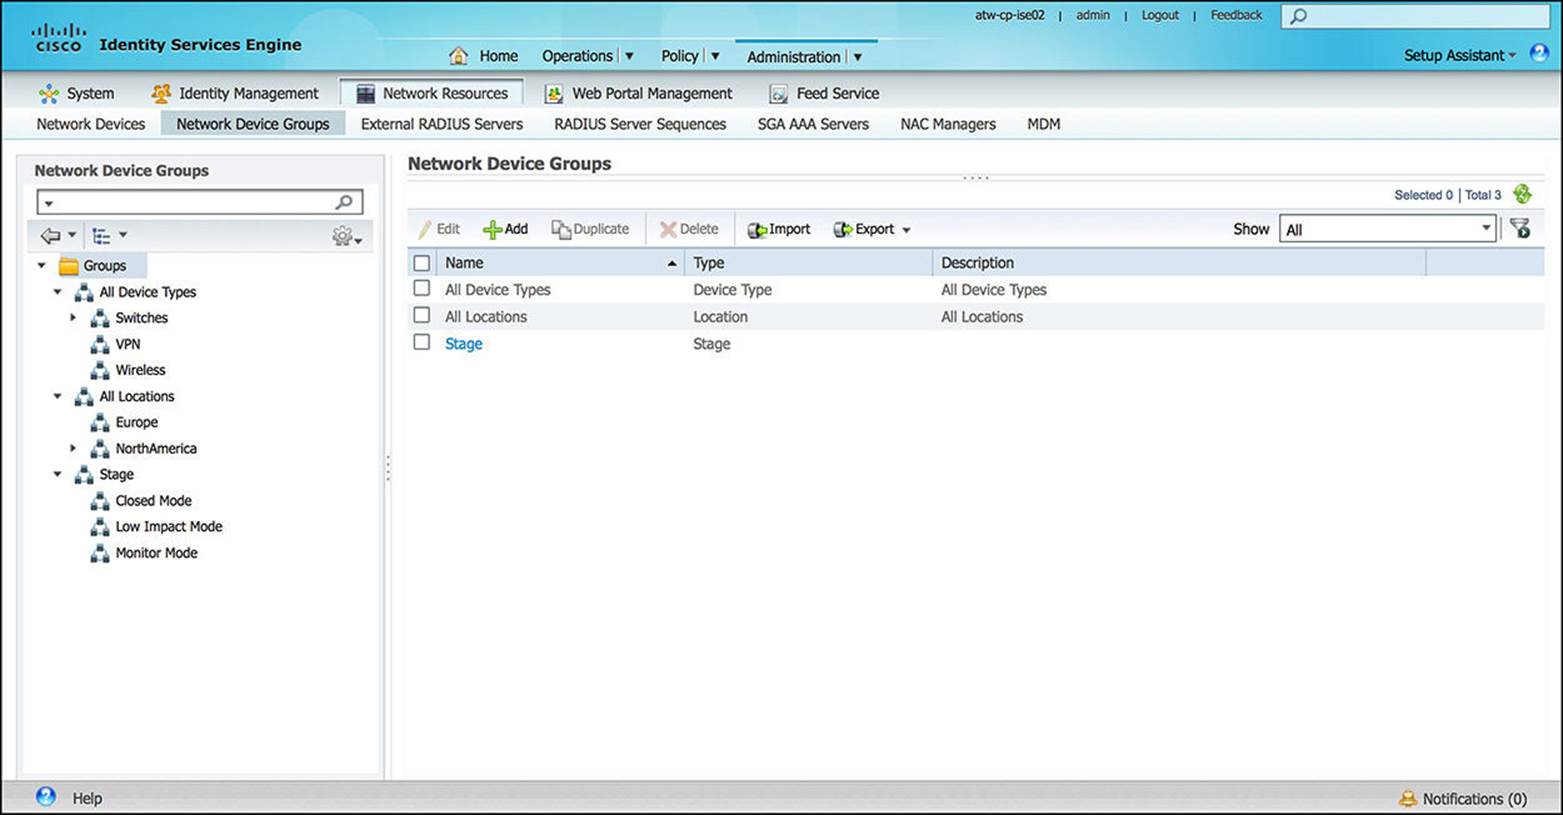
Figure 8-37 Network groups configuration.
We’ll learn more about differentiating levels of access more in Chapter 10 and Chapter 11, “Authorization Policies.”
![]() External RADIUS Servers—If your organization already has a RADIUS server in place, you can continue to leverage and supplement this RADIUS server as you deploy ISE. If an external RADIUS server is in use, ISE can receive the RADIUS requests and proxy them to the external server. The response from the external RADIUS server will also be proxied by ISE back to the original NAD.
External RADIUS Servers—If your organization already has a RADIUS server in place, you can continue to leverage and supplement this RADIUS server as you deploy ISE. If an external RADIUS server is in use, ISE can receive the RADIUS requests and proxy them to the external server. The response from the external RADIUS server will also be proxied by ISE back to the original NAD.
![]() RADIUS Server Sequences—RADIUS server sequences leverages the External RADIUS Servers that we mentioned previously. After configuring the external RADIUS servers, you can select one or more of these servers to comprise a RADIUS server sequence. Furthermore, you can elect whether you would like to modify the RADIUS request before it is forwarded to the external RADIUS server and whether you want to modify the RADIUS response before it is forwarded to the NAD. Again, ISE is acting as a RADIUS proxy in both the forward and reverse direction.
RADIUS Server Sequences—RADIUS server sequences leverages the External RADIUS Servers that we mentioned previously. After configuring the external RADIUS servers, you can select one or more of these servers to comprise a RADIUS server sequence. Furthermore, you can elect whether you would like to modify the RADIUS request before it is forwarded to the external RADIUS server and whether you want to modify the RADIUS response before it is forwarded to the NAD. Again, ISE is acting as a RADIUS proxy in both the forward and reverse direction.
![]() SGA AAA Servers—SGA AAA servers enable the network administrator to configure a list of ISE servers in your deployment in the AAA server list, allowing SGA devices to be authenticated against any of these servers. When you add ISE servers to this list, all these server details are downloaded to the SGA device. When an SGA device tries to authenticate, it would choose any ISE server from this list. If the first server is unavailable, the SGA device can choose another SGA AAA server from this list.
SGA AAA Servers—SGA AAA servers enable the network administrator to configure a list of ISE servers in your deployment in the AAA server list, allowing SGA devices to be authenticated against any of these servers. When you add ISE servers to this list, all these server details are downloaded to the SGA device. When an SGA device tries to authenticate, it would choose any ISE server from this list. If the first server is unavailable, the SGA device can choose another SGA AAA server from this list.
![]() NAC Managers—Network admission control (NAC) managers are the Cisco Clean Access Managers on the network that are used to authenticate, authorize, evaluate, and remediate wired, wireless, and remote users and their machines prior to allowing users onto the network. The solution identifies whether machines are compliant with security policies and repairs vulnerabilities before permitting access to the network.
NAC Managers—Network admission control (NAC) managers are the Cisco Clean Access Managers on the network that are used to authenticate, authorize, evaluate, and remediate wired, wireless, and remote users and their machines prior to allowing users onto the network. The solution identifies whether machines are compliant with security policies and repairs vulnerabilities before permitting access to the network.
![]() MDM—Mobile device managers (MDMs) are third-party security software system that enables an administrator to configure and secure an endpoint, regardless of where the device is located. This is accomplished by leveraging an MDM agent on the endpoint—either a separate application or an agent that is built in to the OS—and an MDM server. This MDM server can reside on premises to the corporation or in the cloud. ISE 1.2 allows for only one active MDM at a time. Figure 8-38 shows the MDM configuration screen.
MDM—Mobile device managers (MDMs) are third-party security software system that enables an administrator to configure and secure an endpoint, regardless of where the device is located. This is accomplished by leveraging an MDM agent on the endpoint—either a separate application or an agent that is built in to the OS—and an MDM server. This MDM server can reside on premises to the corporation or in the cloud. ISE 1.2 allows for only one active MDM at a time. Figure 8-38 shows the MDM configuration screen.
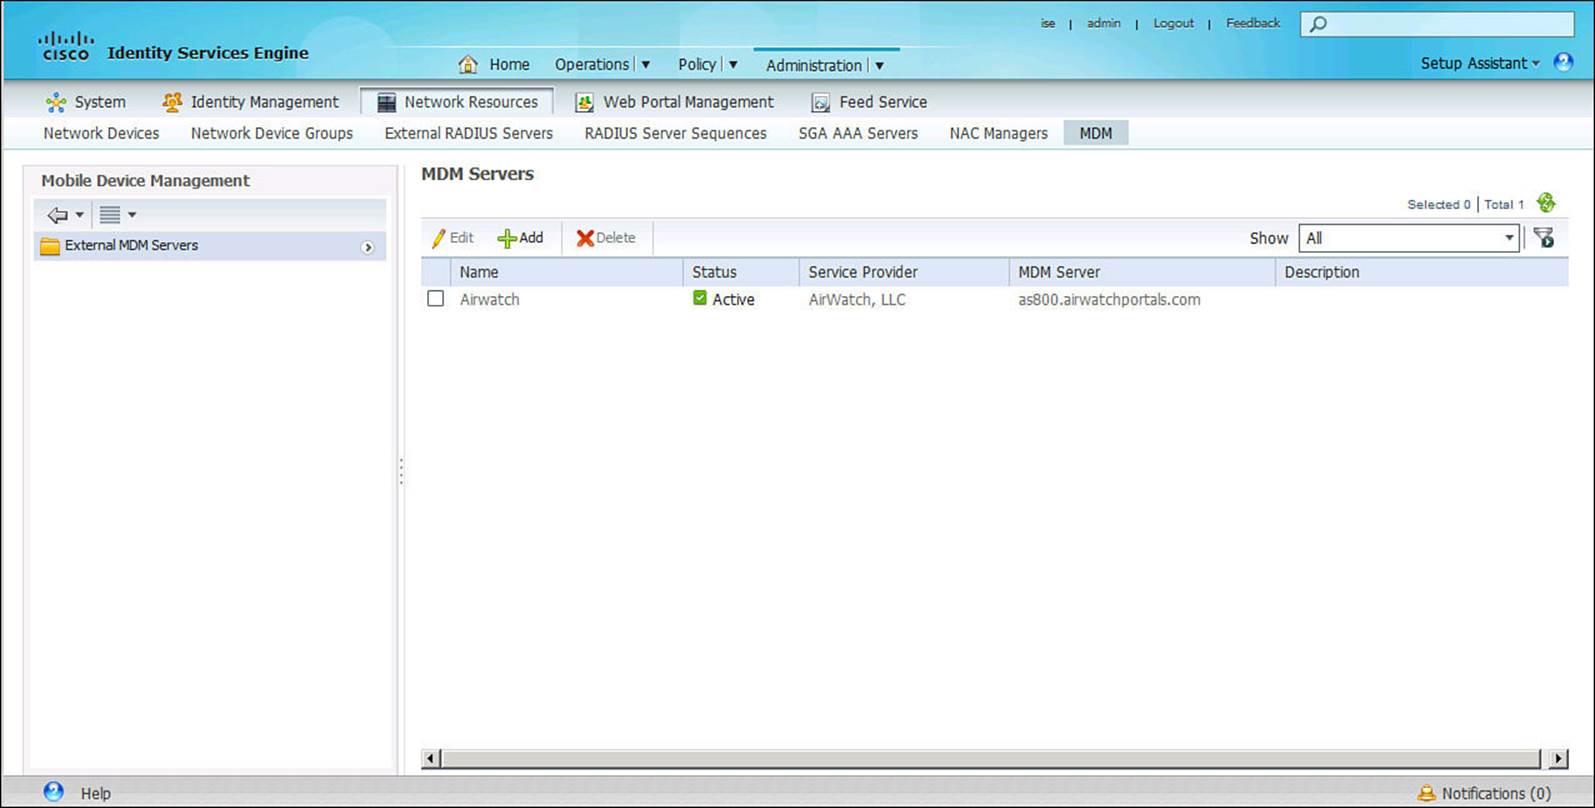
Figure 8-38 Mobile device manager configuration.
Web Portal Management
The Web Portal Management section of the Administration component is where all operational portals are configured. These portals are those that can be used to create guest accounts, allow for onboarding of endpoints, and manage any of your provisioned endpoints. The Web Portal Management enables the configuration of sponsor group policy, sponsor groups, and settings.
![]() Sponsor Group Policy—Sponsor group policy, as shown in Figure 8-39, provides the policy for network sponsors. A network sponsor is a user that can create temporary network accounts—often for guests or contractors. The sponsor group policy, like any other policy within ISE, is heavily based on IF-THEN programming construct. When defining the sponsor group policy, the policy can be based on the identity group of the authenticating sponsor and any other conditions that can be associated with the authenticating sponsor, such as the Active Directory group membership. Based on the outcome of the sponsor group policy, the sponsor will be limited accordingly as to which types of guest accounts that can be created, the length of that guest access, and other restrictions pertaining to guest account creation and access.
Sponsor Group Policy—Sponsor group policy, as shown in Figure 8-39, provides the policy for network sponsors. A network sponsor is a user that can create temporary network accounts—often for guests or contractors. The sponsor group policy, like any other policy within ISE, is heavily based on IF-THEN programming construct. When defining the sponsor group policy, the policy can be based on the identity group of the authenticating sponsor and any other conditions that can be associated with the authenticating sponsor, such as the Active Directory group membership. Based on the outcome of the sponsor group policy, the sponsor will be limited accordingly as to which types of guest accounts that can be created, the length of that guest access, and other restrictions pertaining to guest account creation and access.
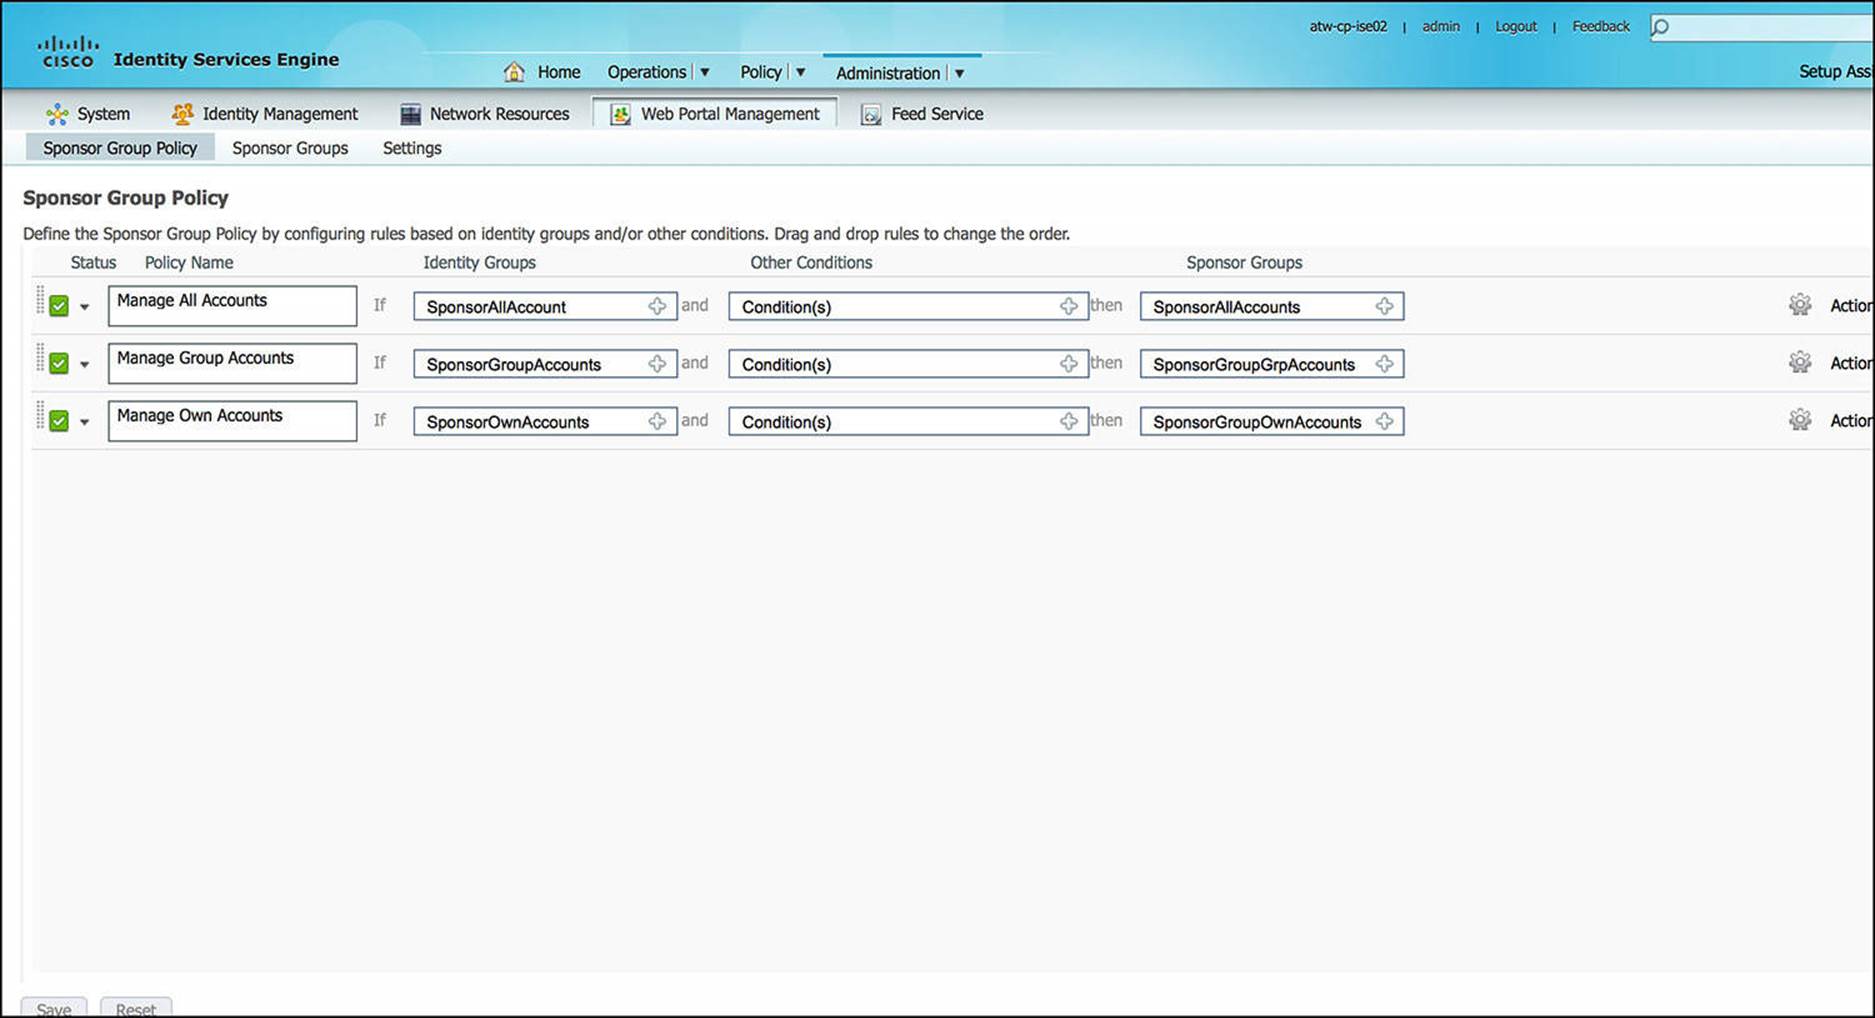
Figure 8-39 Sponsor group policy configuration.
![]() Sponsor Groups—Sponsor groups, as shown in Figure 8-40, describe the level of access that a sponsor will be given in creating guest accounts. Each sponsor group highlights the types of guest accounts that can be created, the length of access, as well as a number of other restrictions. These are the result of the sponsor group policy.
Sponsor Groups—Sponsor groups, as shown in Figure 8-40, describe the level of access that a sponsor will be given in creating guest accounts. Each sponsor group highlights the types of guest accounts that can be created, the length of access, as well as a number of other restrictions. These are the result of the sponsor group policy.
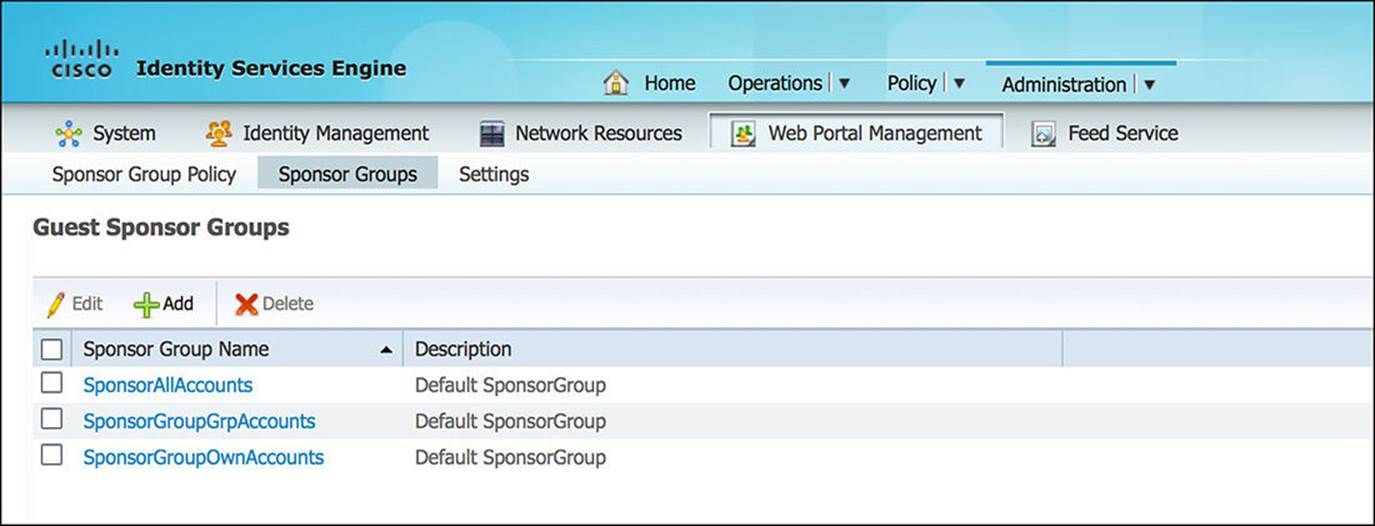
Figure 8-40 Sponsor groups configuration.
![]() Settings—The Settings subsection of Web Portal Management (see Figure 8-41) enables an administrator to customize the operational portals of ISE. These operational portals include the MyDevices portal (allowing users to manage their provisioned endpoints), guest portals (including those for guest access as well as self-provisioning operations), and the sponsor portal (where guest accounts can be created).
Settings—The Settings subsection of Web Portal Management (see Figure 8-41) enables an administrator to customize the operational portals of ISE. These operational portals include the MyDevices portal (allowing users to manage their provisioned endpoints), guest portals (including those for guest access as well as self-provisioning operations), and the sponsor portal (where guest accounts can be created).
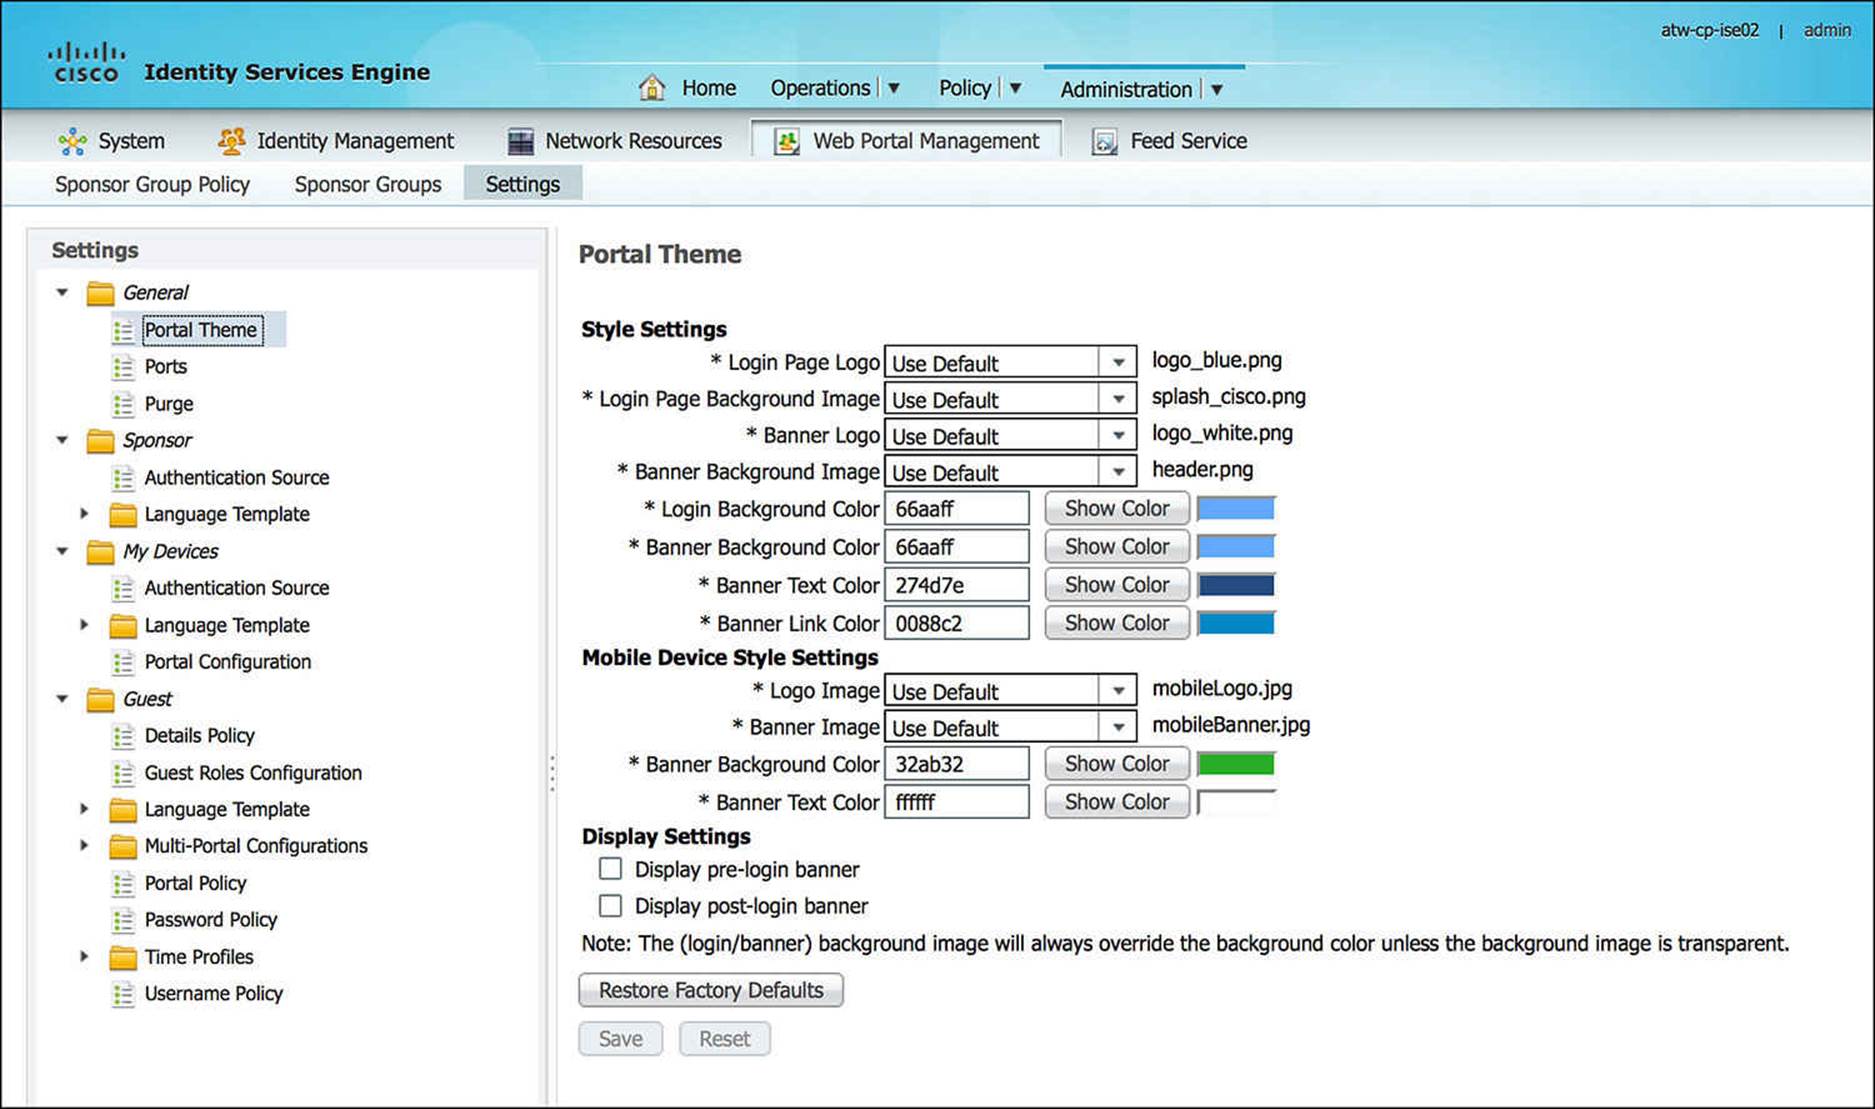
Figure 8-41 Web portal settings configuration.
Feed Service
The Feed Service provides for periodic updates to ISE’s Profiler service. The Profiler service is the capability of ISE to identify the specifics of endpoints that are accessing the network. As was discussed in Chapter 6, “Introduction to Advanced Concepts,” ISE profiles endpoints based on RADIUS Attribute-Value Pairs (such as the MAC address of the endpoint), DHCP traffic, HTTP traffic, and other network communications. (We discuss this more in Chapter 15, “Profiling.”) As endpoint vendors develop new endpoints, ISE can use the Feed Service (as shown in Figure 8-42) to download the updated database of the requisite criteria (MAC Address, DHCP parameters, and so on) that is needed to identify the new endpoint.
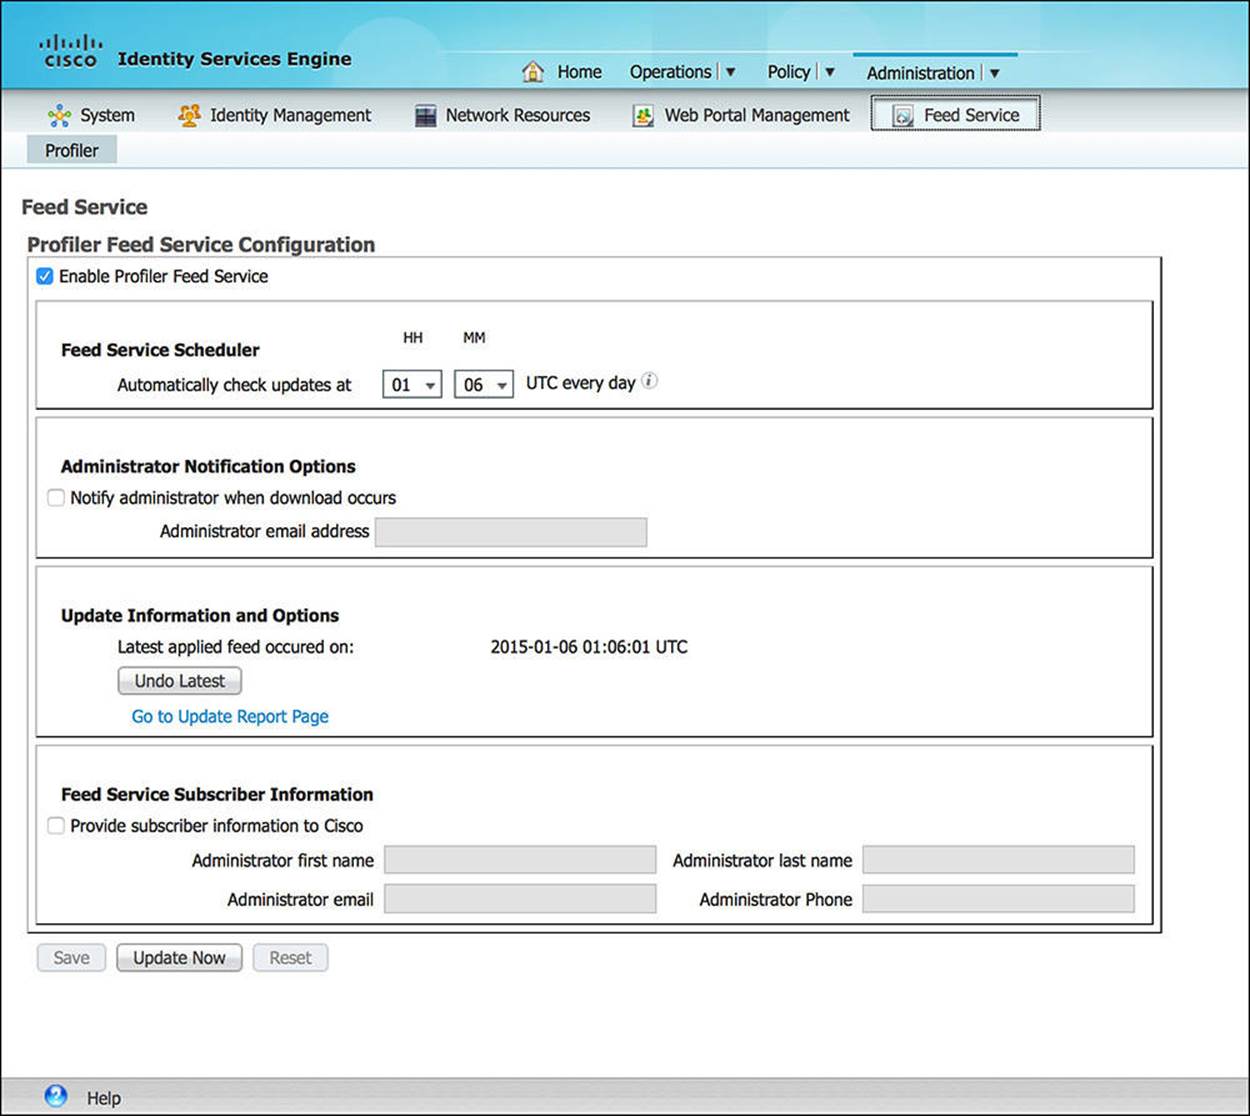
Figure 8-42 Feed Service.
Type of Policies in ISE
ISE is a policy management platform for wired, wireless, and remote access endpoints. As each of these endpoints attempts to access the network, the endpoint (via the NAD) is exposed to a number of policies. Each of these policies serves a purpose to limit or appropriately manage the level of access given to these endpoints. Many of these policies take on the programmatic construct referred to as an IF-THEN statement.
Authentication
Authentication is the capability of ISE to identify the endpoint or the user of the endpoint as it connects to the network. By determining the identity of the endpoint or user, the network administrator can make additional decisions as to which level of access should be given to the endpoint or user. We discuss authentication policy in more detail in Chapter 10.
Authorization
After ISE has determined the identity of the user or endpoint, ISE can use this identity to determine to what the endpoint will be given access. The granting of, or even the denial of, access is referred to as authorization. This authorization policy enables a network administrator to make the final determination based on any number of criteria—information provided via authentication, by the endpoint, or by the NAD from where the endpoint is accessing the network. We discuss authorization policy in more detail in Chapter 11.
Profiling
Profiling is the capability of ISE to determine the type of device that is accessing the network. This is often accomplished based on endpoint information provided via the RADIUS exchange between ISE and the NAD or via other network protocols that the endpoint leverages as it attempts to join the network (that is, DHCP, HTTP, and so on). We discuss profiling in more detail in Chapter 15.
Posture
A posture assessment of an endpoint is an in-depth review of the security policy, including the operating system status and supplementary security software (such as antivirus, antimalware, antispyware, and OS patches), which is present on the endpoint. If the endpoint’s posture does not adhere to the company’s security policy, the device can be labeled as Noncompliant and remediated as necessary. We discuss posturing in more detail in Chapter 19, “Posture Assessment.”
Client Provisioning
Client provisioning is a process whereby all necessary credentials and configurations are deployed to the endpoint, allowing the endpoint to more easily, maybe even automatically, join the network in the future. Provisioning is sometimes referred to as onboarding. This onboarding process might defer depending on the endpoint’s operating system, the NAD where the endpoint is joining the network, the method of access (wired or wireless), and a number of other criteria. The client provisioning policy provides the decision tree as to which credentials and configurations are deployed to the endpoint in these scenarios. Client provisioning is also instrumental in deploying NAC agents to endpoints during posturing. Client provisioning is discussed in greater detail in several chapters as we move forward.
Security Group Access
Security group access (SGA) is a security solution whereby a security group tag (SGT) is assigned to an endpoint following authentication. The SGT plan is often designed to subdivide and easily distinguish different user scenarios—for instance, full access versus partial access, employee versus guest, and engineering versus marketing. Every packet that has the same SGT is given the same level of access on the network. The NAD inserts this SGT into each packet sent by the endpoint, allowing each SGA-enabled upstream device to know which “group” of users or endpoints was responsible for sending that packet and to enforce the appropriate security policy.
The SGA policy within ISE determines the appropriate SGT to assign to an endpoint based on the user of the endpoint, the type of endpoint, the method of access (wired versus wireless), as well as any other criteria that can be determined from the authentication process. SGA is discussed in detail in Chapter 18, “TrustSec and MACSec.”
Exam Preparation Tasks
Review All Key Topics
Review the most important topics in the chapter, noted with the key topics icon in the outer margin of the page. Table 8-6 lists a reference of these key topics and the page numbers on which each is found.


Table 8-6 Key Topics for Chapter 8
Define Key Terms
Define the following key terms from this chapter and check your answers in the glossary:
command-line interface (CLI)
graphical user interface (GUI)