Learning Bitcoin (2015)
Chapter 7. Programming Bitcoin
|
"I am very intrigued by Bitcoin. It has all the signs. Paradigm shift, hackers love it, yet it's derided as a toy. Just like microcomputers." |
||
|
--Paul Graham, Creator of Yahoo Store |
||
Bitcoin, as a currency, exists and functions according to its underlying technology, the Blockchain. The Blockchain is built from a global network of computers. Each miner acts as an autonomous unit with an economic incentive to confirm transactions. The Blockchain's basic unit, the transaction, is an extensible unit upon which we can develop new types of applications.
In fact, each transaction is simply a small script which transfers control of some fraction of a Bitcoin from one address to another. With each transaction, a small amount of data can be stored. When the scripting language is combined with transaction metadata, other types of more complex operations can be written, executed, and stored.
Furthermore, an entire platform can be built on top of the Blockchain. Programmers can define new scripts and operations that run on top of the existing Blockchain operations. These operations are executed and confirmed in the same way as ordinary Bitcoin transfers. The end result is a platform that is completely decentralized, transparent, and resilient.
In this chapter, we will write a set of scripts to illustrate how we can program Bitcoin. We will cover the following topics:
· Installing BitcoinJS
· Programming common Bitcoin operations
· Sending and receiving transactions
· Creating multi-signature addresses
· Scripting a decentralized escrow contract
The projects listed in this chapter involve computer programming. Although a basic understanding of programming is assumed for working with the projects, curious readers are welcome to browse through the examples shown to develop awareness of what Bitcoin and the Blockchain can deliver, and to get a glimpse of the new types of applications that are now possible.
Programmable money
In our modern day society, many aspects in our life are managed or controlled by computer software. From the alarms on our cell phones that wake us up, to the lights that direct the traffic on the way to work, to all the ways we stay connected to each other—software drives it all. The ability to program daily life has transformed our culture and society at a phenomenal rate.
Before software, information was static and often recorded on paper. For example, at a typical financial company, the information had to be counted, sorted, and hand-compiled to extract meaningful knowledge from it.
Today, computers quickly compile these reports, giving the analysts an inside perspective into the business in real time. Software allows the programmers to script operations that can be repeated, often millions of times a second. We can't imagine running a business today without the support of software.
Furthermore, entire industries are created by financial software systems. Financial analysts rely on more and more advanced and complex software to find an edge in a highly competitive marketplace.
In today's world, we still rely on banking, financial services, and government agencies to protect and regulate our financial industry and markets. Yet, even with the best intentions, there is still corruption, manipulation, and fraud. The costs of these inefficiencies are ultimately passed down to the customer or the merchant.
With Bitcoin, and the invention of the Blockchain, we can imagine the next big step in finance: programmable money. We are now finding ourselves at an interesting point in time. Through the intersection of technology, economics, and cryptography, we now have the ability to maintain a completely decentralized system, secure and resilient, yet publicly accessible, from which we can build new types of applications.
Complex financial operations can be scripted, executed, and protected by the Blockchain with minimal costs and without any third-party to trust.
Decentralized applications
As powerful our modern day software systems are, they are still centralized and closed between entities. For example, the accounts listed in one company's system are rarely accessible by another company. Thus, intermediary services are required to maintain trust and accountability between the companies.
This barrier results in inefficiencies that can eventually lead to a breakdown of trust. The financial crisis of 2008 was largely built on top of a complex construction of financial instruments that were repackaged and resold. It was very difficult to assess the true risk of a package due to this complex arrangement.
The benefit of having a decentralized application in the financial world is the ability to have a transparent system upon which we can operate business between multiple entities without a trusted third party. Full transparency, without having to disclose an identity, is very lucrative to a global market where assets can be traded at real-time speed.
With the invention of the Blockchain, we arrange escrow accounts, open market places, and sign digital contracts without the need for an intermediary entity. The participants interact with the system with the private keys helping to protect their identity. The participants can rely on the Blockchain to keep the exchange fully transparent and locked forever. As opposed to paying large fees to financial services, this powerful technology is available for just a few pennies per transaction.
Blockchains
Some organizations in the financial industry have expressed interest in the Blockchain technology aside from Bitcoin. They seek to implement the technology without the currency to leverage the benefits of using a transparent ledger. The potential lies in the ability to share accounts or contracts without a trusted third party. While this is possible, it does change the dynamics a bit.
Bitcoin was launched as a small network of nodes mining and confirming transactions. For the first year, the price of a whole bitcoin was less than a cent. With a small mining base, it would have been easy to overtake the network, but because the currency wasn't worth much, there was little incentive to do so.
Over time, as Bitcoin attracted new interest, the network quickly developed. The computing power of the network eventually grew with the price of the Bitcoin. A higher Bitcoin price attracted more miners, which made the network harder to overtake. Thus, the two actions converged, creating a powerful and valuable network.
Bitcoin's value and the network's computational power are deeply interconnected. This interconnectedness is what allows the participants to interact without a trusted third party.
Public Blockchains
With a public blockchain, the miners have the liberty to come and go. There is an economic incentive for them to protect the network and contribute to consensus rather than to cheat or overtake the system. The value of the public blockchain's unit of account, in our case Bitcoin, is the driver behind the economic incentive.
As it turns out, attracting a strong network of miners is really difficult, which proves its intrinsic value. With a strong economic incentive, such as Bitcoin, it would be challenging to attract a public network of nodes whose interest is to protect the network.
Permissioned Blockchains
A blockchain without Bitcoin, or any other unit of account, is possible with a different set of terms. Unlike an open blockchain, a trusted group of miners would need to be selected. The participants of the system would have to agree to trust the miners and the software they use to confirm the transactions. Blockchains that are closed to a select group of nodes are called Permissioned Blockchains, as each node must be accepted by the user base.
There may be situations where a permissioned blockchain could be useful. For example, a private group of participants would like to maintain a private ledger between them. In that case, they could elect a balanced group of miners between themselves, and execute their operations privately on the network.
Smart contracts
Imagine a group of participants who would like to conduct business together without revealing their identity and without involving a third-party of trust. They could agree on a particular contract that can include an objective set of data points, such as an expiration date or a strike price.
The terms can be programmed as a script running on top of the Blockchain. Provided all the parties agree on the sources of the inputs, the system can follow through with the implementation, execution, and confirmation of the contract. The digital contract would be protected by the network.
The participants claim their stake in the contract with a public address, and hold the corresponding private key that permits them to act. Without having to disclose private information, the parties can agree to come together and conduct a transaction with contractual transparency.
Another example can include the transfer of ownership of digital property or physical property that is controlled by a digital key. Since the transfer of ownership is publicly available, smart contracts have the potential to reshape the role of the government and title companies.
Note
Ethereum (http://ethereum.org) is a complete platform with advanced scripting abilities that's designed to run as an independent blockchain. While still in development at the time of this writing, its promise is to deliver a full platform for building distributed applications.
Let's start by taking a tour of how we can build some basic applications with Bitcoin and the Blockchain. Then, later in the chapter, we'll write some scripts to build a digital escrow contract.
Installing BitcoinJS
To begin our adventures in programming with Bitcoin, we're going to install and work with a set of development tools:
· NodeJS: This is a platform built on the open sourced Javascript engine from Google. It will allow us to write and execute the scripts quickly and easily. These scripts can be written to run in a Web browser or on a server.
· BitcoinJS: This is a Javascript library for working with Bitcoin and its cryptographic functions. We'll use BitcoinJS to generate private keys and addresses.
· Blockchain.info: This is a public API that will allow us to query the blockchain for balances, and to broadcast the transactions to the network. While we can implement our own Bitcoin node, as described in Chapter 5, Installing a Bitcoin Node, using Blockchain.info as the alternative allows us to get up and running quickly and easily.
Requirements
To install the packages listed in the preceding list, you'll need a computer running Windows, OS/X, or Linux with at least 1GB of free hard disk space and 4MB of RAM.
It's recommended that you have some experience with working in a command line environment. The examples shown will involve working with commands that could vary between your operating systems. As a fair warning, some debugging may be necessary.
Beginning the installation
We'll begin by installing NodeJS. Installer packages are available at https://nodejs.org/download/. Simply download the installer and follow the instructions for your operating system. When finished, restart your computer.
To test the installation, we'll run the simplest one line program, Hello World. First, open your computer's terminal and then enter the following commands:
~ node
You should next see the NodeJS prompt. Simply type the following command and hit enter:
> console.log("Hello World")
Hello, world!
undefined
Our one-line script writes the greeting to the display and tells us that the function returned an undefined value. We can ignore that part, but given that we've gotten this far, we can confirm that NodeJS is successfully installed. When you're ready to exit the prompt, press Ctrl + C twice in a row.
Note
On Windows, you can access the command prompt by clicking Start | Run and entering cmd.
On OS/X, you can access the command prompt by pressing command + Spacebar and entering terminal.
Additionally, you can download and install custom terminals for Windows and OS/X.
Next, we'll install BitcoinJS by using NPM, also known as Node Package Manager. NPM is used to install and manage the Javascript modules. The modules are used to group the computer code so that it can be shared with the other developers or projects.
For our example, we'll install bitcoinjs-lib, which is a Javascript library for working with Bitcoin. The documentation and source code for the module is available at http://bitcoinjs.org.
To install BitcoinJS, we simply run NPM's install command with the -g flag to make it globally accessible on our computer:
~ npm install bitcoinjs-lib -g
For OS/X and Linux users, you may have to run as an administrator:
~ sudo npm install bitcoinls-lib -g
To test our installation, we can run the node again and enter the following command:
~ node
> var bitcoin = require('bitcoinjs-lib')
undefined
We are using the require function to load the module bitcoinjs-lib and assign it to the variable bitcoin. If everything goes well, we should get the undefined result and we can check this off our list.
Editing the source code
Now that we have our development environment ready, we'll need to choose a text editor to write and save our scripts.
There are many applications available for all platforms. By default, Windows comes with Notepad and OS/X comes with TextEdit. These are simple applications with the most basic feature set, but are fine for our examples.
If you would like to use a more advanced editor, some fine options are as follows:
· Sublime Text: http://www.sublimetext.com
· Atom: https://atom.io
· Notepad++ (Windows Only): https://notepad-plus-plus.org
· Textmate (OS/X Only): https://macromates.com
Once you have the editor of your choice set up and installed, we can proceed by setting up a workspace for the scripts. The workspace is simply a folder for holding our scripts.
Simply choose a path that's easy to access and/or meets your preference. For example, you can start by creating a folder on your desktop named learning-bitcoin. When creating and editing the scripts, make sure to save them to this folder.
When working from the command line, we'll have to change the working directory to the location of our workspace, so that we can run the scripts. We can select a folder on the desktop with the cd command:
~ cd ~/Desktop/learning-bitcoin
Or from Windows Vista and 7:
> cd c:\Users\[user name]\Desktop
Tip
If you're new to working from the command line, it may be helpful to find some online tutorials to become more familiar with the environment and the basic command needed to navigate it from your operating system.
Programming common Bitcoin operations
Let's start by introducing bitcoinjs-lib by working with private keys and public addresses. The module provides us with some useful components for working with elliptic curve keys.
To generate a new private key, we'll start Node.js from our command line and enter the following commands:
~ node
> var bitcoin = require('bitcoinjs-lib')
> var private_key = bitcoin.ECKey.makeRandom()
> console.log(private_key.toWIF())
KzgRK4nN6bcb5iQN8tLL85U5anc84uH7G9KtsZuqU23h5fN7Z6v4
From our example, you can see that we're importing the bitcoinjs library and calling ECKey.makeRandom(), which returns a random private key. We store an object that represents the key in a variable called private_key. On the third line, we print out the key in WIF format to the console. The result is a valid key from which we can compute a public address from:
> console.log(key.pub.getAddress().toString())
149TUxVkJzowbNDwExc34t4EfyNgAL1pco
Note
WIF stands for Wallet Import Format and is used to make copying ECDSA keys easy to work with. The format has a built in checksum that helps to prevent mistyped characters.
For a more useful example, let's write a script that generates 100 keys in a format that we can import into Excel. Using your text editor, write and save the script to your work folder as make-keys.js:
// make-keys.js
// Creates a comma separated file (CSV) of private keys and address
// Formatted for importing into a spreadsheet application
var bitcoin = require('bitcoinjs-lib')
var fs = require('fs')
// the number of keys to generate
var num_of_keys = 10
// the name of the export file
var file_name = "my-keys.csv"
var stream = fs.createWriteStream(file_name)
stream.once('open', function(fd) {
for (var x=0; x<num_of_keys; x++) {
var key = bitcoin.ECKey.makeRandom()
var line = [x, key.toWIF(), key.pub.getAddress().toString()]
stream.write(line.join(", "))
stream.write("\n")
}
stream.end()
})
Then, from your command line, run the following commands to create your file:
~ node make-keys.js
If all went well, you'll have a file in the same folder named my-keys.csv, from which you can import into Excel:

Figure 7.1 - The private keys and addresses generated from our script
Note
If you intend to use this script to generate private keys to hold real bitcoin, make sure to protect your file from theft, spyware, or loss. Safeguard your keys before using any of the addresses.
Checking your balance
To check the balance of a single Bitcoin address, we'll have to query the Blockchain. We'll use Blockchain.info's API to get real-time balances in our script. For a limited rate of queries, we can use their API for free, without the overhead of setting up our own Bitcoin node, and have our scripts up and running as quickly as possible.
Note
A more advanced approach can involve setting up a local Bitcoin Node, as described in Chapter 5, Installing a Bitcoin Node, for querying blockchain information. The node can be configured to run as a local service to provide access to real-time transactions and balances.
To start, we're going to use another module. To enhance our script's usability, we'll install cli-prompt to make entering information from the command line easier:
~ npm install cli-prompt
Create a file named check-balance.js in your workspace folder and save the following script:
// check-balance.js
// Query blockchain.info API to get address balances
var prompt = require('cli-prompt');
var request = require('request');
// convert 'satoshi' to bitcoin value
var satoshiToBTC = function(value) {
return value * 0.00000001;
}
prompt('Query Bitcoin balance: ', function (address) {
// query blockchain.info for the address in JSON format
var url = "https://blockchain.info/address/" + address + "?format=json";
request(url, function (error, response, body) {
// check the results of the HTTP call
if (!error && response.statusCode == 200) {
// parse the JSON results
var result = JSON.parse(body);
// display the results to the console
// NOTE: results are in 'satoshis' and need to be converted to BTC
console.log('Received: ' + satoshiToBTC(result.total_received));
console.log('Sent: ' + satoshiToBTC(result.total_sent));
console.log('Balance: ' + satoshiToBTC(result.final_balance));
} else {
// handle the error
console.log("Unable to find address");
if (error)
console.log("ERROR:", error);
}
});
});
After saving the files to our work folder, we can run the following script:
~ node check-balance.jsQuery Bitcoin balance:17x23dNjXJLzGMev6R63uyRhMWP1VHawKc
Received: 50
Sent: 0
Balance: 50
In the script, we use cli-prompt to allow the user to type or paste a Bitcoin address. The function returns the address as a variable that is then used to query Blockchain.info. If the address is found, the result is passed back to us as a JSON object containing the following data:
{
"address": "17x23dNjXJLzGMev6R63uyRhMWP1VHawKc",
"final_balance": 5000000000,
"hash160": "4c388152d1d380947df48121d189709b43ea3d01",
"n_tx": 1,
"total_received": 5000000000,
"total_sent": 0,
"txs": [{
"block_height": 30,
"hash": "f5e26c8b82401c…",
"inputs": [{
"script": "04ffff001d0121",
"sequence": 4294967295
}],
"lock_time": 0,
"out": [{
"addr": "17x23dNjXJLzGMev6R63uyRhMWP1VHawKc","n": 0,
"script": "41042cf59fafd08…",
"spent": false,
"tx_index": 14884,
"type": 0,
"value": 5000000000
}],
"relayed_by": "0.0.0.0",
"result": 0,
"size": 134,
"time": 1231602122,
"tx_index": 14884,
"ver": 1,
"vin_sz": 1,
"vout_sz": 1
}]
}
Note how Blockchain.info returns the balance in Satoshis, the smallest Bitcoin unit. In our script, we use the function satoshiToBTC to multiply the balance by 0.00000001 to display in units of BTC. Often when working with code, whole numbers are more precise, as the decimal point arithmetic can often lead to rounding errors.
Tip
As whole numbers are used on the blockchain, it's recommended to keep to whole numbers throughout your code. Then, when ready to display the value to the user, convert the whole number to the unit of choice: BTC, mBTC, satoshis, and so on.
Generating addresses for a website
Automating the process of generating addresses and checking balances makes it easy to setup a payment system for a website. A developer can easily pre-generate a list of private keys offline. Then, the developer can upload the corresponding list of public addresses to a web server to collect the payments.
Without the private keys online, the developer can be certain that the money can't be stolen if the server were to be compromised. In the worst case scenario, the hacker can extract a list of the public addresses that only reveal the public balances.
Each order can be assigned a unique address from the pool. Using an automated script, the developer can continuously check for the payments. If a payment has been made in full, the script can then trigger an event to process, ship, and order.
A more advanced system can implement Hierarchical Deterministic Wallets, which use a master key to produce an unlimited number of private keys and addresses. The wallet can be arranged to only compute the public addresses while the private keys are stored offline.
Sending transactions
In Chapter 5, Installing a Bitcoin Node, we used the Bitcoin node to build, sign, and broadcast a Bitcoin transaction using the createrawtransaction, signrawtransaction, and sendrawtransaction commands.
In this example, we'll perform the same operations but using Javascript and the BitcoinJS library. The process involves the same three steps:
1. Build a transaction with a list of inputs and outputs.
2. Sign the transaction with the required private keys.
3. Broadcast the transaction to the network.
Simple transactions
Using the bitcoinjs library, we will work with the TransactionBuilder object to construct a new transaction. We simply provide the object with one or more private keys as the source of our funds and with one or more addresses for the output, each with the amount we want to send.
Note
For the following examples, real bitcoin can be at stake. Make sure to have backups of your keys before experimenting with them.
In the following example, our script will prompt for the private key of the source address. The script will then compute the public address, query Blockchain.info for the amount, and write a Bitcoin transaction for us to confirm. A small transaction fee that will be paid to the miner will be included in the transaction. To include this fee, it is simply deducted from the total amount we want to send.
Note
To improve clarity in the examples, we'll truncate the digits of long keys, addresses, and hashes.
// send-transaction.js
// Create and send a Bitcoin transaction
// 1 - query for unspent outputs
// 2 - create a transaction
// 3 - forward the transaction to the network
var bitcoin = require('bitcoinjs-lib');
var request = require('request');
var prompt = require('cli-prompt');
// convert 'satoshi' to bitcoin value
var satoshiToBTC = function(value) {
return value * 0.00000001;
};
// broadcasts a transaction to the network via blockchain.info
var broadcast_tx = function(tx) {
var options = {
url: "https://blockchain.info/pushtx",
formData: {
tx: tx.toHex()
}
};
request.post(options, function(err, httpResponse, body) {
if (err) {
console.error('Request failed:', err);
} else {
console.log('Broadcast results:', body);
console.log("Transaction send with hash:", tx.getId());
}
});
}
// fee to pay the miners
var tx_fee = 10000;
// prompt for the private key of the source address
prompt('Enter the private key of the source address (WIF format): ', function (private_wif) {
// get the source bitcoin address from the private key
var private_key = bitcoin.ECKey.fromWIF(private_wif);
var source_address = private_key.pub.getAddress().toString();
// query blockchain.info for the unspent outputs from the source address
var url = "https://blockchain.info/unspent?active=" + source_address;
request(url, function (error, response, body) {
if (!error && response.statusCode == 200) {
// parse the response and get the first unspent output
var json = JSON.parse(body);
var unspent = json["unspent_outputs"][0];
// prompt for the destination address
console.log("Found an unspent transaction output with", satoshiToBTC(unspent.value), "BTC.");
prompt('Enter a destination address: ', function (dest_address) {
// calculate the withdraw amount minus the tx fee
var withdraw_amount = unspent.value - tx_fee;
// build a transaction
var txb = new bitcoin.TransactionBuilder(bitcoin.networks.bitcoin);
txb.addInput(unspent.tx_hash_big_endian, unspent.tx_output_n);
txb.addOutput(dest_address, withdraw_amount);
txb.sign(0, private_key);
var tx = txb.build();
// prompt to confirm sending the transaction
var confirm = "Send " + satoshiToBTC(withdraw_amount) + " plus miner fee? (y/N):";
prompt(confirm, function(result) {
if (result.toUpperCase() == "Y") {
broadcast_tx(tx);
};
});
});
} else {
console.log("Unable to find any unspent transaction outputs.");
if (error)
console.log("ERROR:", error);
}
});
});
Given everything checks out, the script will build, sign, and broadcast the transaction. The transaction's hash is then logged to the console:
~ node send-transaction.js
Enter the private key of the source address (WIF format): L2MswPx…
Found an unspent transaction output with 0.0007 BTC.
Enter a destination address: 1A7L2B9ZnJR…
Send 0.02 plus miner fee? (y/N):y
Broadcast results: Transaction Submitted
Transaction send with hash:02c50c5233dcc01d999…
Using the web interface in Blockchain.info, we can then enter the transaction hash displayed at the end of the script to verify that the transaction was indeed broadcasted to the network. The transaction hash can be used as a reliable unique identifier for the transaction.
Note
Your private keys are never sent to Blockchain.info or the network. The keys are only used locally to digitally sign the transaction.
Building an Escrow contract
Now that we've illustrated some ways in which we can program Bitcoin, let's apply it to a common example in the real world.
When buying and selling goods over the internet, the two parties involved may choose to exchange the payment through an Escrow account. The purpose of the account is to hold the payment until the item is delivered as agreed. If there is a dispute, a refund is requested or a moderator is introduced to resolve the issue.
Using the Blockchain, we can build a solution that empowers each party with a private key. A multi-signature address is created to hold the payment without the need for a third party to hold the funds. To generate the address, three keys are issued, one each to the buyer, the seller, and the moderator. Of the keys issued, two are required to release the payment.
Given the item is delivered as agreed, the seller generates a withdraw transaction and sends it to the buyer for the first signature. The buyer signs the transaction and returns it to the seller. The seller then signs the withdraw, providing the second signature required, and broadcasts the withdraw to the network for access to the funds.
In the case of a refund, the process is reversed. The buyer creates a refund transaction and requests the seller to sign it. In the case of a dispute, or one party's absence, a trusted moderator holding the third key can aid in resolving the issue with the ability to provide the second signature.
There are advantages to a Blockchain-based escrow. The funds are safely stored in an escrow address rather than in a third-party account. Thus, it's harder for the funds to be compromised. With a Blockchain contract, each party is in control of their portion of the contract.
In addition, the merchant can save on fees, withdraw limits, and delays. Contracts executed on the Blockchain only require a minimal miner's fee, which in today's transactions is usually only a few cents.
Let's begin with an overview of how to implement this system by reviewing the steps involved:
1. Each party generates a private/public key pair. The private key is kept secret and used to sign a withdraw transaction.
2. The buyer collects the public key from each participant and generates a multi-signature Bitcoin address. The address is reproducible for verification purposes.
3. The buyer sends the payment to the address. Each participant can verify the payment on the blockchain. Once the payment is sent to the escrow address, two keys are required to release it.
4. The seller delivers the product and this is confirmed by all the parties involved.
5. The seller generates a withdraw transaction, requiring two of the three signatures. The transaction is sent to the buyer for signing.
6. The buyer signs the transaction and returns it to the seller.
7. The seller then signs the transaction, satisfying the second signature requirement, and broadcasts it to the network.
To implement the system, we'll write a set of scripts that will perform each of these steps for us. For this example, we'll execute the scripts locally on our computer to understand the process. In a real-world example, these scripts could be shared between all the parties or replaced with a more user-friendly system.
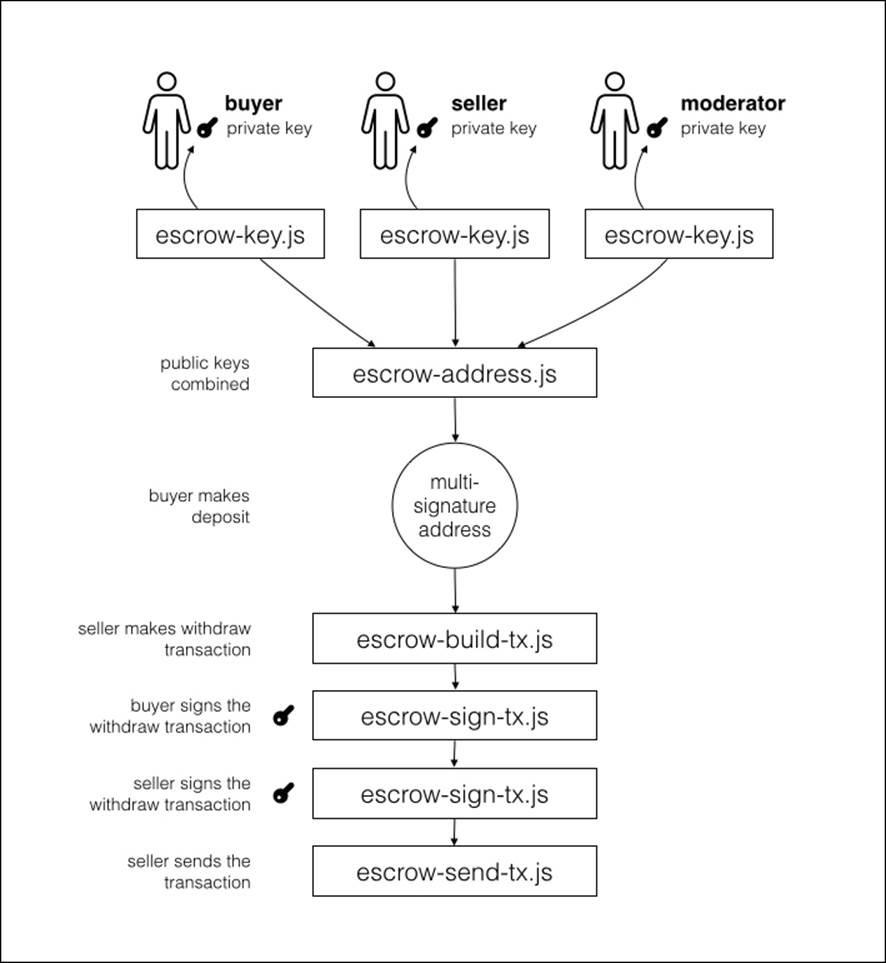
Figure 7.2 - Escrow contract based on a multi-signature address
Figure 7.2 illustrates how the scripts are arranged in the system. The best-case scenario is shown in the illustration, where the buyer releases the payment to the seller, but the system can be slightly modified to issue a refund payment or an override by the moderator.
Now with the system defined, let's begin writing our scripts.
Generating the keys
For each participant, we'll generate a private/public key pair. Using the functions described earlier in the chapter, we'll generate two files, one containing the public/private keys and the other without the private key.
Create a new script named escrow-key.js and save it with the follow script:
// escrow-key.js
// generates a random private/public key and address
var bitcoin = require('bitcoinjs-lib');
var fs = require('fs');
// create a new random key
var privKey = bitcoin.ECKey.makeRandom();
// save it in a JSON object to be written to disk
var key_info = {
private_key: privKey.toWIF(),
public_key: privKey.pub.toHex(),
address: privKey.pub.getAddress().toString()
}
// display the key details to the console
console.log("A new private key has been generated for you\n");
console.log("private key:", key_info.private_key);
console.log("public key:", key_info.public_key);
console.log("public address:", key_info.address);
console.log("\n");
// write the key info to disk for backup
var priv_file = "./key-private-" + key_info.address.substring(0,6) + ".json";
fs.writeFile(priv_file, JSON.stringify(key_info, null, 4), function(err) {
if (err) { return console.log(err) }
console.log("Private key saved as:", priv_file);
})
// write public key and address to disk for sharing
delete key_info["private_key"]; // hide private key
var pub_file = "./key-public-" + key_info.address.substring(0,6) + ".json";
fs.writeFile(pub_file, JSON.stringify(key_info, null, 4), function(err) {
if (err) {return console.log(err) }
console.log("Public key saved as:", pub_file);
})
To run the script, we simply execute:
~ node escrow-key.js
A new private key has been generated for you
private key: KxfncWVpwmq….
public key: 03b0835dd022ed….
public address: 12xfRFqThM4…..
Public key information saved as: ./key-public-12xfRF.json
Private key information saved as: ./key-private-12xfRF.json
The script generates a random private key, and computes the public key and the Bitcoin address from it. Two files are created in the folder and named using the first six characters of the Bitcoin address.
Each user will share the file named key-public-xxxxxx.json with the buyer. Saving the keys in JSON format makes it easy to share and load with Javascript.
Note
The public file contains the public key which is used to generate the multi-signature address. The public key, unlike the Bitcoin address generated from it, does not have any error checking. Any errors made to the string will not be detected. Make sure you handle this with care when sharing.
Generating the Escrow address
The escrow address is a special type of Bitcoin address that's generated from a list of public keys. Assuming we've collected the public keys from each participant, we can combine them using another script.
Create a new file named escrow-address.js and save the following script:
// escrow-address.js
// generate a 2-of-3 multi-signature Bitcoin address
var bitcoin = require('bitcoinjs-lib');
var prompt = require('cli-prompt');
var fs = require('fs');
// prompt for the 3 keys
console.log("Create a new escrow address from the public keys of each participant.");
prompt.multi([{ key: "buyer" },{ key: "seller" },{ key: "moderator" }], function (result) {
// create a eliptic curve public key from the hex codes
var pubKeys = [
bitcoin.ECPubKey.fromHex(result.buyer),
bitcoin.ECPubKey.fromHex(result.seller),
bitcoin.ECPubKey.fromHex(result.moderator),
]
// generate a m-of-n multisignature output script
var redeemScript = bitcoin.scripts.multisigOutput(2, pubKeys);
var scriptPubKey = bitcoin.scripts.scriptHashOutput(redeemScript.getHash());
// generate the escrow bitcoin address and redeem script
// stored in a JSON file for organizing the subsequent steps
var escrow_info = {
address: bitcoin.Address.fromOutputScript(scriptPubKey).toString(),
redeem_script: redeemScript.toHex().toString()
}
console.log("\n");
console.log("The address to your escrow:", escrow_info.address);
// write the escrow info to disk for building a transaction
var filename = "./escrow-" + escrow_info.address.substring(0,6) + ".json"
fs.writeFile(filename, JSON.stringify(escrow_info, null, 4), function(err) {
if (err) {return console.log(err) }
console.log("Escrow information saved as:", filename);
})
});
In this preceding script, we prompt the user to provide us with the three public keys from each user. We then generate a public key object from the hex codes. Using the bitcoin.scripts.multisigOutput function, we create a Bitcoin script that requires two of the keys from the list to spend. From this script, we create the hash that is used to generate our address using bitcoin.scripts.scriptHashOutput.
We then store the address and the redeem script, in hexadecimal format, as a JSON object and save it to disk:
~ node escrow-address.js
Create a new escrow address from the public keys of each participant.
buyer: 03768c29a9…
seller: 036a110b3c…
moderator: 02f38df7cc…
The address to your escrow: 3Ci6QdGyPF…
Escrow information saved as: ./escrow-3Ci6Qd.json
The Bitcoin address is used to receive and lock the payment. This address is publicly accessible from the blockchain and can be used to verify that a payment has been made.
Note
Multisignature Bitcoin addresses start with a 3.
At this point, the buyer can send the payment to the address. When confirmed, the seller can make arrangements to deliver the item.
In the next step, we'll use the redeem script to generate a withdraw transaction.
Creating a withdraw script
Assuming the item was delivered as agreed and all the parties are happy, we can take the next step and create a withdraw transaction for the seller. The transaction will specify where the funds will be sent and the amount to send. To keep the example simple, we'll withdraw the full amount to one address.
Create a new file named escrow-build-tx.js and save the following script:
// escrow-build-tx.js
// Create a transaction to withdraw the escrow balance
var bitcoin = require('bitcoinjs-lib');
var request = require('request');
var prompt = require('cli-prompt');
var fs = require('fs');
// fee to pay the miners
var tx_fee = 10000;
// convert 'satoshi' to bitcoin value
var satoshiToBTC = function(value) {
return value * 0.00000001;
}
// load the escrow json file
var escrow_filename = process.argv[2];
if (!escrow_filename) {
console.log("Please provide the escrow filename.")
console.log("example usage: node escrow-build-tx.js ./escrow-3Bh334.json")
return;
}
var escrow = require(escrow_filename);
console.log("Create a withdraw transaction for the escrow address:", escrow.address);
prompt('Choose a bitcoin address to send the balance: ', function (address) {
// query blockchain.info for the unspent outputs from the escrow address
var url = "https://blockchain.info/unspent?active=" + escrow.address;
request(url, function (error, response, body) {
if (!error && response.statusCode == 200) {
// parse the response and get the first unpsent output
var json = JSON.parse(body);
var unspent = json["unspent_outputs"][0];
// calculate the withdraw amount minus the tx fee
var withdraw_amount = unspent.value - tx_fee;
// build a transaction
var txb = new bitcoin.TransactionBuilder(bitcoin.networks.bitcoin);
var redeem_script = bitcoin.Script.fromHex(escrow.redeem_script);
txb.addInput(unspent.tx_hash_big_endian, unspent.tx_output_n, bitcoin.Transaction.DEFAULT_SEQUENCE, redeem_script);
txb.addOutput(address, withdraw_amount);
var tx = txb.buildIncomplete();
console.log("Unsigned transaction created to withdraw",
satoshiToBTC(withdraw_amount), "BTC with", satoshiToBTC(tx_fee), "BTC mining fee.");
// save the unsigned transaction as json to disk
escrow.signatures_required = 2;
escrow.signatures = 0;
escrow.pay_to_address = address;
escrow.amount = withdraw_amount;
escrow.fee = tx_fee;
escrow.encoded_tx = tx.toHex();
// write the json to disk
fs.writeFile(escrow_filename, JSON.stringify(escrow, null, 4), function(err) {
if (err) { return console.log(err) }
console.log(escrow_filename, "has been updated with the withdraw transaction.")
});
} else {
console.log("Unable to get an unspent transaction output.");
if (error)
console.log("ERROR:", error);
}
});
})
To run the script, we need to provide the name of the file generated by the escrow-address.js script, which contains the redeem script. We load this file as an argument to the script:
~ node escrow-build-tx.js ./escrow-3J2fuD.json
Create a withdraw transaction for the escrow address: 3J2fuD…
Choose a bitcoin address to send the balance: 3KQFR…
Unsigned transaction created to withdraw 0.08 BTC with 0.0001 BTC mining fee.
./escrow-3J2fuD.json has been updated with the withdraw transaction.
The script looks for the first unspent transaction output and prompts for a destination address. The amount listed is the full amount for the output minus the transaction fee. A redeem script and the Bitcoin address with additional details are stored in the JSON file, as follows:
~ cat escrow-3J2fuD.json
{
"address": "3J2fuD…",
"redeem_script": "522102f38d…",
"signatures_required": 2,
"signatures": 0,
"pay_to_address": "1GEpz…",
"amount": 800000,
"fee": 10000
}
The actual transfer is encoded and stored in hexadecimal format as unsigned_hex. This code contains the instructions to make the actual transfer. The encoded transaction will be passed to the buyer and seller for signing.
Signing the transaction
The next step involves the seller requesting a signature from the buyer. The seller can send the escrow-3J2fuD.json file to the buyer for the signature. Using the next script, the buyer can use the private key to sign and return the transaction.
Create a file named escrow-sign-tx.js and save the following script:
// escrow-sign-tx.js
// Sign the escrow transaction with a private key
var bitcoin = require('bitcoinjs-lib');
var prompt = require('cli-prompt');
var fs = require('fs')
// convert 'satoshi' to bitcoin value
var satoshiToBTC = function(value) {
return value * 0.00000001;
}
// load the escrow json file
var escrow_filename = process.argv[2];
if (!escrow_filename) {
console.log("Please provide the escrow filename.")
console.log("example usage: node escrow-sign-tx.js ./escrow-3Bh334.json")
return;
}
var escrow = require(escrow_filename);
// report the details of the escrow transaction
console.log("Sign withdraw of", satoshiToBTC(escrow.amount), "BTC to", escrow.pay_to_address);
console.log("Transaction has", escrow.signatures, "of", escrow.signatures_required, "signatures");
// exit if escrow has been signed by two signatures
if (escrow.signatures >= escrow.signatures_required) {
console.log("Escrow transaction is ready to broadcast.");
return;
}
prompt('Private key for signing the transaction (WIF format): ', function (val) {
try {
// create the transaction builder object
var script = bitcoin.Script.fromHex(escrow.redeem_script);
var tx = bitcoin.Transaction.fromHex(escrow.encoded_tx);
var txb = bitcoin.TransactionBuilder.fromTransaction(tx);
// sign the transaction
var private_key = bitcoin.ECKey.fromWIF(val);
txb.sign(0, private_key, script);
// build the transaction, either first or second signature
if (escrow.signatures == 0) {
// record the first signature
escrow.encoded_tx = txb.buildIncomplete().toHex();
escrow.signatures = 1
console.log("Escrow transaction requires one more signature.");
}
else {
// record the second signature
var tx = txb.build();
escrow.encoded_tx = tx.toHex();
escrow.signatures = 2;
escrow.tx_hash = tx.getId();
console.log("Escrow transaction is ready to broadcast.");
}
// write the signed transaction to disk
fs.writeFile(escrow_filename, JSON.stringify(escrow, null, 4), function(err) {
if (err) { return console.log(err) }
});
} catch(e) {
console.log("Unable to sign:", e.message);
}
})
This script will be used first by the buyer and then by the seller to sign the transaction. First the buyer will run the following:
Sign withdraw of 0.0007 BTC to 1GEpz…
Transaction has 0 of 2 signatures
Private key for signing the transaction (WIF format): KxQV1YmA8i…
Escrow transaction requires one more signature.
After the script has been run, the JSON file will be modified to include the signature in the encoded transaction and an increment to the 'signatures' key.
Once signed, the buyer sends the JSON file back to the seller. The seller then signs the transaction with his private key, using the same script:
Sign withdraw of 0.0007 BTC to 1GEpz…
Transaction has 1 of 2 signatures
Private key for signing the transaction (WIF format): KYmAxQV18i…
Escrow transaction is ready to broadcast.
The JSON file now contains the fully signed transaction that is ready to broadcast to the network. Also included in the JSON file is the transaction's hash, which can be used as a reference to verify the transmission to the network.
Broadcasting the transaction
Now we're down to the last step: broadcasting the transaction to the network. Now that our transaction has both the signatures, we can simply call Blockchain.info's API to broadcast the transaction.
Create a new file named escrow-send-tx.js and save the following script:
// escrow-send-tx.js
// broadcast the signed transaction to the network
var request = require('request');
var fs = require('fs');
// load the escrow json file
var escrow_filename = process.argv[2];
if (!escrow_filename) {
console.log("Please provide the escrow filename.")
console.log("example usage: node escrow-sign-tx.js ./escrow-3Bh334.json")
return;
}
var escrow = require(escrow_filename);
// broadcast the encoded transction to the network via blockchain.info
var options = {
url:'https://blockchain.info/pushtx',
formData: {tx:escrow.encoded_tx}
};
request.post(options, function(err, httpResponse, body) {
if (err) {
console.error('Request failed:', err);
} else {
console.log('Broadcast results:', body);
}
});
The seller, when ready can simply run the script as:
~ node escrow-send-tx.js
Broadcast results: Transaction sent!
If successful, the transaction's hash, located in the JSON file, can be used to query Blockchain.info's website for confirmation.
Refunding
Depending on the outcome of the physical exchange, the participants can agree on who's entitled to the final withdraw by signing the transaction. A buyer can request a refund by sending a withdraw request to the seller asking for his signature. If the seller agrees, the buyer simply signs the withdraw and forwards it back to the buyer.
In the case of a dispute, either party can send the moderator a withdraw request and an audit trail or proof of their claim. Using the third key, the moderator has the ability to grant the withdraw or recommend an alternative resolution.
Summary
In this chapter, we've demonstrated the power of programmable money and how it can refine and reshape the financial industry. Starting by automating simple Bitcoin operations, we learned how to send and receive money. We closed the chapter with a real-world example by implementing a decentralized escrow contract on top of the blockchain.
An advantage of using cryptographic keys is that it virtually eliminates fraud, and reduces the costs and risks involved.
As demonstrated, using the blockchain to script various contracts is a very powerful tool for creating more efficient and transparent financial services.
In the next chapter, we'll explore alt-coins and look at how we can use digital contacts to implement a voting system using a platform called Counterparty.
All materials on the site are licensed Creative Commons Attribution-Sharealike 3.0 Unported CC BY-SA 3.0 & GNU Free Documentation License (GFDL)
If you are the copyright holder of any material contained on our site and intend to remove it, please contact our site administrator for approval.
© 2016-2026 All site design rights belong to S.Y.A.