Responsive Theming for Drupal (2014)
Chapter 5. Responsive Theming Using Zen
Zen is perhaps the most well-known Drupal theme, created and maintained by the also well-known John Albin. It’s a lightweight, mobile-first responsive base theme with Sass/Compass support and very few opinions about how you should be doing things.
Pros and Cons
At around 111,000 reported installs at the moment, Zen is also almost twice as popular as Omega, which is in the number two spot. This means that you get a big community of users answering questions, writing documentation, and fixing bugs along with some battle hardened code that other base themes can’t match.
Why has it been so popular? For one, Zen has been around for a long time. It was first created back in 2006, making it a good bit older than just about all other base themes still being maintained.
It is known as one of the most accessible base themes, and the maintainer has done a lot of work in this regard. Plus, it has RTL support.
Zen has also done a good job of balancing tried-and-true, rock-solid solutions with the cutting edge of frontend development. For example, it picked up Sass/Compass back in 2011, well before most Drupal themers were thinking about it, but it has stayed away from all the fancy plug-ins that might not be widely used or officially supported.
Besides that, it’s the brainchild of John Albin, a highly respected member of the Drupal community. You can rest assured that John Albin isn’t going to lead you astray.
All that being said, to me the big draw of Zen is that it is extremely non-opinionated (about how code is structured, how layouts are built, or really anything that base themes are often opinionated about) and fairly lightweight as base themes go. Of the three base themes in this book, Zen is definitely the lightest, and a lot of people (myself included) consider that a good thing. It has found the sweet spot between ultra-minimal but useless and feature-rich but bulky.
However, there are some obvious cons here. For one, finding decent documentation on such an old project can be tough because your Google searches will return results from years ago that aren’t relevant to current versions.
Perhaps more importantly, it’s probably not the most productive theme if you’re comfortable with opinionated themes and convention over configuration. For example, it supports whatever grid system you want to throw at it, and sometimes you don’t want to have to research a choice yourself—you just want to start building your grid in whatever system it tells you to use.
Getting Started
Let’s walk through the steps required to start your theme with Zen as the base. For this section, we’ll assume that you’re using Drush.
Step 1: Install Zen Using Drush
This is done just like any other theme. Just download it from Drupal.org or by running:
drush dl zen
Then enable it either on the theme’s page or by running:
drush en zen
Finally, you’ll want to clear the caches so that Drush can pick up the new Drush command that Zen created:
drush cc all
Step 2: Create Your Subtheme
Zen comes with some nice Drush integration for creating subthemes, so we’re going to take that feature for a spin. Creating a subtheme is easy-peasy with just a single command:
drush zen "Your theme name"
Replace “Your theme name” with the human-readable name of your theme and Zen will do the rest.
Here I should note that there are a few options you can pass in to customize things a bit. Simply run drush help zen, to see what they are:
Options:
--description A description of your theme.
--machine-name [a-z, 0-9] A machine-readable name for your theme.
--name A name for your theme.
--path The path where your theme will be created.
Defaults to: sites/all/themes
--without-rtl Remove all RTL stylesheets.
So you may end up with something more like this:
drush zen "Your theme name"
--without-rtl
--machine-name=your_theme
--description="A custom theme for you"
--path=sites/yoursite.com/themes
Step 3: Set Your Subtheme as the Default Theme
As always, when working with a theme, you have to tell Drupal to start using it. Head on over to the Appearance page (/admin/appearance) and click the “Enable and set default” link next to your subtheme.
Now go to the home page of your site. If the content is right but it all looks like a big unstyled mess, then that means you’re seeing your subtheme. Yay!
Step 4: Install Sass/Compass
You’ll need to install Sass and Compass as outlined in Chapter 3.
Step 5: Install Zen Grids
Now you’ll need to install the gem that provides Zen Grids, the sassy grid-system goodness that Zen plays nicely with. To do so, run this command:
gem install zen-grids
Fire Up Compass
Yay, we’re ready to get going! But first we need to tell Compass to start keeping an eye out for file changes so that it can recompile our Sass into regular old CSS for the browser on the fly as changes are made.
To do that, just navigate to your subtheme’s directory and run:
compass watch
As always with Compass, it’s a good idea to run a quick sanity check by editing a Sass file to see if Compass detects the change and recompiles the CSS. So go ahead and make an edit to any Sass file and see if you get a message like this:
Change detected at 10:34:47 to: some/file/path.scss
overwrite some/css/path.css
If so, you’re ready to rock. If not, you might want to go through the previous steps one more time to make sure you didn’t miss anything.
Getting to Work
You did great at creating that subtheme and installing all the dependencies, so now let’s put it to work and start styling your site.
Let’s take a little tour of Zen’s code. In the root of your subtheme, here’s what you’ll see:
config.rb
The Sass/Compass configuration file
css/
Compiled CSS spit out by the Sass compiler
sass/
SCSS files; this is your home base
sass-extensions/
Used for third-party extensions to Sass, such as Zen Grids (which is the only one there by default); you can also think of this as the vendor/ directory
images/
Theme-related images
js/
Theme/presentation-related JavaScript
templates/
All .tpl.php files go here (node templates, page templates, etc.)
template.php
Regular old template.php used for preprocess functions
themename.info
Regular old .info file used to tell Drupal about your theme
So obviously, we will be doing the bulk of our work in the sass/ diretory since that’s where the actual styles go.
The first thing to note is that Zen 5.4 and later tends to encourage the SMACSS (“Scalable and Modular Architecture for CSS”) guidelines for categorizing and organizing CSS rules. Explaining the details of SMACSS is outside the scope of this book, but the basic idea is that you organize rules into five buckets:
1. Base — Site defaults that are applied directly to element tags
2. Layout — Used for adjusting placement and flow of page components and areas
3. Module — Used for individual chunks of HTML
4. State — Styles that depend on some dynamic condition (anything that can start with “is,” like active, collapsed, published, etc.)
5. Theme — Not used as often and not needed in our case, so we will ignore this one
When we take a look at Zen’s Sass files, we can split them up into the SMACSS organization technique, as illustrated in Figure 5-1:
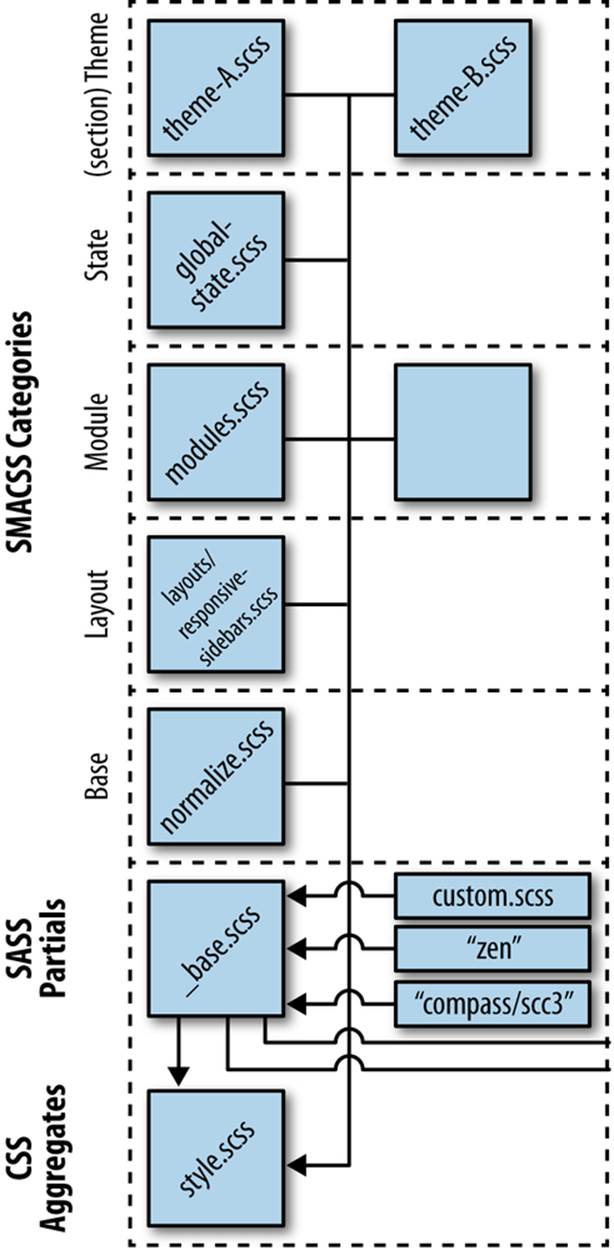
Figure 5-1. The SMACSS organization technique
So at a high level, when theming with Zen 5.4 and later, we want to categorize rules into the Sass files as laid out there.
Working With Zen Grids
Since Zen is a fairly basic implementation of Sass/Compass into Drupal and it doesn’t have a lot of theme-specific helpers or anything, there’s really not much to talk about that we hadn’t already discussed in Chapter 3.
One exception to that is Zen Grids, the grid system built by John Albin and named after Zen itself. Zen Grids is a general purpose Sass grid framework and can be used outside of Drupal just as easily as inside of Drupal.
It’s actually strikingly similar to Singularity, as covered in Chapter 4’s discussion of Aurora. As an example, let’s assume we have some CSS that looks like this, which was taken from Zen Grids’ excellent documentation:
<div class="container">
<article class="content">
Tha main content. We like semantic HTML ordering.
</article>
<aside class="aside1">
An aside.
</aside>
<aside class="aside2">
Another aside.
</aside>
<footer class="footer1">
A footer.
</footer>
<footer class="footer2">
Another footer.
</footer>
</div>
Here’s what a simple grid might look like, complete with comments about what each line is doing:
// Import Zen Grids with this statement.
@import "zen";
// Set the total number of columns in the grid.
$zen-column-count: 7;
// Set the gutter size. A half-gutter is used on each side of each column.
$zen-gutter-width: 10px;
.container {
// Apply this mixin to the container to initialize the grid on it.
@include zen-grid-container;
}
.aside1 {
// Make this grid item span 2 columns and position it in the 1st column.
@include zen-grid-item(2, 1);
}
.content {
// Make this grid item span 4 columns and position it in the 3rd column.
@include zen-grid-item(4, 3);
}
.aside2 {
// Make this grid item span 1 columns and position it in the 7th column.
@include zen-grid-item(1, 7);
}
.footer1 {
// Apply this mixin to start a new row.
@include zen-clear();
// Make this grid item span 3 columns and position it in the 5th column.
@include zen-grid-item(3, 5);
}
.footer2 {
// Make this grid item span 4 columns and position it in the 1st column.
// Note that this puts it before footer1 visually despite being after
// it in the markup.
@include zen-grid-item(4, 1);
}
That’s pretty much all you need to create some advanced grids with Zen Grids. The syntax is about as simple as you’re likely to find on a grid system with any amount of flexibility.
And that’s more or less a wrap on Zen. It’s just a super simple theme that hands you a code structure, some Sass integration, and a grid system, and gets out of your way. Now let’s take a look at the opposite end of the spectrum with Omega.
All materials on the site are licensed Creative Commons Attribution-Sharealike 3.0 Unported CC BY-SA 3.0 & GNU Free Documentation License (GFDL)
If you are the copyright holder of any material contained on our site and intend to remove it, please contact our site administrator for approval.
© 2016-2026 All site design rights belong to S.Y.A.