PHP, MySQL, JavaScript & HTML5 All-in-One For Dummies (2013)
Book I: Getting Started with PHP & MySQL
Chapter 3: Installing PHP
In This Chapter
![]() Checking whether PHP needs to be installed
Checking whether PHP needs to be installed
![]() Installing PHP on Windows, Mac OS X, and Linux
Installing PHP on Windows, Mac OS X, and Linux
![]() Configuring your web server for PHP
Configuring your web server for PHP
![]() Configuring PHP
Configuring PHP
![]() Testing PHP
Testing PHP
![]() Troubleshooting the PHP installation
Troubleshooting the PHP installation
You might or might not need to install PHP, depending on which operating system you’re using. PHP isn’t provided with the Windows operating system. In many cases with other operating systems, however, PHP is already installed. For instance, some recent Linux and Mac distributions automatically install PHP.
You can check to see whether PHP needs to be installed by following the instructions in this chapter. If it isn’t currently installed or if you have an older version that needs to be updated, you need to install PHP.
Installing PHP includes the following steps, which are explained in detail in this chapter:
1. Check to find out whether PHP needs to be installed.
2. Obtain the PHP software, usually by downloading it from a website.
3. Install PHP.
4. Configure your web server for PHP.
5. Configure PHP.
6. Test PHP.
If you encounter any problems, some additional troubleshooting might be required, and we tell you how to do that, also, in this chapter.
Checking the PHP Installation
To see whether PHP is installed, search your hard drive for any PHP files:
![]() Linux/Unix/Mac: Type the following:
Linux/Unix/Mac: Type the following:
find / -name "php*"
![]() Windows: Use the Find feature (choose Start⇒Find) to search for php*. In general, PHP isn’t installed on Windows computers.
Windows: Use the Find feature (choose Start⇒Find) to search for php*. In general, PHP isn’t installed on Windows computers.
If you don’t find any PHP files, PHP isn’t installed. In the next section, we describe how to obtain and install PHP.
If you find PHP files on your computer, PHP might or might not be ready to go. The files might reside on your hard drive, but PHP might not have been installed. Or PHP might be installed, but it might not be the most recent version. In that case, you might want to install the most up-to-date version.
You can test whether PHP is ready to go using the testing procedure described in the section Testing PHP, later in this chapter. The tests in that section determine whether PHP is installed and tell you which version is installed.
Most Mac OS X versions since 10.3 come with PHP already installed, but Apache might not be configured to handle PHP code. If PHP is installed on your Mac but doesn't seem to be working, try following the instructions in the section Configuring Your Web Server for PHP, later in this chapter. Editing the httpd.conf file might be all you need to do to get your PHP up and running.
Obtaining PHP
At the time of this writing, two versions of PHP are available: PHP 4 and PHP 5. When PHP 6 is released, three versions of PHP might be available for a period of time. If you’re installing PHP for the first time and creating your first website, you should download PHP 5, or PHP 6 if it is available at the time you read this book.
 You should install an older version of PHP only if you need to maintain or modify an existing website with existing code.
Code that’s written for one version of PHP might need to be modified to run on another version of PHP. If you have a lot of code, you might want to update the code over a period of time.
The sections that follow provide some general information about what you’ll find on the PHP website and tell you how to get the PHP installation file for Windows, Linux, and Mac — and also how to obtain an all-in-one installation kit that includes PHP plus more web development tools. Choose the option that best fits your needs. After downloading the file, you can verify that the file is secure.
Downloading from the PHP website
PHP for all operating systems is available on the PHP website at www.php.net. You can download source code to compile on your operating system. Compiling and installing source code isn't difficult on Linux and the Mac OS, but requires expert knowledge and software on Windows.
Binary files — compiled, ready-to-run files that just need to be copied to the correct location — are available only for Windows. You can obtain binary files for Linux and the Mac OS from other web locations, but not from the PHP website.
Obtaining PHP for Windows
You can easily install PHP from binary files that you can download from the PHP website at www.php.net. You can download a Zip file that contains all the necessary files or an installer that you can run to install all the PHP files. The PHP documentation recommends that you install PHP from the Zip file for better understanding of the installation and easier addition of extensions later. The directions in this chapter provide instructions for installing PHP from the Zip file.
 Although Windows users can compile and install PHP from source code, also available from the PHP website, it is difficult and should only be attempted by advanced users. It requires advanced knowledge and special software.
To download the Windows Zip file, take these steps:
1. Go to www.php.net/downloads.php.
2. Download the Zip package for the most recent version of PHP.
Obtaining PHP for Linux
Most recent versions of Linux include PHP. If you need to install PHP or upgrade to a more recent version, most Linux distributions provide software on their website that you can download and install on your specific Linux system. In addition, most Linux systems provide utilities specifically for downloading and installing software. For instance, Fedora provides the yum utility that downloads and installs software from the Fedora website, and Ubuntu includes a package manager as well. See the documentation for your Linux distribution for information on how to download and install software on your Linux system.
In some cases, you might need to install PHP manually. The software provided by the website might not be the most recent or might not be configured to your needs. To install manually, you need to download the source code from the PHP website at www.php.net.
You can easily compile and install PHP from the source code. This process isn’t as technical and daunting as it sounds. Instructions for installing PHP from source code on Linux are provided in this chapter.
Obtaining PHP for the Mac OS
PHP comes already installed on most recent versions of Mac OS X. If you need to install PHP because it isn't installed or an older version is installed, the easiest way is to install from a binary file. The PHP website doesn't provide a binary file, but binary files are provided for some versions of OS X at https://blog.liip.ch/archive/2011/04/13/php-5-3-for-os-x-10-6-one-line-installer.html. The information needed to download and install the binary file is provided at this website. Check the support and extensions provided in the binary file to ensure that you have the features you need.
If the binary file doesn’t provide the features or extensions you need, you can download the source files from the PHP website to compile and install on your Mac. Instructions for installing PHP from the source code are provided in this chapter.
Obtaining all-in-one installation kits
You can obtain some kits that contain and install PHP, MySQL, and Apache in one procedure. These kits can greatly simplify the installation process. However, the software provided might not include the features and extensions that you need.
XAMPP is a popular all-in-one installation kit that contains Apache, PHP, and MySQL. XAMPP is available at www.apachefriends.org/en/xampp.html. Instructions for installing your software using XAMPP are provided in Chapter 5 in this minibook.
WAMPServer is a popular installation kit for Windows that provides recent versions of Apache, PHP, and MySQL. WAMPServer is available at www.wampserver.com.
MAMP is an installation kit for Mac that installs Apache, PHP, and MySQL for Mac OS X. This free package installs a local server environment on your Mac. You can obtain MAMP at www.mamp.info.
Verifying a downloaded file
The PHP website provides methods to verify the software after you download it, as a security precaution to make sure that the file hasn’t been altered by bad guys. You can verify using either the MD5 method or the PGP method. The MD5 method is simpler and is described in this section.
On the download web page, a long string called a signature is displayed below the file you downloaded. Here’s an example:
MD5: 6112f6a730c680a4048dbab40e4107b3
The downloaded PHP file needs to provide the same MD5 signature shown on the download page. You use software on your computer to check the MD5 signature of the downloaded file. On Windows, you might need to download and install MD5 software. You can find software that checks MD5 signatures at www.fourmilab.ch/md5. Your Linux or Mac system includes software to check the MD5 signature.
You can check the MD5 signature of the downloaded file at a command line prompt, such as the command prompt window in Windows. You may need to be in the directory where the downloaded file resides. To check the MD5 signature, type:
md5 filename
Use the name of the file that you downloaded, such as md5 php-5.2.1-Win32.zip. In Windows, you might need to copy the downloaded file to the directory where the MD5 software (such as md5.exe) is installed, change to this directory, and then type the preceding command.
A signature displays. The signature here should be the same signature displayed under the filename on the download page of the PHP website.
HashCheck is a simple, open source (free) Windows program with a graphical interface that allows you to check MD5 signatures by clicking buttons and dragging filenames, rather than by typing commands in a command prompt window. You can obtain it athttp://code.kliu.org/hashcheck.
You can verify the downloads for Apache and MySQL with a similar procedure, as discussed elsewhere in this minibook.
Installing PHP
Although PHP runs on many platforms, we describe installing it on Unix, Linux, Mac, and Windows, which represent the operating systems in use by the majority of websites on the Internet. PHP runs with several web servers, but these instructions focus mainly on Apache and Internet Information Servers (IIS) because together they power almost 90 percent of the websites on the Internet. If you need instructions for other operating systems or web servers, see the PHP website, at www.php.net.
This chapter provides installation instructions for PHP 5 and 6. If you're installing an earlier version, there are some small differences, so read the install.txt file provided with the PHP distribution.
Installing on Unix and Linux
You can install PHP as an Apache module or as a stand-alone interpreter. If you’re using PHP as a scripting language in web pages to interact with a database, install PHP as an Apache module. PHP is faster and more secure as a module. We don’t discuss PHP as a stand-alone interpreter in this book.
We provide step-by-step instructions in the next few sections for compiling and installing PHP on Unix and Linux. Read all the way through the steps before you begin the installation procedure.
Preparing for installation on Unix and Linux
Before beginning to install PHP, check the following:
![]() The Apache module mod_so is installed. It usually is. To display a list of all the modules, type the following at the command line:
The Apache module mod_so is installed. It usually is. To display a list of all the modules, type the following at the command line:
httpd -l
You might have to be in the directory where httpd is located before the command will work. The output usually shows a long list of modules. All you need to be concerned with for PHP is mod_so. If mod_so isn't loaded, Apache must be reinstalled using the enable-module=so option.
![]() The apxs utility is installed. The apxs utility is installed when Apache is installed. You should be able to find a file called apxs. If Apache was already installed on Linux or installed from a Linux distribution website, apxs might not have been installed. Some Apache installations consist of two installation packages: one for the basic Apache server and one for Apache development tools. The development tools, which contain apxs, might need to be installed.
The apxs utility is installed. The apxs utility is installed when Apache is installed. You should be able to find a file called apxs. If Apache was already installed on Linux or installed from a Linux distribution website, apxs might not have been installed. Some Apache installations consist of two installation packages: one for the basic Apache server and one for Apache development tools. The development tools, which contain apxs, might need to be installed.
![]() The Apache version is recent. See Chapter 2 of this minibook for a discussion of Apache versions. To check the version, type the following:
The Apache version is recent. See Chapter 2 of this minibook for a discussion of Apache versions. To check the version, type the following:
httpd -v
You might have to be in the directory where httpd is located before the command will work.
Installing on Unix and Linux
To install PHP on Unix or Linux with an Apache web server, follow these steps:
1. Change to the directory where you downloaded the source code (for instance, cd-/usr/src).
You see a file named php-, followed by the version name and tar.gz. This file is a tarball that contains many files.
2. Unpack the tarball.
The command for PHP version 5.4.5 is
gunzip -c php-5.4.5.tar.gz | tar -xf –
A new directory called php-5.4.5 is created with several subdirectories.
3. Change to the new directory that was created when you unpacked the tarball.
For example, type cd php-5.4.5.
4. Type the configure command.
The configure command consists of ./configure followed by the configuration options you want to use. The minimum configure command is
./configure --with-apxs2
You might want to use other configuration options with the configure command. The available configuration options are discussed in the section Installation options for Unix, Linux, and Mac, later in this chapter.
 For this book, you need to activate MySQL support now, which is done with a configuration option. Activating MySQL support is discussed in Chapter 4 of this minibook.
When you type the configure command, you see many lines of output. Wait until the configure command has finished. This might take a few minutes. If the configure command fails, it provides an informative message. Usually, the problem is missing software. You see an error message indicating that certain software can't be found. In that case, you need to install or update the software that PHP needs.
If the apxs utility isn't installed in the expected location, you see an error message indicating that apxs couldn't be found. If you get this message, check the location where apxs is installed (find / -name apxs2) and include the path in the with-apxs option of the configure command: --with-apxs=/usr/sbin/apxs2 or /usr/local/apache/bin/apxs2 or possibly /usr/bin/apxs2.
5. Type make.
You see many lines of output. Wait until it’s finished. This might take a few minutes.
6. Type make install.
Installing on Mac OS X
Beginning with PHP 4.3, you can install PHP on Mac OS X as easily as on Unix and Linux. You install PHP by downloading source files, compiling the source files, and installing the compiled programs.
Read all the way through the steps before you begin. Be sure that you understand it all clearly and have everything prepared so you don’t have to stop in the middle of the installation.
Preparing for a Mac OS X installation
If you want to use PHP with Apache for your website, Apache must be installed. Most Mac OS X systems come with Apache already installed. For more information on Apache, see Chapter 2 of this minibook.
Before beginning to install PHP, check the following:
![]() The Apache version is recent. See Chapter 2 of this minibook for a discussion of Apache versions. To check the version, type the following on the command line:
The Apache version is recent. See Chapter 2 of this minibook for a discussion of Apache versions. To check the version, type the following on the command line:
httpd -v
You might have to be in the directory where httpd is located before the command will work.
![]() The Apache module mod_so is installed. It usually is. To display a list of all the modules, type the following:
The Apache module mod_so is installed. It usually is. To display a list of all the modules, type the following:
httpd -l
You might have to be in the directory where httpd is located before the command will work. The output usually shows a long list of modules. All you need to be concerned with for PHP is mod_so. If mod_so isn't loaded, you must reinstall Apache.
![]() The apxs utility is installed. apxs is normally installed when Apache is installed. To determine whether it's installed on your computer, look for a file called apxs2. If you can find the file, apxs is installed; if not, it isn't.
The apxs utility is installed. apxs is normally installed when Apache is installed. To determine whether it's installed on your computer, look for a file called apxs2. If you can find the file, apxs is installed; if not, it isn't.
![]() The files from the Developer's Tools CD are installed. This CD is supplemental to the main Mac OS X distribution. If you can't find the CD, you can download the tools from the Apple Developer Connection website at https://developer.apple.com/technologies/tools.
The files from the Developer's Tools CD are installed. This CD is supplemental to the main Mac OS X distribution. If you can't find the CD, you can download the tools from the Apple Developer Connection website at https://developer.apple.com/technologies/tools.
Installing on Mac OS X
To install PHP on Mac OS X, follow these steps:
1. Change to the directory where you downloaded PHP (for example, cd-/usr/src).
You see a file named php-, followed by the version name and tar.gz. This file contains several files compressed into one. The file might have been unpacked by the expander automatically so that you see the directory php-5.4.5 (or similar, the version will likely be different). If so, skip to Step 3.
2. Unpack the tarball.
The command to unpack the tarball for PHP version 5.4.5 is
tar xvfz php-5.4.5.tar.gz
A new directory called php-5.4.5 is created with several subdirectories.
3. Change to the new directory that was created when you unpacked the tarball.
For example, you can use a command like the following:
cd php-5.4.5
4. Type the configure command.
The configure command consists of ./configure followed by all the necessary options. The minimum set of options follows:
• Location options: Because the Mac stores files in different locations than the PHP default locations, you need to tell PHP where files are located. Use the following options:
--prefix=/usr
--sysconfdir=/etc
--localstatedir=/var
--mandir=/usr/share/man
• zlib option: --with-zlib.
• Apache option: If you're installing PHP for use with Apache, use the following option: --with-apxs or --with-apxs2.
The most likely configuration command is
./configure --prefix=/usr --sysconfdir=/etc
--localstatedir=/var --mandir=/usr/share/man
--with-apxs –-with-zlib
You also need to use an option to include MySQL support. See Chapter 4 of this minibook for information on including MySQL support.
You can type the configure command on one line. If you use more than one line, type \ at the end of each line.
You see many lines of output. Wait until the configure command has finished. This might take a few minutes.
If the apxs utility isn't installed in the expected location, you see an error message, indicating that apxs couldn't be found. If you get this error message, check the location where apxs is installed (find / -name apxs) and include the path in the with-apxs option of the configurecommand: --with-apxs=/usr/sbin/apxs.
You might need to use many other options, such as options that change the directories where PHP is installed. These configure options are discussed in the Installation options for Unix, Linux, and Mac section, later in this chapter.
5. Type make.
You see many lines of output. Wait until it’s finished. This might take a few minutes.
6. Type sudo make install.
Installation options for Unix, Linux, and Mac
The preceding sections give you steps to quickly install PHP on Unix, Linux, or Mac with the options needed for the applications in this book. However, you might want to install PHP differently. For instance, all the PHP programs and files are installed in their default locations, but you might need to install PHP in different locations. Or you might be planning applications using additional software. You can use additional command line options if you need to configure PHP for your specific needs. Just add the options to the command shown in Step 4 of the Unix and Mac installation instructions.
 In general, the order of the options in the command line doesn’t matter but the case does. Unix, Linux, and Mac commands are typically case sensitive, so if you see the command in lowercase (which is typical), you need to make sure you use lowercase as well when you type it in.
Table 3-1 shows the most commonly used options for PHP. To see a list of all possible options, type ./configure --help.
Table 3-1 PHP Configure Options
|
Option |
Tells PHP To |
|
prefix=PREFIX |
Set the main PHP directory to PREFIX. The default PREFIX is /usr/local. |
|
exec-prefix=EPREFIX |
Install architecture dependent files in EPREFIX. The default EPREFIX is PREFIX. |
|
bindir=DIR |
Install user executables in DIR. The default is EPREFIX/bin. |
|
infodir=DIR |
Install info documentation in DIR. The default is PREFIX/info. |
|
mandir=DIR |
Install man files in DIR. The default is PREFIX/man. |
|
with-config-file-path=DIR |
Look for the configuration file (php.ini) in DIR. Without this option, PHP looks for the configuration file in a default location, usually /usr/local/lib. |
|
disable-libxml |
Disable XML support that’s included by default. |
|
enable-ftp |
Enable FTP support. |
|
enable-magic-quotes |
Enable automatic escaping of quotes with a backslash. |
|
with-apxs=FILE |
Build a shared Apache module using the apxs utility located at FILE. Default FILE is apxs. |
|
with-apxs2=FILE |
Build a shared Apache 2 module using the apxs utility located at FILE. The default FILE is apxs. |
|
with-mysql=DIR |
Enable support for MySQL 4.0 or earlier databases. The default DIR where MySQL is located is /usr/local. |
|
with-mysqli=DIR |
Enable support for MySQL 4.1 or later databases. DIR needs to be the path to the file named mysql_config that was installed with 4.1. Available only with PHP 5 or later. |
|
with-openssl=DIR |
Enable OpenSSL support for a secure server. Requires OpenSSL version 0.9.5 or later. |
|
with-oci8=DIR |
Enable support for Oracle 7 or later. Default DIR is contained in the environmental variable, ORACLE_HOME. |
|
with-oracle=DIR |
Enable support for earlier versions of Oracle. The default DIR is contained in the environmental variable, ORACLE_HOME. |
|
with-pgsql=DIR |
Enable support for PostgreSQL databases. The default DIR where PostgreSQL is located is /usr/local/pgsql. |
|
with-servlet=DIR |
Include servlet support. DIR is the base install directory for the JSDK. The Java extension must be built as a shared .dll. |
Installing on Windows
PHP runs on Microsoft Windows beginning with Windows 98, though you’ll likely have difficulty getting everything running if you’re still using Windows 98. A newer version of Windows, such as Windows XP or later, ideally Windows 7 or later, is recommended.
To install PHP 5 or 6 on Windows, you unzip the file that contains all the necessary files for PHP and store the files in the appropriate locations. As an alternative to unzipping the files, you could run a PHP installer, which may also be available for your version of Windows. You can find out at the PHP website.
The following steps show how to install PHP on Windows using the Zip file:
1. Extract the files from the .zip file into the directory where you want PHP to be installed, such as c:\php.
The Zip file is named php, followed by the version number and win32.zip, such as php5.4.5-Win32.zip-. If you double-click the file, it should open. Copy the files to an appropriate directory or extract them, if your unzip software has that option. C:\php is a good choice for installation because many configuration files assume that's where PHP is installed, so the default settings are more likely to be correct.
 Do not install PHP in a directory with a space in the path, such as in Program Files\PHP.
You now have a directory and several subdirectories that contain all the files from the Zip file. You should be able to run PHP programs. Occasionally, PHP needs files that it can't find. When this happens, PHP displays an error message when you run a PHP program, saying that it can't find a particular file with a .dll extension. You can usually find the DLL in the ext subdirectory and copy it into the main PHP directory.
2. Activate MySQL support.
Instructions are provided in Chapter 4 of this minibook.
3. Configure your web server.
The next section provides instructions for configuring your web server.
4. Configure PHP.
Follow the directions in the Configuring PHP section, later in this chapter.
Configuring Your Web Server for PHP
Your web server needs to be configured to recognize PHP scripts and run them. Here we tell you how to configure both Apache and IIS on Windows, and we also tell you how to configure Apache on Linux and Mac.
Configuring your web server on Windows
You can’t have Apache and Internet Information Services (IIS) running at the same time using the same port number. Either shut down one web server or tell them to listen on different ports. (We tell you how to change the port on which Apache listens in Chapter 2 of this minibook.)
In this section, we tell you how to configure both Apache and IIS for PHP.
Configuring Apache on Windows
You must edit an Apache configuration file, called httpd.conf, before PHP can run properly. It's possible that PHP automatically configured itself to work with Apache; if that's the case, you'll see the LoadModule directive already present and uncommented and therefore following these steps is not necessary. To configure Apache for PHP, follow these steps:
1. Open httpd.conf for editing.
To open the file, choose Start⇒Programs⇒Apache HTTPD Server⇒Configure Apache Server⇒Edit Configuration.
If Edit Configuration isn't on your Start menu, find the httpd.conf file on your hard drive, usually in the directory where Apache is installed, in a conf subdirectory (for example, c:\program files\Apache group\Apache\conf). Open this file in a text editor, such as Notepad or WordPad.
2. Activate the PHP module.
Look for the module statement section in the file and locate the following line:
#LoadModule php5_module "c:/php/php5apache2_2.dll"
Remove the # from the beginning of the line to activate the module. The name of the module may differ slightly depending on the version of PHP and the version of Apache that you're using.
3. Tell Apache which files are PHP programs.
Look for a section describing AddType. This section might contain one or more AddType lines for other software. The AddType line for PHP is
AddType application/x-httpd-php .php
Look for this line. If you find it with a pound sign at the beginning of the line, remove the pound sign. If you don't find the line, add it to the list of AddType statements. You can specify any extension or series of extensions.
This line tells Apache that files with the .php extension are files of the type application/x-httpd-php. Apache then knows to send files with .php extensions to the PHP module.
4. Start Apache (if it isn’t running) or restart Apache (if it is running).
You can start it as a service in later versions of Windows by choosing Start⇒Programs⇒Apache HTTPD Server⇒Control Apache Server and then selecting Start or Restart. You can start it in Windows 98/Me by choosing Start⇒Programs⇒Apache Web Server⇒Management.
Sometimes restarting Apache isn’t sufficient; you must stop it first and then start it. In addition, your computer is undoubtedly set up so that Apache will start whenever the computer starts. Therefore, you can shut down and then start your computer to restart Apache.
Configuring IIS
PHP can also be used with IIS. Though we focus mainly on Apache in the book, you can use these steps to configure IIS to work with:
1. Enter the IIS Management Console.
You can enter it by choosing Start⇒Programs⇒Administrative Tools⇒Internet Services Manager or Start⇒Control Panel⇒Administrative Tools⇒Internet Services Manager.
2. Right-click your website (such as Default Website).
3. Choose Properties.
4. Click the Home Directory tab.
5. Click the Configuration button.
6. Click the App Mappings tab.
7. Click Add.
8. In the Executable box, type the path to the PHP interpreter.
For example, type c:\php\php-cgi.exe.
9. In the Extension box, type .php.
This will be the extension associated with PHP scripts.
10. Select the Script Engine check box.
11. Click OK.
Repeat Steps 6–10 if you want any extensions in addition to .php to be processed by PHP, such as .phtml.
Configuring Apache on Linux and Mac
You must configure Apache to recognize and run PHP files. An Apache configuration file, httpd.conf, is on your system, possibly in /etc or in /usr/local/apache/conf. You must edit this file before PHP can run properly. Because Apache was installed prior to PHP, the PHP installation process may have edited the file automatically. If this is the case, you'll notice that the PHP module will already appear in the httpd.conf file.
Follow these steps to configure your system for PHP:
1. Open the httpd.conf file so you can make changes.
2. Configure Apache to load the PHP module.
Find the list of LoadModule statements. Look for the following line:
LoadModule php5_module libexec/libphp5.so
If this line isn't there, add it. If a pound sign (#) is at the beginning of the line, remove the pound sign.
3. Configure Apache to recognize PHP extensions.
You need to tell Apache which files might contain PHP code. Look for a section describing AddType. You might see one or more AddType lines for other software. Look for the AddType line for PHP, as follows:
AddType application/x-httpd-php .php
If you find a pound sign (#) at the beginning of the line, remove the pound sign. If you don't find this line, add it to the AddType statements. This line tells Apache to look for PHP code in all files with a .php extension. You can specify any extension or series of extensions.
4. Start the Apache httpd server (if it isn't running) or restart the Apache httpd server (if it is running).
You can start or restart the server with a script that was installed on your system during installation. This script might be apachectl or httpd.apache, and might be located in /bin or /usr/local/apache/bin. For example, you might be able to start the server by typing apachectl start, restart it by using apachectl restart, or stop it by using apachectl stop. Sometimes restarting isn't sufficient; you must stop the server first and then start it.
Configuring PHP
PHP uses settings in a file named php.ini to control some of its behavior. PHP looks for php.ini when it begins and uses the settings that it finds. If PHP can't find the file, it uses a set of default settings. The default location for the php.ini file is one of the following unless you change it during installation:
![]() Windows: The system directory, depending on the Windows version: on Windows 98/Me/XP/Vista/7/8, windows; on Windows NT/2000 (and sometimes XP and Vista), winnt
Windows: The system directory, depending on the Windows version: on Windows 98/Me/XP/Vista/7/8, windows; on Windows NT/2000 (and sometimes XP and Vista), winnt
![]() Unix, Linux, and Mac: /usr/local/lib
Unix, Linux, and Mac: /usr/local/lib
If the php.ini file isn't installed during installation, you need to install it now. A configuration file with default settings, called php.ini-dist, is included in the PHP distribution. Copy this file into the appropriate location, such as the default locations just mentioned, changing its name tophp.ini.
If you have a previous version of PHP installed (such as PHP 4.3), make a backup copy of the php.ini file before you overwrite it with the php.ini file for PHP 5 or 6. You can then see the settings you are currently using and change the settings in the new php.ini file to match the current settings.
To configure PHP, follow these steps:
1. Open the php.ini file for editing.
2. Change the settings you want to change.
Steps 3, 4, and 5 mention some specific settings that you should always change if you’re using the specified environment.
3. Only if you’re using PHP 5 or earlier, turn off magic quotes.
Look for the following line:
magic_quotes-gpc On
Change On to Off.
4. Only if you’re using PHP 5 or 6 on Windows, activate mysqli or mysql support.
See Chapter 4 of this minibook for instructions.
5. Only if you’re using PHP on Windows with the IIS web server, turn off force redirect.
Find this line:
;cgi.force_redirect = 1
You need to remove the semicolon so that the setting is active, and also change the 1 to 0. After the changes, the line looks as follows:
cgi.force_redirect = 0
6. Only if you’re using PHP 5 or later, set your local time zone.
Find the line:
;date.timezone =
Remove the semicolon from the beginning of the line. Add the code for your local time zone after the equal sign. For instance, the line might be
date.timezone = America/Los_Angeles
You can find a list of time zone codes at www.php.net/manual/en/timezones.php.
7. Save the php.ini file and restart the web server.
In general, the remaining default settings allow PHP to run okay, but you might need to edit some of these settings for specific reasons. We discuss settings in the php.ini file throughout the book when we discuss a topic that might require you to change settings.
Testing PHP
To test whether PHP is installed and working, follow these steps:
1. Find the directory in which your PHP programs need to be saved.
This directory and the subdirectories under it are your Document Root. The default document root for Apache is htdocs in the directory where Apache is installed. For IIS, it's Inetpub\wwwroot. In Linux, it might be /var/www/html. The web space can be set to a different directory by configuring the web server. If you're using a web hosting company, the staff will supply the directory name.
2. Create the following file somewhere in your web space with the name test.php.
<!doctype html>
<html>
<head>
<title>PHP Test</title>
</head>
<body>
<p>This is an HTML line</p>
<?php
echo "<p>This is a PHP line</p>";
phpinfo();
?>
</body>
</html>
 The file must be saved in your document root in order for the web server to find it.
3. Run the test.php file created in Step 2. That is, type the host name of your web server into the browser address window, followed by the name of the file (for example, type http://www.example.com/test.php).
If your web server, PHP, and the test.php file are on the same computer that you're testing from, you can type http://localhost/test.php.
For the file to be processed by PHP, you need to access the file through the web server — not by choosing File⇒Open from your web browser menu.
The output from the test.php program is shown in Figure 3-1. The output shows two lines, followed by a table. The table is long and shows all the information associated with PHP on your system. It shows PHP information, pathnames and filenames, variable values, and the status of various options. The table is produced by the phpinfo() line in the test script. Anytime that you have a question about the settings for PHP, you can use the phpinfo() statement to display this table and check a setting.
If you see only a blank page or only the first line and not the second line and the table of settings, see the next section.
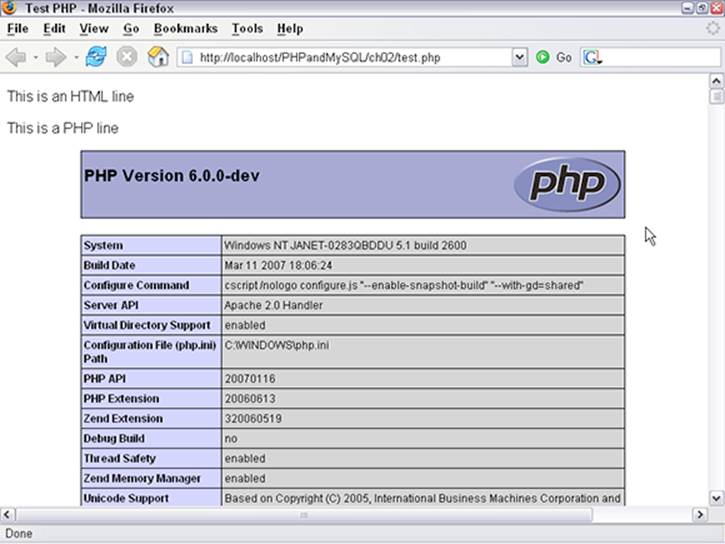
Figure 3-1: PHP settings.
Troubleshooting
This section describes some common problems encountered with the installation of PHP. We don’t stop there, of course. We provide some solutions for those problems, too.
Unable to change PHP settings
If you change settings in your php.ini file but the changes don't seem to have the expected effect on PHP operations, one of two things is probably the cause:
![]() You didn’t restart the web server. If that’s the case, just restart the web server so that the changes will go into effect.
You didn’t restart the web server. If that’s the case, just restart the web server so that the changes will go into effect.
![]() You might not be editing the php.ini file in the location where PHP is reading it. You can check which php.ini file PHP is reading. You might have more than one php.ini file or you might have it stored in the wrong location. When you test PHP using the phpinfo() statement, as shown in the earlier Testing PHP section, PHP outputs many variable values and settings. One of the settings close to the top is Configuration File Path, which shows the path to the location where PHP is looking for the configuration file. If the path ends in a filename, that's the file PHP is using for its configurations. If the path ends in a directory name, PHP is looking in the directory for the configuration file but can't find it, so PHP is using its default configurations.
You might not be editing the php.ini file in the location where PHP is reading it. You can check which php.ini file PHP is reading. You might have more than one php.ini file or you might have it stored in the wrong location. When you test PHP using the phpinfo() statement, as shown in the earlier Testing PHP section, PHP outputs many variable values and settings. One of the settings close to the top is Configuration File Path, which shows the path to the location where PHP is looking for the configuration file. If the path ends in a filename, that's the file PHP is using for its configurations. If the path ends in a directory name, PHP is looking in the directory for the configuration file but can't find it, so PHP is using its default configurations.
Displays error message: Undefined function
You might see an error message stating that you called an undefined function. This message means that you’re calling a function that PHP doesn’t recognize. You might have misspelled the function name, or you might be calling a function in an extension that isn’t activated.
Displays a blank page or HTML output only
When you look at a web page in your browser and a blank page displays or only the HTML output displays, the web server isn’t sending the PHP code to PHP for processing.
You might not be viewing the web page through the web server. You can’t open the web page by selecting File⇒Open Page in your browser menu. You must type the URL to the page, such as http://localhost/test.php, in the browser address window.
You might not have your web server configured correctly for PHP. Check the section Configuring Your Web Server for PHP, earlier in this chapter. Double-check that the Apache directives are typed correctly and in the correct location. Restart the web server after making any changes.
All materials on the site are licensed Creative Commons Attribution-Sharealike 3.0 Unported CC BY-SA 3.0 & GNU Free Documentation License (GFDL)
If you are the copyright holder of any material contained on our site and intend to remove it, please contact our site administrator for approval.
© 2016-2026 All site design rights belong to S.Y.A.