Apache Hadoop YARN: Moving beyond MapReduce and Batch Processing with Apache Hadoop 2 (2014)
2. Apache Hadoop YARN Install Quick Start
Apache Hadoop presents the user with a vast ecosystem of tools and applications. For those familiar with Hadoop version 1, there are two core components; the Hadoop Distributed File System and the integrated MapReduce distributed processing engine. Hadoop YARN is the new replacement for the monolithic MapReduce component found in version 1. The scheduling and resource management have been separated from the management of MapReduce pipelines. While Hadoop version 2 with YARN still provides full MapReduce capability and backwards compatibility with version 1, it also opens the door to many other “application frameworks” that are not based on MapReduce processing.
The acronym YARN is short for “Yet Another Resource Negotiator,” which is a good description of what YARN actually does. Fundamentally, YARN is a resource scheduler designed to work on existing and new Hadoop clusters. The seemingly trivial split of resource scheduling from the MapReduce data flow opens up a whole new range of possibilities for Hadoop and Big Data processing. A separate scheduler allows for better utilization and scalability of the cluster, while simultaneously providing a platform for other non-MapReduce applications to take advantage of the Hadoop Distributed File System and run-time environment. A more detailed discussion of the new Hadoop YARN capabilities can be found in Chapter 3, “Apache Hadoop YARN Core Concepts.”
From a larger vantage point, YARN can be viewed as a cluster-wide Operating System that provides the essential services for applications to take advantage of a large dynamic and parallel resource infrastructure. Applications written in any language can now take advantage of the combined Hadoop compute and storage assets within any size cluster.
Although motivated by the needs of large clusters, YARN is capable of running on a single cluster node or desktop machine. The instructions in this chapter will allow you to install and explore Apache Hadoop version 2 with YARN on a single machine.
Getting Started
A production Apache Hadoop system can take time to set up properly and is not necessary to start experimenting with many of the YARN concepts and attributes. This chapter provides a quick start guide to installing Hadoop version Hadoop 2.2.0 on a single machine (workstation, server, or a laptop).
A more complete description of other installation options, such as those required by a production cluster setup, is given in Chapter 5, “Installing Apache Hadoop YARN.” Before we begin with the quick start, we will mention a few background details that will help with installation. These items include rudimentary knowledge of Linux, package installation, and basic system administration commands.
A basic Apache Hadoop version 2 system has two core components:
![]() The Hadoop Distributed File System (HDFS) for storing data
The Hadoop Distributed File System (HDFS) for storing data
![]() Hadoop YARN for implementing applications to process data
Hadoop YARN for implementing applications to process data
Other Apache Hadoop components, such as Pig and Hive, can be added after the two core components are installed and operating properly.
Steps to Configure a Single-Node YARN Cluster
The following type of installation is often referred to as “pseudo-distributed” because it mimics some of the functionality of a distributed Hadoop cluster. A single machine is, of course, not practical for any production use, nor is it parallel. A small-scale Hadoop installation can provide a simple method for learning Hadoop basics, however.
The recommended minimal installation hardware is a dual-core processor with 2 GB of RAM and 2 GB of available hard drive space. The system will need a recent Linux distribution with Java installed (e.g., Red Hat Enterprise Linux or rebuilds, Fedora, Suse Linux Enterprise, OpenSuse, Ubuntu). Red Hat Enterprise Linux 6.3 is used for this installation example. A bash shell environment is also assumed. The first step is to download Apache Hadoop.
Note that the following commands and files are available for download from the book repository; see Appendix A for details.
Step 1: Download Apache Hadoop
Download the latest distribution from the Hadoop website (http://hadoop.apache.org/). For example, as root do the following:
# cd /root
# wget http://mirrors.ibiblio.org/apache/hadoop/common/hadoop-2.2.0/hadoop-2.2.0.tar.gz
Next create and extract the package in /opt/yarn:
# mkdir –p /opt/yarn
# cd /opt/yarn
# tar xvzf /root/hadoop-2.2.0.tar.gz
Step 2: Set JAVA_HOME
For Hadoop 2, the recommended version of Java can be found at http://wiki.apache.org/hadoop/HadoopJavaVersions. In general, a Java Development Kit 1.6 (or greater) should work. For this install, we will use Open Java 1.6.0_24, which is part of Red Hat Enterprise Linux 6.3. Make sure you have a working Java JDK installed; in this case, it is the Java-1.6.0-openjdk RPM. To include JAVA_HOME for all bash users (other shells must be set in a similar fashion), make an entry in /etc/profile.d as follows:
# echo "export JAVA_HOME=/usr/lib/jvm/java-1.6.0-openjdk-1.6.0.0.x86_64/" > /etc/ profile.d/java.sh
To make sure JAVA_HOME is defined for this session, source the new script:
# source /etc/profile.d/java.sh
Step 3: Create Users and Groups
It is best to run the various daemons with separate accounts. Three accounts (yarn, hdfs, mapred) in the group hadoop can be created as follows:
# groupadd hadoop
# useradd -g hadoop yarn
# useradd -g hadoop hdfs
# useradd -g hadoop mapred
Step 4: Make Data and Log Directories
Hadoop needs various data and log directories with various permissions. Enter the following lines to create these directories:
# mkdir -p /var/data/hadoop/hdfs/nn
# mkdir -p /var/data/hadoop/hdfs/snn
# mkdir -p /var/data/hadoop/hdfs/dn
# chown hdfs:hadoop /var/data/hadoop/hdfs –R
# mkdir -p /var/log/hadoop/yarn
# chown yarn:hadoop /var/log/hadoop/yarn -R
Next, move to the YARN installation root and create the log directory and set the owner and group as follows:
# cd /opt/yarn/hadoop-2.2.0
# mkdir logs
# chmod g+w logs
# chown yarn:hadoop . -R
Step 5: Configure core-site.xml
From the base of the Hadoop installation path (e.g., /opt/yarn/hadoop-2.2.0), edit the etc/hadoop/core-site.xml file. The original installed file will have no entries other than the <configuration> </configuration> tags. Two properties need to be set. The first is the fs.default.name property, which sets the host and request port name for the NameNode (metadata server for HDFS). The second is hadoop.http.staticuser.user, which will set the default user name to hdfs. Copy the following lines to the Hadoop etc/hadoop/core-site.xml file and remove the original empty <configuration> </configuration> tags.
<configuration>
<property>
<name>fs.default.name</name>
<value>hdfs://localhost:9000</value>
</property>
<property>
<name>hadoop.http.staticuser.user</name>
<value>hdfs</value>
</property>
</configuration>
Step 6: Configure hdfs-site.xml
From the base of the Hadoop installation path, edit the etc/hadoop/hdfs-site.xml file. In the single-node pseudo-distributed mode, we don’t need or want the HDFS to replicate file blocks. By default, HDFS keeps three copies of each file in the file system for redundancy. There is no need for replication on a single machine; thus the value of dfs.replication will be set to 1.
In hdfs-site.xml, we specify the NameNode, Secondary NameNode, and DataNode data directories that we created in Step 4. These are the directories used by the various components of HDFS to store data. Copy the following lines into Hadoop etc/hadoop/hdfs-site.xmland remove the original empty <configuration> </configuration> tags.
<configuration>
<property>
<name>dfs.replication</name>
<value>1</value>
</property>
<property>
<name>dfs.namenode.name.dir</name>
<value>file:/var/data/hadoop/hdfs/nn</value>
</property>
<property>
<name>fs.checkpoint.dir</name>
<value>file:/var/data/hadoop/hdfs/snn</value>
</property>
<property>
<name>fs.checkpoint.edits.dir</name>
<value>file:/var/data/hadoop/hdfs/snn</value>
</property>
<property>
<name>dfs.datanode.data.dir</name>
<value>file:/var/data/hadoop/hdfs/dn</value>
</property>
</configuration>
Step 7: Configure mapred-site.xml
From the base of the Hadoop installation, edit the etc/hadoop/mapred-site.xml file. A new configuration option for Hadoop 2 is the capability to specify a framework name for MapReduce, setting the mapreduce.framework.name property. In this install, we will use the value of “yarn” to tell MapReduce that it will run as a YARN application. First, copy the template file to the mapred-site.xml.
# cp mapred-site.xml.template mapred-site.xml
Next, copy the following lines into Hadoop etc/hadoop/mapred-site.xml file and remove the original empty <configuration> </configuration> tags.
<configuration>
<property>
<name>mapreduce.framework.name</name>
<value>yarn</value>
</property>
</configuration>
Step 8: Configure yarn-site.xml
From the base of the Hadoop installation, edit the etc/hadoop/yarn-site.xml file. The yarn.nodemanager.aux-services property tells NodeManagers that there will be an auxiliary service called mapreduce.shuffle that they need to implement. After we tell the NodeManagers to implement that service, we give it a class name as the means to implement that service. This particular configuration tells MapReduce how to do its shuffle. Because NodeManagers won’t shuffle data for a non-MapReduce job by default, we need to configure such a service for MapReduce. Copy the following lines to the Hadoop etc/hadoop/yarn-site.xml file and remove the original empty <configuration> </configuration> tags.
<configuration>
<property>
<name>yarn.nodemanager.aux-services</name>
<value>mapreduce_shuffle</value>
</property>
<property>
<name>yarn.nodemanager.aux-services.mapreduce.shuffle.class</name>
<value>org.apache.hadoop.mapred.ShuffleHandler</value>
</property>
</configuration>
Step 9: Modify Java Heap Sizes
The Hadoop installation uses several environment variables that determine the heap sizes for each Hadoop process. These are defined in the etc/hadoop/*-env.sh files used by Hadoop. The default for most of the processes is a 1 GB heap size; because we’re running on a workstation that will probably have limited resources compared to a standard server, however, we need to adjust the heap size settings. The values that follow are adequate for a small workstation or server.
Edit the etc/hadoop/hadoop-env.sh file to reflect the following (don’t forget to remove the “#” at the beginning of the line):
HADOOP_HEAPSIZE="500"
HADOOP_NAMENODE_INIT_HEAPSIZE="500"
Next, edit mapred-env.sh to reflect the following:
HADOOP_JOB_HISTORYSERVER_HEAPSIZE=250
Finally, edit yarn-env.sh to reflect the following:
JAVA_HEAP_MAX=-Xmx500m
The following line will need to be added to yarn-env.sh:
YARN_HEAPSIZE=500
Step 10: Format HDFS
For the HDFS NameNode to start, it needs to initialize the directory where it will hold its data. The NameNode service tracks all the metadata for the file system. The format process will use the value assigned to dfs.namenode.name.dir in etc/hadoop/hdfs-site.xml earlier (i.e., /var/data/hadoop/hdfs/nn). Formatting destroys everything in the directory and sets up a new file system. Format the NameNode directory as the HDFS superuser, which is typically the “hdfs” user account.
From the base of the Hadoop distribution, change directories to the “bin” directory and execute the following commands:
# su - hdfs
$ cd /opt/yarn/hadoop-2.2.0/bin
$ ./hdfs namenode -format
If the command worked, you should see the following near the end of a long list of messages:
INFO common.Storage: Storage directory /var/data/hadoop/hdfs/nn has been successfully formatted.
Step 11: Start the HDFS Services
Once formatting is successful, the HDFS services must be started. There is one service for the NameNode (metadata server), a single DataNode (where the actual data is stored), and the SecondaryNameNode (checkpoint data for the NameNode). The Hadoop distribution includes scripts that set up these commands as well as name other values such as PID directories, log directories, and other standard process configurations. From the bin directory in Step 10, execute the following as user hdfs:
$ cd ../sbin
$ ./hadoop-daemon.sh start namenode
The command should show the following:
starting namenode, logging to /opt/yarn/hadoop-2.2.0/logs/hadoop-hdfs-namenode-limulus.out
The secondarynamenode and datanode services can be started in the same way:
$ ./hadoop-daemon.sh start secondarynamenode
starting secondarynamenode, logging to /opt/yarn/hadoop-2.2.0/logs/hadoop-hdfs-secondarynamenode-limulus.out
$ ./hadoop-daemon.sh start datanode
starting datanode, logging to /opt/yarn/hadoop-2.2.0/logs/hadoop-hdfs-datanode-limulus.out
If the daemon started successfully, you should see responses that will point to the log file. (Note that the actual log file is appended with “.log,” not “.out.”). As a sanity check, issue a jps command to confirm that all the services are running. The actual PID (Java Process ID) values will be different than shown in this listing:
$ jps
15140 SecondaryNameNode
15015 NameNode
15335 Jps
15214 DataNode
If the process did not start, it may be helpful to inspect the log files. For instance, examine the log file for the NameNode. (Note that the path is taken from the preceding command.)
vi /opt/yarn/hadoop-2.2.0/logs/hadoop-hdfs-namenode-limulus.log
All Hadoop services can be stopped using the hadoop-daemon.sh script. For example, to stop the datanode service, enter the following (as user hdfs in the /opt/yarn/hadoop-2.2.0/sbin directory):
$ ./hadoop-daemon.sh stop datanode
The same can be done for the NameNode and SecondaryNameNode.
Step 12: Start YARN Services
As with HDFS services, the YARN services need to be started. One ResourceManager and one NodeManager must be started as user yarn (exiting from user hdfs first):
$ exit
logout
# su - yarn
$ cd /opt/yarn/hadoop-2.2.0/sbin
$ ./yarn-daemon.sh start resourcemanager
starting resourcemanager, logging to /opt/yarn/hadoop-2.2.0/logs/yarn-yarn-resourcemanager-limulus.out
$ ./yarn-daemon.sh start nodemanager
starting nodemanager, logging to /opt/yarn/hadoop-2.2.0/logs/yarn-yarn-nodemanager-limulus.out
As when the HDFS daemons were started in Step 1, the status of the running daemons is sent to their respective log files. To check whether the services are running, issue a jps command. The following shows all the services necessary to run YARN on a single server:
$ jps
15933 Jps
15567 ResourceManager
15785 NodeManager
If there are missing services, check the log file for the specific service. Similar to the case with HDFS services, the services can be stopped by issuing a stop argument to the daemon script:
./yarn-daemon.sh stop nodemanager
Step 13: Verify the Running Services Using the Web Interface
Both HDFS and the YARN ResourceManager have a web interface. These interfaces are a convenient way to browse many of the aspects of your Hadoop installation. To monitor HDFS, enter the following (or use your favorite web browser):
$ firefox http://localhost:50070
Connecting to port 50070 will bring up a web interface similar to Figure 2.1.

Figure 2.1 Webpage for HDFS file system
A web interface for the ResourceManager can be viewed by entering the following:
$ firefox http://localhost:8088
A webpage similar to that shown in Figure 2.2 will be displayed.
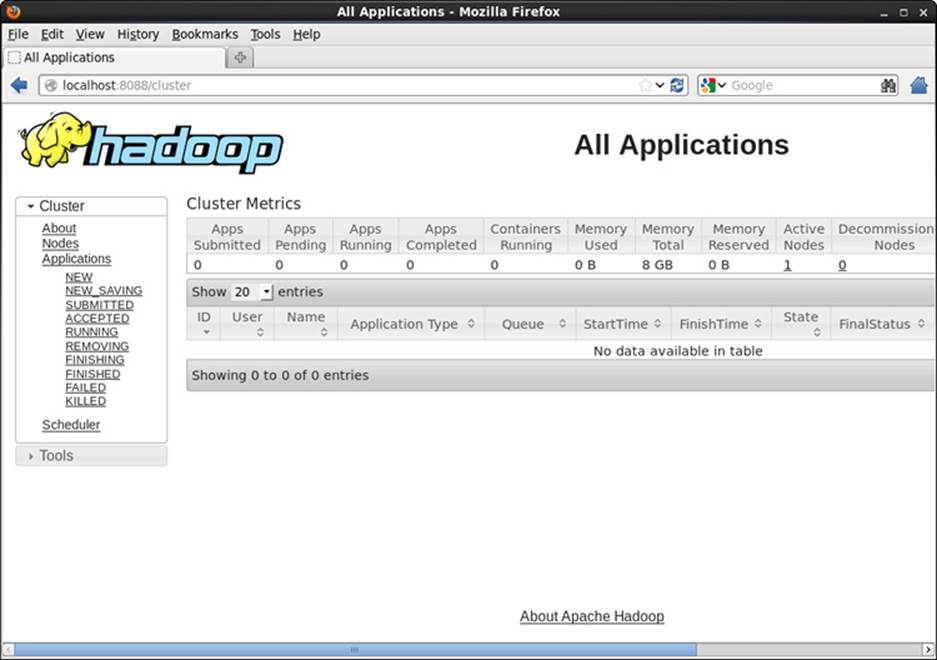
Figure 2.2 Webpage for YARN ResourceManager
Run Sample MapReduce Examples
To test your installation, run the sample “pi” program that calculates the value of pi using a quasi-Monte Carlo method and MapReduce. Change to user hdfs and run the following:
# su - hdfs
$ cd /opt/yarn/hadoop-2.2.0/bin
$ export YARN_EXAMPLES=/opt/yarn/hadoop-2.2.0/share/hadoop/mapreduce
$ ./yarn jar $YARN_EXAMPLES/hadoop-mapreduce-examples-2.2.0.jar pi 16 1000
If the program worked correctly, the following should be displayed at the end of the program output stream:
Estimated value of Pi is 3.14250000000000000000
This example submits a MapReduce job to YARN from the included samples in the share/hadoop/mapreduce directory. The master JAR file contains several sample applications to test your YARN installation. After you submit the job, its progress can be viewed by updating the ResourceManager webpage shown in Figure 2.2.
You can get a full list of examples by entering the following:
./yarn jar $YARN_EXAMPLES/hadoop-mapreduce-examples-2.2.0.jar
To see a list of options for each example, add the example name to this command. The following is a list of the included jobs in the examples JAR file.
![]() aggregatewordcount: An Aggregate-based map/reduce program that counts the words in the input files.
aggregatewordcount: An Aggregate-based map/reduce program that counts the words in the input files.
![]() aggregatewordhist: An Aggregate-based map/reduce program that computes the histogram of the words in the input files.
aggregatewordhist: An Aggregate-based map/reduce program that computes the histogram of the words in the input files.
![]() bbp: A map/reduce program that uses Bailey-Borwein-Plouffe to compute the exact digits of pi.
bbp: A map/reduce program that uses Bailey-Borwein-Plouffe to compute the exact digits of pi.
![]() dbcount: An example job that counts the pageview counts from a database.
dbcount: An example job that counts the pageview counts from a database.
![]() distbbp: A map/reduce program that uses a BBP-type formula to compute the exact bits of pi.
distbbp: A map/reduce program that uses a BBP-type formula to compute the exact bits of pi.
![]() grep: A map/reduce program that counts the matches to a regex in the input.
grep: A map/reduce program that counts the matches to a regex in the input.
![]() join: A job that effects a join over sorted, equally partitioned data sets.
join: A job that effects a join over sorted, equally partitioned data sets.
![]() multifilewc: A job that counts words from several files.
multifilewc: A job that counts words from several files.
![]() pentomino: A map/reduce tile laying program to find solutions to pentomino problems.
pentomino: A map/reduce tile laying program to find solutions to pentomino problems.
![]() pi: A map/reduce program that estimates pi using a quasi-Monte Carlo method.
pi: A map/reduce program that estimates pi using a quasi-Monte Carlo method.
![]() randomtextwriter: A map/reduce program that writes 10 GB of random textual data per node.
randomtextwriter: A map/reduce program that writes 10 GB of random textual data per node.
![]() randomwriter: A map/reduce program that writes 10 GB of random data per node.
randomwriter: A map/reduce program that writes 10 GB of random data per node.
![]() secondarysort: An example defining a secondary sort to the reduce.
secondarysort: An example defining a secondary sort to the reduce.
![]() sort: A map/reduce program that sorts the data written by the random writer.
sort: A map/reduce program that sorts the data written by the random writer.
![]() sudoku: A Sudoku solver.
sudoku: A Sudoku solver.
![]() teragen: Generate data for the terasort.
teragen: Generate data for the terasort.
![]() terasort: Run the terasort.
terasort: Run the terasort.
![]() teravalidate: Check the results of the terasort.
teravalidate: Check the results of the terasort.
![]() wordcount: A map/reduce program that counts the words in the input files.
wordcount: A map/reduce program that counts the words in the input files.
![]() wordmean: A map/reduce program that counts the average length of the words in the input files.
wordmean: A map/reduce program that counts the average length of the words in the input files.
![]() wordmedian: A map/reduce program that counts the median length of the words in the input files.
wordmedian: A map/reduce program that counts the median length of the words in the input files.
![]() wordstandarddeviation: A map/reduce program that counts the standard deviation of the length of the words in the input files.
wordstandarddeviation: A map/reduce program that counts the standard deviation of the length of the words in the input files.
Some of the examples require files to be copied to or from HDFS. For those unfamiliar with basic HDFS operation, an HDFS quick start is provided in Appendix F. If you were able to complete the preceding steps, you should now have a fully functioning Apache Hadoop YARN system running in pseudo-distributed mode.
Wrap-up
With a working installation of YARN, the concepts, examples, and applications found in this book can be explored further without the need for a large production cluster. Keep in mind that many aspects of the configuration were simplified for this single-machine installation. In particular, a single workstation/server install does not have a true parallel HDFS or parallel MapReduce environment. Additional production installation scenarios are provided in Chapter 5, “Installing Apache Hadoop YARN.”