SQL Server Integration Services Design Patterns, Second Edition (2014)
Chapter 19. Business Intelligence Markup Language
You likely purchased this book to learn how to be a more productive SQL Server Integration Services (SSIS) developer. I applaud your desire and decision, and I sincerely hope the information contained herein has provided ideas and information to help you be more productive. I am always on the lookout for ways to become a better data integration developer. Specifically, I seek out ways to improve code quality and reduce the amount of time required to build solutions. Those goals are what motivated me to begin practicing patterns-based development in the first place, which eventually led to the idea for this book.
Business Intelligence Markup Language—or Biml—represents SSIS packages using XML. By storing metadata that describes SSIS packages in XML, Biml approaches data integration development from the perspective of a domain-specific language. Biml provides another means to materialize SSIS design patterns—something other than an SSIS package library containing template packages. Regardless of which mechanism is used, storing design patterns facilitates code production at a consistent and repeatable quality. That may sound innocuous, but I assure you it is important; and it is one of the primary reasons to use design patterns in the first place.
Biml is a complex language. You would do well to gain an understanding of domain-specific languages, XML, and .NET development before diving into Biml development proper. I will not delve into the underlying architecture of Biml in this chapter. I will show you some of the mechanisms and direct you to the Biml documentation websites: the Biml Language (www.varigence.com/Documentation/Language/Index) and the Biml Api (www.varigence.com/Documentation/Api/Index). I believe this is enough to whet your appetite while I am demonstrating the power of Biml.
A Brief History of Business Intelligence Markup Language
In early 2007, the Microsoft Customer Service and Support (CSS) business incubated a new approach to building business intelligence (BI) solutions. As the organization responsible for managing all frontline customer support interactions, CSS has significant analytical and predictive needs—across data from a wide variety of sources. To accelerate the development of its internal solutions, CSS began developing the Vulcan project, which used an XML-based markup language to describe a subset of SISS packages. This created a model where business intelligence solutions could be developed more rapidly and iteratively by globally distributed teams of BI developers.
After a period of significant success building new BI capabilities, the CSS and the SQL Server product team decided to publish the source code for the Vulcan project on CodePlex to enable customers to try the technology and begin building a community around it (http://vulcan.codeplex.com). Feedback from customers showed that they recognized that the approach was powerful and promising, but that the implementation reflected the project’s status as an internal tool used to accelerate an operational delivery team. Without documentation and training resources, usability considerations, and additional features, the cost of adopting Vulcan was prohibitive for all but the most determined customers.
In late 2008, Scott Currie, who worked with the Vulcan technology in CSS, founded Varigence, Inc. Varigence created the Business Intelligence Markup Language (Biml), along with tools to enable its design and development. Although Biml didn’t directly use any code or technology from Vulcan, the approach taken by the Vulcan project inspired the Varigence team to build Biml as an XML-based markup language with rapid, iterative global team development capabilities in mind.
Biml is now available in proprietary products and open source projects and has been published as an open language specification. Varigence has developed a Biml compiler that enables a wide variety of automation and multitargeting capabilities. Additionally, Varigence offers an Integrated Development Environment (IDE) for Biml called Mist. Mist enables rapid and visual design and debugging features for Biml. The open source BIDS Helper project includes Biml functionality, enabling anyone to write and execute Biml code for free.
In this chapter, we will leverage the free Biml functionality included with BIDS Helper to dynamically generate SSIS packages.
![]() Note An object containing Business Intelligence Markup Language is a Biml file. Biml files are “executed” to generate SSIS packages.
Note An object containing Business Intelligence Markup Language is a Biml file. Biml files are “executed” to generate SSIS packages.
Building Your First Biml File
Before we get started with Business Intelligence Markup Language, you will need to download and install the latest version of BIDS Helper from http://bidshelper.codeplex.com. Once it is installed, create a new SSIS solution and project named Biml2014. In Solution Explorer, right-click the project name and click Add New Biml File. The new file, BimlScript.biml, will be created and assigned to the Miscellaneous virtual folder in Solution Explorer. Double-click the file to open it in the editor.
The file begins with the most basic Biml construct, as shown in Listing 19-1.
Listing 19-1. Initial Biml Code
<Biml xmlns="http://schemas.varigence.com/biml.xsd">
</Biml>
Add XML so that your Biml file reads as shown in Listing 19-2. As you type, note IntelliSense auto-indents XML tags to produce well-formed code that is easier to read.
Listing 19-2. Biml After Adding Package XML Metadata
<Biml xmlns="http://schemas.varigence.com/biml.xsd">
<Packages>
<Package Name="TestBimlPackage" ConstraintMode="Parallel">
</Package>
</Packages>
</Biml>
Save the file, right-click BimlScript.biml in Solution Explorer, and then click Generate SSIS Packages. Figure 19-1 shows that a new SSIS package named TestBimlPackage.dtsx is created in the project and file system. The package shows up in Solution Explorer as part of this project.
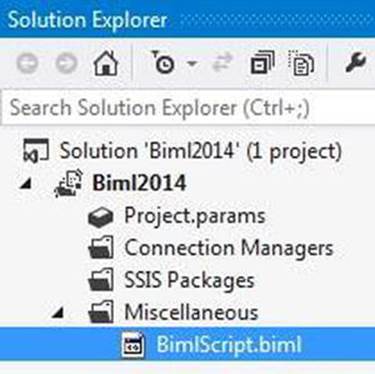
Figure 19-1. TestBimlPackage.dtsx
Let’s return to the BimlScript.biml file and add a task. Create a new XML node beneath the <Package> tag named Tasks. Between the <Tasks> and </Tasks> tags, add a new node named ExecuteSQL.
![]() Tip If you are not seeing IntelliSense with Biml, follow this link: http://bidshelper.codeplex.com/wikipage?title=Manually%20Configuring%20Biml%20Package%20Generator&referringTitle=xcopy%20deploy for Biml IntelliSense configuration instructions.
Tip If you are not seeing IntelliSense with Biml, follow this link: http://bidshelper.codeplex.com/wikipage?title=Manually%20Configuring%20Biml%20Package%20Generator&referringTitle=xcopy%20deploy for Biml IntelliSense configuration instructions.
Add an attribute to the ExecuteSQL root node named Name and set its value to “Test Select”. Create a new XML node between the <ExecuteSQL> and </ExecuteSQL> tags named DirectInput. Between the <DirectInput> and</DirectInput> tags, add the T-SQL statement Select 1 As One. If you are playing along at home, your BimlScript.biml file should look like Listing 19-3.
Listing 19-3. Biml After Adding Initial Metadata Describing an Execute SQL Task
<Biml xmlns="http://schemas.varigence.com/biml.xsd">
<Packages>
<Package Name="TestBimlPackage" ConstraintMode="Parallel">
<Tasks>
<ExecuteSQL Name="Test Select">
<DirectInput>Select 1 As One</DirectInput>
</ExecuteSQL>
</Tasks>
</Package>
</Packages>
</Biml>
To test, save the file and generate the SSIS package from BimlScript.biml in Solution Explorer. (Generate the package by right-clicking on the Biml file and selecting Generate SSIS Packages from the context-sensitive menu). Do you get an error similar to that displayed in Figure 19-2? You should get such an error.

Figure 19-2. Missing ConnectionName attribute
The Business Intelligence Markup Language engine includes validation functionality and it caught the error in Figure 19-2. You can invoke a validation from Solution Explorer; simply right-click BimlScript.biml and then click Check Biml For Errors.
To fix the error, we need to add a ConnectionName attribute to the ExecuteSQL tag. But we don’t have a connection specified at this time. To create a connection, return to the top of BimlScript.biml and add a new line just after the Biml tag and before the Packages tag. On this line, add the Connections XML node. Inside the <Connections> and </Connections> tags, add a Connection XML node. A Connection XML node requires two attributes, Name and ConnectionString. I created a connection to the AdventureWorks2012 database on the default instance of the local SQL Server. Once the Connection metadata is configured, I added a ConnectionName attribute to the ExecuteSQL tag. My BimlScript.biml file now contains the code listed in Listing 19-4.
Listing 19-4. Biml After Adding Connection Metadata
<Biml xmlns="http://schemas.varigence.com/biml.xsd">
<Connections>
<Connection Name="AdventureWorks2012" ConnectionString=
"Data Source=.;Initial Catalog=AdventureWorks2012;Provider=
SQLNCLI10.1;Integrated Security=SSPI;Auto Translate=False;" />
</Connections>
<Packages>
<Package Name="TestBimlPackage" ConstraintMode="Parallel">
<Tasks>
<ExecuteSQL Name="Test Select" ConnectionName="AdventureWorks2012">
<DirectInput>Select 1 As One</DirectInput>
</ExecuteSQL>
</Tasks>
</Package>
</Packages>
</Biml>
Let’s test by regenerating the TestBimlPackage.dtsx SSIS package from BimlScript.biml. When you attempt to generate the SSIS package, you see a dialog that confirms you would like to overwrite the existing TestBimlPackage.dtsx SSIS package. When you confirm this intention, the TestBimlPackage.dtsx SSIS package is regenerated from the metadata contained in the updated BimlScript.biml file. Open the TestBimlPackage.dtsx SSIS package: it should appear as shown in Figure 19-3.
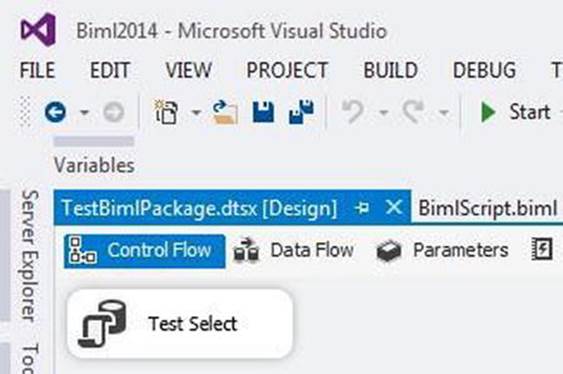
Figure 19-3. A Biml-generated SSIS package
Building a Basic Incremental Load SSIS Package
The incremental load pattern is fundamental in data integration solutions; especially Extract, Transform, and Load (ETL) solutions. Biml provides a mechanism for codifying the incremental load pattern in a repeatable fashion.
Creating Databases and Tables
Let’s prepare for this demo by building a couple databases and tables. Execute the T-SQL statements from Listing 19-5 to build and populate the test databases and tables.
Listing 19-5. Building and Populating Demo Databases and Tables
Use master
Go
If Not Exists(Select name
From sys.databases
Where name = 'SSISIncrementalLoad_Source')
CREATE DATABASE [SSISIncrementalLoad_Source]
If Not Exists(Select name
From sys.databases
Where name = 'SSISIncrementalLoad_Dest')
CREATE DATABASE [SSISIncrementalLoad_Dest]
Go
Use SSISIncrementalLoad_Source
Go
If Not Exists(Select name
From sys.tables
Where name = 'tblSource')
CREATE TABLE dbo.tblSource
(ColID int NOT NULL
,ColA varchar(10) NULL
,ColB datetime NULL constraint df_ColB default (getDate())
,ColC int NULL
,constraint PK_tblSource primary key clustered (ColID))
Use SSISIncrementalLoad_Dest
Go
If Not Exists(Select name
From sys.tables
Where name = 'tblDest')
CREATE TABLE dbo.tblDest
(ColID int NOT NULL
,ColA varchar(10) NULL
,ColB datetime NULL
,ColC int NULL)
If Not Exists(Select name
From sys.tables
Where name = 'stgUpdates')
CREATE TABLE dbo.stgUpdates
(ColID int NULL
,ColA varchar(10) NULL
,ColB datetime NULL
,ColC int NULL)
Use SSISIncrementalLoad_Source
Go
-- insert an "unchanged", a "changed", and a "new" row
INSERT INTO dbo.tblSource
(ColID,ColA,ColB,ColC)
VALUES
(0, 'A', '1/1/2007 12:01 AM', -1),
(1, 'B', '1/1/2007 12:02 AM', -2),
(2, 'N', '1/1/2007 12:03 AM', -3)
Use SSISIncrementalLoad_Dest
Go
-- insert a "changed" and an "unchanged" row
INSERT INTO dbo.tblDest
(ColID,ColA,ColB,ColC)
VALUES
(0, 'A', '1/1/2007 12:01 AM', -1),
(1, 'C', '1/1/2007 12:02 AM', -2)
The T-SQL statements in Listing 19-5 create two databases; SSISIncrementalLoad_Source and SSISIncrementalLoad_Dest. A table named tblSource is created in the SSISIncrementalLoad_Source database and is populated with three rows. Another table named tblDest is created in the SSISIncrementalLoad_Dest database and is populated with two rows.
The configuration created by Listing 19-5 is a basic setup for an incremental load. ColID is the business key. This value should never change and should also uniquely identify the row in the Source and Destination systems. The character values in ColA of the Source and Destination tables indicate clues to the type of row. The A row is present and identical in both the Source and Destination tables. It is an Unchanged row. The row with a ColID value of 1 contains the ColA value B in the Source and the ColA value C in the Destination table. This row has Changed in the Source since it was initially loaded into the Destination table. The row with a ColID value of 2 exists only in the Source. It is a New row.
Adding Metadata
In this section, we will
· Add metadata that defines the connection managers used in the incremental load SSIS design pattern.
· Add a new Biml file to the Biml project and rename it IncrementalLoad.biml.
· Add a Connections XML node just after the <Biml> tag.
· Add two Connection XML nodes configured to connect with the SSISIncremental_Source and SSISIncremental_Dest databases.
Your code should appear as shown in Listing 19-6.
Listing 19-6. Configured Connections for IncrementalLoad.biml
<Biml xmlns="http://schemas.varigence.com/biml.xsd">
<Connections>
<Connection Name="SSISIncrementalLoad_Source" ConnectionString=
"Data Source=(local);Initial Catalog=SSISIncrementalLoad_Source;Provider=
SQLNCLI11.1;Integrated Security=SSPI;" />
<Connection Name="SSISIncrementalLoad_Dest" ConnectionString=
"Data Source=(local);Initial Catalog=SSISIncrementalLoad_Dest;Provider=
SQLNCLI11.1;OLE DB Services=1;Integrated Security=SSPI;" />
</Connections>
</Biml>
Add a Packages node between the </Connections> and </Biml> tags. Just after, add a Package XML node followed by a Tasks node. Immediately thereafter, add an ExecuteSQL node configured as shown in Listing 19-7.
Listing 19-7. Configured Packages, Package, Tasks, and ExecuteSQL Nodes
<Packages>
<Package Name="IncrementalLoadPackage" ConstraintMode=
"Parallel" ProtectionLevel="EncryptSensitiveWithUserKey">
<Tasks>
<ExecuteSQL Name="Truncate stgUpdates" ConnectionName="SSISIncrementalLoad_Dest">
<DirectInput>Truncate Table stgUpdates</DirectInput>
</ExecuteSQL>
</Tasks>
</Package>
</Packages>
The Execute SQL task defined in the Biml in Listing 19-7 will truncate a staging table that will hold rows that have been changed in the Source table since being loaded into the Destination table.
Specifying a Data Flow Task
After the </ExecuteSQL> tag, add a Dataflow XML node. Include a Name attribute and set the value of the Name attribute to "Load tblDest". Inside the <Dataflow> tag, add a PrecedenceConstraints node. Place an Inputs node inside the <PrecedenceConstraints> tag, and an Input node that includes an OutputPathName attribute with the value "Truncate stgUpdates.Output" inside the <Inputs> tag, as shown in Listing 19-8.
Listing 19-8. Adding a Precedence Constraint from the Truncate stgUpdates Execute SQL Task to the “Load tblDest” Data Flow Task
<Dataflow Name="Load tblDest">
<PrecedenceConstraints>
<Inputs>
<Input OutputPathName="Truncate stgUpdates.Output" />
</Inputs>
</PrecedenceConstraints>
</Dataflow>
This code defines an OnSuccess precedence constraint between the Truncate stgUpdates Execute SQL task and the Load tblDest Data Flow task.
Adding Transforms
We are now ready to add metadata that define transforms, which are the heart of a Data Flow task. In this section, we will design an incremental load that includes an OLE DB Source adapter, a Lookup transform, a Condition Split transform, and a couple of OLE DB Destination adapters.
To begin, Add a Transformations node just after the </PrecedenceConstraints> tag. Inside the <Transformations> tags, add an OleDbSource tag with following the attribute and value pairs:
· Name: tblSource Source
· ConnectionName: SSISIncrementalLoad_Source
Inside the <OleDbSource> tag, add an ExternalTableInput node with a Table attribute whose value is "dbo.tblSource". This metadata constructs an OLE DB Source adapter named "tblSource Source" that connects to the SSISIncrementalLoad_Source connection defined earlier inside the <Connections> tag. The OLE DB Source adapter will connect to the table "dbo.tblSource" as specified in the ExternalTableInput tag. The Dataflow XML node will now appear, as shown in Listing 19-9.
Listing 19-9. The Dataflow Node Containing an OLE DB Source Adapter
<Dataflow Name="Load tblDest">
<PrecedenceConstraints>
<Inputs>
<Input OutputPathName="Truncate stgUpdates.Output" />
</Inputs>
</PrecedenceConstraints>
<Transformations>
<OleDbSource Name="tblSource Source" ConnectionName="SSISIncrementalLoad_Source">
<ExternalTableInput Table="dbo.tblSource" />
</OleDbSource>
</Transformations>
</Dataflow>
To continue, add a Lookup XML node immediately after the </OleDbSource> tag. Include the following attribute and value pairs in the <Lookup> tag:
· Name: Correlate
· OleDbConnectionName: SSISIncrementalLoad_Dest
· NoMatchBehavior: RedirectRowsToNoMatchOutput
The Name attribute sets the name of the Lookup transform. The OleDbConnectionName instructs Biml to use the connection manager defined in the <Connections> tag in the listing. The NoMatchBehavior attribute is configured to redirect nonmatching rows to the NoMatch output of the Lookup transform.
Continue configuring the metadata that define the Lookup transform by adding a DirectInput node immediately after the <InputPath> tag. Enter the following T-SQL statement between the <DirectInput> and </DirectInput> tags.
SELECT ColID, ColA, ColB, ColC FROM dbo.tblDest
Add an Inputs node immediately following the </DirectInput> tag. Inside the <Inputs> tag, add a Column node. Include the following attribute name and value pairs.
· SourceColumn: ColID
· TargetColumn: ColID
The preceding metadata provides the mapping between the Available Input columns and Available Lookup columns on the Columns page of the Lookup transform.
Add an Outputs node immediately following the </Inputs> tag. Inside the <Outputs> tag, add three Column nodes with the following attribute name and value pairs.
1.
a. SourceColumn: ColA
b. TargetColumn: Dest_ColA
2.
a. SourceColumn: ColB
b. TargetColumn: Dest_ColB
3.
a. SourceColumn: ColC
b. TargetColumn: Dest_ColC
The preceding metadata “selects” the columns returned from the Lookup transform’s Available Lookup columns on the Columns page. Once added, the Lookup transform metadata should appear as shown in Listing 19-10.
Listing 19-10. Transformations Including Lookup Metadata
<Transformations>
<OleDbSource Name="tblSource Source" ConnectionName="SSISIncrementalLoad_Source">
<ExternalTableInput Table="dbo.tblSource" />
</OleDbSource>
<Lookup Name="Correlate" OleDbConnectionName="SSISIncrementalLoad_Dest"
NoMatchBehavior="RedirectRowsToNoMatchOutput">
<InputPath OutputPathName="tblSource Source.Output" />
<DirectInput>SELECT ColID, ColA, ColB, ColC FROM dbo.tblDest</DirectInput>
<Inputs>
<Column SourceColumn="ColID" TargetColumn="ColID" />
</Inputs>
<Outputs>
<Column SourceColumn="ColA" TargetColumn="Dest_ColA" />
<Column SourceColumn="ColB" TargetColumn="Dest_ColB" />
<Column SourceColumn="ColC" TargetColumn="Dest_ColC" />
</Outputs>
</Lookup>
</Transformations>
Immediately following the </Lookup> tag, add an OleDbDestination XML node with the following attribute name and value pairs.
· Name: tblDest Destination
· ConnectionName: SSISIncrementalLoad_Dest
Inside the <OleDbDestination> tag, add an InputPath node with an OutputPathName attribute set to the value "Correlate.NoMatch". After the <InputPath> tag, add an ExternalTableOutput node with a Table attribute set to the value "dbo.tblDest".
The preceding metadata defines an OLE DB Destination adapter and configures it to connect the Lookup transform’s NoMatch output to the SSISIncrementalLoad_Dest connection defined earlier.
Add a ConditionalSplit XML node immediately after the </OleDbDestination> tag. Add an attribute called Name and set its value to "Filter". Inside the <ConditionalSplit> tags, add an InputPath XML node with an OutputPathName attribute set to"Correlate.Match". Now we need to add a conditional output path. Immediately following the <InputPath> tag, add an OutputPaths node, followed in turn by an OutputPath node containing a Name attribute set to "Changed Rows". Inside the <OutputPaths> tags, create an Expression node. Between the <Expression> and </Expression> tags, add the following SSIS expression.
(ColA != Dest_ColA) || (ColB != Dest_ColB) || (ColC != Dest_ColC)
Once this step is complete, the Transformations XML should appear as shown in Listing 19-11.
Listing 19-11. Transformations Node Including an OLE DB Source, Lookup, Conditional Split, and one OLE DB Destination
<Transformations>
<OleDbSource Name="tblSource Source" ConnectionName="SSISIncrementalLoad_Source">
<ExternalTableInput Table="dbo.tblSource" />
</OleDbSource>
<Lookup Name="Correlate" OleDbConnectionName="SSISIncrementalLoad_Dest"
NoMatchBehavior="RedirectRowsToNoMatchOutput">
<InputPath OutputPathName="tblSource Source.Output" />
<DirectInput>SELECT ColID, ColA, ColB, ColC FROM dbo.tblDest</DirectInput>
<Inputs>
<Column SourceColumn="ColID" TargetColumn="ColID" />
</Inputs>
<Outputs>
<Column SourceColumn="ColA" TargetColumn="Dest_ColA" />
<Column SourceColumn="ColB" TargetColumn="Dest_ColB" />
<Column SourceColumn="ColC" TargetColumn="Dest_ColC" />
</Outputs>
</Lookup>
<OleDbDestination Name="tblDest Destination" ConnectionName="SSISIncrementalLoad_Dest">
<InputPath OutputPathName="Correlate.NoMatch" />
<ExternalTableOutput Table="dbo.tblDest" />
</OleDbDestination>
<ConditionalSplit Name="Filter">
<InputPath OutputPathName="Correlate.Match"/>
<OutputPaths>
<OutputPath Name="Changed Rows">
<Expression>(ColA != Dest_ColA) || (ColB != Dest_ColB) ||
(ColC != Dest_ColC)</Expression>
</OutputPath>
</OutputPaths>
</ConditionalSplit>
</Transformations>
The conditional split metadata most recently added configures a single output named "Changed Rows" and assigns an SSIS expression designed to detect changes in rows that exist in both the Source and Destination tables.
The final component in our Data Flow task is an OLE DB Destination adapter designed to stage rows that will be updated after the data flow completes execution. Immediately following the </ConditionalSplit> tag, add an OleDbDestination node with the following attribute name and value pairs.
· Name: stgUpdates
· ConnectionName: SSISIncrementalLoad_Dest
Inside the <OleDbDestination> tag, add a new node named InputPath with an attribute named OutputPathName and the value set to "Filter.Changed Rows". Immediately thereafter, add a node named ExternalTableOutput that includes a Table attribute set to"dbo.stgUpdates". This metadata defines an OLE DB Destination adapter that connects the Changed Rows output of the conditional split named Filter to a table named dbo.stgUpdates in the database defined by the SSISIncrementalLoad_Dest connection defined previously.
The complete Data Flow task metadata is shown in Listing 19-12.
Listing 19-12. The Completed Dataflow XML Node
<Dataflow Name="Load tblDest">
<PrecedenceConstraints>
<Inputs>
<Input OutputPathName="Truncate stgUpdates.Output" />
</Inputs>
</PrecedenceConstraints>
<Transformations>
<OleDbSource Name="tblSource Source" ConnectionName="SSISIncrementalLoad_Source">
<ExternalTableInput Table="dbo.tblSource" />
</OleDbSource>
<Lookup Name="Correlate" OleDbConnectionName="SSISIncrementalLoad_Dest"
NoMatchBehavior="RedirectRowsToNoMatchOutput">
<InputPath OutputPathName="tblSource Source.Output" />
<DirectInput>SELECT ColID, ColA, ColB, ColC FROM dbo.tblDest</DirectInput>
<Inputs>
<Column SourceColumn="ColID" TargetColumn="ColID" />
</Inputs>
<Outputs>
<Column SourceColumn="ColA" TargetColumn="Dest_ColA" />
<Column SourceColumn="ColB" TargetColumn="Dest_ColB" />
<Column SourceColumn="ColC" TargetColumn="Dest_ColC" />
</Outputs>
</Lookup>
<OleDbDestination Name="tblDest Destination" ConnectionName="SSISIncrementalLoad_Dest">
<InputPath OutputPathName="Correlate.NoMatch" />
<ExternalTableOutput Table="dbo.tblDest" />
</OleDbDestination>
<ConditionalSplit Name="Filter">
<InputPath OutputPathName="Correlate.Match"/>
<OutputPaths>
<OutputPath Name="Changed Rows">
<Expression>(ColA != Dest_ColA) || (ColB != Dest_ColB) ||
(ColC != Dest_ColC)</Expression>
</OutputPath>
</OutputPaths>
</ConditionalSplit>
<OleDbDestination Name="stgUpdates" ConnectionName="SSISIncrementalLoad_Dest">
<InputPath OutputPathName="Filter.Changed Rows" />
<ExternalTableOutput Table="dbo.stgUpdates" />
</OleDbDestination>
</Transformations>
</Dataflow>
There remains one more Execute SQL task to complete our incremental load SSIS package. This task will update the Destination table by applying the rows stored in the "dbo.stgUpdates" table using a single Update T-SQL statement. Applying the updates in this fashion is generally faster than updating each row individually.
To continue developing the demo code, add an ExecuteSQL XML node immediately following the </Dataflow> tag with the following attribute name and value pairs.
· Name: Apply stgUpdates
· ConnectionName: SSISIncrementalLoad_Dest
Immediately following the <ExecuteSQL> tag, add a PrecedenceConstraints node, followed by an Inputs node. Inside the <Inputs> tag add an Input node containing an attribute named OutputPathName set to the value "Load tblDest.Output". Add a DirectInput node immediately following the </PrecedenceConstraints> tag. Inside the <DirectInput> tags, add the following T-SQL statement.
Update Dest
Set Dest.ColA = Upd.ColA
,Dest.ColB = Upd.ColB
,Dest.ColC = Upd.ColC
From tblDest Dest
Join stgUpdates Upd
On Upd.ColID = Dest.ColID
Believe it or not, that’s it! If your Biml looks like Listing 19-13, you should have compilable metadata.
Listing 19-13. The Complete IncrementalLoad.biml Listing
<Biml xmlns="http://schemas.varigence.com/biml.xsd">
<Connections>
<Connection Name="SSISIncrementalLoad_Source" ConnectionString=
"Data Source=(local);Initial Catalog=SSISIncrementalLoad_Source;Provider=
SQLNCLI11.1;Integrated Security=SSPI" />
<Connection Name="SSISIncrementalLoad_Dest" ConnectionString=
"Data Source=(local);Initial Catalog=SSISIncrementalLoad_Dest;Provider=
SQLNCLI11.1;OLE DB Services=1;Integrated Security=SSPI;" />
</Connections>
<Packages>
<Package Name="IncrementalLoadPackage" ConstraintMode=
"Parallel" ProtectionLevel="EncryptSensitiveWithUserKey">
<Tasks>
<ExecuteSQL Name="Truncate stgUpdates" ConnectionName="SSISIncrementalLoad_Dest">
<DirectInput>Truncate Table stgUpdates</DirectInput>
</ExecuteSQL>
<Dataflow Name="Load tblDest">
<PrecedenceConstraints>
<Inputs>
<Input OutputPathName="Truncate stgUpdates.Output" />
</Inputs>
</PrecedenceConstraints>
<Transformations>
<OleDbSource Name="tblSource Source"
ConnectionName="SSISIncrementalLoad_Source">
<ExternalTableInput Table="dbo.tblSource" />
</OleDbSource>
<Lookup Name="Correlate" OleDbConnectionName="SSISIncrementalLoad_Dest"
NoMatchBehavior="RedirectRowsToNoMatchOutput">
<InputPath OutputPathName="tblSource Source.Output" />
<DirectInput>SELECT ColID, ColA, ColB, ColC FROM dbo.tblDest</DirectInput>
<Inputs>
<Column SourceColumn="ColID" TargetColumn="ColID" />
</Inputs>
<Outputs>
<Column SourceColumn="ColA" TargetColumn="Dest_ColA" />
<Column SourceColumn="ColB" TargetColumn="Dest_ColB" />
<Column SourceColumn="ColC" TargetColumn="Dest_ColC" />
</Outputs>
</Lookup>
<OleDbDestination Name="tblDest Destination"
ConnectionName="SSISIncrementalLoad_Dest">
<InputPath OutputPathName="Correlate.NoMatch" />
<ExternalTableOutput Table="dbo.tblDest" />
</OleDbDestination>
<ConditionalSplit Name="Filter">
<InputPath OutputPathName="Correlate.Match"/>
<OutputPaths>
<OutputPath Name="Changed Rows">
<Expression>(ColA != Dest_ColA) || (ColB != Dest_ColB) ||
(ColC != Dest_ColC)</Expression>
</OutputPath>
</OutputPaths>
</ConditionalSplit>
<OleDbDestination Name="stgUpdates" ConnectionName="SSISIncrementalLoad_Dest">
<InputPath OutputPathName="Filter.Changed Rows" />
<ExternalTableOutput Table="dbo.stgUpdates" />
</OleDbDestination>
</Transformations>
</Dataflow>
<ExecuteSQL Name="Apply stgUpdates" ConnectionName="SSISIncrementalLoad_Dest">
<PrecedenceConstraints>
<Inputs>
<Input OutputPathName="Load tblDest.Output" />
</Inputs>
</PrecedenceConstraints>
<DirectInput>
Update Dest
Set Dest.ColA = Upd.ColA
,Dest.ColB = Upd.ColB
,Dest.ColC = Upd.ColC
From tblDest Dest
Join stgUpdates Upd
On Upd.ColID = Dest.ColID
</DirectInput>
</ExecuteSQL>
</Tasks>
</Package>
</Packages>
</Biml>
We are now ready to test!
Testing the Biml
Testing the Biml will consist of generating the SSIS package, then executing it. We will look at the data to see if the incremental load executed as expected. To begin, I have prepared a T-SQL Reset Rows script shown in Listing 19-14.
Listing 19-14. Resetting the Incremental Load Source and Destination Values
Use SSISIncrementalLoad_Source
Go
TRUNCATE TABLE dbo.tblSource
-- insert an "unchanged" row, a "changed" row, and a "new" row
INSERT INTO dbo.tblSource
(ColID,ColA,ColB,ColC)
VALUES
(0, 'A', '1/1/2007 12:01 AM', -1),
(1, 'B', '1/1/2007 12:02 AM', -2),
(2, 'N', '1/1/2007 12:03 AM', -3)
Use SSISIncrementalLoad_Dest
Go
TRUNCATE TABLE dbo.stgUpdates
TRUNCATE TABLE dbo.tblDest
-- insert an "unchanged" row and a "changed" row
INSERT INTO dbo.tblDest
(ColID,ColA,ColB,ColC)
VALUES
(0, 'A', '1/1/2007 12:01 AM', -1),
(1, 'C', '1/1/2007 12:02 AM', -2)
Listing 19-15 contains the test script we will use to examine and compare the contents of the Source and Destination.
Listing 19-15. Test Script for the IncrementalLoad.dtsx SSIS Package
Use SSISIncrementalLoad_Source
Go
SELECT TableName = 'tblSource'
,ColID
,ColA
,ColB
,ColC
FROM dbo.tblSource
Go
Use SSISIncrementalLoad_Dest
Go
SELECT TableName = 'tblDest'
,[ColID]
,[ColA]
,[ColB]
,[ColC]
FROM [dbo].[tblDest]
SELECT TableName = 'stgUpdates'
,[ColID]
,[ColA]
,[ColB]
,[ColC]
FROM [dbo].[stgUpdates]
Go
Executing the test script after executing the reset script yields the results pictured in Figure 19-4.
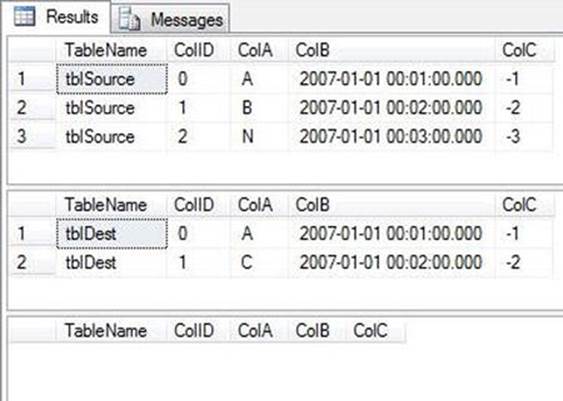
Figure 19-4. Pre-SSIS-Package-Execution results of test script
Return to Solution Explorer in SQL Server Data Tools. Right-click IncrementalLoad.biml and click Generate SSIS Packages. If you receive no error, your Biml is sound and you should see an SSIS package named IncrementalLoadPackage.dtsx in the SSIS Packages virtual folder in Solution Explorer. If the SSIS package opens with no errors, press the F5 key to execute it in the Debugger. If all is as it should be, you should see results similar to those shown in Figure 19-5.
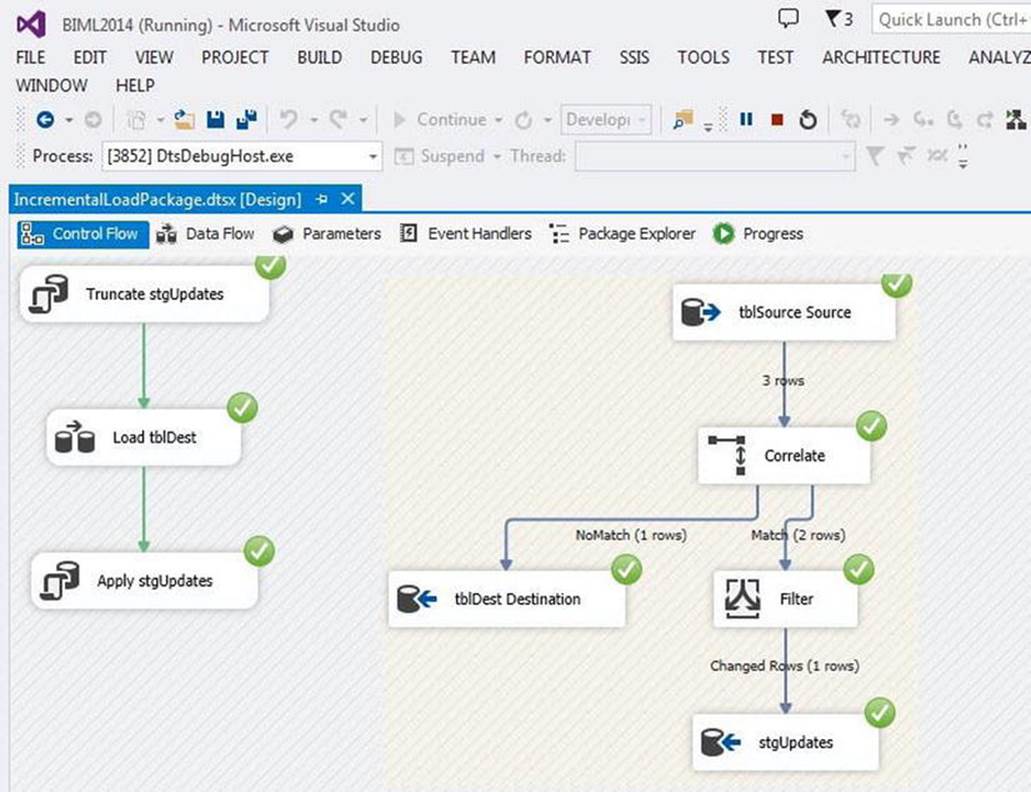
Figure 19-5. Debug execution for IncrementalLoadPackage.dtsx
Executing the test script now returns evidence that SSISIncrementalLoad_Dest.dbo.tblDest has received the updates loaded from SSISIncrementalLoad_Source.dbo.tblSource, as shown in Figure 19-6.
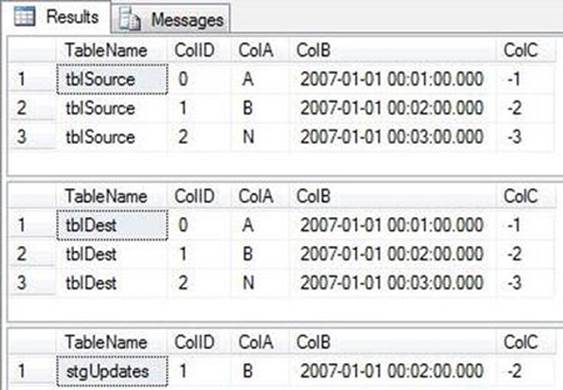
Figure 19-6. Results of a successful execution of IncrementalLoadPackage.dtsx
By examining the results and comparing them to Figure 19-4, we can see SSISIncrementalLoad_Dest.dbo.tblDest has been updated to match SSISIncrementalLoad_Source.dbo.tblSource. We can also see the updated row, with ColID equal to 1, was sent to the SSISIncrementalLoad_Dest.dbo.stgUpdates table.
Cool. But just wait: this is about to get awesome.
Using Biml as an SSIS Design Patterns Engine
Let’s do something really cool and interesting with Biml. Using the IncrementalLoad.biml file as a template, and applying .NET integration—known as BimlScript—found in the Biml library supplied to BISD Helper, we are going to add flexibility and versatility to a new Biml file that will build an incremental load SSIS package between all the tables in a source and staging database. This is an example of the capital “E” in ETL; this is an extraction SSIS design pattern.
![]() Note This pattern requires that the Source and Stage tables exist prior to expanding the Biml file to create the SSIS packages. Even with this caveat, which can be addressed, automated, and overcome, I believe this example demonstrates the power and game-changing attributes of Biml.
Note This pattern requires that the Source and Stage tables exist prior to expanding the Biml file to create the SSIS packages. Even with this caveat, which can be addressed, automated, and overcome, I believe this example demonstrates the power and game-changing attributes of Biml.
Let’s begin by adding new tables to the SSISIncrementalLoad_Source database and creating—and populating—a new database named SSISIncrementalLoad_Stage. First, add new tables to SSISIncrementalLoad_Source by executing the T-SQL script shown inListing 19-16.
Listing 19-16. Adding and Populating New SSISincrementalLoad_Source Tables
USE SSISIncrementalLoad_Source
GO
-- Create Source1
If Not Exists(Select name
From sys.tables
Where name = 'Source1')
CREATE TABLE dbo.Source1
(ColID int NOT NULL
,ColA varchar(10) NULL
,ColB datetime NULL
,ColC int NULL
,constraint PK_Source1 primary key clustered (ColID))
Go
-- Load Source1
INSERT INTO dbo.Source1
(ColID,ColA,ColB,ColC)
VALUES
(0, 'A', '1/1/2007 12:01 AM', -1),
(1, 'B', '1/1/2007 12:02 AM', -2),
(2, 'C', '1/1/2007 12:03 AM', -3),
(3, 'D', '1/1/2007 12:04 AM', -4),
(4, 'E', '1/1/2007 12:05 AM', -5),
(5, 'F', '1/1/2007 12:06 AM', -6)
-- Create Source1
If Not Exists(Select name
From sys.tables
Where name = 'Source2')
CREATE TABLE dbo.Source2
(ColID int NOT NULL
,Name varchar(25) NULL
,Value int NULL
,constraint PK_Source2 primary key clustered (ColID))
Go
-- Load Source2
INSERT INTO dbo.Source2
(ColID,Name,Value)
VALUES
(0, 'Willie', 11),
(1, 'Waylon', 22),
(2, 'Stevie Ray', 33),
(3, 'Johnny', 44),
(4, 'Kris', 55)
-- Create Source3
If Not Exists(Select name
From sys.tables
Where name = 'Source3')
CREATE TABLE dbo.Source3
(ColID int NOT NULL
,Value int NULL
,Name varchar(100) NULL
,constraint PK_Source3 primary key clustered (ColID))
Go
-- Load Source3
INSERT INTO dbo.Source3
(ColID,Value,Name)
VALUES
(0, 101, 'Good-Hearted Woman'),
(1, 202, 'Lonesome, Onry, and Mean'),
(2, 303, 'The Sky Is Crying'),
(3, 404, 'Ghost Riders in the Sky'),
(4, 505, 'Sunday Morning, Coming Down')
The T-SQL in Listing 19-16 creates and populates three new tables.
· dbo.Source1
· dbo.Source2
· dbo.Source3
Execute the T-SQL shown in Listing 19-17 to build and populate the SSISIncrementalLoad_Stage database.
Listing 19-17. Building and Populating the SSISIncrementalLoad_Stage Database
Use master
Go
If Not Exists(Select name
From sys.databases
Where name = 'SSISIncrementalLoad_Stage')
Create Database SSISIncrementalLoad_Stage
Go
Use SSISIncrementalLoad_Stage
Go
CREATE TABLE dbo.tblSource(
ColID int NOT NULL,
ColA varchar(10) NULL,
ColB datetime NULL,
ColC int NULL
)
CREATE TABLE dbo.stgUpdates_tblSource(
ColID int NOT NULL,
ColA varchar(10) NULL,
ColB datetime NULL,
ColC int NULL
)
Go
INSERT INTO dbo.tblSource
(ColID,ColA,ColB,ColC)
VALUES
(0, 'A', '1/1/2007 12:01 AM', -1),
(1, 'B', '1/1/2007 12:02 AM', -2),
(2, 'N', '1/1/2007 12:03 AM', -3)
Go
CREATE TABLE dbo.Source1(
ColID int NOT NULL,
ColA varchar(10) NULL,
ColB datetime NULL,
ColC int NULL
)
CREATE TABLE dbo.stgUpdates_Source1(
ColID int NOT NULL,
ColA varchar(10) NULL,
ColB datetime NULL,
ColC int NULL
)
Go
INSERT INTO dbo.Source1
(ColID,ColA,ColB,ColC)
VALUES
(0, 'A', '1/1/2007 12:01 AM', -1),
(1, 'Z', '1/1/2007 12:02 AM', -2)
Go
CREATE TABLE dbo.Source2(
ColID int NOT NULL,
Name varchar(25) NULL,
Value int NULL
)
CREATE TABLE dbo.stgUpdates_Source2(
ColID int NOT NULL,
Name varchar(25) NULL,
Value int NULL
)
Go
INSERT INTO dbo.Source2
(ColID,Name,Value)
VALUES
(0, 'Willie', 11),
(1, 'Waylon', 22),
(2, 'Stevie', 33)
Go
CREATE TABLE dbo.Source3(
ColID int NOT NULL,
Value int NULL,
Name varchar(100) NULL
)
CREATE TABLE dbo.stgUpdates_Source3(
ColID int NOT NULL,
Value int NULL,
Name varchar(100) NULL
)
Go
INSERT INTO dbo.Source3
(ColID,Value,Name)
VALUES
(0, 101, 'Good-Hearted Woman'),
(1, 202, 'Are You Sure Hank Done It This Way?')
Go
Let’s continue by adding a new Biml file to the Biml project. Rename this file GenerateStagingPackages.biml. Before the <Biml> tag, add the code snippet shown in Listing 19-18.
Listing 19-18. Adding .NET Namespaces and Initial Method Calls to Biml
<#@ import namespace="System.Data" #>
<#@ import namespace="Varigence.Hadron.CoreLowerer.SchemaManagement" #>
<# var connection = SchemaManager.CreateConnectionNode("SchemaProvider", "Data Source=(local);Initial Catalog=SSISIncrementalLoad_Source;Provider=SQLNCLI11.1;Integrated Security=SSPI;"); #>
<# var tables = connection.GenerateTableNodes(); #>
The code in Listing 19-18 imports the System.Data and Varigence.Hadron.CoreLowerer.SchemaManagement namespaces into the Biml file. A variable named connection is created and assigned the value of a SchemaManager ConnectionNode object, which is aimed at the SSISIncrementalLoad_Source database. The connection variable supports another variable named tables. The tables variable is populated from a call to the connection variable’s GenerateTableNodes() method, which populates tables with the list of tables found in the SSISIncremetalLoad_Source database.
After the <Biml> tag, add a Connections XML node that contains two Connection child nodes so that your Biml file now appears as shown in Listing 19-19.
Listing 19-19. Adding Connections to the GenerateStagingPackages.biml File
<#@ import namespace="System.Data" #>
<#@ import namespace="Varigence.Hadron.CoreLowerer.SchemaManagement" #>
<# var connection = SchemaManager.CreateConnectionNode("SchemaProvider",
"Data Source=(local);Initial Catalog=SSISIncrementalLoad_Source;Provider=
SQLNCLI11.1;Integrated Security=SSPI;"); #>
<# var tables = connection.GenerateTableNodes(); #>
<Biml xmlns="http://schemas.varigence.com/biml.xsd">
<Connections>
<Connection Name="SSISIncrementalLoad_Source" ConnectionString=
"Data Source=(local);Initial Catalog=SSISIncrementalLoad_Source;Provider=
SQLNCLI11.1;Integrated Security=SSPI;" />
<Connection Name="SSISIncrementalLoad_Stage" ConnectionString=
"Data Source=(local);Initial Catalog=SSISIncrementalLoad_Stage;Provider=
SQLNCLI11.1;OLE DB Services=1;Integrated Security=SSPI;" />
</Connections>
As in the IncrementalLoad.biml file we designed in the last section, the Connection nodes are the templates for SSIS Connection Managers in the SSIS package. Next, add a Package node immediately after the </Connections> tag. Here we will make a crucial modification to this Biml file and its capability. We begin a C# loop here that spans all but the last two lines of this Biml file. Your Biml file should now include the code from Listing 19-20, immediately after the </Connections> tag.
Listing 19-20. Adding the Packages Node and Starting a Loop
<Packages>
<# foreach (var table in tables) { #>
The loop defined in Listing 19-20 will drive the Biml engine as it creates an SSIS package for each table found in the SSISIncrementalLoad_Source database. Because we are using the SSIS incremental load design pattern as the template for this package, this Biml file will construct an incremental load SSIS package for each of these tables.
The variables defined above are used later in the Biml file. Immediately after these variable declarations, add the Package node shown in Listing 19-21.
Listing 19-21. The Package Node with .NET Replacements
<Package Name="IncrementalLoad_<#=table.Name#>" ConstraintMode=
"Linear" ProtectionLevel="EncryptSensitiveWithUserKey">
This Biml code, like much in this Biml file, is copied from the IncrementalLoad.biml file and modified to accept .NET overrides from the ForEach loop. Each SSIS package generated when this Biml is expanded will be named consistently: IncrementalLoad_<Source Table Name>.
Also note the ConstraintMode attribute of the Package node is set to "Linear". In the IncrementalLoad.biml file, this was set to "Parallel". The differences are subtle but powerful. First, the Biml compiler will automatically create precedence constraints for you. Specifically, it will create an OnSuccess precedence constraint in the control flow from one task to the next, based on the order they appear in the Biml file. This functionality makes scripting and simple file authoring extremely quick. Second, you can eliminate InputPath nodes in the Data Flow task because the InputPath will connect to the default output path of the transform that appears directly before it.
Immediately following the <Package> tag, add a Tasks node, followed by an ExecuteSQL node configured as shown in Listing 19-22.
Listing 19-22. Adding Tasks and the Truncate Staging Table Execute SQL Task
<Tasks>
<ExecuteSQL Name="Truncate stgUpdates_<#=table.Name#>"
ConnectionName="SSISIncrementalLoad_Stage">
<DirectInput>Truncate Table stgUpdates_<#=table.Name#></DirectInput>
</ExecuteSQL>
Again, note the generic naming of the Execute SQL task that performs the truncate operation on the staging table. The name of the Source table will replace the <#=table.Name#> placeholder when the Biml file is expanded. It will be named differently for each table in the Source database, but it will also be descriptive and accurate.
In the next listing (Listing 19-23), I am simply going to show you the Biml for the incrementally loading Data Flow task. Each component includes .NET code where necessary to make the Biml generic enough to respond to different Source table schemas.
Listing 19-23. The Generic Data Flow Task
<Dataflow Name="Load <#=table.Name#>">
<Transformations>
<OleDbSource Name="<#=table.Name#> Source" ConnectionName="SSISIncrementalLoad_Source">
<DirectInput>SELECT <#=table.GetColumnList()#> FROM
<#=table.SchemaQualifiedName#></DirectInput>
</OleDbSource>
<Lookup Name="Correlate" OleDbConnectionName="SSISIncrementalLoad_Stage"
NoMatchBehavior="RedirectRowsToNoMatchOutput">
<DirectInput>SELECT <#=table.GetColumnList()#> FROM dbo.<#=table.Name#></DirectInput>
<Inputs>
<# foreach (var keyColumn in table.Keys[0].Columns) { #>
<Column SourceColumn="<#=keyColumn.Column#>" TargetColumn="<#=keyColumn.Column#>" />
<# } #>
</Inputs>
<Outputs>
<# foreach (var col in table.Columns) { #>
<Column SourceColumn="<#=col#>" TargetColumn="Dest_<#=col#>" />
<# } #>
</Outputs>
</Lookup>
<ConditionalSplit Name="Filter">
<OutputPaths>
<OutputPath Name="Changed Rows">
<# string exp ="";
foreach (var colex in table.Columns) { exp += "(" + colex + " != Dest_"
+ colex + ") || "; } #>
<Expression><#=exp.Substring(0, exp.Length - 4)#></Expression>
</OutputPath>
</OutputPaths>
</ConditionalSplit>
<OleDbDestination Name="stgUpdates_<#=table.Name#>"
ConnectionName="SSISIncrementalLoad_Stage">
<InputPath OutputPathName="Filter.Changed Rows" />
<ExternalTableOutput Table="dbo.stgUpdates_<#=table.Name#>" />
</OleDbDestination>
<OleDbDestination Name="<#=table.Name#> Destination"
ConnectionName="SSISIncrementalLoad_Stage">
<InputPath OutputPathName="Correlate.NoMatch" />
<ExternalTableOutput Table="dbo.<#=table.Name#>" />
</OleDbDestination>
</Transformations>
</Dataflow>
The Biml/.NET code shown in Listing 19-24 dynamically generates an incrementally loading Data Flow task, given the caveats listed near the beginning of this section. Let’s complete the Biml file by creating a generic template for the final Execute SQL task that performs the set-based update for Changed Rows between the staging table and destination, shown in Listing 19-24.
Listing 19-24. The Generic Apply Staged Updates Execute SQL Task
<ExecuteSQL Name="Apply stgUpdates_<#=table.Name#>"
ConnectionName="SSISIncrementalLoad_Stage">
<# string upd ="Update Dest Set ";
foreach (var colex in table.Columns.Where(column =>
!table.Keys[0].Columns.Select(keyColumn => keyColumn.Column).Contains(column))) {
upd = upd + "Dest." + colex + " = Upd." + colex + ",";
}
var updc = upd.Substring(0,upd.Length-1) + " From " + table.SchemaQualifiedName +
" Dest Join [" + table.Schema.Name + "].[stgUpdates_" + table.Name + "] Upd On Upd." +
table.Keys[0].Columns[0].Column + " = Dest." + table.Keys[0].Columns[0].Column;#>
<DirectInput><#=updc#></DirectInput>
</ExecuteSQL>
The final instructions contained in the Biml file are shown in Listing 19-25 and close out the Tasks, Package, Packages, loop, and Biml nodes.
Listing 19-25. Closing out the Last Nodes and Loop in the Biml File
</Tasks>
</Package>
<# } #>
</Packages>
</Biml>
Time for a Test
In Solution Explorer, right-click the GenerateStagingPackages.biml file and click Generate SSIS Packages. If all goes as planned, your Solution Explorer window should appear similar to that shown in Figure 19-7.
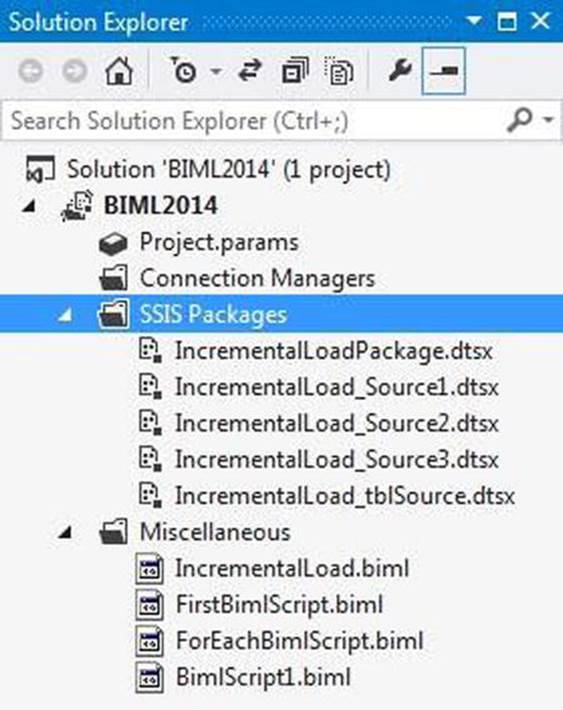
Figure 19-7. Four SSIS packages from one Biml file!
Conduct further testing by executing (and re-executing) each of the four SSIS packages created by the Biml expansion. When I execute the SSIS package named IncrementalLoad_tblSource.dtsx, I see results (shown in Figure 19-8) remarkably similar to those observed earlier (in Figure 19-5).
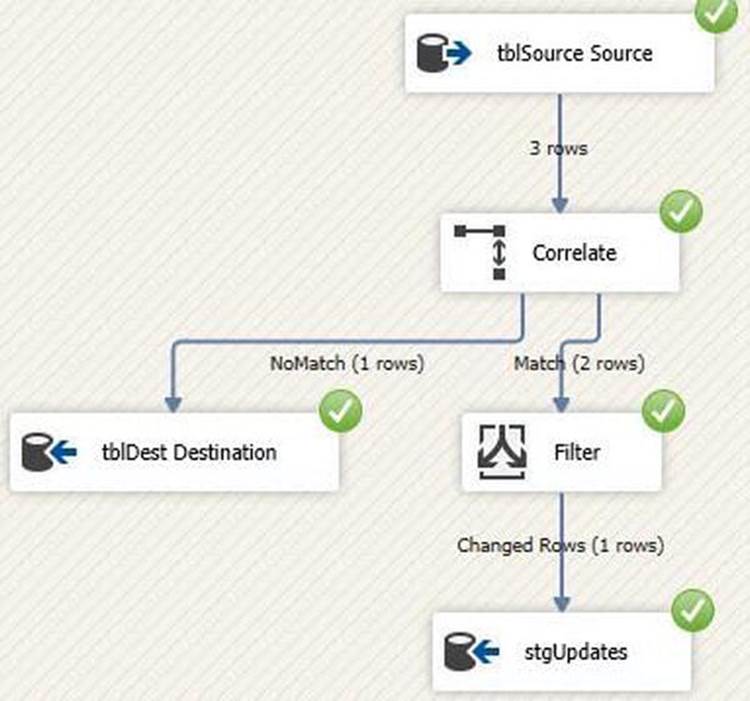
Figure 19-8. Dynamically-built incremental load SSIS package
Testing will reveal the other SSIS packages perform similarly.
Conclusion
In this chapter, we have taken a brief tour of some of the functionality of Business Intelligence Markup Language. We have demonstrated its usefulness as a domain-specific language for generating SSIS design patterns, focusing on the incremental load pattern. In the final example, we demonstrated how Biml’s integrated .NET functionality, BimlScript, can be used to create a patterns-based approach to building four SSIS packages using a tried-and-true data integration pattern (incremental load). On my machine, the four packages were generated in a matter of seconds. I assure you, based on testing, Biml can produce hundreds of incremental load SSIS packages in a matter of minutes. This is game-changing technology, because generating hundreds of SSIS packages—even using templates and patterns—can easily consume data integration developer-months.