Jump Start PHP Environment (2015)
Chapter 4 Virtual Machines
In this chapter, we’re going to learn about virtualization and why it’s absolutely essential for a quality development experience. We’ll use industry-standard tools such as Vagrant, and talk about ways to make using virtual machines more user-friendly, so that they become more accessible to a wider audience.
I’d still advise reading this chapter even if you’re familiar with virtualization, as it will undoubtedly contain information new to you. It will also explain and demonstrate the virtual box that we’ll be using throughout the remainder of the book.
To use the tools we present in this chapter, you’ll need to install some software on your computer. This software is cross-platform, so there’s a version for your computer no matter which operating system you use.
Before proceeding, please ensure that you’ve installed the following:
· Vagrant, from https://www.vagrantup.com/
· VirtualBox, from https://www.virtualbox.org/
· Git, from http://git-scm.com/downloads
All these links include installation guides for every major operating system.
Virtual Machines Explained
Before we use virtual machines, or VMs, I’ll explain what they are in general, and in the context of web development (which is not the same!).
What are VMs?
Your computer is a machine. It contains hardware such as the CPU, the GPU, some RAM, a hard drive, and so on. You need all this to run your operating system and the apps installed into it. A virtual machine is a special type of application that reserves a part of your computer and pretends it's a real machine on its own. For example, a virtual machine might reserve a part of your CPU and 2GB of RAM from your main machine, along with 20GB of hard-drive space. These resources are then brought together into a whole, seen in Figure 4.1, which can act as a computer on its own. It can have its own operating system independent from the main machine's OS (the host) with its own applications installed.
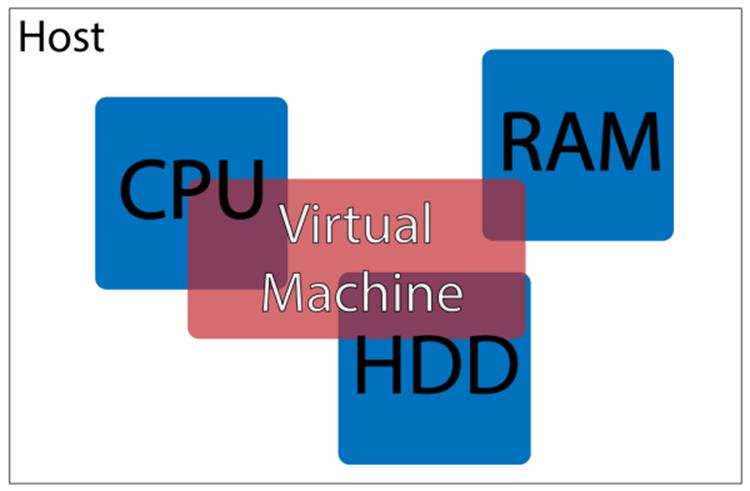
Figure 4.1. Visualizing a virtual machine
The operating systems—in fact, the entire environments of the different machines (the host and the virtual machine running on the host)—are entirely independent and, indeed, unaware of each other. The host knows it has fewer resources at its disposal, but is unconcerned. The virtual machine knows it has some resources at its disposal, but has no idea they’re not real; it thinks they’re actual hardware parts.
A virtual machine is, quite literally, a computer within a computer. Some people use them for running video games on operating systems without native support for them; for example, running Windows games on a Linux system. Security companies use them as sandboxes, environments in which they can let loose a virus or potentially malicious piece of code without worrying about the consequences: if the virtual machine gets damaged, it’s rebuilt with two simple commands (it’s virtual, after all!). Enterprise companies use them as a way to avoid updating their software. Rather than spend billions on a software rewrite because their internal application depends on Windows XP and the newest version is Windows 10, they’ll spend much less on buying Windows XP licenses and running Windows XP virtual machines inside of their Windows 10 host machines, enabling their app to live longer while enjoying the increased security of a newer host operating system.
In development, a virtual machine is used as an isolated environment for your application. You can install different versions of PHP and MySQL in it, and you can break anything as a virtual machine can be reset into its original state easily. This is what makes virtual machines very appealing, not only for testing code on different versions of PHP on different operating systems, but also for development/production parity (discussed in the Chapter 3): it allows you to configure a virtual machine to resemble a live server as closely as possible, thus being able to test the code as if it was online, minimizing errors.
Getting to Know VirtualBox and Vagrant
VirtualBox, one of the pieces of software we installed in the introduction to this chapter, is used to build these virtual machines. It takes the resources from the host, and gives them to the virtual machine. It is what boots up the virtual machine (they need booting up just like regular machines), helping it live out its illusion of reality. VirtualBox has many features including, but not limited to, the sharing of graphics cards (enabling a virtual display within your display), inputs (keyboards, mice, and so on), and sound (playing sound from the virtual machine on the host’s speakers). Figure 4.2 depicts VirtualBox in action.
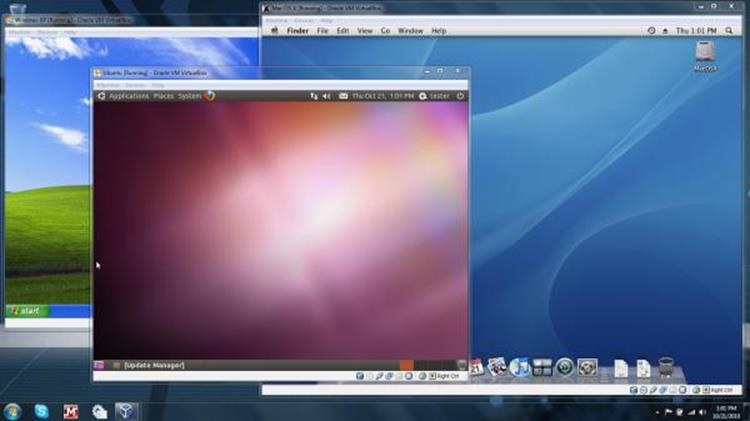
Figure 4.2. VirtualBox in action
However, this can be very resource-consuming and can be incredibly sluggish. Booting up virtual machines with full graphic interfaces takes just as long as booting up on old hardware matching the hosts's power of the reserved resources; consequently, this would be unnecessarily slow when developing for the Web. Furthermore, most web developers have their favorite IDE and browser, along with other tools, all configured for a pleasant workflow. If developers had to reinstall and reconfigure these tools into every new virtual machine they booted up, their profession would rapidly lose its appeal. Developers want to be able to use the tools they know and love without much configuring; they want to be able to dive into a new project as soon as possible, so they want to keep their tools on the host.
This is where Vagrant comes in. Vagrant is a helper tool that uses VirtualBox to create “headless VMs.” In other words, it boots them up without the multimedia angle (that is, without graphics and sound) so that they look almost like actual servers; all you are given is a terminal application, as seen in Figure 4.3.
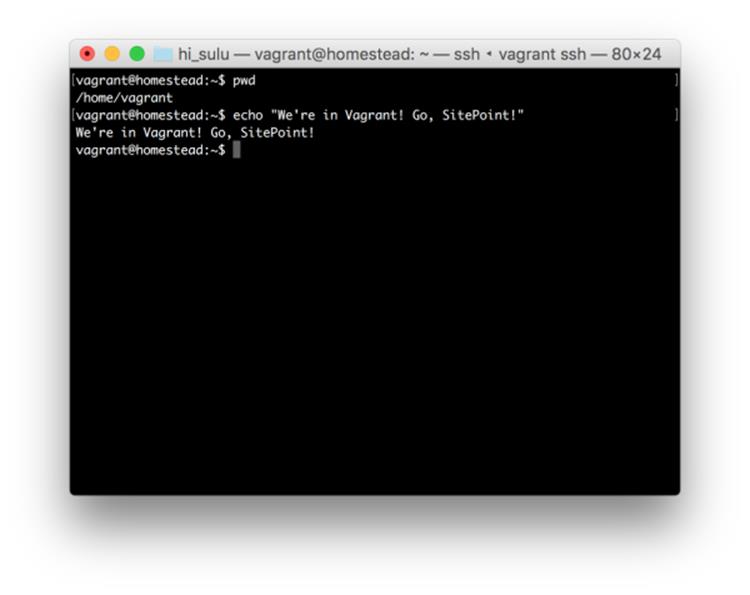
Figure 4.3. Vagrant in action
We’ll discuss Vagrant in more depth below.
The Benefits of VMs
To recap, the benefits of using VMs in development are:
· they’re easy to destroy and rebuild into an initial state without any consequences
· you can use your favorite applications on your host machine
· you can achieve development/production parity by configuring a VM to be similar to your live server, thus enjoying a more bug-free deployment
· you get to learn some system administration
· it’s impossible to do any harm to your host machine when using VMs as they’re completely isolated
· it’s easy to share entire configurations with other people (by sending them a Vagrantfile—more on this later) so that they have the exact same setup on their machine
· there’s no need to install PHP, servers, and databases on your host machine, thus keeping your main operating system clean and fast indefinitely
Vagrant in a Nutshell
Vagrant is an application that uses another application (in our case, VirtualBox) to create virtual machines via simple commands such as vagrant up. Where punching in such commands would usually be tedious, error-prone, and incredibly time-consuming (albeit possible!) in a VirtualBox-only world, Vagrant helps us shorten the process to be up and running incredibly quickly.
Vagrant knows what it needs to do with the help of a specific Vagrantfile, which contains all the instructions for how to set up the environment, making the process of creating a new virtual box much simpler.
Vagrant Boxes
Take, for example, your own computer. It has a plethora of installed applications and services, and probably a bunch of media in your home folder such as pictures, music, and so on. If you had the ability to package your entire machine’s collection of software into a single file, so that when unpacked on another computer it turns out a clone of your own machine, you would be building a box. This is what Vagrant boxes are: preconfigured Virtual machine shells with some pre-installed software (provisioned software―covered in the next section), making it easy to dive right into a project.
All the various Vagrant boxes can be found on https://atlas.hashicorp.com/boxes/search. These are boxes preconfigured by other people and available to everyone for free. You can find anything from bare-bones operating system installations to fully configured environments that are compatible with specific software. You can use these preconfigured boxes, tweak existing ones, or build your own. For resources on this, please see the links at the end of this chapter.
Provisioning
A provisioner is a tool used to automatically install some prerequisite software onto a machine (whether virtual or not). Provisioners are often used in real live servers as well to bring them up to par with the requirements of the application being deployed. Some popular provisioners areAnsible, Puppet, and Chef. A provisioner accepts a recipe, a list of steps required to prepare an environment for an application.
For example, assuming we’re about to build a PHP application, we might have a provisioner do the following for us on a bare-bones Vagrant box:
· install Git
· install PHP
· install some PHP extensions
· install MySQL
· set the default MySQL username and password
· download sample database data and import it into MySQL
Doing all this manually is tedious and error-prone. Provisioners have the awesome ability of taking care of operating system differences for us so they can be run on our virtual machine, live server, staging server, and so on. They always perform the same operations and produce the same result: the prerequisites to run our application will be taken care of for us.
Vagrant integrates closely with the various provisioners and employs them to set up the environments we tell it to set up. Thus, when booting up a Vagrant box the virtual machine is started up first, followed by the designated provisioner. There’s no need to know about provisioners at this point, but there will be links to some more resources about them at the end of this chapter. We'll be using a preconfigured Vagrantfile for our experiments in this chapter, along with an already preconfigured provisioning script, in order to keep matters simple and newbie-friendly.
Another approach to easy provisioning is using various available graphical user interfaces (GUIs) to build your own Vagrantfile (and thus, provisioning script), such as by using PuPHPet, as shown in Figure 4.4..
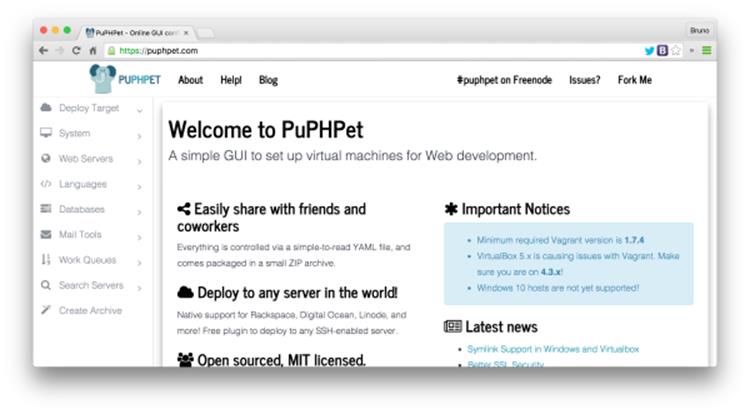
Figure 4.4. Provisioning with PuPHPetPu
PuPHPet (which uses Puppet as a provisioner), and Phansible (which uses the arguably simpler Ansible as a provisioner) are good examples of GUIs for setting up virtual machines. These GUIs will enable you to go through a step-by-step process of selecting all the software and configuration values you need for your environment, ultimately producing a Vagrantfile, with which you can easily boot up your desired environment. If you’d like to see an example of this, there’s a great post about PuPHPet on SitePoint.
Using Vagrant
Enough theory, let’s try and use Vagrant by setting up a version of Homestead, which is a preconfigured virtual machine, and then I’ll explain it all in the next section. Assuming you’ve installed the software from the introduction part of this chapter, please go to the URLhttps://github.com/Swader/homestead_improved. Once there, click the Download Zip button shown in Figure 4.5.
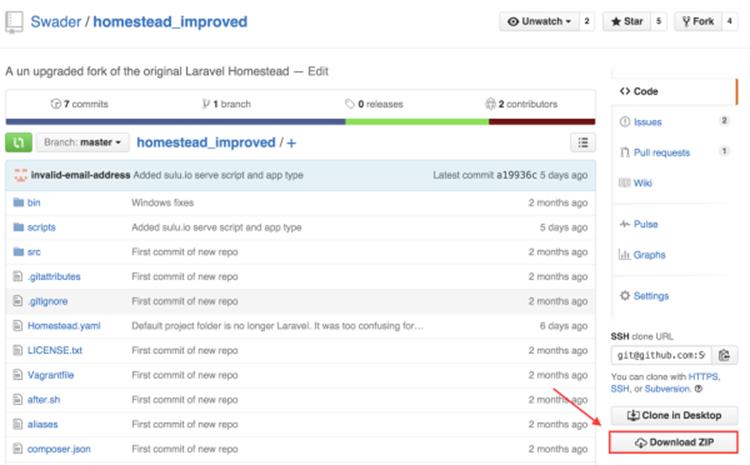
Figure 4.5. Downloading Homestead
Download the file somewhere onto your computer (I recommend your home folder) and unzip it, either by double-clicking or by right-clicking and selecting Extract here.
Now it’s time to fire up our old friend Terminal, or command line, again. On OS X or Linux, open the Terminal app. On Windows, because we installed Git at the beginning of this chapter, run the program Git Bash as it should now be available.
Then, let’s enter the folder into which we extracted the contents of the homestead_improved-master.zip archive, seen in Figure 4.6. The command should be as simple as cd ~/homestead_improved-master, assuming you unzipped into the home folder.
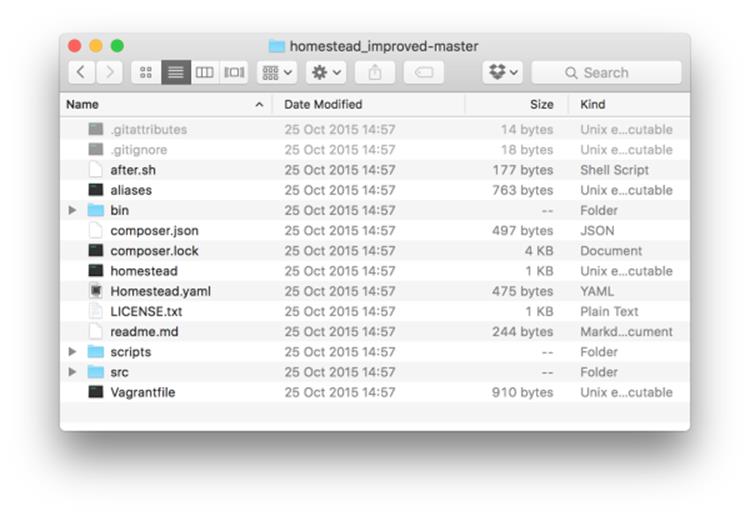
Figure 4.6. The folder upon being unzipped
Now that you’re inside the homestead_improved-master folder, run the command bin/folderfix.sh. Then, run the command vagrant up.
This will download the box and place it in a common location, so it doesn’t have to be downloaded again when you make other “homesteads” in the future. It will then use the box to create the virtual machine by following instructions in the Vagrantfile. Depending on whether you’ve done this before, downloading the box might take a while.
While waiting, add the following entry to your hosts file (see the Hosts and Virtual Hosts section of Chapter 3 chapter for details on how and why to do this):
192.168.10.10 homestead.app
Once the original Terminal window where you ran the vagrant up command is done and waiting for more input, open your browser and visit the URL: http://homestead.app/. The screen should read No input file specified. If it does, everything works! Now in the homestead_improved-master folder, make a subfolder called Project. Inside it, create another called public. Finally, in that folder create a file called index.php with the following content inside:
<?php
echo "Hello Virtual Machine!";
Reload the http://homestead.app/ URL in your browser, and the screen should read “Hello Virtual Machine!”
Let’s now examine everything that happened.
Homestead Improved: Explanation
When we visited the URL https://github.com/Swader/homestead_improved, we went to GitHub, a coding social network for open-source projects. Homestead is a preconfigured virtual machine running the Ubuntu operating system with critical system security patches installed and some commonly used software for PHP development; that is, a new version of PHP and some databases, among others. Homestead Improved is a slightly enhanced version of Homestead that makes it even easier to get started with some things. Every project on GitHub is a repository, a set of files.
The Homestead Improved repository contains all the files necessary to run a Vagrant environment, specifically the Vagrantfile. This Vagrantfile loads the contents of all the other important files in the repository and uses the combination of these files to set up (provision) your environment. This is what the vagrant up command was for: reading the Vagrantfile and following instructions within.
When we ran the folderfix command, we executed a shell script, which is a tiny program whose sole purpose is to establish the folder from which it’s being run and set that folder up as shared with the VM. Remember that VMs are isolated environments unaware of the host machine they’re running on? If they’re completely unconnected, how can we then use our host machine’s applications to write code that runs in the VMs? The answer is folder sharing. By mapping a specific location on our host machine (the current folder) to a specific location within the VM (theCode folder), we tell Vagrant to copy every file we create or change in this folder into the designated location inside the VM. This creates a weak link between the host and the virtual machine, enabling files to be shared; this, in turn, allows us to use the IDEs installed on the host machine to write code that eventually runs on the virtual machine.
So, what about that No input file specified message? If you look at Homestead.yaml in the sites block, you see the following:
sites:
- map: homestead.app
to: /home/vagrant/Code/Project/public
This means that whenever we try to visit http://homestead.app, the computer should look for files to run inside the path in the to line. But since a fresh Homestead Improved VM is yet to have any files in that location, the message we receive is one of a missing input file. We then fix this by putting an index.php file in that location, giving us our “Hello Virtual Machine” message.
Defining New Sites
Most of the time, you’ll want a custom folder path and site URL for your project. Let’s define a new one on the same Homestead Improved VM we just used. A single VM can host an unlimited number of apps/projects; it’s up to you to decide how you want to distribute them across various machines/environments for testing or development isolation purposes.
Open the file Homestead.yaml again. Under sites, add another map / to pair. Make sure the indentation matches the pair above it, as they need to have the same padding—that’s a rule of the YAML file format. I’ll make a new site called test.app so that my sites block looks as follows:
sites:
- map: homestead.app
to: /home/vagrant/Code/Project/public
- map: test.app
to: /home/vagrant/Code/test
This means: look for the files of the test.app URL in the folder /home/vagrant/Code/test.
Now make a new test folder in the homestead_improved-master folder, and inside it put the file index.php with the contents:
<?php
echo "Hello ".(isset($_GET['name']) ? $_GET['name'] : "World")."!";
Then add 192.168.10.10 test.app to your hosts file.
To apply these changes, the VM needs to reload the configuration. We handle this by executing the command vagrant provision from the command line inside the homestead_improved-master folder.
If you now visit http://test.app/ in the browser, you should see “Hello World!” And if you visit http://test.app?name=Vagrant, you should see “Hello Vagrant!”, as shown in Figure 4.7. You’ve just done some PHP programming in a virtual machine!
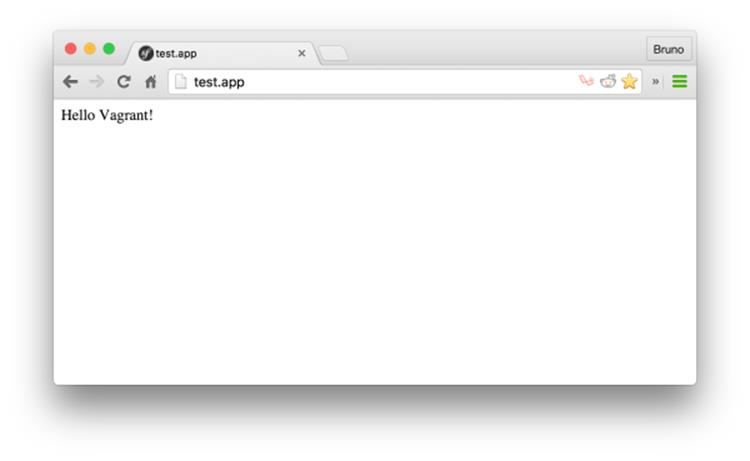
Figure 4.7. Our first program in a virtual machine
You probably noticed that a new site requires you to add a new sites block, but not a new folders entry. This is because we’ve set up Homestead Improved in such a way that its entire master folder (the one you’re in: homestead_improved-master) is shared into the Code folder of the VM, so any subfolders of these two folders are automatically shared and kept in synchronization with each other as well. Technically, we could define separate folder mappings that go outside the homestead_improved-master folder and share a completely arbitrary location from outside of it with a completely arbitrary location inside the VM, but it is my feeling that adopting this isolated approach keeps it much cleaner.
Shutdown
The VM, while running, takes up a significant share of your host machine’s resources. In fact, if you look at Homestead.yaml, you’ll notice that it takes one CPU core and two entire gigabytes of RAM (lines two and three in the file). Leaving a VM on while not in use is wasteful and slows down your host computer, so powering it down (just like shutting a computer down when you leave the house, for example) makes sense. We do this by executing the vagrant halt command from the terminal while inside the homestead_improved-master folder. Alternatively, the vagrant suspend command can be used―it’s faster, but ends up eating a bit more hard drive space, even while off.
Let’s halt the machine. Inside the homestead_improved-master folder, run:
vagrant halt
To completely destroy the VM, wiping its hard drive and all the software installed after download, we can execute vagrant destroy. To revive it and reinitiate the provisioning process, we can run vagrant up again and all will be as it was. This is the beauty of Vagrant―destroying and rebuilding is only two commands away, lending itself perfectly to experimentation with even the most volatile cutting-edge technologies.
Further Reading
This is, more or less, everything you need to know about Vagrant and VMs to get started properly. Homestead is, of course, a shortcut―but it’s a good one worth starting with. Once you’re comfortable with it, feel free to explore other approaches such as building a box from scratch, modifying a Vagrantfile, using a different base box to boot up a different operating system, and more.
For further reading and more in-depth information, please see the following articles:
· Re-introducing Vagrant: The Right Way to Start with PHP
· Quick Tip: Get a Homestead Vagrant VM Up and Running
· How to Create and Share a Vagrant Base Box
· Vagrantfile Explained: Setting Up and Provisioning with Shell
Summary
In this chapter, we learned about virtualization―a crucial part of anyone’s development workflow, even if they’re yet to know it. We introduced Vagrant, and added new sites to a preconfigured Vagrantfile setup called Homestead Improved. We also explained why one should always use virtual machines while developing, even for the simplest projects.
In the next chapter, we’ll talk about version control and why it’s essential for any kind of progressive work.